
PDZ 25 A1 - Compressor PARKSIDE - Free user manual and instructions
Find the device manual for free PDZ 25 A1 PARKSIDE in PDF.

| Product Type | Portable Air Compressor |
| Brand | Parkside |
| Model | PDZ 25 A1 |
| Motor Power | Approx. 1500 W |
| Maximum Pressure | 8 bar |
| Air Flow | Approx. 200 L/min |
| Tank | 25 liters |
| Power Supply | 230 V / 50 Hz |
| Dimensions (L x W x H) | Approx. 40 x 30 x 50 cm |
| Weight | Approx. 15 kg |
| Noise Level | Approx. 85 dB(A) |
| Lubrication Type | Oil-free (low maintenance) |
| Main Functions | Inflation, nailing, painting, cleaning |
| Maintenance | Drain tank regularly, check filters |
| Cleaning | Wipe with a damp cloth, do not use solvents |
| Safety Instructions | Use hearing protection, do not direct air jet at people |
| Spare Parts | Available on Parkside website or in store |
| Repairability | Repairability index to check, standard parts |
| Warranty | 3 years (according to conditions) |
| General Information | Domestic use, ideal for DIY projects |
Frequently Asked Questions - PDZ 25 A1 PARKSIDE
User questions about PDZ 25 A1 PARKSIDE
0 question about this device. Answer the ones you know or ask your own.
Ask a new question about this device
Download the instructions for your Compressor in PDF format for free! Find your manual PDZ 25 A1 - PARKSIDE and take your electronic device back in hand. On this page are published all the documents necessary for the use of your device. PDZ 25 A1 by PARKSIDE.
USER MANUAL PDZ 25 A1 PARKSIDE
natural_image
Collection of industrial piping and valve fittings including hoses, bolts, and connectors (no text or labels visible)DRUCKLUFT-ZUBEHÖR-SET / AIR TOOL SET / SET D'ACCESSOIRES POUR COMPRESSEUR PDZ 25 A1
DE AT CH
DRUCKLUFT-ZUBEHÖR-SET
Operation and safety notes
NL BE
PERSLUCHTTOEBEHORENSET
GB / IE Operation and safety notes Page 11
natural_image
Industrial air compressor with coiled spring and wheels (no visible text or symbols)B
C

flowchart
graph TD
    A["14"] --> B["5"]
    B --> C["8"]
    D["9"] --> E["11"]
    E --> F["10"]
    F --> G["11"]
    G --> H["13"]
D
Intended use....Page 12
Scope of delivery Page 12
Technical data......Page 12
Safety notices Page 12
Use Page 14
Connect with compressor....Page 14
Using the air blow gun Page 14
Using the accessories Page 15
Pump up bicycles/vehicle tyres......Page 15
Cleaning and maintenance Page 15
Disposal Page 15
Air Tool Set PDZ 25 A1
- Introduction
We congratulate you on the purchase of your new product. You have chosen a high quality product. Familiarise yourself with the product before using it for the first time. In addition, please carefully refer to the operating instructions and the safety advice below. Only use the product as instructed and only for the indicated field of application. Keep these instructions in a safe place. If you pass the product on to anyone else, please ensure that you also pass on all the documentation with it.
Intendeduse
This product is intended for applications involving compressed air i.e. the air gun can be used to clean using compressed air or to air-clean materials from hard to reach places. The different valve attachments can be used to inflate items such as bicycle tyres, rubber dinghies, air mattresses and balls. The adapter allows tools powered by compressed air to be attached. Any other use or modification of the product shall be considered as improper use and could lead to risk of injury and/or damage to the product. The manufacturer assumes no liability for damages or injuries due to improper use. This product is not intended for commercial use.
- Scope of delivery
25-part set consisting of:
1 x Air spiral hose up to approx. 7.5 m, 5 x 8 mm
2 x Air quick coupling R 1/4", female thread
3 2 x Air plug nipple R 14 , female thread
4 x Air plug nipple R 14 , male thread
5 1 x Blow gun
6 1 x Thread sealant, approx. 12 m
7 1 × Air chuck
8 1 x Conical nozzle
9 1 x Rubber nozzle, (pre-assembled with brass connector)
10 1 x Plug adapter and valve adapter for Dunlop valve
11 1 x Safety nozzle
12 2 x Adapter R 14 " , male thread
13 2 x Adapter R 14 , female thread
14 3 x Ball pump needle
15 1 x Air tire inflator
16 1 x Tire pressure gauge
- Technical data
Blow gun
Max. operating pressure: 8 bar
Compressed air quality: cleaned, oil-free and condensate-free
Compressed air connection: R 14 "
Pneumatic hose
Max. operating pressure: 10 bar
Compressed air quality: cleaned, oil-free and condensate-free
Compressed air connection: R 14 "
Hose length: approx. 7.5 m
Pneumatic guage
Range: 0.5–3.5 bar/
5-50 psi

Safety notices
KEEP ALL SAFETY NOTICES AND INSTRUCTIONS FOR FUTURE REFERENCE!
WARNING!
DANGER TO LIFE AND
RISK OF ACCIDENTS FOR INFANTS AND CHILDREN!
Never leave children unsupervised with the packaging materials.
The packaging material poses a suffocation hazard. Children frequently underestimate the dangers. Please always keep the product out of the reach of children. It is not a toy.

WARNING!
the product if your responsiveness has been impaired by alcohol, medication, drugs, illness or tiredness. A moment of inattentiveness can lead to serious injuries.
CAUTION! RISK OF INJURY!
Using tools powered by com- pressed air can lead to serious injuries if the adapter or the compressed air hose are not connected correctly or come loose. Please check all connec- tions to see if they are secured tightly or function correctly. Only use safety couplings.
RISK OF FIRE AND EXPLO- SION AND HEALTH HAZARD!
Use the individual components in well-ventilated areas only.
CAUTION! RISK OF INJURY!
Never exceed the maximum permissible operating air pressure of 8 bar. Use a pressure reducer to set the operating air pressure.
- Check the unit after filling with compressed air using a tested pressure gauge.
RISK OF RECOIL FORCES!
High working pressures can give rise to recoil forces that under certain conditions can result in danger from continuous loading.
■ CAUTION! RISK OF INJURY!
IMPROPER USE! Never point the product at people and / or animals.
■ CAUTION! RISK OF INJURY!
Never use oxygen or other flammable gases as energy source.
■ CAUTION! RISK OF INJURY!
First, remove the hose from the compressed air source and then remove the supply hose from the product. This is how you can prevent the supply hose from spinning around or recoiling uncontrollably.
- When removing the hose coupling, hold the hose firmly in your hand to prevent injuries caused by the hose springing back.
- Watch out for damage. Check the product for damage before first use. If the product shows deficiencies, it cannot be operated in any circumstances.
■ The product may only be operated using cleaned, oil-free and condensate-free compressed air.
■ CAUTION! RISK OF INJURY!
Keep children and other people away from the product during use. You could lose control of the product if you are distracted.
■ Be attentive while working! Pay attention to what you are doing. Proceed with caution.
- Avoid uncomfortable positions. Make sure that you are standing firmly and that your weight is evenly balanced.
■ Wear suitable working clothes. Wear tight-fitting clothing, non-slip shoes, a hairnet, or tie back your hair. Jewellery or loose-fitting clothing can get stuck in moving parts of the product.
- Keep your workplace clean.
Disorder can lead to accidents.
- Do not use the product in a damp or wet environment.
Ever person in the direct vicinity of the work environment must wear protective goggles and earmuffs.
■ Remove the product from the compressed air source before repair and maintenance work and before transport.
- Do not carry the compressed air device by the hose, but by the housing instead.
- Do not kink the compressed air hose. This could cause damage.
NOTE! Please observe all manufacturer's instructions regarding inflatable articles.
Use
Note: Please remove all packaging material from the product.
Note: Lag all male threads on the pneumatic accessories with thread sealant 6.
Note: Always operate the product with compressed air that is clean, oil-free and moisture-free. Do not exceed the maximum working pressure of 8 bar at the device.
- Connect with compressor
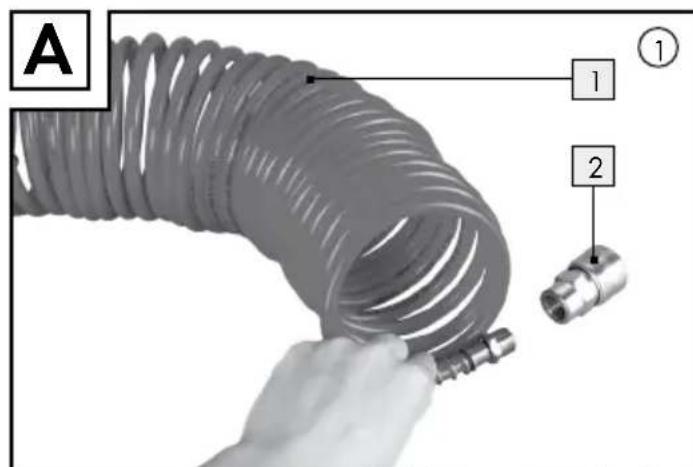
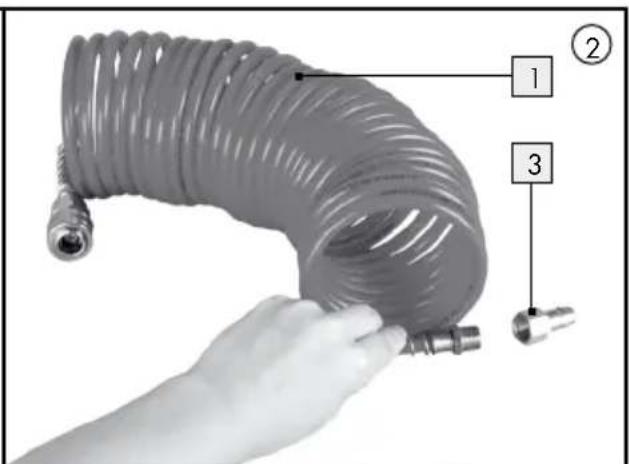
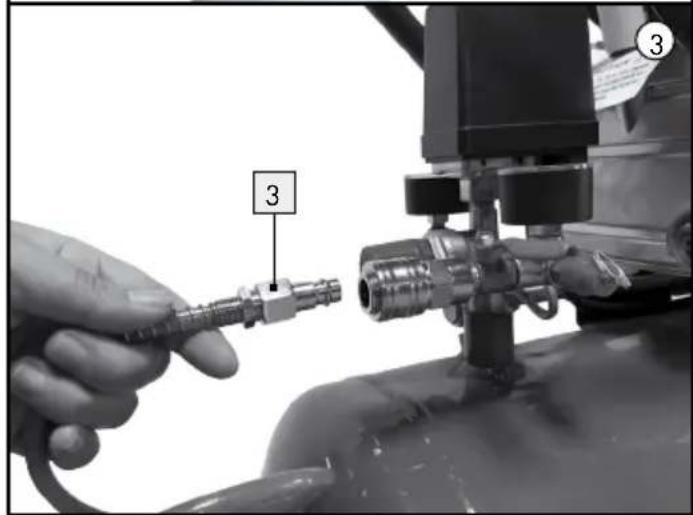
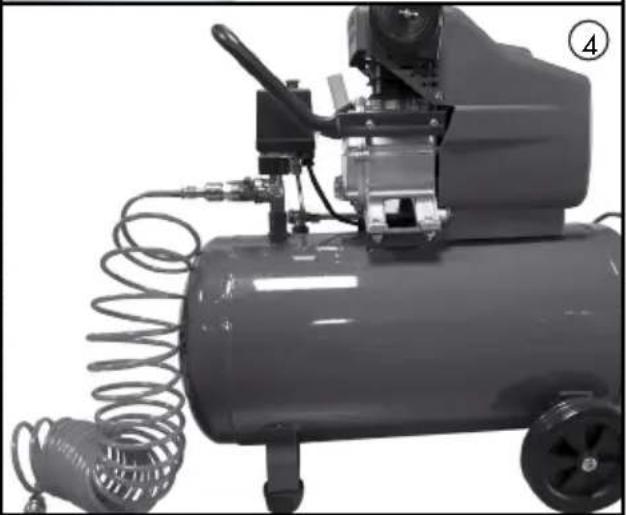
☐ Connect the spiral hose 1 to the quick coupling 2, and quick plug nipple 3 and then connect to a suitable compressed air source (see Fig. A).
☐ To break the connection, pull the sleeve of the quick coupling 2 back and pull the quick plug nipple 3 or 4 out. Remember to turn off the compressor when you do not wish to use it anymore.
• Using the air blow gun
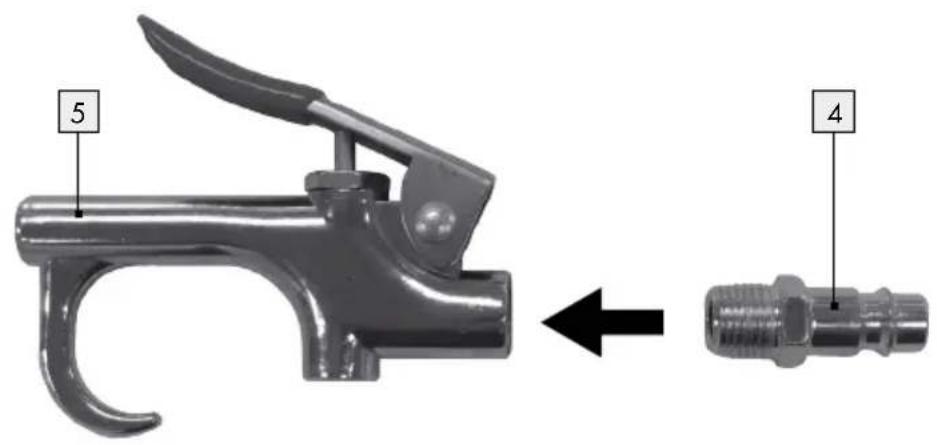
☐ Connect the blow gun 5 with an air plug nipple 4 (see Fig. B).
☐ Connect the blow gun to the compressed air source (see section „Connect with compressor“). For your own safety, a permanent hose connection between the blow gun 5 and the spiral hose 1 is not recommended.
☐ Press the compressed air supply trigger to release compressed air. The longer you hold down the trigger, the greater the compressed air output.
☐ Let go of the trigger to stop the compressed air.
☐ Disconnect the product fully from the compressed air supply when you have finished work.
• Using the accessories
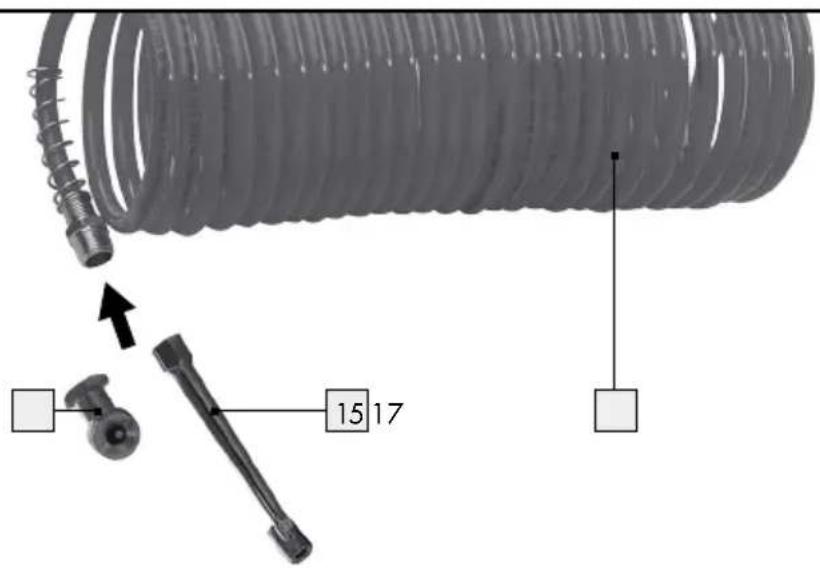
☐ Screw in accessory parts 8 to 14 into the blow gun 5 for different application. e. g. fill up ball or inflatable bed, etc. (see Fig. C).
Note: When using the conical nozzle or ball needle 14, please also connect the safety valve 11 as an adapter. Cover the 2 small holes on the side of the safety nozzle 11 with fingers to inflate normally, or release the 2 holes to lose inflation pressure.
Note: The rubber nozzle can be used to blow out dirt in hard to reach places. Screw the rubber nozzle 9 to the blow gun 5 to use.
- Pump up bicycles / vehicle tyres
☐ Depending on the structure of your inflation valve you can use the air chuck 7 or the air tyre inflator 15 to pump up bicycle or vehicle tyres. To do this, adapt air chuck 7 or the air tyre inflator 15 to the spiral hose 1 (see Fig. D). For dunlop valve, use the plug adapter 10 (please refer to "Using the accessories"). To do this you must use a compressed air gun with a pressure gauge (not included in delivery). You can press the tyre gauge 16 against the inflation valve to test the inner pressure of the tyre.
- Cleaning and maintenance
Regularly lubricate and clean the product to ensure proper functionality.
RISK OF INJURY! Disconnect the product fully from the compressed air supply before cleaning.
Do not use sharp objects to clean the product. Do not allow any liquids to enter the product. Otherwise the product could be damaged.
- Do not use harsh or aggressive cleaning agents such as thinners or petrol as these can dissolve the plastic parts.
□ Clean the product regularly, preferably immediately after every use.
□ Clean the housing with a soft, dry cloth.
●Disposal
The packaging is made entirely of recyclable materials, which you may dispose of at local recycling facilities.
Contact your local refuse disposal authority for more details of how to dispose of your worn-our product.