
LL-173C - Calculator SHARP - Free user manual and instructions
Find the device manual for free LL-173C SHARP in PDF.

| Brand | SHARP |
| Model | LL-173C |
| Product type | 17-inch LCD monitor |
| Display diagonal | 17.0 inches (43.3 cm) |
| Max. resolution | SXGA 1280 x 1024 pixels |
| Displayable colors | Approx. 16.19 million (6-bit + FRC) |
| Brightness | 260 cd/m² |
| Contrast ratio | 500:1 |
| Viewing angle | 160° horizontal / 160° vertical (contrast >5) |
| Display area | 337.9 mm x 270.3 mm |
| Video signal | Analog RGB (0.7 Vp-p, 75 Ω) |
| Sync | Separate TTL sync, Sync On Green, Composite |
| Connector | Mini D-sub 15-pin (3 rows) |
| Power supply | AC 100-240 V, 50/60 Hz |
| Power consumption | 30 W max, 1.0 W standby |
| Weight | Approx. 4.4 kg (with stand) |
| Tilt | Upward 0°-20°, downward 0°-5° |
| Operating temperature | 5°C to 35°C |
| Power management | VESA DPMS |
| Plug & Play | VESA DDC2B |
| VESA mount | Yes (VESA standard) |
| Security | Kensington lock slot |
Frequently Asked Questions - LL-173C SHARP
User questions about LL-173C SHARP
0 question about this device. Answer the ones you know or ask your own.
Ask a new question about this device
Download the instructions for your Calculator in PDF format for free! Find your manual LL-173C - SHARP and take your electronic device back in hand. On this page are published all the documents necessary for the use of your device. LL-173C by SHARP.
USER MANUAL LL-173C SHARP
Please also refer to the operation manual in the [manual] folder included in the supplied CD-ROM.
natural_image
Line drawing of a flat-screen computer monitor with a base mount (no text or symbols)Table of Contents / Table des matières / Índice / Inhaltsverzeichnis / Indice
Notice for Users in the UK....2
Notice for Users in the USA 3
Notice for Users in Europe 4
English 5
Français 9
Español.... 13
Deutsch 17
Italiano 21
Notice for Users in the UK
FOR CUSTOMERS IN U.K.
IMPORTANT
The wires in this mains lead are coloured in accordance with the following code:
GREEN-AND-YELLOW : Earth
BLUE : Neutral
BROWN : Live
As the colours of the wires in the mains lead of this apparatus may not correspond with the coloured markings identifying the terminals in your plug proceed as follows:
- The wire which is coloured GREEN-AND-YELLOW must be connected to the terminal in the plug which is marked by the letter E or by the safety earth 12 or coloured green or green-and-yellow.
- The wire which is coloured BLUE must be connected to the terminal which is marked with the letter N or coloured black.
- The wire which is coloured BROWN must be connected to the terminal which is marked with the letter L or coloured red.
Ensure that your equipment is connected correctly. If you are in any doubt consult a qualified electrician.
"WARNING: THIS APPARATUS MUST BE EARTHED."
Notice for Users in the USA
IMPORTANT:
To aid in reporting in case of loss or theft, please record the monitor's model and serial numbers in the space provided. The numbers are located on the rear of the monitor.
Model No.:
Serial No.:
FCC Statement
WARNING – FCC Regulations state that any unauthorized changes or modifications to this equipment not expressly approved by the manufacturer could void the user's authority to operate this equipment.
Note: This equipment has been tested and found to comply with the limits for a Class B digital device pursuant to Part 15 of the FCC Rules.
These limits are designed to provide reasonable protection against harmful interference in a residential installation. This equipment generates, uses and can radiate radio frequency energy and, if not installed and used in accordance with the instructions, may cause harmful interference to radio communications. However, there is no guarantee that interference will not occur in a particular installation. If this equipment does cause harmful interference to radio or television reception, which can be determined by turning the equipment off and on, the user is encouraged to try to correct the interference by one or more of the following measures:
- Reorient or relocate the receiving antenna.
- Increase the separation between the equipment and receiver.
- Connect the equipment into an outlet on a circuit different from that to which the receiver is connected.
- Consult the dealer or an experienced radio/TV technician for help.
Use nothing but the included cables and AC cord to insure compliance with FCC regulation for Class B computing equipment.
Declaration of Conformity
SHARP LCD Color Monitor LL-173C-B
This device complies with part 15 of the FCC rules. Operation is subject to the following conditions: (1) this device may not cause harmful interference, and (2) this device must accept any interference received, including interference that may cause undesired operation.
Responsible Party: SHARP ELECTRONICS CORPORATION
Sharp Plaza, Mahwah, New Jersey 07430
TEL: 1-800-BE-SHARP

* As an ENERGY STAR® Partner, SHARP has determined that this product meets the ENERGY STAR® guidelines for energy efficiency.
This product utilizes tin-lead solder, and fluorescent lamp containing a small amount of mercury. Disposal of these materials may be regulated due to environmental considerations. For disposal or recycling information, please contact your local authorities or the Electronics Industries Alliance: www.eiae.org
Notice for Users in Europe
This equipment complies with the requirements of Directives 89/336/EEC and 73/23/EEC as amended by 93/68/EEC.
Tips and safety precautions.... 5
Product description 6
Connecting the cables....6
Turning the power on 7
Turning the power off 7
Storage 7
Troubleshooting 7
Specifications 8
Tips and safety precautions
- Never rub or tap the monitor with hard objects.
- The LCD panel used in this monitor is made of glass. Pressure from hands on the LCD panel could cause damage.
- Do not modify, disassemble, or repair the monitor by yourself. Doing so may cause a fire, electric shock, or injury.
- Be careful not to allow your fingers to be pinched between the display and stand.
Location
- Do not use the monitor where ventilation is poor, where there is a lot of dust, where humidity is high, or where the monitor may come into contact with oil or steam, as this could lead to fire.
- The vents and other openings in the cabinet are designed for ventilation. Do not cover or block these vents and openings since insufficient ventilation can cause overheating and/or shorten the life of the monitor. Do not place the monitor on a bed, sofa, rug, or other similar surface, or in an enclosed space since they can block ventilation openings.
- Ensure that the monitor does not come into contact with water or other fluids. Ensure that no objects such as paper clips or pins enter the monitor as this could lead to fire or electric shock.
- Do not place the monitor on top of unstable objects or in unsafe places. Do not allow the monitor to come into contact with strong shocks or vibrations. Causing the monitor to fall or topple over may damage it.
- Do not use in places where the monitor will be subject to direct sunlight, near heating equipment or anywhere else where there is likelihood of high temperature, as this may lead to generation of excessive heat and outbreak of fire.
The power cord
- Do not damage the power cord, place heavy objects on it, stretch it, or over bend it. Also, do not add extension cords. Damage to the cord may result in fire or electric shock.
-
Use only the power cord supplied with the monitor.
-
Insert the power plug directly into the AC outlet. Adding an extension cord may lead to fire as a result of overheating.
- Do not remove or insert the power plug with wet hands. Doing so could result in electric shock.
Monitor and accessory checklist
- Please check that the following items are included in the package.
- LCD monitor (1)
- Base (1)
- Power cord (1)
- Analog signal cable (1) (model name: 0PD5301010011)
- CD-ROM (1)
- Start guide (1)
Note:
- Use only the cables supplied with the monitor.
Installing the base
- Place the base on a flat surface, such as a desktop, and insert the stand carefully. Insert the stand until it clicks.
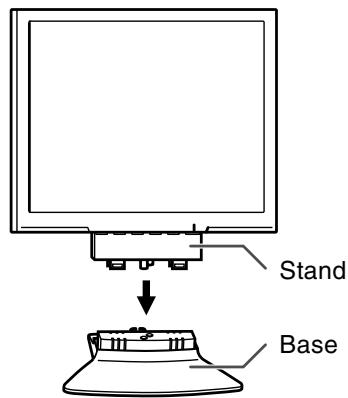
CAUTION!
- Be careful not to allow your fingers to be pinched.
- Check that the base is firmly installed before use. If the installation is not performed correctly, the monitor may fall down or the base may drop.
Product description

- AUTO button .... This button is used to perform automatic adjustment of the screen (CLOCK, PHASE, H-POS, and V-POS).
- MENU button ...... This button is used to pop-up, select, and close the On Screen Display (OSD) Menu.
- ▼ / MODE button ...... When the OSD Menu is displayed: This button is used to select menu options. When the OSD Menu is not displayed: This button is used to set DISPLAY MODE.
- ◀▶ buttons ...... When the OSD Menu is displayed: These buttons are used to select an option or adjust the value of the selected option. When the OSD Menu is not displayed: These buttons are used to adjust backlight brightness.
- Power button (⏻)....Pressing this button turns the power on. Press the button again to turn the power off.
- Power LED ...... This LED is lit green when in use and orange when in power-saving mode.
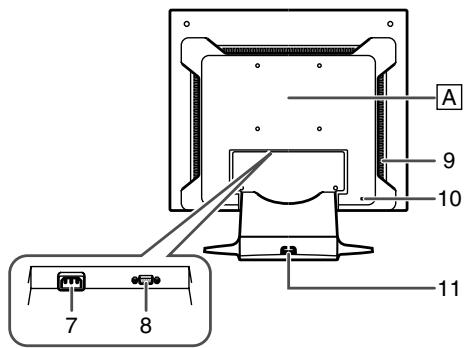
- Power terminal
- Analog RGB input terminal ..... The analog signal cable is connected here. The analog signal cable supplied should be used.
- Ventilation openings...... Never block the ventilation openings as this may lead to overheating inside the monitor and result in malfunction.
- Security lock anchor ....By connecting a security lock (commercially available) to the security lock anchor, the monitor is fixed so that it cannot be transported. The security slot works in conjunction with Kensington Micro Saver Security Systems.
- Cable clamp .... You can use this to secure the cables connected to the terminals. A .... An arm or stand based on the VESA standard (commercially available) can be attached to the monitor.
Connecting the cables
CAUTION!
- When connecting, ensure that both the monitor and computer are switched off.
- Connect the supplied analog signal cable to the analog RGB terminal. (1)
- Connect the supplied power cord to the power terminal, and place the power plug into an AC outlet. (2)

Turning the power on
- Press the monitor's power button (⏻).
- Turn on the computer.
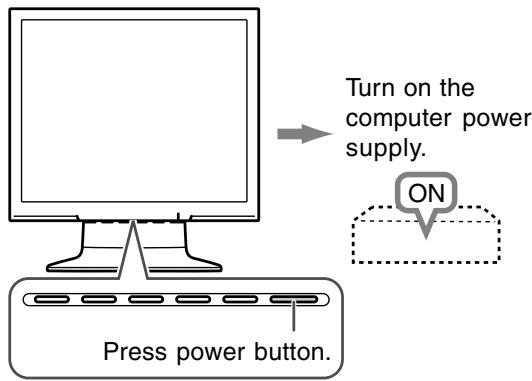
When a signal is input from the computer, the power LED lights up green, and the screen is displayed.
Note:
- For information on screen adjustment, refer to the operation manual included in the supplied CD-ROM.
Turning the power off
- Turn the computer off.
- Press the monitor's power button (⏻).
The power LED will disappear.
If the monitor is not going to be used for a long period of time, be sure to unplug it from the AC outlet.
Storage
If the monitor will not be used for a long period of time, be sure to remove the power plug from the AC outlet.
CAUTION!
- Do not leave the monitor in contact with rubber or plastic items for long periods of time as this could lead to color change or change in shape.
Troubleshooting
If you think the monitor may be faulty, please check the following points before taking it to be repaired. If afterwards it still does not work, please contact the shop where you purchased the monitor or your nearest Sharp authorized Service Center.
The monitor's fluorescent tubes have a limited life span.
- If the screen darkens, persistently flickers or does not light up, the fluorescent tube has reached the end of its operational life span. Please inquire at the shop where you purchased the monitor or your nearest Sharp authorized Service Center.
- In the initial period of use, due to the characteristics of fluorescent tubes the screen may flicker. (This is not a malfunction.) Should this happen, check by first turning off the power, then turning it on again.
No image appears on the screen (power LED is not lit).
- Is the power cord connected properly? (p.6)
No image appears on the screen (power LED is lit).
- Is the computer connected properly? (p.6)
- Is the computer turned on?
- Does the computer's signal timing correspond to monitor specifications? (p.8)
- Is the computer in power-saving mode? Try pressing a key on the keyboard or moving the mouse.
Control buttons do not work.
- Is the adjustment lock set? (*)
The image appears distorted.
- Does the computer's signal timing correspond to monitor specifications? (p.8)
- Perform automatic screen adjustment. (*)
- If you can change the refresh rate on the computer you are using, change the value to a lower frequency. (p.8)
* Please refer to the operation manual in the supplied CD-ROM.
Specifications
Product specifications
Model name
LL-173C-B
LCD display
17" TFT LCD module
Actual display size
17.0" (43.3 cm) measured diagonally
Resolution (max.)
SXGA 1280 x 1024 pixels
Displayable colors (max.)
Approx. 16.19 million colors (6 bit + FRC)
Brightness (max.)
260 cd/m²
(The screen brightness deteriorates over time.
Constant brightness cannot be maintained.)
Dot pitch (H x V)
0.264 mm x 0.264 mm
Contrast ratio
500:1
Angle of visibility
Left-right 160°; up-down 160°
(contrast ratio > 5)
Screen display size (H x V)
337.9 mm x 270.3 mm
(13.30" x 10.64")
Video signal
Analog RGB (0.7 Vp-p) [75Ω]
Sync signal
Separate Sync (TTL level: +/-), Sync on
Green, Composite Sync (TTL level: +/-)
Expansion compensation
Digital scaling (Enlarges VGA/SVGA/XGA etc. to full screen size.)
Scaling to full screen size only is available.
You cannot scale the screen image at 1:1 or with
the aspect ratio (horizontal to vertical ratio) fixed.
Plug & Play
VESA DDC2B compatible
Power management
VESA: based on DPMS
Input signal terminal
Mini D-sub 15 pin, 3 rows
Screen tilt
Upward approx. 0^ - 20^ ; downward approx. 0^ - 5^
Power supply
100 VAC - 240 VAC, 50/60 Hz
Temperature of operating environment
5^ - 35^ (41^ - 95^)
Power consumption
30 W maximum
1.0 W when in power-saving mode
Dimensions (W x D x H)
Approx. 377 mm x 209 mm x 392 mm
(Approx. 14.8" x 8.2" x 15.4")
Weight (Excluding cables.)
Approx. 4.4 kg; 9.7 lb.
(Approx. 3.9 kg; 8.6 lb. excluding stand and
base)
Note:
- As a part of our policy of continuous improvement, SHARP reserves the right to make design and specification changes for product improvement without prior notice. The performance specification figures indicated are nominal values of production units. There may be some deviations from these values in individual units.
Relevant signal timings
| Screen resolution | Hsync | Vsync | Dot frequency | |
| VESA | 640x480 | 31.5kHz | 60Hz | 25.175MHz |
| 37.9kHz | 72Hz | 31.5MHz | ||
| 37.5kHz | 75Hz | 31.5MHz | ||
| 800x600 | 35.1kHz | 56Hz | 36.0MHz | |
| 37.9kHz | 60Hz | 40.0MHz | ||
| 48.1kHz | 72Hz | 50.0MHz | ||
| 46.9kHz | 75Hz | 49.5MHz | ||
| 1024x768 | 48.4kHz | 60Hz | 65.0MHz | |
| 56.5kHz | 70Hz | 75.0MHz | ||
| 60.0kHz | 75Hz | 78.75MHz | ||
| 1152x864 | 67.5kHz | 75Hz | 108.0MHz | |
| 1280x960 | 60.0kHz | 60Hz | 108.0MHz | |
| 1280x1024 | 64.0kHz | 60Hz | 108.0MHz | |
| 80.0kHz | 75Hz | 135.0MHz | ||
| US text | 720x400 | 31.5kHz | 70Hz | 28.3MHz |
| Power Macintosh series | 640x480 | 35.0kHz | 66.7Hz | 30.2MHz |
| 832x624 | 49.7kHz | 74.6Hz | 57.3MHz | |
| 1024x768 | 60.2kHz | 75Hz | 80.0MHz | |
| 1152x870 | 68.7kHz | 75Hz | 100.0MHz | |
| 1280x1024 | 64.0kHz | 60Hz | 108.0MHz | |
| 80.0kHz | 75Hz | 135.0MHz | ||
| Sun Ultra series | 1024x768 | 48.3kHz | 60Hz | 64.13MHz |
| 53.6kHz | 66Hz | 70.4MHz | ||
| 56.6kHz | 70Hz | 74.25MHz | ||
| 1152x900 | 61.8kHz | 66Hz | 94.88MHz | |
| 71.8kHz | 76.2Hz | 108.23MHz | ||
| 1280x1024 | 71.7kHz | 67.2Hz | 117.01MHz | |
| 81.1kHz | 76Hz | 134.99MHz | ||
- Recommended resolution is 1280 x 1024.
- All are compliant only with non-interlaced.
- Frequencies for Power Macintosh and the Sun Ultra series are reference values.
Table des matières
ATTENTION!
Dimensions (L x P x H)
Approx. 377 mm x 209 mm x 392 mm
¡PRECAUCIÓN!
ATTENZIONE!
- Table of Contents / Table des matières / Índice / Inhaltsverzeichnis / Indice
- Notice for Users in the UK
- FOR CUSTOMERS IN U.K.
- Notice for Users in the USA
- IMPORTANT:
- FCC Statement
- Declaration of Conformity
- SHARP LCD Color Monitor LL-173C-B
- Notice for Users in Europe
- Tips and safety precautions
- Location
- The power cord
- Monitor and accessory checklist
- Note:
- Installing the base
- CAUTION!
- Product description
- Connecting the cables
- Turning the power on
- Turning the power off
- Storage
- Troubleshooting
- Control buttons do not work.
- The image appears distorted.
- Specifications
- Product specifications
- Table des matières
- ATTENTION!
- ¡PRECAUCIÓN!
- ATTENZIONE!
Brand : SHARP
Model : LL-173C
Category : Calculator