— Laser printer — Mode d'emploi PDF")
OPTRAIMAGE 242/232 (OCT 2000) - Laser printer LEXMARK - Free user manual and instructions
Find the device manual for free OPTRAIMAGE 242/232 (OCT 2000) LEXMARK in PDF.
User questions about OPTRAIMAGE 242/232 (OCT 2000) LEXMARK
0 question about this device. Answer the ones you know or ask your own.
Ask a new question about this device
Download the instructions for your Laser printer in PDF format for free! Find your manual OPTRAIMAGE 242/232 (OCT 2000) - LEXMARK and take your electronic device back in hand. On this page are published all the documents necessary for the use of your device. OPTRAIMAGE 242/232 (OCT 2000) by LEXMARK.
USER MANUAL OPTRAIMAGE 242/232 (OCT 2000) LEXMARK
Edition: October 2000
The following paragraph does not apply to any country where such provisions are inconsistent with local law: LEXMARK INTERNATIONAL, INC., PROVIDES THIS PUBLICATION "AS IS" WITHOUT WARRANTY OF ANY KIND, EITHER EXPRESS OR IMPLIED, INCLUDING, BUT NOT LIMITED TO, THE IMPLIED WARRANTY OF MERCHANTABILITY OR FITNESS FOR A PARTICULAR PURPOSE. Some states do not allow disclaimer of express or implied warranties in certain transactions; therefore, this statement may not apply to you.
This publication could include technical inaccuracies or typographical errors. Changes are periodically made to the information herein; these changes will be incorporated in later editions. Improvements or changes in the products or the programs described may be made at any time.
Comments may be addressed to Lexmark International, Inc., Department F95/032-2, 740 West New Circle Road, Lexington, Kentucky 40550, U.S.A. In the United Kingdom and Eire, send to Lexmark International Ltd., Marketing and Services Department, Westhorpe House, Westhorpe, Marlow Bucks SL7 3RQ. Lexmark may use or distribute any of the information you supply in any way it believes appropriate without incurring any obligation to you. You can purchase additional copies of publications related to this product by calling 1-800-553-9727. In the United Kingdom and Eire, call 0628-481500. In other countries, contact your point of purchase.
References in this publication to products, programs, or services do not imply that the manufacturer intends to make these available in all countries in which it operates. Any reference to a product, program, or service is not intended to state or imply that only that product, program, or service may be used. Any functionally equivalent product, program, or service that does not infringe any existing intellectual property right may be used instead. Evaluation and verification of operation in conjunction with other products, programs, or services, except those expressly designated by the manufacturer, are the user's responsibility.
Lexmark and Lexmark with diamond design, MarkNet, MarkVision, and Optra are trademarks of Lexmark International, Inc., registered in the United States and/or other countries. Optralmage and MarkTrack are trademarks of Lexmark International, Inc. PostScript® is a registered trademark of Adobe Systems Incorporated. PostScript Level 2 or PostScript 3 is Adobe Systems' designation of a set of printer commands (language) and functions included in its software products. This printer is intended to be compatible with the PostScript Level 2 or PostScript 3 language. This means the printer recognizes PostScript Level 2 or PostScript 3 commands used in various application programs, and that the printer emulates the functions corresponding to the commands. Other trademarks are the property of their respective owners.
Copyright 1999, 2000 Lexmark International, Inc. All rights reserved.
UNITED STATES GOVERNMENT RESTRICTED RIGHTS
This software and documentation are provided with RESTRICTED RIGHTS. Use, duplication or disclosure by the Government is subject to restrictions as set forth in sub-. paragraph (c)(1)(ii) of the Rights in Technical Data and Computer Software clause at DFARS 252.227-7013 and in applicable FAR provisions: Lexmark International, Inc., Lexington, KY 40550.
Optralmage
Setup Guide
English
For use with Optralmage 242/232
Safety information - - - - - - - - - - - - 4
Set up your printer - - - - - - - - - - - - - 5
Install the MarkNet print server - - - - - - - - 6
Unlock the scan unit - - - - - - - - - - - 7
Install paper feed tray and paper stop- - - - - 8
Attach cables and power cords - - - - - - - - 9
Turn on scan unit and printer - - - - - - - 12
Assign a network address - - - - - - - - 13
Set default copy settings - - - - - - - - - 15
Set up to send and receive faxes - - - - - 17
Set up network scanning - - - - - - - - - 21
Verify the setup 24
Distribute Optralmage user instructions - - - 25
Solve setup problems - - - - - - - - - 26
Maintain your scanner - - - - - - - - - 27
Notices 30
General safety information
Always follow all safety precautions when installing or using telephone equipment to reduce the risk of fire, electric shock and injury to persons, including the following:
- If your product is NOT marked with this symbol , it MUST be connected to a properly grounded electrical outlet.
- The power cord must be connected to an electrical outlet near the product and easily accessible.
- Refer service or repairs, other than those described in the operating instructions, to a professional service person.
- This product is designed, tested, and approved to meet strict global safety standards with the use of specific Lexmark components. The safety features of some parts may not always be obvious. Lexmark is not responsible for damages resulting from the use of other replacement parts.
Fax and telephone safety information
- When installing the Lexmark™ MarkNet™ N2501e print server containing the fax modem port, follow all safety precautions of any equipment into which the card is being installed.
- Do not perform the setup procedures in this guide during a lightning storm.
- Never install or use this equipment in wet locations.
- Before attempting to access the printer compartment where the option card is installed, you must remove the fax phone line cable first from the wall outlet, and then from the fax modem port of the MarkNet print server.
Step 1: Set up your printer
You may have received more than one copy of the Drivers, MarkVision, and Utilities CD. When installing printer drivers, make sure you use the latest version.
1 Set up the printer according to the instructions in the documentation shipped with your printer. This includes setting up all bins and trays, duplex hardware, and any other options purchased.
If you attach the printer to a network, save your network setup page to use the information contained on it during the Optralmage setup.
2 Verify the printer hardware setup by printing the menu settings page. Instructions for printing this page are included in your printer setup documentation.
3 Turn the printer power off before continuing with the next step. Read the following caution statement.
CAUTION: Turn All Power Off
Before and during Optralmage setup, unplug all power cords, fax/phone cables, and network cables from their electrical outlets. This includes all cords and cables attached to a workstation, printer, MarkNet print server, scan unit, and any other peripherals powered from an outlet.
Following setup, all equipment may be plugged into properly grounded or fax/phone outlets and turned on.
Step 2: Install the MarkNet print server
CAUTION! Before installing the MarkNet N2501e print server in your printer, make sure the fax/phone cable is not plugged into the card or the wall outlet. Make sure your printer is unplugged.
See "Safety information" on page 4 for additional caution information.
If your printer shipped with the MarkNet N2501e or N2401e print server already installed, skip to the next step.
Install the MarkNet N2501e or N2401e print server in an available optional card slot inside your printer. (MarkNet internal print servers are sometimes called printer option cards.)
For detailed instructions about installing your print server, refer to your printer setup documentation.
MarkNet N2501e print server ports

SCSI port (Optralmage scan unit attaches here)
Ethernet 10/100 port (uses RJ-45 cable)
Fax Modem port (uses RJ-11 cable)
MarkNet 2401e print server ports

SCSI port (Optrealmage scan unit attaches here)
Ethernet 10/100 port (uses RJ-45 cable)
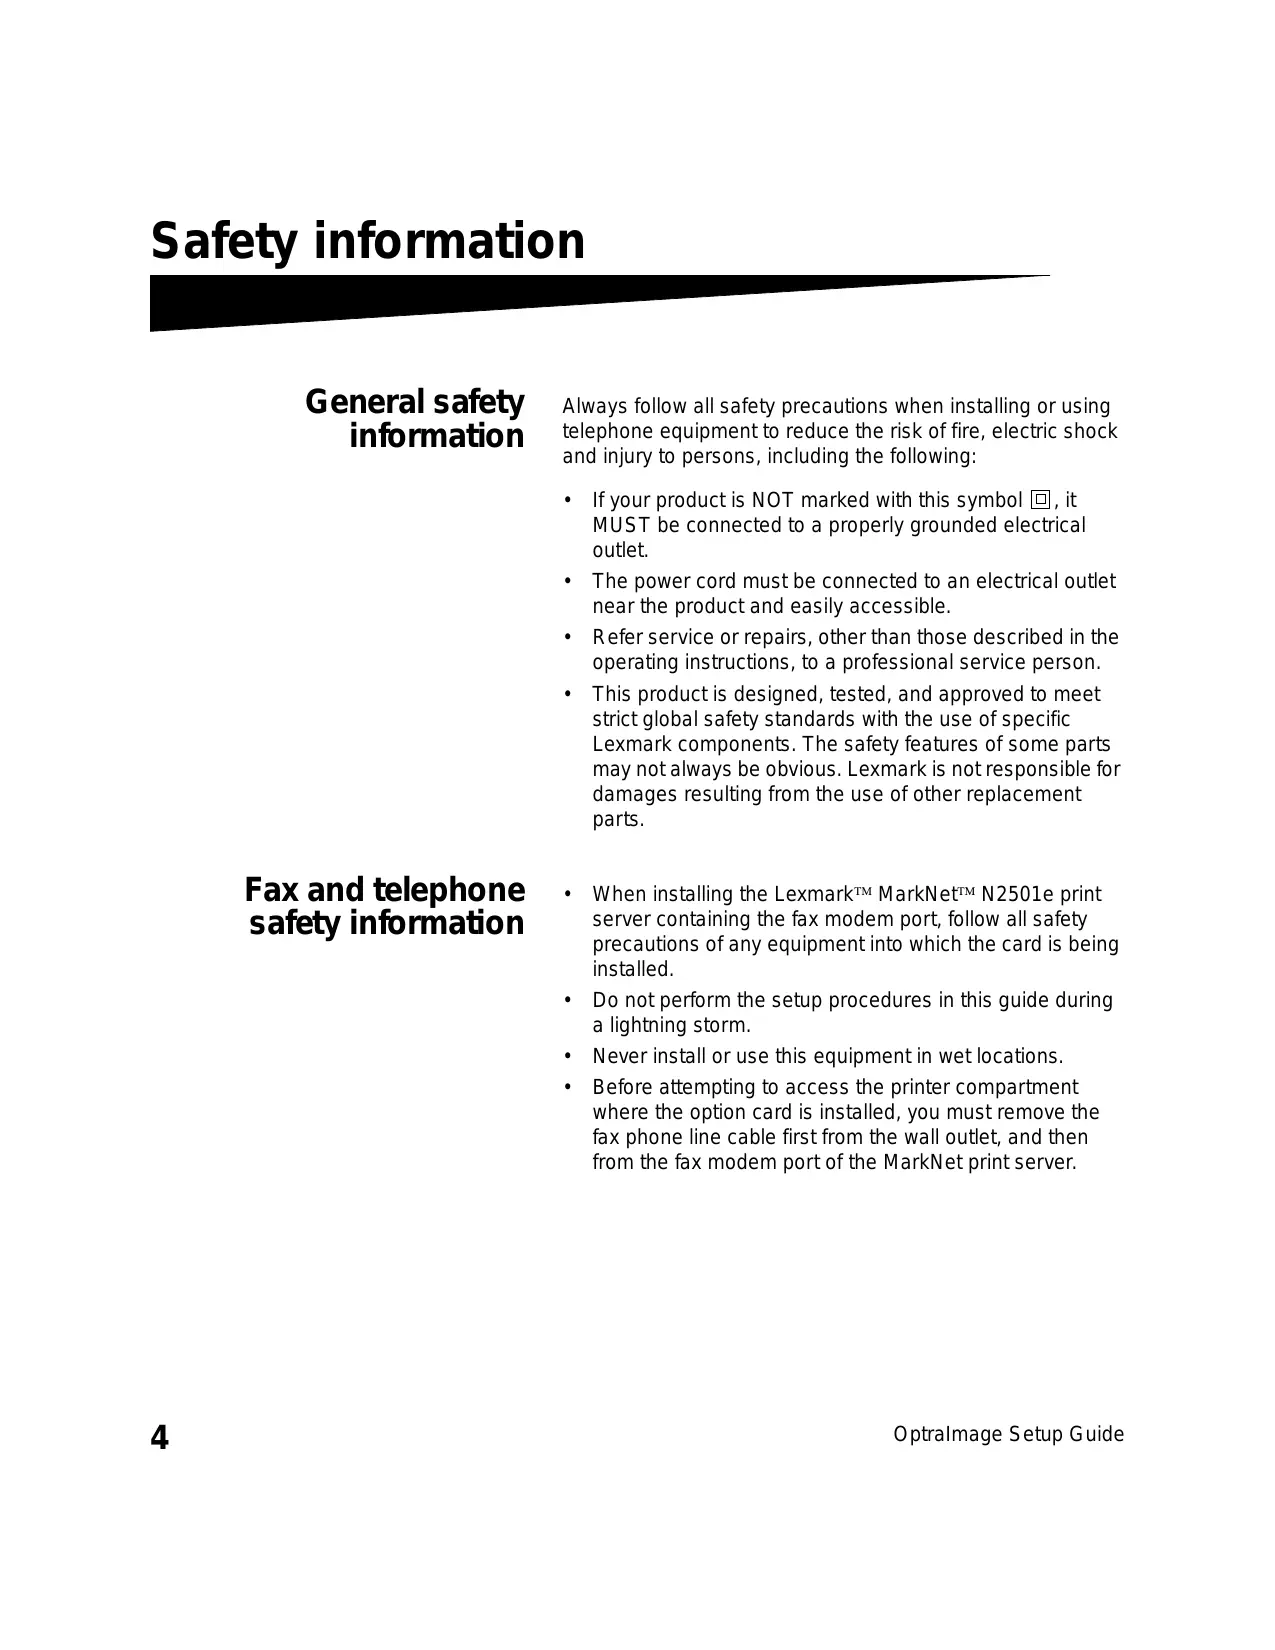
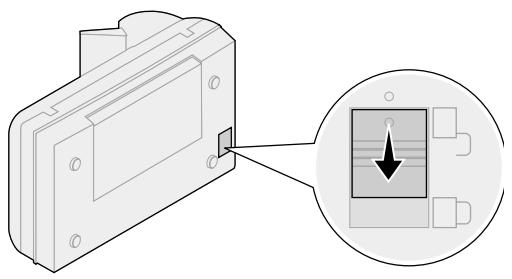
Step 3: Unlock the scan unit
Scan units are locked during shipping to protect the scanning mechanism from being damaged.
You must unlock the scan unit before you can use it.
1 Locate the lock switch on the bottom of the scan unit.
2 Push the switch up to the unlocked position.
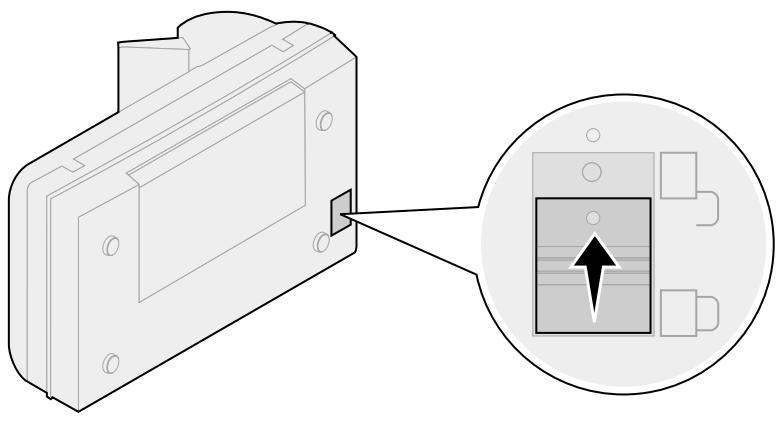
Step 4: Install paper feed tray and paper stop
1 Connect the paper extension to the paper feed tray.
2 Attach the paper feed tray to the automatic document feeder.
3 Attach the paper stop to the top cover.
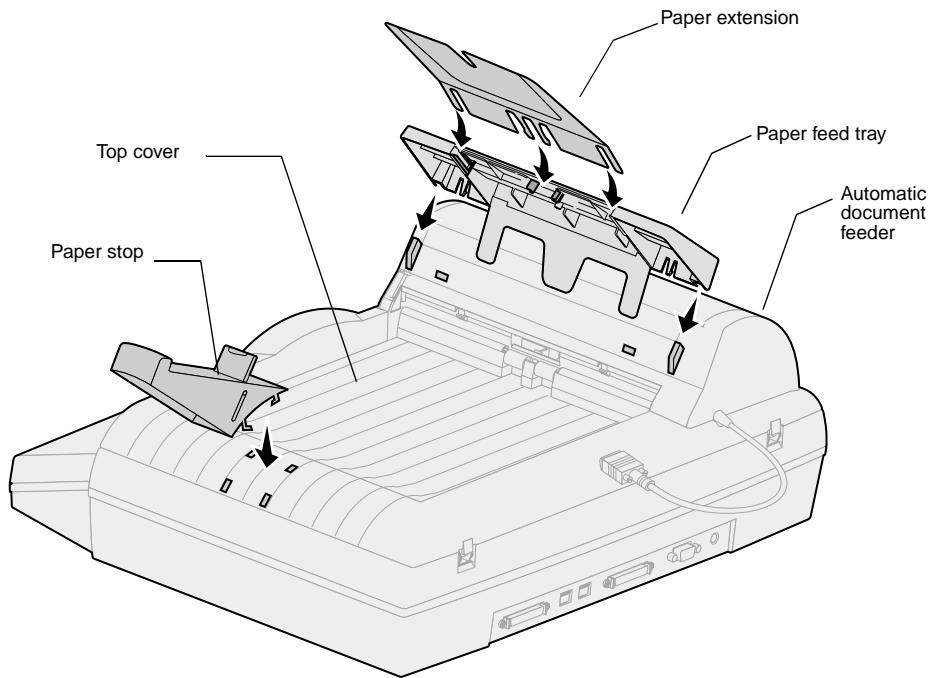
Step 5: Attach cables and power cords
Attach all the cables and power cords to the Optralmage hardware, but do not plug the power cords into electrical outlets.
It is important to turn the power on in the correct sequence. See "Turn on scan unit and printer" on page 12 for detailed information.
Germany: Use only the German TAE type F adapter (P/N 14B5123) shipped with this product because it contains a billing tone filter. The adapter is designed only for the F connector of the German wall outlet. This must be the only device attached to the NFN wall receptacle. Switzerland: Use only the Swiss adapter (P/N 14B5109) shipped with this product because it contains a billing tone filter.
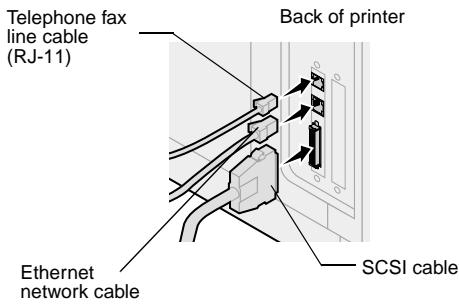
Telephone fax cable
To send or receive faxes, you must plug the RJ-11 telephone fax line cable into the fax modem port of the back on the MarkNet N2501e print server installed in your printer.
If you received a telephone adapter specifically designed for use in your country, attach the telephone adapter to the telephone fax line cable. Do not plug the fax telephone cable into the outlet yet.
Network cable
If you want to be able to send network print jobs to your Optraltmage printer, plug the Ethernet cable into the Ethernet network port on the back of the MarkNet print server installed in your printer.
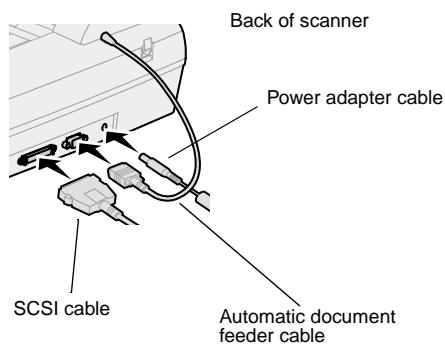
Automatic document feeder cable
In order for the automatic document feeder to function, you must plug the automatic document feeder cable into the corresponding port on the back of the scan unit.
Power cords
Connect all the power cords to the scan unit and the printer, but do not turn the power on yet.
SCSI cable
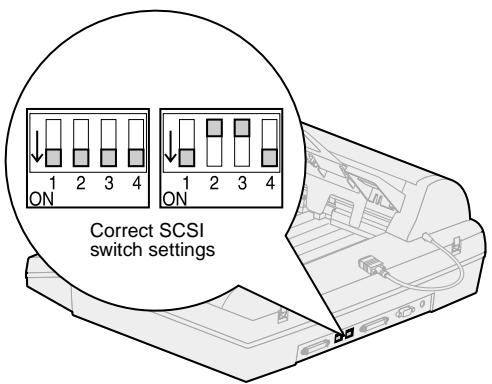
The SCSI cable connects your scan unit and printer to each other. Connect the SCSI cable in this step, but do not turn the power on yet.
Make sure the SCSI switch settings on the back of the scan unit are in the correct position.
Step 6: Turn on scan unit and printer
Power up sequence
1 If you are using a MarkNet N2501e, plug the telephone fax line cable into the phone line outlet.
2 If you disconnected the Ethernet network cable from the print server in a previous step, reconnect it.
3 Plug in the scan unit power cord. THE SCAN UNIT AUTOMATICALLY TURNS ON.
4 Plug the printer power cord into a properly grounded outlet and turn on the printer.
5 If you turned off the power to your computer in a previous step, turn the power back on.
6 Wait for Optralmage to initialize. When the scan unit comes on, there is a short wait cycle while the firmware is initialized. "Please Set Date/Time" displays on the first line of the Optralmage control panel and "Please Wait..." displays on the second line. Do not turn off the printer or unplug the scan unit until the "Please Wait..." message disappears from the control panel.
| First time setup | Optralmage panel: Please Set Date/Time Please Wait . . . | When initialization is completed, the Please wait message disappears. The Please Set Date/Time prompt indicates that you need to set required fax information. |
| Restart | Optralmage Panel: Please Wait . . . | When you restart Optralmage, a Please wait message displays on the second line of the control panel. When initialization is completed the Optralmage control panel displays the current time and date, plus the Ready status message. |
| Printer panel | Printer panel: 24MB of memory required for Fax. . . | When you first turn on your printer, you may see the message on the left. The Analog Fax option is disabled unless an upgrade of memory to a total of at least 24MB is performed. |
Hardware setup is now complete. You are ready to configure Optralmage.
Print a network setup page
You cannot manually configure network scanning using the Optralmage control panel. You must browse to the IP address of the MarkNet print server and use the MarkNet resident Web pages.
Some networks take several minutes to communicate with other devices on the network. If the network setup page doesn't contain the information you think it should, such as an automatically assigned IP address, wait a few minutes and try printing the page again.
Manually assign IP address information
"X" designates which option card slot in the printer is being used. For example, if you install the MarkNet print server in option slot 2, the printer operator panel displays: Network Option 2.
For instructions about other ways to set the IP address such as static ARP and telnet, RARP and telnet, BOOTP, and MarkVisionTM, look on the Drivers, MarkVision, and Utilities CD. Click View Documentation and look for the MarkNet link.
For other network devices to find the Optralmage, you must assign an IP address, netmask, and gateway to the MarkNet print server.
If your network is using DHCP, the proper address values are automatically assigned. Use the printer operator panel to print a network setup page. Press Network Menu, Network Option X, Network X Setup, Print, and then Print Setup Page. Look for the TCP/IP information on your network setup page. Once you find the address, go to the next step.
If you don't have DHCP, you must manually assign an IP address. Manually setting an IP address is generally performed by a network administrator and can affect other network settings. Do not attempt to manually assign an address unless it is appropriate to do so.
Method 1: Printer operator panel
A simple way to set address information inside the MarkNet print server is to use the printer operator panel. You need to be standing at the printer to use this method.
1 On the printer operator panel, select Network Menu, Network Option X, Network X Setup, TCP/IP, and then Set IP Address. Press Menu> repeatedly until you see the menu item, and then press Select.
2 When the current IP address is displayed (default is zeros), use the buttons to change the address. Pressing Select advances to the next segment in the address. Pressing Menu> increases the number by one. Pressing <Menu decreases the number by one.
3 When you finish setting the IP address, press Select repeatedly until the word SAVED appears briefly
4 Print a new network setup page to verify the information was entered as you intended.
Method 2: Print server TCP/IP setup utility
Use this simple utility to initialize the IP address if your computer is running Windows 95/98, Windows NT, or Windows 2000.
Use either form of UAA (MSB or canonical).
You can find information about installing, using, and troubleshooting the utility on the Drivers, MarkVision, and Utilities CD.
You need to know the 12-digit physical address (UAA) of the print server to use this method. The UAA is listed on the network setup page. See "Print a network setup page" on page 13.
To install the utility:
1 Launch the Drivers, MarkVision, and Utilities CD that shipped with your Optraltage hardware.
2 Do a custom install to add network support.
3 In the list of installable components, select Print Server TCP/IP Setup Utility.
4 Follow the instructions on your screen.
There are two ways to set the copy default settings for the Optralmage.
Method 1: Use the Optralmage resident web page.
Many of these settings depend on the type of printer and scanner you have.
1 Type the IP address of the Optralmage in the URL field of your browser (for example, http://192.168.236.24), and then press Enter.
2 Click Configuration.
3 Select Copy Setup from the Optralmage menu.
The Copy Setup page has the following settings available:
Content
- Copy Media
Paper Saver
n-up frame
Duplex
Finishing
Original Size
- Copy Size
Scaling
Default Darkness
Output bin
Number of Copies
Factory Defaults
4 After you select your settings, click Submit.
Method 2: Use the Optralmage control panel.
1 From the Optralmage control panel, press buttons (Content, Copy Media, Duplex, and so on) for the default options you want.
2 After you make your selections, press Menu> until Copy menu appears.
3 Press Menu> until Copy menu=Save settings appears, and press Select to save.
Step 9: Set up to send and receive taxes
FCC fax requirements
See "Emission Notices" on page 30 and "Telecommunications Notices" on page 31 for more FCC information.
During fax setup you must assign some basic information. The Telephone Consumer Protection Act of 1991 requires all outgoing faxes to contain the following information in a margin at the top or bottom of each transmitted page, or on the first page of the transmission:
- Date and Time (date and time fax is sent)
- Station Name (identification of the business, other entity, or individual sending the message)
- Station Number (telephone number of the sending fax machine, business, other entity, or individual)
Manual fax setup
If you do not have a TCP/IP environment, you must use the Opttralmage control panel to set your basic fax information.
For specific instructions, refer to the online documentation on the Optralmage CD. Click View Documentation, Use Optralmage, and search for More Fax Configuration.
Set up to send faxes
Configuration is a task usually done by a network administrator or system support person. If you are prompted for a password during the following instructions, see your primary system support person for help.
If you are changing fax modes, you must click Submit before you can access the configuration page.
After the IP address is set (using any method), use your browser to set the required fax information.
1 Type the IP address of the Optralmage in the URL field of your browser (for example, http://192.168.236.24), and then press Enter.
2 Click Configuration.
3 Under the Optralmage heading, click FAX Setup.
4 Click Configuration.
During printer power up, if the MarkNet print server is configured to use Network Time Protocol (NTP) time, the current date and time are provided by the time server. However, you must set the time zone to get the correct time.
5 Enter the required FCC information:
- Date and Time (current date and time)
- Station Name (personal name or company name)
- Station Number (fax phone line number)
6 Select the Time Zone, such as Eastern (USA and Canada, Eastern Standard Time). This sets the required information.
7 Set or change any additional fax settings you want.
8 After you finish entering the information, click Submit.
Use MarkVision to set fax information
MarkVision is a printer management utility on the Drivers, MarkVision, and Utilities CD.
After installing MarkVision, you can do an IP search to find the Optralmage printer containing the MarkNet N2501e or N2401e print server and go to the Fax tab to set the required information. Click Configure, TCP/IP, and launch the TCP/IP address manager.
Installation instructions for installing MarkVision is in the CD booklet shipped with the Drivers, MarkVision, and Utilities CD.
Follow the instructions on the screen, and then save your settings before closing MarkVision.
Set up to receive taxes
The available printer output bin choices are determined by what your printer supports. For information about what your printer supports, refer to your printer documentation.
If you are changing fax modes, you must click Submit before you can access the configuration page.
For a complete list of receive fax options, refer to the online documentation on the OptralImage CD. Click View Documentation, Use OptralImage, and search for Solve Fax Problems.
You can configure Optralmage to route faxes received through the fax modem port on the MarkNet N2501e to an output bin on your printer.
To set the fax receive options:
1 Type the IP address of the Optralmage in the URL field of your browser, and then press Enter.
2 Click Configuration.
3 Under the Optralmage heading, click FAX Setup.
4 Click Configuration.
5 Set your options for Fax storage, Output bin, Rings to Answer, and so on.
6 When you have finished, click Submit.
Set up fax transmission log
For a complete list of fax log options, refer to the online documentation on the OptralImage CD. Click View Documentation, Use OptralImage, and search for Solve Fax Problems.
If Analog is already selected, simply press the Configuration button.
Create permanent fax destinations
Once permanent fax destinations are created, they become accessible on the OptraImage control panel. Press Fax/ Scan mode repeatedly until SCAN FAX appears in the control panel display. Pressing Menu > and < Menu moves you through the list.
You can create a group fax distribution list by creating a permanent destination containing multiple recipient fax numbers. Separate each entry with a comma. Make sure you assign a unique name that identifies the destination as a group fax.
When you send or receive a fax, an entry of the activity is recorded in a file. You can print this file when you want, or specify that it be printed automatically.
To set the fax transmission log options:
1 Type the IP address of the Optralmage in the URL field of your browser, and then press Enter.
2 Click Configuration.
3 Under the Optralmage heading, click FAX Setup.
4 Click Configuration.
5 Set your options for printing the transmission logs and output bins.
6 When you have finished, click Submit.
See your printer documentation for supported paper sizes, paper types, and output bins.
Instead of entering the phone numbers of fax recipients each time you send a fax, you can create permanent fax destinations that appears in the Optralmage control panel.
1 Type the IP address of the Optralmage in the URL field of your browser, and then press Enter. The destinations you create here are stored only on this Optralmage.
2 Click Configuration.
3 Under the Optralmage heading, click Manage Destinations.
4 Click FAX Destinations Setup.
5 Enter a unique name for the fax recipient and specify their fax number (for example, John_Acct 555-1212).
6 Assign a shortcut number (1- 245).Assigning a shortcut lets you press #, and then the assigned number to activate your scan. If you enter a shortcut number already in use, you are prompted to select another number.
7 Click Submit.
Enable fax server function
Enabling the fax server function disables the analog fax send function.
If Fax Server is already selected, simply press the Configuration button.
When this mode is enabled, instead of using the modem to send outgoing faxes, the phone number is incorporated into the e-mail address of the Fax Server and an e-mail is sent to the fax server with the fax image as an attachment.
1 Type the IP address of the Optralmage in the URL field of your browser (for example, http://192.168.236.24), and then press Enter.
2 Click Configuration.
3 Click Fax Setup under the Optralmage menu.
4 Select Fax Server and click Submit.
5 Enter the settings for Fax server.
For the control panel to display menus for SCAN PROFILE,
SCAN EMAIL, or SCAN FTP, you must configure each of these scan to the IP address of the OptraImage and using the MarkNet resident web pages.
In addition to making copies and sending faxes, Optralmage lets you scan documents and send them to designated destinations on your network.
There are three scan to network modes:
- Scan to Profile (for single use scan jobs such as one time scan to e-mail or scanning documents back to your workstation)
- Scan to e-mail (to a permanent destination)
- Scan to FTP (to an FTP server)
Scan to Network General Setup
Configure default scan job settings
You can configure some default scan job settings that preset the Optralmage control panel formats for all Scan to e-mail and Scan to FTP jobs.
1 Type the IP address of the Optralmage in the URL field of your browser (for example, http://192.168.236.24), and then press Enter.
2 Click Configuration.
3 Under the Optralmage heading, click Scan to Network General Setup.
4 Set your default network scan settings. It is a good idea to base these settings on the most common types of originals you will be scanning. However, these defaults can be overridden by changing the settings on the Optralmage control panel just before you begin scanning.
5 Click Submit.
After you create a list of permanent destinations, it becomes available in the OptraImage control panel, these default settings are active choices for your typical scan job.
Specify SMTP gateway and other E-mail settings
1 Type the IP address of the Optralmage in the URL field of your browser, and then press Enter.
2 Click Configuration.
Scan to E-mail General Setup
You may want to use the network administrator's address as the default address. When an e-mail cannot be sent, notification is returned to this address.
3 Under the Optralmage heading, click Scan to E-mail General Setup.
4 Specify the SMTP gateway of your network or internet service provider, plus your e-mail address for the reply line of the message.
5 Enter a subject (descriptive name) and a generic message suitable for use on all Scan to e-mail jobs. This information appears on all e-mail scanned to permanent e-mail destinations.
6 To store scanned documents on a Web site and send only a web link in the e-mail, complete the Web Link section.
7 After entering your choices, click Submit.
Create permanent E-mail destinations
Before you create a destination, check the list at the bottom of the Web page. Make sure your recipient is not already listed.
You can rapidly find your e-mail recipient by pressing # and entering the shortcut number on the Optralmage control panel.
Create a separate recipient entry for each destination and give them unique names easily identified in the destinations list.
1 Type the IP address of the Optralmage in the URL field of your browser, and then press Enter.
2 Click Configuration.
3 Under the Optralmage heading, click Manage Destinations.
4 Click E-mail Destinations Setup.
5 Enter a unique name for the destination.
6 Enter the destination e-mail address.
7 Specify to send the scanned document either as an Attachment or as a Web Link.
8 Select scan type and resolution.
9 If you want, assign a shortcut number (1- 245) to the destination (optional).
10 Click Add/Modify. This new destination is now available for selection from the Optralmage control panel menu.
Create permanent FTP destinations
Before you create a destination, check the list at the bottom of the Web page. Make sure your recipient is not already listed.
You can rapidly find your FTP recipient by pressing # and entering the shortcut number on the OptraImage control panel.
Create a separate recipient entry for each destination and give them unique names easily identified in the destinations list.
1 Type the IP address of the Optralmage in the URL field of your browser, and then press Enter.
2 Click Configuration.
3 Under the Optralmage heading, click Manage Destinations.
4 Click FTP Destinations Setup.
5 Enter a unique name for the destination.
6 Enter Server name, Log-in, Password and Filename.
7 Select scan type and resolution.
8 If you want, assign a shortcut number (1- 245) to the destination (optional).
9 Click Add/Modify. This new destination is now available for selection from the Optralmage control panel menu.
Step 11: Verify the setup
Make a test copy
Copy mode is the default setting of the control panel.
1 Make sure the Ready status message is displayed.
2 Place your original in the scan unit.
3 Press Go/Send to send a copy to your printer.
Send a test fax
If Send/Fax is disabled, this option does NOT appear.
Send a one page test fax to someone and ask for feedback.
1 Press Fax/Scan Mode once. Enter Phone # displays on the Optralmage control panel.
2 Use the numeric keypad on the control panel and enter the phone number of the person receiving the fax.
3 Place your original in the scan unit.
4 Press Go/Send to send a fax.
Test scan to network
Test your scan to network functions by creating Scan Profiles or scanning to permanent destinations.
Remember you can only test the scan to network functions that you configured during setup. For example, to test Scan to e-mail, you must have created at least one permanent e-mail destination. Otherwise, SCAN EMAIL does not appear as a scan to network mode in the Optralmage control panel.
Step 12: Distribute Optralmage user instructions
Find user instructions
Optralmage online documentation includes helpful instructions for making copies, sending faxes, and scanning documents to e-mail, FTP destinations, or back to your computer.
To view the available information on the Optralmage CD, click View Documentation, and then Use Optralmage to browse the table of contents.
Distribute user information
Here are several ways to distribute Optralmage information:
- Print copies of each set of user instructions stored on the Optralmage CD, and manually deliver them to users.
- Copy the PDFs containing the user instructions and store them in a convenient common location on your network or Intranet. The PDFs are stored in the Pubs directory on the Optraltage CD.
- Browse to the Lexmark web site (www.lexmark.com) and access the information there. Save the URL and send the link to your Optralmage users.
Limit Optralmage use
Optralmage Job Accounting can be configured to require users to enter an authorized Job Account number or select an authorized Account name to unlock the control panel.
Detailed instructions can be found on the Optralmage CD. Click View Documentation, Use Optralmage, and then More Optralmage Configuration.
| Problem | Solution |
| Ready status message not displayed | The control panel and the printer are not talking to each other, or the printer may be turned off. 1 Turn printer off, and then back on. 2 Turn printer and scan unit off. Make sure all cables and cords are connected, and then power up in the correct order. See “Turn on scan unit and printer” on page 12. |
| Control panel buttons not responding | Make sure the printer is turned on. |
| Scan unit isn’t working | 1 Make sure the scan unit is unlocked. See “Unlock the scan unit” on page 7. 2 Turn printer off and unplug scan unit. Make sure all cables and cords are connected, and then power up in the correct order. See “Turn on scan unit and printer” on page 12. |
| Test document did not print | 1 Verify each electrical outlet has power. 2 Make sure all cables and line cords are properly seated. 3 Restart the copy job. |
| Unable to send or receive faxes. | 1 Make sure the telephone fax line cable is properly connected to the fax modem port on the print server and to the fax phone outlet. 2 Repeat the fax setup. See “Set up to send and receive faxes” on page 17. 3 Refer to the online documentation on the Optralmage CD. Click View Documentation, Use Optralmage, and then Solving fax problems. |
| Network scanning modes (SCAN→PROFILE, SCAN→EMAIL, and/or SCAN→FTP) don’t appear in the control panel | Scan to network modes must be configured in order to show up in the Optralmage control panel. See “Set up network scanning” on page 21 for detailed instructions. |
If you need more help
Launch the OptraImage CD, and then click Contact Lexmark for a complete list of phone numbers and web sites.
Clearing a paper jam in the ADF
Cleaning the ADF
1 Turn off and disconnect the power to the scan unit.
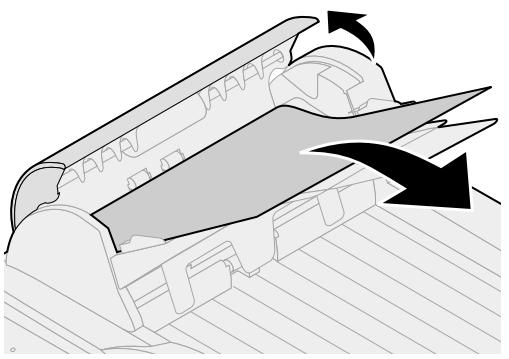
2 Open the Automatic Document Feeder (ADF) to its full position.
3 Carefully pull out the jammed piece of paper.
4 Close the ADF.
5 Connect the power and turn the scan unit back on.
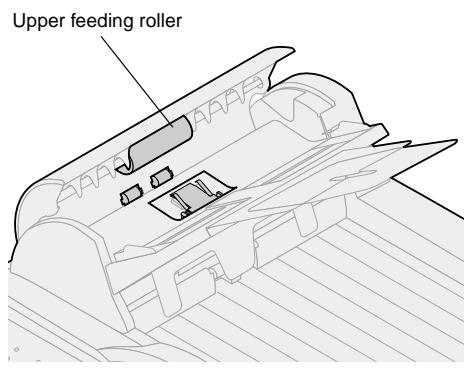
Clean the scan unit if documents do not feed smoothly or easily, or if several documents feed at one time. The scan unit parts may be contaminated with ink, toner particles or paper coatings.
1 Wet a clean, lint-free cloth or cotton swab with isopropyl alcohol (95%).
2 Open the ADF unit and wipe the upper feeding roller by moving the swab from side to side.
3 Rotate the roller forward with your finger and repeat the above cleaning procedures until the entire roller is cleaned.
4 Wipe the pad from top to bottom. Be careful not to hook the pick springs.
5 Close the ADF unit. Your scan unit is now ready for use.
Cleaning the document glass
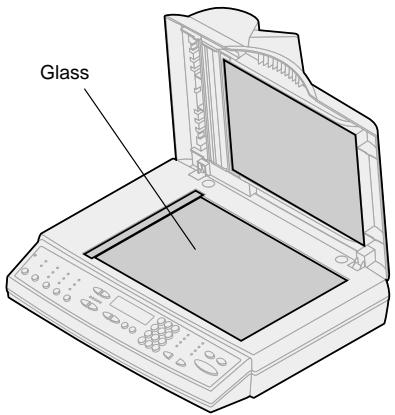
Moving the scan unit
1 Wet a clean, lint-free cotton cloth or swab with some isopropyl alcohol (95%).
2 Open the ADF unit and document cover as shown. Wipe the glass of flatbed and ADF area by moving the cloth or swab from side to side.
3 Close the ADF unit and document cover. Your scan unit is now ready for use.
If you need to transport the scanner, follow these instructions to lock the scanner:
1 Disconnect the power to the scan unit.
2 Raise the scanner high enough to push the switch down to the locked position.
Replacing the ADF pad assembly
If you experience problems with papers double-feeding through the ADF, the pad assembly may be worn out and need to be replaced.
1 Turn off the scan unit and disconnect the power supply.
2 Open the ADF front cover
3 Remove the old ADF detachable pad assembly by squeezing and pulling out the upper part of the pad clamp
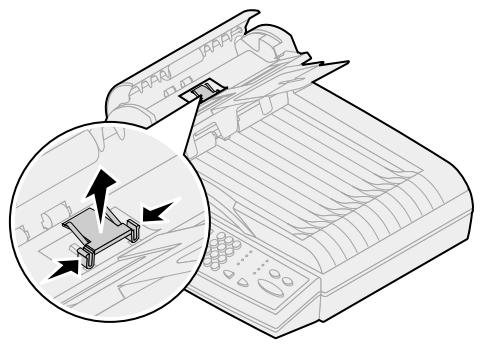
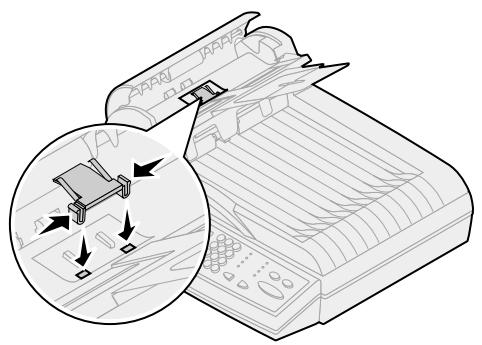
4 Hold the upper part of the new clamp, squeeze, and place it gently in the pad holder.
5 Close the ADF.
6 Reconnect the power supply and turn the scan unit back on.
The following notices apply to machine type 4036-301. The following telecommunications notices apply to those machines in which the MarkNet print server is installed.
Emission Notices
Warning! This is a Class A product. In a domestic environment, this product may cause radio interference, in which case the user may be required to take adequate measures.
FCC Rules -- Part 15
The MarkNet print server has been tested and found to comply with the limits for a Class A digital device, pursuant to Part 15 of the FCC Rules (Federal Communications Commission).
Operation is subject to the following two conditions: (1) this device may not cause harmful interference, and (2) this device must accept any interference received, including interference that may cause undesired operation.
The FCC Class A limits are designed to provide reasonable protection against harmful interference when the equipment is operated in a commercial environment. This equipment generates, uses, and can radiate radio frequency energy and, if not installed and used in accordance with the instruction manual, may cause harmful interference to radio communications. Operation of this equipment in a residential area is likely to cause harmful interference, in which case the user will be required to correct the interference at his own expense.
The manufacturer is not responsible for any radio or television interference caused by using other than recommended cables or by unauthorized changes or modifications to this equipment. Unauthorized changes or modifications could void the user's authority to operate this equipment.
Industry Canada ICES-003
This Class A digital apparatus complies with Canadian ICES-003.
Telecommunications Notices
FCC rules Part 68
This equipment complies with Part 68 of the FCC rules. On the backside of this option card is a label that contains, among other information, the FCC registration number and Ringer Equivalence Number (REN) for this equipment. If requested, this information must be provided to the Telephone Company.
The REN is used to determine the quantity of devices which may be connected to the telephone line. Excessive RENs on the telephone line may result in the device not ringing in response to an incoming call. In most, but not all, areas the sum of the RENs should not exceed five (5.0). To be certain of the number of devices that may be connected to the line as determined by the REN, contact the telephone company to determine the maximum REN for the calling area.
This equipment cannot be used on telephone company-provided coin service. Connection to party lines is subject to state tariffs.
This equipment uses the following Universal Service Order Code (USOC) jack: RJ-11C.
This equipment is designed to be connected to the telephone network or premises wiring using a compatible jack which is FCC Part 68 compliant. An FCC compliant telephone cord and modular plug, is provided with this equipment. See "Attach cables and power cords" for instructions about connecting the fax telephone cable.
If this equipment causes harm to the telephone network, the telephone company will notify you in advance that temporary discontinuance of service may be required. If advance notice is not practical, the telephone company will notify the customer as soon as possible. Also, you will be advised of your right to file a complaint with the FCC if you believe it is necessary.
The telephone company may make changes to its facilities, equipment, operations, or procedures that could affect the operation of the equipment. If this happens, the telephone company will provide advance notice in order for you to make necessary modification in order to maintain uninterrupted service.
Information about contacting Lexmark is located on the OptralImage CD. Click the Contact Lexmark link.
If trouble is experienced with this equipment, and you cannot correct the problem, please contact Lexmark International, Inc. for repair and warranty information. If the trouble is causing harm to the telephone network, the telephone company may request you to disconnect the equipment from the network until the problem is resolved.
It is recommended that the customer install an AC surge arrester in the AC outlet to which this device is connected. This is to avoid damage to the equipment caused by local lightning strikes and other electrical surges.
The Telephone Consumer Protection Act of 1991 makes it unlawful for any person to use a computer or other electronic device to send any message via a telephone fax option unless such message clearly contains the following information in a margin at the top or bottom of each transmitted page or on the first page of the transmission:
the date and time it is sent
This information is transmitted with your document by the TTI feature.
- an identification of the business or other entity, or other individual sending the message
- the telephone number of the sending machine or such business, other entity, or individual.
See the instructions "Set up to send and receive faxes".
Industry Canada CS-03 Notice
Notice: The Industry Canada label identifies certified equipment. This certification means that the equipment meets certain telecommunications network protective operational and safety requirements in the appropriate Terminal Equipment Technical Requirements documents. The Department does not guarantee the equipment will operate to the user's satisfaction.
Before installing this equipment, users should ensure that it is permissible to be connected to the facilities of the local telecommunications company. The equipment must also be installed using an acceptable method of connection. The customer should be aware that compliance with the above conditions may not prevent degradation of service in some situations.
Repairs to certified equipment should be coordinated by a representative designated by the supplier. Any repairs or alterations made by the user to this equipment, or equipment malfunctions, may give the telecommunications company cause to request the user to disconnect the equipment.
CAUTION! Users should not attempt to make such connections themselves, but should contact the appropriate electric inspection authority, or electrician, as appropriate.
Users should ensure for their own protection that the electrical ground connections of the power utility, telephone lines and internal metallic water pipe system, if present, are connected together. This precaution may be particularly important in rural areas.
The Ringer Equivalence Number (REN) of this device is 0.8.
The Ringer Equivalence Number (REN) assigned to each terminal device provides an indication of the maximum number of terminals allowed to be connected to a telephone interface. The termination of an interface may consist of any combination of devices subject only to the requirement that the sum of the Ringer Equivalence Numbers of all the devices does not exceed 5.
This equipment uses the following jacks: CA11A.
European Community (EC) Declaration of Conformity
This product is in conformity with the protection requirements of EC Council directives 1999/5/EC, 89/336/EEC, and 73/23/EEC on the approximation and harmonization of the laws of the Member States relating to electromagnetic compatibility and safety of electrical equipment designed for use within certain voltage limits, and attachment of equipment to the Public Switched Telecommunications Network.
A declaration of conformity with the requirements of the Directive has been signed by Mr. Laurent Giannichi, Lexmark International Technology, S.A., Managing Director, Geneva, Switzerland.
Warning! This is a Class A product. In a domestic environment, this product may cause radio interference, in which case the user may be required to take adequate measures.
This product satisfies the Class A limits of the EMC standard EN 55022 and the safety requirements of EN 60950. It is compliant with the telecommunication standard: TBR 21 for use with Telecommunication Terminal Equipment which is permitted by Council Directive 1999/5/EC of the European Parliament and of the Council relating to Radio & Telecommunications Terminal Equipment.
Network compatibility notices
This equipment has been designed, tested and found to be compliant with the European technical standard TBR 21 for pan-European single terminal connection to the Public Switched Telephone Network (PSTN). This applies to all MarkNet print servers which bear the following mark:
C E
This equipment is designed to inter-work with PSTN networks that accept analog signals.
However, due to differences between the individual PSTNs provided in different countries, the TBR 21 certification does not, in itself, give an unconditional assurance of successful operation on every PSTN network termination point. In the event of problems, you should contact your equipment supplier in the first instance.
Lexmark does not currently know of any interoperating difficulties for the following countries:
| Austria | Belgium | Denmark | Finland |
| France | Germany | Luxemburg | Netherlands |
| Greece | Iceland | Ireland | Italy |
| Portugal | Sweden | United Kingdom | Switzerland |
| Spain | Norway |
Using the MarkNet print server in Germany
The MarkNet print server requires a German billing tone filter (P/N 14B5123) to be installed on any line which receives metering pulses in German.
The subscriber may request that metering pulses be placed on the line, or can have them removed by calling the German network provider. Normally, metering pulses are not provided unless specifically requested by the subscriber at the time of installation.
Using the MarkNet print server in Switzerland
The MarkNet print server requires a Switzerland billing tone filter (P/N 14B5109) to be installed on all equipment used in Switzerland since metering pulses are present on all analog lines.
New Zealand Telecom Warning Notice
The grant of a Telepermit for any item of terminal equipment indicates only that Telecom has accepted that the item complies with minimum conditions for connection to its network. It indicates no endorsement of the product by Telecom, nor does it provide any sort of warranty. Above all, it provides no assurance that any item will work correctly in all respects with another item of Tele permitted equipment of a different make or model., nor does it imply that any product is compatible with all of Telecom's network services.
Warning! No '111' or other calls can be made from this device during a main power failure.
This equipment may provide for the effective hand-over of a call to another device connected to the same line.
Some parameters required for compliance with Telecom's Telepermit requirements are dependent on the equipment (PC) associated with this device. In order to operate within the limits for compliance with Telecom's Specifications, the associated equipment shall be set to ensure that calls are answered between 3 and 30 seconds of receipt of ringing.
If a charge for local calls is unacceptable, the "Dial" button should NOT be used for local calls.
Only the 7-digits of the local number should be dialed from your telephone. DO NOT dial the area code digit or "0" prefix.
South Africa Telecommunications Notice
This modem must be used in conjunction with an approved surge protection device when connected to the PSTN network.
Homologation Industry Canada ICES-003
Homologation Industry Canada CS-03
New Zealand Telecom Warning Notice
The grant of a Telepermit for any item of terminal equipment indicates only that Telecom has accepted that the item complies with minimum conditions for connection to its network. It indicates no endorsement of the product by Telecom, nor does it provide any sort of warranty. Above all, it provides no assurance that any item will work correctly in all respects with another item of Tele permitted equipment of a different make or model., nor does it imply that any product is compatible with all of Telecom's network services.
Warning! No '111' or other calls can be made from this device during a main power failure.
This equipment may provide for the effective hand-over of a call to another device connected to the same line.
Some parameters required for compliance with Telecom's Telepermit requirements are dependent on the equipment (PC) associated with this device. In order to operate within the limits for compliance with Telecom's Specifications, the associated equipment shall be set to ensure that calls are answered between 3 and 30 seconds of receipt of ringing.
If a charge for local calls is unacceptable, the "Dial" button should NOT be used for local calls.
Only the 7-digits of the local number should be dialed from your telephone. DO NOT dial the area code digit or "0" prefix.
South Africa Telecommunications Notice
This modem must be used in conjunction with an approved surge protection device when connected to the PSTN network.
Installationshandbuch
Deutsch
New Zealand Telecom Warning Notice
The grant of a Telepermit for any item of terminal equipment indicates only that Telecom has accepted that the item complies with minimum conditions for connection to its network. It indicates no endorsement of the product by Telecom, nor does it provide any sort of warranty. Above all, it provides no assurance that any item will work correctly in all respects with another item of Tele permitted equipment of a different make or model., nor does it imply that any product is compatible with all of Telecom's network services.
Warning! No '111' or other calls can be made from this device during a main power failure.
This equipment may provide for the effective hand-over of a call to another device connected to the same line.
Some parameters required for compliance with Telecom's Telepermit requirements are dependent on the equipment (PC) associated with this device. In order to operate within the limits for compliance with Telecom's Specifications, the associated equipment shall be set to ensure that calls are answered between 3 and 30 seconds of receipt of ringing.
If a charge for local calls is unacceptable, the "Dial" button should NOT be used for local calls.
Only the 7-digits of the local number should be dialed from your telephone. DO NOT dial the area code digit or "0" prefix.
South Africa Telecommunications Notice
This modem must be used in conjunction with an approved surge protection device when connected to the PSTN network.
New Zealand Telecom Warning Notice
Warning! No '111' or other calls can be made from this device during a main power failure.
The grant of a Telepermit for any item of terminal equipment indicates only that Telecom has accepted that the item complies with minimum conditions for connection to its network. It indicates no endorsement of the product by Telecom, nor does it provide any sort of warranty. Above all, it provides no assurance that any item will work correctly in all respects with another item of Tele permitted equipment of a different make or model., nor does it imply that any product is compatible with all of Telecom's network services.
This equipment may provide for the effective hand-over of a call to another device connected to the same line.
Some parameters required for compliance with Telecom's Telepermit requirements are dependent on the equipment (PC) associated with this device. In order to operate within the limits for compliance with Telecom's Specifications, the associated equipment shall be set to ensure that calls are answered between 3 and 30 seconds of receipt of ringing.
If a charge for local calls is unacceptable, the "Dial" button should NOT be used for local calls.
Only the 7-digits of the local number should be dialed from your telephone. DO NOT dial the area code digit or "0" prefix.
South Africa Telecommunications Notice
This modem must be used in conjunction with an approved surge protection device when connected to the PSTN network.
LEXMARK
Lexmark and Lexmark with diamond design are trademarks of Lexmark International, Inc., registered in the United States and/or other countries.
© 2000 Lexmark International, Inc.
740 West New Circle Road
Lexington, Kentucky 40550