S3V1 - Hand blender Vigan Mammoth - Free user manual and instructions
Find the device manual for free S3V1 Vigan Mammoth in PDF.


User questions about S3V1 Vigan Mammoth
0 question about this device. Answer the ones you know or ask your own.
Ask a new question about this device
Download the instructions for your Hand blender in PDF format for free! Find your manual S3V1 - Vigan Mammoth and take your electronic device back in hand. On this page are published all the documents necessary for the use of your device. S3V1 by Vigan Mammoth.
USER MANUAL S3V1 Vigan Mammoth
natural_image
Black-and-white product photo featuring a Vigan Mammoth blender, a glass of fruit and a bowl of strawberry salad, and a hand mixer (no text or symbols on main objects)Eletrický šlehač
natural_image
Mechanical assembly diagram showing two elongated components with a labeled part '2' (no text or symbols beyond label)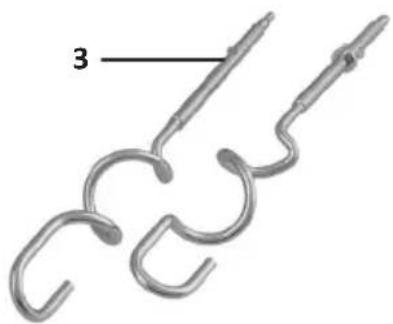
natural_image
Illustration of two metal hookages with a numbered label '3' pointing to one end (no text or symbols on the hookages themselves)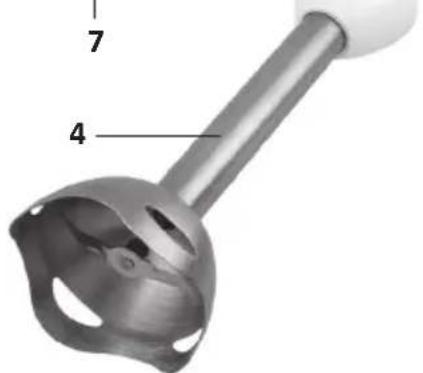
text_image
7 4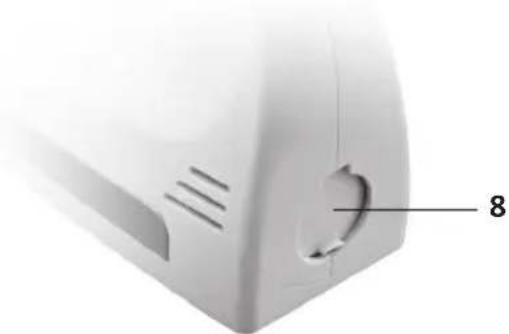
natural_image
Close-up of a white electronic device casing with ventilation slots and a labeled part '8' (no text or symbols beyond the number)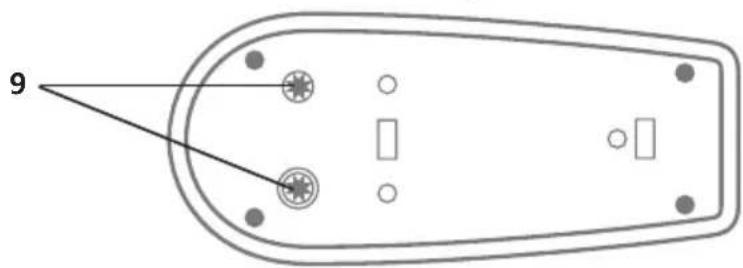
text_image
9
OBSLUHA
PŘED PRVNÍM POUŽITÍM
We would like to thank you for buying this product. Please read carefully this instruction manual before use. This product is designed for the use as described in this manual. The manufacturer is not responsible for any damages caused by inappropriate use which is in contrary to this instruction manual. Please keep this instruction manual for later use. It is highly recommended to keep original sales packaging and the purchase receipt at least for the duration of the warranty. If the product will be handed to another person, make sure that this instruction manual is always included. This product is designed to meet the highest standards of the quality, functionality and design. We believe that it will quickly become your irreplaceable helper in your kitchen.
SPECIFICATION
Power supply: 220-240 V \~ 50 Hz
Power input: 350 W
Type of protection: Class II
Gross weight: 1,2 kg
Net weight: 1,05 kg
Net dimensions: 145 x 90x 205 mm
Gross dimensions: 210 x 100 x 210 mm
Pcs in carton: 6
Important safety instructions:

- This product is designed for home use only. It is not to be used commercially.
- After unpacking the product, search for any damages. If any damages are found (during the search or later on) do not use the product (stop using the product immediately) and contact the seller or authorized service. Contact the seller or the authorized service if you have any doubts about usage of the product!
- This device can be used by children 8 years of age or older and persons with reduced physical, sensory or mental capabilities or lack of experience and knowledge, if they are properly instructed and supervised about safe and proper use of the equipment. Children must not play with this product! The maintenance of this product must not be conducted by children under age of 8 and with no supervision.
- Children under age of 8 must keep away from the appliance and its power cord.
- This appliance must not be used by children without supervision.
- Never lay this product on hot surfaces, for example hot plates, cookers or any other heat sources!
- Never leave the appliance connected/ turned on unattended!
- Before plugging the power cord into the socket, make sure that the voltage on the rating label is same as the voltage in your power electrical grid.
- It is highly recommended to not to use adaptors/ extension cords. If you will use them, make sure that you will use the accessory which is in conformity with valid safety standards.
- Blades of mixing attachment are very sharp. Handle with care!
- This product is designed for indoor use only! Never use outdoor.
- Dispose ecologically of the packaging material right after the unpacking. Always make sure that the packaging material doesn't get into the hands of children. Plastic bags might cause suffocation!
- Do not wash the motor unit of this appliance in dishwasher/ with running water. Only the kneading, mixing and whisking attachments can be washed in dishwasher.
-
Do not run the appliance without load. It can negatively influence its lifetime.
-
Never unplug the power cord from the socket by a force pull.
• Always unplug the appliance after the use. - Never manipulate the power cord with wet hands!
- Any repairs of the appliance can be done by the authorized service only! Never make any repairs/modifications by yourself!
- Never leave the power cord hanging from the workspace. It might cause the cable slack and possible dropping of the appliance!
- When installing or changing attachments, always make sure that the appliance is turned off!
- If you don't use the appliance, always unplug it from the electric grid.
- Make sure that the cable doesn't get in contact with hot/sharp items.
- Before plugging, always make sure that the power cord is not damaged. If you find any damages on power cord/ appliance, contact the authorized service/seller.
- Make sure before every cleaning that the appliance is unplugged from the electric grid
- Never use the accessory that was not delivered with the appliance or is not meant for use with this model
- Before turning the whisker on, make sure that there are no objects (for example hair, pieces of clothing) in surrounding area. It could cause wobbling on the kneading/whisking attachment which could lead to damages/injuries!
PRODUCT DESCRIPTION
1) Unit body
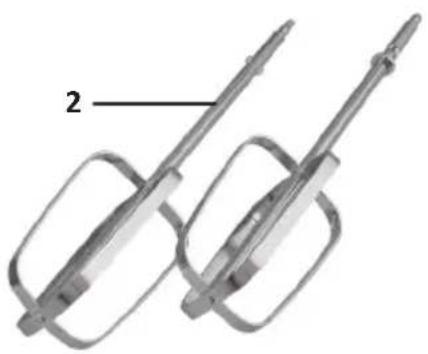
2) Whisking attachment
3) Kneading attachment
4) Mixing attachment
5) Button for ejecting the kneading/whisking attachment
6) Power controller
7) Turbo button
8) Mixing attachment slot
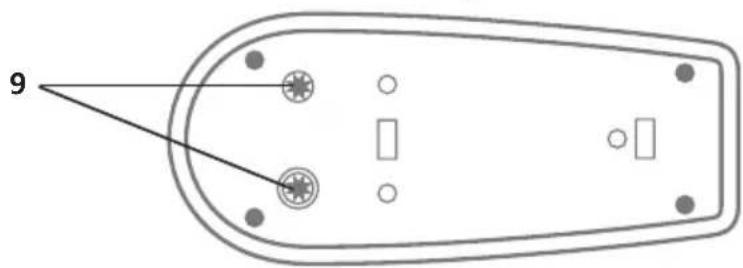
9) Kneading and whisking attachment slot
natural_image
Mechanical assembly diagram showing two elongated components with a labeled part '2' (no text or symbols beyond label)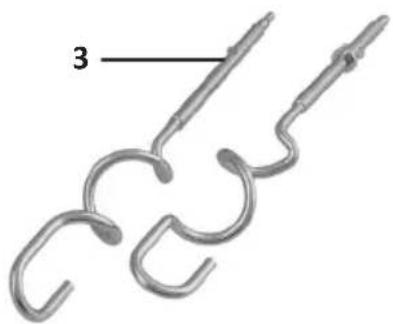
natural_image
Illustration of two metal hookages with a numbered label '3' pointing to one end (no text or symbols on the hookages themselves)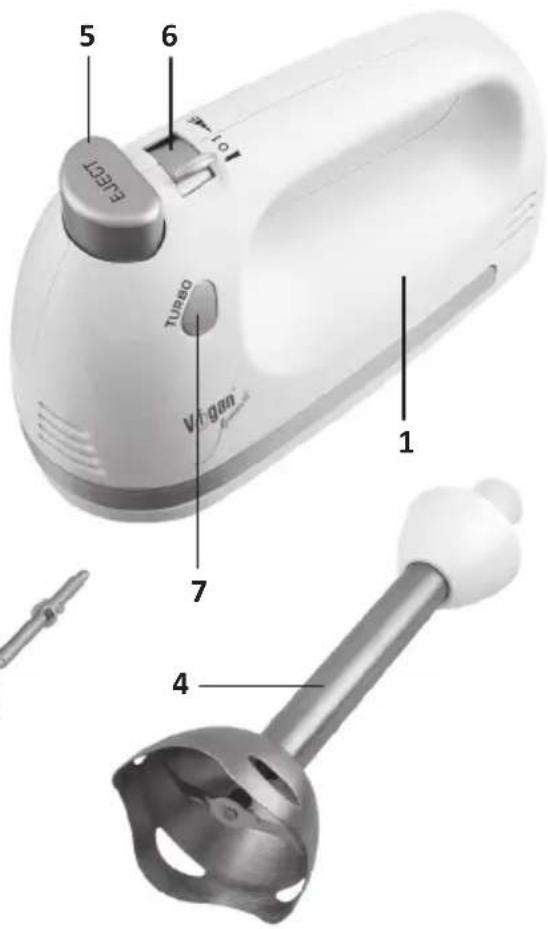
text_image
5 6 10 TURBO Vegan 1 7 4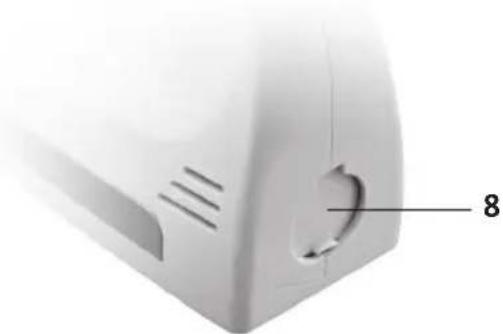
natural_image
Close-up of a white electronic device casing with ventilation slots and a labeled part '8' (no text or symbols on the object itself)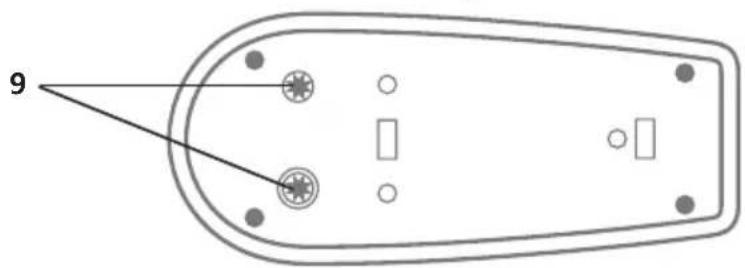
text_image
9OPERATION
BEFORE FIRST USE
Unpack the appliance from the box and make sure that the packaging material do not get into the hands of children (plastic bags might cause suffocation). Kneading, whisking and mixing attachments must be washed thoroughly with hot water and dishwashing detergent before the first use! After cleaning them, rinse them with drinking water and dry them. Before plugging the power cord, compare the data displayed on rating label with the parameters of your electrical grid. These data must match!
Caution: Operation of the appliance must be interrupted for a couple of minutes after 3 minutes of continuous operation. Failure to observe this rule could damage the appliance!
USE WITH WHISKING/ KNEADING ATTACHMENT
1) When installing the whisking (number 2)/kneading (number 3) attachments, insert its end into the slot in the unit body (number 9). It is necessary to differentiate the attachments with and without the circle on the axis (always in pair). The attachment with the circle is to be placed into the right slot and the one without the circle into the left one. Always use the attachments in pairs, never combine them!
2) Place the ingredients into the deep bowl – it will prevent the ingredients to fall out of the bowl during mixing.
3) Always make sure that you haven't left any cutlery or other items in the mixing bowl! After the check, put the whisking/kneading attachment into the bowl.
4) Plug the appliance into the electric grid.
5) Turn on the appliance by picking the desired speed level on the power controller (number 6). We strongly recommend to start with the lowest level and gradually increase the speed.
6) If you need to use the highest speed level, push the TURBO button (number 7).
7) After finishing the whisking/kneading, switch the power controller (number 6) to position "0" which will turn off the appliance. Unplug the power cord from the electric grid. Remove the attachments by pushing EJECT button (number 5). Never push the EJECT button (number 5) while whisking/kneading!
USAGE WITH MIXING ATTACHMENT
1) Make sure that the appliance is turned off and unplugged from the electric grid. Lift the lever on the mixing attachment slot (number 8).
2) Take the mixing attachment (number 4) and screw it into the attachment slot (number 8). Make sure that the attachment is installed properly!
3) Place the ingredients into the deep bowl – it will prevent the ingredients to fall out of the bowl during mixing.
4) Always make sure that you haven't left any cutlery or other items in the mixing bowl! After the check, put the whisking/kneading attachment into the bowl.
5) Plug the appliance into the electric grid.
6) Turn on the appliance by switching the power controller (number 6) left – just below the picture of mixing attachment. The mixing attachment is controlled by TURBO button (number 7).
7) After finishing the mixing, switch the power controller to "0" position and turn off the appliance. Unplug the power cord from the electric grid. Unscrew the mixing attachment and remove it from the body unit.
Note: When the mixing attachment is installed, the whisking/kneading slots will automatically close.
Whisking attachments:
These are ideal for mixing thin mashes, whisking cream, whisking egg whites etc.
Never use the whisking attachments for whisking thick doughs or porridges!
Kneading attachments:
These are ideal for kneading the yeast dough, spreads, mayonnaises etc.
Mixing attachments:
This attachment is ideal for puree, sauces and cocktails preparations.
Recommended whipping/kneading speeds:
| Level Processed ingredients | |
| 1 Initial speed is ideal for mixing larger amount of ingredients or thorough mixing of dry ingredients (flour etc.) | |
| 2 The ideal speed for connecting dry and liquid ingredients | |
| 3 Higher speed for processing dense dough, such as cookie / bread dough | |
| 4 Speed designed for whipping butter and sugar, preparation of frosting or fluffy topping | |
| 5 This speed is used for whisking of the egg whites or for example for the preparation of meringues | |
| TURBO This speed can be used for a short time in the need for a rapid increasement of power |
MAINTENANCE OF THE APPLIANCE
Caution: All of the attachments are designed for short-term contact with the food which means no longer than 2 hours!
1) Attachments
Attachments can be washed in the dishwasher or you can clean it manually with the usage of dishwasher detergent. Always wipe it clean before storing it!
Never use abrasive cleaning detergents, degreasers, alcohol based cleaners or aggressive detergents!
2) Body unit
Before cleaning, always make sure that the appliance is disconnected from the electric grid. Never use abrasive cleaning detergents, degreasers, alcohol based cleaners or aggressive detergents!
Never clean the body unit with scourer or rough cloths. Always use fine, and slightly wet cloth.
When the body unit is very dirty, you can clean it with the use of dishwasher detergent
Never immerse/ soak the body unit in the water!
Never clean the appliance with running water!
Never put the body unit into the dishwasher!
DISPOSAL OF OLD ELECTRICAL AND ELECTRONIC EQUIPMENT
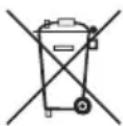

This symbol on the product, its accessories, packaging or accompanying documents indicates that the product should not be treated as household waste. Please take this product to the respective collection point where will be carried out specialist recycling of electronic equipment. In the European Union and other European countries there are collection points for used electrical and electronic equipment. By ensuring proper product disposal, you prevent potential negative impact for the environment and human health, which could result from improper handling of this product. Recycling of these materials also helps to
preserve natural resources. For this reason, please do not throw the old electric and electronic equipment together with household waste. For more information please contact your local authority, any service company liquidating household waste or the store where you purchased the product. Details also refer to the relevant laws about waste, in the Czech Republic no. 185/2001 Coll. as amended. Furthermore, the website www.elektrowin.cz, www.remasystem.cz and www.asekol.cz (disposal of electrical waste). The improper disposal of this waste can be in accordance with applicable laws, regulations and fines.

WARRANTY
We offer warranty for 24 months counting from the day of purchase by you. This warranty covers defect caused by defective material or error in workmanship. It does not cover defects caused by mechanical damage, natural disaster of other inevitable events, connecting to the wrong power grid voltage, modifications or service work by non-qualified or unauthorized personal, misuse or use in contradiction to this manual.
All documents about your purchase and service repairs on any product keep for at least three years to ensure quality customer service.
Please remember, that this product is only for home use, not professional use.
If you find out, that this product does not suit you, it is not a reason for a complaint.
In the case of complaint please submit receipt.
In the case of malfunction of your product, please contact the dealer, you bought it from, or service at the following address:
Service: Interservis Liberec s r.o.
natural_image
Mechanical assembly diagram showing two elongated components with a labeled part '2' (no text or symbols beyond label)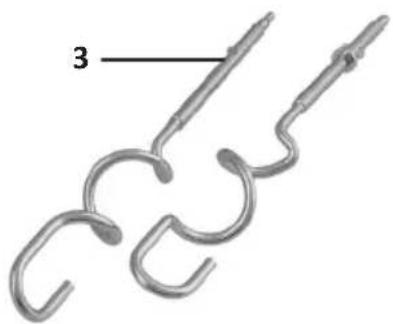
natural_image
Illustration of two metal hookages with a numbered label '3' pointing to one end (no text or symbols on the hookages themselves)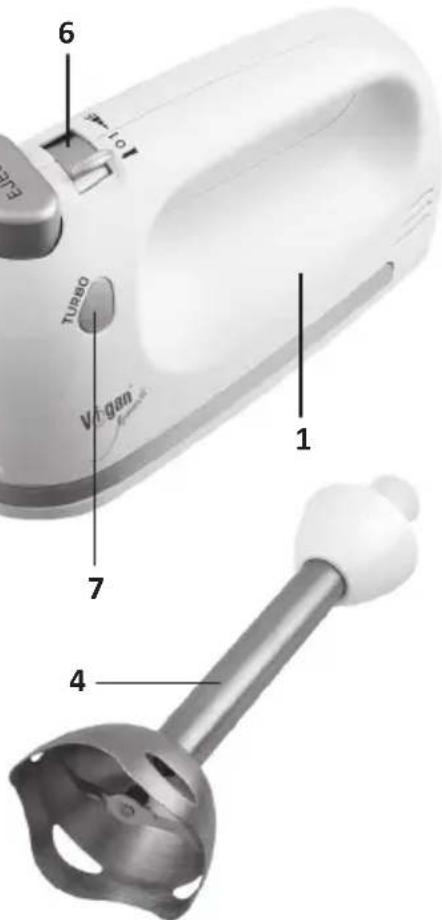
text_image
1 2 3 4 5 6 TURBO Vigan 10 L 7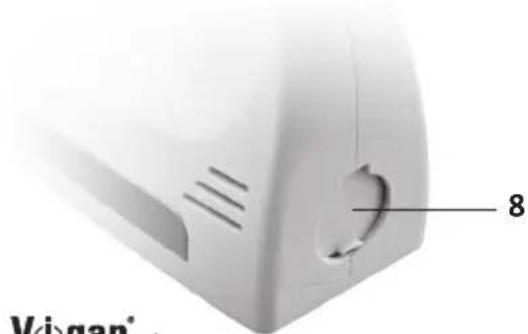
text_image
8 Vigan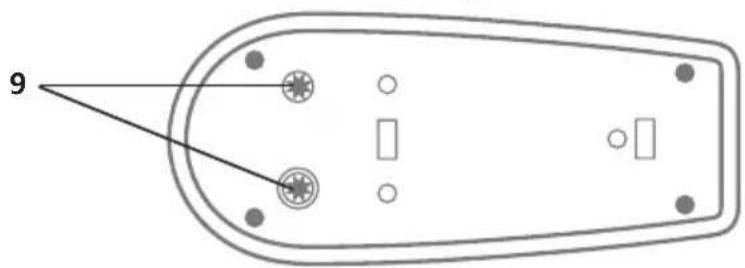
text_image
9BEDIENUNG
VOR DEM ERSTEN GEBRAUCH
natural_image
Technical illustration of two mechanical components with labeled parts (no text or symbols present)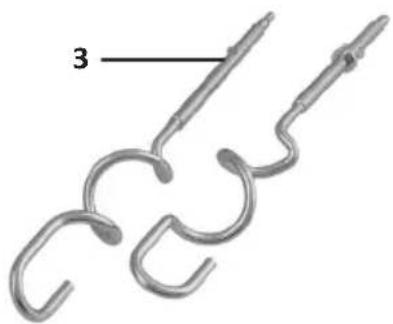
natural_image
Illustration of two metal hookages with a numbered label '3' pointing to one end (no text or symbols on the hookages themselves)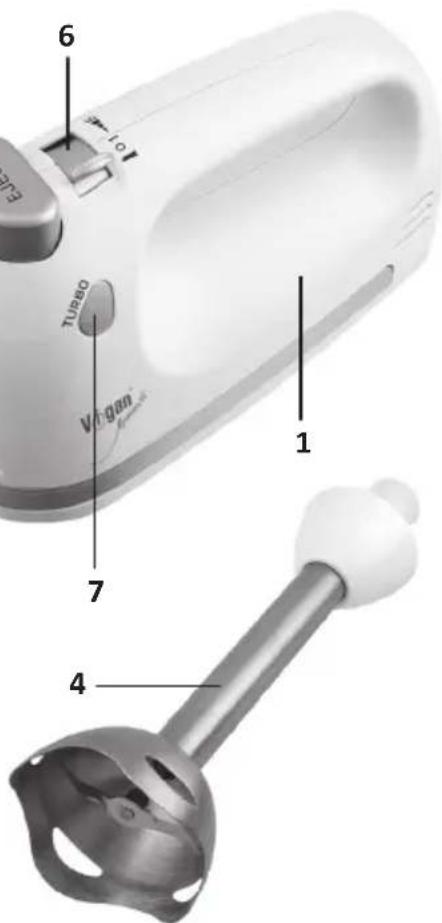
text_image
ELU 10 L TURBO Výban 1 7 4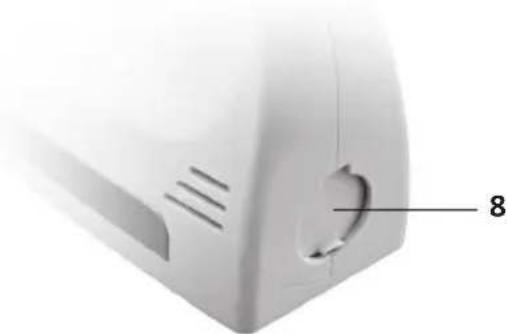
natural_image
Close-up of a white electronic device casing with ventilation slots and a labeled part '8' (no text or symbols beyond the number)