Z6V1 - Beard trimmer Vigan Mammoth - Free user manual and instructions
Find the device manual for free Z6V1 Vigan Mammoth in PDF.


User questions about Z6V1 Vigan Mammoth
0 question about this device. Answer the ones you know or ask your own.
Ask a new question about this device
Download the instructions for your Beard trimmer in PDF format for free! Find your manual Z6V1 - Vigan Mammoth and take your electronic device back in hand. On this page are published all the documents necessary for the use of your device. Z6V1 by Vigan Mammoth.
USER MANUAL Z6V1 Vigan Mammoth
text_image
Vigan® Mammoth V.1 gantext_image
Technical diagram showing various hair tools and accessories with numbered labels for identification.BEZPEČNOSTNÍ UPOZORNĚNÍ

natural_image
Line drawing of a mechanical device with a spring and housing (no text or symbols)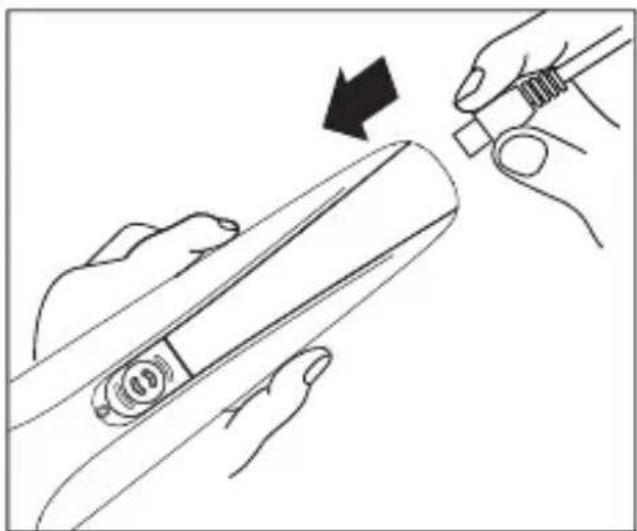
natural_image
Line drawing of hands using a tool to adjust or install a device, with an arrow indicating the process (no text or symbols present)natural_image
Line drawing of a man's face with short hair and beard, wearing a collared shirt (no text or symbols)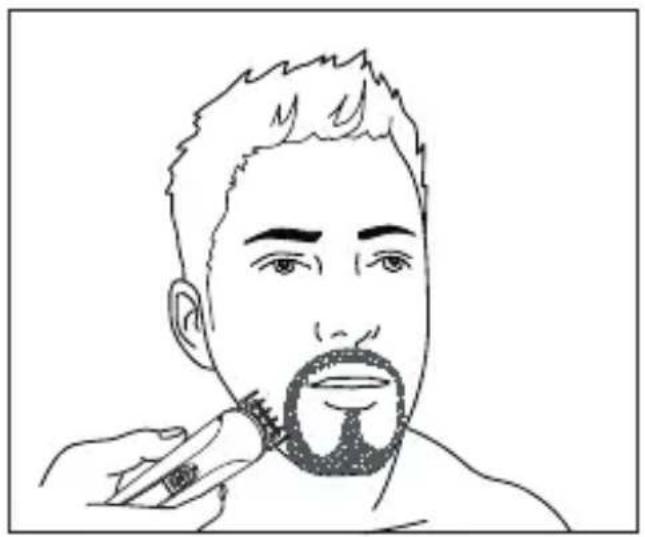
natural_image
Line drawing of a person applying a toothbrush to their beaded mouth (no text or symbols)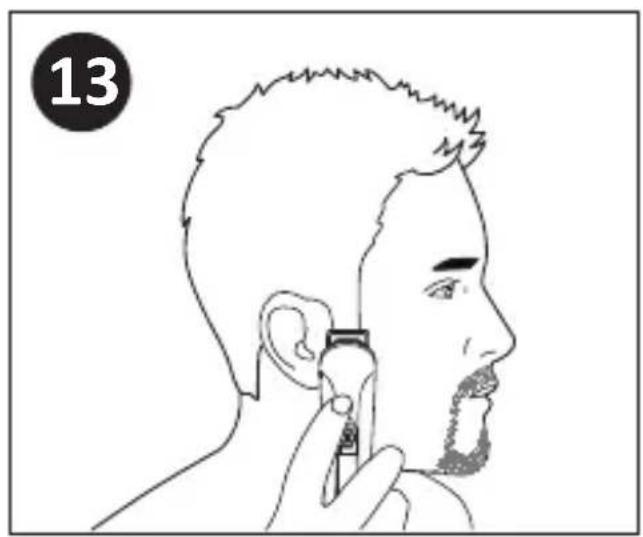
natural_image
Line drawing of a person applying a toothpaste to their ear (no text or symbols)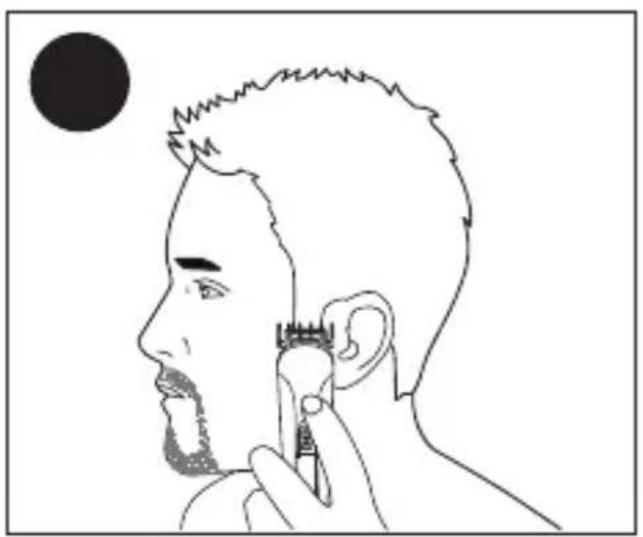
natural_image
Line drawing of a person's profile with a hand using a tool near their ear, no text or symbols present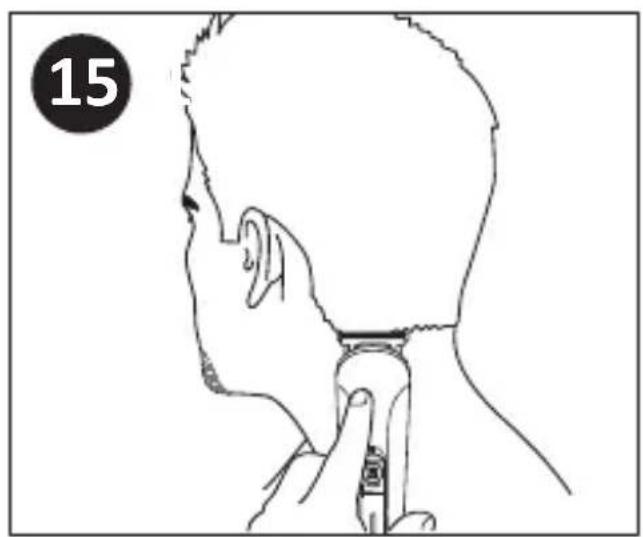
natural_image
Line drawing of a person's head and neck with a tool inserted, no text or symbols present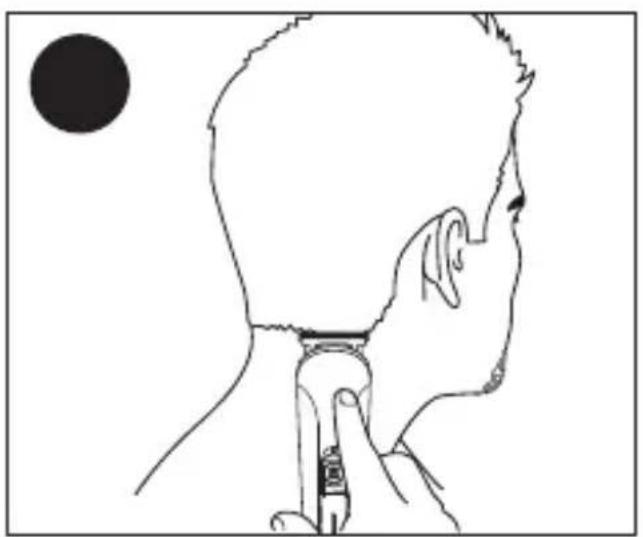
natural_image
Line drawing of a person's head and neck with a finger pointing to the ear, against a black circular background (no text or symbols)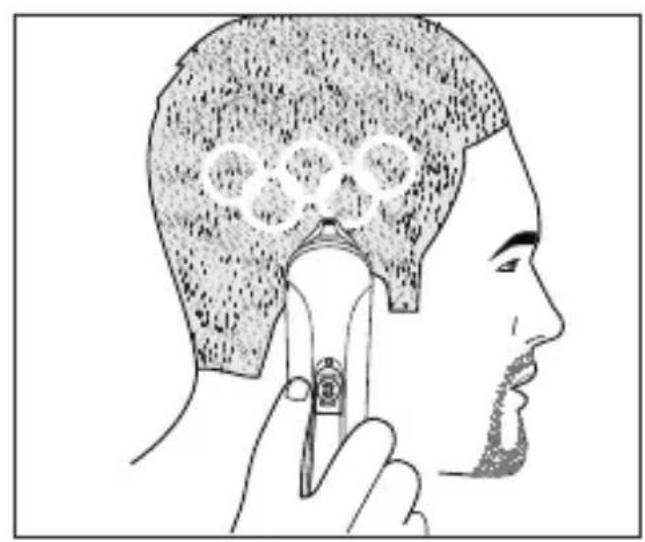
natural_image
Illustration of a person applying hair to their neck, showing a tool and magnified circular objects (no text or symbols)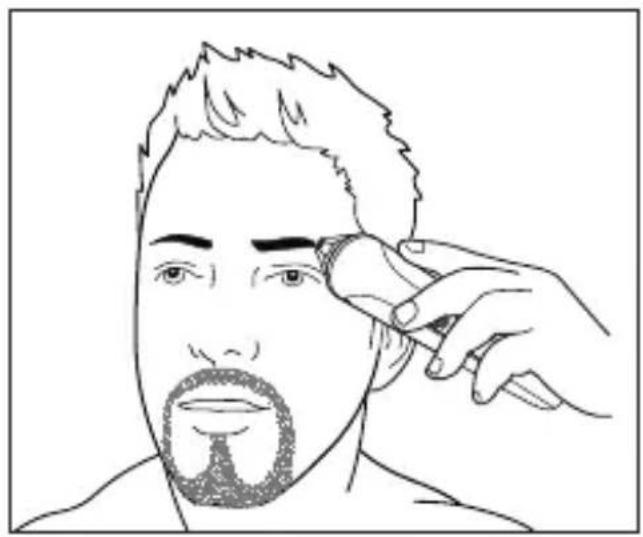
natural_image
Line drawing of a person applying makeup to their face, no text or symbols present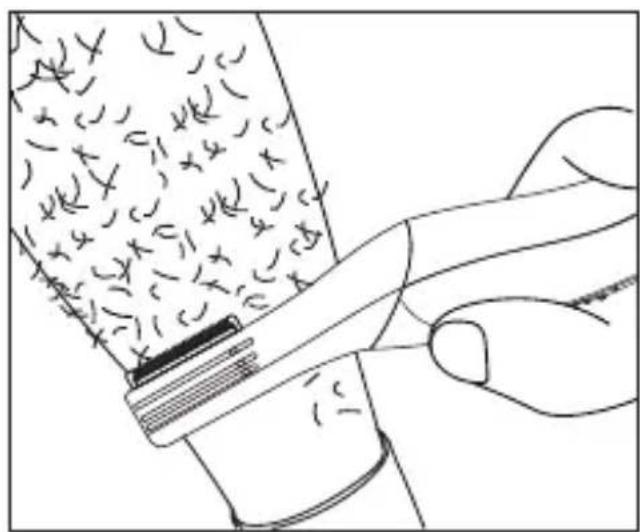
natural_image
Illustration of a hand using a tool to remove or brush into a container with scattered handwritten marks (no text or symbols present)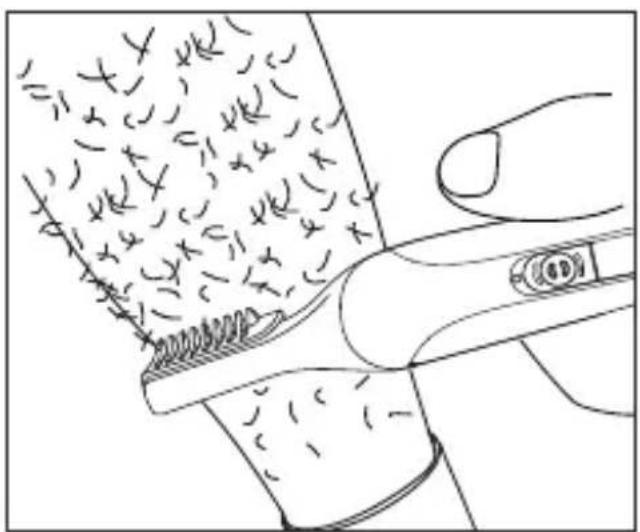
natural_image
Line drawing of a hand holding a tool interacting with a textured surface (no text or symbols)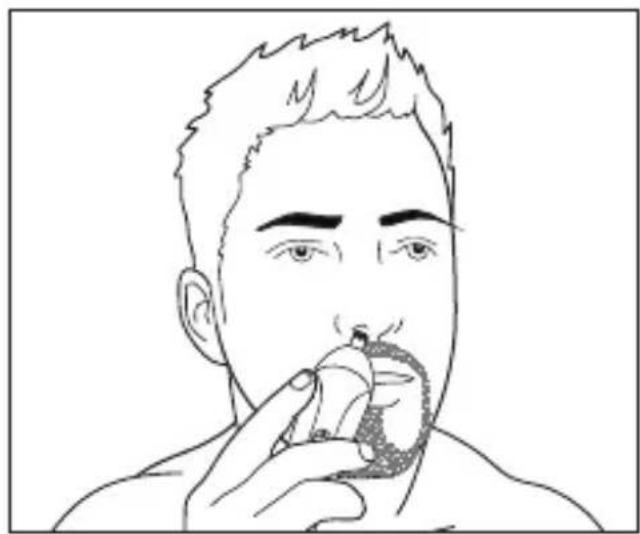
natural_image
Line drawing of a person holding a small object near their mouth (no text or symbols)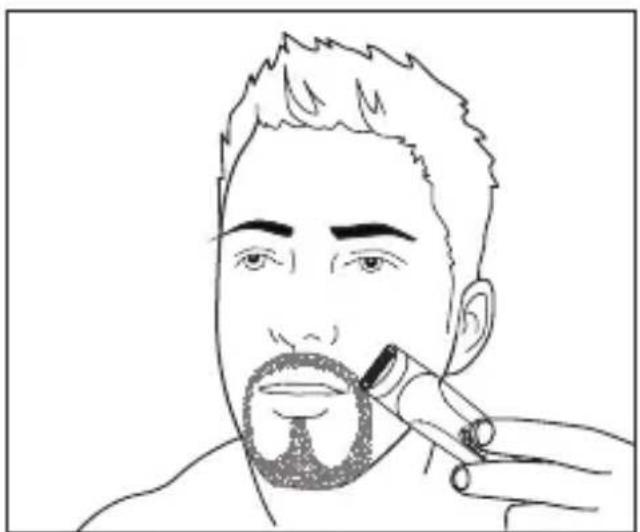
natural_image
Line drawing of a person applying makeup to their beak, with no text or symbols presentÚDRŽBA, ČIŠTĚNÍ
natural_image
Illustration of hands assembling a mechanical component with a tool (no text or symbols visible)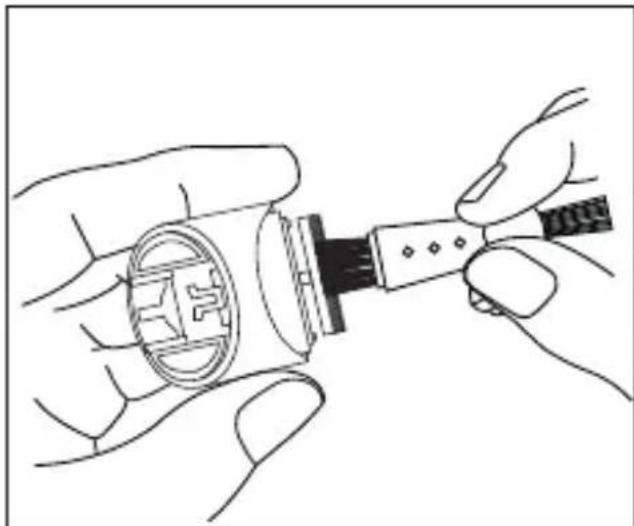
natural_image
Line drawing of hands assembling a mechanical component with a circular base (no text or symbols)TECHNICKÁ SPECIFIKACE
text_image
Technical diagram showing various hair styling tools and their exploded view with numbered labelsBEZPEČNOSTNÉ UPOZORNENIE

natural_image
Line drawing of a mechanical device with a spring attached (no text or symbols)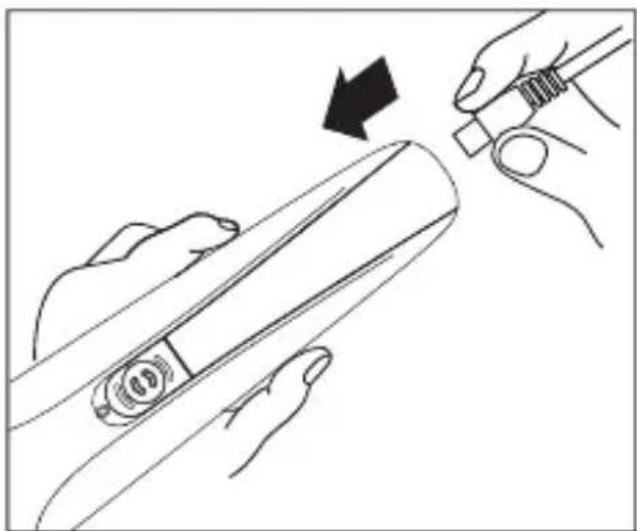
natural_image
Line drawing of hands using a tool to adjust or install a device, with an arrow indicating the process (no text or symbols present)natural_image
Line drawing of a man's face with short hair and beard, wearing a collared shirt (no text or symbols)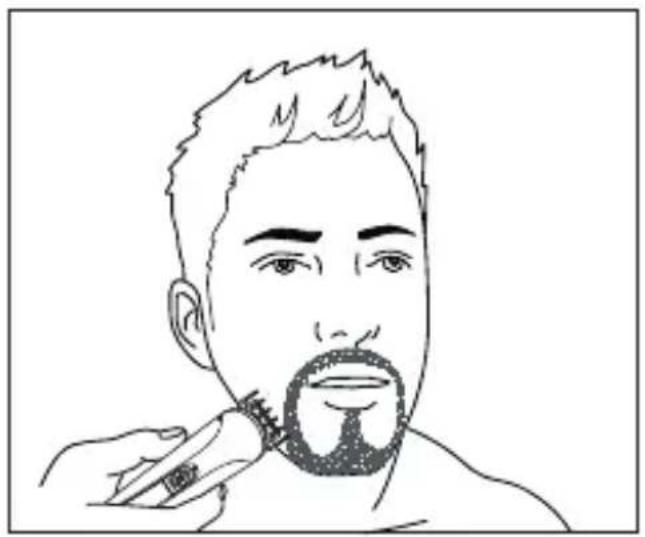
natural_image
Line drawing of a person applying a toothbrush to their beaded mouth (no text or symbols)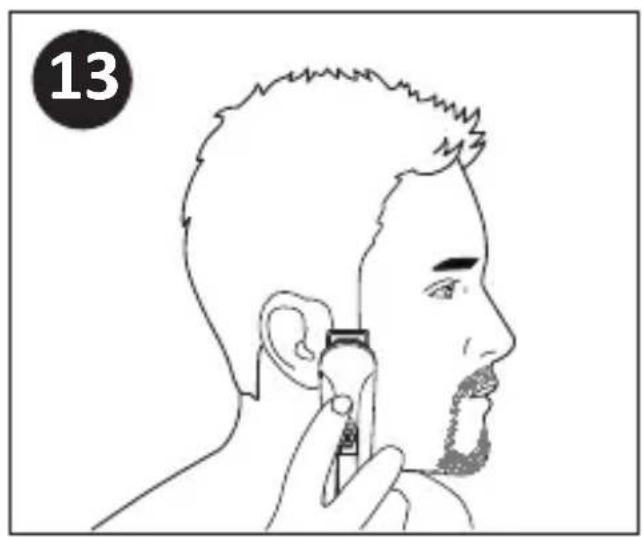
natural_image
Line drawing of a person applying a product to their ear (no text or symbols)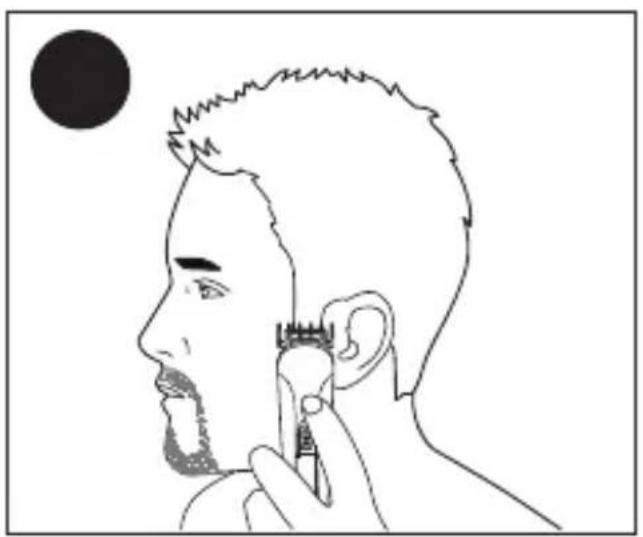
natural_image
Line drawing of a person's profile with a hand using a tool near the ear, no text or symbols present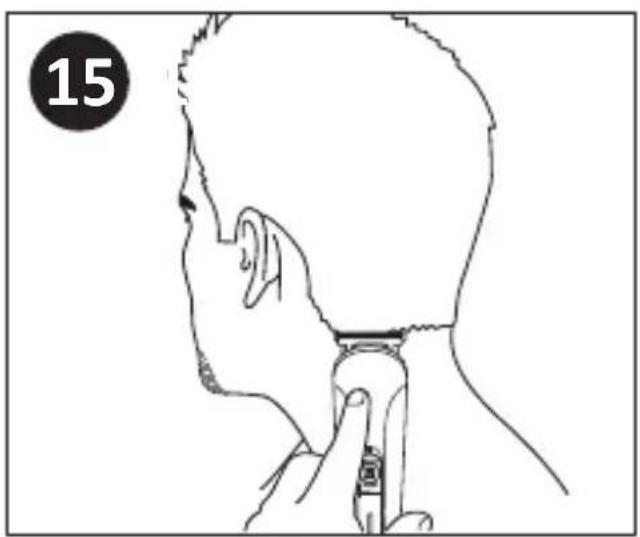
natural_image
Line drawing of a person's head and neck with a handheld device, no text or symbols present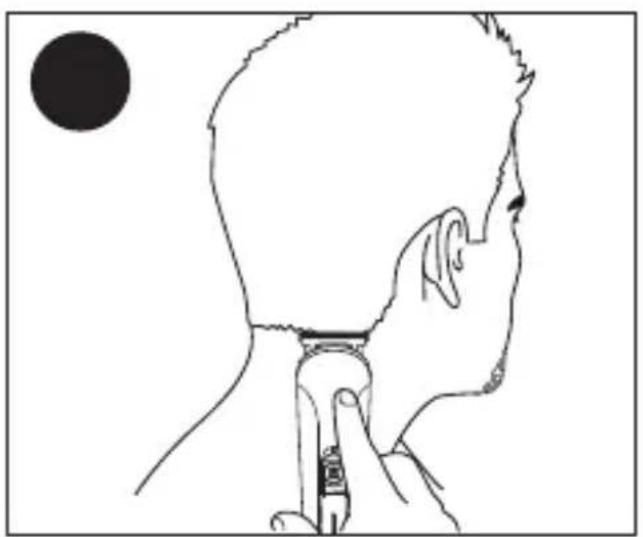
natural_image
Line drawing of a person's head and neck with a finger pointing to the ear, against a plain background (no text or symbols)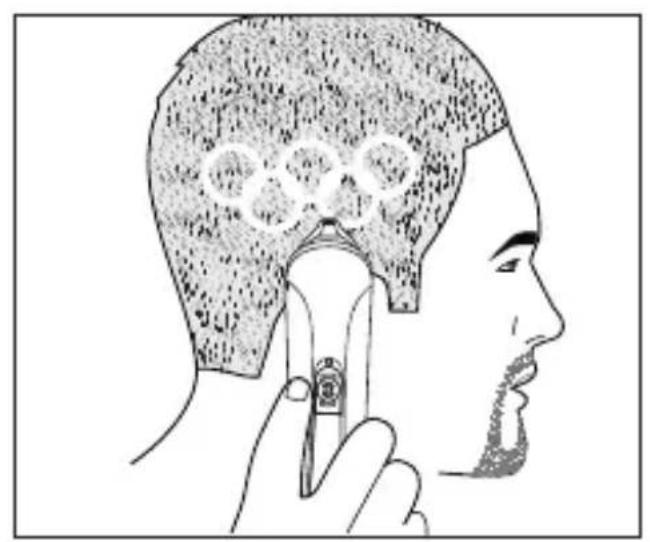
natural_image
Side profile illustration of a person using a tool to apply hair or hair product, with no visible text or symbols.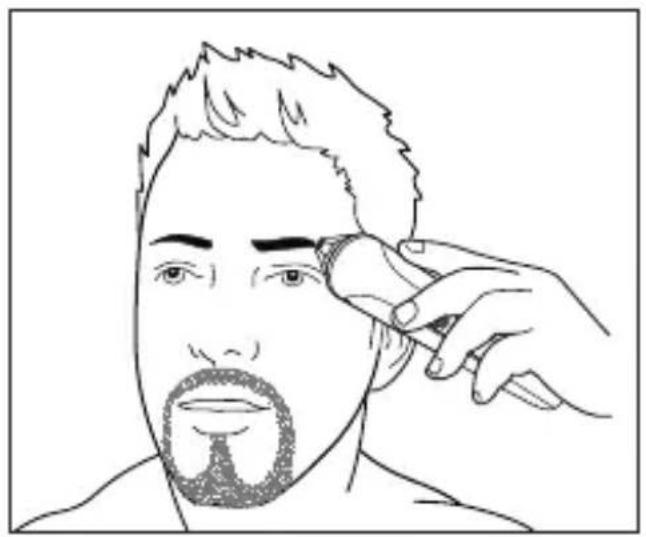
natural_image
Line drawing of a person applying makeup to their face, with no text or symbols present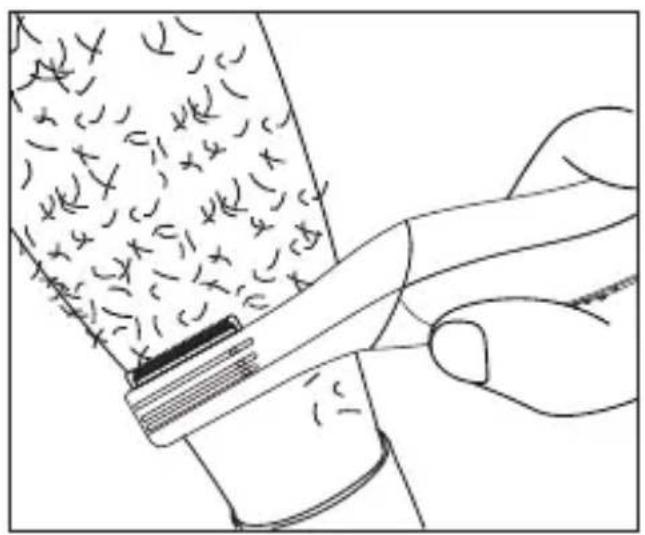
natural_image
Illustration of a hand using a tool to remove chromosome (no text or symbols present)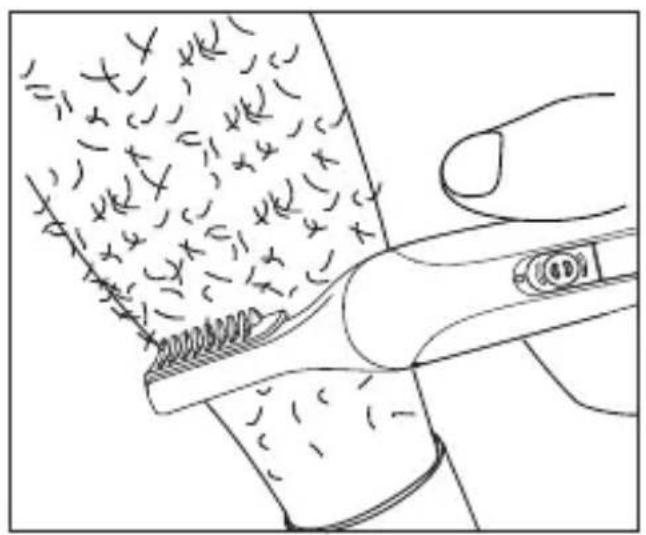
natural_image
Line drawing of a hand holding a tool interacting with a textured surface (no text or symbols)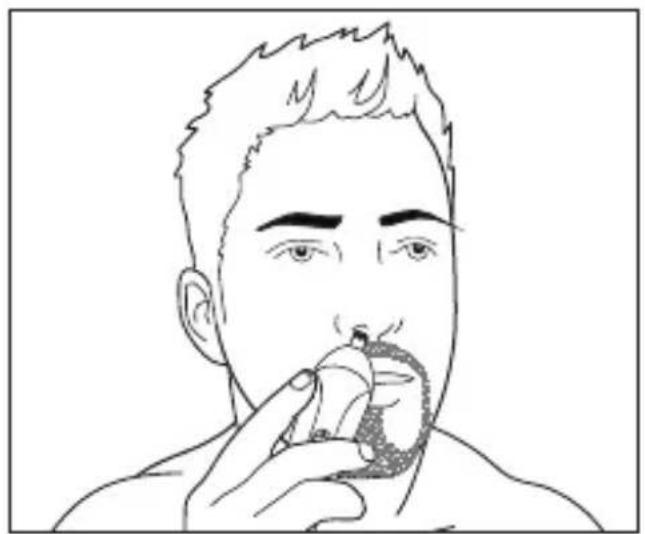
natural_image
Line drawing of a person holding a small object near their mouth (no text or symbols)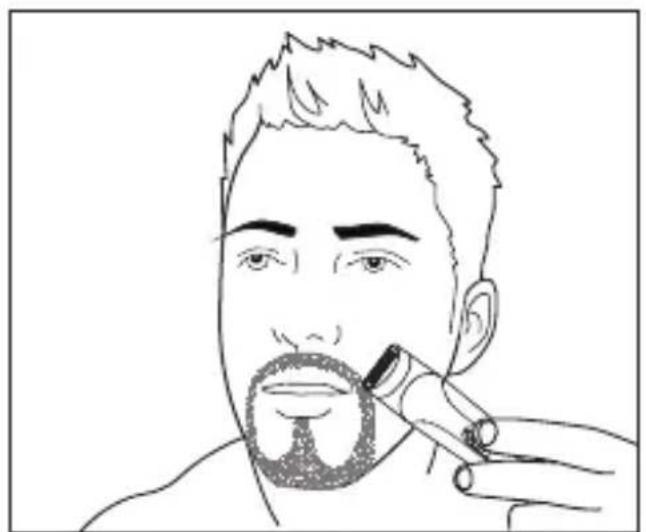
natural_image
Line drawing of a person applying a toothbrush to their beak (no text or symbols)ÚDRŽBA, ČISTENIE
natural_image
Illustration of hands assembling a mechanical component with a circular base and cable (no text or symbols)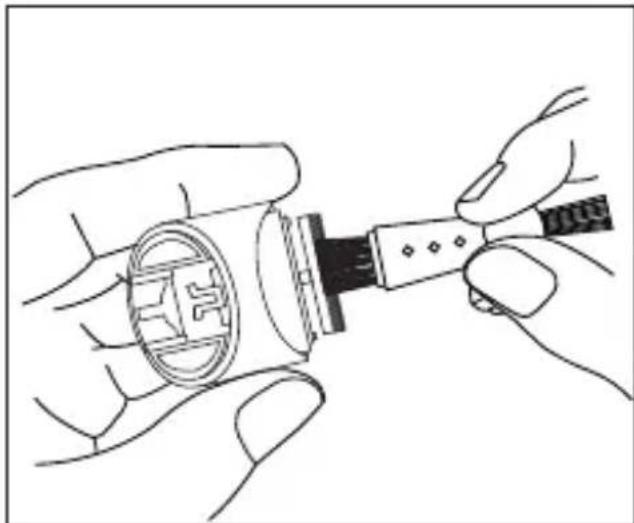
natural_image
Line drawing of hands assembling a mechanical component with a circular base (no text or symbols)TECHNICKÁ ŠPECIFIKÁCIA
Hair and beard trimmer
Vigan Mammoth Z6V1 6v1
Dear customer,
we would like to thank you for buying Vigan Z6V1. This device is designed to meet the highest standards of quality, functionality and design. Hair trimmer Vigan Z6V1 is ideal helper for perfect home care of your hair and beard. Z6V1 perfectly trims, cuts and details the contours of your hair. Keep this instruction manual for later use. We also recommend to keep the original packaging and receipt.
DEVICE AND ACCESSORIES DESCRIPTION
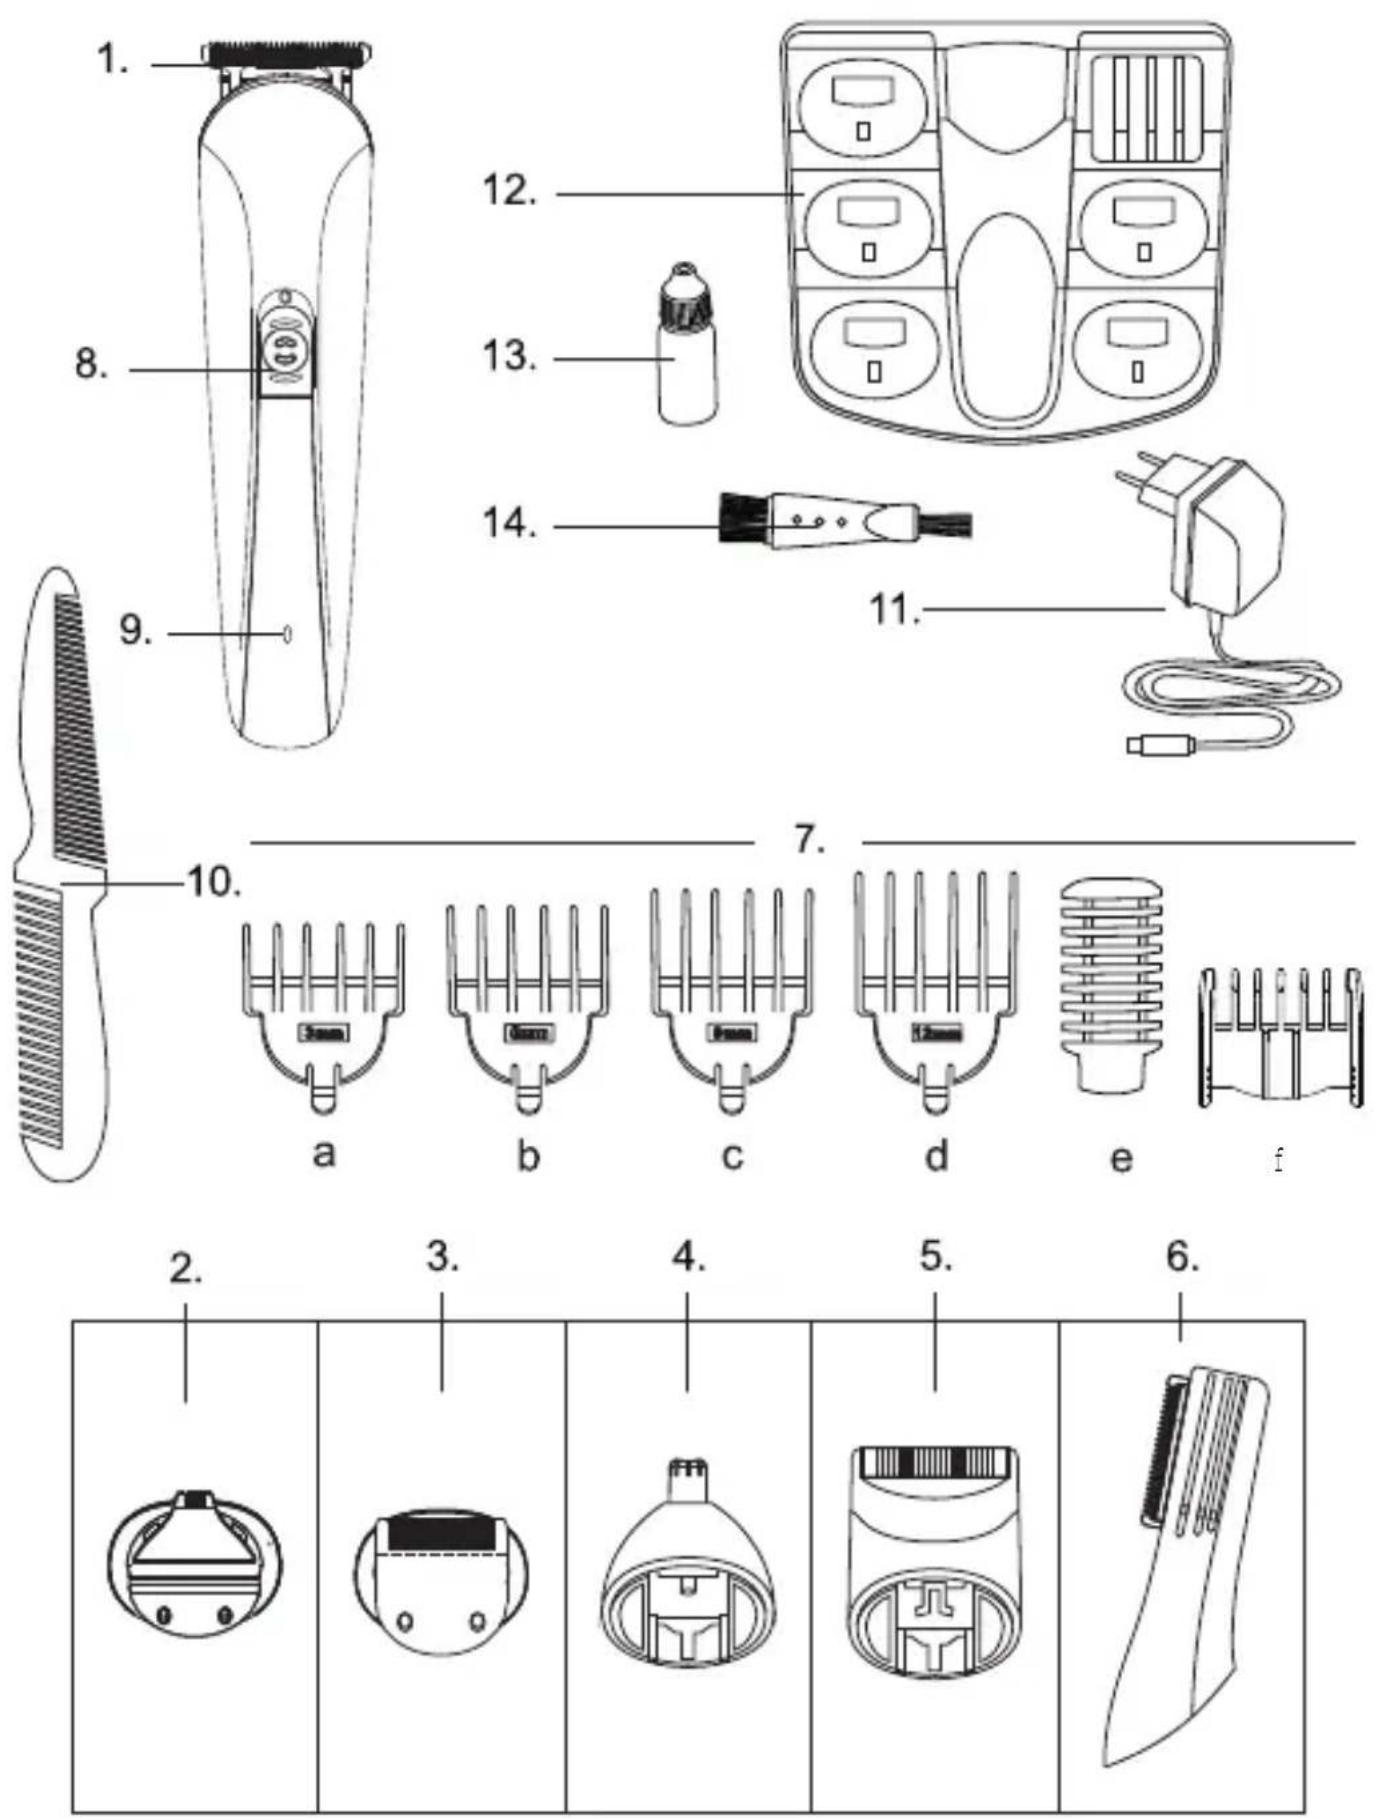
- Full size trimmer
- Design trimmer
- Narrow trimmer
- Ear and nose trimmer
- Shaver
- Body trimmer
- Guide comb
a) Guide comb 3 mm
b) Guide comb 6 mm
c) Guide comb 9 mm
d) Guide comb 12 mm
e) Guide comb for body trimmer
f) Adjustable guide comb 4-5,5 mm
-
On/off button
-
LED charging indication
-
Comb
-
Charging adapter DC 100-240V 50/60Hz, 0,2A
-
Stand rack for trimmer and accessories
-
Lubricating oil for blades
-
Cleaning brush
text_image
Technical diagram showing various hair styling tools and their exploded view with numbered labelsSAFETY INSTRUCTIONS

While using this device, always obey following instructions:
- Manufacturer (importer) is not responsible for any damages/ injuries caused by inappropriate usage of the device. The warranty expires if the user does not follow the safety instructions mentioned in this instruction manual.
- After unpacking the device, remove all the packaging material (it must not be handled by children, there is a risk of suffocation). Don’t use the plastic bags nearby cradles, strollers etc. The plastic bag (and every other packaging material) is not a toy!
- The device is designed for home use only. It is not suitable for commercial use.
- Never manipulate with the device/ adapter with wet hands
- Don't leave the device unattended
- Never immerse the device/ adaptor into the water! Do not clean with running water.
- Store the device in dry place.
- This device can be used by children 8 years of age or older and persons with reduced physical, sensory or mental capabilities or lack of experience and knowledge, if they are properly instructed and supervised about safe and proper use of the equipment.
- Before plugging the adapter into the electric socket, make sure that the voltage on the adapter is the same as the voltage in your electrical grid. If these values differ, do not use the adaptor and return the device to seller.
- Before switching the accessories, cleaning, maintenance etc. make sure that the device is turned off!
- If the charging cable is damaged, it has to be replaced by the manufacturer or authorized after sale service. Never change the cable/disassemble the device at home!
- Do not use the device if it is damaged/ doesn't work properly/ if you dropped it into the water/ to the ground or if the adaptor is damaged. In these cases, hand the device over to authorized after sale service.
- For perfect protection, we recommend to install current protector (RCD) with current less than 30 mA into your electrical grid. We strongly recommend to consult with the professional/ revision technician before installing.
- The device and the adaptor must not be used in places where it could get in contact with water (bath, sink, pool, etc.). If you drop device into the water, do not try to pull it out. First of all, disconnect the adaptor from the electric socket and then remove it from the water. In such case, do not use the device! Hand it over to professional after sale service.
- The adaptor delivered with this device is designed for this device only. Do not use it with other products
- Use the device only with the original accessories! Never use the broken accessories.
- In case of breakdown/ blockage of the cutting razor, turn off the device immediately and fix the problem.
• Before every usage, make sure that the device and accessories are not broken.
- Do not disassemble the device by yourself! Always contact the professional after sale service.
- Keep the included lubricating oil out of reach of children and incompetent persons. This oil is intended only for lubricating the blades of trimmer. If ingested, search for medical help.
- Don't use the trimmer if the blades are damaged! (visible cracks, holes or other deformations)
- The body of the device can heat up during charging. This is a normal state
- Always charge the device in ambient room temperature (The temperature must not be lower than 10^ and higher than 40^ ). Never charge/ leave the adapter and device exposed to sunlight. Also, never leave/ charge the device nearby heat sources
- Do not place the trimmer on/ near heat sources (fireplace, stove, heater etc.)
- If the device was stored in place with lower temperature, leave it in place with ambient temperature for couple of minutes before usage. It will eliminate the solidification of the oil in the bearings and extend the life of the plastic parts.
- Never throw the device into the fire. There is a risk of explosion!
- Never expose the device to temperature higher than 50^ .
- Do not push in the device or accessories into any of your body parts. The only exception is the usage of the ears and nose attachment. Never insert the ears and nose attachment deeper than 0,6 cm into your nose/ ears.
- It is forbidden to use the trimmer during bathing, showering, sauna.
Do not use on wet/ artificial hair. - Never use for trimming pets.
- Never lay the trimmer on soft surfaces (for example towels, carpets etc.).
You will prevent the damages to mentioned items or the device - Make sure that the cable from the adapter doesn't hang slanted from the edge of the table/ sink etc. Make sure that the device cannot be reached by children!
- The charging cable must not be damaged by sharp/ hot items, open fire, it must not immerse into the water or bend over the sharp edges. Make sure that the cable is not bent when stored. The cable might get broken.
- If you need to use the extension cord, make sure that it is not broken and complies with technical standards.
- Turn off the trimmer after the usage and let it cool down. If you are not using the trimmer, store it in dry place out of reach of children and incompetent persons.
- This device has built-in batteries. Do not remove them from the device!
They can be removed only when the trimmer is intended for disposal.
INSTRUCTIONS
It is highly recommended to fully charge the device before the first use. The operating time depends on chosen type of trimmer and style of trimming. It is usually 90 - 120 minutes.
Charging
- Before first usage/ if you haven't used device for the long time, you have to fully charge the device. Capacity and the performance of the battery will be at its best if you will charge the device after complete discharge.
a) Charging outside recommended range of temperature (+10°C; +40°C) has negative impact on the battery life.
b) Frequent charging of the trimmer lowers the battery life.
-
Make sure that the trimmer is turned off.
-
Plug in the adaptor into the adequate electric socket. Always use only original adapter.
-
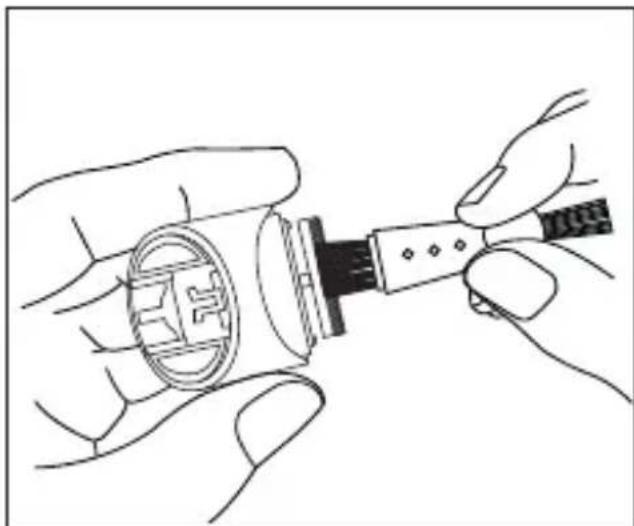
Plug in the connector into the device socket placed in the lower part of the trimmer.
-
It is highly recommended to charge the device for 8 hours when charging for the very first time. Every other charging should take around 2 hours.
-
There is a red charging indicator which shines during the charging. When the device is fully charged, the indicator will turn green.
-
After the charging disconnect the cable from the device and afterwards, unplug the adapter from electric socket.
-
This device has a cord operation function. It means that it can be operated while charging. We recommend to use this function as little as possible.
-
Don't leave the cable connected to device when not charging.
-
In order to maintain the long life of battery, it is recommended to fully discharge the battery every 6 months.
Note: The body of the device can heat up during charging. This is a normal state
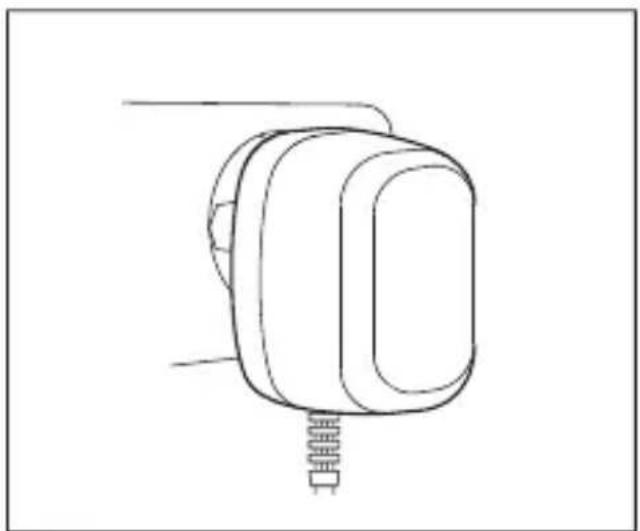
natural_image
Line drawing of a mechanical device with a spring attached (no text or symbols)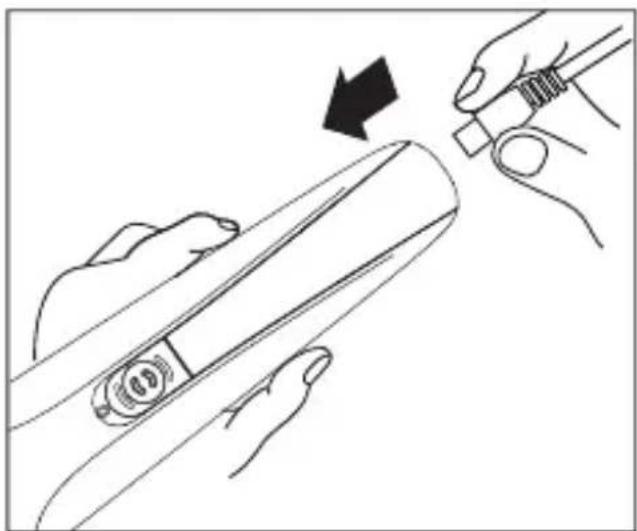
natural_image
Line drawing of hands using a tool to adjust or install a device, showing a black arrow indicating the process (no text or symbols present)Preparation
Chose one of the six attachments for desired purpose and install it according to pictures below.
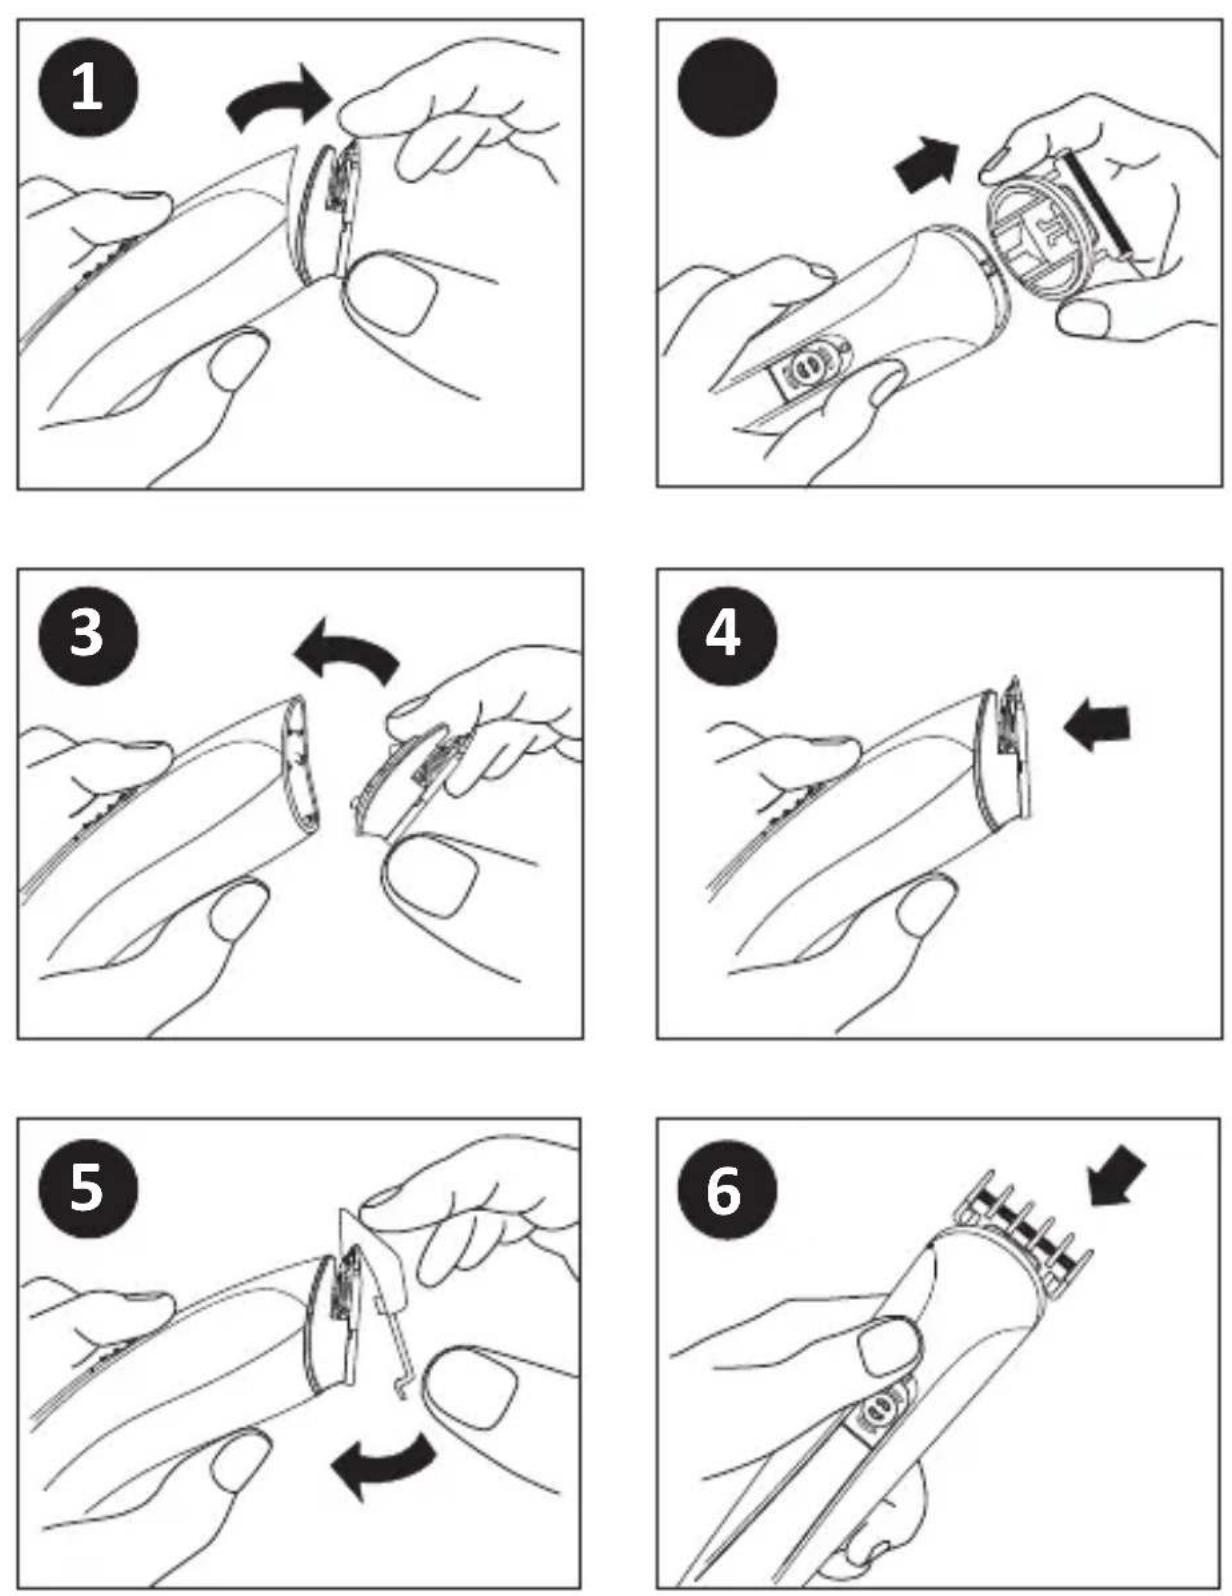
Preparation
Chose one of the six attachments for desired purpose and install it according to pictures below.
When changing the attachments, first place the attachments edge to the trimmer (picture 3), and then slightly push the attachment towards the trimmer until it locks (clicks) (picture 3-4). For attachment removal, follow the pictures 1-2.
When installing the guide comb, place it on the trimmer head and push it evenly to the back until it locks (picture 5-6).
The package contains 4 guide combs with different lengths - 3, 6, 9 and 12 mm.
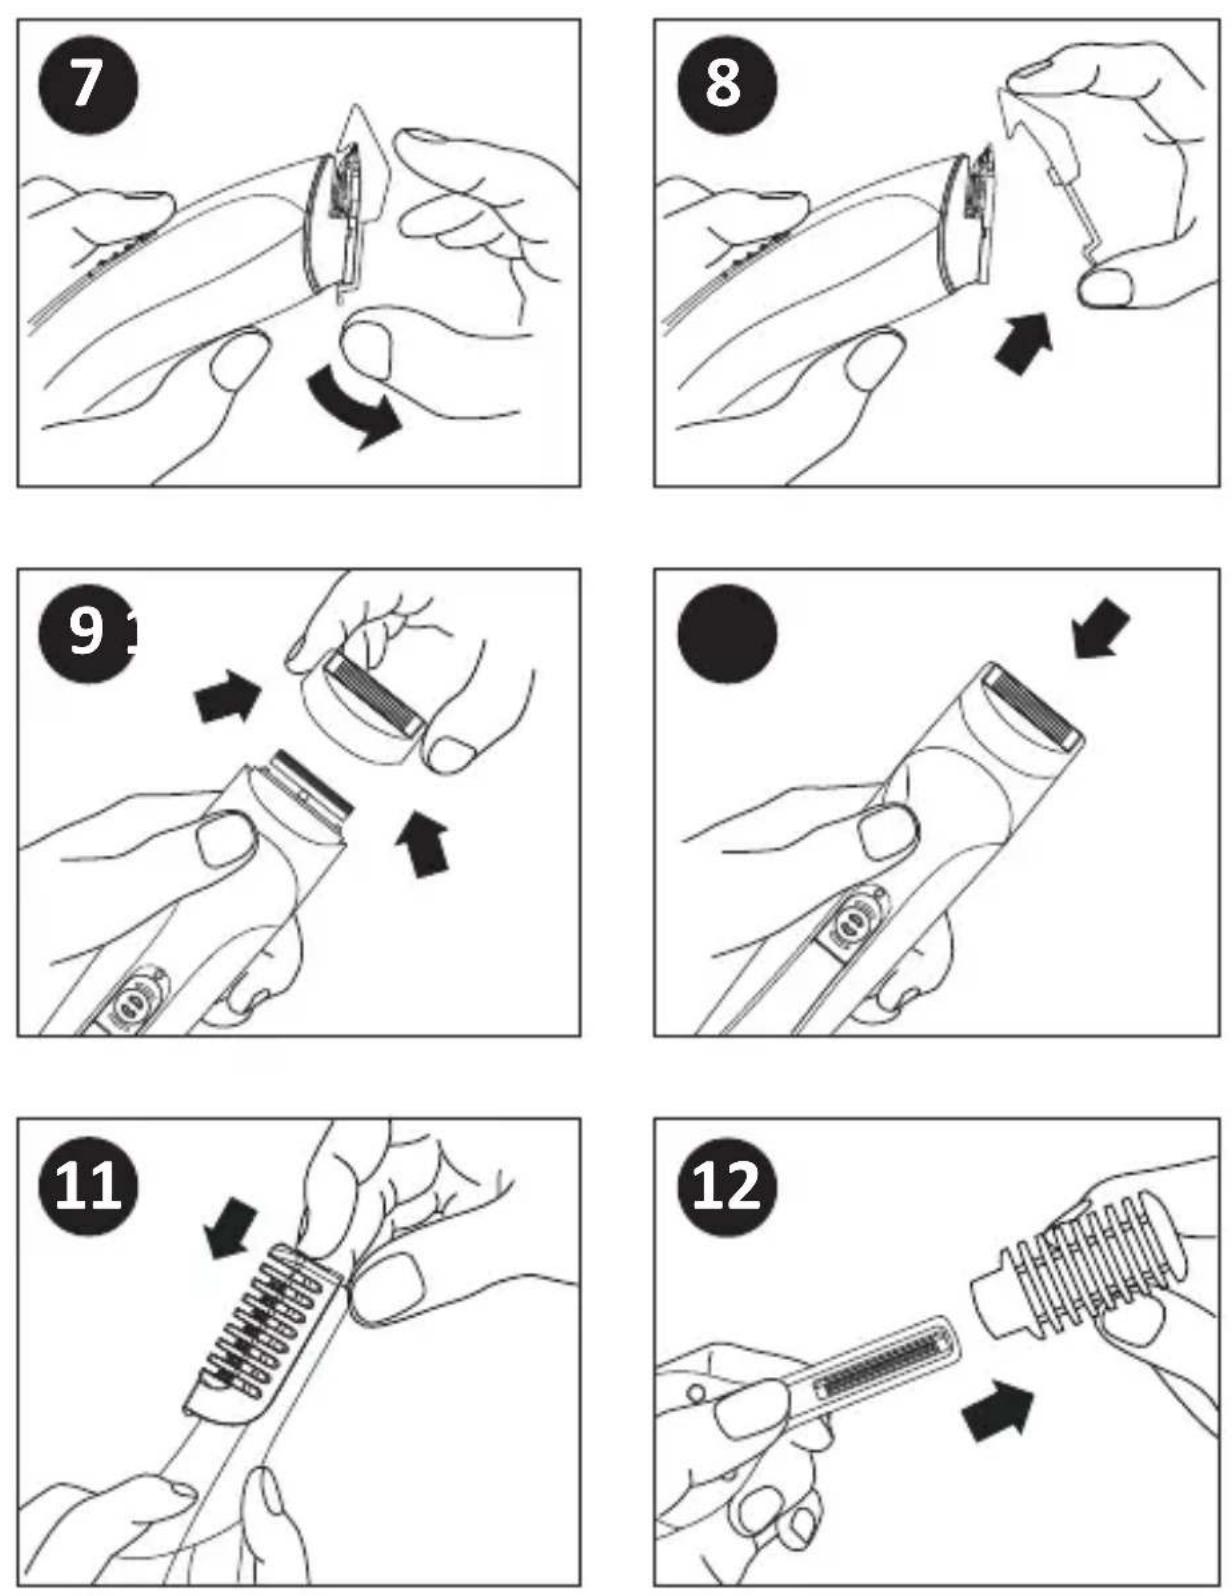
When removing the guide comb, unlock the comb by lifting the lever in the back of the comb (picture 7-8).
Install the shaver by pushing both sides of the attachment and placing it to trimmer – when removing, do the exact opposite (pictures 9-10).
Adjustable guide comb – slide the comb on the trimmer head (picture 13) and set desired length of the cut. This comb has 4 different positions:
| Level Lenght (mm) | |
| 1 4 | |
| 2 4,5 | |
| 3 | 5 |
| 4 5,5 |
Body trimmer is designed for shaving various body parts. Install it according to picture 11. The body trimmer can be used with the adjustable comb, which can be simply slid to the Body trimmer. Choose the desired by length by placing the comb into one of the grooves. (picture 12)
| Level Lenght (mm) | |
| 1 2,8 | |
| 2 5,5 | |
| 3 9,8 |
INSTRUCTIONS
General instructions and recommendations:
This device can be operated both cord and cordless.
CAUTION!
If the device gets blocked during the operation, turn the device off immediately and fix the problem.
The hair trimmer turns on/off by the button (number 8). Before turning the device on, make sure that all the attachments/combs are properly installed and the trimmer is ready to use. It is highly recommended to lubricate the blades before first use.
The trimmer is designed for cutting dry hair. We do not recommend cutting wet/washed hair.
Before trimming your hair, we recommend to comb your hair in the direction of growth.
The best trimming results will be achieved by moving the device slowly against the direction of hair growth.
Trimming with guide combs
The set includes 4 guide combs with different cut lengths.
1) Choose one of two trimming heads and make sure that it is properly installed.
2) Pick one of the guide combs and install it. Then you can turn the trimmer on.
Remark: The small trimming head can be used with the adjustable guide comb (f).
The length can be adjusted from 4 - 5,5 mm.
3) We recommend to start the trimming with guide comb that has longer cut in order to avoid cutting the hair too short. When you get familiar with the device, you can pick directly the comb that you already know.
4) Make sure that the comb is during the trimming in contact with your scalp. This method will provide best results.
5) For reaching the best results move the trimmer slowly over your head.
6) Move the trimmer against the hair growth direction.
7) Make sure that you trim every spot at least once.
8) When the trimming is done, turn of the hair trimmer and remove the guide comb.
Clean the rest of the hair from the trimmer by blowing or brushing.
Usage of the trimming head without the guide comb
Pick suitable size of trimming head (no.1 or no.3). For detailing, you can use the trimming head no.2.
1) Install suitable trimming head without the guide comb. Be very careful during trimming without the comb, the trimmer will cut every hair that gets into the contact with.
2) When trimming the ear contours, tilt the trimmer so only on side of gets into the contact with hairline.
3) When trimming the neck, turn the trimmer upside down (picture 15-16).
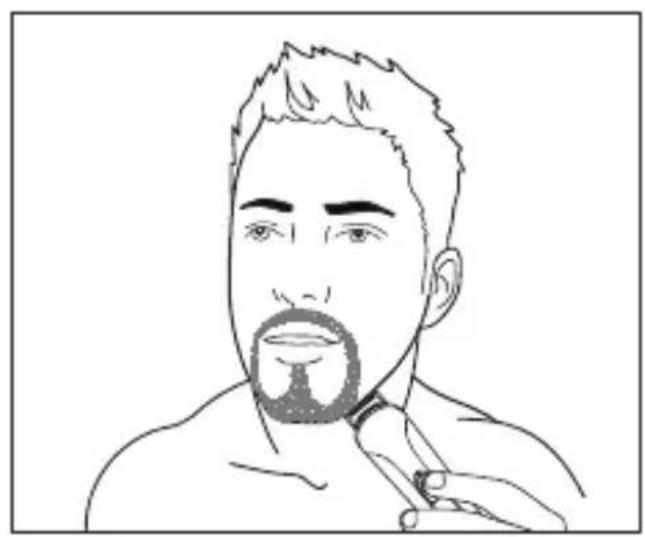
4) When trimming the beard, turn the trimmer upside down (picture 13-14).
Trimming the hair in ear and nose
Nose:
1) Make sure that the inside of your nose is clean.
2) Install the nose and ear hair trimming head (no.4).
3) Turn on the device and put the tip of the trimmer into your nose. Never put the tip into your nose deeper than 6 mm!
4) Repeat slow circle moves until you reach the desired result. The easiest and fastest way of trimming the nose hair is to copy the inner shape of your nostrils.
5) Turn off the trimmer and clean the head properly.
Ears:
1) First of all, clean your ears thoroughly.
2) Install the ear and nose hair trimmer.
3) Turn on the device and move the tip of the trimmer around your ear.
4) Carefully put the tip of the trimmer into your ear and proceed same as with the nose hair trimming. Never put the tip into your nose deeper than 6 mm!
5) Turn off the device and clean the attachment carefully.
Shaving
1) Install the shaving head (no.5).
2) Before the use, check if the shaving blade is not broken. If there are any damages, do not use it before the problem is fixed. Turn on the device and enclose the device to your skin and move slowly. Make sure that you don't push too hard.
Remark: The micro shaver is designed for shaving details/contours of your beard, mustache, neck and cheeks. It is not designed for common shaving. For safe and precise shave, use the devices designed primarily for this purpose.
Beard trimming
Choose one of the trimming heads (no.1 or no.3) according to your desired results.
1) Before trimming the beard, make sure that it is dry and combed.
2) Mark the contour line by cutting the beard from the outer line.
3) For perfect result use only one trimming head. It is recommended to cut the hair with the help of comb. It will help you to measure the length of the beard.
4) After the trimming, you can shave the adjacent beard area by shaver (no.5).
5) For details and precise forming, we recommend to use trimming head no.2.
Mustache trimming
Choose the trimming head no.1 or no.2.
1) Make sure that the mustache is dry and combed before the trimming.
2) For achieving even results, cut the ends of your mustache with the help of comb.
3) For details and precise forming, we recommend to use trimming head no.2.
Body trimming
This set includes the body hair trimmer no.6.
1) Install the body hair trimmer.
2) Choose the desired length of the cut by adjusting the comb.
3) This body trimmer is designed for removing or shortening the hair on your chest, legs etc.
natural_image
Line drawing of a man's face with short hair and beard, wearing a collared shirt (no text or symbols)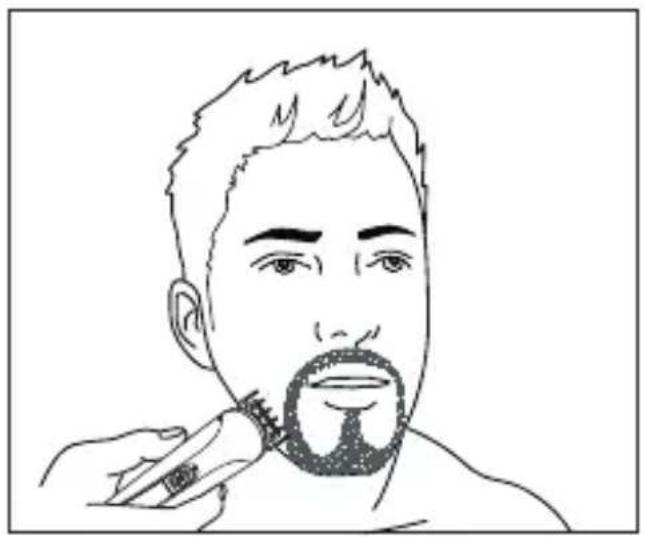
natural_image
Line drawing of a person applying a toothbrush to their beaded mouth (no text or symbols)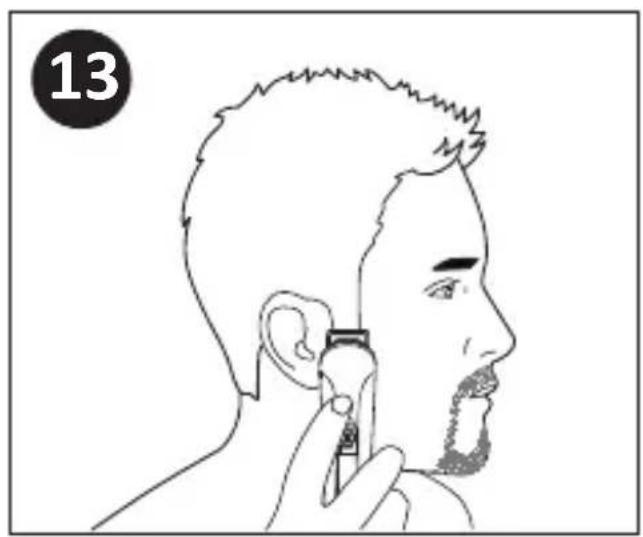
natural_image
Line drawing of a person applying a product to their ear (no text or symbols)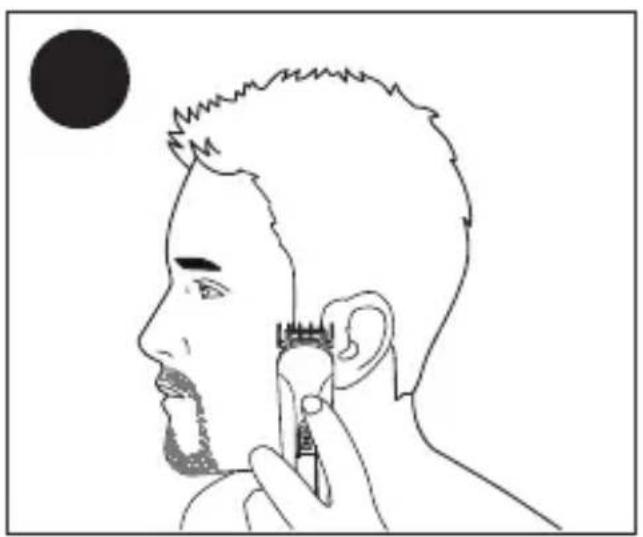
natural_image
Line drawing of a person's profile with a hairpin and beard, no text or symbols present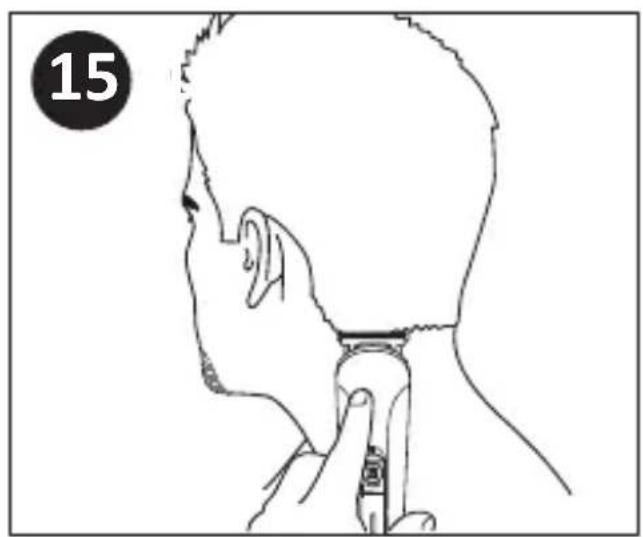
natural_image
Line drawing of a person's head and neck with a hairpin inserted, no text or symbols present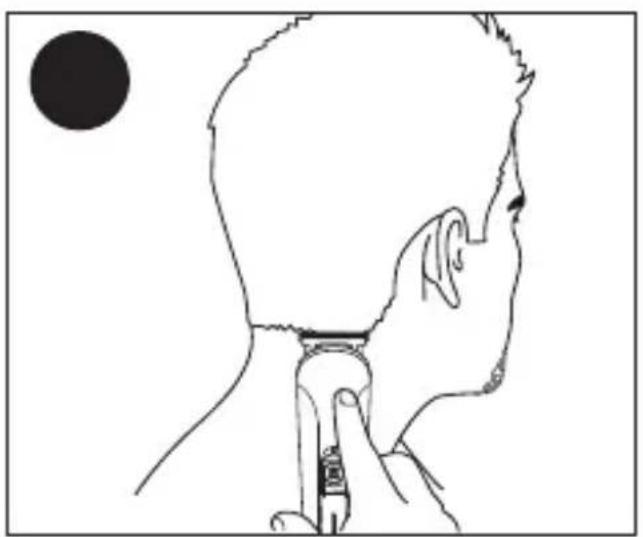
natural_image
Line drawing of a person's head and neck with a finger pointing to the ear, no text or symbols present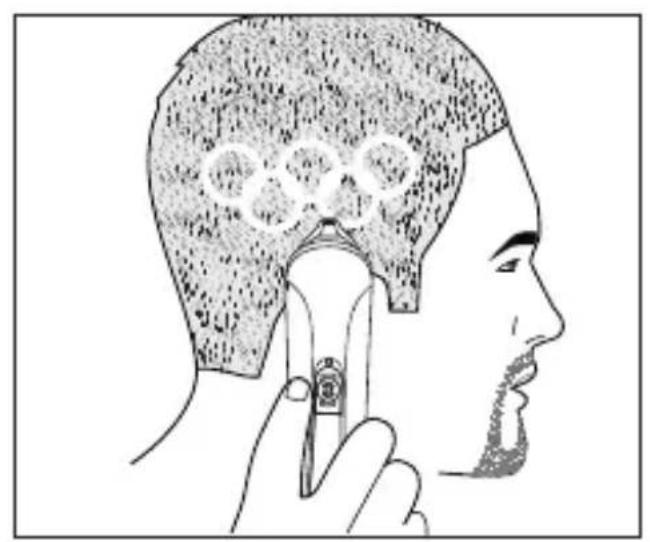
natural_image
Side profile illustration of a person using a tool to apply hair or hair product, with no visible text or symbols.
natural_image
Line drawing of a person applying makeup to their face, with no text or symbols present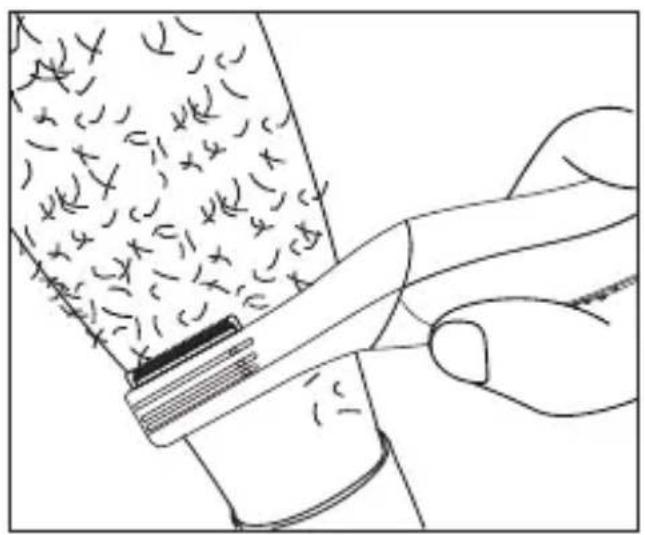
natural_image
Illustration of a hand using a tool to remove chromosome (no text or symbols present)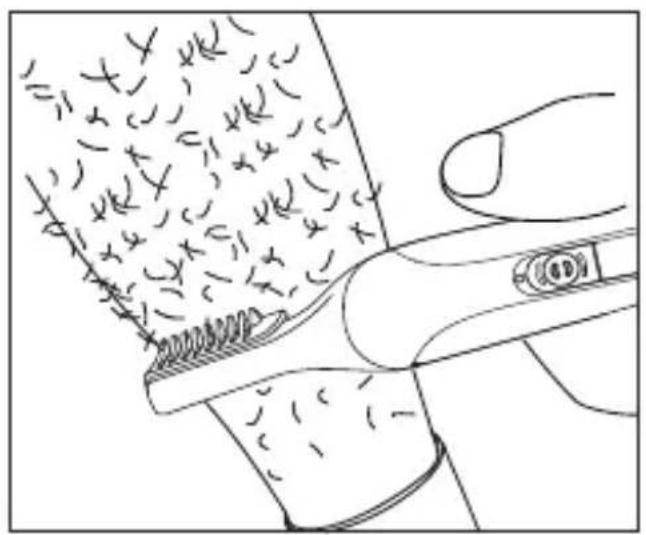
natural_image
Line drawing of a hand holding a tool interacting with a textured surface (no text or symbols)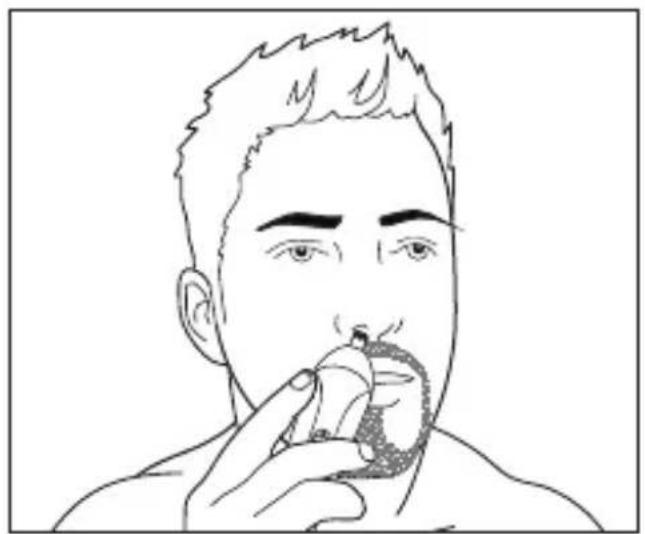
natural_image
Line drawing of a person holding a small object near their mouth, no text or symbols present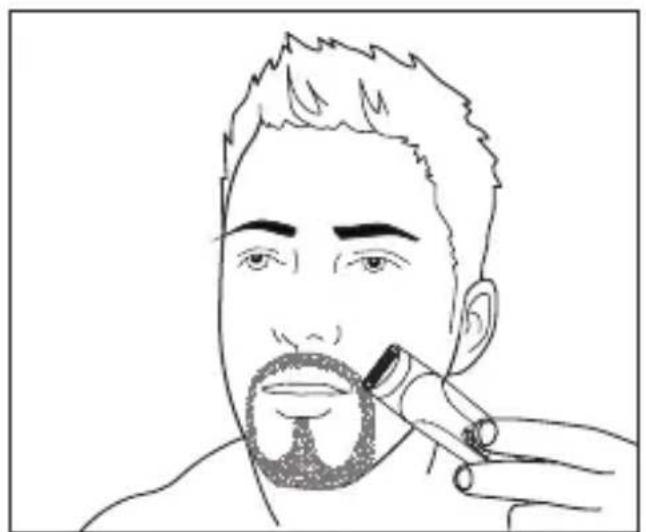
natural_image
Line drawing of a person applying a toothbrush to their beak (no text or symbols)CLEANING, MAINTENANCE
Never immerse the trimmer into the water!
Never use the scourer, abrasive cleaning products or fluid aggressive detergents (thinner, toluene etc.) for cleaning the device and it's accessories
Cleaning:
- Turn of the device and unplug the adapter from the socket.
-
Clean the blades with the brush that is contained in the package. If the trimmer is very dirty, remove the blade and clean it with running water with dishwashing detergent.
Use the soft brush for better results. Dry the blades after the cleaning and put them back into trimmer. After cleaning the blades this way, it is necessary to lubricate them with the oil. Use only the oil that is part of the package. If you run out of this oil, you can use the lubricating oil for sewing machines. -
The body of the trimmer can be wiped with the wet cloth and dried immediately. After the cleaning is completed, store the product into dry place which is out of reach of children and incompetent persons!
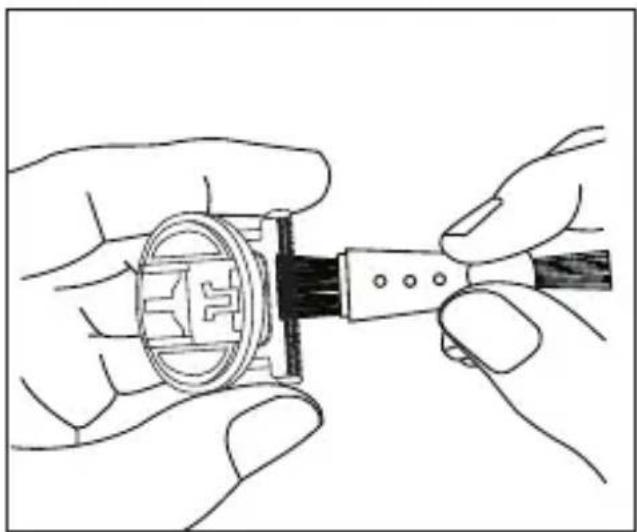
natural_image
Illustration of hands assembling a mechanical component with a tool (no text or symbols visible)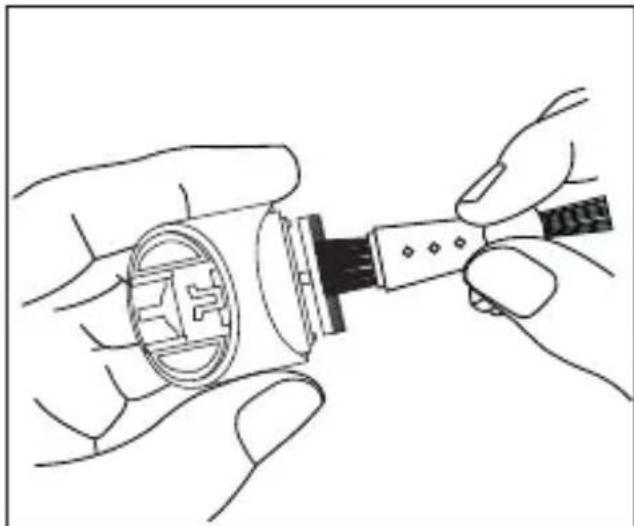
natural_image
Line drawing of hands assembling a mechanical component with a circular base (no text or symbols)SPECIFICATION
Technical parameters:
Trimmer type: hair and beard trimmer
Usage/maintenance: Home use only/non washable
Number of functions: 6
Number of hair combs: 4
Number of adjustable combs: 2
Charging: Adaptor DC 100-240V 50/60Hz, 0,2A
Battery type: Li-ion, 600mAh
Cord/ cordless function
Number of batteries: 1
Protection class III
Operating time: up to 120 minutes
Charging time: approximately 120 minutes
Dimensions NET without the attachments:
Width: 3.8 cm
Height: 15 cm
Depth: 4 cm
Package gross dimensions:
Width: 18.5 cm
Height: 25 cm
Depth: 7.5 cm
Net weight: 0.3 kg
Gross weight: 0.6 kg
Pcs in carton: 20
Any changes in technical specification or package content of optional accessories reserved by the manufacturer.
DISPOSAL OF OLD ELECTRICAL AND ELECTRONIC EQUIPMENT
This symbol on the product, its accessories, packaging or accompanying documents indicates that the product should not be treated as household waste. Please take this product to the respective collection point where will be carried out specialist recycling of electronic equipment. In the European Union and other European countries there are collection points for used electrical and electronic equipment. By ensuring proper product disposal, you prevent potential negative impact for the environment and human health, which could result from improper handling of this product. Recycling of these materials also helps to preserve natural resources. For this reason, please do not throw the old electric and electronic equipment together with household waste. For more information please contact your local authority, any service company liquidating household waste or the store where you purchased the product. Details also refer to the relevant laws about waste, in the Czech Republic no. 185/2001 Coll. as amended. Furthermore, the websites www.elektrowin.cz, www.remasystem.cz and www.asekol.cz (disposal of electrical waste). The improper disposal of this waste can be in accordance with applicable laws, regulations and fines.

WARRANTY
We offer warranty for 24 months starting from the day of purchase by you. This warranty covers defect caused by defective material or error in workmanship. It does not cover defects caused by mechanical damage, natural disaster of other inevitable events, connecting to the wrong power grid voltage, modifications or service work by non-qualified or unauthorized personal, misuse or use in contradiction to this manual.
This device is equipped with long-life Li-ion battery. The 24 months warranty doesn't include the decreasing battery capacity caused either by the use or age. The capacity decreases depending on how often and how do you use/charge the battery.
All documents about your purchase and service repairs on any product keep for at least three years to ensure quality customer service.
Please remember, that this product is only for home use, not professional use.
If you find out, that this product does not suit you, it is not a reason for a complaint.
In the case of complaint please submit receipt.
In the case of malfunction of your product, please contact the dealer, you bought it from, or service at the following address:
natural_image
Line drawing of a mechanical device with a spring attached (no text or symbols)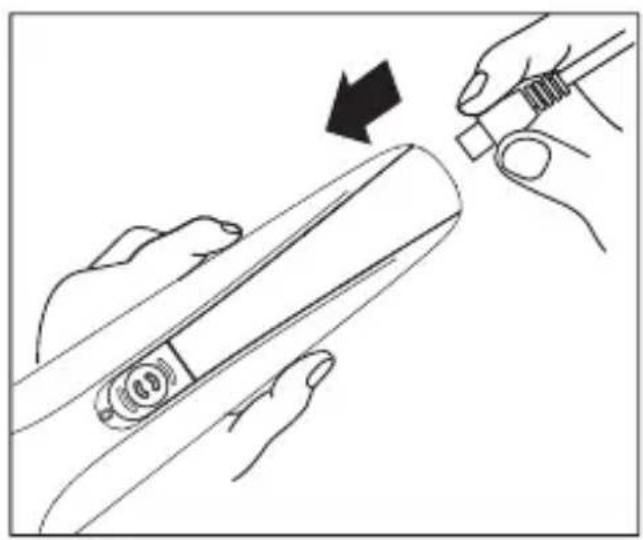
natural_image
Line drawing of hands using a tool to adjust or install a device, showing a black arrow indicating the process (no text or symbols present)natural_image
Line drawing of a man's face with short hair and beard, wearing a collared shirt and tie (no text or symbols)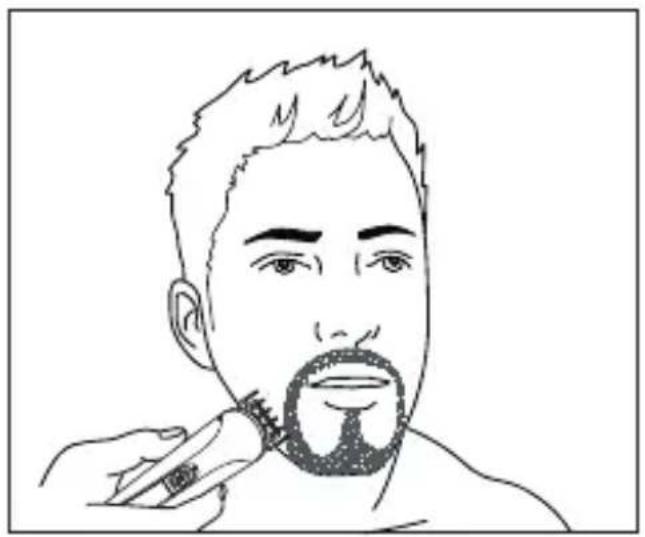
natural_image
Line drawing of a person applying a toothbrush to their beaded mouth (no text or symbols)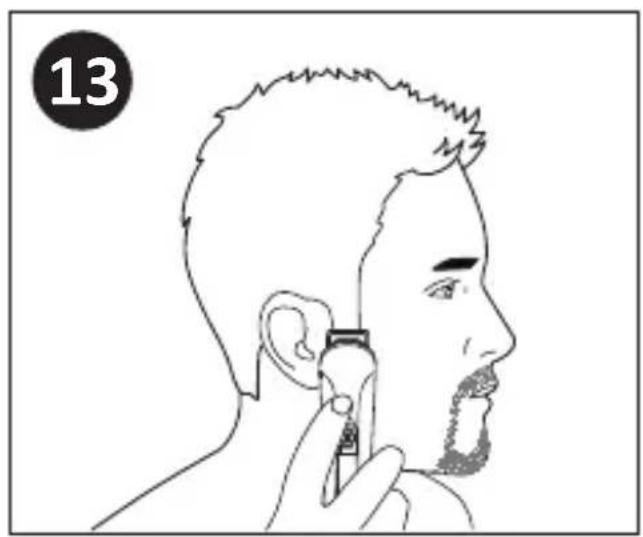
natural_image
Line drawing of a person applying a product to their ear, no text or symbols present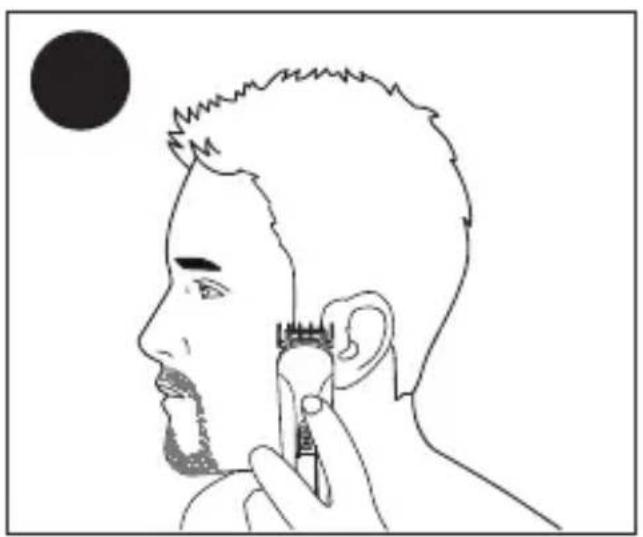
natural_image
Line drawing of a person's profile with a hand using a tool near their ear, no text or symbols present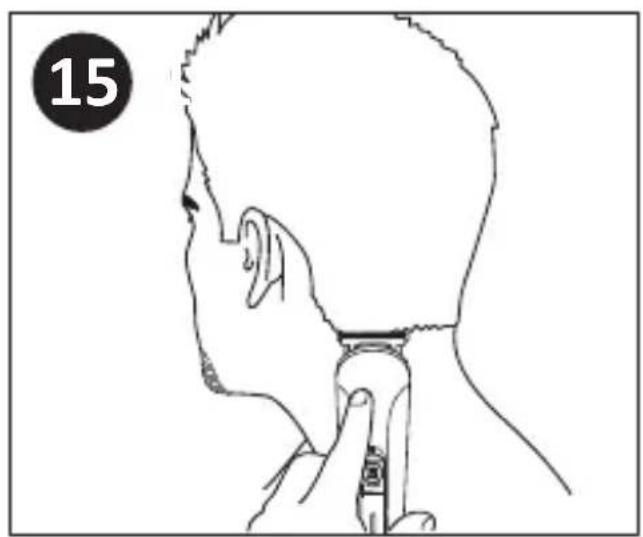
natural_image
Line drawing of a person's head and neck with a handheld device, no text or symbols present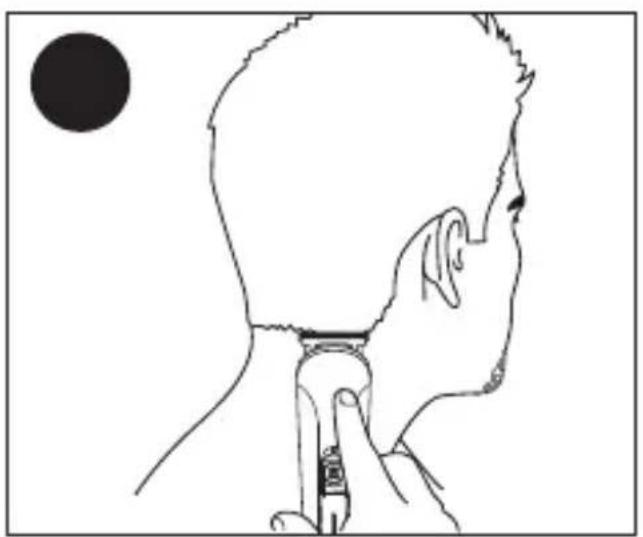
natural_image
Line drawing of a person's head and neck with a finger pointing to the lower lip (no text or symbols)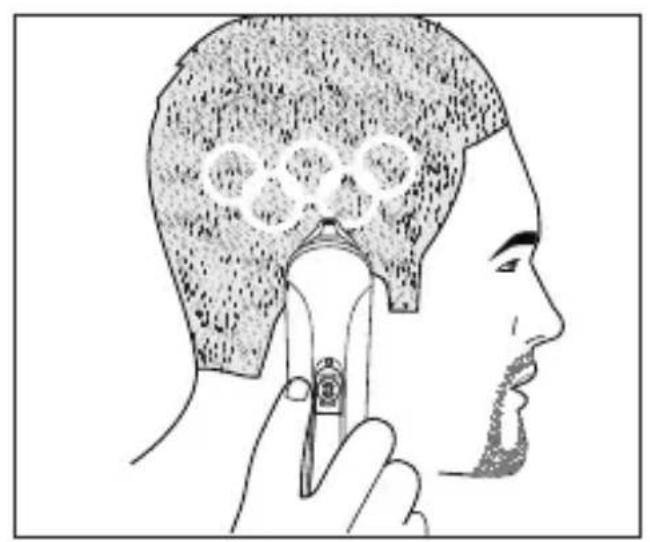
natural_image
Side profile illustration of a person using a tool to apply hair or hair product, with no visible text or symbols.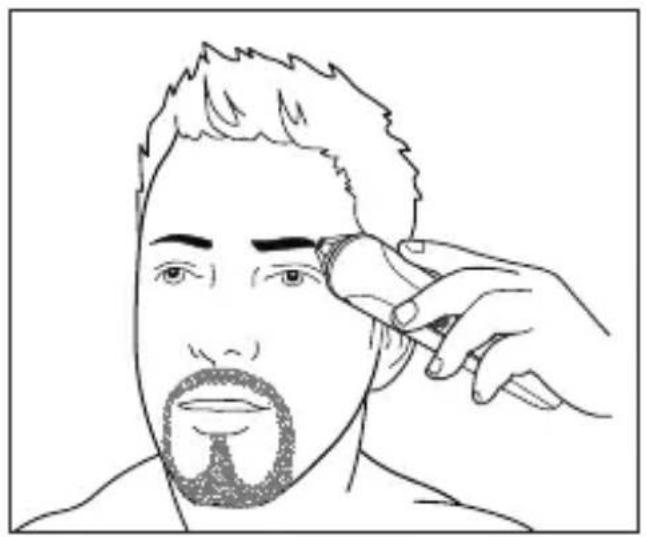
natural_image
Line drawing of a person applying makeup to their face, with no text or symbols present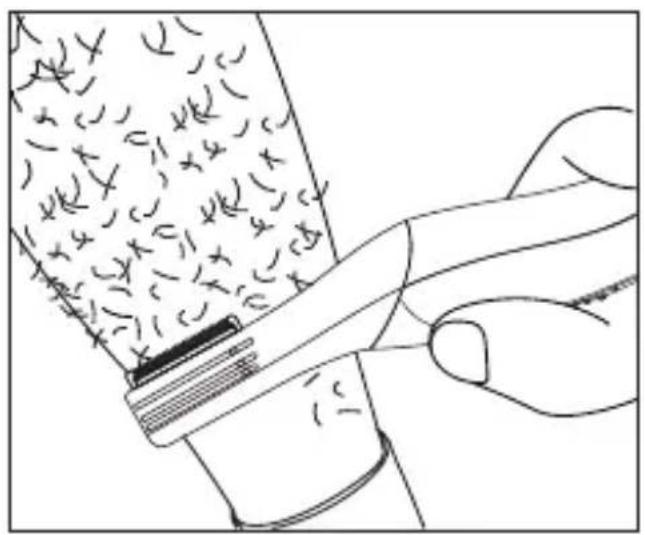
natural_image
Illustration of a hand using a tool to remove or brush into a container with scattered particles (no text or symbols)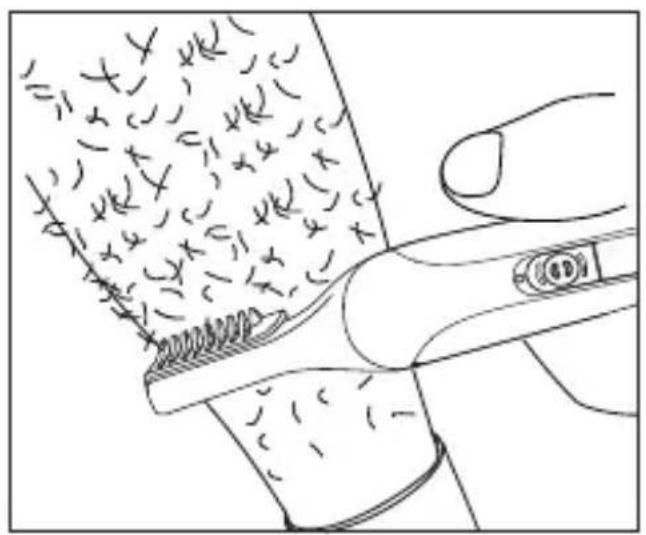
natural_image
Diagram of a hand holding a tool interacting with a textured surface, showing no text or symbols.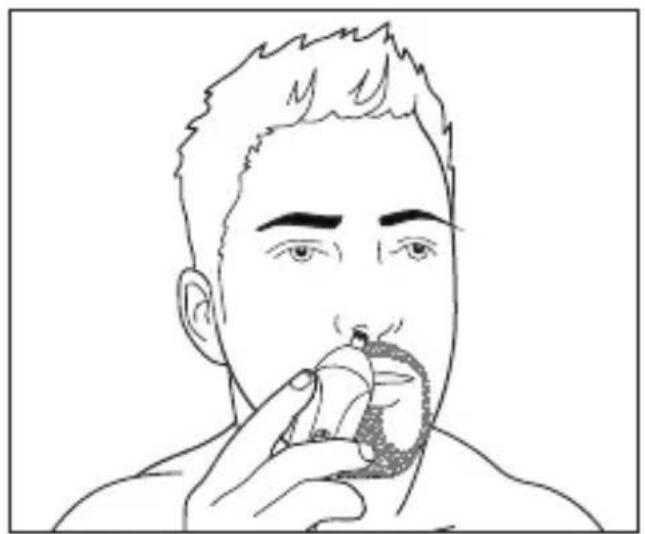
natural_image
Line drawing of a person holding a small object near their mouth, no text or symbols present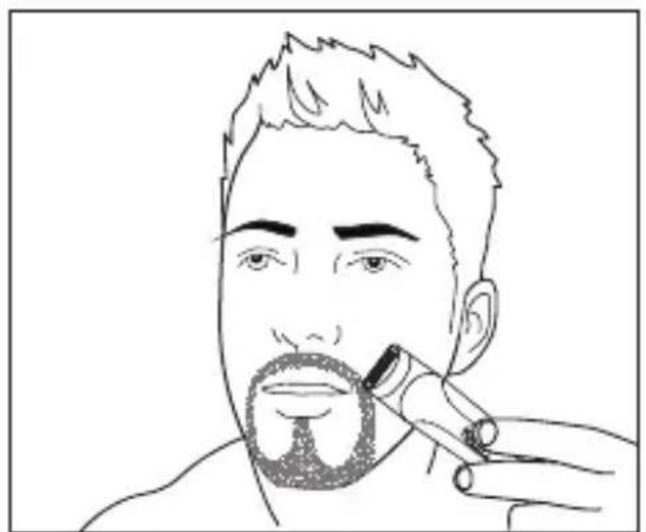
natural_image
Line drawing of a person applying a toothbrush to their beak (no text or symbols)WARTUNG, REINIGUNG
natural_image
Illustration of hands assembling a mechanical component with a circular base and handle (no text or symbols)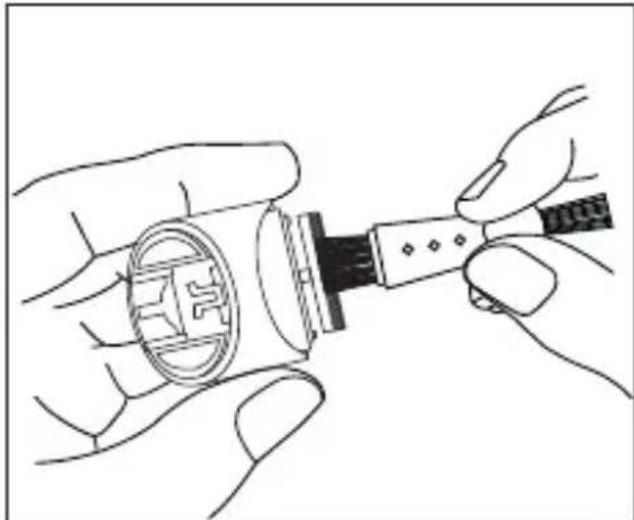
natural_image
Line drawing of hands assembling a mechanical component with a circular base (no text or symbols)natural_image
Line drawing of a mechanical component with a spring-like base (no text or symbols)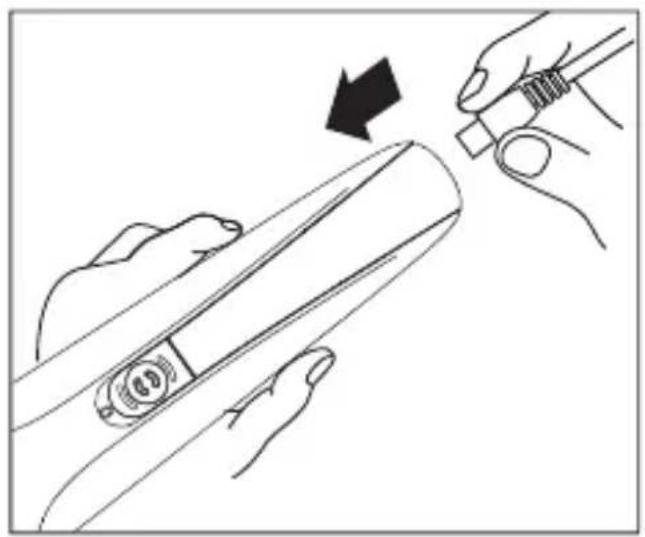
natural_image
Line drawing of hands using a tool to adjust or install a device, showing a magnified view with an arrow indicating the process (no text or symbols present)natural_image
Line drawing of a man's face with short hair and beard, wearing a collared shirt and tie (no text or symbols)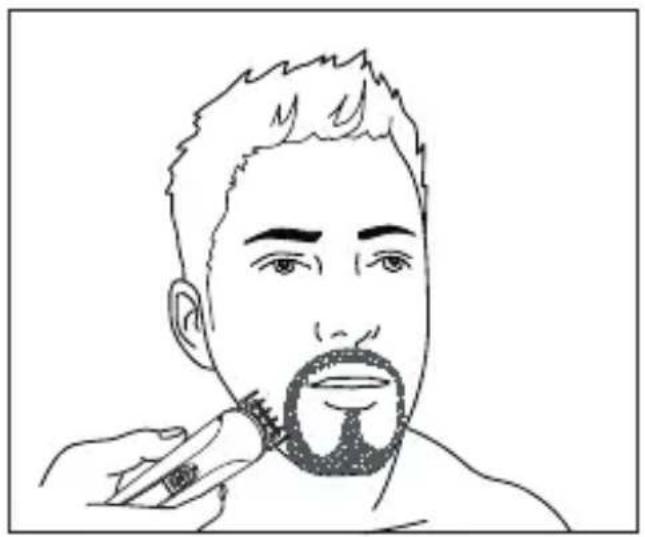
natural_image
Line drawing of a person applying a toothbrush to their beaded mouth (no text or symbols)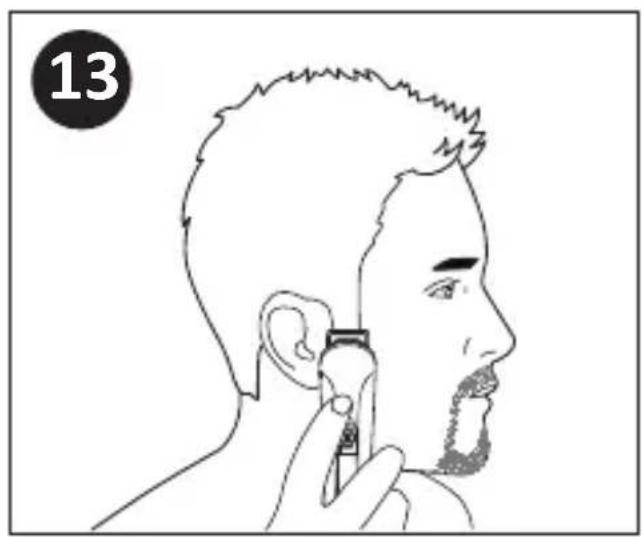
natural_image
Line drawing of a person applying a product to their ear, no text or symbols present
natural_image
Line drawing of a person's profile with a hand using a tool near the ear, no text or symbols present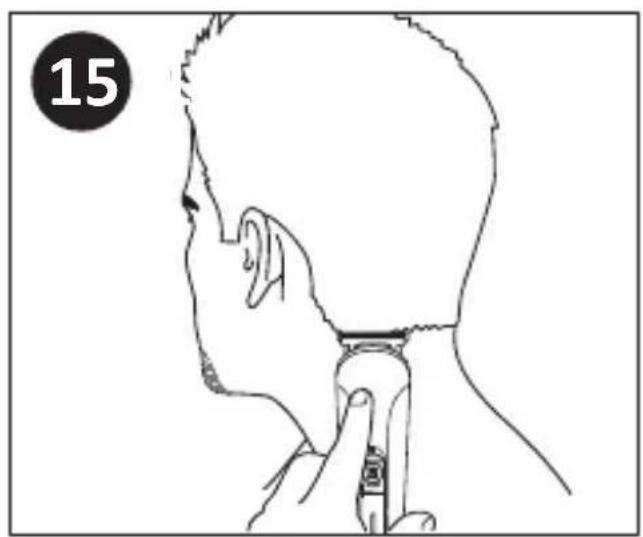
natural_image
Line drawing of a person's head and neck with a hairpin inserted, no text or symbols present
natural_image
Line drawing of a person's head and neck with a finger pointing to the lower lip (no text or symbols)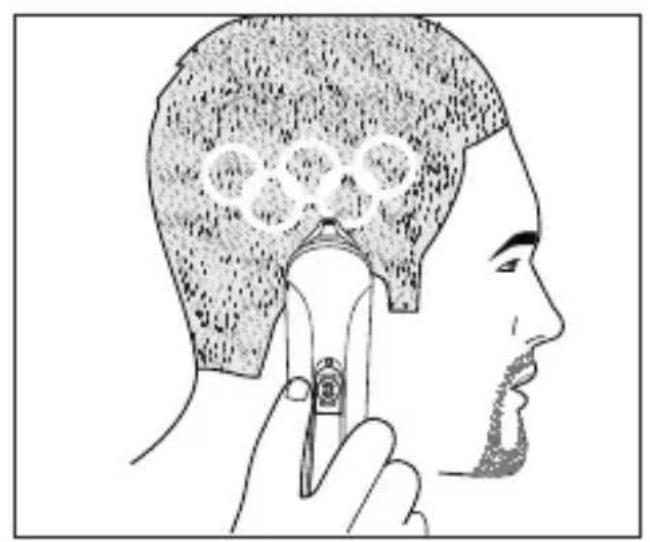
natural_image
Side profile illustration of a person applying hair to their neck, with a tool in use (no text or symbols)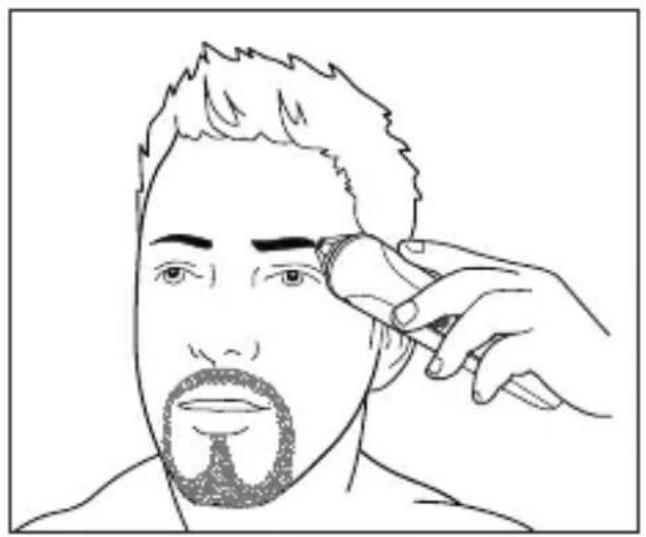
natural_image
Line drawing of a person applying makeup to their face, with no text or symbols present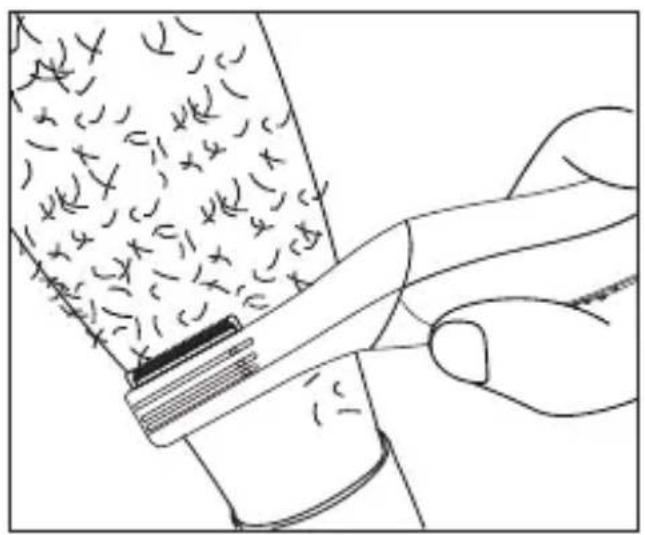
natural_image
Illustration of a hand using a tool to remove chromosome (no text or symbols present)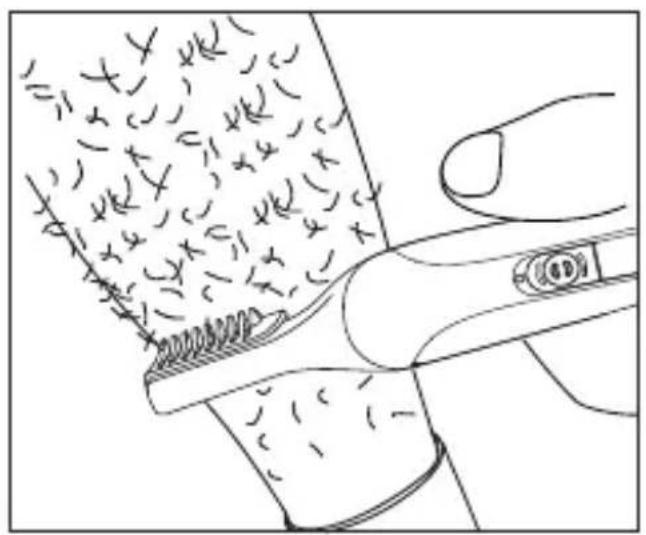
natural_image
Line drawing of a hand holding a tool interacting with a textured surface (no text or symbols)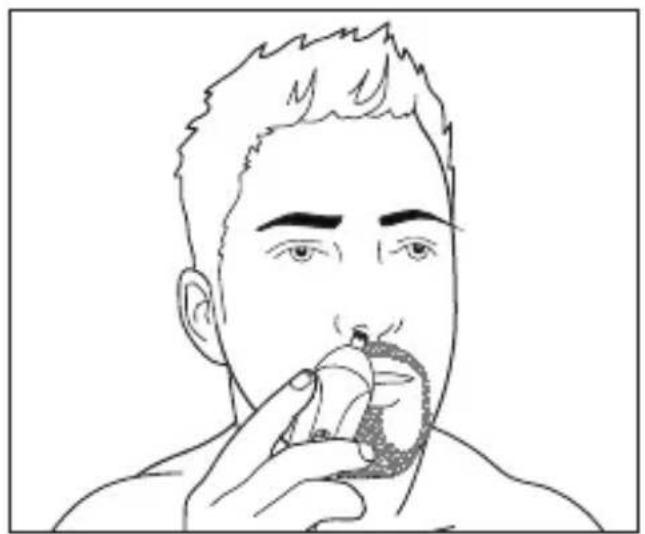
natural_image
Line drawing of a person holding a small object near their mouth (no text or symbols)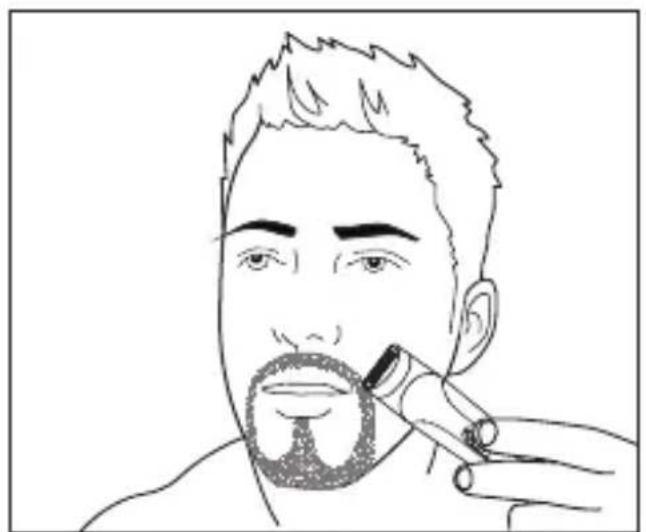
natural_image
Line drawing of a person applying a toothbrush to their beak (no text or symbols)natural_image
Illustration of hands assembling a mechanical component with a tool (no text or symbols visible)