
EasyPhone AD - Smartphone Evolveo - Free user manual and instructions
Find the device manual for free EasyPhone AD Evolveo in PDF.


| Product Type | Smartphone |
| Brand | Evolveo |
| Model | EasyPhone AD |
| Dimensions (H x W x D) | 150 x 72 x 8.5 mm (5.9 x 2.8 x 0.33 in) |
| Weight | 185 g (6.53 oz) |
| Battery Capacity | 3000 mAh Li-Ion |
| Operating System | Android (likely version) |
| Display Size | 5.5 inches |
| Processor | Quad-core 1.3 GHz |
| RAM | 2 GB |
| Internal Storage | 16 GB |
| Camera (Rear) | 8 MP |
| Camera (Front) | 5 MP |
| Connectivity | Wi-Fi, Bluetooth, GPS, 4G LTE |
| Main Functions | Calling, messaging, internet browsing, camera, music player, GPS navigation |
| Cleaning & Care | Wipe with a soft dry cloth; avoid liquid contact and extreme temperatures. |
| Safety Warnings | Do not disassemble, use only original charger, avoid magnetic fields, keep away from children. |
| Spare Parts & Repairability | Battery, screen, and back cover replaceable by a professional; contact service center. |
| General Information | Year of release: 2019; Manual available in PDF at notice-facile.com. |
Frequently Asked Questions - EasyPhone AD Evolveo
User questions about EasyPhone AD Evolveo
0 question about this device. Answer the ones you know or ask your own.
Ask a new question about this device
Download the instructions for your Smartphone in PDF format for free! Find your manual EasyPhone AD - Evolveo and take your electronic device back in hand. On this page are published all the documents necessary for the use of your device. EasyPhone AD by Evolveo.
USER MANUAL EasyPhone AD Evolveo
Understanding your Phone
1. Phone description
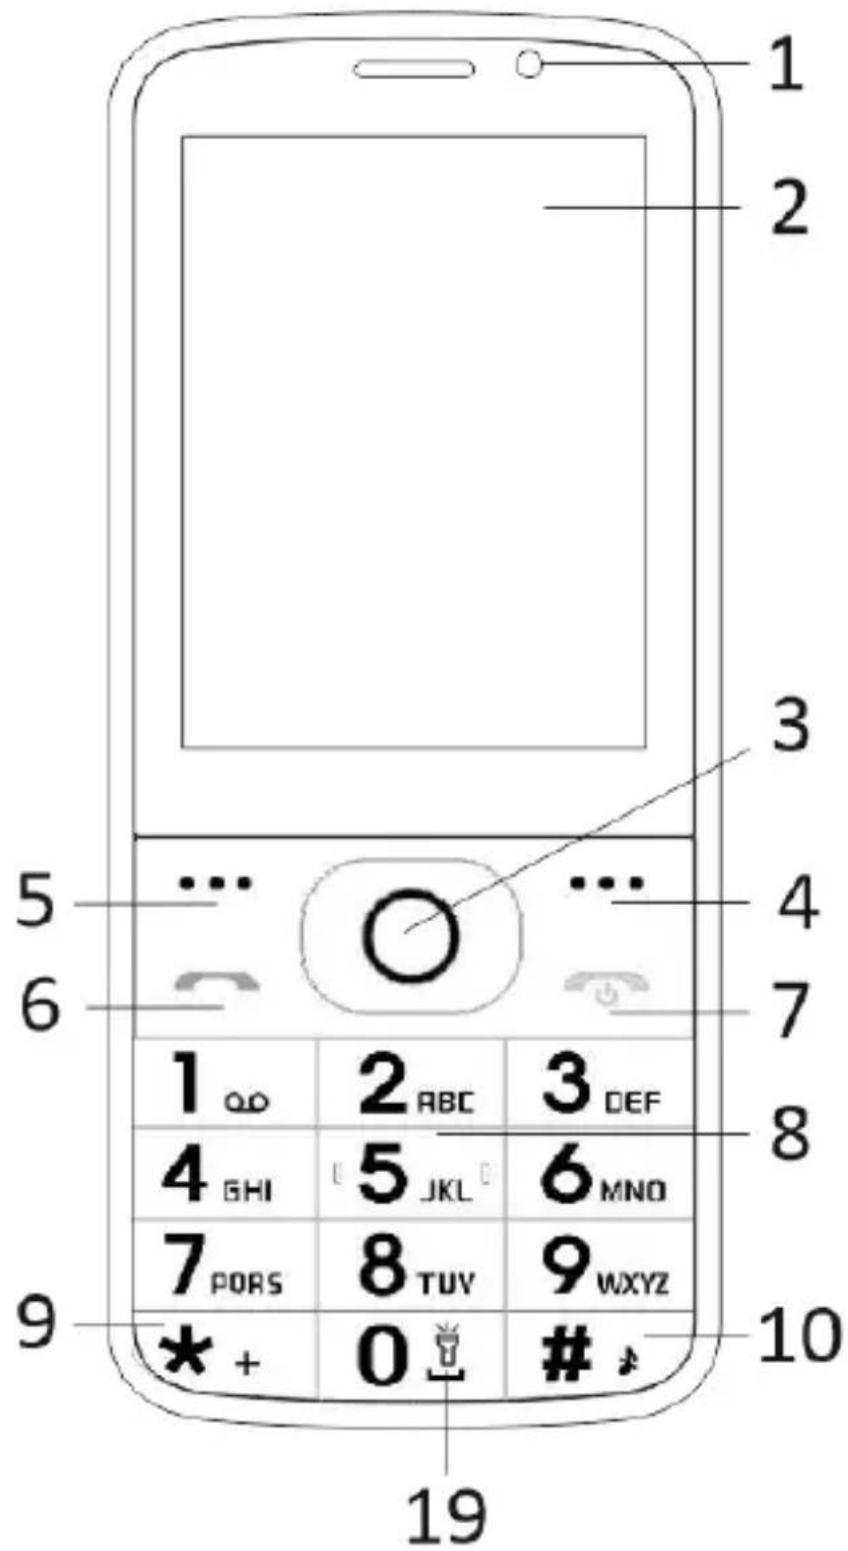
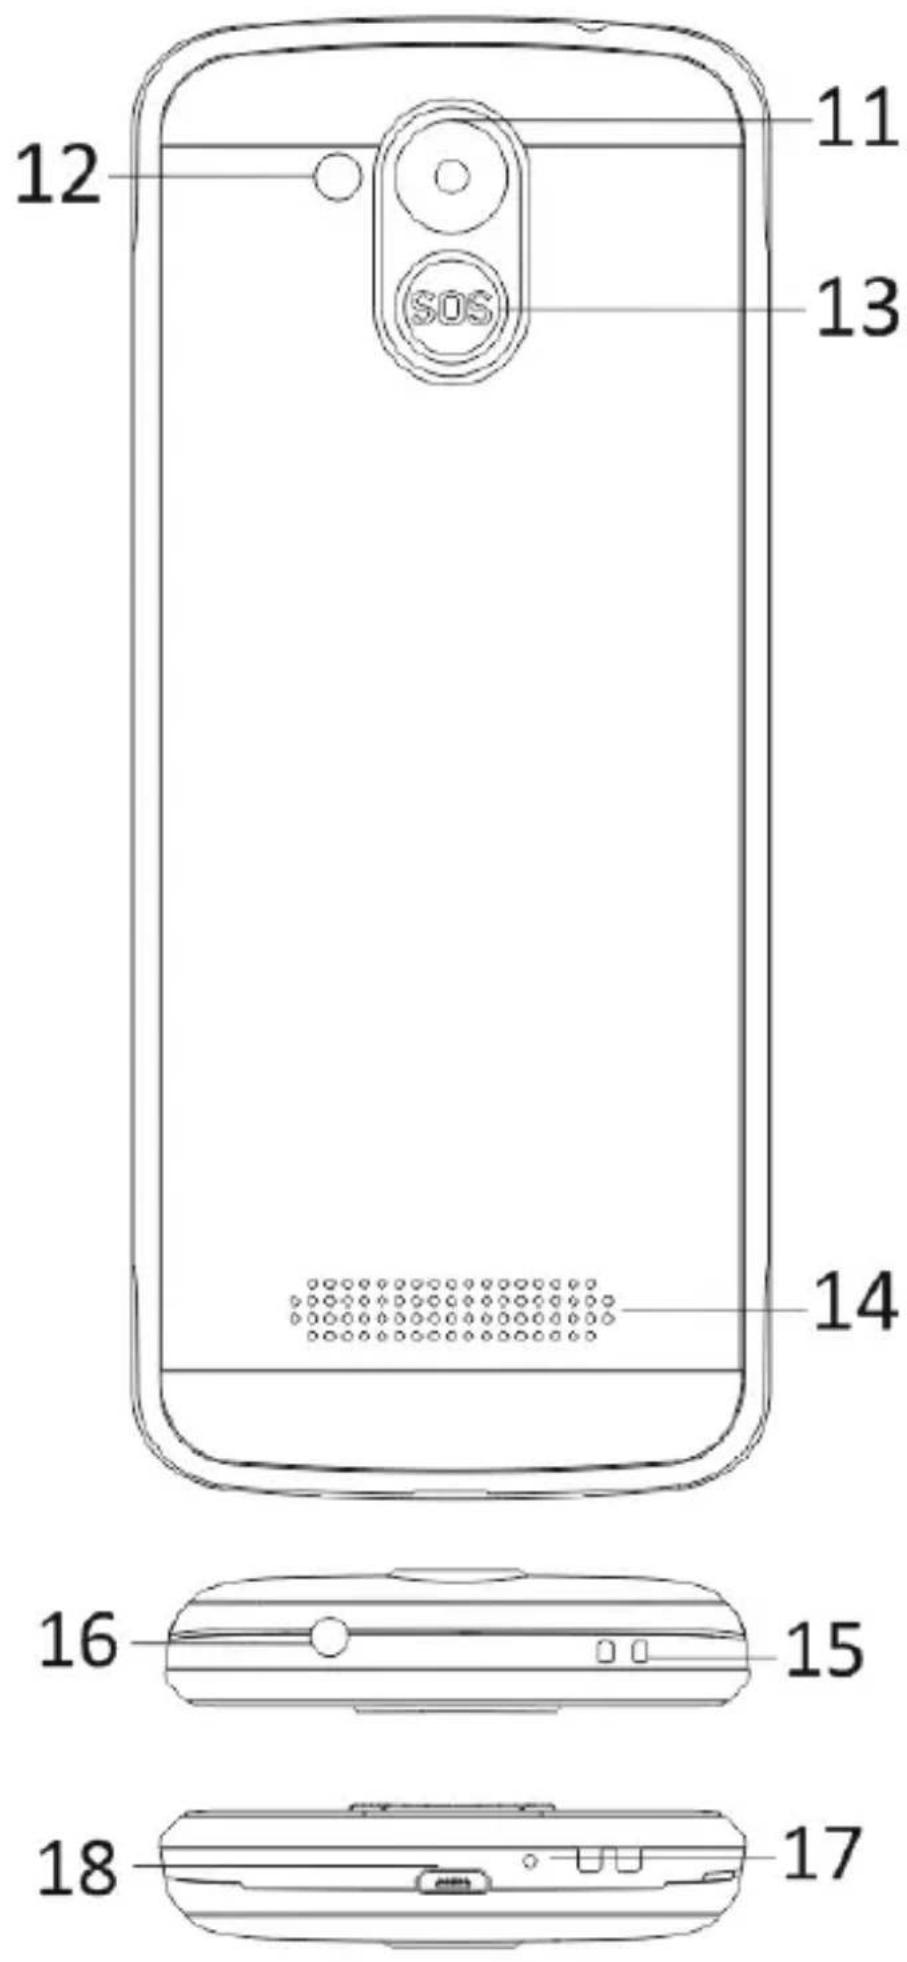
| 1 | Multi-touch display |
| 2 | Front camera |
| 3 | Orientation keys |
| 4 | Right soft key |
| 5 | Left soft key |
| 6 | Call key |
| 7 | End Call /Power on/off key |
| 8 | Number Keys |
| 9 | * Key |
| 10 | # Key |
| 11 | Rear camera |
| 12 | Flashlight |
| 13 | SOS key |
| 14 | Speaker |
| 15 | Strip hole |
| 16 | Earset Hole |
| 17 | Receiver |
| 18 | USB |
| 19 | Hold lamp on/off |
| Keys Functions | |
| Left soft key | Different functions under different menus. Press this key to realize the function which display on the left-down corner. |
| Right soft key | Different functions under different menus. Press this key to go back to previous menu. |
| Call key | Press this key to make a call when select a number. Press to answer an receiving call. Press to enter call history under standby mode. |
| End key | Power Off: Long press to power off under standby mode. Power On: Long press to power on if the phone is power off. |
| Press this key to go back to standby mode.Press this key to go back to main menu.Press this key to end a call. | |
| Orienta-tion keys | Move cursor left and right when edit. Sroll and scan the contact list/ number/messages and all sub menus.Move cursor up and down when edit.It can switch options when press them.In “FM radio”, they adjust frequency. |
| SOS key | Long press SOS key, to call an emergency call as its setting. |
| Number keys | Dial numbers under standby mode and enter numbers and characters in editing mode. |
| * Key | Under standby mode, press * key twice to display “+”. |
| Under FM radio, Video player, in conversation status * key to decrease the volume. | |
| # Key | Switch input method under text edit interface.Long press change user profiles under standby interface.Under FM radio, Video player, in conversation status press “#” key to increase volume. |
2. Description Icons
Note: Icons are only for demonstration; they may differ in actual device.
| Icons | Descriptions | Icons | Descriptions |
 | Shows the phone's network signal strength. |  | Show the phone's battery capacity. |
 | Missed calls. |  | Unread SMS. |
 | Wifi is ON |  | Bluetooth ON |
| USB storage Turned on. | Flight Mode |
3. SIM cards, T-flash & Battery
Inserting Battery
Open the battery cover on the back of your phone. Align the battery's contact points with those of the phone and gently press the battery down into place. Replace the battery cover clicking it back into position
Removing Battery
Switch off your phone. Open the battery cover. Gently shift the cover and open. Lift the battery up and out of your phone.
To install SIM cards
Your device is supports two SIM cards.
Remove the battery if it is installed. Locate the SIM card slot, and then insert the SIM card with its gold contacts facing down and its cut-off corner facing out the card slot.
Slide the SIM card completely into the slot.
To install T-Flash card
To have additional storage for your images, videos, music, and files, you can purchase a memory card and install it into your device. Remove the battery if it is installed. Insert the memory card into the slot according to
the indication icon. To remove the memory card, perform according to the conversed installations.
4. Charging the battery
The rechargeable Li-ion battery that comes with your phone is ready to be used, but is not charged. It is easy to do & can be done in 3 simple steps below:
Connect the charger to your phone, and plug it into a socket.
The battery indicator in the corner of the screen will scroll to show its charging.
When fully charged, the battery indicator will stop scrolling. Disconnect the charger from your mobile, and unplug.
5. Power ON/OFF
Press the power key to power-ON/OFF the phone. When you turn your phone on, it'll automatically check the SIM and show the following information on screen:
Input SIM1 PIN: If you've set a PIN for your SIM1.
Input SIM2 PIN: If you've set a PIN for your SIM2.
Note: The PIN is supplied with your SIM.
Please replace it with your own PIN code as soon as possible. Enter the wrong PIN three times, and your SIM will be locked. Then you'll need to contact your network service provider to ask for a PUK code to unlock it. It is applicable for both the SIMs if you are using 2 SIM Cards.
6. Use Notification Bar
As a new notification appears in the notification area, slide down the notification bar to view their contents.
7. Expand Main Interface
The main interface may extend and exceed the screen width to provide more space for newly added shortcuts and tools.
Slide your finger horizontally on the main interface to extend to the left or right area of the main interface.
8. Install APK through File Manager
APK is a supported file format for the Android mobile operating system. Please copy the downloaded APK file into the SD card, and then insert the SD card into the phone. In Idle mode, click Main Menu to
enter the main menu. Click “File Manager” to enter the directory of SD card. Click the APK file you wish to install, and follow the installation wizard.
Using your Phone
1. Main Menu & Its Functions
1) Call log
Allow you to make quick outgoing calls.
2) Contact
To see your list of Contacts. Access phonebook through this function.
3) Messages
Allow you to view messages sent & received as a thread.
4) Gmail
Allows you set up your POP/IFMAP email accounts.
To use the FM Radio, please insert the earphone first and then listen to it.
9) SOS
SOS numbers may be set.
SOS procedure: When SOS status on and long press key SOS button on the rear side of phone, the SOS function started with below:
A loud emergence alarm will be shouted, it will start to call the emergency number one by one, each number will call 3 times; If somebody answers the call, the SOS will be stopped; or if all the people don't answer the call, it will stop after call all the number 3 times. At the same time, a SMS with content “I am in danger, please help me!” will be sent to all the emergency number.
10) Browser
Browse the internet.
11) Music
View the list of songs available in your phone. View the artists, albums, playlists & more.
12) Video
View from list of videos.
13) Camera
Allows you to click pictures anytime you want. Your smart phone has High Definition camera which ensures you always click good quality of pictures and stores them under
the Gallery folder. In Camera, easily choose Camcorder to record Video Files.
14) Gallery
Allows you to save & view photos & videos.
15) Sound Recorder
Allows you to record sounds.
16) Files
You could install the files in APK format & also view your files.
17) Clock
Allows you to set the Alarm from Clock.
18) Calculator
Allows you to make arithmetic calculations quickly.
19) Calendar
View the calendar & add events.
20) Play Store
Log in to your Gmail account to view all the applications & download from thousands of applications available under the Google Market called Play Store.
Note: To use this app please connect to an internet connection.
21) Installed Apps
22) Settings
2. Wi-Fi
Your Smart Phone supports Wi-Fi which allows you to connect with a Wireless connection. This is useful for surfing internet on phone.
Go to Settings--Wifi, activate Wifi.
Enter WiFi, select the hotspot you want to connect.
If the hotspot needs password, you have to enter the right password first, and then use Wifi properly.
3. Inputting Text
1) Intelligent keyboard
Your smart phone automatically corrects and suggests words as you type.
2) Cut, Copy and Paste
Touch and hold text content to bring up the magnifying glass, and then slide your finger to move the insertion points. Then choose to cut, copy, or paste. It is very easy to copy text from web pages, email, or text messages.
Maintenance
Use a dry soft cloth to wipe general dirt.
Do not use a hard cloth, benzene or thinner to wipe the phone, otherwise, the surface of the phone will be scratched or could even result in the fading of color.
Do you still need an advice after reading this guide?
First read “Frequently Asked Questions” at www.evolveo.com or contact the EVOLVEO technical support.
The warranty DOESN'T APPLY to:
- using the device for other purposes than it was designed to
- installation of another firmware then the one that was installed as the original from the factory or that is to be downloaded at ftp://ftp.evolveo.com
- mechanical damage of caused by inappropriate using
- damage caused by the natural elements as fire, water, static electricity, overvoltage and so on
- damage caused by unauthorized repair
- damage of the guarantee seal or unreadable serial number of the device

Disposal: The symbol of crossed out
container on the product, in the literature or on the wrapping means that in the European Union all the electric and electronic products, batteries and accumulators must be placed into the separate salvage after finishing their lifetime. Do not throw these products into the unsorted municipal waste
① CE
DECLARATION OF CONFORMITY
Hereby, the company Abacus Electric, s.r.o. declares that the EVOLVEO EasyPhone AD is in compliance with the requirements of the standards and regulations, relevant for the given type of device.
Find the complete text of Declaration of Conformity at ftp://ftp.evolveo.com/ce
Copyright © Abacus Electric, s.r.o.
www.evolveo.com
www.facebook.com/EvolveoCZ
All rights reserved.
Design and specification may be changed without prior notice.
EVOLVE0
EasyPhone AD
BG
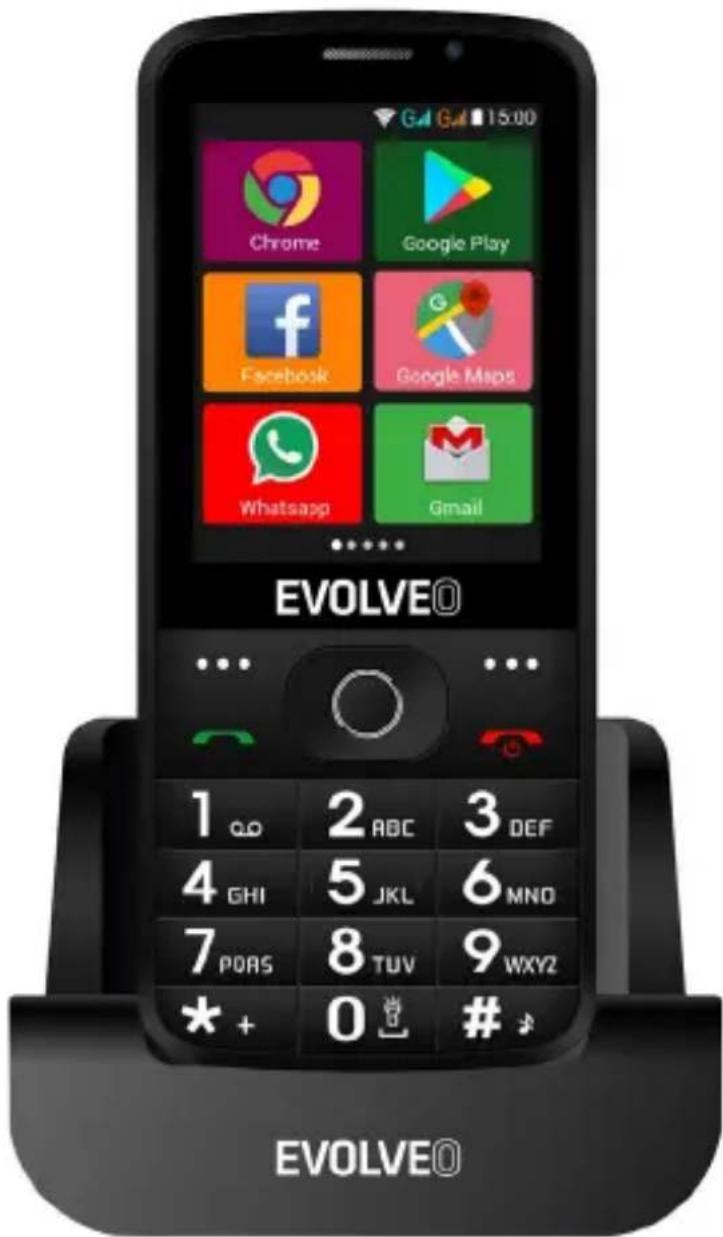
Copyright © Abacus Electric, s.r.o.
www.evolveo.com
www.facebook.com/EvolveoCZ
Copyright © ABACUS Electric, s.r.o.
www.evolveo.com
www.facebook.com/EvolveoCZ
Minden jog fenntartva.
Copyright © Abacus Electric, s.r.o.
www.evolveo.com
www.facebook.com/EvolveoCZ
Vse pravice pridržane.

- Understanding your Phone
- Phone description
- Description Icons
- SIM cards, T-flash & Battery
- Inserting Battery
- Removing Battery
- To install SIM cards
- To install T-Flash card
- Charging the battery
- Power ON/OFF
- Use Notification Bar
- Expand Main Interface
- Install APK through File Manager
- Using your Phone
- Main Menu & Its Functions
- 1) Call log
- 2) Contact
- 3) Messages
- 4) Gmail
- 10) Browser
- 11) Music
- 12) Video
- 13) Camera
- 14) Gallery
- 15) Sound Recorder
- 16) Files
- 17) Clock
- 18) Calculator
- 19) Calendar
- 20) Play Store
- Wi-Fi
- Inputting Text
- 1) Intelligent keyboard
- 2) Cut, Copy and Paste
- Maintenance
- Do you still need an advice after reading this guide?
- The warranty DOESN'T APPLY to:
- Disposal: The symbol of crossed out
- ① CE
- DECLARATION OF CONFORMITY
- EVOLVE0
- EasyPhone AD
Brand : Evolveo
Model : EasyPhone AD
Category : Smartphone