
IAN 399127 - Uncategorized Livarno Lux - Free user manual and instructions
Find the device manual for free IAN 399127 Livarno Lux in PDF.


| Brand | Livarno Lux |
| Model | IAN 399127 |
| Product Type | Household Device |
| Dimensions (approx.) | 20 x 15 x 10 cm |
| Weight (approx.) | 0.5 kg |
| Power Supply | 9V DC adapter (included) or 6 x AA batteries (not included) |
| Power Consumption | 5 W (max) |
| Main Functions | Automatic on/off, adjustable brightness, timer function |
| Control Type | Touch sensor or remote control |
| Material | ABS plastic, metal base |
| Color | White/Black/Silver (depends on variant) |
| Protection Class | IP20 (indoor use only) |
| Operating Temperature | 0°C to 40°C |
| Safety Features | Overheat protection, short-circuit protection |
| Certifications | CE, RoHS |
| Care and Cleaning | Wipe with a dry cloth; do not use abrasive cleaners |
| Battery Type (if applicable) | AA 1.5V (alkaline recommended) |
| Remote Control Range | Up to 5 meters |
| Included Accessories | Power adapter, remote control, user manual |
| Warranty | 2 years |
Frequently Asked Questions - IAN 399127 Livarno Lux
User questions about IAN 399127 Livarno Lux
0 question about this device. Answer the ones you know or ask your own.
Ask a new question about this device
Download the instructions for your Uncategorized in PDF format for free! Find your manual IAN 399127 - Livarno Lux and take your electronic device back in hand. On this page are published all the documents necessary for the use of your device. IAN 399127 by Livarno Lux.
USER MANUAL IAN 399127 Livarno Lux
natural_image
Pure black rectangular panel with vertical lines and a small protrusion on the left side (no text or symbols)
CLAMP PRIVACY SCREEN
DELTA SPORT HANDELSKONTOR OMBH
Vizgelsp 6 • OS22397 Homburg
CZENWALY
...
12/202
Assembly instructions
①
ZAŠCITA PRED POGLEDI S
SPONKAMI
Before reading, told out the illustration page and get to know all of the functions of your unit.
(1)
C5 Assembly and safety information Page 7
natural_image
Pure architectural line drawing of a symmetrical structure with vertical supports and horizontal beams (no text or symbols)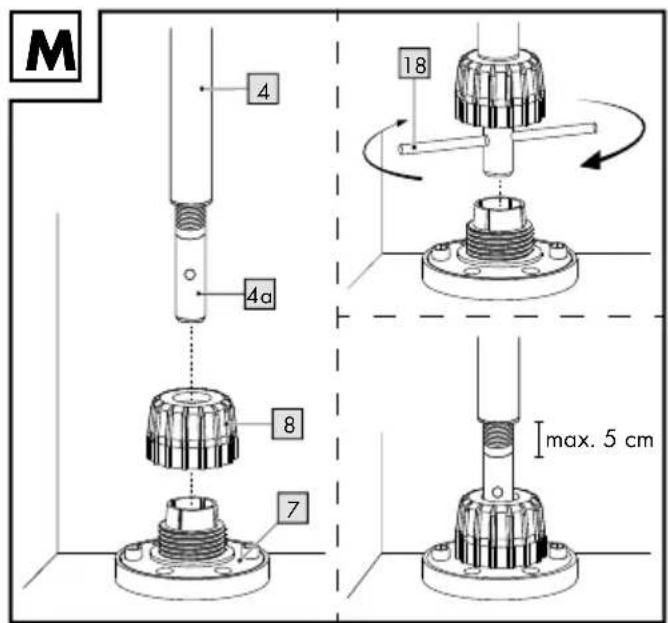
GB
IMPORTANT, RETAIN FOR FUTURE REFERENCE: READ CAREFULLY!
HU
FONTOS, KÉSŐBBI HIVATKOZÁSOK CÉLJÁBÓL ŐRIZZE MEG: OLVASSA EL FIGYELMESEN!
SI
POMEMBNO, SHRANITE ZA KASNEJŠO UPORABO: NATANČNO PREBERITE!
CZ
DŮLEŽITÉ, UČHOVEJTE PRO POZDĚJŠÍ POUŽITÍ: PEČLIVĚ SI PŘEČTĚTE!
SK
DÔLEŽITÉ, USCHOVAJTE PRE PRÍPAD POUŽITIA V BUDÚCNOSTI: DÔKLADNE SI PREČÍTAJTE POKYNY!
DE AT CH
WICHTIG, FÜR SPÄTERE BEZUGNAHME AUFBEWAHREN: SORGFÄLTIG LESEN!
GB
Package contents 9
Technical data 9
Intended use 9
Safety information 9-11
Life-threatening hazard 9-10
Risk of injury 10
Preventing damage to the product 11
Important pre-installation information 11
Suitable installation site 11
Suitable installation materials 11
Assembly 11-13
Installing the ceiling bracket 12
Installing the floor bracket 12
Fastening the covering 12
Assembling the frame 12-13
Assembling the stand posts 13
Securing the frame in the bracket 13
Use 13
Storage, cleaning 13
Maintenance 14
Disposal information 14
Warranty and servicing information 14-15
HU
Csomag tartalma 16
Müszaki adatok 16
You have chosen to purchase a high-quality product. Familiarise yourself with the product before using it for the first time.

Read the following as- sembly instructions and the safety information carefully.
Use the product only as described and only for the given areas of application. Store these assembly instructions carefully. When passing the product on to third parties, please also hand over all accompanying documents.
Package contents (Fig. A)
1 x roller shaft with covering (1)
1 x upper post with hand crank (2)
1 x upper post with hand crank lug (3)
2 x lower post (4)
1 x hand crank (5)
2 x ceiling bracket (6)
2 x floor bracket (7)
2 x locking nut (8)
4 x plastic cap (9)
4 x screw (10)
8 x screw ST6 x 50mm (11)
8 x wall plug ∅ 10/50 (12)
2 x nut (13)
2 x spacer (14)
2 x washer (15)
4 x washer (16)
8 x washer (17)
1 x tension rod (18)
1 x assembly instructions
Technical data
Dimensions: approx.
$$ 1 2 0 \times 2 0 6 - 3 0 0 \mathrm{cm} (\mathrm{W} \times \mathrm{H}) $$
The product corresponds to wind resistance class 0 (wind speed < 20km/h).
For safety reasons, the product should not be used in wind speeds greater than 20km/h!

Date of manufacture
(month/year): 12/2021
Intended use
The product is designed for privacy and sun protection for outdoor use, such as on balconies or terraces, and is manufactured for private use. The product is not intended for commercial use.
Safety information

Life-threatening hazard!
- Never leave children unattended with the packaging materials.
There is a risk of suffocation. - The product is not a toy or a climbing apparatus!
Ensure that persons, especially children, do not pull themselves up on the product or stand on it. The product can tip over.
- The maximum load of the retractable parts of the blind must not exceed 15kg!
- Check the product for damage or wear before each use. Only use the product if it is in perfect condition!
- Ensure that the plastic caps have no external damage. Defective plastic caps must be replaced.
- When installing on balconies or locations not at ground level, the floor and ceiling brackets must be fastened with suitable mounting materials in order to prevent the product from falling.
- Because of the risk of falling, make sure that the person installing the product is sufficiently secured with a harness.

Risk of injury!
- When extending and retracting the product, take care to avoid injuries and pinching.
- The product may only be used under adult supervision and must not be used as a toy.
- Ensure the product is properly stabilised before using it.
-
Keep open flames, barbecues, and patio heaters away from the product.
-
Check that all parts have been properly assembled before each use.
- Improper installation can impair the safety and functionality of the product.
- The product must not be used in adverse weather conditions such as strong winds, rain or snow.
- Retract the product if wind speeds higher than 20km/h are expected (moderate breeze moving tree limbs and thinner branches, raising dust and loose paper).
- Never use the product as shelter during storms.
- Close the product if the wind picks up or in other adverse weather conditions.
- Before opening or closing the product, ensure that there are no persons or objects in the opening or closing areas.
- The product offers protection from direct sunlight outdoors. Due to reflecting UV radiation, appropriate sunscreen products should still be used.
- Place the product on a flat, level surface.
- Check regularly to make sure all screws are tight!
- The manufacturer accepts no liability for accidents which occur as a result of ignoring the safety information above or due to improper handling.

Preventing damage to the product!
- Secure the product during extreme weather conditions, e.g. strong wind. Store the product in a sheltered area.
Important pre-installation information
WARNING! For optimal stability of the product, the floor and ceiling brackets must be firmly screwed in place, especially on balconies or locations not at ground level. If the product is not screwed to the floor and ceiling, the manufacturer is absolved of all liability.
WARNING! Before you begin installing the product, measure the height between the floor and the ceiling.
WARNING! Assembling the product requires at least two people, due to its size.
WARNING! As tools/machinery need to be used, manual skills are essential.
Suitable installation site
For ceiling installation, a concrete ceiling or a load-bearing wooden beam is suitable. For floor installation, a concrete foundation or concrete slab of at least 50 x 50 x 5cm (L x W x D) is suitable.
Note: if you attach the product to a wooden beam, you must fasten the product to it firmly, as wood warps depending on the temperature and humidity. Enquire at a specialist retailer about suitable installation materials.
Note: alternative installation conditions require inspection of load-bearing capacity and durability by a specialist company.
Suitable installation materials
Before installing the product, the installation materials must be determined. If the installation surface is load-bearing, appropriate installation materials must be selected for fastening the product. Installation materials:
- ∅ 10/50 wall plug (12) and ST6 x 50mm screw (11) for concrete and load-bearing masonry.
- ST6 x 50mm screw (11) for load-bearing wooden beams.
Note: enquire at a specialist retailer about suitable installation materials for the floor and ceiling brackets.
Assembly
To assemble the product you will need the following tools (not included in the package contents): a suitable drill, measuring tape, a Phillips screw-driver, a spanner and a hex key.
WARNING! Because of the risk of falling, make sure that the person installing the product is sufficiently secured with a harness.
Note: for optimal stability of the product, the floor and ceiling brackets must be firmly screwed in place.
Installing the ceiling bracket
Important: the ceiling brackets must be exactly aligned and exactly 104.5cm apart (measured between the inner drill holes on both ceiling brackets) (Fig. E).
Place the ceiling bracket (6) in the desired position and mark 2 opposing holes with a pencil (Fig. B).
- Using the appropriate tool, drill 2 holes in the marked places. Insert 1 wall plug (12) into each hole (Fig. C).
Note: use other wall plugs and screws, if required, if the installation surface requires it.
- Place a plastic cap (9) onto each ceiling brackets (6) and insert 2 screws (11) through each washer (17) (Fig. D).
- Mount the ceiling bracket onto the ceiling.
- Mount the second ceiling bracket as described in steps 1-3.
Installing the floor bracket
- Plumb the exact position of the floor bracket (7) with a cord (not included in the package contents).
Mark the correct places and mark 2 opposing holes (Fig. F).
Note: the floor bracket (7) must be positioned perpendicular to the ceiling bracket (6).
- Using the appropriate tool, drill 2 holes in the marked places. Insert 1 wall plug (12) into each of the two holes (Fig. G).
Note: if necessary, use other wall plugs and screws if required for the installation surface.
- Place a plastic cap (9) onto each floor bracket (7) and insert 2 screws (11) through each washer (17) (Fig. H).
- Mount the floor bracket onto the floor.
- Mount the second floor bracket, as described in steps 1–4.
Important: the floor brackets must be exactly aligned and exactly 104.5cm apart (measured between the inner drill holes on both floor brackets).
Fastening the covering
Pull both rings at the bottom ends of the covering (1) over the upper stand posts (2)/(3) (Fig. I).
Assembling the frame
-
Put a spacer (14) on the roller shaft (1) and then insert it through the post (2).
-
Place a spacer (14) and a washer (15) on the roller shaft and secure it with a nut (13) (Fig. J).
- Insert the other side of the drive shaft (1) through the post (3).
- Place a washer (15) on the roller shaft and secure it with a nut (13) (Fig. J).
Assembling the stand posts (Fig. K)
There are 19 adjustment options for setting the length of the stand posts.
- Loosen the screws (4a) on the posts (4) to be able to adjust the height of the ring.
- Connect the upper posts (2)/(3) with the lower posts (4) and ensure the lengths match.
- Fix the ring at the appropriate height once again, with the screw (4a).
Securing the frame in the bracket
Important: assembling the product requires at least two people, due to its size.
- First insert the covering frame into the ceiling brackets (Fig. K).
- Place the locking nut (8) on the threaded spindle (4a) (Fig. L).
- Insert the tension rod (18) through the hole in the threaded spindle (4a) and turn it to change the height of the post (Fig. L).
Note: please note the maximum extension length (max. 5cm) of the threaded spindle (4a).
- Screw the locking nut (8) onto the floor bracket (7) to fix the threaded spindle (Fig. L).
Note: please note that the threaded spindle (4a) may be unscrewed by no more than 5cm (Fig. L).
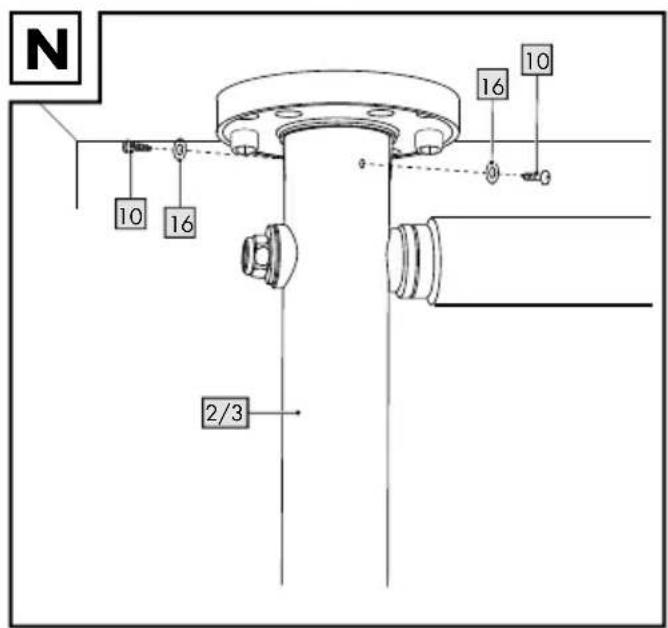
- Finally, fasten the posts to each ceiling bracket with 2 screws (10) and washers (16) (Fig. M).
Note: for easier installation, drill two holes into each ceiling bracket before fastening the posts.
Use
- Hook the hand crank (5) into the hand crank lug of the upper post (3).
- Turn the hand crank (5) to open or close the product.
- Remove the hand crank (5) after each use and store it in a secure location.
Storage, cleaning
When not in use, always store the product clean and dry at room temperature. Clean only with water and wipe dry afterwards with a cloth. IMPORTANT! Never clean the product with harsh cleaning agents. Leave the product open to dry.
Maintenance
- Regularly check the product for signs of wear or damage in order to ensure safe, risk-free use. If you discover any damage, hire a suitable specialist company to repair it.
- Only use replacement parts approved by the manufacturer.
Disposal
Dispose of the article and the packaging materials in accordance with current local regulations. Packaging materials such as foil bags are not suitable to be given to children. Keep the packaging materials out of the reach of children.

Dispose of the products and the packaging in an environmentally friendly manner.

The recycling code is used to identify various materials for recycling. The code consists of the recycling symbol – which is meant to reflect the recycling cycle – and a number which identifies the material.
Notes on the guarantee and service handling
The product was produced with great care and under continuous quality control. DELTA-SPORT HANDELS KONTOR GmbH gives private end customers a three-year guarantee on this product from the date of purchase (guarantee period) in accordance with the following provisions. The guarantee is only valid for material and manufacturing defects. The guarantee does not cover parts subject to normal wear and tear that are thus considered wear parts (e.g. batteries) or fragile parts such as switches, rechargeable batteries, or parts made of glass. Claims under this guarantee are excluded if the product has been used incorrectly, improperly, or contrary to the intended purpose, or if the provisions in the instructions for use were not observed, unless the end customer proves that a material or manufacturing defect exists that was not caused by one of the aforementioned circumstances.
Claims under the guarantee can only be made within the guarantee period by presenting the original sales receipt. Please therefore keep the original sales receipt. The guarantee period is not extended by any repairs carried out under the guarantee, under statutory guarantees, or as a gesture of goodwill. This also applies to replaced and repaired parts.
If you wish to make a claim please first contact the service hotline mentioned below or contact us by e-mail. If there is a guarantee case, then the product will be repaired or replaced free of charge to you or the purchase price will be refunded, depending on our choice.
Your legal rights, in particular guarantee claims against the respective seller, are not limited by this guarantee.
IAN: 399127_2107

Service Great Britain
Tel.: 0800 404 7657
E-Mail: deltasport@lidl.co.uk


- CLAMP PRIVACY SCREEN
- IMPORTANT, RETAIN FOR FUTURE REFERENCE: READ CAREFULLY!
- FONTOS, KÉSŐBBI HIVATKOZÁSOK CÉLJÁBÓL ŐRIZZE MEG: OLVASSA EL FIGYELMESEN!
- POMEMBNO, SHRANITE ZA KASNEJŠO UPORABO: NATANČNO PREBERITE!
- DŮLEŽITÉ, UČHOVEJTE PRO POZDĚJŠÍ POUŽITÍ: PEČLIVĚ SI PŘEČTĚTE!
- DÔLEŽITÉ, USCHOVAJTE PRE PRÍPAD POUŽITIA V BUDÚCNOSTI: DÔKLADNE SI PREČÍTAJTE POKYNY!
- WICHTIG, FÜR SPÄTERE BEZUGNAHME AUFBEWAHREN: SORGFÄLTIG LESEN!
- GB
- HU
- Read the following as- sembly instructions and the safety information carefully.
- Package contents (Fig. A)
- Technical data
- Intended use
- Safety information
- Life-threatening hazard!
- Risk of injury!
- Preventing damage to the product!
- Important pre-installation information
- Suitable installation site
- Suitable installation materials
- Assembly
- Installing the ceiling bracket
- Installing the floor bracket
- Fastening the covering
- Assembling the frame
- Assembling the stand posts (Fig. K)
- Securing the frame in the bracket
- Use
- Storage, cleaning
- Maintenance
- Disposal
- Notes on the guarantee and service handling
Brand : Livarno Lux
Model : IAN 399127
Category : Uncategorized