
GZ 115A - Sewing machine Guzzanti - Free user manual and instructions
Find the device manual for free GZ 115A Guzzanti in PDF.


| Brand | Guzzanti |
| Model | GZ 115A |
| Product Type | Sewing machine |
| Power Supply | 220-240 V, 50 Hz |
| Motor Power | 70 W |
| Stitch Selection | Rotary dial with 22 stitch patterns (utility, stretch, decorative) |
| Stitch Length Control | Adjustable from 0 to 4 mm, with SS position for stretch stitches |
| Reverse Stitch | Yes, lever control for sewing backwards |
| Needle Threader | Automatic needle threader |
| Bobbin Winding | Push-to-right spindle with automatic stop when full |
| Presser Foot Types | Snap-on: zigzag foot, buttonhole foot, zipper foot, hemmer foot (optional) |
| Free Arm | Yes, for sewing cuffs and sleeves |
| Extension Table | Removable, serves as accessory storage box |
| Lighting | LED light, automatic when switched on |
| Speed Control | Variable by foot pedal pressure |
| Darning Plate | Included for button sewing and free-motion work |
| Needle Plate | Standard with seam guide markings |
| Thread Tension | Dial adjustable, numbered 1-9 for upper thread |
| Recommended Needle Sizes | 9, 11, 14, 16; ball point for stretch fabrics |
| Safety Features | Auto shut-off? Not specified; always unplug before cleaning |
| Accessories Included | Bobbin, needle set, screwdriver, seam ripper, extension table, darning plate, various presser feet |
Frequently Asked Questions - GZ 115A Guzzanti
User questions about GZ 115A Guzzanti
0 question about this device. Answer the ones you know or ask your own.
Ask a new question about this device
Download the instructions for your Sewing machine in PDF format for free! Find your manual GZ 115A - Guzzanti and take your electronic device back in hand. On this page are published all the documents necessary for the use of your device. GZ 115A by Guzzanti.
USER MANUAL GZ 115A Guzzanti
natural_image
Two diagrams showing a slide with motion arrows indicating rotation, no text or symbols presentnatural_image
Technical line drawing of a mechanical component with no visible text or symbolsnatural_image
Technical line drawing of a mechanical assembly or tool (no text or symbols visible)Šití volným ramenem
natural_image
Technical line drawing of a sewing machine tool and its side view (no text or symbols)natural_image
Line drawing of a sewing machine needle and foot (no text or symbols)natural_image
Line drawing of a sewing machine needle and fabric component (no text or symbols)natural_image
Technical line drawing of a mechanical device with no visible text or symbols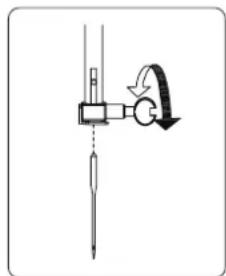
natural_image
Diagram of a mechanical device with a lever and curved arrow indicating motion (no text or symbols)natural_image
Diagram of a sewing machine needle being adjusted, showing no text or symbolsnatural_image
Illustration of a sewing machine needle stitching fabric (no text or symbols visible)natural_image
Simple line drawing of a lathe setup with a tool and a cup, no text or symbols presentnatural_image
Illustration of hands assembling or adjusting a mechanical component (no text or symbols visible)natural_image
Line drawing of a hand holding a small device with a scroll wheel and a downward arrow indicating motion (no text or symbols)natural_image
Line drawing of a hand holding a small object with a pointed tip, no text or symbols present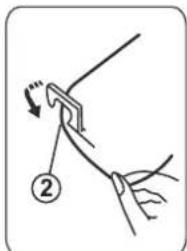
natural_image
Diagram of a bent tube with labeled point 3, no text or symbols present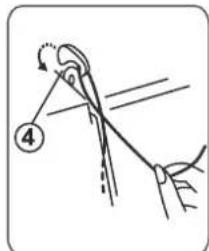
natural_image
Line drawing of a sewing machine needle and foot, no text or symbols presentnatural_image
Illustration of a sewing machine being adjusted for a sewing machine, showing hand positioning and tool path (no text or symbols)natural_image
Technical line drawing of a sewing machine needle and foot (no text or symbols)chemical
Diagram showing structural changes under stress and ric rac steh conditions, with +· SS·− group indicatednatural_image
Hand pressing a button on a surface, showing a finger pointing to the button (no text or symbols present)natural_image
Isometric diagram of a device with a lid and internal circuit board (no text or symbols)natural_image
Simple line drawing of a device with a rectangular component and a pen-like tool inserted into a button (no text or symbols)natural_image
Line drawing of a sewing machine needle and handle (no text or symbols)natural_image
Technical illustration of a sewing machine with a close-up inset showing the base detail (no text or symbols)natural_image
Illustration of a hand using a tool to generate a fan or antenna, with no visible text or symbols.natural_image
Line drawing of a sewing machine needle stitching a saw (no text or symbols)natural_image
Diagram of a sewing machine needle stitching a zigzag fabric (no text or symbols)natural_image
Line drawing of a sewing machine needle and foot (no text or symbols)natural_image
Diagram of a sewing machine needle stitching a slotted edge (no text or symbols)natural_image
Line drawing of a sewing machine needle stitching fabric (no text or symbols)natural_image
Technical line drawing of a sewing machine needle and base (no text or symbols)natural_image
Line drawing of a hand holding a flat object, no text or symbols presentnatural_image
Mechanical assembly diagram showing a sewing machine with two downward arrows indicating force or movement (no text or symbols present)natural_image
Line drawing of a sewing machine needle and handle assembly (no text or symbols)Spustte patku a šijte dál.
natural_image
Technical line drawing of a mechanical device with no visible text or symbolsnatural_image
Line drawing of a sewing machine (no text or symbols)Volič stehu nastavte na „điđ”
natural_image
Two identical circular objects on horizontal lines, no text or symbols presentnatural_image
Line drawing of a sewing machine needle and base (no text or symbols)natural_image
Technical line drawing of a sewing machine with spring and collar components (no text or symbols)natural_image
Technical line drawing of a sewing machine with a spring-loaded mechanism (no text or symbols)natural_image
Technical line drawing of a sewing machine with a spring scale and base plate (no text or symbols)natural_image
Illustration of a hand using a tool to draw a spring-like object, no text or symbols presentnatural_image
Line drawing of a hand holding a mechanical component (no text or symbols)natural_image
Technical line drawing of a mechanical component with no visible text or symbolsnatural_image
Line drawing of a sewing machine needle stitching fabric (no text or symbols)DÔLEŽITÉ BEZPEČNOSTNÉ POKYNY
natural_image
Two diagrams showing a mechanical device with rotational motion arrows, no text or symbols presentnatural_image
Technical line drawing of a mechanical component with no visible text or symbolsnatural_image
Technical line drawing of a mechanical assembly or tool (no text or symbols visible)natural_image
Technical line drawing of a sewing machine tool and its side view (no text or symbols)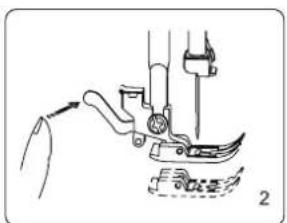
natural_image
Line drawing of a sewing machine needle and foot (no text or symbols)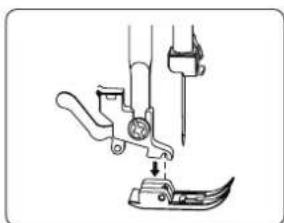
natural_image
Mechanical assembly diagram showing a sewing machine needle inserted into a boat's side (no text or labels)Otočte ručným kolieskom k sebe a zdvihnite ihlu do hornej úvrati. Zdvihnite pätku.
natural_image
Technical line drawing of a mechanical device with no visible text or symbols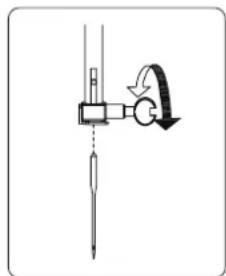
natural_image
Diagram of a mechanical device with a lever and curved arrow indicating motion (no text or symbols)natural_image
Diagram of a sewing machine needle being adjusted, showing no text or symbolsnatural_image
Illustration of a sewing machine needle stitching fabric (no text or symbols visible)natural_image
Simple line drawing of a lathe setup with a tool and a cup, no text or symbols presentnatural_image
Illustration of hands assembling or adjusting a mechanical component (no text or symbols visible)natural_image
Illustration of a hand holding a small device with a downward arrow indicating motion (no text or symbols)Nit' zasuňte do zárezu v puzdre.
natural_image
Illustration of a hand holding a small object with a pointed tip, no text or symbols presentPretiahnite nit' dol'ava, pod napínací pero až k otvoru.
*Nechajte pribl. 10 cm vol'nej nite.
natural_image
Diagram of a bent tube with labeled point (3), no text or symbols present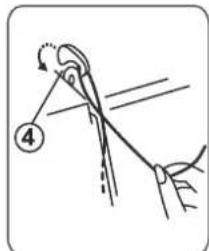
natural_image
Illustration of a rope being twisted with a handle, showing angle and measurement (no text or symbols)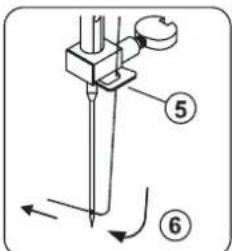
natural_image
Line drawing of a sewing machine needle and foot, no text or symbols presentnatural_image
Illustration of a sewing machine being adjusted for a sewing machine, showing hand positioning and tool path (no text or symbols)natural_image
Technical line drawing of a sewing machine needle and foot (no text or symbols)③ Vytiahnite obe nite pribl. 15 cm a položte dolava pod pätku.
chemical
Diagram showing structural changes under stress and ric rac steh conditions, with +·SS·− group indicatednatural_image
Hand pressing a button on a surface, showing a finger pointing to the button (no text or symbols present)natural_image
Isometric line drawing of a device with a lid and base plate, showing internal components (no text or symbols)Prekrytie podávača:
natural_image
Simple line drawing of a device with a rectangular component and a pen-like tool inserted into a button (no text or symbols)natural_image
Line drawing of a sewing machine needle and handle (no text or symbols)natural_image
Illustration of a hand using a tool to generate a starburst effect on a circuit board (no text or symbols present)natural_image
Line drawing of a sewing machine needle stitching a slotted fabric (no text or symbols)Nastavte stroj podl'a obrázka.
natural_image
Diagram of a sewing machine needle stitching a zigzag fabric (no text or symbols)natural_image
Line drawing of a sewing machine needle and foot assembly (no text or symbols)natural_image
Diagram of a sewing machine needle stitching a slotted fabric (no text or symbols)natural_image
Line drawing of a sewing machine needle stitching fabric (no text or symbols)natural_image
Technical line drawing of a sewing machine needle and base (no text or symbols)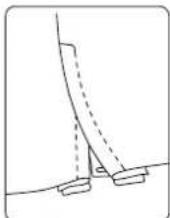
natural_image
Line drawing of a hand holding a flat object, no text or symbols presentnatural_image
Line drawing of a sewing machine needle and handle assembly (no text or symbols)Spustite pätku a šite d'alej.
natural_image
Technical line drawing of a mechanical device with no visible text or symbolsnatural_image
Technical line drawing of a sewing machine (no text or symbols)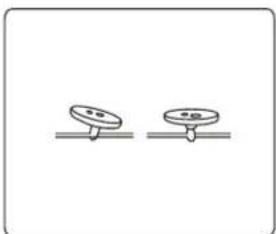
natural_image
Two identical circular objects on horizontal lines, no text or symbols presentnatural_image
Line drawing of a sewing machine needle and base (no text or symbols)natural_image
Technical line drawing of a sewing machine with spring and collar components (no text or symbols)Teraz ušite l'avú stranu. Nastavte volič pre vol'bu
natural_image
Technical line drawing of a sewing machine with a spring-loaded mechanism (no text or symbols)natural_image
Technical line drawing of a sewing machine with a spring scale and base plate (no text or symbols)natural_image
Illustration of a hand using a tool to draw a spring-like object, no text or symbols presentnatural_image
Line drawing of a sewing machine needle stitching fabric (no text or symbols)natural_image
Line drawing of a hand holding a mechanical component with no visible text or symbolsIhlu nastavte do hornej úvrate. Otvorte veko a vyberte puzdro.
natural_image
Technical line drawing of a mechanical component with no visible text or symbolsnatural_image
Line drawing of a sewing machine needle stitching fabric (no text or symbols)natural_image
Two diagrams showing a ramp mechanism with dashed arrows indicating rotational motion (no text or symbols)natural_image
Technical line drawing of a mechanical component with no visible text or symbolsnatural_image
Technical line drawing of a mechanical assembly or tool (no text or symbols visible)Swobodne szycie
natural_image
Technical line drawing of a sewing machine tool and its side view (no text or symbols)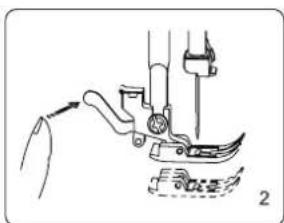
natural_image
Line drawing of a sewing machine needle and foot (no text or symbols)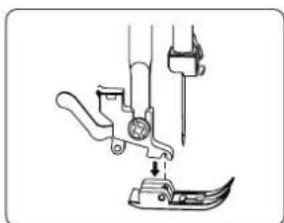
natural_image
Mechanical assembly diagram showing a sewing machine needle inserted into a boat (no text or labels)natural_image
Technical line drawing of a mechanical device with no visible text or symbols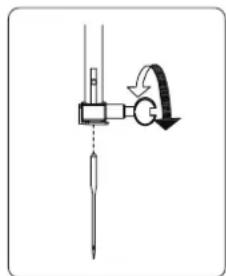
natural_image
Diagram of a mechanical device with a lever and curved arrow indicating motion (no text or symbols)natural_image
Diagram of a sewing machine needle being adjusted, showing no text or symbolsnatural_image
Line drawing of a sewing machine needle stitching fabric (no text or symbols)natural_image
Simple line drawing of a lathe setup with a tool and a cup, no text or symbols presentnatural_image
Line drawing of hands assembling a mechanical component (no text or symbols)natural_image
Illustration of a hand holding a small device with a downward arrow indicating motion (no text or symbols)natural_image
Line drawing of a hand holding a small object, possibly a tool or device, with no visible text or symbols.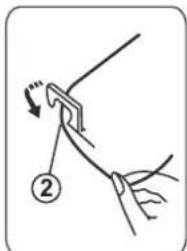
natural_image
Diagram of a bent tube with labeled point 3, no text or symbols present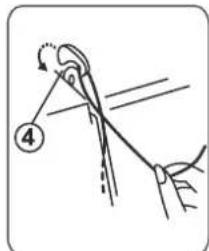
natural_image
Illustration of a hand holding a tool with a numbered label (4) and no visible text or symbols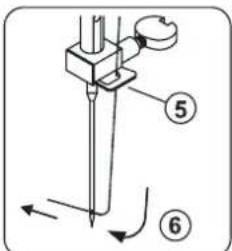
natural_image
Line drawing of a sewing machine needle stitching a garment (no text or symbols)natural_image
Illustration of a sewing machine being adjusted for a sewing machine, showing hand positioning and tool path (no text or symbols)natural_image
Technical line drawing of a sewing machine needle and foot (no text or symbols)chemical
Diagram showing structural changes under Strecz and Ścieg Ric rac conditions, with +· SS·− group indicatednatural_image
Line drawing of a hand pressing down on a button labeled 'P' with an arrow, no text or symbols presentnatural_image
Isometric diagram of a device with a lid and internal circuit board (no text or symbols)natural_image
Simple line drawing of a device with a battery and a lever (no text or symbols)natural_image
Line drawing of a sewing machine needle and handle (no text or symbols)natural_image
Mechanical sewing machine diagram showing needle insertion and base adjustment (no text or labels)natural_image
Illustration of a hand using a wind turbine to lift a component (no text or symbols visible)natural_image
Line drawing of a sewing machine needle stitching a saw (no text or symbols)natural_image
Line drawing of a sewing machine needle stitching a zigzag fabric (no text or symbols)natural_image
Line drawing of a sewing machine needle and foot assembly (no text or symbols)natural_image
Line drawing of a sewing machine needle stitching a slotted fabric (no text or symbols)natural_image
Line drawing of a sewing machine needle and chain (no text or symbols)natural_image
Technical line drawing of a sewing machine needle and base (no text or symbols)natural_image
Line drawing of a hand holding a flat object, no text or symbols presentnatural_image
Mechanical assembly diagram showing a sewing machine with two downward arrows indicating force or movement (no text or symbols present)natural_image
Line drawing of a sewing machine needle and handle assembly (no text or symbols)natural_image
Technical line drawing of a mechanical device with no visible text or symbols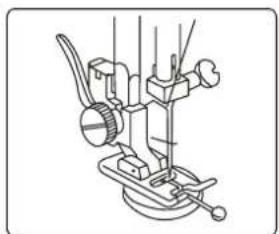
natural_image
Line drawing of a sewing machine needle and base mount (no text or symbols)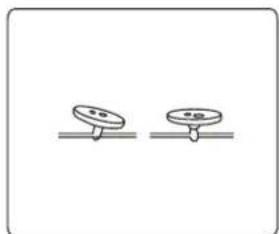
natural_image
Simple line drawing of two pushpins on a surface (no text or symbols)natural_image
Line drawing of a sewing machine needle and base (no text or symbols)natural_image
Technical line drawing of a sewing machine with spring and base mount (no text or symbols)natural_image
Technical line drawing of a sewing machine with spring and base mount (no text or symbols)natural_image
Technical line drawing of a sewing machine with a spring scale and base mount (no text or symbols)natural_image
Illustration of a hand using a tool to draw a spring-like object, no text or symbols presentnatural_image
Line drawing of a sewing machine needle stitching a chain of thread (no text or symbols)natural_image
Line drawing of a sewing machine needle and base (no text or symbols)natural_image
Line drawing of a hand holding a mechanical component with no visible text or symbolsnatural_image
Technical line drawing of a mechanical component with no visible text or symbolsnatural_image
Line drawing of a sewing machine needle stitching fabric (no text or symbols)natural_image
Two diagrams showing a slide with motion arrows indicating rotation, no text or symbols presentnatural_image
Technical line drawing of a mechanical component with no visible text or symbolsnatural_image
Technical line drawing of a mechanical assembly or tool (no text or symbols visible)Varrás szabadkarral
natural_image
Technical line drawing of a sewing machine tool and its side view (no text or symbols)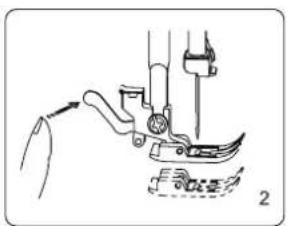
natural_image
Line drawing of a sewing machine needle and foot (no text or symbols)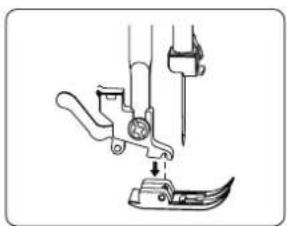
natural_image
Line drawing of a sewing machine needle and fabric component (no text or symbols)natural_image
Technical line drawing of a mechanical assembly with no visible text or symbols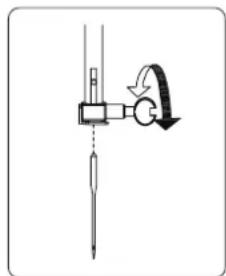
natural_image
Diagram of a mechanical device with a lever and curved arrow indicating motion (no text or symbols)natural_image
Diagram of a sewing machine needle being adjusted, showing force application and rotation (no text or labels)natural_image
Line drawing of a sewing machine needle stitching fabric (no text or symbols)natural_image
Simple line drawing of a lathe setup with a tool and a cup, no text or symbols presentnatural_image
Illustration of hands assembling a mechanical component (no text or symbols visible)natural_image
Illustration of a hand holding a small device with a downward arrow indicating motion (no text or symbols)natural_image
Illustration of a hand holding a small object with a pointed tip, no text or symbols present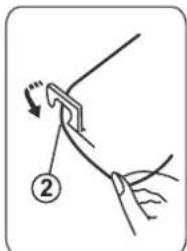
natural_image
Diagram of a bent tube with labeled point 3, no text or symbols present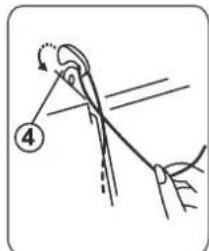
natural_image
Illustration of a hand holding a tool with a numbered label (4) and no visible text or symbols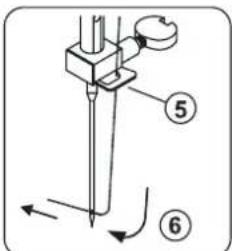
natural_image
Line drawing of a sewing machine needle insertion operation, showing needle insertion and base mount (no text or symbols)natural_image
Illustration of a sewing machine being adjusted for a sewing machine, showing hand positioning and tool path (no text or symbols)natural_image
Mechanical assembly diagram showing a foot and arm mechanism (no text or symbols)chemical
Chemical reaction diagram showing Sztreccs formation with SS and - chargesRic rac öltés
Visszavarró gomb
natural_image
Hand pressing a button on a surface, showing a finger pointing to the button (no text or symbols present)natural_image
Isometric diagram of a device with a lid and internal circuit board, no text or symbols presentnatural_image
Simple line drawing of a device with a rectangular component and a vertical tool inserted into a button (no text or symbols)natural_image
Line drawing of a sewing machine needle and handle (no text or symbols)natural_image
Technical illustration of a sewing machine with a close-up inset showing the base detail (no text or symbols)natural_image
Illustration of a hand using a tool to generate a fan-like structure, no text or symbols presentnatural_image
Line drawing of a sewing machine needle stitching a saw (no text or symbols)natural_image
Line drawing of a sewing machine needle stitching a zigzag fabric (no text or symbols)natural_image
Line drawing of a sewing machine needle and foot assembly (no text or symbols)natural_image
Line drawing of a sewing machine needle stitching a slotted fabric (no text or symbols)natural_image
Line drawing of a sewing machine needle stitching fabric (no text or symbols)natural_image
Technical line drawing of a sewing machine needle and base (no text or symbols)natural_image
Line drawing of a hand holding a flat object, no text or symbols presentnatural_image
Line drawing of a sewing machine needle and handle assembly (no text or symbols)natural_image
Technical line drawing of a mechanical device with no visible text or symbols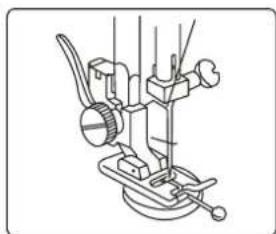
natural_image
Line drawing of a mechanical device with no visible text or symbols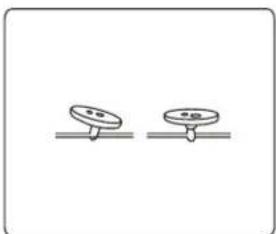
natural_image
Two identical circular objects on horizontal lines, no text or symbols presentnatural_image
Line drawing of a sewing machine needle and base (no text or symbols)natural_image
Technical line drawing of a sewing machine with spring and base mount (no text or symbols)natural_image
Technical line drawing of a sewing machine with a spring-loaded mechanism (no text or symbols)natural_image
Technical line drawing of a sewing machine with a spring scale and base plate (no text or symbols)natural_image
Illustration of a hand using a tool to draw a hairpin, with no text or symbols present.natural_image
Line drawing of a sewing machine needle stitching fabric (no text or symbols)natural_image
Line drawing of a hand holding a mechanical component with no visible text or symbolsnatural_image
Technical line drawing of a mechanical component with no visible text or symbolsnatural_image
Line drawing of a sewing machine needle stitching fabric (no text or symbols)natural_image
Two diagrams showing a mechanical device with rotational arrows indicating motion (no text or symbols)natural_image
Technical line drawing of a mechanical component with mounting holes and a curved bracket (no text or symbols)natural_image
Technical line drawing of a mechanical assembly or tool (no text or symbols visible)natural_image
Technical line drawing of a sewing machine tool and its side view (no text or symbols)natural_image
Line drawing of a sewing machine needle and foot (no text or symbols)Pritisnite na ročico in odstranite tačko.
natural_image
Line drawing of a sewing machine needle and fabric component (no text or symbols)Postavite novo tačko pod utor na nosilcu tačke. Spustite nosilec tačke, da tačka zaskoči.
Menjava igle
natural_image
Technical line drawing of a sewing machine tool and base (no text or symbols)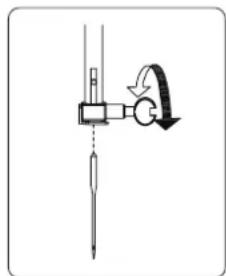
natural_image
Diagram of a mechanical device with a lever and curved arrow indicating motion (no text or symbols)Izvlecite nosilec omota sukanca. V odprtino vtaknite krajši konec.
natural_image
Diagram of a sewing machine needle being adjusted, showing no text or symbolsnatural_image
Line drawing of a sewing machine needle stitching fabric (no text or symbols)natural_image
Simple line drawing of a lathe setup with a tool and a cup, no text or symbols presentPotegnite sukanec iz omota. Napeljite ga okoli vodila sukanca za navijanje tuljavice. Napeljite sukanec skozi luknjico tuljavice od znotraj navzven. Tuljavico nataknite na vretence navijalca in potisnite jo v desno. S tem se deaktivira stroj in aktivira funkcija navijanja tuljavice. Pridržite prosti konec sukanca in pritisnite na pedal. Po nekaj ovojih ustavite navijanje ter odrežite sukanec tik ob tuljavici. Ponovno pritisnite na pedal. Ko je tuljavica polna, se navijanje samodejno ustavi. Potisnite vretence s tuljavico v prvotni položaj, tako da potisnete tuljavico v levo in odrežite sukanec.
natural_image
Line drawing of hands assembling a mechanical component (no text or symbols)natural_image
Illustration of a hand holding a small device with a downward arrow indicating motion (no text or symbols)Potegnite sukanec v zarezo na ohišju tuljavice.
natural_image
Illustration of a hand holding a small object with a pointed tip, no text or symbols presentPotegnite sukanec pod vzmet v podajno oko. *Pustite približno 10 cm prostega sukanca.
natural_image
Diagram of a bent tube with dashed lines indicating internal structure, labeled with number 3 (no text or symbols beyond label)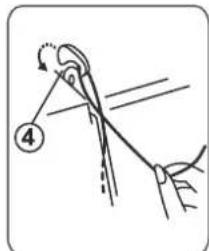
natural_image
Illustration of a hand holding a tool with a numbered label (4) and no visible text or symbols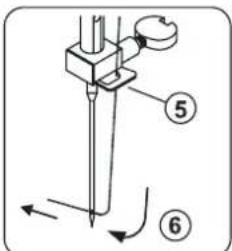
Z vrtenjem pogonskega kolesa proti sebi dvignite predajnik sukanca v njegov najvišji položaj. Dvignite tačko. Nataknite omot s sukancem na nosilec tako, da bo sukanec prihajal z zadnje strani.
- Napeljite sukanec čez vodilo sukanca.
- Potegnite sukanec v drugo vodilo ②.
- Pridržite sukanec pri omotu ter ga potegnite skozi napenjalni del ter nato okoli zaključka vodilne ploščice
- Potegnite sukanec navzgor in skozi oko predajnika sukanca z desne v levo.
- Vlecite sukanec navzdol ter skozi igelno vodilo sukanca.
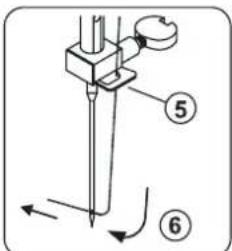
- Napeljite sukanec v iglo od spredaj nazaj.
natural_image
Line drawing of a sewing machine needle and foot (no text or symbols)-
Potegnite zanko sukanca skozi uho igle. Povlecite 10 cm sukanca pod tačko.
-
Spustite tačko v najnižji položaj. Kaveljček gre skozi uho sukanca.
- Potegnite sukanec s kaveljčka A na desno stran pod kaveljček.
① Dvignite tačko in primite prosti konec sukanca igle z levo roko.
natural_image
Illustration of a sewing machine being adjusted with a tool, showing the base and handle (no text or symbols present)② Zavrtite pogonsko kolo proti sebi tako, da predajnik sukanca obstane v najvišjem položaju. Rahlo potegnite igelni sukanec, sukanec tuljavice se izvleče v obliki zankice.
natural_image
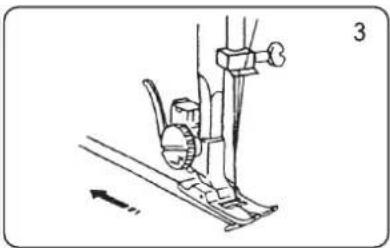
Technical line drawing of a sewing machine needle and foot (no text or symbols)③ Izvlecite približno 15 cm obeh sukancev in ju potegnite na levo pod tačko.
chemical
Diagram showing structural changes of Raztegljivi and Ricrac vbod with +·SS·− pair, indicating structural changes in a material.Gumb za vzvratno šivanje
natural_image
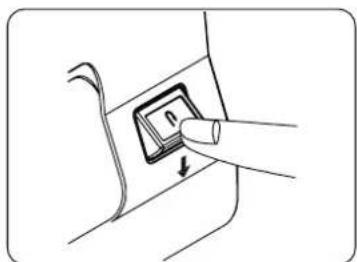
Hand pressing a button on a surface, showing a finger pointing to the button (no text or symbols present)Dokler pritiskate na ta gumb, stroj šiva vzvratno.
Pokrov grabljic
natural_image
Isometric line drawing of a device with a lid and base plate, showing internal components (no text or symbols)Prekritje predajnih grabljic:
natural_image
Simple line drawing of a device with a rectangular component and a mechanical lever (no text or symbols)natural_image
Line drawing of a sewing machine needle and foot (no text or symbols)Dvignite tačko in vstavite blago. Spustite tačko in pritisnite na pedal. Nežno vodite blago, ne vlecite ga.
natural_image
Technical illustration of a sewing machine with a close-up inset showing the base detail (no text or symbols)natural_image
Illustration of a hand using a sewing machine to lift a hairpin (no text or symbols visible)natural_image
Line drawing of a sewing machine needle stitching a saw (no text or symbols)natural_image
Diagram of a sewing machine needle stitching a zigzag fabric (no text or symbols)natural_image
Line drawing of a sewing machine needle and foot assembly (no text or symbols)natural_image
Diagram of a sewing machine needle stitching a slotted edge (no text or symbols)Vstavite blago pod tačko tako, da je rob rahlo pod desno stranjo tačke. Blago vodite tako, da so desni vbodi na robu blaga.
Trojni ojačani vbod
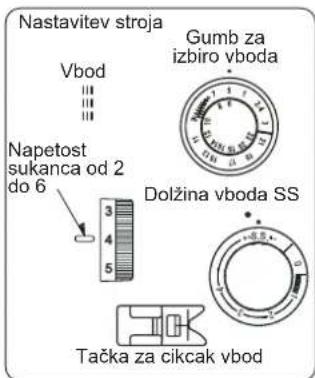
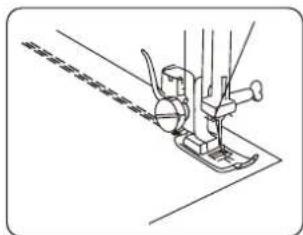
natural_image
Line drawing of a sewing machine needle stitching fabric (no text or symbols)natural_image
Technical line drawing of a sewing machine needle and base (no text or symbols)natural_image
Simple line drawing of a hand holding a piece of paper or tool, no text or symbols presentRob blaga dvakrat prepognite za 0,25 cm v dolžini 8 cm.
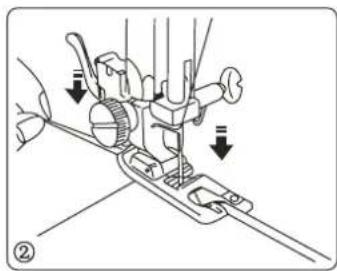
natural_image
Mechanical assembly diagram showing a sewing machine with two downward arrows indicating force or movement (no text or symbols present)Spustite iglo v blago in spustite tačko. Naredite 3-4 vbode in močno držite oba sukanca.
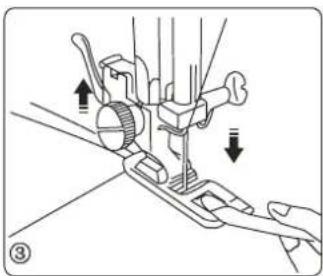
Pustite iglo v blagu, dvignite tačko in vstavite blago v vodilo za zvijanje.
natural_image
Line drawing of a sewing machine needle and handle assembly (no text or symbols)Spustite tačko in nadaljujte s šivanjem.
natural_image
Technical line drawing of a mechanical device with no visible text or symbolsnatural_image
Line drawing of a sewing machine needle and base mount (no text or symbols)Gumb za izbiro vboda nastavite na „k:supluknjici na gumbu se morata pokrivati z odprtinami na tački. Levo luknjico gumba dajte pod iglo. Spustite tačko in nastavite gumb za izbiro vboda tako, da je igla neposredno nad desno luknjico gumba. Naredite približno pet vbodov in dvignite iglo. Nastavite gumb za izbiro vboda na „k:supluknjici naredite še nekaj vbodov.
natural_image
Two identical circular objects on horizontal lines, no text or symbols presentZa ojačanje peclja odrežite sukanec tako, da ostane približno 20 cm. Potegnite sukanec navzdol skozi luknjico gumba ter ga nekajkrat ovijte okoli peclja. Nato ga potegnite na drugo stran in zavozlajte.
Šivanje gumbnic
natural_image
Line drawing of a sewing machine needle and base (no text or symbols)natural_image
Technical line drawing of a sewing machine with spring and base mount (no text or symbols)Sedaj šivajte levo stran. Nastavite gumb za izbiro vboda na in naredite 5 vbodov. Z vrtenjem kolesa dvignite iglo iz blaga.
natural_image
Technical line drawing of a sewing machine with spring and base mount (no text or symbols)e gumb za izbiro vboda na in naredite 5 vbodov. Z vrtenjem kolesa dvignite iglo iz blaga.
Nastavite gumb za izbiro vboda na šivajte desno stran gumbnice. Stroj sedaj šiva vzvratno. Z vrtenjem kolesa dvignite iglo v najvišji položaj.
natural_image
Technical line drawing of a sewing machine with a spring scale and base plate (no text or symbols)natural_image
Line drawing of a hand using a tool to draw a hair follicle from a spring (no text or symbols)Školjkast vbod je okrasni vbod, ki na robovih naredi školjkast vzorec. Vstavite rob blaga pod tačko in šivajte vzdolž roba.
natural_image
Line drawing of a sewing machine needle and base (no text or symbols)natural_image
Line drawing of a hand holding a mechanical component with no visible text or symbolsnatural_image
Technical line drawing of a mechanical component with no visible text or symbolsnatural_image
Line drawing of a sewing machine needle stitching fabric (no text or symbols)Odstranite iglo in tačko.
S krtačko iz pribora odstranite prah z grabljic in njihove okolice. Ponovno namestite vbodno ploščo in privijte vijake.
MOTNJE V DELOVANJU
natural_image
Two diagrams showing a ramp mechanism with dashed arrows indicating rotational motion (no text or symbols)natural_image
Technical line drawing of a mechanical component with no visible text or symbolsnatural_image
Technical line drawing of a mechanical assembly or tool (no text or symbols visible)Nähen mit Freiarm
natural_image
Technical line drawing of a sewing machine tool and its side view (no text or symbols)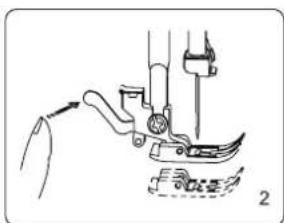
natural_image
Line drawing of a sewing machine needle and foot (no text or symbols)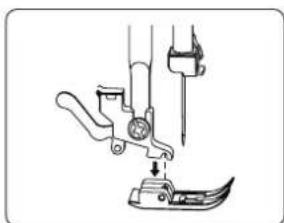
natural_image
Mechanical assembly diagram showing a sewing machine needle inserted into a boat (no text or labels)natural_image
Technical line drawing of a mechanical device with no visible text or symbols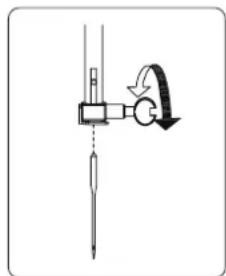
natural_image
Diagram of a mechanical device with a lever and curved arrow indicating motion (no text or symbols)natural_image
Diagram of a sewing machine needle being adjusted, showing no text or symbolsnatural_image
Line drawing of a sewing machine needle stitching fabric (no text or symbols)natural_image
Simple line drawing of a cooking step with a tool and a bowl (no text or symbols)natural_image
Illustration of hands assembling a mechanical component (no text or symbols visible)natural_image
Illustration of a hand holding a small device with a downward arrow indicating motion (no text or symbols)natural_image
Illustration of a hand holding a small object with a pointed tip, no text or symbols present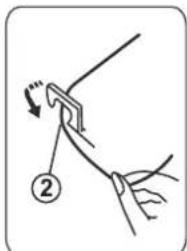
natural_image
Diagram of a bent tube with labeled point 3, no text or symbols present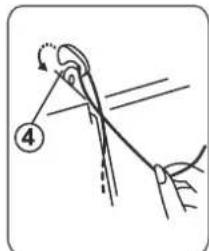
natural_image
Illustration of a hand holding a tool with a numbered label (4) and no visible text or symbols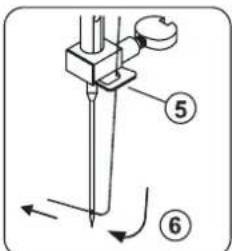
natural_image
Line drawing of a sewing machine needle and foot (no text or symbols)natural_image
Illustration of a sewing machine being adjusted for a sewing machine, showing hand positioning and tool path (no text or symbols)natural_image
Technical line drawing of a sewing machine needle and foot (no text or symbols)chemical
Chemical structures of Elastischer Stich and Zick-Zack-Stich with SS··- notationnatural_image
Hand placing a button on a surface, showing a finger pressing the button (no text or symbols)natural_image
Diagram of a device with an open lid and internal circuit board, showing mounting holes (no text or symbols)natural_image
Simple line drawing of a device with a rectangular component and a lever mechanism (no text or symbols)natural_image
Line drawing of a sewing machine needle and handle (no text or symbols)natural_image
Technical illustration of a sewing machine with an inset close-up showing the base detail (no text or symbols)natural_image
Illustration of a hand using a sewing machine to generate a fan-shaped object (no text or symbols visible)natural_image
Line drawing of a sewing machine needle stitching fabric (no text or symbols)natural_image
Line drawing of a sewing machine needle stitching a zigzag fabric (no text or symbols)natural_image
Line drawing of a sewing machine needle and foot assembly (no text or symbols)natural_image
Diagram of a sewing machine needle stitching a slotted fabric edge (no text or symbols)natural_image
Line drawing of a sewing machine needle and chain (no text or symbols)natural_image
Line drawing of a sewing machine needle stitching fabric (no text or symbols)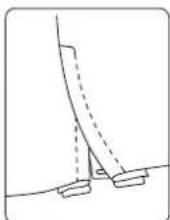
natural_image
Line drawing of a hand holding a flat object, no text or symbols presentnatural_image
Line drawing of a sewing machine needle and handle assembly (no text or symbols)natural_image
Technical line drawing of a mechanical device with no visible text or symbolsnatural_image
Technical line drawing of a sewing machine (no text or symbols)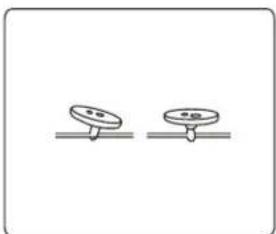
natural_image
Two identical circular objects on horizontal lines, no text or symbols presentnatural_image
Line drawing of a sewing machine needle and base (no text or symbols)natural_image
Technical line drawing of a sewing machine with spring and collar mechanism (no text or symbols)natural_image
Technical line drawing of a sewing machine with spring-loaded mechanism (no text or symbols)natural_image
Technical line drawing of a sewing machine with a spring scale and base plate (no text or symbols)natural_image
Line drawing of a hand holding a tool with a spring-like object, no text or symbols presentnatural_image
Line drawing of a mechanical component with a hand adjusting parts (no text or symbols)natural_image
Technical line drawing of a mechanical component with no visible text or symbolsnatural_image
Line drawing of a sewing machine needle stitching fabric (no text or symbols)IMPORTANT SAFETY INSTRUCTIONS
When using an electrical appliance, basic safety precautions should always be followed, including the following:
Read all instructions before using (this appliance).
DANGER — TO REDUCE THE RISK OF ELECTRIC SHOCK:
An appliance should never be left unattended when plugged in. Always unplug this appliance from the electric outlet immediately after using and before cleaning.
WARNING — TO REDUCE THE RISK OF BURNS, FIRE, ELECTRIC SHOCK, OR INJURY TO PERSONS:
- Do not allow to be used as a toy. Close attention is necessary when this appliance is used by or near children.
- Use this appliance only for its intended use as described in this manual. Use only attachments recommended by the manufacturer as contained in this manual.
- Never operate this appliance if it has a damaged cord or plug, if it is not working properly, if it has been dropped or damaged, or dropped into water. Return the appliance to the nearest authorized dealer or service center for examination, repair, electrical or mechanical adjustment.
- Never operate the appliance with any air openings blocked. Keep ventilation openings of the sewing machine and foot controller free from the accumulation of lint, dust, and loose cloth.
- Never drop or insert any object into any opening.
- Do not use outdoors.
- Do not operate where aerosol (spray) products are being used or where oxygen is being administered.
- To disconnect, turn all controls to the off ("O") position.then remove plug from outlet.
- Do not unplug by pulling on cord. To unplug, grasp the plug, not the cord.
- This appliance can be used by children aged from 8 years and above and persons with reduced physical, sensory or mental capabilities or lack of experience and knowledge if they have been given supervision or instruction concerning use of the appliance in a safe way and understand the hazards involved. Children shall not play with the appliance. Cleaning and user maintenance shall not be made by children without supervision
DANGER
- Do not reach for an appliance that has fallen into water. Unplug immediately.
- Do not place or store appliance where it can fall or be pulled into a lub or sink. Do not place or drop into water or other liquid.
English
WARNING
- Keep fingers away from all moving parts. Special care is required around the sewing machine needle.
- Always use proper needle plate. The wrong plate can cause the needle to break.
- Do not use bent needles.
- Do not pull or push fabric while stitching. It may deflect the needle causing it to break.
- Switch the sewing machine off ("O") when making any adjustments in the needle area, such as threading needle, changing needle, threading bobbin, or changing presser foot, etc.
- Always unplug sewing machine from the electrical outlet when removing covers, lubricating, or when making any other user ser. vicing adjustments mentioned in the instruction manual.
- Never operate on a soft surface such as a bed or couch where the air openings may be blocked
!!!! SAVE THESE INSTRUCTIONS !!!!!
220-240 V - 50 Hz
Motor: 70 W
Contents
IMPORTANT SAFETY INSTRUCTIONS.... 2
GETTING READY TO SEW 6
Extension Table (Accessory Storage Box) 7
To Snap On and Snap Off the Presser Foot....7
Changing needles....8
Thread and Needle Chart....8
Setting spool pin....9
Winding the Bobbin 9
Threading Bobbin Case....10
Threading the Machine....10
Using Automatic Needle Thread....11
Drawing up Bobbin Thread.... 12
Balancing Needle Thread Tension.... 12
Stitch Selector Dial 13
Stitch Length Control....13
Adjusting Stretch Stitch Balance 14
Reverse Stitch Control.... 14
BASIC SEWING....15
Straight Stitch Sewing 15
To Change the Sewing Directions 16
Zigzag Stitching....16
UTILITY STITCHING....17
Overcasting 17
Tricot Stitch....17
Overedge Stitch....17
Triple Strength Stitch....17
Zipper Application....18
Sewing Buttons.... 19
Buttonhole Stitching....21
DECORATIVE STITCHING....22
Shell Tuck....22
Stretch Stitch Patterns....22
CARE OF YOUR MACHINE....23
Cleaning the Feed Dogs....24
Trouble Shooting 25
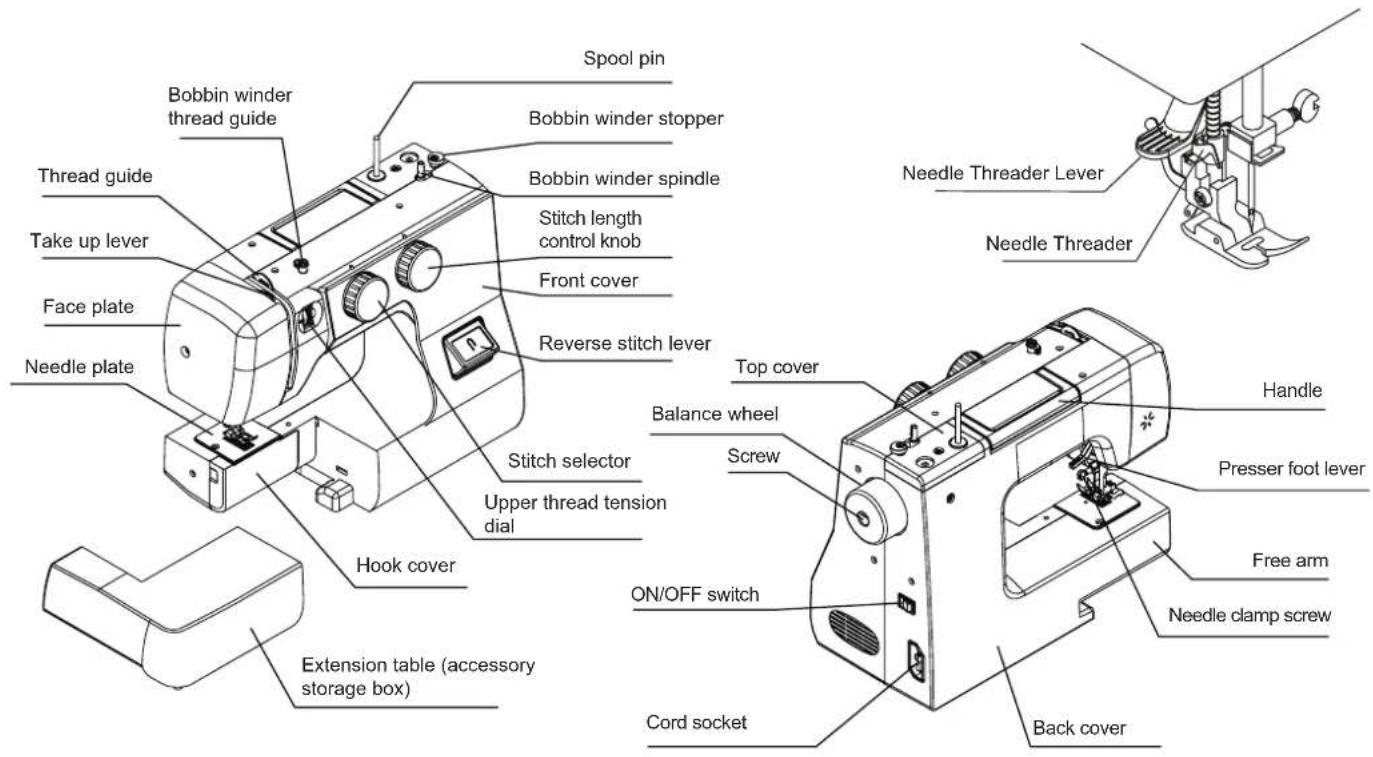
Parts diagram
GETTING READY TO SEW
Connecting the Machine to the Power Supply Foot control Sewing light
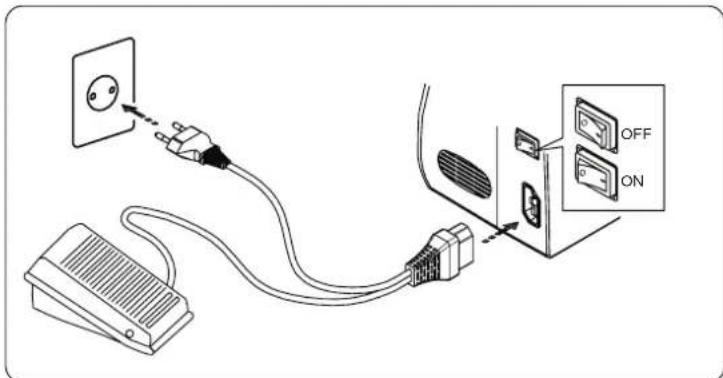
Before connecting the machine to the power supply, make sure that the voltage and frequency of your electricity matched that of the machine
Fit the nonreversible plug into the cord socket and plug the machine into the power supply
natural_image
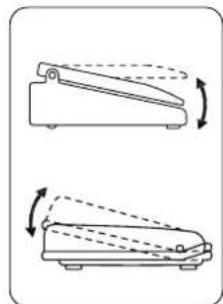
Two diagrams showing a lever mechanism with dashed arrows indicating rotational motion (no text or symbols)Sewing speed can be varied by the foot control.
The harder you press on the control, the faster the machine runs.
natural_image
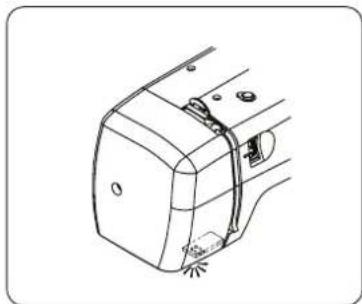
Technical line drawing of a mechanical component with no visible text or symbolsSewing machine is equipped with LED light. Switch machine ON, LED light will switch ON automatically and can be used immediately. If end-user has any problems with LED lighting system, please go to service station nearest you. DO NOT maintain LED lighting system by yourself to avoid any un-expected dangerous.
Extension Table (Accessory Storage Box)
Extension Table
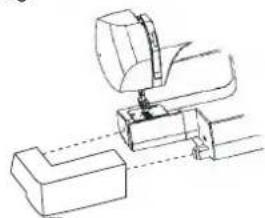
The extension table provides added sewing surface and can be easily removed for free arm sewing.
natural_image
Technical line drawing of a mechanical assembly or assembly (no text or symbols visible)For free arm sewing
Pull the end of the extension table away from the machine, as illustrated.
For attaching the table
Push the extension table toward the machine making sure that the locating pins are aligned
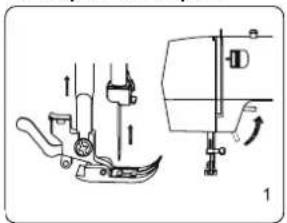
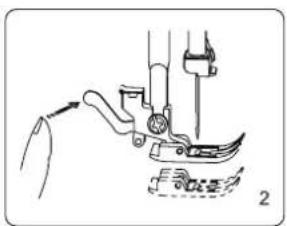
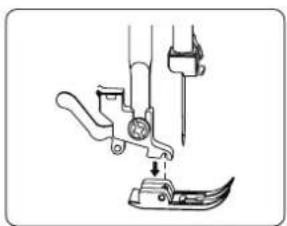
To Snap On and Snap Off the Presser Foot
To snap off To snap on
natural_image
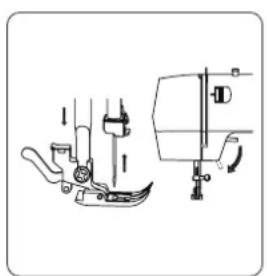
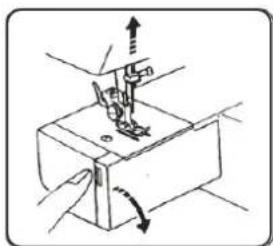
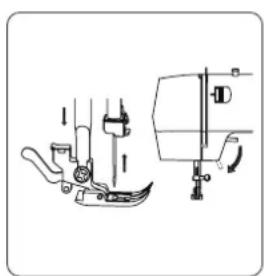
Technical line drawing of a sewing machine tool and its side view (no text or symbols)Turn the balance wheel toward you to raise the needle to its highest position. Raise the presser foot.
natural_image
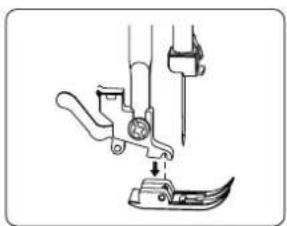
Line drawing of a sewing machine needle and foot (no text or symbols)Press the lever on the back of the foot holder. The presser foot will drop off.
natural_image
Line drawing of a sewing machine needle and fabric component (no text or symbols)Place the presser foot so the pin on the foot lies just under the groove of the foot holder. Lower the foot holder to lock the foot in place.
Changing needles
natural_image
Technical line drawing of a mechanical device with no visible text or symbols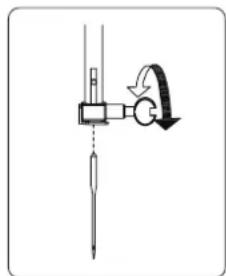
natural_image
Diagram of a mechanical device with a lever and curved arrow indicating motion (no text or symbols)Raise the needle by turning the balance wheel toward you and lower the presser foot.
Undo the needle clamp screw just enough to release the needle.
Switch off the machine and disconnect the machine from the power point.
Loosen the needle clamp screw by turning it counter-clockwise.
Remove the needle from the clamp.
Insert the new needle into the needle clamp with the flat side away from you.
When inserting the needle into the clamp, push it up as far as it will go and tighten the clamp screw firmly with the screwdriver. Please do not overtighten as this can snap the needle bar.
Thread the needle. Reconnect the machine to the power point, switch on the machine and continue to sew.
* Check your needles frequently for barbed or blunted points. Snags and runs in knits, fine silks and silk-like fabrics are permanent and are almost always caused by a damaged needle.
Thread and Needle Chart
- In general, fine threads and needles are used for sewing thin fabrics, and thicker threads and needles are used for sewing heavy fabrics. Always test thread and needle size on a small piece of fabric which will be used for actual sewing.
• Use the same thread for needle and bobbin - When sewing stretch, very fine fabrics and synthetics, use a BALL POINT needle. The blue tipped needle effectively prevents skipped stitches.
- When sewing very fine fabrics, sew over a piece of paper to prevent fabric distortion.
| Fabrics Threads Needle size | |||
| Light weight | Crepe de Chine, Voile Lawn, Organdy, Georgette, Tricot | Fine Silk Fine Cotton Fine Synthetic Fine Cotton Covered Polyester | 9 or 11 |
| Medium weight Linen, Cotton | Cotton, Pique, Serge, Double Knits, Percale | 50 silk 50 to 80 Cotton 50 to 60 Synthetic Cotton Covered Polyester | 11 or 14 |
| Heavy weight | Denim, Tweed, Gabardine, Coating, Drapery and Upholstery Fabrics | 50 silk 40 to 50 Cotton 40 to 50 Synthetic Cotton Covered Polyester | 14 or 16 |
| Denim Jeans needle (156) | |||
SETTING SPOOL PIN
Removing or Inserting the Bobbin Case Switch off the machine while doing this.
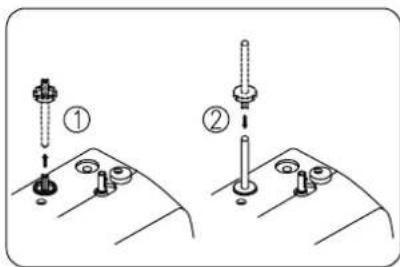
Pull out the spool pin. Insert the shorter side of spool pin into the machine.
natural_image
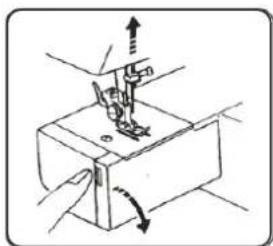
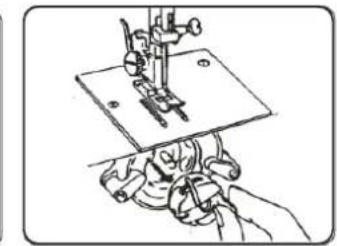
Diagram of a sewing machine needle being adjusted, showing no text or symbolsOpen the hook cover.
natural_image
Illustration of a sewing machine needle stitching fabric (no text or symbols visible)Raise the needle by turning the balance wheel toward you. Take out the bobbin case by holding the latch.
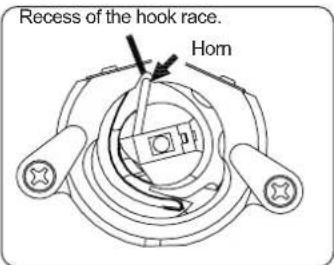
When inserting the bobbin case, place the horn into the recess of the hook race. Switch on the machine.
Winding the Bobbin
natural_image
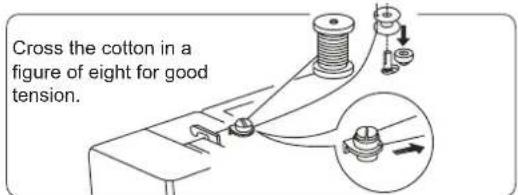
Simple line drawing of a cooking step with a tool and a bowl (no text or symbols)Draw thread from spool. Guide the thread around the bobbin winder thread guide.
Insert the thread through one of the holes in the bobbin from the inside to the outside.
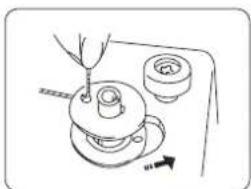
Put the bobbin on the bobbin winder spindle, and push it to the right. This will disengaged the machine and engage the spooling facility. With the free end of the thread held in your hand. Depress the foot control. Stop the machine when it has made a few turns, and cut the thread close to the hole in the bobbin. Depress the foot control again.
When the bobbin is fully wound, it will stop automatically.
Return the bobbin winder to its original position by moving the spindle to the left, and cut the thread.
Threading Bobbin Case
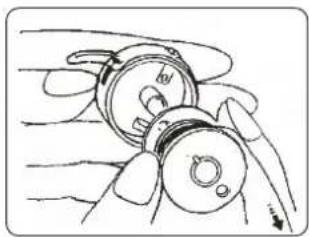
natural_image
Illustration of hands assembling or adjusting a mechanical component (no text or symbols visible)Place bobbin into bobbin case. Make sure the thread unwinds in the direction of arrow.
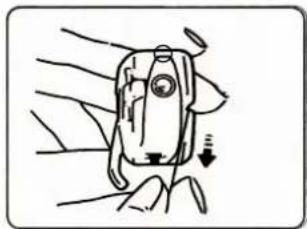
natural_image
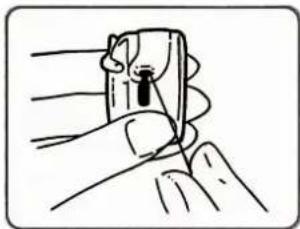
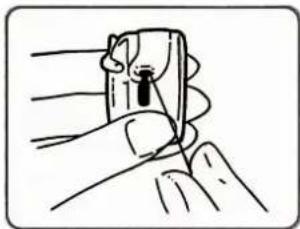
Illustration of a hand holding a small device with a downward arrow indicating motion (no text or symbols)Pull the thread into the bobbin case slot.
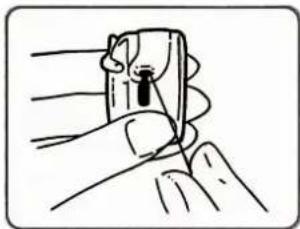
natural_image
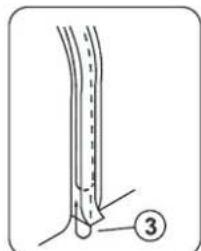
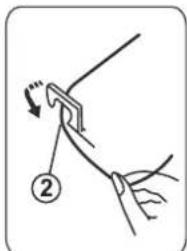
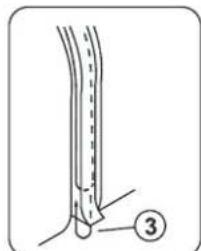
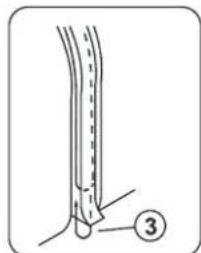
Illustration of a hand holding a small object with a pointed tip, no text or symbols presentDraw the thread under the tension spring and into the delivery eye.
* Leave about 10 cm (4 inches) of free thread.
Threading the Machine
Always thread your machine with the power off.
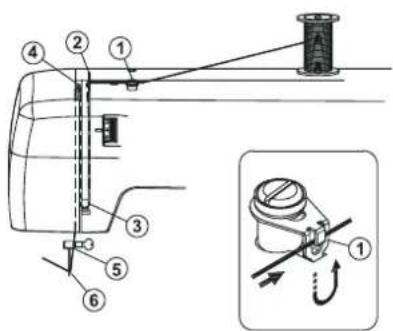
natural_image
Diagram of a bent tube with labeled point 3, no text or symbols present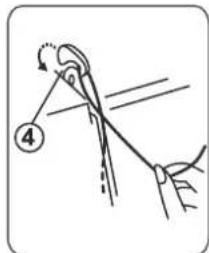
natural_image
Illustration of a mechanical device with labeled parts (no text or symbols present)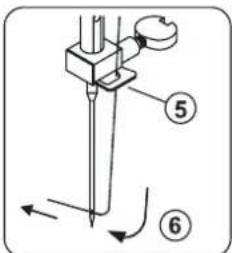
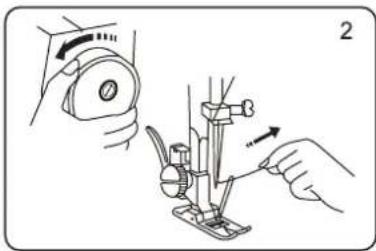
Raise take-up lever to its highest position by turning balance wheel toward you.
Raise presser foot.
Place spool on spool pin as shown, with thread coming from the back of the spool.
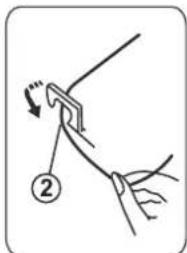
- Draw thread into thread guide using both hands.
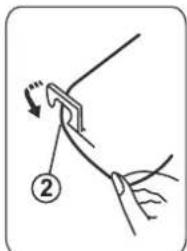
- Draw thread into the second ② thread guide using both hands.
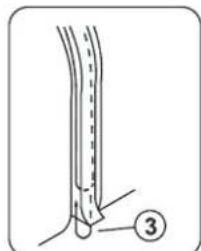
- While holding thread near spool, draw thread down into the tension area and then around the check spring holder.
- Firmly draw thread up and through take-up lever from right to left.
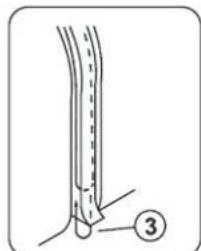
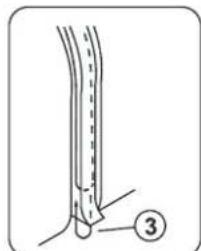
- Draw thread down and slip it into needle bar thread guide.
- Thread needle eye from front to back.
NOTE: You may want to cut the end of thread with a pair of sharp scissors for easier needle threading. Switch on the power after threading the machine and bobbin. Your are now ready to sew.
Using Automatic Needle Thread
Automatic threader function will be available only when machine comes with automatic threader.
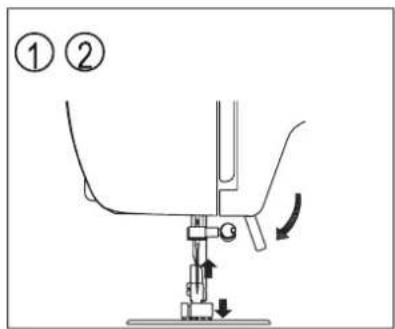
- Lower the presser foot.
- Raise the needle.
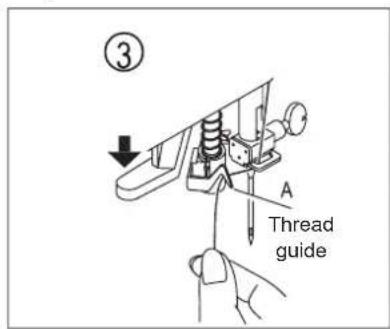
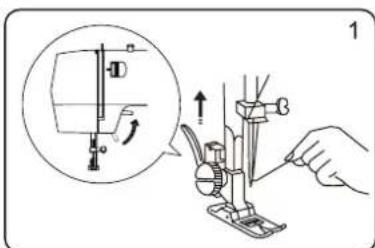
- Lower the needle threader lever slowly. Pass thread round hook as insert A.
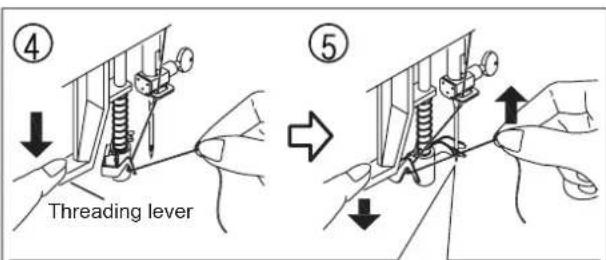
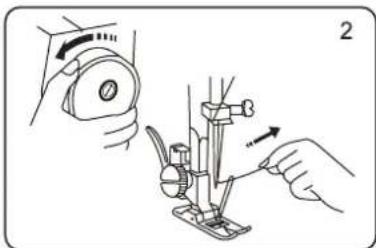
- Hold the thread loosely, release the lever. A thread loop will pass through the needle eye.
natural_image
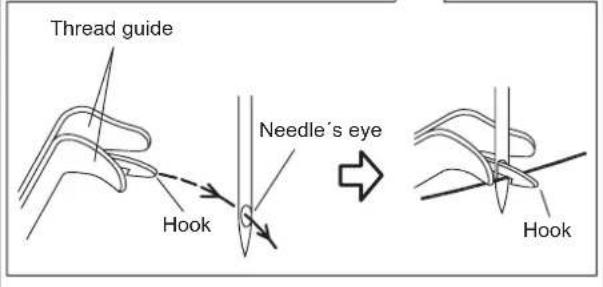
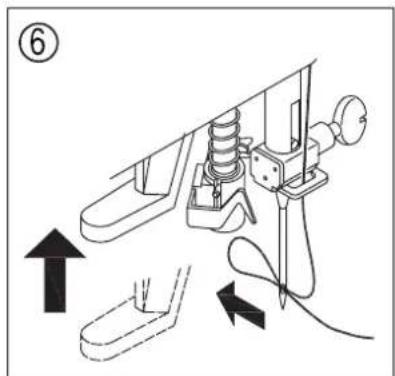
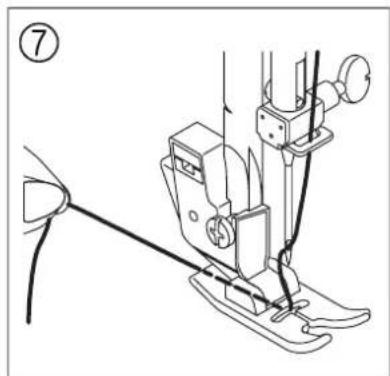
Line drawing of a sewing machine needle stitching a garment, no text or symbols present- Pull out thread loop through the needle eye. Pass a 10 cm length of thread under the presser foot.
- Lower the lever to its lowest position. Thread hook passes through needle eye.
- Bring thread from hook A to the right side under the hook.
NOTE: The needle threader is used with needles: sizes 11, 14 and 16.
Drawing up Bobbin Thread
① Raise presser foot and hold the needle thread lightly with your left hand.
natural_image
Illustration of a sewing machine being adjusted for a hand, showing the needle and base (no text or symbols present)② Turn the balance wheel slowly towards you with your right hand until the needle goes down and continue turning balance wheel until the take-up lever is at its highest position. Lightly draw up the needle thread forming a loop of the bobbin thread.
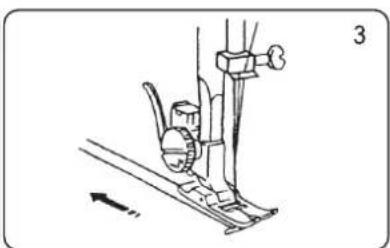
natural_image
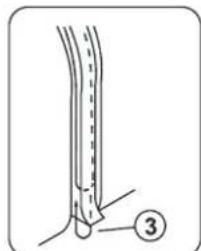
Technical line drawing of a sewing machine needle and foot (no text or symbols)③ Pull 15 cm (6") of both threads back and under the presser foot.
Balancing Needle Thread Tension
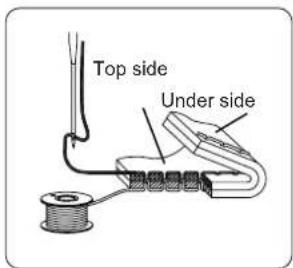
The needle thread and the bobbin thread should interlock in the center of two layers of fabric in straight stitch seams.
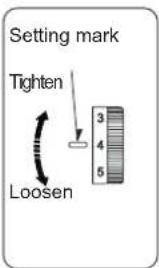
Set the desired number of the thread tension dial at setting mark.
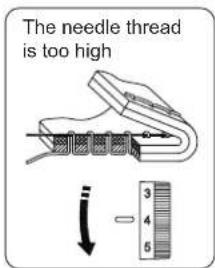
Loosen the needle thread tension by moving the dial to a lower number.
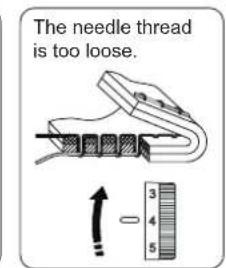
Tighten the needle thread tension by moving the dial to a higher number.
Thread Tension for Zigzag Sewing
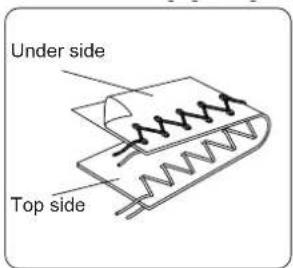
Upper tension should be slightly lower than in the case of straight sewing. The upper thread should appear slightly on the reverse side of the fabric.
Stitch Selector Dial
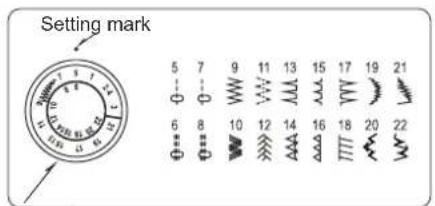
Stitch Selector
The stitch selector not only determines the stitch you select, but also regulates the stitch width for regular zigzag and rick rack stretch stitches.
NOTE: To avoid needle or fabric damage, be sure your needle is up and out of the fabric when adjusting this control.
Stitch Length Control
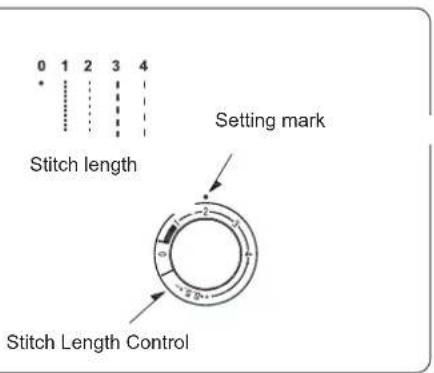
The stitch length control regulates the length of stitch, and also has a stretch stitches setting.
The higher the number, the longer the stitch.
„O“ means no feed.
Depending upon your fabric or your own preference in buttonholes, you may alter the buttonhole stitch density within the buttonhole range ( for the stitch length control.
Adjusting Stretch Stitch Balance
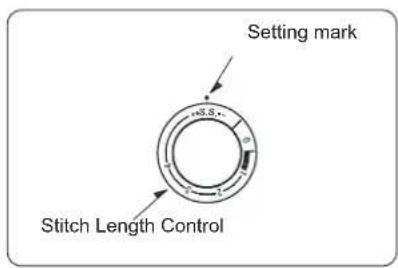
To select Stretch Stitches, set this control at SS position. In stretch stitch sewing.Stitch Length Control should be in the Center position between-and+(SSposition) for most materials. Depending upon the type of fabric used, you may need to adjust this control to match forward stitches of stretch sewing with reverse motion stitches.
To shorten stretch stitches, turn the control slightly toward "-" To lengthen, turn toward "+"
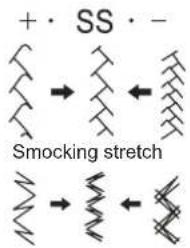
Ric rac stretch
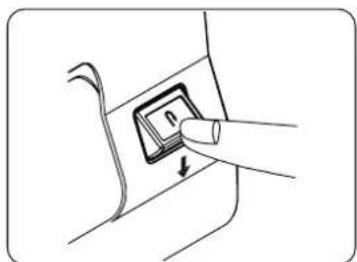
Reverse Stitch Control
natural_image
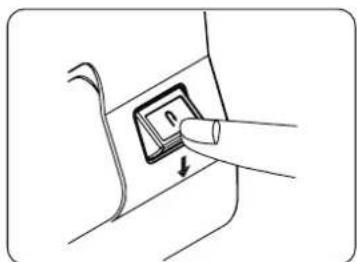
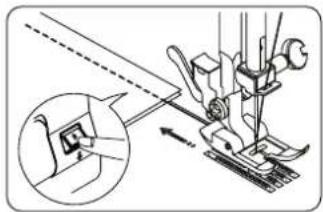
Hand pressing a button on a surface, showing a finger pointing to the button (no text or symbols present)As long as you keep the reverse stitch control depressed, the machine sews backwards.
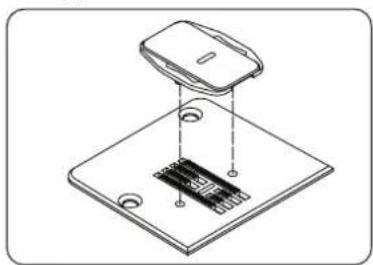
Darning plate
natural_image
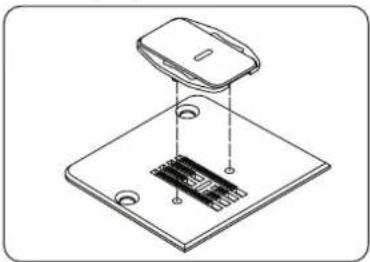
Isometric diagram of a device with a lid and internal circuit board (no text or symbols)To Put on the Darning Plate:
1. Position the darning plate with the 3 pins on the bottom.
2. Fit the darning plate pins into the needle plate holes. The feed dogs will show through the darning plate holes.
Left Needle Position
natural_image
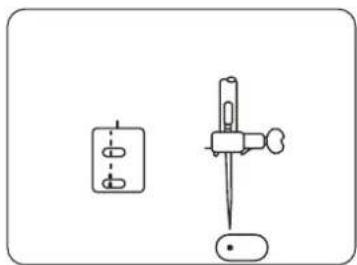
Simple line drawing of a device with a rectangular component and a vertical tool inserted into a button (no text or symbols)Use Left Needle Position for more, control while topstitching or edge stitching difficult fabrics. NOTE: Use only zigzag presser foot for Left Needle Sewing. For left needle position sewing please use stitch number 7 and 8 on stitch selection dial.
BASIC SEWING
Straight Stitch Sewing
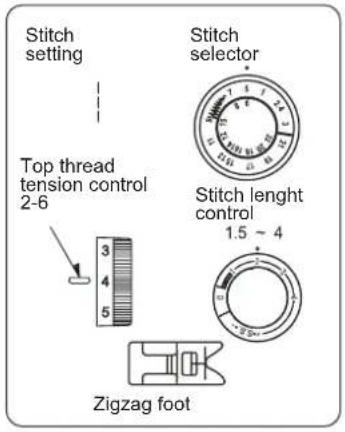
natural_image
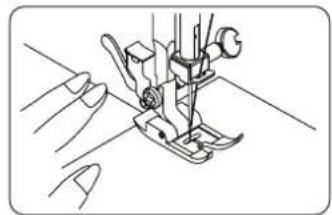
Line drawing of a sewing machine needle and foot (no text or symbols)Raise the presser foot and position the fabric under the presser foot.
Lower the presser foot and smooth the threads toward the back.
Depress the foot control.
Gently guide the fabric letting the fabric feed by itself.
natural_image
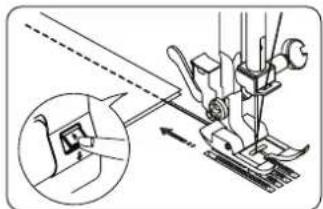
Technical illustration of a sewing machine with a close-up inset showing the base detail (no text or symbols)For fastening the ends of seams, press the reverse stitch control and sew several reverse stitches.
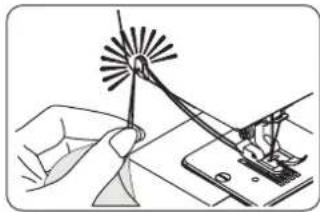
Raise the presser foot and remove the fabric, drawing the threads to the back.
If the fabric won't release turn the hand wheel towards you to complete the stitch, and gently pull out material.
natural_image
Illustration of a hand using a tool to generate a fan-like structure, with no visible text or symbols.The threads are cut to the proper length for the next seam
To Change the Sewing Directions
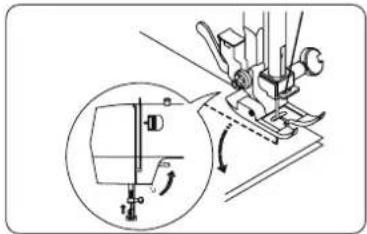
Stop the machine and turn the balance wheel toward you to bring the needle down into the fabric.
Raise the presser foot.
Pivot the fabric around the needle to change sewing direction as desired. Lower the presser foot and continue sewing.
Zigzag Stitching
natural_image
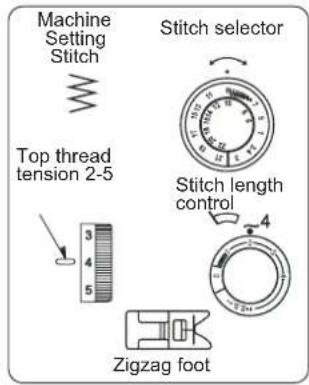
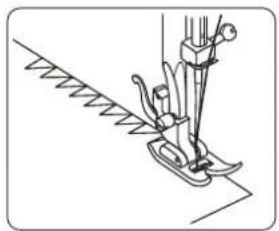
Line drawing of a sewing machine needle stitching a slotted fabric (no text or symbols)Simple zigzag stitching is widely used for overcasting, sewing on buttons etc.
UTILITY STITCHING
Overcasting
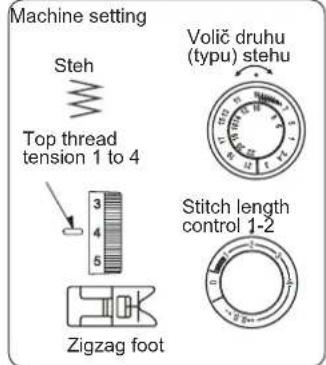
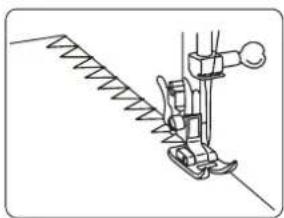
natural_image
Line drawing of a sewing machine needle stitching a zigzag fabric (no text or symbols)This type of stitch is used on the seam to prevent fabrics from fraying at raw edges.
Overedge Stitch
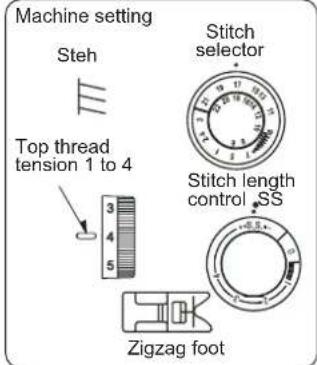
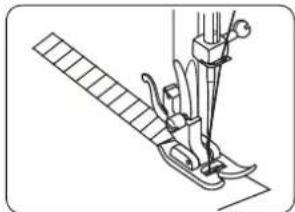
natural_image
Line drawing of a sewing machine needle and foot assembly (no text or symbols)Overedge stitches are most effective when the right side stitches of ZigZag fall slightly off the edge of the fabric.
Tricot Stitch
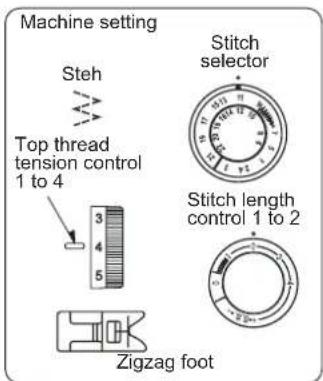
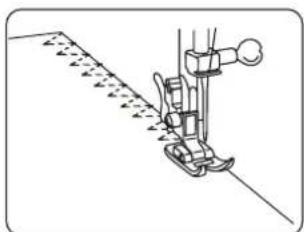
natural_image
Diagram of a sewing machine needle stitching a slotted fabric (no text or symbols)Triple Strength Stitch
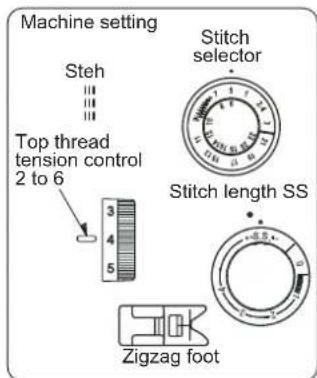
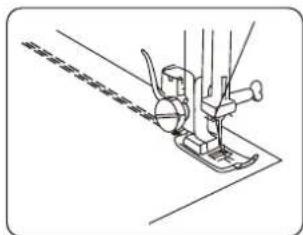
natural_image
Line drawing of a sewing machine needle stitching fabric (no text or symbols)The stitch is sewn with two stitches forward and one stitch backward forming a seam that does not rip easily. Garments should be basted for fitting before seaming. Basting stitch-large loose stitch also known as tucking stitch.
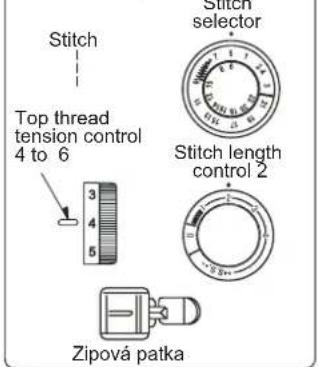
Zipper Application
Machine setting
natural_image
Technical line drawing of a sewing machine needle and base (no text or symbols)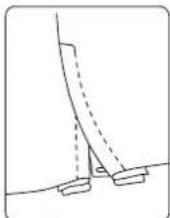
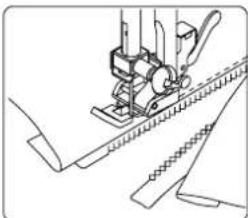
Pin or baste zipper tape to fabric and place it under the foot. Smooth the threads toward the back and lower the foot. To sew left side of the zipper, guide the edge of the zipper along the zipper teeth and stitch through garment and zipper tape. Turn the fabric over and sew the other side of the zipper in the same way as you did on the left side of the zipper.
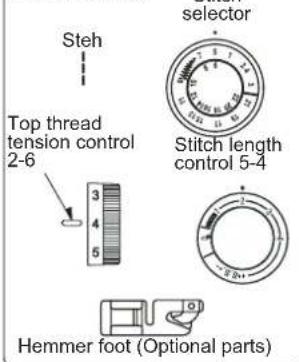
Rolled Hem
Machine setting
natural_image
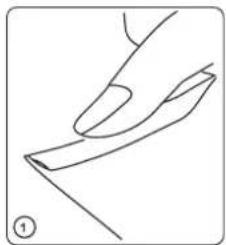
Line drawing of a hand holding a flat object, no text or symbols presentMake a double 0.25 cm (1/8") fold approximately 8 cm (3") in length.
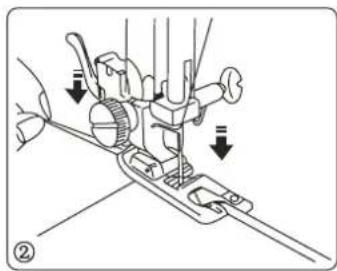
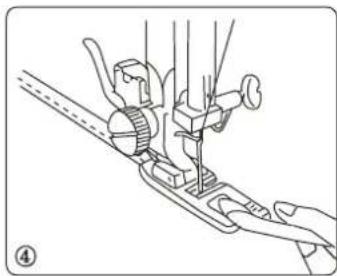
Lower the needle to the point where you are going to start sewing and then lower the hemmer foot. Sew 3 or 4 stitches while holding the needle and bobbin threads
natural_image
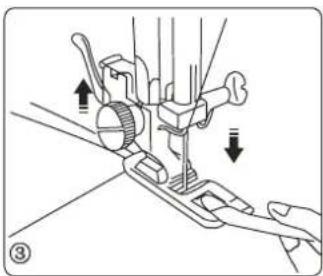
Diagram of a sewing machine needle and handle mechanism (no text or symbols)Insert the folded portion of the fabric into the curl of the hemmer foot.
natural_image
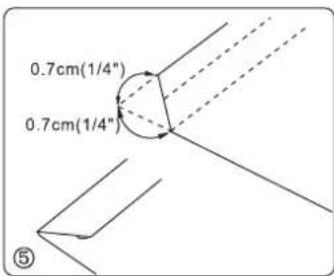
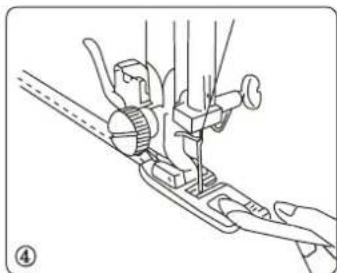
Line drawing of a sewing machine needle and handle assembly (no text or symbols)Lower the hemmer foot, then sew by lifting up the edge of the fabric to keep it feeding smoothly and evenly.
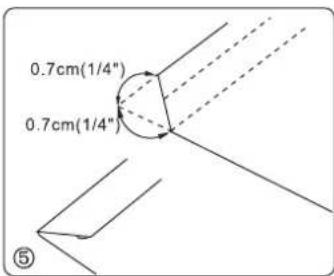
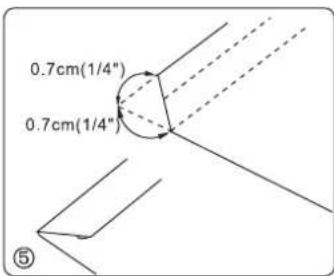
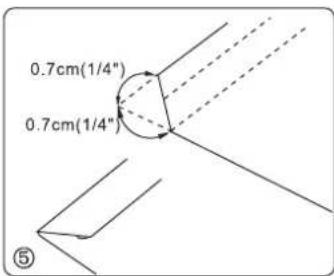
Trim about 0.7 cm (1/4") from corners as illustrated, to reduce bulk.
Sewing Buttons
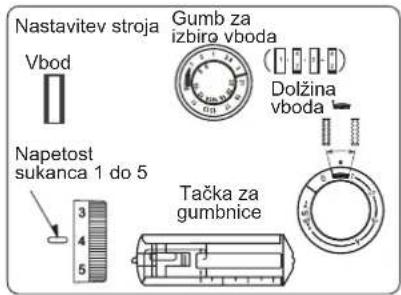
Machine Setting
Stitch

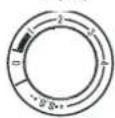
Stitch selector
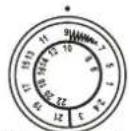
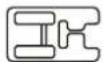
Zigzag foot
Top thread tension 1 to 4
Stitch length control any number (not necessary to adjust)
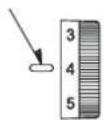
Darning plate
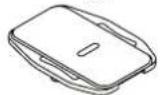
Use the darning plate for button sewing.
natural_image
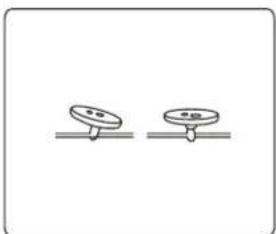
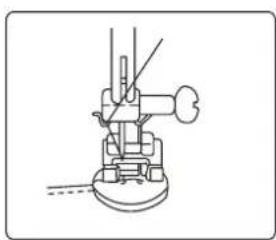
Technical line drawing of a mechanical device with no visible text or symbolsA pin can be placed on top of the button to form a shank.
Set the stitch selector at _
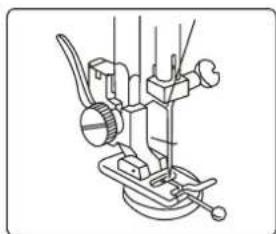
Align both holes of the button with the slot of the foot and place the left hole of the button just below the needle point. Lower the foot and turn the pattern selector until the needle point comes just above the right hole of the button. Sew about five stitches and raise needle. Set the stitch selector at
" again and sew a few stitches to lock thread.
natural_image
Line drawing of a sewing machine needle and base mount (no text or symbols)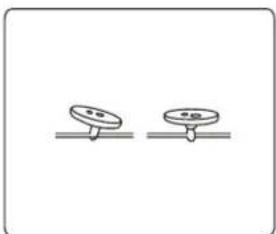
natural_image
Two identical circular objects on horizontal lines, no text or symbols presentTo strengthen the shank, cut the threads leaving a 20 cm (8") tail.
Bring the needle thread down through the hole in the button and wind it around the shank. Draw the thread to the wrong side and knot.
Buttonhole Stitching
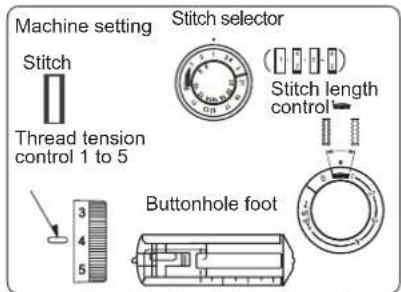
Make a sample button hole using a piece of the same material as the garment Place the button on the fabric sample and mark the top and bottom to determine the buttonhole length.
natural_image
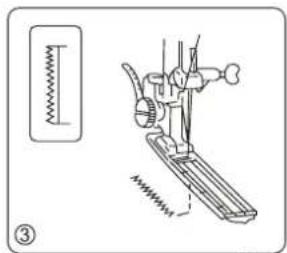
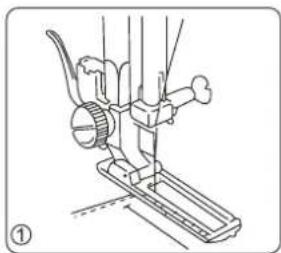
Line drawing of a sewing machine needle and base (no text or symbols)Set the stitch selector at ☐. Slide both threads to the left. Lower the needle into the garment where the buttonhole is to start, and lower the foot.
natural_image
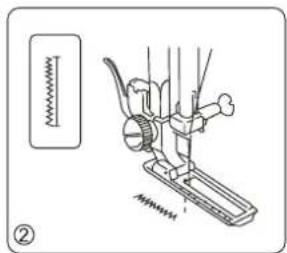
Technical line drawing of a sewing machine with spring and base mount (no text or symbols)Sew down the left side stopping at the bottom mark. Raise the needle.
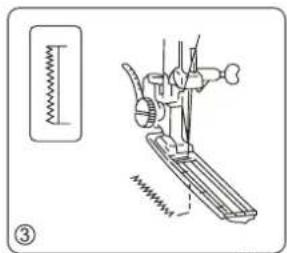
natural_image
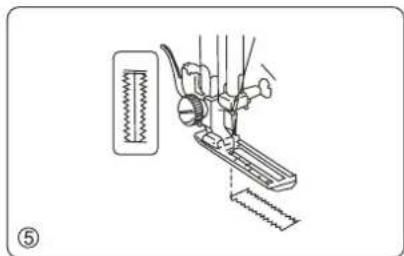
Technical line drawing of a sewing machine with spring and base mount (no text or symbols)Set the stitch selector at sew 5 stitches of bartack and raise the needle up from the fabric.
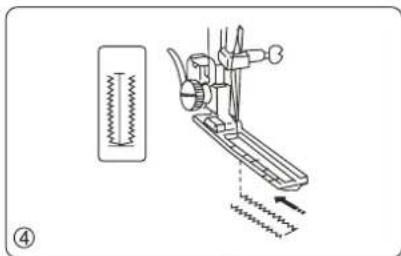
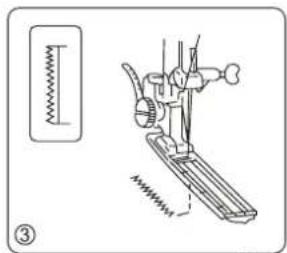
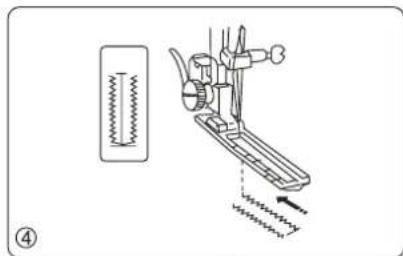
Set the stitch selector at ☐. Sew up the right side of the buttonhole. Stop the machine when you are directly opposite the first stitch on the left hand side and raise the needle.
natural_image
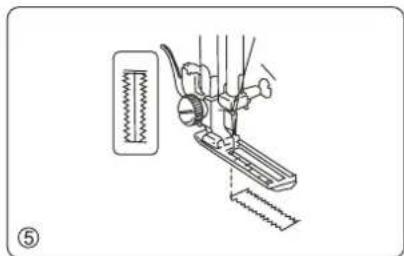
Technical line drawing of a sewing machine with a spring scale and base plate (no text or symbols)Set the stitch selector at 4. Sew 5 bartacks stitches and raise the needle up from the fabric. Set the stitch length control to "0" and the stitch selector at straight stitch sewing. Sew a few locking stitches.
natural_image
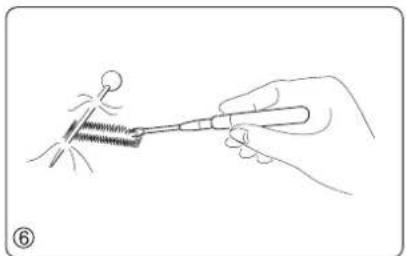
Illustration of a hand using a tool to draw a circular object, no text or symbols presentRemove the fabric from the machine and cut the sewing threads. Insert a pin inside the bartack. Then cut the opening with a seam ripper. Take care not to cut the stitches.
DECORATIVE STITCHING
Shell Tuck
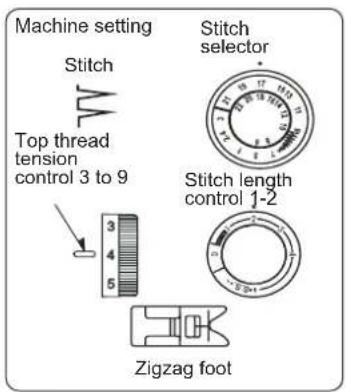
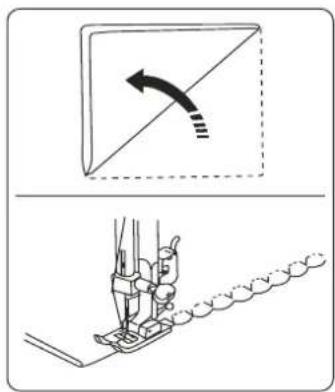
Place the folded edge along the slot of the foot. The needle should fall off the edge of the fabric on the right forming a tuck.
Stretch Stitch Patterns
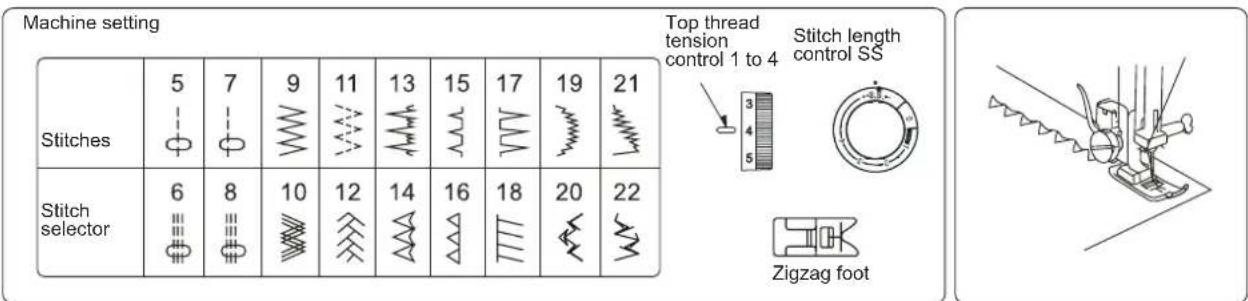
When forward and reverse feeds become unbalanced depending upon the type of fabric, correct the balance by turning the stitch length control as follows: When patterns are compressed, correct it by turning the dial toward "+". When patterns are drawn out, correct it by turning the dial toward "-".
CARE OF YOUR MACHINE
When caring for your machine, cleaning, removing the thread or any other function please make sure that the power is switched off and the machine is unplugged.
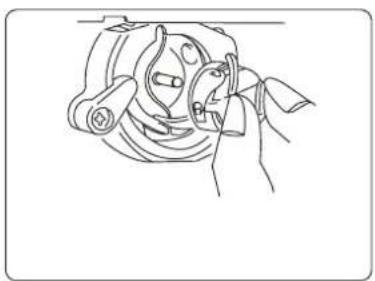
Dismantling and Assembling Hook Race CARE OF YOUR MACHINE
natural_image
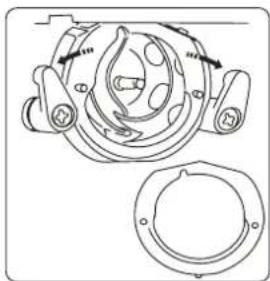
Line drawing of a mechanical component with a hand adjusting parts (no text or symbols)To dismantle hook race: Raise the needle to its highest position and open the hook cover.
Open the hinged latch of the bobbin case and remove it from it's position.
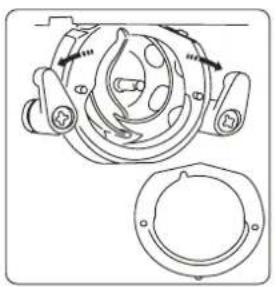
natural_image
Technical line drawing of a mechanical component with no visible text or symbolsOpen the hook race ring holders and remove the hook race ring.
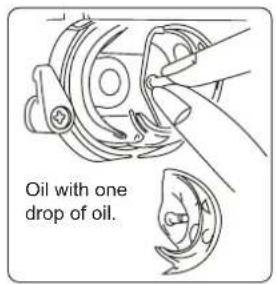
Remove the hook.
* Clean the hook race with a brush and a soft dry cloth
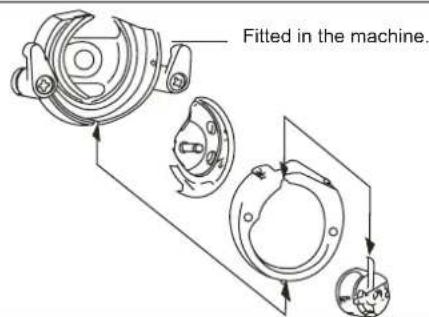
To assemble hook race:
Hold the hook by the center pin and fit it carefully back into the hook race, forming a perfect circle with the shuttle driver. Attach the hook race ring making sure bottom pin fits into the notch. Lock the hook race ring by turning the holders back into position. Insert the bobbin case. Thread the bobbin and machine, reconnect the power, switch on the machine and you are ready to sew.
Cleaning the Feed Dogs
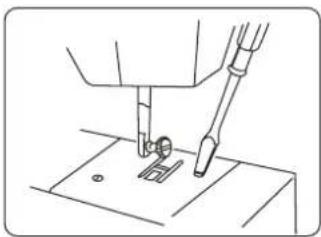
natural_image
Line drawing of a sewing machine needle stitching fabric (no text or symbols)Remove the needle and the presser foot. Unscrew the needle plate set screws and remove the needle plate
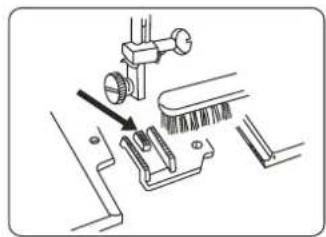
With a brush, clean out dust and lint clogging on the feed dog teeth. Replace the needle plate, tighten screws.
NOTE: It is easier if you lay the machine on its back to replace the race.
TROUBLE SHOOTING
| ConditionThe machine does not run smoothly and is noisy. | Case1Threads have been caught in hook mechanism.2.The feed dog is packed with lint. |
| The needle thread breaks. | 1.The needle thread is not threaded properly.2.The needle thread tension is too tight3.The needle is bent or blunt.4.The needle is incorrectly inserted.5.The fabric is not being drawn to the back when sewing is finished.6.The thread is either too heavy or too fine for the needle. |
| The needle breaks. 1. The needle is incorrectly inserted.2.The needle is bent or blunt.3.The needle clamp screw is loose.4.The tension of the needle thread is too tight.5.The fabric is not drawn to the back when sewing is finished.6.The needle is too fine for the fabric being sewn.7.The stitch selector has been turned while the needle was in the material. | |
| The bobbin thread breaks. | 1.The bobbin thread is not threaded properly in the bobbin case.2.Lint has collected in the bobbin case.3.The bobbin is damaged and doesn't turn smoothly. |
| Skipped stitches 1. The needle is incorrectly inserted.2. The needle is bent or blunt.3. The needle and/or threads are not suitable for the work being sewn.4. A BALL POINT needle is not being used for sewing stretch, very fine fabrics and synthetics.5. The needle thread is not threaded properly. |
| Seam Puckering 1. The needle thread tension is too tight.2. The machine is not threaded correctly.3. The needle is too heavy for the Cloth being sewn.4. The stitches are too long for the fabric being sewn.* When sewing extremely light weight materials, Place a sheet of tissue underneath the fabric. |
| Stitches form loops below the work.1. The needle thread tension is too loose.2. The needle is either too heavy or too fine for the thread. |
| The cloth is not feeding smoothly.1. The feed dog is packed with lint.2. The stitches are too fine. |
| The machine does not work.1. The machine is not plugged in.2. A thread is caught in the hook race.3. Bobbin wninding spindle is pushed to the right. |
| The buttonhole stitches are not balanced.1. Stitch length is not suitable for the fabric being sewn.2. The work is being pulled or held back. |
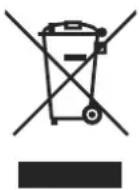
Meaning of crossed out wheeled dustbin:
Do not dispose of electrical appliances as unsorted municipal waste, use separate collection facilities.
Contact you local government for information regarding the collection systems available.
If electrical appliances are disposed of in landfills or dumps, hazardous substances can leak into the groundwater and get into the food chain, damaging your health and well-being.
When replacing old appliances with new ones, the retailer is legally obligated to take back your old appliance for disposals at least free of charge.
This appliance is not intended for use by persons (including children) with reduced physical, sensory or mental capabilities, or lack of experience and knowledge, unless they have been given supervision or instruction concerning use of the appliance by a person responsible for their safety.
Children should be supervised to ensure that they do not play with the appliance.
910960008-04 03-2020

- DÔLEŽITÉ BEZPEČNOSTNÉ POKYNY
- Visszavarró gomb
- Menjava igle
- Gumb za vzvratno šivanje
- Šivanje gumbnic
- Nähen mit Freiarm
- IMPORTANT SAFETY INSTRUCTIONS
- Read all instructions before using (this appliance).
- DANGER — TO REDUCE THE RISK OF ELECTRIC SHOCK:
- WARNING — TO REDUCE THE RISK OF BURNS, FIRE, ELECTRIC SHOCK, OR INJURY TO PERSONS:
- DANGER
- English
- WARNING
- !!!! SAVE THESE INSTRUCTIONS !!!!!
- Contents
- GETTING READY TO SEW
- Extension Table (Accessory Storage Box)
- To Snap On and Snap Off the Presser Foot
- Changing needles
- Thread and Needle Chart
- SETTING SPOOL PIN
- Winding the Bobbin
- Threading Bobbin Case
- Threading the Machine
- Using Automatic Needle Thread
- Drawing up Bobbin Thread
- Balancing Needle Thread Tension
- Stitch Selector Dial
- Stitch Length Control
- Adjusting Stretch Stitch Balance
- Reverse Stitch Control
- BASIC SEWING
- Straight Stitch Sewing
- To Change the Sewing Directions
- Zigzag Stitching
- UTILITY STITCHING
- Zipper Application
- Sewing Buttons
- Buttonhole Stitching
- DECORATIVE STITCHING
- Shell Tuck
- Stretch Stitch Patterns
- CARE OF YOUR MACHINE
- Cleaning the Feed Dogs
Brand : Guzzanti
Model : GZ 115A
Category : Sewing machine