GZ-118 - Sewing machine Guzzanti - Free user manual and instructions
Find the device manual for free GZ-118 Guzzanti in PDF.


| Product Type | Sewing Machine |
| Brand | Guzzanti |
| Model | GZ-118 |
| Dimensions (L x W x H) | 40 x 18 x 30 cm (15.7 x 7.1 x 11.8 in) |
| Weight | 5 kg (11 lbs) |
| Power Supply | 220-240 V, 50/60 Hz |
| Power Consumption | 70 W |
| Sewing Speed | Up to 800 stitches per minute |
| Stitch Types | 12 built-in stitches |
| Stitch Length | Adjustable (0-4 mm) |
| Stitch Width | Adjustable (0-5 mm) |
| Buttonhole Style | 1-step automatic buttonhole |
| Needle Threader | Automatic |
| Bobbin Winding | Automatic |
| Free Arm | Yes, for cuffs and sleeves |
| Built-in Light | Yes, LED |
| Presser Foot Lift | Up to 10 mm |
| Accessories Included | Multiple presser feet, needles, bobbins, seam ripper, etc. |
| Maintenance | Regular cleaning and oiling |
| Safety Features | Power switch, protective cover |
| Reparability | Spare parts available, user-replaceable consumables |
Frequently Asked Questions - GZ-118 Guzzanti
User questions about GZ-118 Guzzanti
0 question about this device. Answer the ones you know or ask your own.
Ask a new question about this device
Download the instructions for your Sewing machine in PDF format for free! Find your manual GZ-118 - Guzzanti and take your electronic device back in hand. On this page are published all the documents necessary for the use of your device. GZ-118 by Guzzanti.
USER MANUAL GZ-118 Guzzanti
natural_image
Line drawing of a sewing machine with no visible text or symbolsNávod k obsluze Návod na obsluhu Instrukcja obsługi Használati útmutató Navodila za uporabo Gebrauchsanleitung Instruction manual
OBSAH
1. DŮLEŽITÉ BEZPEČNOSTNÍ POKYNY

Příslušenství
natural_image
Technical line drawing of a mechanical assembly with tool and component (no text or symbols)

natural_image
Simple line drawing of a hand holding a stack of papers with a downward arrow (no text or symbols)
natural_image
Line drawing of a hand holding a circular object with a knob, no text or symbols present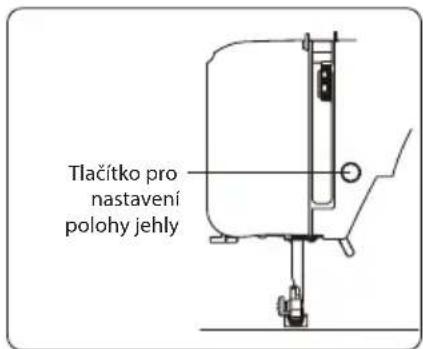
natural_image
Technical illustration of a sewing machine needle and its corresponding circuit board (no text or symbols)natural_image
Line drawing of a sewing machine needle with adjustment arrows (no text or symbols)Navíjení cívky
natural_image
Technical line drawing of a mechanical device with no visible text or symbols
natural_image
Illustration of a mechanical assembly with a hand holding a tool, no text or symbols present
natural_image
Illustration of a sewing machine needle being adjusted, showing hand positioning and fabric shift (no text or symbols)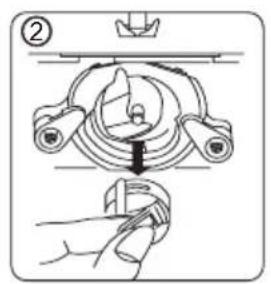

natural_image
Illustration of a hand holding a mechanical component with a curved arrow indicating rotation (no text or symbols)
natural_image
Diagram of a hand holding a device with a downward arrow indicating motion (no text or symbols)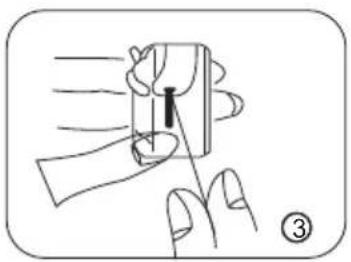
natural_image
Illustration of a hand holding a small object with motion lines indicating movement (no text or symbols)natural_image
Mechanical diagram showing a sewing machine with a curved arrow indicating rotation (no text or symbols)


natural_image
Illustration of a hand holding a tool with a curved object, labeled with number 3 (no text or symbols on the diagram itself)

natural_image
Illustration of a hand holding a tool with a pen inserted, no text or symbols present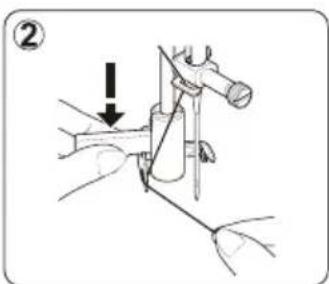


natural_image
Diagram of a sewing machine needle with a curved arrow indicating rotation (no text or symbols)

natural_image
Mechanical device diagram showing motion direction with arrows, no text or symbols presentnatural_image
Diagram of a wire spool and cable assembly with a numbered label (1), no text or symbols present.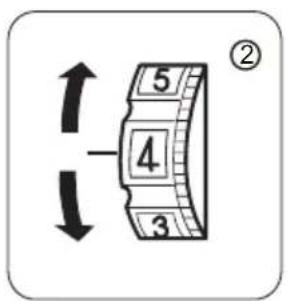


natural_image
Line drawing of a hand holding a circular object with a knob, no text or symbols present
UPOZORNĚNÍ
natural_image
Mechanical diagram showing a lever mechanism with a curved arrow indicating motion (no text or symbols present)natural_image
Line drawing of a foot pressing down on a wooden block, showing motion direction (no text or symbols)Zpětné šití
natural_image
Line drawing of a hand holding a tool interacting with a device (no text or symbols visible)
natural_image
Illustration of a sewing machine needle stitching a flat sheet, with an arrow indicating fabric direction (no text or symbols)3. Šití křivek
natural_image
Two gray 3D-rendered objects with curved surfaces, one being folded and the other lying flat (no text or symbols)natural_image
Technical illustration of a sewing machine needle stitching fabric (no text or symbols)Přišívání knoflíků
CZ


natural_image
Two diagrams showing a screw fastening mechanism: one with a curved screw and the other with a threaded screw (no text or symbols)natural_image
Line drawing of a hand holding a circular object with a ring, no text or symbols present
natural_image
Technical line drawing of a sewing machine with a close-up inset showing a detail (no text or symbols)
Užitečný tip:
natural_image
Technical illustration of a sewing machine with a close-up inset showing the mechanism (no text or symbols)

natural_image
Two technical line drawings of sewing machine components, showing front and side views with no text or symbols.

natural_image
Mechanical assembly diagram showing a motor with rotating components and directional arrows (no text or labels)natural_image
Technical line drawing of a sewing machine with a flange and mechanical components (no text or symbols)
natural_image
Technical line drawing of a mechanical device with no visible text or symbols
natural_image
Technical line drawing of a mechanical device with no visible text or symbols
natural_image
Technical line drawing of a sewing machine with a circular component inserted, showing no text or symbols.natural_image
Mechanical assembly diagram showing a rotating motor with directional arrows (no text or labels)
natural_image
Technical line drawing of a mechanical device with a magnified inset showing a circular component (no text or symbols)natural_image
Technical line drawing of a mechanical assembly with three bolts and a base plate (no text or symbols)natural_image
Technical line drawing of a sewing machine needle stitching fabric into a circuit board (no text or symbols)CZ
natural_image
Symbol of a trash bin crossed with two diagonal lines, representing no waste or discharge (no text or labels)
DÔLEŽITÉ BEZPEČNOSTNÉ POKYNY
Nastavte prepínač napájania/osvetlenia na „vypnuté“
natural_image
Technical line drawing of a mechanical assembly with tool and component (no text or symbols)

natural_image
Simple line drawing of a hand holding a stack of coins with a downward arrow (no text or symbols)
natural_image
Line drawing of a hand holding a circular object with a knob, no text or symbols present
Zapustenie podávača

natural_image
Technical illustration showing a sewing machine needle stitching fabric strips (no text or symbols)
natural_image
Line drawing of a hand operating a device with three buttons and an arrow indicating motion (no text or symbols)Navíjanie cievky

natural_image
Illustration of a cartoon character being assisted by a hand using a tool (no text or symbols)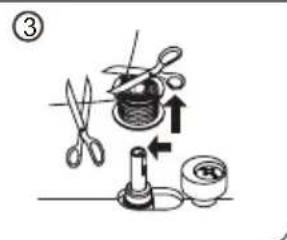
natural_image
Illustration of a sewing machine needle stitching fabric, showing hand positioning and cutting edge (no text or symbols)

natural_image
Illustration of a hand holding a mechanical component with a curved arrow indicating rotation (no text or symbols)
natural_image
Diagram of a hand holding a device with motion lines and a downward arrow, no text or symbols present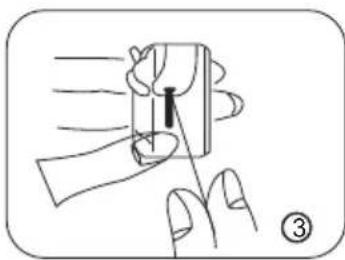
natural_image
Illustration of a hand holding a small object with motion lines, no text or symbols presentnatural_image
Mechanical assembly diagram showing a sewing machine with a rotating arm (no text or symbols)


natural_image
Simple line drawing of two mechanical components with a numbered label (1) and connecting lines, no text or symbols present.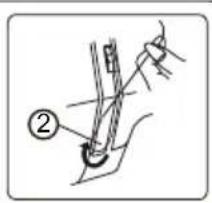

natural_image
Simple line drawing of a rope being inserted into a wire, no text or symbols present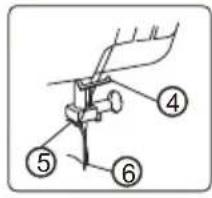
Dvojihla
Postup navlečenia dvojihly:
natural_image
Illustration of a hand holding a tool with a pen inserted, no text or symbols present


natural_image
Diagram of a mechanical device with a curved arrow indicating rotation (no text or symbols present)


natural_image
Mechanical diagram showing a device with motion arrows indicating movement (no text or symbols)natural_image
Diagram of a wire spool and cable being inserted into a damaged package, with no text or symbols present.


natural_image
Line drawing of a hand holding a circular object with a knob, no text or symbols present
UPOZORNENIE
natural_image
Mechanical diagram showing a lever mechanism with a curved arrow indicating motion (no text or symbols present)natural_image
Line drawing of a hand pressing down on a rectangular object with a curved band, no text or symbols present
natural_image
Line drawing of a hand holding a small electronic component with wires inserted (no text or symbols)
Spätné šitie
Spätné šitie
natural_image
Illustration of a sewing machine needle stitching a flat sheet, with an arrow indicating fabric direction (no text or symbols)3. Šitie kriviek
1). Zastavte šijací stroj a mierne zmeňte smer šitia, aby ste šili okolo krivky.
2). Pokial' chcete šit' pozdlž krivky kl'ukatým stehom, nastavte kratšiu dížku stehu, získate tak jemnejší steh.
natural_image
Two gray 3D-rendered objects with curved surfaces, one folded and the other flat, both with a black ribbon (no text or symbols)natural_image
Technical illustration of a sewing machine needle stitching fabric (no text or symbols)Prišívanie gombíkov


natural_image
Two mechanical components with threaded fasteners, shown from different angles (no text or symbols)natural_image
Line drawing of a hand holding a circular object with a ring, no text or symbols present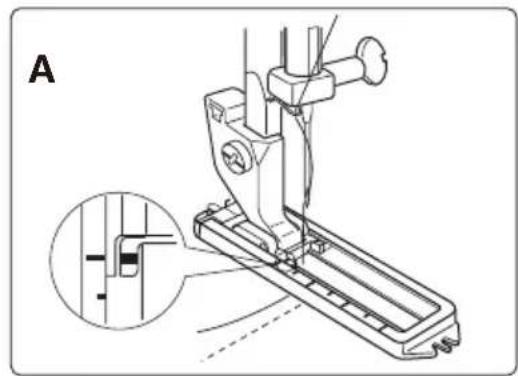
natural_image
Technical line drawing of a sewing machine with a close-up inset showing the base detail (no text or symbols)
Užitočný tip:


natural_image
Two technical line drawings of sewing machine components, showing front and side views with no text or symbols.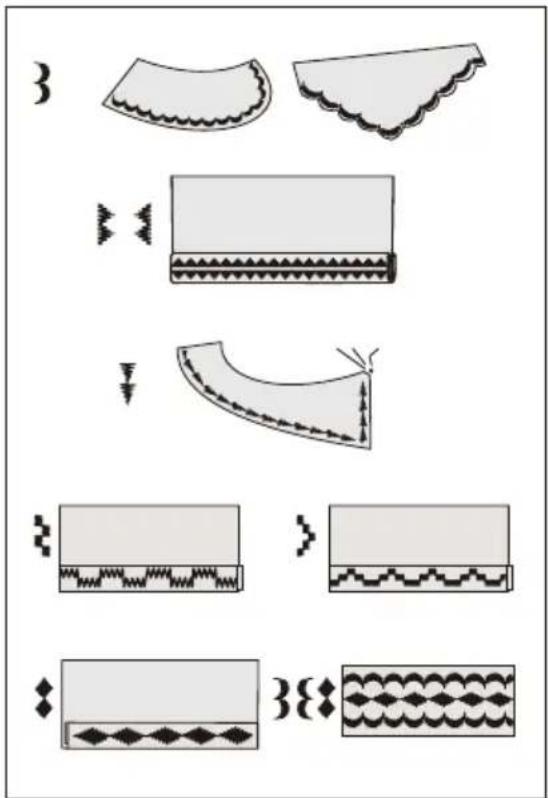
STAROSTLIVOSŤ O ŠIJACÍ STROJ
Vybratie a nasadenie chapača
Vybratie a premazanie chapača.
Zdvihnite ihlu do najvyššej polohy a otvorte kryt chapača.


natural_image
Mechanical assembly diagram showing a motor with rotating components and directional arrows (no text or labels)-
Uchopte člnok za zarážku a vyberte ho zo stroja.
-
Odblokujte zaistovacie páčky chapača posunutím do strán.

natural_image
Technical line drawing of a mechanical device with no visible text or symbols
natural_image
Technical line drawing of a mechanical device with no visible text or symbols
natural_image
Technical line drawing of a sewing machine with a circular component inserted, showing no text or symbols.natural_image
Mechanical assembly diagram showing a rotating motor with directional arrows (no text or labels)
natural_image
Technical line drawing of a mechanical device with a magnified inset showing a circular component (no text or symbols)natural_image
Technical line drawing of a mechanical assembly with three bolts and a base plate (no text or symbols)natural_image
Technical line drawing of a sewing machine needle stitching fabric into a circuit board (no text or symbols)SK
natural_image
Symbol of a trash bin crossed with no text or numbers, representing environmental restriction (no text present)
Akcesoria
natural_image
Technical line drawing of a mechanical assembly with tool and component (no text or symbols)

natural_image
Simple line drawing of a hand holding a piece of paper with a downward arrow (no text or symbols)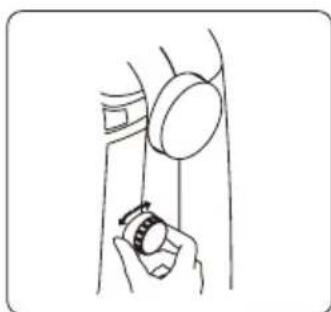
natural_image
Line drawing of a hand holding a circular object with a ring, no text or symbols present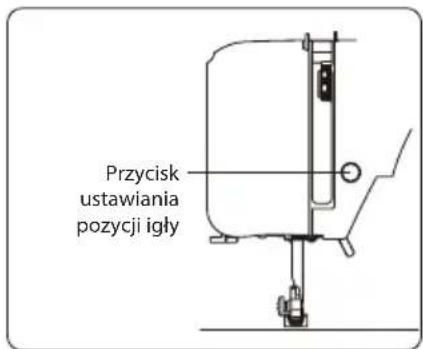

natural_image
Illustration of a sewing machine needle stitching fabric (no text or symbols)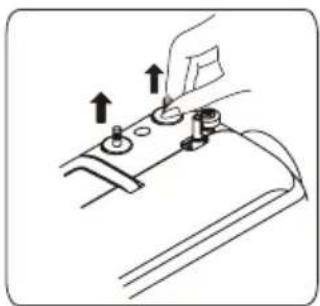
natural_image
Line drawing of a hand operating a sewing machine with tools and buttons (no text or symbols)Nawijanie szpuli
natural_image
Technical line drawing of a mechanical device with no visible text or symbols
natural_image
Illustration of a cartoon character being assisted by a hand, no text or symbols present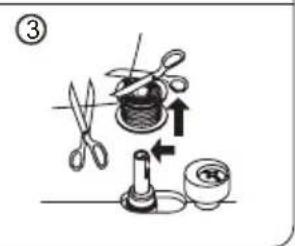
natural_image
Illustration of a sewing machine needle being adjusted, showing hand positioning and fabric cutting (no text or symbols)

natural_image
Illustration of a hand holding a mechanical component with a curved arrow indicating rotation (no text or symbols)
natural_image
Diagram of a hand holding a small object with a downward arrow indicating motion or force (no text or symbols)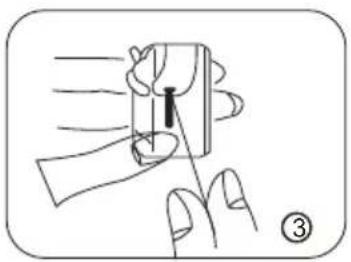
natural_image
Illustration of a hand holding a small object with motion lines indicating movement (no text or symbols)natural_image
Mechanical assembly diagram showing a lever mechanism with a curved arrow indicating rotation (no text or symbols present)


Podwójna igła
natural_image
Illustration of a hand using a tool to adjust or install a mechanical component (no text or symbols visible)


natural_image
Diagram of a mechanical device with a curved arrow indicating motion (no text or symbols)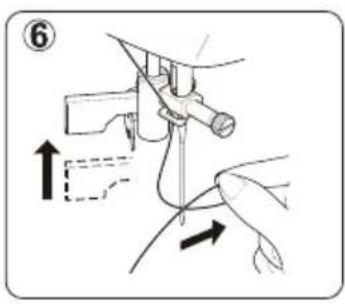

natural_image
Mechanical device diagram showing motion direction with arrows, no text or symbols presentnatural_image
Diagram of a mechanical device with a spool and coiled spring, no text or symbols present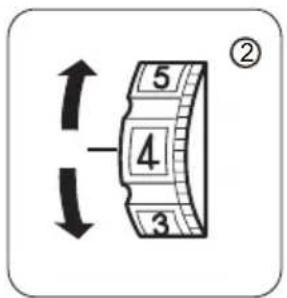
natural_image
Line drawing of a person holding a device with a circular object above their head (no text or symbols)
OSTRZEŻENIE
natural_image
Mechanical assembly diagram showing a piston and crank mechanism with an arrow indicating rotational motion (no text or symbols)natural_image
Line drawing of a foot pressing down on a wooden plank, showing motion direction (no text or symbols)
natural_image
Line drawing of a hand holding a small electronic component with wires, no text or symbols present
Szycie z powrotem
Szycie wsteczne
natural_image
Illustration of a sewing machine needle stitching a flat sheet, with an arrow indicating fabric direction (no text or symbols)natural_image
Two gray 3D-rendered objects with curved surfaces, one with a black arrow indicating motion or force, the other flat (no text or symbols)natural_image
Technical illustration of a sewing machine needle stitching fabric (no text or symbols)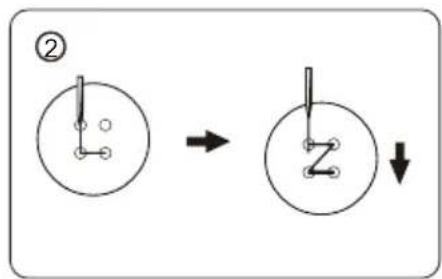

natural_image
Two diagrams showing a screw being inserted into a surface, with no text or symbols present.Szycie dziurki na guzik
natural_image
Line drawing of a hand holding a circular object with a ring, no text or symbols present
natural_image
Technical line drawing of a sewing machine with a close-up inset showing a detail (no text or symbols)
Użyteczna rada:
natural_image
Technical illustration of a sewing machine with a close-up inset showing the mechanism (no text or symbols)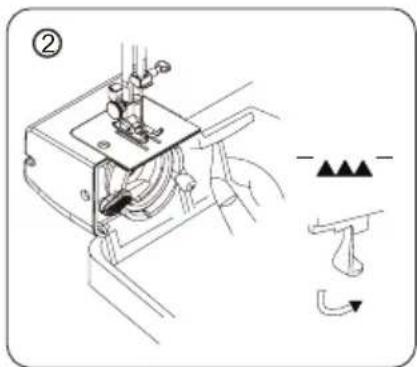
natural_image
Two technical line drawings of sewing machine components, showing front and side views with no text or symbols.
KONSERWACJA MASZYNY DO SZYCIA

natural_image
Mechanical assembly diagram showing a motor with rotating components and directional arrows (no text or labels)
natural_image
Technical line drawing of a mechanical device with no visible text or symbols
natural_image
Technical line drawing of a mechanical device with no visible text or symbols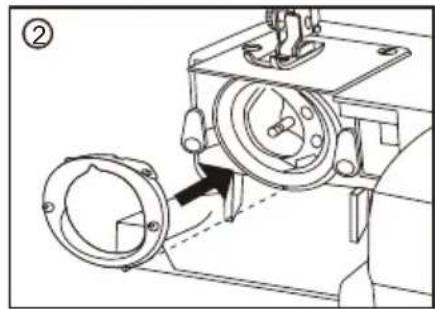
natural_image
Technical line drawing of a sewing machine with a circular component inserted, showing no text or symbols.natural_image
Mechanical assembly diagram showing a rotating motor with directional arrows (no text or labels)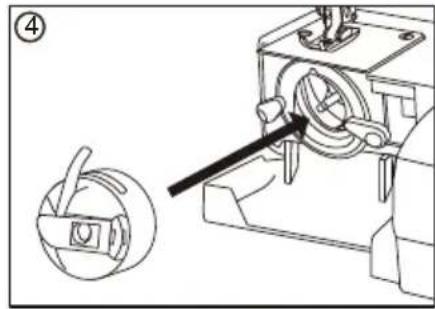
natural_image
Technical line drawing of a mechanical device with a magnified inset showing a circular component (no text or symbols)natural_image
Technical line drawing of a mechanical assembly with three bolts and a base plate (no text or symbols)natural_image
Technical line drawing of a sewing machine needle stitching fabric into a circuit board (no text or symbols)PL
natural_image
Symbol of a trash bin crossed with no text or numbers, representing environmental restriction (no text present)natural_image
Technical line drawing of a mechanical assembly with a hand operating a component (no text or symbols present)

natural_image
Simple line drawing of a hand holding a piece of paper with a downward arrow (no text or symbols)
natural_image
Line drawing of a person holding a magnifying glass (no text or symbols)

natural_image
Technical illustration of a sewing machine needle stitching fabric (no text or symbols)natural_image
Line drawing of a hand operating a sewing machine with three buttons and a handle (no text or symbols)Orsózás

natural_image
Illustration of a hand holding a tool above a small object, possibly a device or tool, with no visible text or symbols.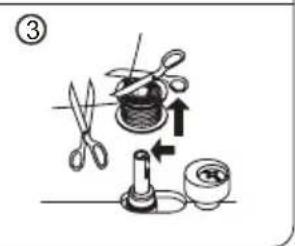
natural_image
Illustration of a sewing machine needle stitching fabric, showing hand positioning and fabric movement (no text or symbols)

natural_image
Illustration of a hand holding a mechanical component with a curved arrow indicating rotation (no text or symbols)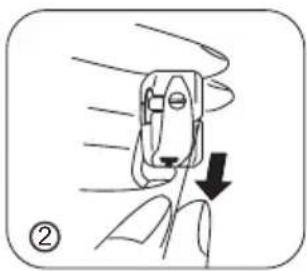
natural_image
Illustration of a hand holding a small object with a downward arrow indicating motion or force (no text or symbols)
natural_image
Illustration of a hand holding a small object with motion lines indicating movement (no text or symbols)Nyomótalp - csere
natural_image
Mechanical assembly diagram showing a lever mechanism with a curved arrow indicating motion (no text or symbols)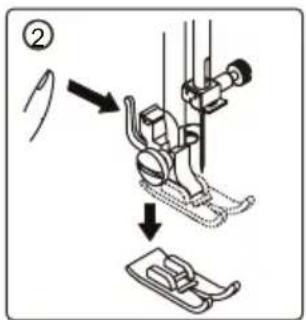


Szál a jobb tűben

natural_image
Illustration of a hand holding a tool with a pen inserted, no text or symbols present
natural_image
Mechanical assembly diagram showing a lever mechanism with no visible text or symbols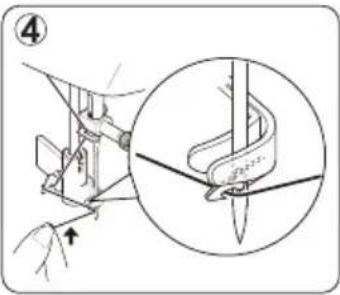
natural_image
Diagram of a mechanical device with a curved arrow indicating rotation (no text or symbols)

natural_image
Diagram of a mechanical device with a spool and coil, no text or symbols present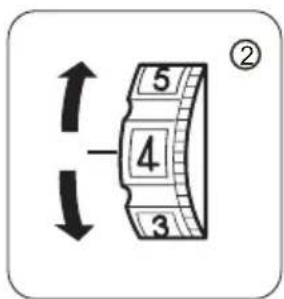

natural_image
Line drawing of a person holding a device with a circular object on the shoulder (no text or symbols)FIGYELMEZTETÉS
natural_image
Mechanical assembly diagram showing a piston and crank mechanism with an arrow indicating rotational motion (no text or symbols)natural_image
Diagram of a hand pressing down on a curved object, showing motion direction (no text or symbols)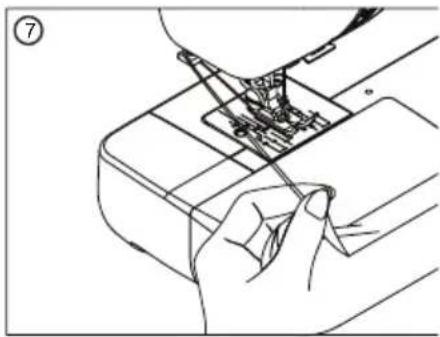
natural_image
Line drawing of a hand holding a tool interacting with a device (no text or symbols visible)
Visszavarrás
Visszavarrás
natural_image
Illustration of a person using a tool to lift a flat panel, with an arrow indicating motion (no text or symbols)3. Ívek varrása
natural_image
Two gray 3D-rendered objects with curved surfaces, one being folded and the other lying flat (no text or symbols)natural_image
Technical illustration of a sewing machine needle stitching fabric (no text or symbols)Gombfelvarrás


natural_image
Two mechanical diagrams showing a spring and a coin-like object on a surface (no text or symbols)Gomblyukazás
natural_image
Line drawing of a hand holding a circular object with a ring, no text or symbols present
natural_image
Technical line drawing of a sewing machine with an inset close-up showing a detail (no text or symbols)
Hasznos tanács:

Díszítő öltések
natural_image
Two technical line drawings of sewing machine components, showing front and side views with no text or symbols.
A VARRÓGÉP ÁPOLÁSA
natural_image
Mechanical assembly diagram showing a motor with rotating components and directional arrows (no text or labels)natural_image
Technical line drawing of a sewing machine with a circular component inserted, showing no text or symbols.
natural_image
Technical line drawing of a mechanical device with no visible text or symbols
natural_image
Technical line drawing of a mechanical device with no visible text or symbols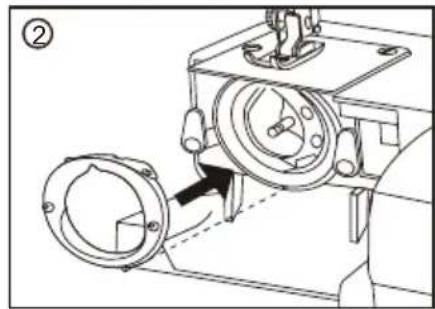
natural_image
Technical line drawing of a sewing machine with a circular component inserted, showing no text or symbols.natural_image
Mechanical assembly diagram showing a motor and gear mechanism (no text or labels)
natural_image
Technical line drawing of a mechanical assembly with screws and a base plate (no text or symbols)natural_image
Technical line drawing of a sewing machine needle stitching into a circuit board (no text or symbols)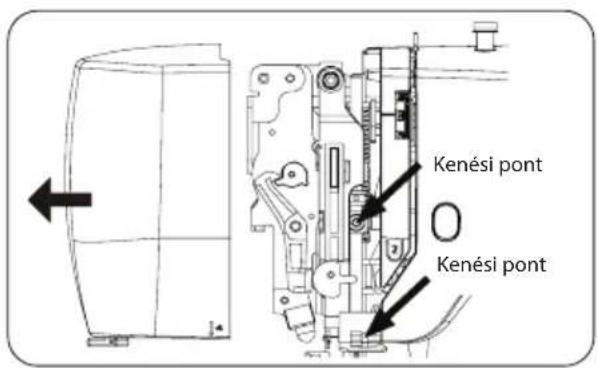
natural_image
Symbol of a trash bin with crossed lines indicating no waste or discharge, and a solid black rectangle below (no text or labels)
Igla in tačka
Oprema
natural_image
Technical line drawing of a mechanical assembly with tool and component (no text or symbols)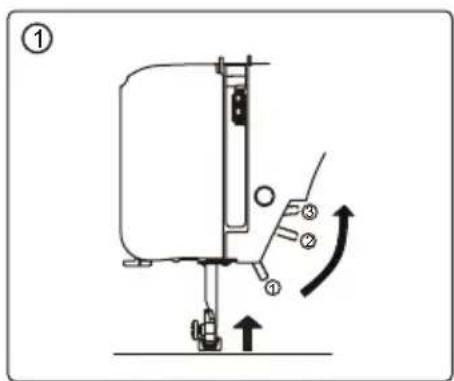

natural_image
Simple line drawing of a hand holding a stack of coins with a downward arrow (no text or symbols)
natural_image
Line drawing of a hand holding a circular object with a knob, no text or symbols present
Kako spustiti grabljice

natural_image
Illustration of a sewing machine needle stitching fabric (no text or symbols)Izvlek nosilca sukancev
Na nosilca sukancev nataknete omota sukancev, s katerimi šivate. Izvlecite nosilec sukancev in nanj nataknite omot sukanca. Ko končate s šivanjem, odstranite omot sukanca in vstavite nosilec sukanca nazaj.

natural_image
Line drawing of a hand operating a sewing machine with tools and buttons (no text or symbols)Navijanje tuljavice
- Nataknite omot sukanca na levi nosilec sukanca. Izvlecite sukanec z omota in ga speljite okoli vodila sukanca za navijanje, glej sliko. Vtaknite konec sukanca v luknjico v tuljavici, ki jo želite naviti, glej sliko.
- Potisnite vretence navijalca tuljavic v levo. Nataknite tuljavico na nosilec tako, da konec sukanca gleda iz zgodnjega dela tuljavice. Potisnite vretence navijalca tuljavic skupaj s tuljavico v desno, da se zaskoči. Držite konec sukanca.
- Pritisnite na pedal. Sukanec se začne navijati na tuljavico. Ko je tuljavica polna, se navijanje samodejno ustavi. Potisnite vretence navijalca tuljavic v levo, odstranite tuljavico in odrežite sukanec.

natural_image
Illustration of a sewing machine needle stitching fabric, showing hand positioning and cutting edge (no text or symbols)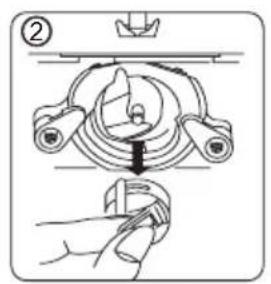
natural_image
Illustration of a hand holding a mechanical component with a curved arrow indicating rotation (no text or symbols)
natural_image
Illustration of a hand holding a device with motion lines and a downward arrow, no text or symbols present
natural_image
Illustration of a hand holding a device with motion lines indicating movement (no text or symbols)Menjava tačke
- Z vrtenjem pogonskega kolesa proti sebi dvignite iglo v njen najvišji položaj. Dvignite tačko.
- Pritisnite na ročico na zadnji strani nosilca tačke. Tačka se sprosti z nosilca.
- Postavite želeno tačko na vbdno ploščo tako, da bo paličica na tački ležala pod utorom na nosilcu tačke. Spustite nosilec tačke in pritrdite tačko. Tačka se mora zaskočiti v utoru nosilca.

natural_image
Mechanical sewing machine diagram showing a rotating arm and base mount (no text or symbols)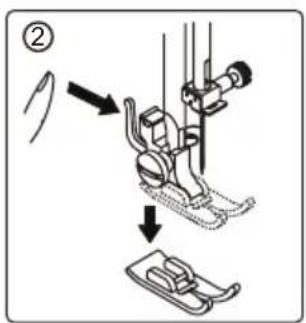


OPOZORILO
Najprej vdenite levo, nato pa desno iglo. Nataknite omot sukanca na nosilec sukanca. Sukanec leve igle se mora odvijati z omota v nasprotni smeri urinega kazalca, sukanec desne igle pa v smeri urinega kazalca.
Uporaba vdevalca sukanca
natural_image
Illustration of a hand using a tool to adjust or install a mechanical component (no text or symbols visible)

natural_image
Diagram of a mechanical device with a curved arrow indicating rotation (no text or symbols)


natural_image
Diagram of a mechanical device with directional arrows indicating motion or force (no text or symbols)natural_image
Diagram of a wire spool and cable assembly with a numbered label (1), no text or symbols present.


OPOMBA: Pri cikcak šivu mora biti napetost zgornjega sukanca nekoliko manjša od napetosti spodnjega sukanca. Zgornji sukanec mora biti na narobni strani blaga nekoliko viden, medtem ko spodnji sukanec ne sme biti viden na licu blaga.
Tabela igel, sukancev in vrst blaga
natural_image
Line drawing of a hand holding a circular object with a ring, possibly part of a device or tool (no text or symbols present)
OPOZORILO
natural_image
Mechanical assembly diagram showing a piston and crank mechanism with an arrow indicating motion (no text or symbols)Opomba: Na gumb ne pritiskajte prehitro, drugače se oglasi opozorilni signal.
natural_image
Diagram of a hand pressing down on a rectangular object with a curved band, showing motion direction (no text or symbols)
natural_image
Line drawing of a hand holding a tool interacting with a device (no text or symbols visible)
Vzvratno šivanje
Vzvratno šivanje
natural_image
Illustration of a sewing machine needle stitching a flat sheet, with an arrow indicating fabric direction (no text or symbols)3. Šivanje krivulj
natural_image
Two gray 3D-rendered objects with curved surfaces, one being folded and the other lying flat (no text or symbols)Obrnite blago na lično stran. Vbodi na licu tkanine skoraj niso vidni.
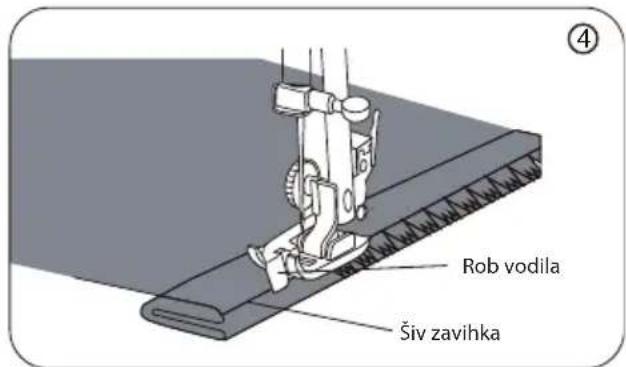
Vstavljanje zadrg
natural_image
Technical illustration of a sewing machine needle stitching fabric (no text or symbols)Šivanje gumbov
Lahko šivate gumbe z 2 ali 4 luknjami.


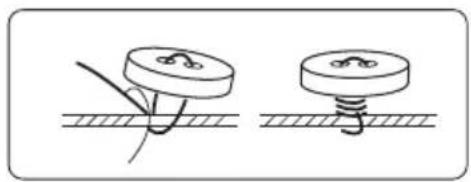
natural_image
Two mechanical fasteners with levers and springs, shown side by side against a textured surface (no text or symbols)Šivanje gumbnice
natural_image
Line drawing of a hand holding a circular object with a ring, no text or symbols present
natural_image
Technical line drawing of a sewing machine with an inset close-up showing a detail (no text or symbols)
Koristen nasvet:

Okrasni vbodi
natural_image
Technical line drawing of two sewing machine components with spring and rope details (no text or symbols)
VZDRŽEVANJE ŠIVALNEGA STROJA

natural_image
Mechanical assembly diagram showing a motor with rotating components and directional arrows (no text or labels)natural_image
Technical line drawing of a sewing machine with a circular component inserted, showing no text or symbols.
natural_image
Technical line drawing of a mechanical device with no visible text or symbols
natural_image
Technical line drawing of a mechanical device with no visible text or symbols
natural_image
Technical line drawing of a sewing machine with a circular component inserted, showing no text or symbols.natural_image
Mechanical assembly diagram showing a rotating motor with directional arrows (no text or labels)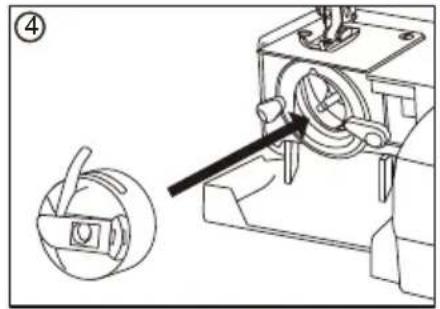
natural_image
Technical line drawing of a mechanical device with a magnified inset showing a circular component (no text or symbols)natural_image
Technical line drawing of a mechanical assembly with three bolts and a base plate (no text or symbols)Odstranite iglo in tačko. Odvijte vijake, ki pritrjujejo vbdno ploščo. Odstranite vbdno ploščo.

natural_image
Technical line drawing of a sewing machine needle stitching a printed circuit board (no text or symbols)natural_image
Symbol of a trash bin crossed with no text or numbers, representing environmental protection (no text present)Garnrollenhalter....8
DE

Nadel und Nähfuß
Zubehör

natural_image
Technical line drawing of a mechanical assembly with a hand operating a component (no text or symbols present)

natural_image
Simple line drawing of a hand holding a piece of paper with a downward arrow (no text or symbols)
natural_image
Line drawing of a person holding a magnifying glass (no text or symbols)

natural_image
Technical illustration showing a sewing machine needle stitching fabric strips (no text or symbols)natural_image
Line drawing of a hand operating a mechanical device with three arrows indicating motion (no text or symbols)
natural_image
Line drawing of a sewing machine needle stitching fabric, showing hand positioning and cutting edge (no text or symbols)

natural_image
Illustration of a hand holding a mechanical component with a curved arrow indicating rotation (no text or symbols)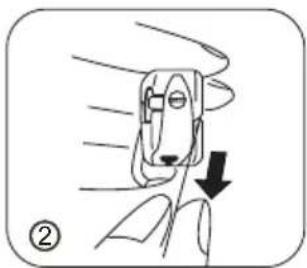
natural_image
Illustration of a hand holding a small object with motion lines indicating movement, marked with a downward arrow (no text or symbols)
natural_image
Illustration of a hand holding a device with motion lines indicating movement (no text or symbols)natural_image
Mechanical diagram showing a sewing machine with a rotating arm and base mount (no text or symbols)


natural_image
Simple line drawing of two mechanical components with a numbered label (1) and connecting lines, no text or symbols present.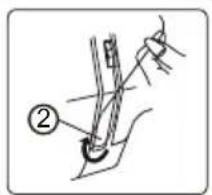

natural_image
Simple line drawing of a rope being inserted into a hook, with no text or symbols present
natural_image
Illustration of a hand using a tool to adjust or install a mechanical component (no text or symbols visible)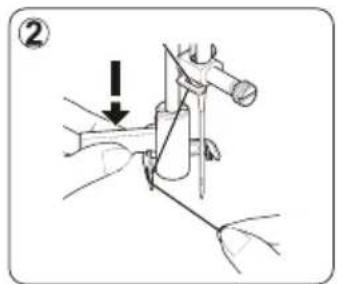

natural_image
Diagram of a mechanical device with a curved arrow indicating rotation (no text or symbols)

natural_image
Line drawing of a mechanical device with a spool and coiled spring (no text or symbols)


natural_image
Line drawing of a hand holding a device with a circular component, no text or symbols present
HINWEIS
natural_image
Mechanical assembly diagram showing a piston and lever mechanism with an arrow indicating rotation (no text or symbols)natural_image
Diagram of a hand pressing down on a curved object, showing motion direction (no text or symbols)
natural_image
Line drawing of a hand holding a tool interacting with a device (no text or symbols visible)
Rückwärtsnähen
Rückwärtsnähen
natural_image
Illustration of a person climbing a slope with an arrow indicating motion (no text or symbols)3. Nähen von Kurven
natural_image
Two gray 3D-rendered objects with curved surfaces and a black ribbon, no text or symbols presentnatural_image
Technical line drawing of a mechanical device with no visible text or symbolsnatural_image
Line drawing of a mechanical device with no visible text or symbolsnatural_image
Line drawing of a sewing machine needle stitching fabric (no text or symbols)Kordonieren
natural_image
Technical illustration of a sewing machine needle stitching fabric (no text or symbols)Annähen von Knöpfen

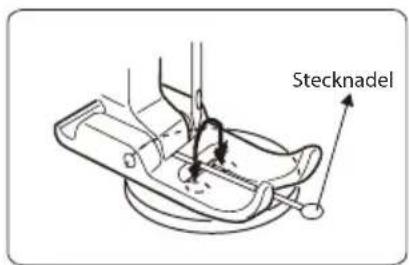

natural_image
Two diagrams showing a mechanical component with a handle and spring, mounted on a surface (no text or symbols)natural_image
Line drawing of a hand holding a circular object with a ring, no text or symbols present
natural_image
Technical line drawing of a sewing machine with an inset close-up showing a detail (no text or symbols)
Nützlicher Tipp:
natural_image
Technical illustration of a sewing machine with a close-up inset showing the mechanism (no text or symbols)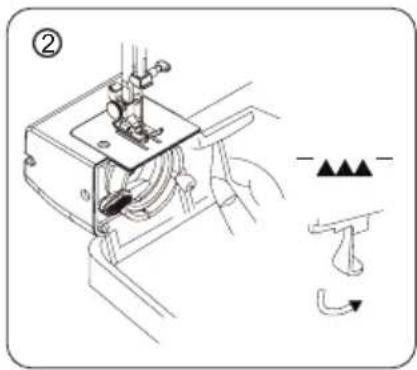

natural_image
Two technical line drawings of sewing machine components, showing front and side views with no text or symbols.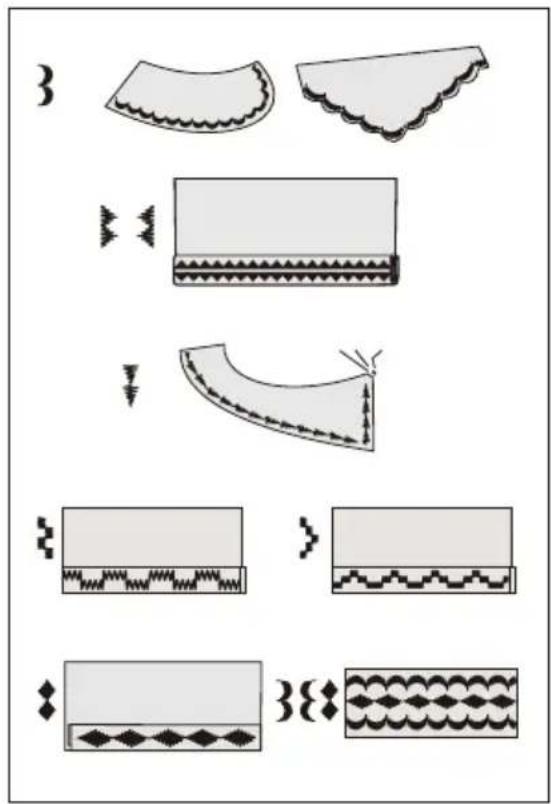
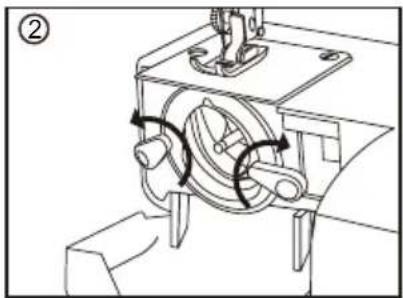
natural_image
Mechanical assembly diagram showing a motor with rotating components and directional arrows (no text or labels)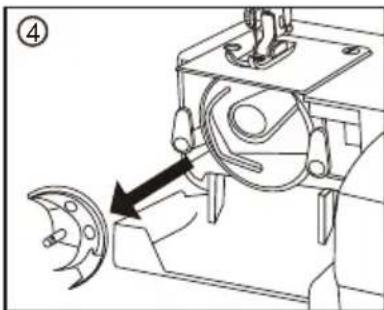
natural_image
Technical line drawing of a mechanical device with no visible text or symbols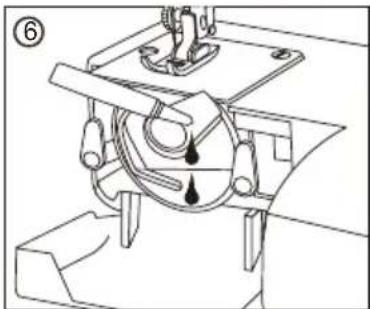
natural_image
Technical line drawing of a mechanical clamp or clamping device with no visible text or symbols
natural_image
Technical line drawing of a sewing machine with a circular component inserted, showing no text or symbols.natural_image
Mechanical assembly diagram showing a rotating motor with directional arrows (no text or labels)
natural_image
Technical line drawing of a mechanical assembly with bolts and a base plate (no text or symbols)natural_image
Technical line drawing of a sewing machine needle stitching material into a circuit board (no text or symbols)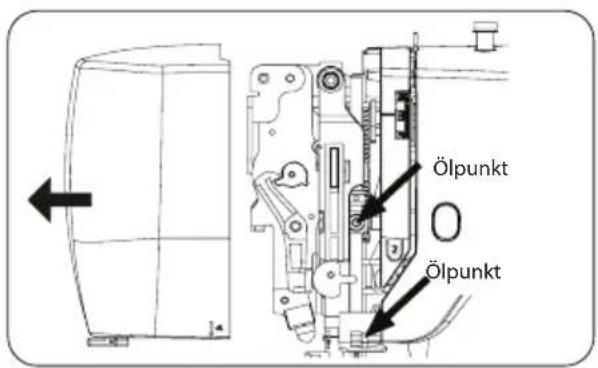
natural_image
Symbol of a trash bin crossed with no text or numbers, representing environmental restriction (no text present)1. KNOWING YOUR SEWING MACHINE
Machine identification 5
Main parts....5
Needle and presser parts 5
Accessories 6
Setting up your machine....6
Power line cord/foot control 6
Power/light switch....6
Converting to free-arm sewing....7
Presser foot lifter....7
Reverse sewing lever....7
Stitch length dial 7
Needle position button....7
Dropping the feed dogs 8
Seam guide line 8
Setting spool pins 8
Winding the bobbin....8
Removing or replace the bobbin case....9
Threading the bobbin case....9
Changing the presser foot 9
Threading the machine....10
Single needle....10
Twin needle....10
Using automatic needle threader....10
Drawing up bobbin thread....11
Balancing top thread tension 11
Needle, thread and fabric chart 12
Changing the needle 12
Functions of control panel....13
Pattern selection....13
Stitch width selection....13
Twin needle selection....13
Helpful messages 14
2. SEWING BASICS
Sewing....15
Normal sewing steps 15
Select stitch....15
Example 16
Start sewing....17
Reverse sewing 17
Useful sewing tips....18
3. UTILITY STITCHES
Straight stitch....19
Sewing....19
Keep seams straight....19
Change the needle position....19
Zigzag stitch/overcasting stitch....20
Blind hem stitch....21
Zipper insertion 22
Piping....22
Button sewing 23
Buttonhole sewing 24
Free seam 25
Decorative stitch....26
4. CARING FOR YOUR MACHINE
Dismantling and assembling shuttle race....29
To dismantle and oil the shuttle race....29
To assemble the shuttle race....30
Cleaning the feed dogs....30
Oiling the needle bar 31
Remove the face cover....31
Oiling the connecting rod....31
- TROUBLESHOOTING 32
IMPORTANT SAFETY INSTRUCTIONS
When using an electrical appliance, basic safety precautions should always be followed, including the following. Read all instructions before using this sewing machine.
DANGER - To reduce the risk of electric shock:
- Do not allow to be used as a toy. Close attention is necessary when this sewing machine is used by or near children.
- This appliance can be used by children aged from 8 years and above and persons with reduced physical, sensory or mental capabilities or lack of experience and knowledge if they have been given supervision or instruction concerning use of the appliance in a safe way and understand the hazards involved. Children shall not play with the appliance. Cleaning and user maintenance shall not be made by children without supervision.
- Use this sewing machine only for its intended use as described in this manual. Use only attachments recommended by the manufacturer as contained in this manual.
- Never operate this sewing machine if it has a damaged cord or plug, if it is not working properly, if it has been dropped or damaged, or dropped into water. Return the sewing machine to the nearest authorized dealer or service center for examination, repair, electrical or mechanical adjustment.
-
Never operate the sewing machine with any air openings blocked. Keep ventilation openings of the sewing machine and foot control free from the accumulation of lint, dust, and loose cloth.
-
Never drop or insert any object into any opening.
-
Do not use outdoors.
-
Do not operate where aerosol (spray) products are being used or where oxygen is being administered.
-
To disconnect, turn switch to the off ("O") position, then remove plug from outlet.
-
Do not unplug by pulling on cord. To unplug, grasp the plug, not the cord.
-
Keep fingers away from all moving parts. Special care is required around the sewing machine needle.
-
Never sew with a damaged needle plate as this can cause needle to break.
-
Do not use bent needles.
-
Do not pull or push fabric while stitching. It may deflect the needle causing it to break.
-
Switch the sewing machine off ("O") when making any adjustments in the needle area, such as threading needle, changing needle, threading bobbin, or changing presser foot, etc.
-
Always unplug sewing machine from the electrical outlet when removing covers, lubricating, or when making any other user servicing adjustments mentioned in the instruction manual.
-
Attention the following to avoid injury:
- switch off or unplug the appliance when leaving it unattended;
- unplug the appliance before carrying out maintenance.
CAUTION - Moving parts-To reduce risk of injury, switch off before servicing. Close cover before operating machine.
SAVE THESE INSTRUCTIONS
This product is for household use, or equivalent.
This appliance complies with EMC Directive 2014/30/EU covering the electromagnetic compatibility.

Please note that on disposal, this product must be safely recycled in accordance with relevant National legislation relating to electrical/electronic products. If in doubt please contact your retailer for guidance.
KNOWING YOUR SEWING MACHINE
Machine identification
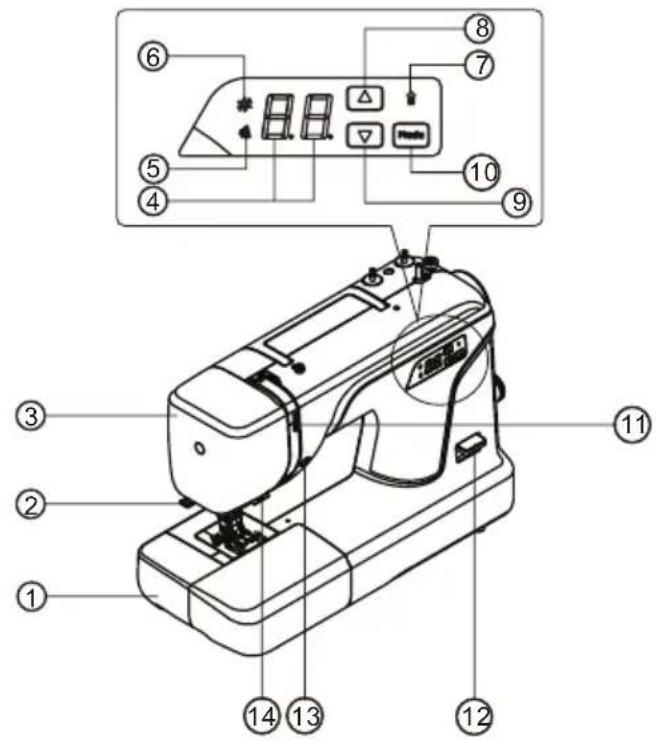
Main parts
- Extension table (Accessories box)
- Thread cutter
- Face cover
- LED display
- Stitch width indicator LED
- Pattern indicator LED
- Twin needle indicator LED
- Increase button
- Decrease button
- Mode selection button
- Thread tension control dial
- Reverse sewing lever
- Needle position button
- Lower thread guide
- Bobbin wider shaft
- Spool pins
- Bobbin wider thread guide
- Top thread guide
- Handle
- Presser foot lifter
- Cord socket
- Power/light switch
- Stitch length dial
- Hand wheel

Needle and presser parts
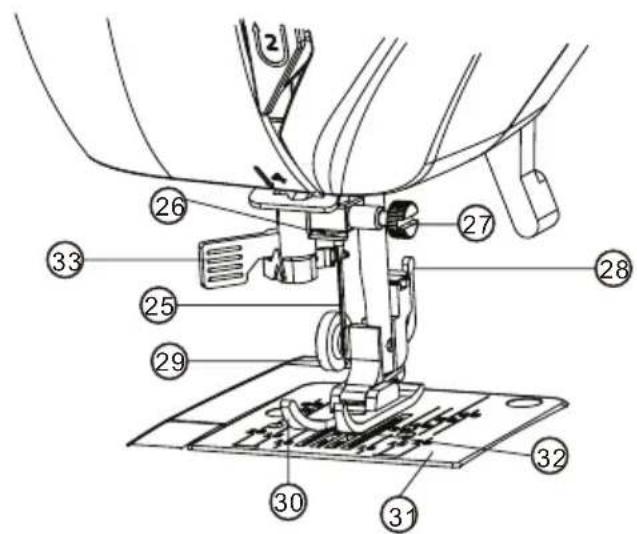
- Needle
- Needle bar thread guide
- Needle clamp screw
- Presser foot holder
- Presser foot screw
- Presser foot
- Needle plate
- Feed dogs
- Auto threader
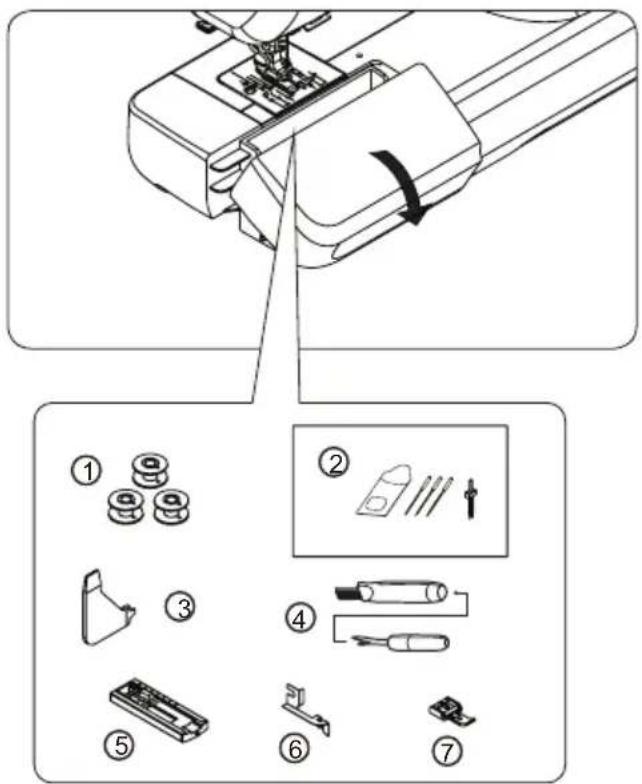
Accessories
- Bobbins (3pcs)
- Needle 3 pcs and twin needle 1 pc
- Multi-function screwdriver
- Ripper/Brush
- Buttonhole foot
- Guide presser foot
- Zipper foot
The foot that comes on your sewing machine is called zigzag foot and will be used for the majority of your sewing.
Setting up your machine
Bu sure to wipe off any surplus oil from needle plate area before using your machine the first time.
Power line cord/foot control
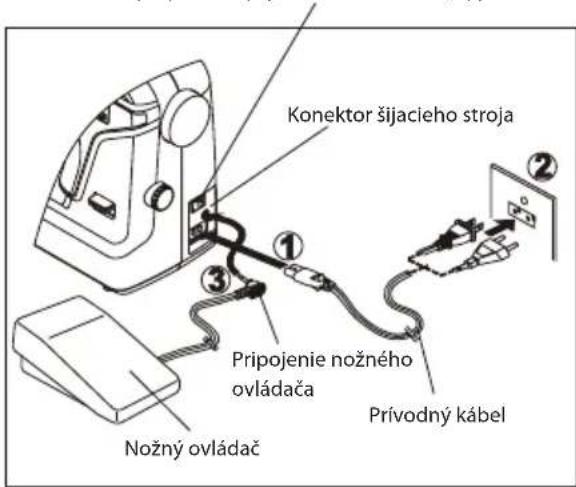
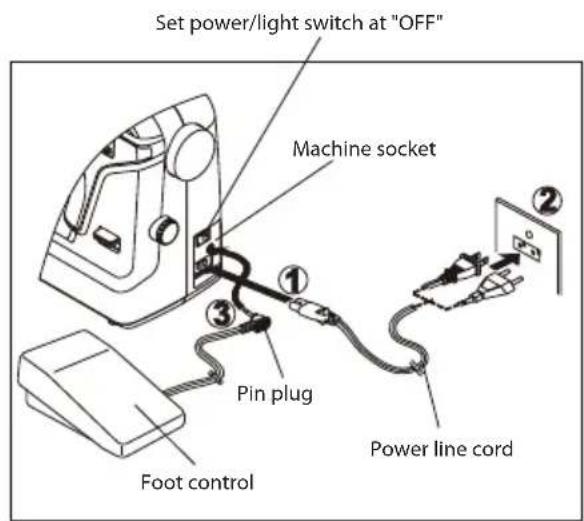
Make sure that the sewing machine is turned off (the power switch is set to "O"), and then connect the plug of the power line and into the cord socket (1) and your wall outlet (2) as illustrated. Connect the foot control plug (3) into the machine socket.
NOTE: When foot control is disconnected, the machine will not operate.

CAUTION
Always disconnect the machine from power supply by removing the plug from the wall-outlet.

Power/light switch
Your machine will not operate until the power/light switch is turned on. The same switch controls both the power and the light.
When servicing the machine, or changing needles, etc., machine must be disconnected from the power supply.
Converting to free-arm sewing
Your machine can be used either as a flat-bed or as a free-arm model.
With the extension table in position, it provides a large working surface as a standard flat-bed model.
To remove the extension table, hold it firmly with both hands and pull it off to the left as shown. To replace, slide the extension table back into place until it clicks. With the extension table removed the machine converts into a slim free-arm model for sewing children's clothes, cuffs, trouser legs, and other hardto-reach places.
Presser foot lifter
There are three positions for your presser foot.
- Lower the presser foot to sew.
- Raise the lifter to the middle position to insert or remove fabric.
- Lift it to its highest position to change the presser foot or to remove thick fabric.
Reverse sewing lever
As long as you are pressing down this button while sewing, the machine will to feed the fabric backwards.
Stitch length dial
- Turn this dial to set stitch length. (Setting range: 0 to 4 mm.)
- Turn this dial to (b1,b2,b3) position to set buttonhole step.
Needle position button
Press this button to raise or lower the needle. Press this button twice to sew a stitch.

natural_image
Technical line drawing of a mechanical assembly with a hand operating a component (no text or symbols present)
natural_image
Simple line drawing of a hand holding a sponge with a downward arrow (no text or symbols)
natural_image
Line drawing of a person holding a magnifying glass (no text or symbols)
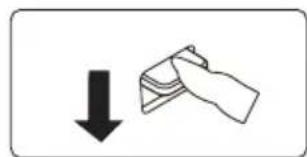
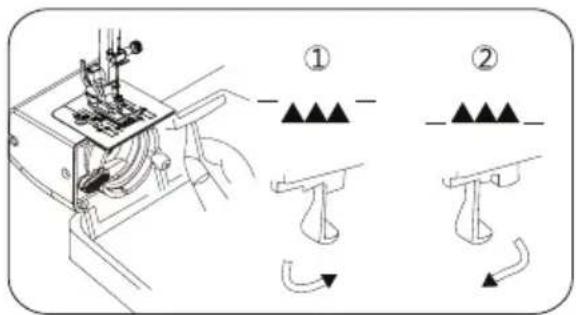
Dropping the feed dogs
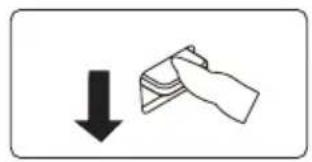
- For dropping the feed dogs, press down lever and move it to the direction of arrow as illustrated.
- To raise the feed dogs, press down the lever and move it to the direction or arrow as illustrated.
* Feed dogs must always be up for normal sewing.
* When working with the feed dog put down, please be sure to turn the stitch length dial to "0".
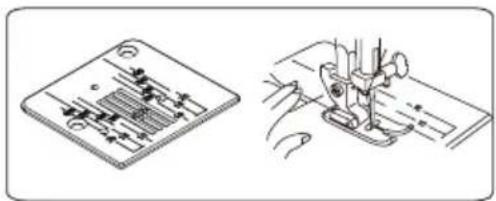
Seam guide line
The numbers on the needle plate indicate the distance between the center needle position and the indicating line.
The numbers in the front indicate in Millimeters. The numbers in the back indicate in inches.
natural_image
Illustration of a sewing machine needle stitching fabric (no text or symbols)Setting spool pins
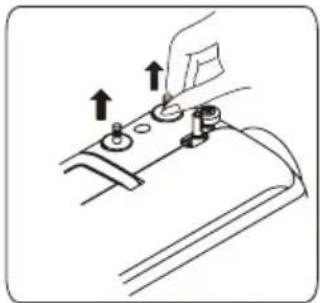
The spool pins are used for holding the spool of thread in order to feed thread to the machine.
To use, pull up the spool pin. Push down for storage.
natural_image
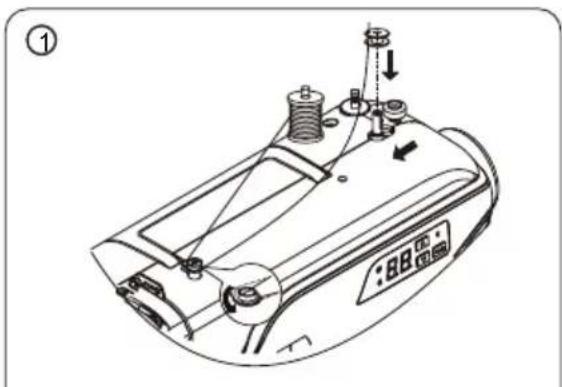
Line drawing of a hand operating a mechanical device with adjustment knobs and arrows indicating motion (no text or symbols)Winding the bobbin
- Place a spool of thread on the left spool pin. Pull the thread out from the spool and place it through thread guide as shown in illustration. Put end of thread through the hole in bobbin as shown.
- Push the bobbin wider shaft to far left position, if it is not already there. Place bobbin onto the bobbin wider shaft with end of thread coming from top of bobbin. Push bobbin winder shaft to the right until it clicks. Hold onto end of thread.
- Start machine. Bobbin will automatically stop turning when completely filled. Push shaft to the left to remove bobbin and cut thread.
NOTE: When under bobbin winding situation, there will be „” displayed in LED display window. There will be invalid and buzzer sounds when press buttons.
natural_image
Technical line drawing of a mechanical device with no visible text or symbols
natural_image
Illustration of a cartoon character performing a hand gesture with a tool, no text or symbols present
Removing or replace the bobbin case
- Refer to page 7 to remove the Extension table, raise the needle by turning the hand wheel toward you, then open the shuttle cover.
- Take out bobbin case holding the latch.
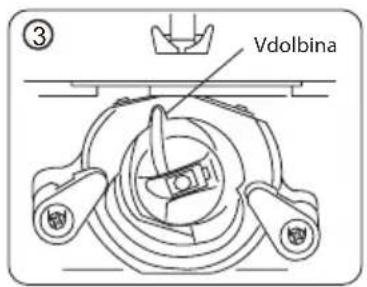
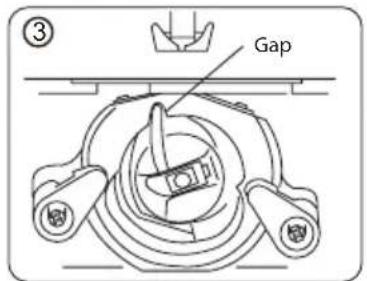
- When installing the bobbin case, the pin on the case should fit into the gap of the shuttle race.
CAUTION
Be sure to disconnect the power supply before operating the machine.

natural_image
Illustration of a sewing machine needle stitching fabric, showing hand positioning and cutting edge (no text or symbols)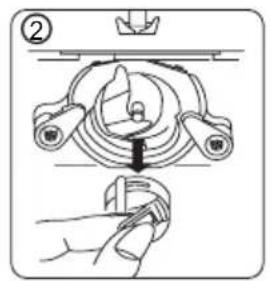
Threading the bobbin case
- Install the bobbin into bobbin case. Make sure the thread unwinds in the direction of arrow.
- Pull the thread into the groove in the bobbin case slot.
- Now pull the thread under the tension spring and into the delivery eye.
NOTE: Leave about 10cm (4 inches) of the thread hanging out of the bobbin case. When you pull the thread, the bobbin should spin clockwise.

natural_image
Illustration of a hand holding a mechanical device with a rotating knob (no text or symbols)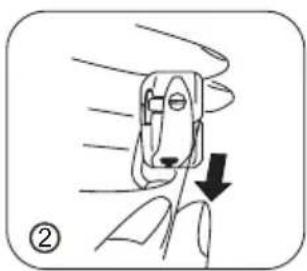
natural_image
Illustration of a hand holding a device with a downward arrow indicating motion (no text or symbols)
natural_image
Illustration of a hand holding a device with motion lines indicating movement (no text or symbols)Changing the presser foot
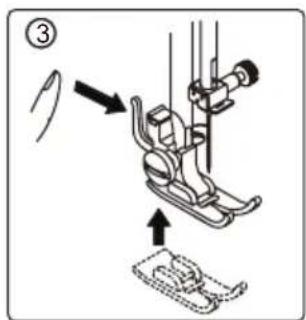
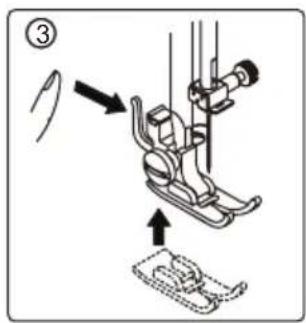
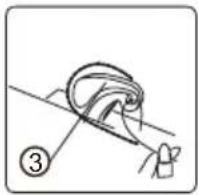
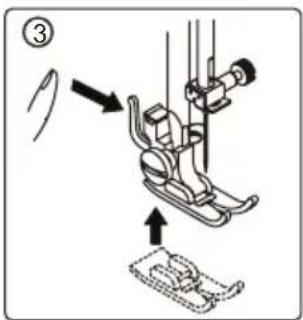
- Turn the hand wheel toward you to raise the needle to its highest position. Raise the presser foot.
- Press the lever on the back of the presser foot holder. The presser foot will drop off.
- Place the presser foot so the pin on the foot lies just under the groove of the holder. Lower the presser foot holder to lock the foot in place.

natural_image
Mechanical sewing machine diagram showing a lever and base mechanism (no text or labels)

Threading the machine
Single needle
Raise take-up lever to its highest position by turning hand wheel toward you. Raise presser foot.
Place spool of thread on spool pin as shown, with thread coming from the back of the spool.
- Feed the thread into the top thread guide.
- Pull the thread down through the tension control and pull it around the tension control loop and upwards.
- Slide the thread into the thread take-up lever from the right to the left.
- Pull the thread downwards and pass it behind the lower thread guide.
- Continue to pull the thread down and slide it into the needle bar thread guide.
- Thread the needle, from the front to the back.
NOTE: Cut the thread end with sharp scissors for easier needle threading.
Twin needle
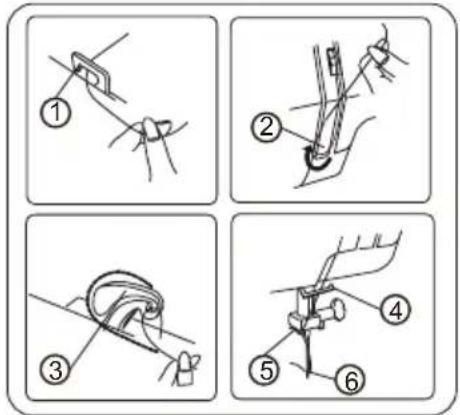
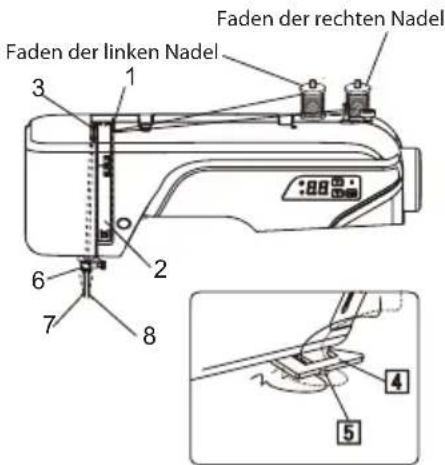
How to thread the twin needle:
-
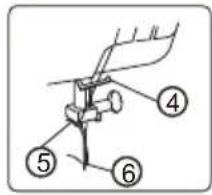
Thread the left needle according to the way of threading single needle from step one to step four, then fix the thread into the twin needle spring as point 5 in the right picture. Draw thread down and slip it into needle bar thread guide 6. Finally thread into the left needle eye from front to back.
-
Thread the right needle according to the way of threading single needle from step one to step seven.

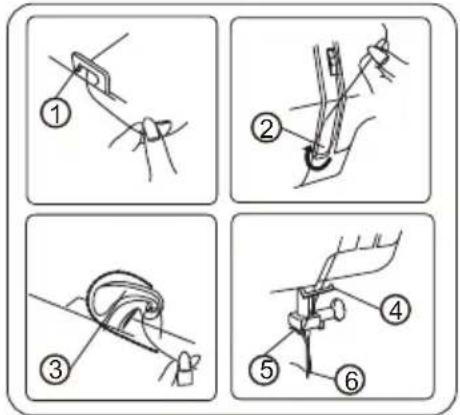
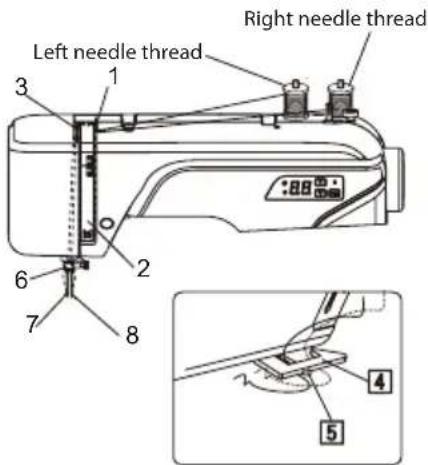
CAUTION
Be sure to thread the left needle thread firstly then thread the right needle thread. Put the thread spool on the spool pin, make sure that the left thread will run anti-clockwise, the right thread will run clockwise.
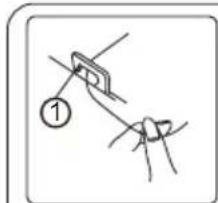
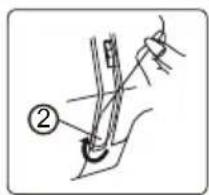
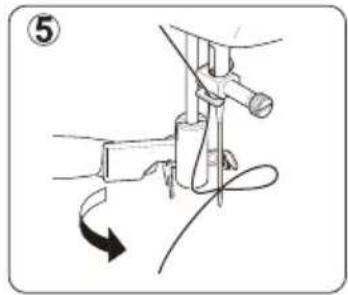
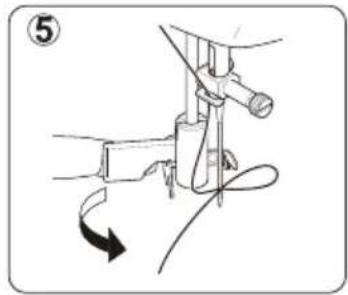
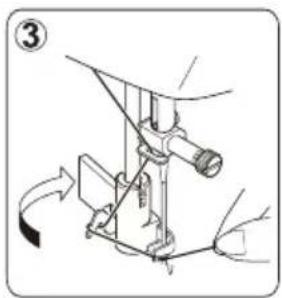
Using automatic needle threader
Raise the needle to its highest position by rotating the hand wheel towards you.
- Hook thread to thread guide as illustrated.
- Pull down lever while holding the end of thread.
- Rotate the lever to the rear of the machine.
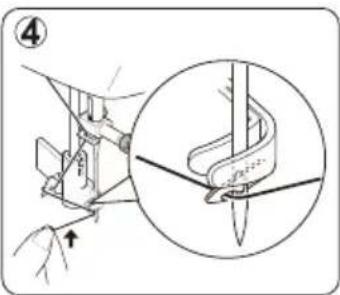
- Guide thread into hooked end and pull the thread upward.
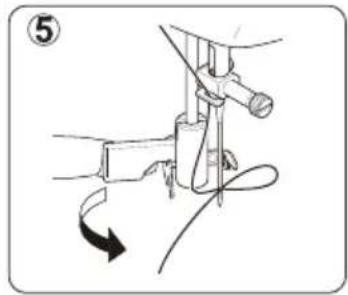
- Return the lever and needle will be threaded automatically.
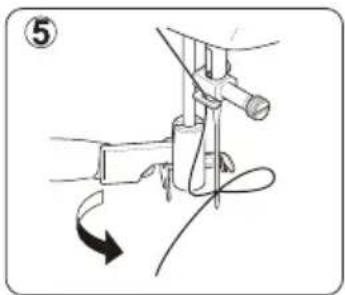
- Release the lever and pull thread away from you.

natural_image
Illustration of a hand holding a tool with a pen inserted, no text or symbols present
NOTE: For smooth threading it is recommended you select straight stitching when using the needle threader.
Automatic needle threader is only applicable for zigzag presser foot.
Automatic needle threader cannot be used for double needle.
natural_image
Line drawing of a sewing machine needle with a curved arrow indicating rotation (no text or symbols)
Drawing up bobbin thread
- Raise the presser foot and hold the needle thread lightly with your left hand.
- Press the needle position button twice with your right hand. Lightly draw up the needle thread forming a loop of the bobbin thread.
- Pull 15cm (6") of both thread back and under the presser foot.


natural_image
Mechanical device diagram showing motion direction with arrows, no text or symbols presentBalancing top thread tension
- The top thread and the bobbin thread should interlock in the center of two layers of fabric in straight seams.
- Set the desired number of the thread tension dial at setting mark.
- If the tension is too tight, loosen the needle thread tension by moving t If the tension is too tight, he dial to a lower number.
- If the tension is too loose, tighten the needle thread tension by moving the dial to a higher number.

natural_image
Diagram of a mechanical device with a spool and coiled spring, no text or symbols present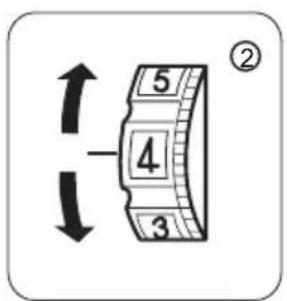
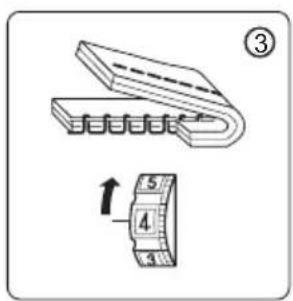

NOTE: In order to obtain better zigzag stitches, the top thread tension should be slightly weaker than the bobbin thread tension. That means, the top thread should appear slightly on the reverse side of the fabric, but the bobbin thread cannot appear on the top side of the fabric.
Needle, thread and fabric chart
Your fabric will determine the choice of a needle and thread. The following table is a practical guide to needle and thread selection.
Always refer to it before a new sewing project. And be sure to use the same size and type of thread in the bobbin as in the top thread supply.
| Type Fabric Threads Needle size | |||
| Light Weight | Crepe de chine, Voile Lawn, Organdy, Georgette, Tricot. | Fine Silk.Fine Cotton.Fine Synthetic.Fine Cotton Covered Polyester. | 9 or 11 |
| Medium Weight | Linens, Cotton, Pique, Serge, Double knits, Percale. | 50 silk.50 ~ 80 cotton.50 ~ 60 synthetic Cotton Covered Polyester. | 11 or 14 |
| Heavy Weight | Denim, Tweed, Gabardine, Coating, Drapery and Upholstery Fabric. | 50 silk.40 ~ 50 cotton.40 ~ 50 synthetic Cotton Covered Polyester. | 14 of 16 |
CAUTION
Always disconnect the machine from power supply by removing the plug from the wall-outlet.
Changing the needle
- Raise the needle bar to its highest position by turning the hand wheel toward you.
- Loosen the needle clamp screw by turning it toward you.
- Remove the needle by pulling it downward.
- Insert the new needle clamp with the flat side toward the back.
- Push the needle up as far as it can go.
- Tighten the needle clamp screw with the screw driver.
NOTE: Tighten snugly, but do not over tighten.
Helpful Hint: Placing a scrap of fabric under the presser foot and lowering the presser foot makes it easier to change the needle and will preclude dropping the needle into the needle plate slot.

Functions of control panel

Each time you press MODE button, you can realize the following functions:
- Pattern selection/stitch width mode.
- Twin needle/ single needle mode.
Pattern selection
1). Turn on the sewing machine, the pattern indicator LED will be right on.
2). Press ▲ or ▼ button to increase or decrease the pattern number one by one.
3). Long press ▲ or ▼ button to increase or decrease the pattern number ten by ten.
NOTE: When the sewing machine is turned on, the "pattern mode indicator LED" will light on, and the LED display will show "00", if the LED display is not show "00".
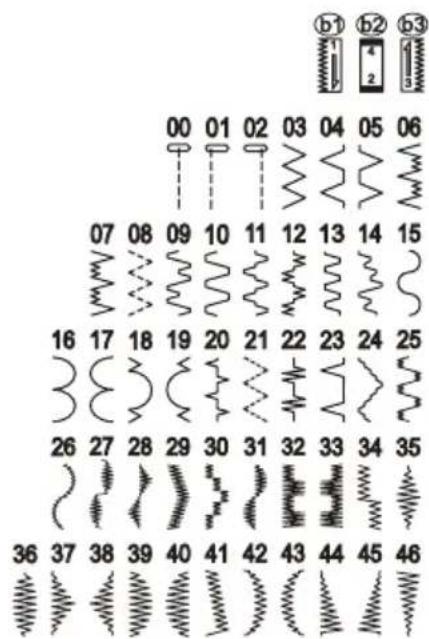
Pattern number reference guide
Stitch width selection
1). Press the MODE button once, the "stitch width mode indicator LED" will light on, and the pattern indicator LED will light off.
Press the mode selection button again, the "stitch width mode indicator LED" will light off, and the pattern indicator LED will light on.
2). Press ▲ or ▼ button to increase or decrease the stitch width by 0.5mm.
Twin needle selection
Long press the MODE button, the "twin needle indicator LED" will light up.
Long press this button again, the "twin needle mode indicator LED" will light off.
NOTE: If select the twin needle mode, before whatever pattern you select, press mode button to select twin needle mode. In this way, the stitch width can be automatically reduced to prevent the twin needle touching the needle plate. Otherwise the needle will be broken or the machine may be damaged.
Helpful messages
If an incorrect operation is made, a helpful message will be displayed. When a helpful message is displayed, fix the problem following the instructions below.
| The bobbin winder is moved to the right.→ Move bobbin winder to left when it is not used. | 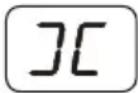 |
| Presser foot is raise up.→ Put down the presser foot. |  |
| Machine is locked up due to thread entangled with bobbin case or rotation interrupted forcibly.→ Turn off power switch and eliminate the problem that caused the machine to stop. |  |
| The stitch length dial is on neutral position.→ Set the stitch length between range 0-4. |  |
| Audible signal The buzzer sounds when | |
| Pip Normal operation | |
| Pip-pip Invalid operation | |
| Pip-pip-pip Invalid machine setting | |
| Pip-pip-pip-pip-pip The machine is jammed | |
SEWING BASICS
Sewing
Basic sewing operation are described below.
Before operating the sewing machine, reading the following precautions.
CAUTION
- When the machine is in operation, keep your hands away from all moving parts such as needle, hand wheel, etc. Otherwise injuries may occur.
- Do not pull or push the fabric to hard when sewing, otherwise injuries may occur or the needle may break.
- Do not use bent needles. Bent needles can easily break, possibly resulting injuries.
Normal sewing steps
The basic sewing procedure is shown below.
- Select needle. (Select suitable needle type according to different fabric.)
- Turn on the sewing machine.
- Select stitches. (Select suitable stitch for the sewing position.)
- Attach presser foot. (Attach suitable presser foot.)
- Start to sew. (Put on fabric, start to sew.)
Select stitch
Press on increase /decrease button to select suitable stitch.
- When the sewing machine is turned on, the set stitch is straight stitch , and the LED display will show "00".
- Press ▲ or ▼ button to select stitch.
- If necessary adjust the stitch length and width.

CAUTION
When turn on sewing machine, there will be three possible conditions:
- When the stitch length dial is on the position between "0-4", LED display will show "00", and you can select 47 utility stitches under this condition.
- When the stitch length dial is on the position of Buttonhole stitch, LED display will show "b1 or b2 or b3", and you cannot select 47 utility stitches under this condition.
- When the stitch length dial is on neutral position, LED display will show "--", under this condition the machine cannot work.
- When the bobbin winder is moved to the right position, LED display will show "JC", under this condition the machine cannot work.
For detail information about each utility stitch, please refer to the following page.
Example
Select stitch
- Press ▲ to select stitch 03.

- Stitch width adjusting.
1). Press MODE button to stitch width adjusting mode.
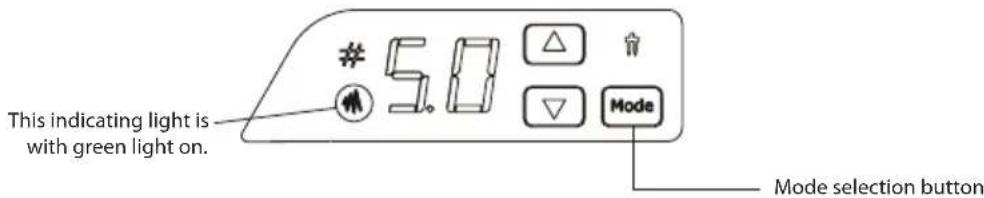
2). Press ▲ or ▼ to adjust stitch width.

Note: Under the stitch width adjusting mode, green light means default setting. Red light means custom setting.
- Stitch length adjusting.
Turn the stitch length dial to adjust the stitch length.

natural_image
Line drawing of a hand holding a circular object with a knob, no text or symbols presentCAUTION
- After adjusting the stitch width, turn the hand wheel 2-3 circles towards you to check if the needle will touch the presser foot or not. If the needle can touch the presser foot, the needle will be bent or broken.
- If the stitches are sewed together, please increase the stitch length before continuing to sew, otherwise will cause needle bent or broken.
Start sewing
- Press the needle position button once or twice to ensure the needle is lifted.
- Lift up the presser foot.
- Feed the fabric under the presser foot. Pull the top thread and bobbin thread towards the back of the machine under the presser foot, until they are about 15cm (6") long.
- Press 6-8 times of the Needle Position Button to fix the fabric.


natural_image
Mechanical assembly diagram showing a piston and crank mechanism with an arrow indicating motion (no text or symbols)Note: Do not press the button too fast, otherwise there will be alarm from machine.
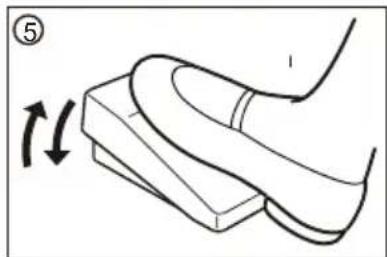
- Press the foot controller carefully and start sewing.
- When you have finished, remove your foot from the foot controller, then the sewing machine will stop.
- Lift up the presser foot, pull the fabric and threads about 15cm backwards, then cut threads with the thread cutter from back to front.
- Observe the finished fabric carefully to check the conditions of top thread and bobbin thread. If the bobbin thread appears on top side of fabric, please adjust the top thread tension.

natural_image
Line drawing of a foot pressing down on a wooden block, showing motion direction (no text or symbols)Reverse sewing
When press the reverse sewing lever, the machine will sew reversely (feed the fabric backwards).

natural_image
Line drawing of a hand holding a tool interacting with a grid device (no text or symbols)Reverse stitch
Useful sewing tips
Various ways to achieve better sewing results are described below. Refer to these tips when sewing.
1. Trial sewing
Use different stitch width and length for trial sewing. When you have finished, select the best looking stitch width and length for correct sewing.
For the trial sewing, use a piece of fabric and thread that are the same as those used for your project, and check the thread tension and stitch length and width. Since the results differ depending on the type of stitching and the number of fabric layers sewn, perform the trial sewing under the same conditions that will be used with your project.
2. Changing the sewing direction
When stitching reaches a corner, stop the sewing machine.
1). Leave the needle lowered in the fabric (under the needle plate) by pressing the needle position button.
2). Raise the presser foot lever, and then turn the fabric by using the needles as a pivot.
3). Lower the presser foot lever and continue sewing.


natural_image
Illustration of a sewing machine needle stitching a flat sheet, with an arrow indicating fabric direction (no text or symbols)3. Sewing curves
1). Stop sewing, and then slightly change the sewing direction to sew around the curve.
2). When sewing along a curve while using a zigzag stitch, select a shorter length in order to obtain a finer stitch.
4. Sewing thick fabrics
If the fabric does not fit under the presser foot
Raise the presser foot even higher to bring the presser foot to its highest position. Then feed the fabric under the presser foot.
5. Sewing elastic fabric or the fabric that is easy to cause skipping stitches
Use round head needle and bigger stitch length. If necessary, add one layer of lining cloth under the fabric for better sewing.
6. Sewing thin fabric or silk
When sewing thin fabric or silk, the stitch may depart from correct direction or cannot feed the fabric correctly. If so, add one layer of lining cloth under the fabric for better sewing.
7. Sewing stretch fabrics
First, baste the piece of fabric together, and then sew without stretching the fabric.
8. Free arm sewing
When sewing tube fabric or the part cannot reach, use the free arm sewing function.
UTILITY STITCHES
Straight stitch
Straight stitch is used for sewing plain seams. Three stitches are available for basic stitching.
| Stitch name Stitch | Stitch No. Presser foot | Stitch width (mm) Stitch length (mm) | ||||||
| Recommended | Adjustable range | Recommended | Adjustable range | |||||
| Straight stitch | L | 01 | Zigzag foot | 0.0 0.0-5.0 | 2.5 1-4 | |||
| M 00 | 2.5 0.0-5.0 2.5 1-4 | |||||||
| R 02 5 | 0.0 0.0-5.0 2.5 1-4 | |||||||
Sewing
- Baste or pin together the fabric pieces.
- Select presser foot and attach it to the machine.
- Select stitch number. If necessary, adjust the stitch length or stitch width.
- Start sewing.
- Finish sewing.
Keep seams straight
To keep the seam straight, use one of the numbered guide lines on the needle plate.
The numbers indicate distance from the needle at its center position.

Change the needle position
There is no stitch width for straight stitch, so the straight stitch width in above table means needle position. Needle position can be adjusted. Under the Stitch Width Adjusting Mode, press ▲ or ▼ to adjust the needle position.
Note: For detail information of how to adjust stitch width, please refer to page 16.

Can be adjusted to anyone of 11 different positions
Zigzag stitch/overcasting stitch
Use overcasting stitch to join fabrics and can finish once. It is also useful for stretch fabrics.
| Stitch name Stitch | Stitch Stitch No. Presser foot | Stitch width (mm) Stitch length (mm) | ||||
| Recommended | Adjustable range | Recommended | Adjustable range | |||
| Zigzag stitch 03 | 5.0 0.0-5.0 | 1 0.5-4 | ||||
| Three-point zigzag stitch | 08 4.5 1.5-4.5zigzag-foot | |||||
| Overcasting stitch | 05 5.0 1.0-5.0 1 0.5-4 | |||||
Sewing
- Select a presser foot and attach it to the machine.
- Select stitch number. If necessary, adjust stitch length or width.
- Start sewing.
- Finish sewing.
Warm tip:
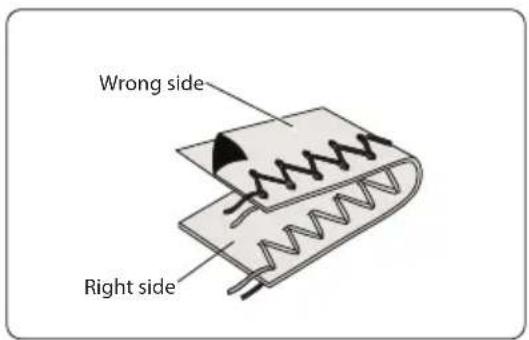
Due to different types of threads, fabrics, stitch patterns, and sewing speed, top thread will appear on wrong side of fabric. But the bobbin thread will not appear on right side of fabric. If the bobbin thread appear on right side of fabric or the fabric is wrinkled, decrease top thread tension a little by turning the thread tension dial.
Blind hem stitch
Use blind hem stitch to hem clothes' edges, such as edges of trousers, and not reveal any stitch.
| Stitch name Stitch | Stitch Stitch No. Presser foot | Stitch width (mm) Stitch length (mm) | ||||
| Recommended | Adjustable range | Recommended | Adjustable range | |||
| Blind hem stitch | 04 | 5.0 1.0-5.0 | 1 1-4 | |||
| 04 5.0 2.0-5.0 2.5 2.4 foot | ||||||
Sewing
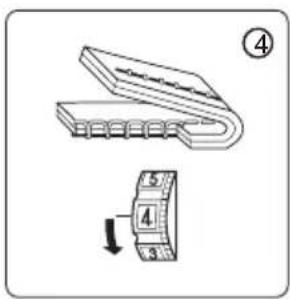
- First, finish the raw edge. Do this by turning it under on fine fabrics or overcasting it on medium to heavyweight fabrics. Then turn the hem up to the required depth, press and pin in place.
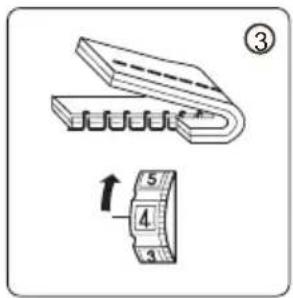
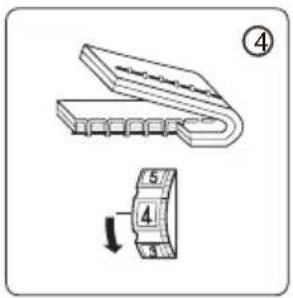
- Now fold the fabric as illustrated with the wrong side facing up.
- Attach the hem guide foot.
1). Loose the presser foot screw, and put in the hem guide foot.
2). Ensure the guide edge of the hem guide foot to be in the middle of the presser foot.
3). Tighten the presser foot screw.
-
Position the fabric with the edge of the folded hem against the guide of the presser foot, and then lower the presser foot lever.
-
Start sewing.
- Finish sewing.

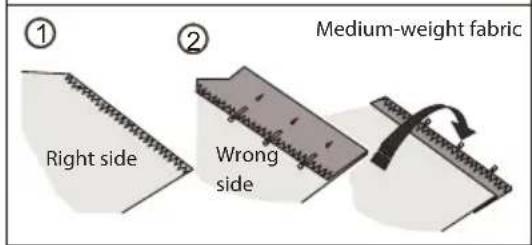


natural_image
Two gray 3D-rendered objects with curved surfaces and a black arrow, no text or symbols presentTurn the fabric to right, there will be almost no stitch appeared on right side of fabric.

Zipper insertion
Zipper foot can be used for sewing all types of zippers, and it is easy to sew to the left or right of the zipper.
| Stitch name Stitch | Stitch Stitch No. Presser foot | Stitch width (mm) Stitch length (mm) | ||||
| Recommended | Adjustable range | Recommended | Adjustable range | |||
| Straight stitch 00 | Zipper foot 2.5 N/A 2.5 1-4 | |||||
Sewing
- Select stitch.
- Attach the zipper foot.
When sewing the right side of the zipper, attach the zipper foot as the illustration in right.
When sewing the left side of the zipper, attach the zipper foot as the illustration in right.
- Start sewing.
- Finish sewing.
Helpful hint:
During zipper inserting, ensure that the needle do not touch the zipper. Otherwise it will cause needle break or even injury.

Piping
To pipe soft furnishings, cover cord with a bias strip of fabric and pin or tack it to the main piece of fabric.
| Stitch name Stitch | Stitch Stitch No. Presser foot | Stitch width (mm) Stitch length (mm) | |||||
| Recommended | Adjustable range | Recommended | Adjustable range | ||||
| Straight stitch 00 | Zipper foot 2.5 No 2.5 1-4 | ||||||
Sewing
- Select stitch.
- Change the zipper foot.
Attach right side of zipper foot to foot holder so that needle passes through the opening on the right side of the foot.
- Start sewing.
- Finish sewing.
Helpful tips:
Use the stitch width adjusting function to adjust the needle position to be more close to the pipe.

natural_image
Technical illustration of a sewing machine needle stitching a curved fabric edge (no text or symbols)Button sewing
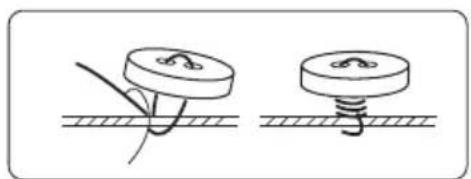
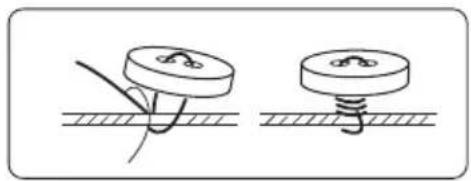
Buttons with 2 or 4 holes can be sew.
| Stitch name Stitch | Stitch Stitch No. Presser foot | Stitch width (mm) Stitch length (mm) | ||||
| Recommended | Adjustable range | Recommended | Adjustable range | |||
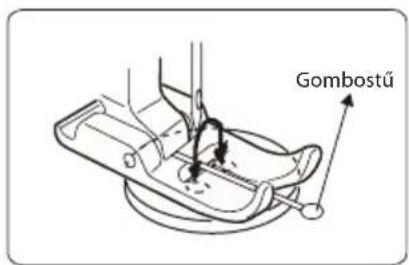
| Zigzag stitch 03 | Zigzag foot + Embroidery plate | Button of the distance between two holes | 0.0-5.0 0 0 | |||
Sewing
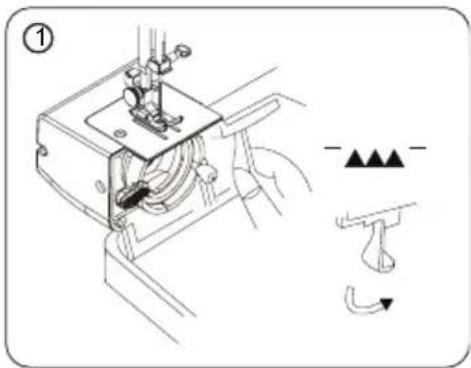
- Drop the feed dog.
NOTE: After you finish sewing, set the drop feed lever to the original position.
- Place the button between the presser foot and the fabric.
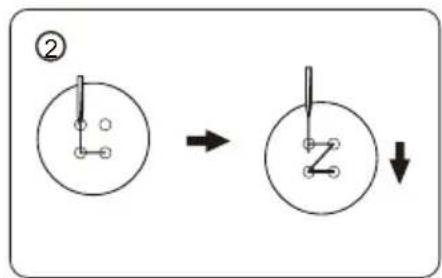
NOTE: When sewing four-hole button, first sew the two holes closest to you. Then, slide the button so that the needle goes into the two holes toward the rear of the sewing machine, and then sew them in the same ways.
-
Select stitch.
-
Adjust the stitch length by turning the stitch length dial to "0".
-
Adjust the stitch width; ensure the needle correctly goes into the left and right hole of the button.
NOTE: Turn the handwheel toward you (counterclockwise) to check that the needle correctly goes into the left and right hole of the button.
-
Start sewing.
-
Finish sewing.
Button sewing tips
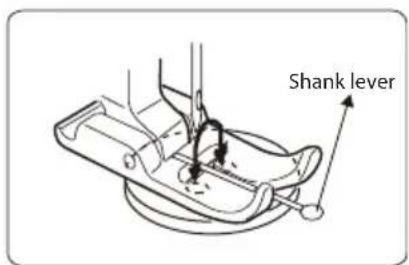
- Attach a shank lever on the presser foot to help sewing.
- To secure thread, cut the upper thread with 25cm of excess, wind it around the thread between the button and the fabric, and then tie it tightly.

natural_image
Two mechanical components with springs and a circular base, shown from different angles (no text or symbols)Buttonhole sewing
Use buttonhole foot can sewing buttonholes.
| Stitch name | Stitch Stitch | No. Presser foot | Stitch width (mm) Stitch length (mm) | ||||
| Recommended Adjustable range | Recommended Adjustable range | ||||||
| Buttonhole stitch | Gentel | b1 | Buttonhole foot | ---- | |||
| Gentel | b2 ---- | ||||||
| Gentel | b3 ---- | ||||||
Sewing
- Attach the buttonhole presser foot.
- Start sewing.
A. Turn the stitch length dial to b1, pull the top thread and the bobbin thread to the left under the foot.
B. Lower the needle at the starting point. Then lower buttonhole foot. Sew the needed length on the left side of buttonhole ant stop the machine.
C. Turn the stitch length dial to b2, sew 5-7 of the bartack stitches, then stop.
D. Turn the stitch length dial to b3, sew the right side of buttonhole the same length as the left side and stop the machine.
E. Turn the stitch length dial to b2, sew 5-7 of the bartack stitches, then stop.
F. Raise the presser foot and draw out the fabric, cut both top thread and bobbin thread leaving about 10cm of thread ends, and tie it on the wrong side of the fabric.
G. Cut open the buttonhole with seam ripper. - Finish stitching.

natural_image
Line drawing of a hand holding a circular object with a ring, no text or symbols present
natural_image
Technical line drawing of a sewing machine with an inset showing a detail view (no text or symbols)
Helpful hint:
- Before buttonhole stitching, trial sewing on other cloth.
- For thin fabric, add lining paper under the fabric.
- Do not sew buttonhole on elastic fabric.
- Please increase the density of the buttonhole by repeating on the same area.
Sewing over the first buttonhole will give you a more rigid buttonhole.
F G

Free seam
Can sewing free-motion stitch with customer's own style.
| Stitch name Stitch | Stitch No. Presser foot | Stitch width (mm) Stitch length (mm) | ||||
| Recommended | Adjustable range | Recommended | Adjustable range | |||
| Straight stitch 00 | Zigzag foot + Embroidery plate | 2.5 0.0-5.0 | 0 0 | |||
Sewing
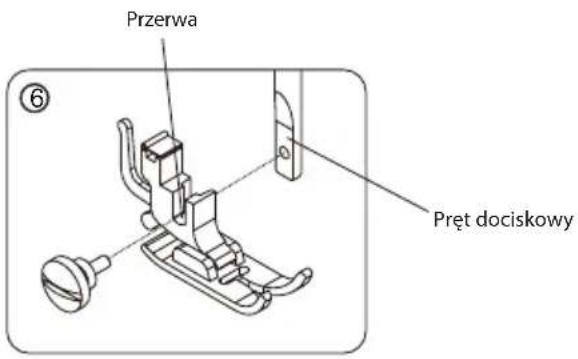
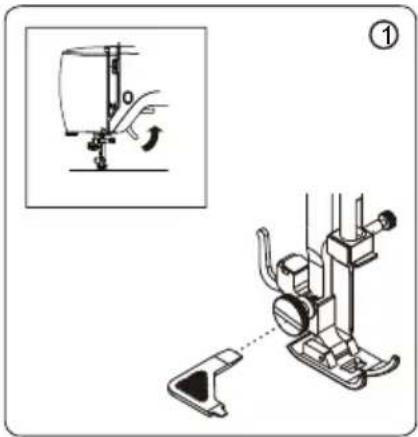
- Detaching the presser foot holder.
a. Raise the presser foot lifter.
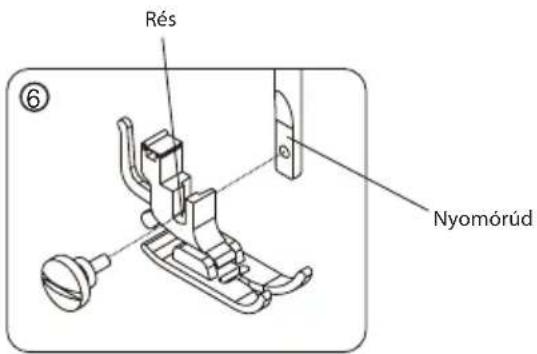
b. Loosen the presser foot screw by turning it counterclockwise by using multi-function screwdriver, the presser foot holder will auto drop down.
c. Remove the presser foot holder and the screw into the accessories box to prevent lose. - Drop the feed dog.
NOTE: After you finish sewing, set the drop feed lever to the original position.
- Select stitch.
- Start sewing.
- Finish sewing.
- Attach the presser foot holder.
Raise the presser foot lifter, align the gap in the foot holder with the presser bar, Tighten the screw by turning it clockwise.

natural_image
Technical illustration of a sewing machine with a close-up inset showing the blade and handle (no text or symbols)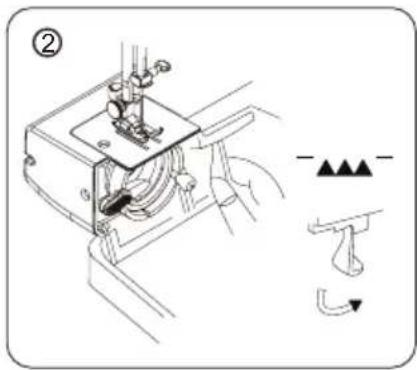
Decorative stitch
Can sew all kinds of decorative stitch as follow.
| Stitch name Stitch No. Presser foot | Stitch width (mm) Stitch length (mm) | ||||||
| Recommended | Adjustable range | Recommended | Adjustable range | ||||
| Decorative stitch (thin) | 07 | 5.0 2.0-5.0 | 0.5 0.5-4 | ||||
| 09 5.0 1.0-5.0 0.5 0.5-4 | |||||||
| 10 5.0 1.0-5.0 0.5 0.5-4 | |||||||
| 11 5.0 1.0-5.0 0.5 0.5-4 | |||||||
| 12 5.0 1.0-5.0 0.5 0.5-4 | |||||||
| 13 5.0 1.0-5.0 0.5 0.5-4 | |||||||
| 14 5.0 3.0-5.0 0.5 0.5-4 | |||||||
| 15 5.0 2.0-5.0 0.5 0.5-4 | |||||||
| 16 5.0 3.0-5.0 0.5 0.5-4 | |||||||
| 17 5.0 3.0-5.0 0.5 0.5-4 | |||||||
| 18 5.0 3.0-5.0 0.5 0.5-4 | |||||||
| 19 5.0 3.0-5.0 0.5 0.5-4 | |||||||
| 20 5.0 1.0-5.0 0.5 0.5-4 | |||||||
| 21 5.0 3.0-5.0 0.5 0.5-4 | |||||||
| 22 5.0 1.0-5.0 0.5 0.5-4 | |||||||
| 23 5.0 1.0-5.0 0.5 0.5-4 | |||||||
| 24 5.0 3.0-5.0 0.5 0.5-4 | |||||||
| 25 5.0 3.0-5.0 0.5 0.5-4 | |||||||
| Stitch name Stitch Stitch No. Presser foot | Stitch width (mm) Stitch length (mm) | ||||||
| Recommended | Adjustable range | Recommended | Adjustable range | ||||
| Decorative stitch (thick) | 26 | 5.0 3.0-5.0 | 0.5 0.5-4 | ||||
| 27 5.0 3.0-5.0 0.5 0.5-4 | |||||||
| 28 5.0 2.5-5.0 0.5 0.5-4 | |||||||
| 29 5.0 2.5-5.0 0.5 0.5-4 | |||||||
| 30 5.0 3.0-5.0 0.5 0.5-4 | |||||||
| 31 5.0 3.0-5.0 0.5 0.5-4 | |||||||
| 32 5.0 1.0-5.0 0.5 0.5-4 | |||||||
| 33 5.0 1.0-5.0 0.5 0.5-4 | |||||||
| 34 5.0 1.0-5.0 0.5 0.5-4 | |||||||
| 35 5.0 2.5-5.0 0.5 0.5-4 | |||||||
| 36 5.0 3.0-5.0 0.5 0.5-4 | |||||||
| 37 5.0 2.5-5.0 0.5 0.5-4 | |||||||
| 38 5.0 2.5-5.0 0.5 0.5-4 | |||||||
| 39 5.0 3.0-5.0 0.5 0.5-4 | |||||||
| 40 5.0 3.0-5.0 0.5 0.5-4 | |||||||
| 41 5.0 2.5-5.0 0.5 0.5-4 | |||||||
| 42 5.0 3.0-5.0 0.5 0.5-4 | |||||||

| Stitch name Stitch | Stitch Stitch No. Presser foot | Stitch width (mm) Stitch length (mm) | ||||
| Recommended | Adjustable range | Recommended | Adjustable range | |||
| Decorative stitch (thick) | 43 | 5.0 3.0-5.0 | 0.5 0.5-4 | |||
| 44 5.0 2.5-5.0 0.5 0.5-4 | ||||||
| 45 5.0 2.5-5.0 0.5 0.5-4 | ||||||
| 46 5.0 3.0-5.0 0.5 0.5-4 | ||||||
Sewing
- Select stitch.
- Start sewing.
- Finish sewing.
Helpful hint:
When sewing, do not feed the fabric too fast, and adjust suitable top and bobbin thread tension, so that the top thread can go down to the wrong side of the fabric.

natural_image
Two technical line drawings of sewing machine components, showing front and side views with no text or symbols.
CARING FOR YOUR MACHINE
Dismantling and assembling shuttle race
To dismantle and oil the shuttle race
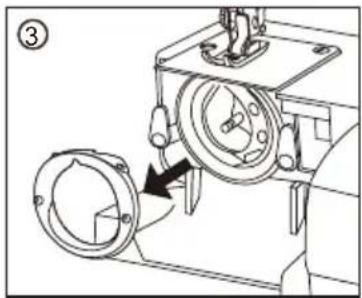
Raise the needle to its highest position and open the shuttle cover.


natural_image
Mechanical assembly diagram showing a motor with rotating components and directional arrows (no text or labels)-
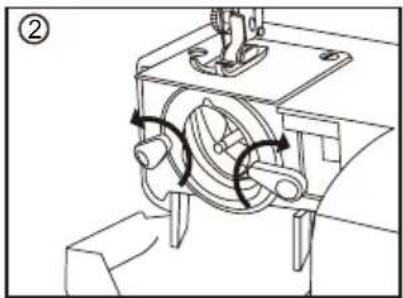
Open the hinged latch of the bobbin case and take it out of the machine.
-
Open the shuttle race cover holders.

-
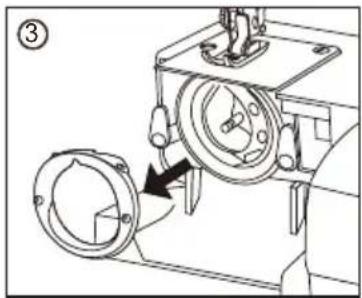
Remove the shuttle race cover.
-
Remove the shuttle.

natural_image
Technical line drawing of a mechanical device with no visible text or symbols
natural_image
Technical line drawing of a mechanical device with no visible text or symbols- Clean the shuttle race with a brush and soft dry cloth.
- Before assembling the shuttle race, oil the shuttle race using a few drops of fine quality sewing machine oil.
Note:
- Use oil sparingly as over oiling will cause it to leak onto your fabric.
- In case the machine does not work smoothly due to standing idle for some time, apply a few drops of kerosene at the oiling point, and turn the machine rapidly for a minute.
- When the machine is does working 4-8 hours or there is abnormal noise, apply 2-3 drops of sewing machine oil at the oiling point.
CAUTION
Be sure to disconnect the power supply before operating the machine.
To assemble the shuttle race
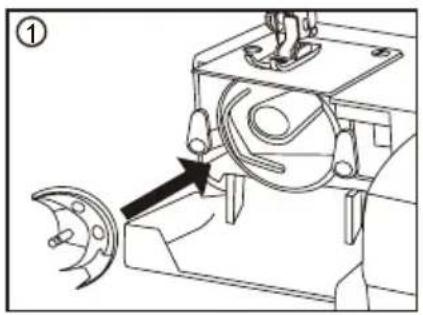

natural_image
Technical line drawing of a sewing machine with a circular component inserted, showing no text or symbols.-
Hold the Shuttle by the center pin and fit it carefully back into the shuttle race, forming a perfect circle with the shuttle driver.
-
Attach the shuttle race cover making sure that the bottom pin fits into the notch.
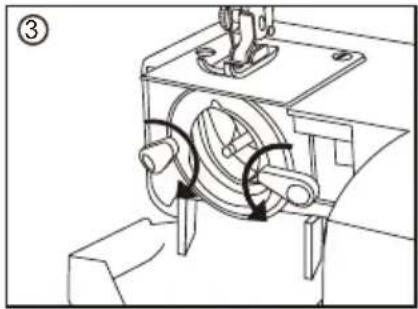
natural_image
Mechanical assembly diagram showing a rotating motor with directional arrows (no text or labels)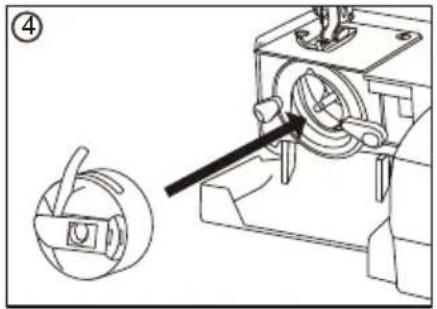
- Lock the shuttle race cover holders by turning the holders back into position.
- Insert the bobbin case.
Cleaning the feed dogs
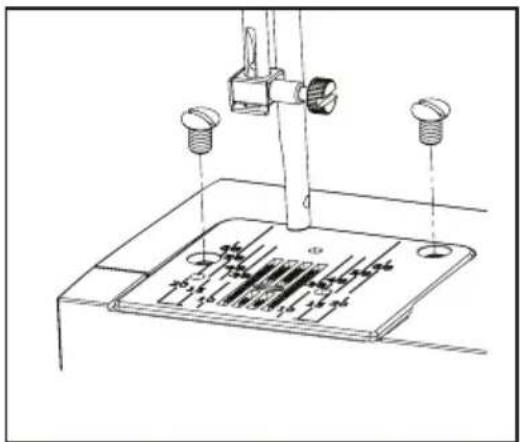
natural_image
Technical line drawing of a mechanical assembly with bolts and a base plate (no text or symbols)Remove the needle and the presser foot. Remove the needle plate set screws and remove the needle plate.

natural_image
Technical line drawing of a sewing machine needle stitching a printed circuit board (no text or symbols)With a brush, clean out dust and lint clogging on the feed dog teeth. Reset the needle plate.
CAUTION
Be sure to disconnect the power supply before operating the machine.
Oiling the needle bar
Remove the face cover
- Face cover screw
- Face cover

Apply a few drops of fine quality sewing machine oil to the point indicated by the arrows in the figures.
For machine in constant use, oil two or three times a year.
In case the machine does not work smoothly due to standing idle for some time, apply a few drops of kerosene at the oiling point, and turn the machine rapidly for a minute.
Before oiling, wipe off oiling points.
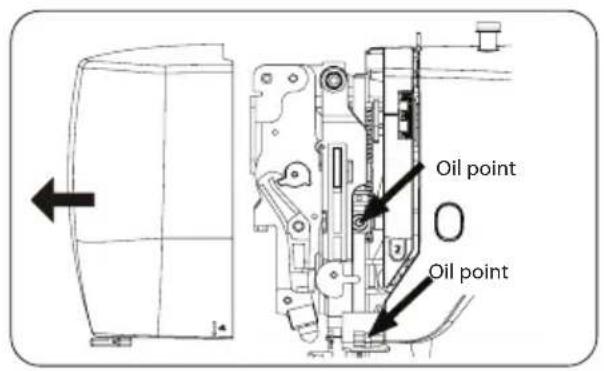
Oiling the connecting rod
- Loosen the little top cover screw used the screwdriver.
- Remove the little top cover.
Apply a few drops of fine quality sewing machine oil to the point indicated by the arrows in the figures. For machine in constant use, oil two or three times a year.
When there is abnormal noise, apply a few drops of sewing machine oil at the oiling point.

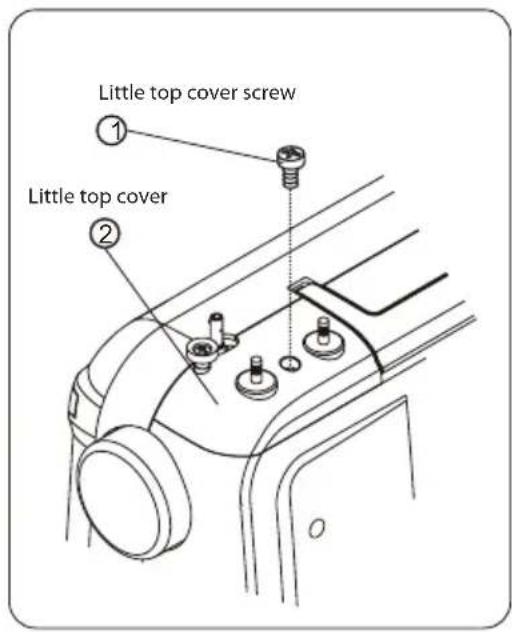
CAUTION
Be sure to disconnect the power supply before operating the machine.
TROUBLESHOOTING
| Trouble Causes Spultion | ||
| Top thread broken 1. Improper top threading.2. Excessively tight top tension.3. Blunt or bend needle.4. Improper fixing of needle.5. At start of sewing, top thread and bottom thread are not correctly fixed beneath the presser.6. The thread is unsuitable. | 1. Threading the top thread again.2. Adjust the top tension.3. Replace the needle.4. Reinstall the needle.5. Proper operation.6. Replace the proper thread. | |
| Bobbin thread broken 1. The bobbin thread is not correctly threaded into bobbin case.2. Cotton flock collected on shuttle race.3. The bobbin is damaged and impossible to smoothly rotate. | 1. Thread the bobbin thread again.2. Clean the shuttle race.3. Replace the bobbin. | |
| Needle broken 1. Improper fixing of needle.2. Blunt or bend needle.3. The needle clamp screw is loosening.4. Excessively tight top tension.5. Too thin needle. | 1. Reinstall the needle.2. Replace the needle.3. Tight the needle clamp screw.4. Adjust the top tension.5. Replace the proper needle. | |
| Skipping stitches 1. Improper fixing of needle.2. Blunt or bend needle.3. The needle and (or) thread is unsuitable for the used fabric.4. Improper top threading.5. The needle is unsuitable. | 1. Reinstall the needle.2. Replace the needle.3. Replace the proper needle and thread.4. Threading the top thread again.5. Replace the proper needle. | |
| Seam puckering 1. Excessively tight top tension.2. Improper top threading.3. Excessively thick top thread for the used fabric. | 1. Adjust the top tension.2. Threading the top thread again.3. Replace the proper thread. | |
| Unsmooth feed 1. Feed dog is wound by thread.2. Thread jams. | 1. Clean the feed dog.2. Clean the clamping thread. | |
| Not run of machine 1. Not surely inserting power plug.2. Clamping thread at shuttle race.3. Failure to replace the bobbin winder shaft at original position after winding bobbin. | 1. Check the power connector.2. Clean the clamping thread.3. Push the bobbin winder shaft to original position. | |
| Thread jaming 1. The presser foot lifter is not lower down when sewing.2. Improper top threading.3. Improper bobbin threading. | 1. Lower down the presser foot lifter.2. Threading the top thread again.3. Threading the bobbin thread again. | |
DISPOSAL OF USED ELECTRICAL AND ELECTRONIC EQUIPMENT

natural_image
Symbol of a trash bin crossed with no text or numbers, representing environmental restriction (no text present)This symbol on products or original documents means that used electric or electronic products must not be added to ordinary municipal waste. For proper disposal, renewal and recycling hand over these appliances to determined collection points. Alternatively, in some European Union states or other European countries you may return your appliances to the local retailer when buying an equivalent new appliance. Correct disposal of this product helps save valuable natural resources and prevents potential negative effects on the environment and human health, which could result from improper waste disposal. Ask your local authorities or collection facility for more details. In accordance with national regulations penalties may be imposed for the incorrect disposal of this type of waste.
For business entities in European Union states
If you want to dispose of electric or electronic appliances, ask your retailer or supplier for the necessary information.
Disposal in other countries outside the European Union.
This symbol is valid in the European Union. If you wish to dispose of this product, request the necessary information about the correct disposal method from the local council or from your retailer.


- OBSAH
- DŮLEŽITÉ BEZPEČNOSTNÍ POKYNY
- Příslušenství
- Navíjení cívky
- UPOZORNĚNÍ
- Zpětné šití
- Šití křivek
- Přišívání knoflíků
- Užitečný tip:
- DÔLEŽITÉ BEZPEČNOSTNÉ POKYNY
- Zapustenie podávača
- Navíjanie cievky
- Dvojihla
- UPOZORNENIE
- Spätné šitie
- Šitie kriviek
- Prišívanie gombíkov
- Užitočný tip:
- STAROSTLIVOSŤ O ŠIJACÍ STROJ
- Vybratie a nasadenie chapača
- Akcesoria
- Nawijanie szpuli
- Podwójna igła
- OSTRZEŻENIE
- Szycie wsteczne
- Szycie dziurki na guzik
- Użyteczna rada:
- KONSERWACJA MASZYNY DO SZYCIA
- Orsózás
- Nyomótalp - csere
- FIGYELMEZTETÉS
- Visszavarrás
- Ívek varrása
- Gombfelvarrás
- Gomblyukazás
- Hasznos tanács:
- Díszítő öltések
- A VARRÓGÉP ÁPOLÁSA
- Igla in tačka
- Oprema
- Kako spustiti grabljice
- Izvlek nosilca sukancev
- Navijanje tuljavice
- Menjava tačke
- OPOZORILO
- Uporaba vdevalca sukanca
- Tabela igel, sukancev in vrst blaga
- Vzvratno šivanje
- Šivanje krivulj
- Vstavljanje zadrg
- Šivanje gumbov
- Šivanje gumbnice
- Koristen nasvet:
- Okrasni vbodi
- VZDRŽEVANJE ŠIVALNEGA STROJA
- Nadel und Nähfuß
- Zubehör
- HINWEIS
- Rückwärtsnähen
- Nähen von Kurven
- Kordonieren
- Annähen von Knöpfen
- Nützlicher Tipp:
- KNOWING YOUR SEWING MACHINE
- SEWING BASICS
- UTILITY STITCHES
- CARING FOR YOUR MACHINE
- IMPORTANT SAFETY INSTRUCTIONS
- DANGER - To reduce the risk of electric shock:
- SAVE THESE INSTRUCTIONS
- This appliance complies with EMC Directive 2014/30/EU covering the electromagnetic compatibility.
- KNOWING YOUR SEWING MACHINE
- Machine identification
- Main parts
- Needle and presser parts
- Accessories
- Setting up your machine
- Power line cord/foot control
- CAUTION
- Power/light switch
- Converting to free-arm sewing
- Presser foot lifter
- Reverse sewing lever
- Stitch length dial
- Needle position button
- Dropping the feed dogs
- Seam guide line
- Setting spool pins
- Winding the bobbin
- Removing or replace the bobbin case
- Threading the bobbin case
- Changing the presser foot
- Threading the machine
- Single needle
- Twin needle
- Using automatic needle threader
- Drawing up bobbin thread
- Balancing top thread tension
- Needle, thread and fabric chart
- Changing the needle
- Functions of control panel
- Pattern selection
- Stitch width selection
- Twin needle selection
- Helpful messages
- SEWING BASICS
- Sewing
- Normal sewing steps
- Select stitch
- Example
- 5.0
- Start sewing
- Reverse sewing
- Useful sewing tips
- Trial sewing
- Changing the sewing direction
- Sewing curves
- Sewing thick fabrics
- Sewing elastic fabric or the fabric that is easy to cause skipping stitches
- Sewing thin fabric or silk
- Sewing stretch fabrics
- Free arm sewing
- UTILITY STITCHES
- Straight stitch
- Keep seams straight
- Change the needle position
- Zigzag stitch/overcasting stitch
- Warm tip:
- Blind hem stitch
- Zipper insertion
- Helpful hint:
- Piping
- Helpful tips:
- Button sewing
- Button sewing tips
- Buttonhole sewing
- Free seam
- NOTE: After you finish sewing, set the drop feed lever to the original position.
- Decorative stitch
- CARING FOR YOUR MACHINE
- Dismantling and assembling shuttle race
- To dismantle and oil the shuttle race
- Note:
- To assemble the shuttle race
- Cleaning the feed dogs
- Oiling the needle bar
- Remove the face cover
- Oiling the connecting rod
- DISPOSAL OF USED ELECTRICAL AND ELECTRONIC EQUIPMENT
- For business entities in European Union states
- Disposal in other countries outside the European Union.
Brand : Guzzanti
Model : GZ-118
Category : Sewing machine