
RVC-124116 - Robot vacuum Emerio - Free user manual and instructions
Find the device manual for free RVC-124116 Emerio in PDF.


| Product Type | Robot Vacuum Cleaner |
| Brand | Emerio |
| Model | RVC-124116 |
| Dimensions (L x W x H) | Approx. 32 x 32 x 8 cm |
| Weight | Approx. 2.5 kg |
| Power Supply | Rechargeable Li-ion battery, 14.4 V / 2600 mAh |
| Charging Time | Approx. 4-5 hours |
| Runtime | Up to 90 minutes |
| Dustbin Capacity | Approx. 300 ml |
| Suction Power | Up to 2000 Pa |
| Noise Level | Approx. 55 dB |
| Cleaning Modes | Auto, Spot, Edge, Schedule |
| Sensors | Drop, Cliff, Obstacle, Wall |
| Filter Type | HEPA filter (washable) |
| Brushes | Main roller brush + side brush |
| Remote Control | Included (batteries not included) |
| Dustbin Full Indicator | Yes |
| Automatic Recharge | Yes, when battery low |
| Surface Types | Hard floors, low-pile carpets |
| Maintenance | Empty dustbin after each use; clean filter weekly; replace brush every 3-6 months |
| Safety Features | Auto-shutdown on low battery; drop sensor prevents falls |
| Spare Parts Available | Yes: filters, brushes, batteries, remote control |
| Warranty | 2 years |
Frequently Asked Questions - RVC-124116 Emerio
User questions about RVC-124116 Emerio
0 question about this device. Answer the ones you know or ask your own.
Ask a new question about this device
Download the instructions for your Robot vacuum in PDF format for free! Find your manual RVC-124116 - Emerio and take your electronic device back in hand. On this page are published all the documents necessary for the use of your device. RVC-124116 by Emerio.
USER MANUAL RVC-124116 Emerio
natural_image
Black circular robotic vacuum cleaner with blue LED indicators (no visible text or symbols)Robotic vacuum cleaner (EN)
Robotski sesalnik (SI)
Robotporszívó (HU)
Instruction manual – English ...... - 11 -
Navodila za uporabo – Slovenian.... - 20 -
natural_image
Technical diagram showing internal components of a device with two views: top view and side view (no text or labels)natural_image
Close-up of hands holding a white and black paper clip (no text or symbols visible)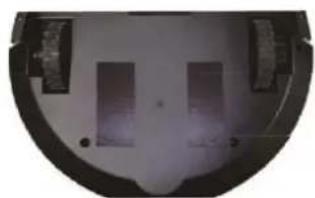
natural_image
Close-up of a circular mechanical component with two rectangular cutouts and dark flanges (no visible text or symbols)2
natural_image
Close-up of a textured, curved surface with no visible text or symbolsnatural_image
Technical line drawing of a circular device with a cable and connector, no text or symbols presentnatural_image
Illustration of a hand using a power outlet to connect to a device with cable and a switch (no text or symbols present)ANMERKUNGEN:
natural_image
Diagram of a hand pressing down on a circular object with arrows indicating motion (no text or symbols)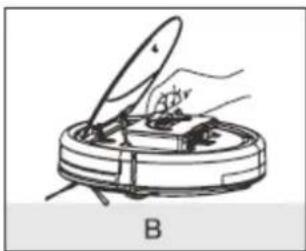
natural_image
Illustration of a hand using a tool to clean or inspect a circular object, labeled 'B' (no text or symbols on the diagram itself)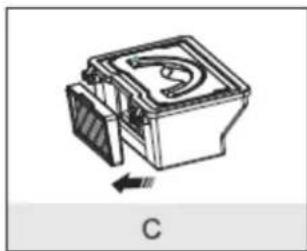
natural_image
Technical line drawing of a mechanical component with an arrow indicating direction (no text or symbols)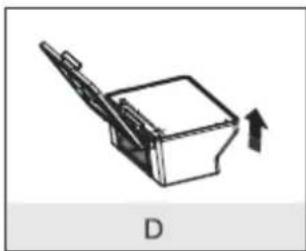
natural_image
Simple line drawing of a mechanical device with an arrow indicating direction (no text or symbols)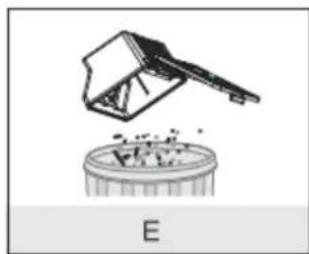
natural_image
Illustration of a hand crushing a container with granular material, labeled 'E' at the bottom (no text or symbols on the diagram itself)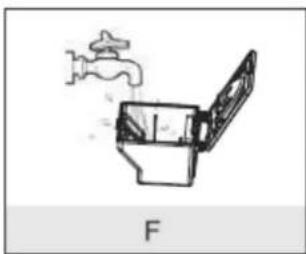
natural_image
Diagram of a toilet with faucet and lid, labeled 'F' (no text or symbols on diagram itself)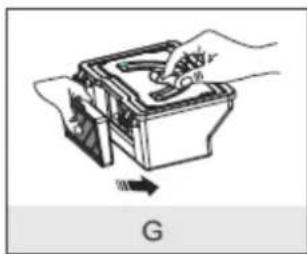
natural_image
Illustration of a hand using a tool to adjust or install a mechanical component, labeled 'G' at the bottom (no text or symbols on the diagram itself)Before use make sure to read all of the below instructions in order to avoid injury or damage, and to get the best results from the appliance. Make sure to keep this manual in a safe place. If you give or transfer this appliance to someone else make sure to also include this manual.
In case of damage caused by user failing to follow the instructions in this manual the warranty will be void. The manufacturer/importer accepts no liability for damages caused by failure to follow the manual, a negligent use or use not in accordance with the requirements of this manual.
-
This appliance can be used by children aged from 8 years and above and persons with reduced physical, sensory or mental capabilities or lack of experience and knowledge if they have been given supervision or instruction concerning use of the appliance in a safe way and understand the hazards involved.
-
Children shall not play with the appliance.
-
Cleaning and user maintenance shall not be made by children without supervision.
-
The appliance is only to be used with the power supply unit provided with the appliance.
-
The plug of adaptor must be removed from the socket-outlet before cleaning or maintaining the appliance.
-
WARNING: For the purposes of recharging the battery, only use the detachable supply unit provided with this appliance.
-
This appliance contains batteries that are only replaceable by skilled persons.
-
Before inserting the plug into the mains socket, please check that the voltage and frequency comply with the
specifications on the rating label.
- Ensure that the mains cable is not hung over sharp edges and keep it away from hot objects and open flames.
- Do not immerse the appliance or the mains plug in water or other liquids. There is danger to life due to electric shock!
- To remove the plug from the plug socket, pull the plug. Do not pull the power cord.
- Do not touch the appliance if it falls into water. Remove the plug from its socket, turn off the appliance and send it to an authorized service center for repair.
- Do not plug or unplug the appliance from the electrical outlet with a wet hand.
- Never attempt to open the housing of the appliance, or to repair the appliance yourself. This could cause electric shock.
- Never leave the appliance unattended during use.
- This appliance is not designed for commercial use.
- Do not use the appliance for other than intended use.
- Do not wind the cord around the appliance and do not bend it.
- The appliance is for indoor use only.
- The unit is suitable for cleaning hard floor, tile, thin carpet, not for thick carpet.
- When the unit is used on a thin carpet, do not use side brushes in case the side brushes are damaged.
- A damaged power supply should be replaced only with the original parts from manufacture.
- Do not use the appliance in wet, flammable, explosive or corrosive environments.
- Do not use the appliance to absorb unburned cigarettes or matches.
- Do not use the appliance to absorb toner used in laser printers and copiers.
- Do not use the appliance to absorb sharp objects, such as
glass sheets, nails, etc.
- Before operation, move away the fragile things (glass, light and etc.) and other things (long hair, plastic bag, rope, wire and etc.) possibly entangle brushes.
- Do not sit on the machine or put heavy things on it.
- Clean the machine regularly. Empty the dust box.
- Recycle the battery when machine becomes broken.
COMPONENTS
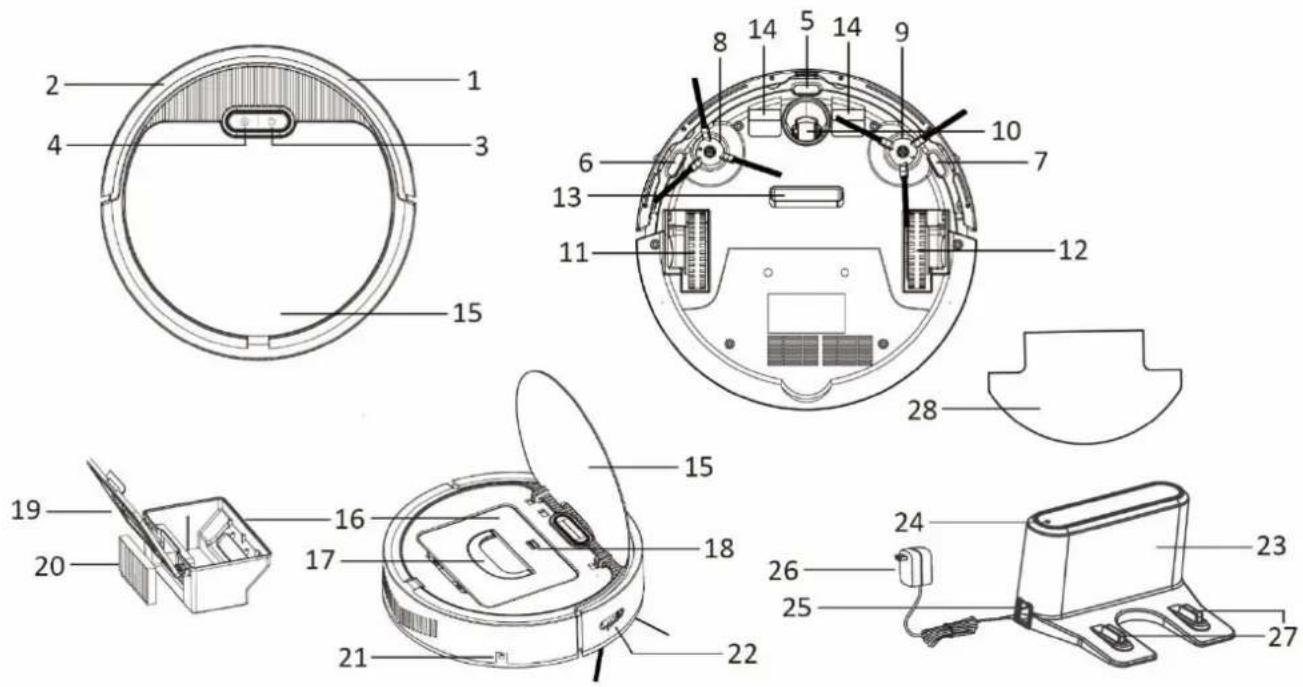
- Right bumper
- Left bumper
- On/off (start/pause) button with indicator light
- Recharge button with indicator light
- Front sensor
- Right sensor
- Left sensor
- Right side brush
- Left side brush
- Main wheel
- Right wheel
- Left wheel
- Suction hole
-
Chip pole piece
-
machine cover
- Dust box
- Dust box handle
- Opening switch of the dust box
- Dust box cover
- HEPA filter
- Charging port on the machine
- Obstacle sensor
- Charging base
- Indicator light on the charging base
- Charging port on the charging base
- Adaptor
- Charging pole piece
- Mop
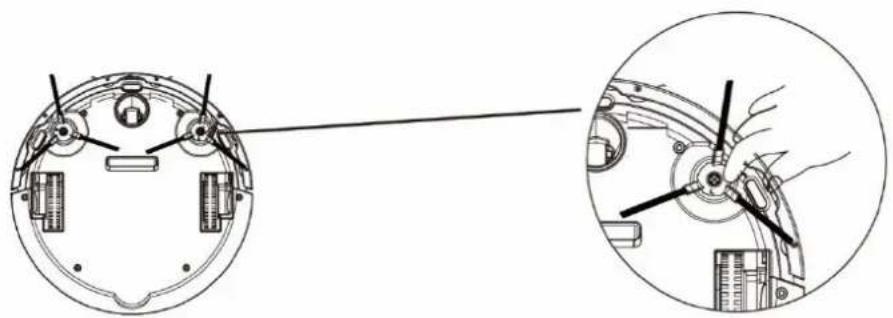
How to install the side brush
natural_image
Technical diagram showing internal components of a device with two views: top view and side view (no text or labels)The machine is packaged with 4 side brushes that differentiate left and right side. When assembling, match the
logo "L"(meaning left) / "R" (meaning right) between the brush and the bottom of the unit to make sure the brushes are correctly installed.
There is a square hole at the bottom of the side brush. Align the brush with the square hole facing down and press it until it clicks in the unit.
BEFORE FIRST USE
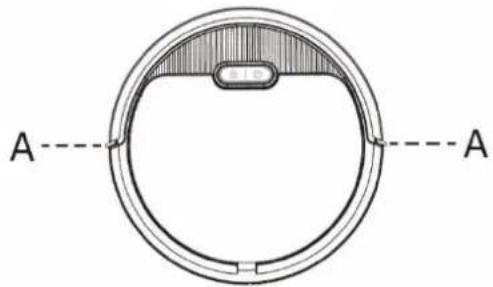
Remove all packaging material and take out the foam strips (A) at both sides.
USE
-
Install two side brushes as described above. Do not reverse the left and right side.
-
Place the machine on the ground to be cleaned.
-
When the machine is off, press and hold the on/off button, buzzer sounds are sent out and the two indicator lights flash. After 3 seconds, the machine turns into the standby mode, and in this mode, the two indicator lights both illuminate.
-
Press the start/pause button, the buzzer sound once and after a delay of 3 seconds, the machine starts cleaning. Now only the indicator light on the start/pause button illuminate.
-
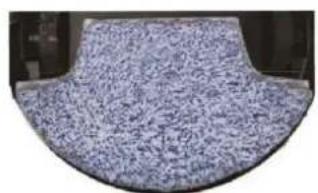
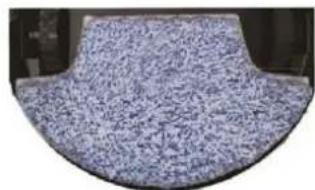
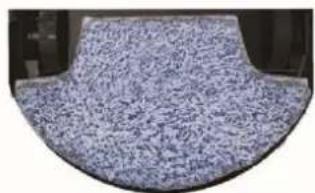
The machine can be installed with the mop to clean. Follow the steps below to paste the mop. In order to avoid water stains, do not use too much water to wet the mop. The mop can be reused. Just take off the mop and wash it; dry it before re-paste it onto the machine.
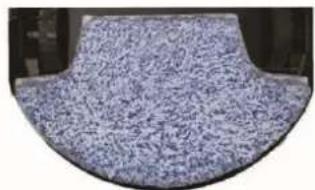
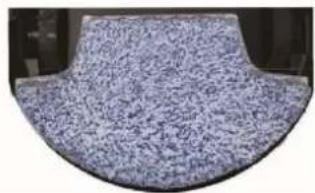
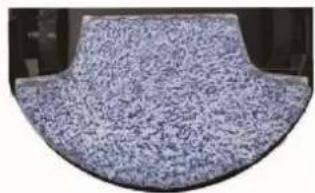
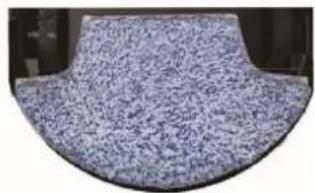
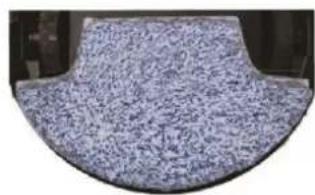
① Rip off the two provided Velcro strips and paste them on the back of the machine as below picture shows.
② Paste the mop onto the Velcro strips.
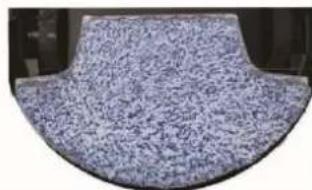
1

natural_image
Close-up of hands holding a white and black triangular object (no text or symbols visible)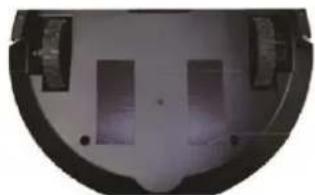
natural_image
Close-up of a circular mechanical component with two rectangular cutouts and mounting holes (no visible text or symbols)2
natural_image
Close-up of a textured, curved surface with no visible text or symbols-
During operation, press the start/pause button or the recharge button, the machine will stop and stay standby.
-
To turn off the machine, first turn the machine into standby mode, then long press the on/off button for about 3 seconds.
NOTES:
• In standby mode, the machine will automatically shut off if there's no operation in 5 minutes.
- When a fault is detected, the error mode is entered. The indicator lights flash and the buzzer sounds. Check it in the section "COMMON ERRORS" below.
RECHARGE
- Charging by the charging base
- To help the machine find the charging base in time, it is recommended to place the charging base smoothly on the side of the wall, and place no obstacles around the charging base within 2 meters in front and 1
meter on its left and right. (see below drawing).
Note: if you want to fix the charging base, you can use the provided double-sided sticker (B) to adhere the back of the charging base to the wall.
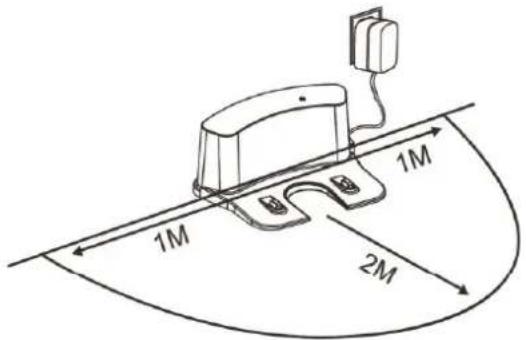
- Connect the adaptor first to the charging port on the charging base, and then to the power outlet. The indicator light on the charging base will illuminate when the power is connected.
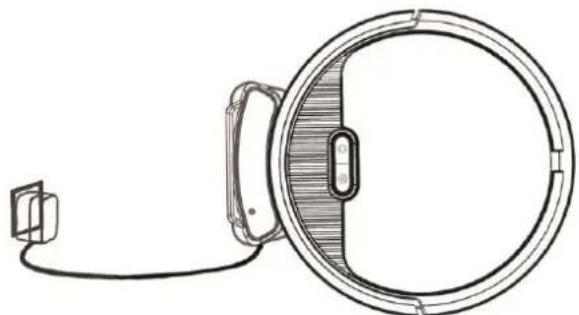
- When the battery is low, the machine will have buzzer sound 3 times and automatically start searching for the charge base. The indicator light on the recharge button will turn on; the indicator light on the on/off button will turn off. When you press the recharge button (in standby mode), the machine will also start searching for the charging stand.
Note: You can also manually place the machine onto the charging base for charging. Make the two chip pole pieces touch the two charging pole pieces.
natural_image
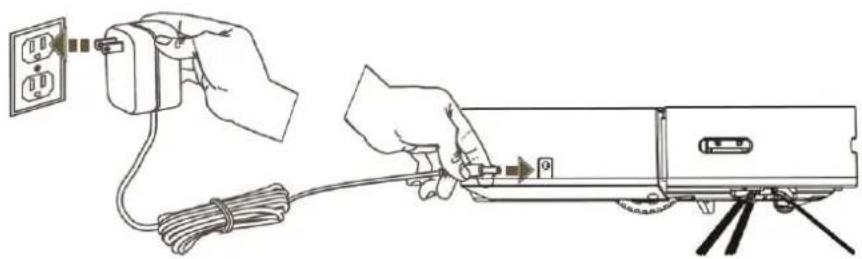
Technical line drawing of a circular device with a cable and connector, no text or symbols present- Charging directly by the adaptor
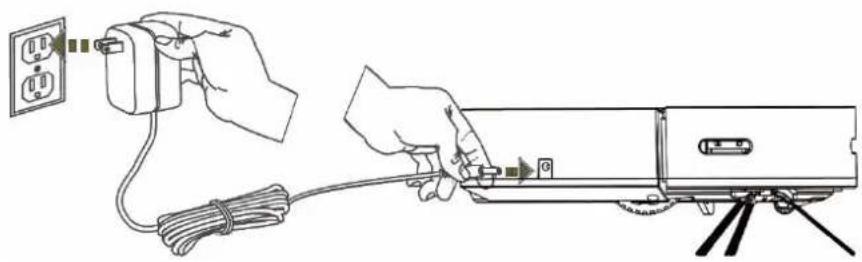
Connect the adaptor to the charging port of the machine, and then connect it to the power outlet.
natural_image
Illustration of hands connecting a power outlet to a device with cable and a switch (no text or symbols)NOTES:
- When the machine is in charging, the indicator light on the on/off button will flash. When charging is finished, the indicator light on the on/off button will illuminate still. (If the charging goes by the charging base, the indicator light on the charging base will also flash when charging and illuminate still when charging is finished.)
- Charge the machine for 12 hours when first time of charging.
- For daily using, it's recommended to store the machine on the charging base and ensure that the charging base is powered on.
CLEANING AND MAINTENANCE
Note:
• A cleaning brush and a HEPA filter replacement are provided with the packaging.
- We don't suggest washing the HEPA filter. If you have it washed, dry it thoroughly before it's been put back, and replace it with a new HEPA filter after washing 4 to 5 times.
- Make sure the machine and charging base are unplugged before cleaning.
- Do not clean the machine and power supply by immersing in water or in other liquids.
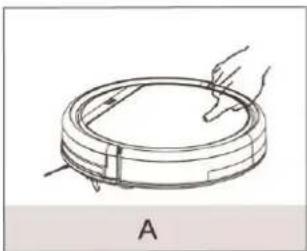
- To clean the dust box and HEPA filter, follow below steps:
A. Lift up the cover of the machine.
B. Take out the dust box by its handle.
C. Take off the HEPA filter. It is recommended to replace it with a new HEPA filter after use of 3 – 6 months. When the HEPA filter is broken, it must be replaced with a new one.
D. Push the opening switch to open the cover of the dust box.
E. Pour out the dust box. Make sure the dust box inlet is not blocked.
F. Wash the dust box with water or a mild detergent. Rinse and dry it completely before placing it back.
G. Put back the HEPA filter to the dust box. Put back the dust box into the machine.
natural_image
Diagram of a robotic vacuum cleaner with hand placement, labeled 'A' at bottom (no text or symbols on diagram itself)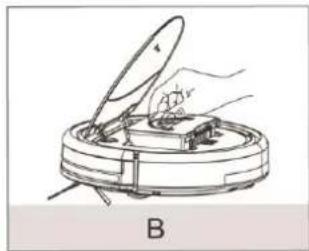
natural_image
Line drawing of a robotic vacuum cleaner with open lid and handle, labeled B (no text or symbols on diagram)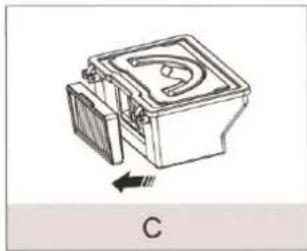
natural_image
Technical line drawing of a mechanical component with a curved cutout and directional arrow, labeled 'C' at bottom (no text or symbols on the diagram itself)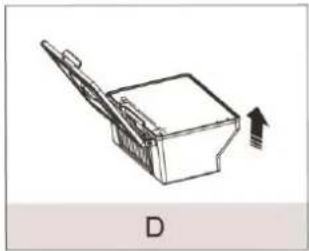
natural_image
Simple line drawing of a mechanical device with an arrow indicating direction (no text or symbols)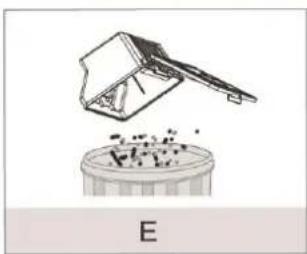
natural_image
Illustration of a mechanical device pouring granular material into a circular container labeled 'E' (no text or symbols on the diagram itself)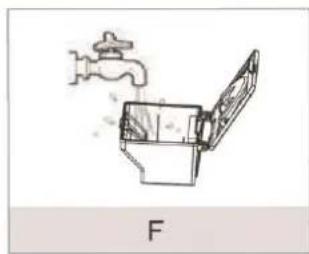
natural_image
Diagram of a faucet pouring liquid into a toilet (no text or symbols)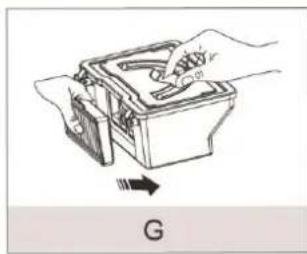
natural_image
Illustration of hands using a tool to adjust or install a mechanical component, labeled 'G' at the bottom (no text or symbols on the diagram itself)- After removing the dust box, check the suction hole of the machine and remove any foreign object.
- Gently wipe the sensor, charge pole pieces and chip pole pieces with a cleaning tool or a soft dry cloth. Never let water or any other liquid enter into the charging base.
- Gently wipe the machine surface with a cleaning tool or a soft dry cloth. Never let water or any other liquid enter into the machine.
- Clean the side brushes. If there's much hair entangled, use scissors to carefully cut the hair. Replace the side brushes if they are damaged.
- Do not use gasoline, alcohol and other strong irritant cleaning lotion to clean the machine.
- If the machine will not be used for a long time, charge the machine fully and then turn off the machine. Store the machine in a cool and dry place.
COMMON ERRORS
| Failure mode | Failure reminder | Trouble shooting |
| Left sensor failure | Indicator lights flash twice and the buzzer has one sound. | Check if the left sensor has too much dust; clean the dust off. |
| Front sensor failure | Indicator lights flash 3 times and the buzzer has one sound. | Check if the front sensor has too much dust; clean the dust off. |
| Right sensor failure | Indicator lights flash 4 times and the buzzer has one sound. | Check if the right sensor has too much dust; clean the dust off. |
| Right bumper failure | Indicator lights flash 6 times and the buzzer has one sound. | Check whether the right front shell has been blocked. |
| Left bumper failure | Indicator lights flash 7 times and the buzzer has one sound. | Check whether the left front shell has been blocked. |
| Left wheel failure | Indicator lights flash 8 times and the buzzer has one sound. | Check whether the left wheel has been entangled or blocked. |
| Right wheel failure | Indicator lights flash 9 times and the buzzer has one sound. | Check whether the right wheel has entangled or blocked. |
| Inner fan failure | Indicator lights flash 12 times and the buzzer has one sound. | Check whether there is foreign object in the fan. |
| Side brush failure | Indicator lights flash 13 times and the buzzer has one sound. | Check whether the left and right side brush have been entangled |
| Battery failure | Indicator lights flash 18 times and the buzzer has one sound. | Battery over discharged or damaged. This needs battery renewal. |
PRODUCT SPECIFICATIONS
Voltage: 7.4 V DC
Rated power: 11.2W
Adaptor input: 100-240V \~ 50/60Hz
0.35A MAX
Adaptor output: 12V =1000mA
Charging time: 3 hours
Continuously working time: 60 - 90 minutes
GUARANTEE AND CUSTOMER SERVICE
Before delivery our devices are subjected to rigorous quality control. If, despite all care, damage has occurred during production or transportation, please return the device to your dealer. In addition to statutory legal rights, the purchaser has an option to claim under the terms of the following guarantee:
For the purchased device we provide 3 years guarantee, commencing from the day of sale. If you have a defective product, you can directly go back to the point of purchase.
Defects which arise due to improper handling of the device and malfunctions due to interventions and repairs by third parties or the fitting of non-original parts are not covered by this guarantee. Always keep your receipt, without the receipt you can't claim any form of warranty. Damage caused by not following the instruction manual, will lead to a void of warranty, if this results in consequential damages then we will not be liable.
Neither can we hold responsible for material damage or personal injury caused by improper use if the instruction manual is not properly executed. Damage to accessories does not mean free replacement of the whole appliance. In such case please contact our service department. Broken glass or breakage of plastic parts is always subject to a charge. Defects to consumables or parts subjected to wearing, as well as cleaning, maintenance or the replacement of said parts are not covered by the warranty and are to be paid.
ENVIRONMENT FRIENDLY DISPOSAL
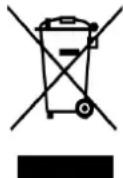
Recycling – European Directive 2012/19/EU
This marking indicates that this product should not be disposed with other household wastes. To prevent possible harm to the environment or human health from uncontrolled waste disposal, recycle it responsibly to promote the sustainable reuse of material resources. To return your used
device, please use the return and collection systems or contact the retailer where the product was purchased. They can take this product for environmental safe recycling.
natural_image
Technical diagram showing internal components of a device with two views (top and side), no text or symbols present.Napravi so priložene skupno 4 stranske krtače za levo in desno stran. Pri montaži bodite pozorni na oznaki »L«
natural_image
Close-up of hands holding a white and black paper clip (no text or symbols visible)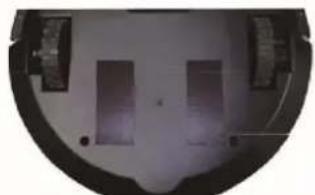
natural_image
Circular object with two rectangular cutouts and a dark border, possibly a device or component (no visible text or symbols)2
natural_image
Close-up of a textured, curved surface with no visible text or symbolsnatural_image
Technical line drawing of a mechanical component with a circular housing and cable, no text or symbols presentnatural_image
Illustration of a hand connecting an electrical outlet to a device with cable and a tripod (no text or symbols)OPOMBE:
natural_image
Diagram of a hand pressing down on a circular object with arrows, labeled 'A' at the bottom (no text or symbols on the object itself)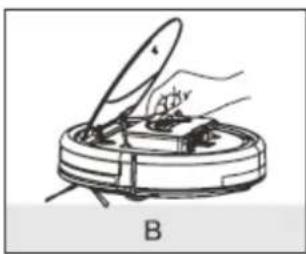
natural_image
Illustration of a robotic vacuum cleaner with a hand holding a tool, labeled 'B' (no text or symbols on the diagram itself)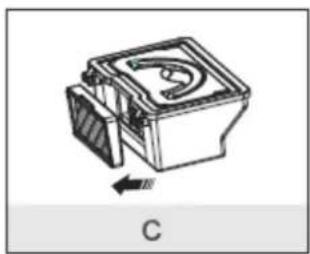
natural_image
Technical line drawing of a mechanical component with an arrow indicating direction (no text or symbols)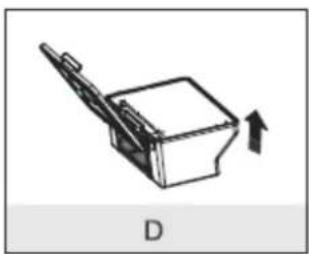
natural_image
Simple line drawing of a mechanical device with an arrow indicating direction (no text or symbols)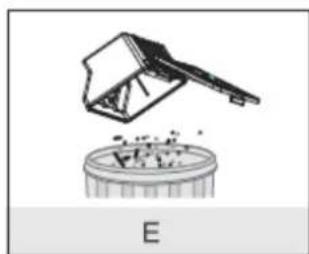
natural_image
Simple line drawing of a mechanical component above a circular base, labeled 'E' at the bottom (no text or symbols on the diagram itself)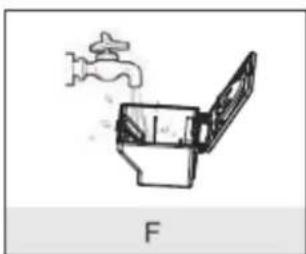
natural_image
Simple line drawing of a toilet with faucet and lid, labeled 'F' at bottom (no text or symbols on diagram itself)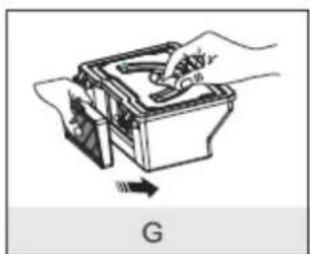
natural_image
Illustration of a hand using a tool to adjust or install a mechanical component, labeled 'G' at the bottom (no text or symbols on the diagram itself)natural_image
Technical line drawing of a mechanical component with cross-sectional and top views (no text or symbols)natural_image
Close-up of hands holding a white and black adhesive tape (no text or symbols visible)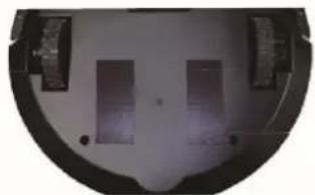
natural_image
Circular object with two rectangular cutouts, possibly a device or component, viewed from an angle (no visible text or symbols)2
natural_image
Close-up of a textured, curved surface with no visible text or symbolsnatural_image
Technical line drawing of a mechanical component with a circular housing and cable, no text or symbols presentnatural_image
Line drawing showing hands connecting a power outlet to a mounted device with cable and a tripod (no text or symbols)MEGJEGYZÉSEK:
natural_image
Diagram of a hand pressing down on a circular object with a handle, labeled 'A' at the bottom (no text or symbols on the object itself)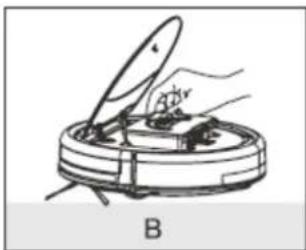
natural_image
Illustration of a robotic vacuum cleaner with a hand holding the blade (no text or symbols)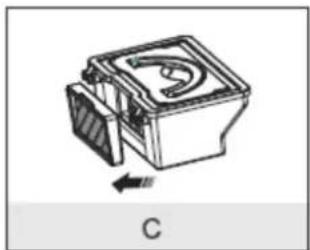
natural_image
Technical line drawing of a mechanical component with an arrow indicating direction (no text or symbols)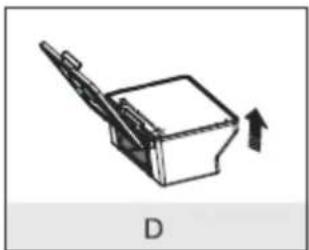
natural_image
Simple line drawing of a chair with an arrow indicating upward motion (no text or symbols)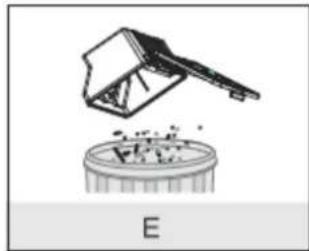
natural_image
Simple line drawing of a container with a lid and a funnel, no text or symbols present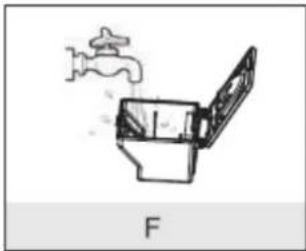
natural_image
Diagram of a faucet opening a toilet with a label 'F' below (no text or symbols on the diagram itself)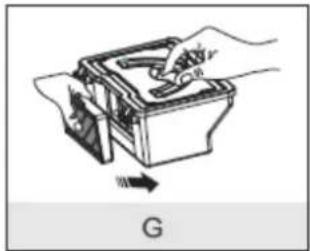
natural_image
Illustration of hands using a tool to adjust or install a mechanical component, with a directional arrow and label 'G' below (no text or symbols on the diagram itself)natural_image
Technical diagram showing internal components of a device with two views: top view and side view (no text or labels)natural_image
Close-up of hands holding a white and black object with a black square on top (no text or symbols visible)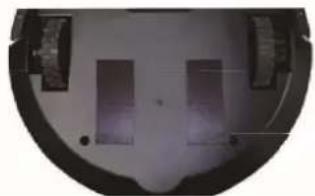
natural_image
Circular object with two rectangular blocks inside, viewed from below (no visible text or symbols)2
natural_image
Close-up of a textured, curved surface with no visible text or symbolsnatural_image
Technical line drawing of a circular device with a cable and connector, no text or symbols presentnatural_image
Illustration of a hand connecting an electrical outlet to a device with cable and a tripod (no text or symbols)UPOZORNENIA:
natural_image
Diagram of a hand pressing down on a circular object with arrows, labeled 'A' at the bottom (no text or symbols on the object itself)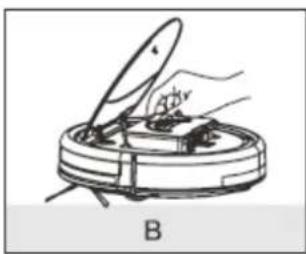
natural_image
Illustration of a robotic vacuum cleaner with a hand holding a tool, labeled 'B' (no text or symbols on the diagram itself)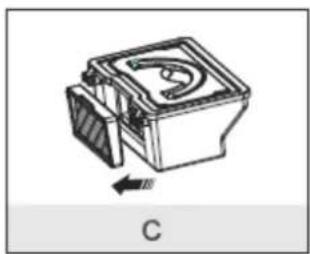
natural_image
Technical line drawing of a mechanical component with an arrow indicating direction (no text or symbols)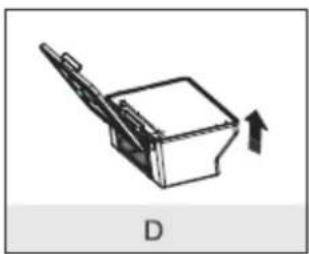
natural_image
Simple line drawing of a mechanical device with an arrow indicating direction (no text or symbols)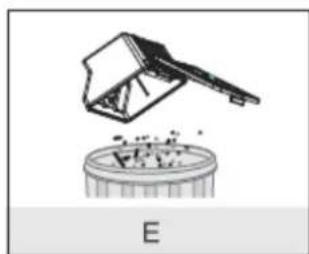
natural_image
Simple line drawing of a mechanical component above a circular base, labeled 'E' at the bottom (no text or symbols on the diagram itself)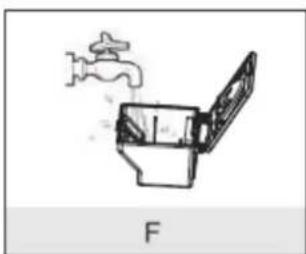
natural_image
Simple line drawing of a toilet with faucet and lid, labeled 'F' at bottom (no text or symbols on diagram)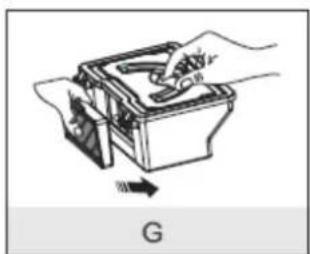
natural_image
Illustration of a hand using a tool to adjust or install a mechanical component, labeled 'G' at the bottom (no text or symbols on the diagram itself)natural_image
Technical diagram showing internal components of a device with two views: top view and side view (no text or labels)natural_image
Close-up of hands holding a small object with a black square patch, alongside a close-up of a dark circular device with rectangular components (no visible text or symbols)2
natural_image
Close-up of a textured, curved surface with no visible text or symbolsnatural_image
Technical line drawing of a circular device with a cable and connector, no text or symbols presentnatural_image
Line drawing showing hands connecting a power outlet to a mounted device with cable and a tripod (no text or symbols)POZNÁMKY:
natural_image
Diagram of a hand pressing down on a circular object with arrows indicating motion (no text or symbols)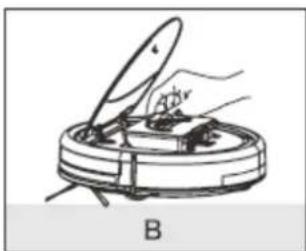
natural_image
Illustration of a robotic vacuum cleaner with a hand holding the blade (no text or symbols)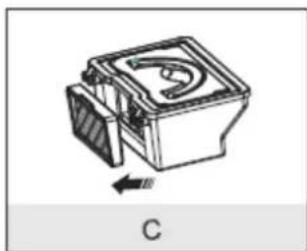
natural_image
Technical line drawing of a mechanical component with an arrow indicating direction (no text or symbols)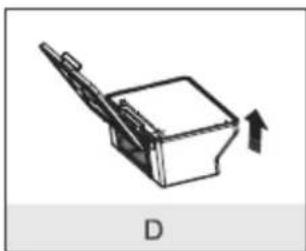
natural_image
Simple line drawing of a mechanical device with an arrow indicating direction (no text or symbols)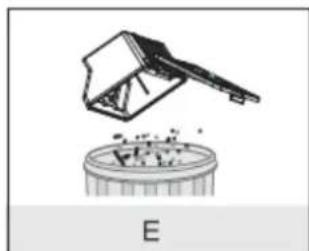
natural_image
Simple line drawing of a mechanical device above a circular base, labeled 'E' at the bottom (no text or symbols on the diagram itself)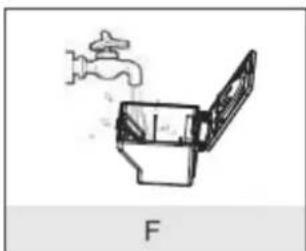
natural_image
Diagram of a toilet with faucet and lid, labeled 'F' (no text or symbols on diagram itself)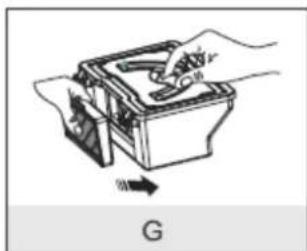
natural_image
Illustration of a hand using a tool to adjust or install a mechanical component, labeled 'G' at the bottom (no text or symbols on the diagram itself)- Desni odbojnik
- Lijevi odbojnik
- Prekidač za uključivanje/isključivanje (start/pauza) s indikatorskom lampicom
- Gumb za punjenje s indikatorskom lampicom
- Prednji senzor
- Desni senzor
- Lijevi senzor
- Desna bočna četka
- Lijeva bočna četka
- Glavni kotač
- Desni kotač
- Lijevi kotač
- Usisni otvor
-
Priključci za punjenje
-
Poklopac uređaja
- Spremnik za prašinu
- Ručka spremnika za prašinu
- Otvarač spremnika za prašinu
- Poklopac spremnika za prašinu
- HEPA filter
- Priključak za punjenje na uređaju
- Senzor prepreke
- Stanica za punjenje
- Indikatorska lampica na stanici za punjenje
- Priključak za punjenje stanice za punjenje
- Adapter
- Punjenje kontakta
- Mop
natural_image
Technical diagram showing internal components of a device with two views (top and side), no text or symbols present.Uređaj dolazi s ukupno 4 bočne četke za lijevu i desnu stranu. Prilikom montiranja obratite pažnju na oznake
natural_image
Close-up of hands holding a white and black object with a black square on top (no text or symbols visible)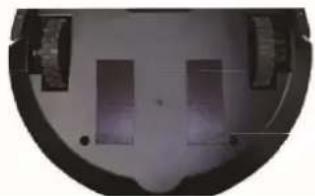
natural_image
Circular object with two rectangular blocks and vertical bars, no visible text or symbols2
natural_image
Close-up of a textured, curved surface with no visible text or symbolsnatural_image
Technical line drawing of a mechanical component with a circular housing and cable, no text or symbols present- Izravno punjenje adapterom
Spojite adapter s priključkom za punjenje na uređaju, a zatim u utičnicu.
natural_image
Line drawing showing hands connecting a wall-mounted electrical outlet to a mounted device with cable and a tripod (no text or symbols)NAPOMENE:
natural_image
Diagram of a hand pressing down on a circular object with arrows, labeled 'A' at the bottom (no text or symbols on the object itself)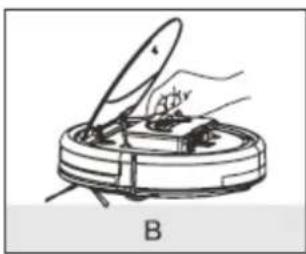
natural_image
Illustration of a robotic vacuum cleaner with a hand holding a tool, labeled 'B' (no text or symbols on the diagram itself)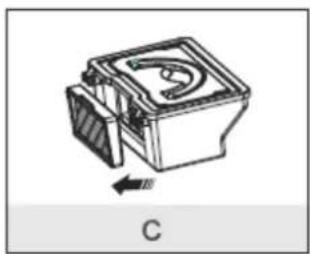
natural_image
Technical line drawing of a mechanical component with an arrow indicating direction (no text or symbols)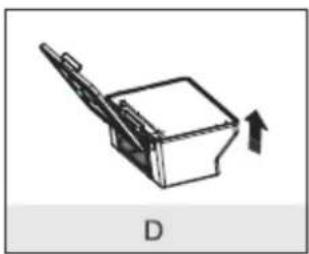
natural_image
Simple line drawing of a mechanical device with an arrow indicating direction (no text or symbols)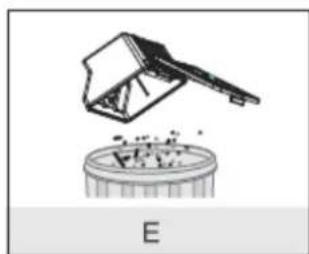
natural_image
Simple line drawing of a mechanical component above a circular base, labeled 'E' at the bottom (no text or symbols on the diagram itself)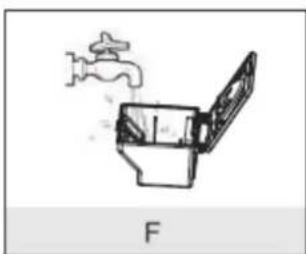
natural_image
Simple line drawing of a toilet with faucet and lid, labeled 'F' at bottom (no text or symbols on diagram itself)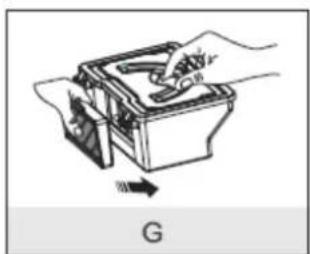
natural_image
Illustration of a hand using a tool to adjust or install a mechanical component, labeled 'G' at the bottom (no text or symbols on the diagram itself)- Nakon uklanjanja spremnika za prašinu, provjerite usisni otvor i uklonite sve strane predmete.
- Lagano obrišite senzor, priključke za punjenje i kontakte za punjenje sredstvom za čišćenje ili mekom suhom krpom. Ni u kojem slučaju ne dopustite da voda ili druge tekućine uđu u stanicu za punjenje.
- Pažljivo obrišite površinu uređaja sredstvom za čišćenje ili suhom, mekom krpom. Ni u kojem slučaju ne dopustite ulazak vode ili drugih tekućina u uređaj.
- Očistite bočne četke. Ako je oko nje omotano puno kose, treba je pažljivo odrezati škarama. Zamijenite bočne četke ako su neispravne.
- Za čišćenie uređaja nemoite koristiti benzin, alkohol ili druga jako nadražujuća sredstva za čišćenie.
- Ako se uređaj ne koristi dulje vrijeme, treba ga potpuno napuniti i isključiti. Uređaj čuvajte na hladnom i suhom miestu.
ČESTE SMETNJE
| Smetnja | Poruka kvara | Uklanjanje |
| Lijevi senzor neispravan | Indikatorske lampice trepću dva puta, a zvučni signal će se oglasiti. | Provjerite ima li previše prašine na lijevom senzoru; uklonite prašinu. |
| Prednji senzor neispravan | Indikatorske lampice trepću 3 puta, a zvučni signal se oglašava. | Provjerite ima li previše prašine na prednjem senzoru; uklonite prašinu. |
| Desni senzor neispravan | Indikatorske lampice trepću 4 puta, a zvučni signal se oglašava. | Provjerite ima li previše prašine na desnom senzoru; uklonite prašinu. |
| Kvar na desnom odbojniku | Indikatorske lampice trepću 6 puta, a zvučni signal se oglašava. | Provjerite je li prednja desna ploča blokirana. |
| Kvar na lijevom odbojniku | Indikatorske lampice trepću 7 puta, a zvučni signal se oglašava. | Provjerite je li prednja lijeva ploča blokirana. |
| Kvar na lijevom kotaču | Indikatorske lampice trepću 8 puta, a zvučni signal se oglašava. | Provjerite je li lijevi kotač zaglavljen ili blokiran. |
| Kvar na desnom kotaču | Indikatorska lampica treptat će 9 puta, a zvučni signal će se oglasiti. | Provjerite je li desni kotač zaglavljen ili blokiran. |
| Kvar unutarnjeg ventilatora | Indikatorske lampice treptat će 12 puta, a zvučni signal će se oglasiti. | Provjerite nalaze li se u ventilatoru strani objekti. |
| Neispravnost bočne četke | Indikatorske lampice treptat će 13 puta, a zvučni signal će se oglasiti. | Provjerite jesu li blokirane lijeva i desna bočna četka. |
| Kvar baterije | Indikatorske lampice treptat će 18 puta, a zvučni signal će se oglasiti. | Baterija je prazna ili neispravna. Bateriju treba zamijeniti. |
TEHNIČKI PODACI
Napon: 7,4 V DC
Nazivna snaga: 11,2 W
Ulaz napajanja: 100-240 V AC, 50/60 Hz
0,35A MAKS
Izlaz napajanja: 12 V = 1000 mA
natural_image
Technical diagram showing internal components of a device with two views (top and side), no text or symbols present.natural_image
Close-up of hands holding a white and black object with a black square on top (no text or symbols visible)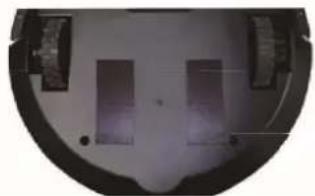
natural_image
Circular object with two rectangular blocks and vertical bars, possibly a device or component (no visible text or symbols)2
natural_image
Close-up of a textured, curved surface with no visible text or symbolsnatural_image
Technical line drawing of a mechanical component with a circular housing and cable, no text or symbols presentnatural_image
Line drawing showing hands connecting a power outlet to a device with cable and plug (no text or symbols)OBSERVATII:
natural_image
Diagram of a hand pressing down on a circular object with arrows, labeled 'A' at the bottom (no text or symbols on the object itself)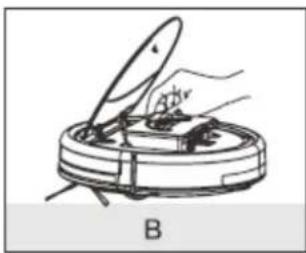
natural_image
Illustration of a robotic vacuum cleaner with a hand holding the blade (no text or symbols)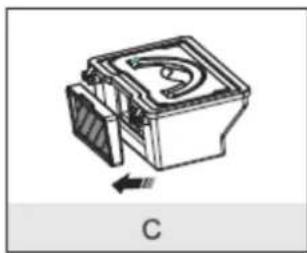
natural_image
Technical line drawing of a mechanical component with an arrow indicating direction (no text or symbols)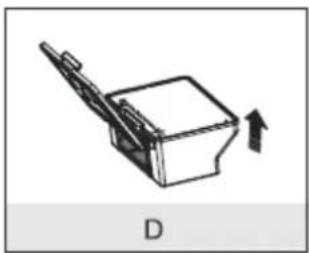
natural_image
Simple line drawing of a mechanical device with an arrow indicating direction (no text or symbols)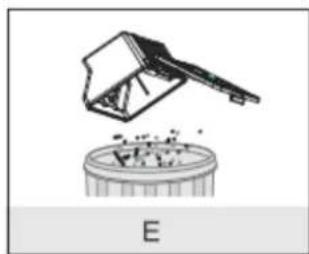
natural_image
Illustration of a mechanical device pouring material into a cylindrical container labeled E (no text or symbols on the diagram itself)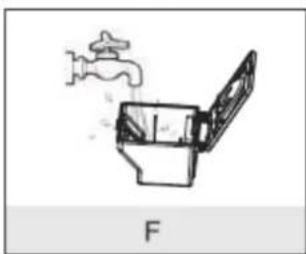
natural_image
Simple line drawing of a toilet with faucet and lid, labeled 'F' at bottom (no text or symbols on diagram itself)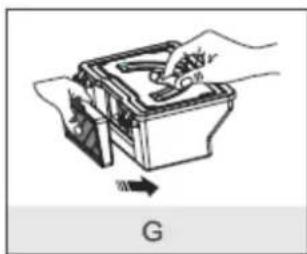
natural_image
Illustration of a hand using a tool to adjust or install a mechanical component, labeled 'G' at the bottom (no text or symbols on the diagram itself)natural_image
Technical line drawing of a mechanical component with cross-sectional and top views (no text or symbols)natural_image
Close-up of hands holding a white and black square object (no text or symbols visible)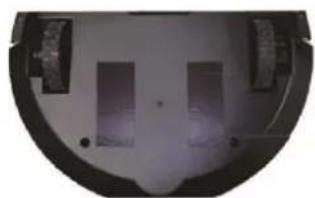
natural_image
Close-up of a circular mechanical component with two rectangular cutouts and a dark ring (no visible text or symbols)2
natural_image
Close-up of a textured, curved surface with no visible text or symbolsnatural_image
Technical line drawing of a circular device with a cable and connector, no text or symbols presentnatural_image
Line drawing showing a hand inserting a plug into an electrical outlet connected to a device with cables (no text or symbols)UWAGI:
natural_image
Diagram of a hand pressing down on a circular component labeled 'A' (no text or symbols on the diagram itself)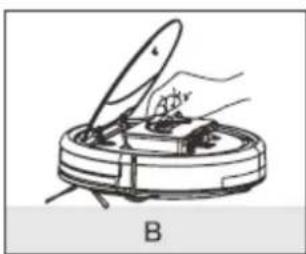
natural_image
Illustration of a robotic vacuum cleaner with a hand holding a tool, labeled 'B' (no text or symbols on the diagram itself)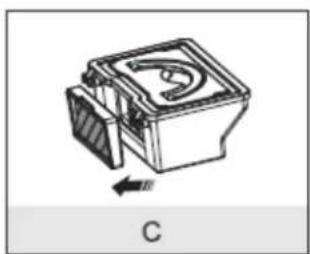
natural_image
Technical drawing of a mechanical component with a curved internal feature and directional arrow (no text or symbols)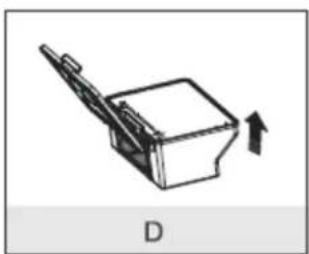
natural_image
Simple line drawing of a mechanical device with an arrow indicating direction (no text or symbols)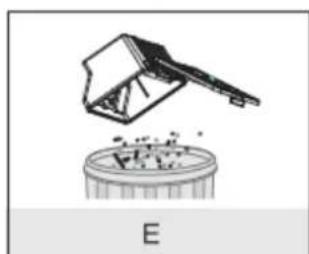
natural_image
Simple line drawing of a mechanical component above a circular base, labeled 'E' at the bottom (no text or symbols on the diagram itself)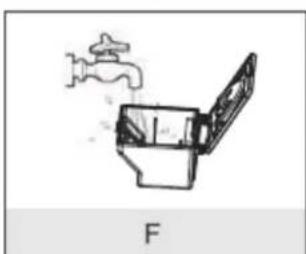
natural_image
Diagram of a toilet with faucet and lid, labeled 'F' (no text or symbols on diagram itself)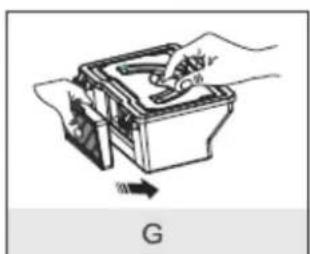
natural_image
Illustration of a hand using a tool to press or install a mechanical component, labeled 'G' at the bottom (no text or symbols on the diagram itself)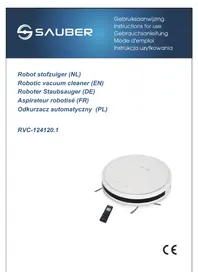
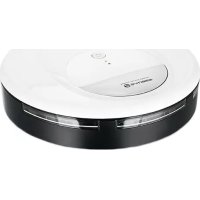
Brand : Emerio
Model : RVC-124116
Category : Robot vacuum