RVC124120 - Robot vacuum Emerio - Free user manual and instructions
Find the device manual for free RVC124120 Emerio in PDF.


| Product Type | Robotic Vacuum Cleaner |
| Brand | Emerio |
| Model | RVC124120 |
| Power Supply | Lithium battery 14.4 V DC, 2500 mA |
| Charger | AC adapter 100-240 V~50/60 Hz, output 19 V 0.6 A |
| Charging Time | About 3 to 5 hours |
| Runtime | Over 90 minutes |
| Suction Power | 800 Pa (standard) / 1300 Pa (powerful) |
| Cleaning Modes | Automatic, spiral, edge following |
| Special Features | Auto recharge, scheduling, remote control, TuyaSmart app control |
| Floor Type | Hardwood, tile, low pile carpet |
| Water Tank | Yes, for mopping cleaning |
| Dustbin Capacity | Not specified (estimated 300-500 ml) |
| Filtration | Non-washable filter + washable sponge |
| Connectivity | Wi-Fi 2.4 GHz, infrared Bluetooth range 7 m |
| Obstacle Detection | Wall sensors, cliff sensors (anti-fall) |
| Brushes | 2 removable side brushes |
| Included Accessories | Charging station, adapter, remote control, screwdriver, cleaning brush, mopping cloth |
| Warranty | 3 years (excluding wear and consumable parts) |
| Certifications | Compliant with Directive 2014/53/EU, recycling according to 2012/19/EU |
Frequently Asked Questions - RVC124120 Emerio
User questions about RVC124120 Emerio
0 question about this device. Answer the ones you know or ask your own.
Ask a new question about this device
Download the instructions for your Robot vacuum in PDF format for free! Find your manual RVC124120 - Emerio and take your electronic device back in hand. On this page are published all the documents necessary for the use of your device. RVC124120 by Emerio.
USER MANUAL RVC124120 Emerio
Robotic vacuum cleaner (EN)
Before use make sure to read all of the below instructions in order to avoid injury or damage, and to get the best results from the appliance. Make sure to keep this manual in a safe place. If you give or transfer this appliance to someone else make sure to also include this manual.
In case of damage caused by user failing to follow the instructions in this manual the warranty will be void. The manufacturer/importer accepts no liability for damages caused by failure to follow the manual, a negligent use or use not in accordance with the requirements of this manual.
- This appliance can be used by children aged from 8 years and above and persons with reduced physical, sensory or mental capabilities or lack of experience and knowledge if they have been given supervision or instruction concerning use of the appliance in a safe way and understand the hazards involved.
- Children shall not play with the appliance.
- Cleaning and user maintenance shall not be made by children without supervision.
- The appliance is only to be used with the power supply unit provided with the appliance.
- The plug of adaptor must be removed from the socket-outlet before cleaning or maintaining the appliance.
- WARNING: For the purposes of recharging the battery, only use the detachable supply unit provided with this appliance.
- This appliance contains batteries that are only replaceable by skilled persons.
-
Before inserting the plug into the mains socket, please check that the voltage and frequency comply with the specifications on the rating label.
-
Ensure that the mains cable is not hung over sharp edges and keep it away from hot objects and open flames.
- Do not immerse the appliance or the mains plug in water or other liquids. There is danger to life due to electric shock!
- To remove the plug from the plug socket, pull the plug. Do not pull the power cord.
- Do not touch the appliance if it falls into water. Remove the plug from its socket, turn off the appliance and send it to an authorized service center for repair.
- Do not plug or unplug the appliance from the electrical outlet with a wet hand.
- Never attempt to open the housing of the appliance, or to repair the appliance yourself. This could cause electric shock.
- Never leave the appliance unattended during use.
- This appliance is not designed for commercial use. Indoor use only.
- Do not use the appliance for other than intended use.
- Do not wind the cord around the appliance and do not bend it.
- Do not use the appliance without dustbin or filters in place.
- This appliance is suitable for floor cleaning of indoor environment, including hard wood floor, tile and thin carpet etc., no suitable for think carpet.
- While the product is in operation, pay attention to avoid tripping over.
- When use or store the appliance, do not use or close to the oven, fireplace or other heat sources. That may cause the appliance casing deformation or aging.
-
Do not use the appliance in a potentially dangerous environment. For example: gas station, oil depots, chemical plants and other flammable places.
-
Damaged adaptor, battery or other accessories should be replaced only with the original parts from manufacture.
- Do not use on wet or greasy dust.
- Before operation, move away the fragile things (glass, light and etc.) and other things (long hair, plastic bag, rope, wire and etc.) possibly entangle brushes.
- Do not sit on the machine or put heavy things on it.
- Clean the machine regularly. Empty the dustbin.
- Only use the original adaptor, battery and charging station, or else it will damage the machine and cause fire because of electric shock and high voltage.
- Do not touch the battery socket and the machine when your hands are wet, or else it will cause electric shock.
- Don't use this product on stairs, hallways, etc without guardrail to prevent the vacuum cleaner from falling accidentally and causing personal injury.
- Do not put your clothes or any part of your body (hair, finger, etc) into the main brush or the wheels, or it will cause personal injury.
- Only the original battery should be used with the appliance.
- If the battery leaks, please do not touch the liquid, wipe the liquid with dry cloth, and put the battery to recycling bin or recycle centre.
- Charge the machine if without use after three months.
- Recycle the battery when machine becomes broken.
PARTS DESCRIPTION
- Recharge button
- On/stand by button
- Transparent window (wall sensor included)
- Charger port
- Cliff sensor
- Charging pin
- Front wheel
- Side brush
- Suction inlet
- Left/right wheel
- Power switch
-
Indicator
-
Signal emission area
- Dustbin
- Adaptor
- Water tank
- Mop
- Screwdriver
- Clean brush
- Remote control
- Main unit
- Charging base
- Lithium battery compartment
Totally four side brushes and four screws in the package. Fix two side brushes on the side brush slots with the screwdrivers and two screws as shown in the figure.
Warm tip: when installing or removing the side brush, press and hold the brush holder (A) by hand to prevent damage to the transmission machine caused by its rotation.
Before use, remove the protective strip on the bump plate to ensure the normal use of the appliance.
HOW TO CHARGE
1: Manual charging
When the cleaning is finished, turn off the appliance; use the adaptor to charge the appliance.
1) Plug one end of the adaptor into the charging port of the main unit.
2) Plug the other end of the adaptor into the power outlet.
3) During charging, the button " " will flash all the time.
4) When fully charged, the button " " will stay lit.
Note:
During charging, all functions will be locked. The appliance will be activated when disconnect the plug.
2. Automatic recharging
1) Place the charging base on a plane place back against the wall.
2) Make sure no obstructions or sunken areas in the range of more than 0.5 meter on the left and right and 1.5 meters in front of the charging base.
3) Connect the adaptor to the charger port of the charging base and then to the power outlet.
4) Press recharge button in the main unit or remote control, the appliance will go for recharging automatically.
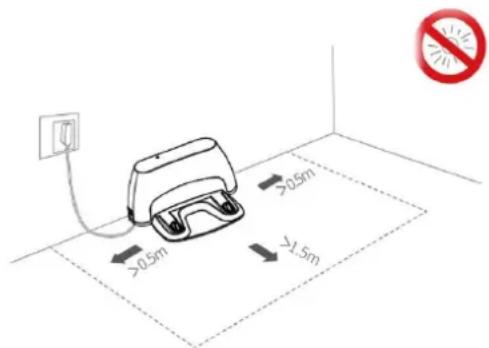

A: main unit B: charging base
Note:
a) Put the power cord in order along the wall so as not to hinder device working.
b) If the signal emission area on the charging base is covered or the appliance is too far to receive the signal, the automatic recharging will fail.
c) The appliance will automatically go for charging base when the cleaning is finished.
d) During cleaning, if the battery is low, the appliance will automatically go for charging base.
e) Remember to plug in the charging base; otherwise, the appliance cannot find the charging base.
f) When the recharge button is pressed, search may fail due to too complicated surrounding obstacles on the exhaustion of the battery.
g) During automatic recharging, if a cleaning schedule is set, the appliance will start cleaning automatically when the set time comes.
OPERATING
A Button " and " in the main unit
- Power on: switch the Power switch to Position "l" to turn on the appliance.
- Power off: switch the Power switch again to Position "O" to turn off the appliance.
- Auto cleaning mode: in standby condition, press button "O" once to start auto cleaning mode.
- Spiral cleaning mode: in standby condition, press button "①" twice to start spiral cleaning mode.
- Wall following cleaning mode: in standby condition, press button " " twice to start wall following cleaning mode.
- Stop working: in working condition, press button "O" or button "O" to stop working.
- Recharge: in standby condition, press button " " once for recharge.
Note:
1) In standby condition, both buttons " " and " " will light up in blue. Both lights will be off if long time without operation, the appliance will come to suspend mode; press any button to wake the appliance up.
2) If the battery is low, the appliance will switch off automatically, and both lights will be off. At that time,
only button " can wake it up. Please recharge the appliance.
Cleaning tips:
(1) If you only need to clean a single room, close the room door.
(2) If there is any obstacles that the appliance cannot deal with, please remove it to avoid the machine blocked intermittently during the cleaning work.
B Remote control
- Standby/suspend mode button
- Display
- Recharge button
- Spiral cleaning button
- Forward button
- Right-turn button
7.Left-turn button - Back button
- Start/pause /confirm button
- Suction adjusting
- Time setting
- Wall following cleaning
- Scheduling setting
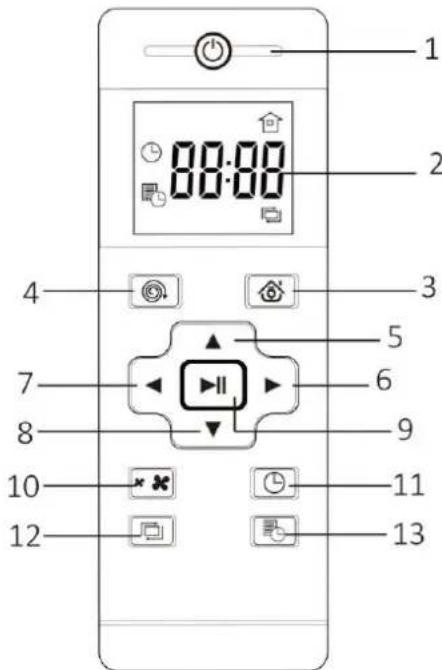
| Button | Function information |
| Standby / suspend mode button | 1. When the appliance is working, press the button to enter into the standby mode2. When the appliance is in standby mode, press this button to enter into the suspend mode. Press again, back to standby mode. |
| Recharge button | Press this button to recharge automatically |
| Spiral cleaning button | Press this button to enter into spiral cleaning mode |
| Forward button | 1. Press and hold this button, the appliance will move forward and clean. Release the button, the appliance will stop.2. When setting the time and scheduling, press the button to increase hour or minute. |
| Right-turn button | 1. Press and hold this button, the appliance will pivot clockwise and clean. Release the button, the appliance will stop. Only press once, the appliance will rotate and then stop.2. When setting the time and scheduling, press the button to switch to minute. |
| Left-turn button | Press and hold this button, the appliance will pivot anti-clockwise and clean. Release the button, the appliance will stop. Only press once, the appliance will rotate and then stop.2. When setting the time and scheduling, press the button to switch to hour. |
| Back button | 1. Press and hold this button, the appliance will turn around and move forward, and clean. Release the button, the appliance will stop. Only press once, the appliance will turn around and then stop.2. When setting the time and scheduling, press the button to decrease hour or minute. |
| Start /pause /confirm button | 1. When the appliance is in standby, press this button to enter into auto cleaning mode.2. When the appliance is working, press this button to stop and enter into standby3. When setting the time and scheduling, press the button to confirm the setting. |
| Suction adjusting | Press this button the adjust suction between Standard (800Pa) and Powerful (1300Pa) |
| Time setting | 1. Press this button, and hour will flash in the display;2. Press forward or back button to adjust hour;3. Press right-turn button to switch to minute, and minute will flash;4. Press forward or back button to adjust minute;5. Press Start /pause /confirm button or time setting button to save them. |
| Wall-following cleaning | Press this button, the appliance will enter into wall-following cleaning mode. |
| Scheduling setting | 1. Press this button, and hour will flash;2. Press forward or back button to adjust hour;3. Press right-turn button to switch to minute, and minute will flash;4. Press forward or back button to adjust minute;5. Press Start /pause /confirm button or scheduling setting button to save them.6. Upon receipt of the setting sent by remote control, the appliance will respond with "DI DI Di" sound.7. Press and hold Scheduling setting button to cancel the setting; "DI Di" sound will |
Tips:
When controlling the appliance remotely with its remote control, stay within the infrared signal range of 7m or the remote control may fail.
C WI-FI FUNCTION (The guide for APP may not be updated regularly due to software version upgrade or other reasons. This instruction is used as a guide only.)
This product is equipped with a Wi-Fi function. You can download the APP on your mobile phone and use it like the remote control. You can control the appliance from long distance by setting the on/off, cleaning mode, recharge, schedule, etc.
- Download APP
1) Open the APP store software on your phone. Search "TuyaSmart" and download. This is free of charge.
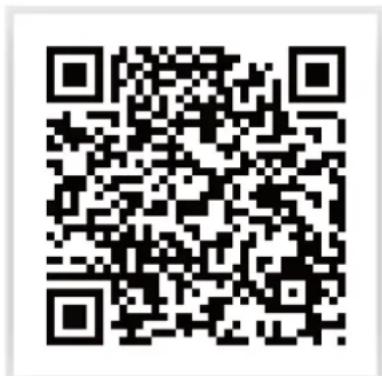
2) Download the app by scanning the QR code below with a device based on Android 4.0/ios7.0 or later version.
- Open the APP and select "Register". Enter your mobile phone number or email address to get verification code. If your account already exists, you can use your password to log in.
- The verification code will send to your phone or email within 60 seconds. Enter this verification code and then set your password. Click "Done" to confirm the registration. The initial screen comes.
- Select "Me", and then select "Home Management" to enter home name, set location and rooms with smart devices. Click "Save" to confirm the setting. Then, the home screen appears.

- Connect your vacuum cleaner and your mobile phone at the same WI-Fl Internet.
4) Long press the button "⑦" for five seconds to turn on the Wi-Fi function, "DI" sound will be heard, and both buttons "⑧" and "⑨" in the main unit will alternately flash green and red.
a) Click "Add Device" to enter into the next screen. Select "Add Manually", and then choose the correct product category (Small Home Appliance Robot Vacuum), then come into the next screen.
b) Select a 2.4 GHz Wi-Fi network and type in the password, then come into the next screen. Choose "Fast flashing", then connection begins.

For "iOS", the screen may differ, like below:

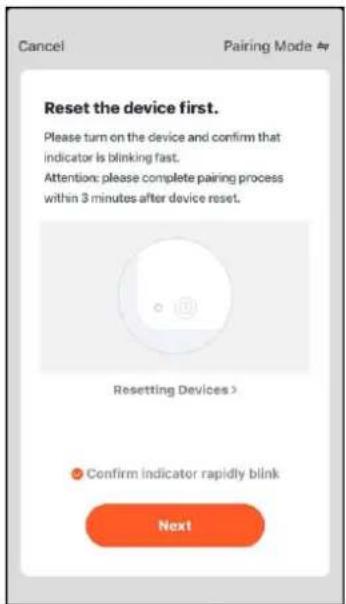
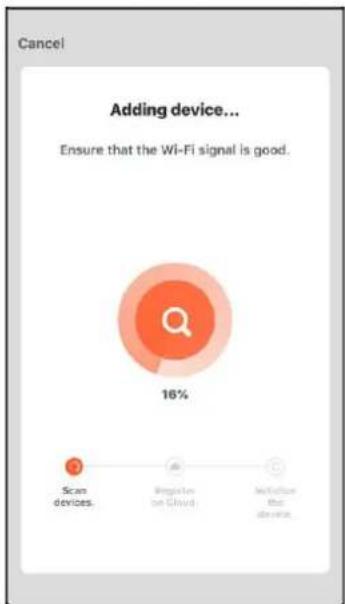
5) If the "Fast flashing" or "fast blink" connection is failed, or TUYA suggests to use the "Slow flashing". Please switch to the "Slow flashing" like below step.
First: return the appliance to standby mode.
Secondly: long press the button " " for five seconds, the first "DI" sound will be heard. Do not release, keep on pressing the button until you hear the second "DI" sound. Both buttons " " and " " alternately flashes green and red.
Then try again:
For "Android": Choose "Slow flashing", then come into the next screen; touch "Go to Connect" to connect the device's hotspot, then come into the next screen; choose "SmartLife-xxxx", then the connection begins.

For "iOS": Touch "Pairing Mode" to change to "AP Mode", come to the next screen; click "Confirm indicator slowly blink" and confirm. You will get the hint "connect your mobile phone to the device's hotspot", click "Go to Connect", you will come to WLAN settings, choose "SmartLife-XXXX". Return to the APP. The connection will begin.
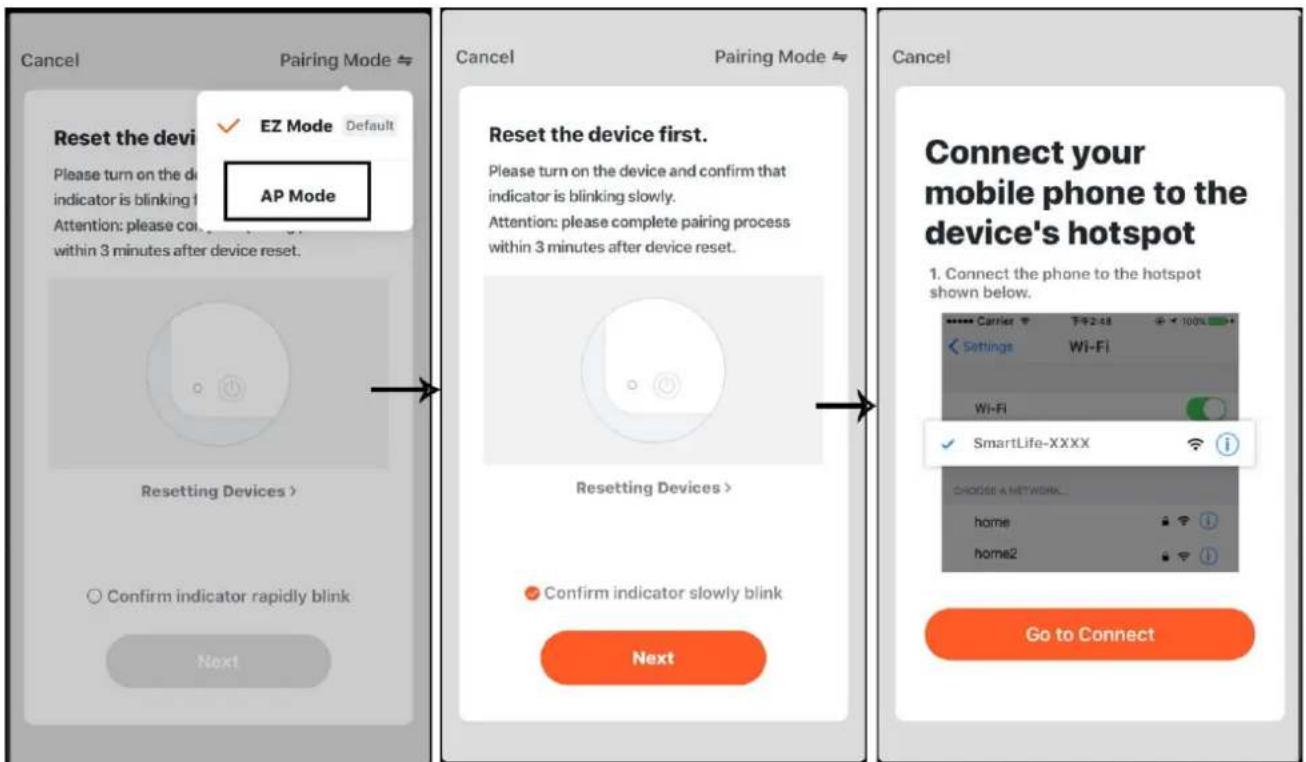
6) When the connection is done, you will come to a screen write "Device added successfully". Click "Done", then you will come to the screen like below picture A. Now you can use your mobile phone like the remote control to control your vacuum cleaner.

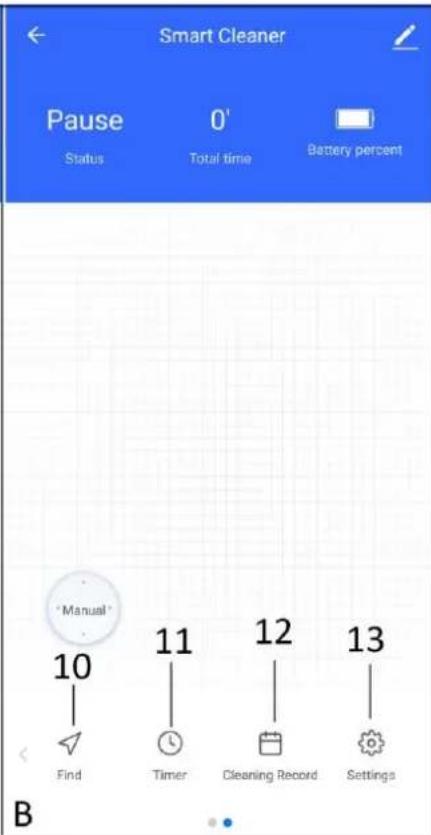

- More information
- Status (cleaning, pause, charging, hibernating)
- Total working time
- Battery percent
- Manual control
- Auto cleaning
- Spot cleaning (spiral cleaning)
- Edge cleaning (wall-following cleaning)
- Recharge
- Find button
- Scheduling setting
- Cleaning record
- Settings
Manual control (Picture C)
a) Forward button
b) Right-turn button
c) Left-turn button
d) Back button
e) Start/pause button
More information
Touch "more information" button, you can change your basic device information, remove your device or others.
Operation
- Touch button "Manual" to enter into manual control panel. Press start/pause button, the appliance will start auto cleaning or pause (in standby mode). In standby mode, touch or long touch any arrow icon to operate the appliance accordingly.
- You can touch button "AUTO", "SPOT" or "EDGE" to get your desired cleaning mode, the appliance will start working. When the cleaning is done, the appliance will go for charging automatically. You can stop it manually by touch start/pause button.
Charge:
Touch button "Charge" to enter into recharge mode.
Find:
Touch button "Find", the appliance will make three buzzer sound to help locate itself.
Timer:
Touch button "Timer" to enter into the next screen; touch "Add", you can make your schedule here. Touch "Save" to confirm the setting.
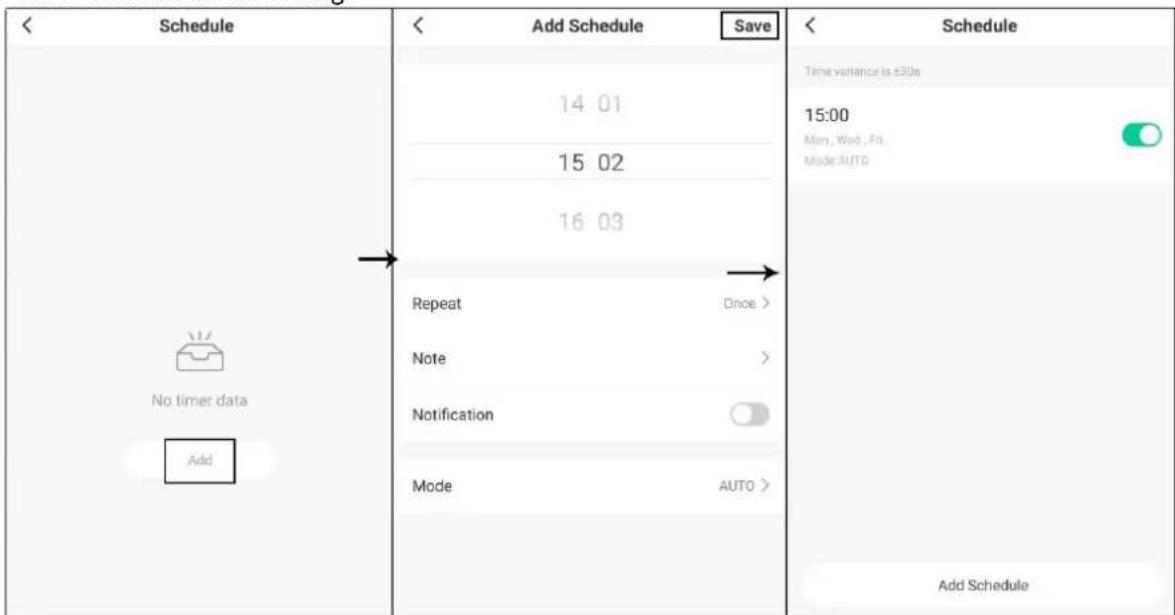
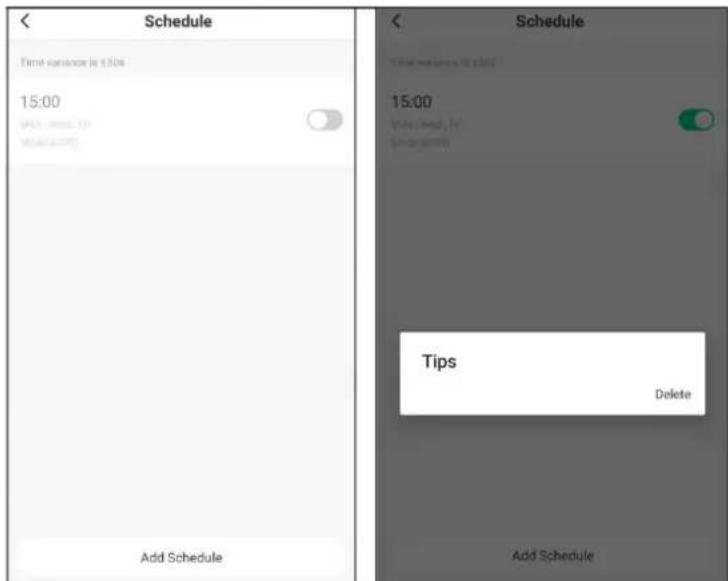
If you want to turn off the schedule, touch icon "". This row of schedule will get grey.
If you want to cancel the schedule, long touch that schedule selection. A small screen will appear; touch "Delete" to confirm. For "iOS", the operation may different. You can slide that schedule selection to the left, then "Delete" button comes.
Cleaning record:
You can find your cleaning record by touch button "cleaning record".
Settings:
You can find the consumption condition of accessories and product Guide by touch button "Settings"
MOPPING FUNCTION
- Open the seal closure of the water tank and add water. Close the seal closure firmly.
- Moisten and wring out the mop before use.
- Attach the mop to the water tank correctly, as show in the picture.
- Stick the mop onto the water tank smoothly with the magic tape.
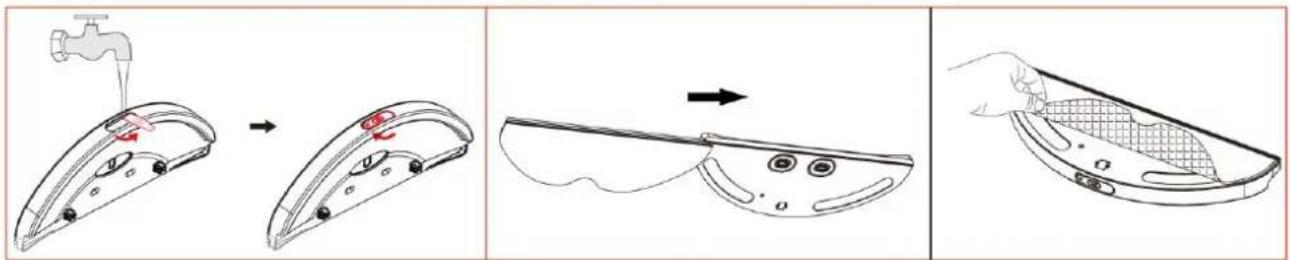
- Pull out the dustbin and clean it, and attach the buckle of the water tank to the clip location of the dustbin correctly and firmly.
- Push the dustbin and water tank back into the main body.

- Press buttons in the main unit or remote control or use APP function to start cleaning.
Note: Do not use mopping function for carpet.
CLEANING
Make sure the machine is unplugged before cleaning.
Cleaning of dustbin and filter
- Press and hold the unlock button and then take out the dustbin.
- Open the dustbin to empty dust.
- Clean it with the clean brush, and rinse the transparent part with running water.

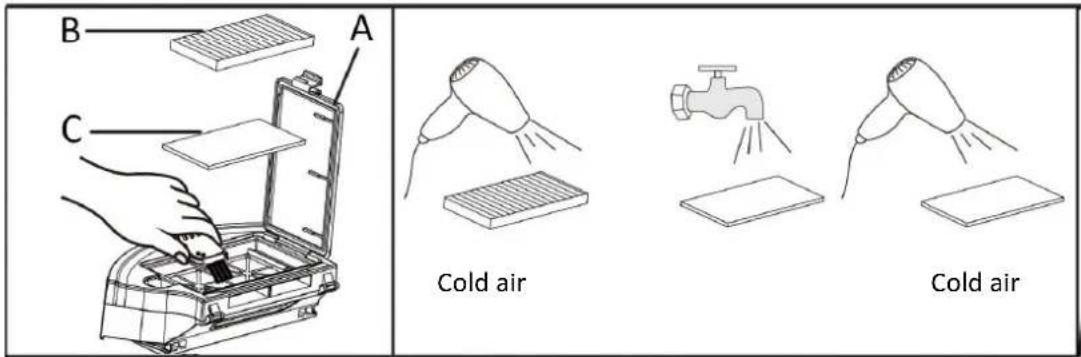
- Open the filter cover (A) to take out filter (B) and sponge (C).
- Smack or blow the dust off the filter with cold air. Note: Filter cannot be cleaned in water.
- Rinse the sponge under running water and dry it thoroughly before reusing it (it can be dried by cold air).
Cleaning of mopping components.
Take down the water tank with force from the bottom of the appliance. Separate the mop and water tank. Rinse them in water and then day in shade.
Cleaning of suction inlet, side brush, wheels, cliff sensors, transparent window and the surface of the appliance
- Clean the suction scraper and side wall with the clean brush, which should be cleaned regularly.
- Remove the side brushes by screwdriver, and then clean it with the clean brush and clear the entanglement of the slot of the side brush.
- Clean the front wheel and left/right wheels with the clean brush regularly and clear the possible entanglements such as hair and cloth strips, of the axles of wheels.
- Clean the cliff sensors, transparent window and product surface with a soft cloth. Do not use gasoline, alcohol and other strong irritant cleaning lotion to clean the appliance.
COMMON FAULTS
| Faulty indication | Fault | Solutions |
| Both buttons flash red twice with one sound | Failure of left wheel | Check if there are twisters on the left wheel of the appliance |
| Both buttons flash red 3 times with one sound | Failure of right wheel | Check if there are twisters on the right wheel of the device |
| Both buttons flash red 4 times with one sound | Off ground failure | Take the appliance back to the floor. Don’t have it suspended in the air. |
| Both buttons flash red 6 times with one sound | Failure of anti-drop sensor | Check if the sensing window at the bottom of the device is abnormally shielded. |
| Both buttons flash red 7 times with one sound | Low electricity of battery | Return the appliance to the charging base for charging. |
| Both buttons flash red 8 times with one sound | Failure of front bumper | Check if the appliance impact buffer is normal or not. |
| Both buttons flash red 10 times with one sound | Failure of side brush | Check if there are things like hair or cloth twine the side brush. |
| Both buttons flash red 11 times with one sound | Failure of wall inspection | Check if the transparent window of the wall inspection is shielded or obstructed by hair and cloth. |
| Both buttons flash red 12 times with one sound | Failure of fan | Check if the blades of the fan are loose or wrapped by hair and cloth. |
| Both buttons flash red | Failure of charging | The appliance cannot be powered or show the |
| 14 times with one sound | charging state. Check if the appliance is connected with the charging base. | |
| Both buttons flash red16 times with one sound | Failure of being stranded | Check the main body for being stranded. |
| Both buttons flash red17 times with one sound | Failure of virtual wall (No such a failure if without virtual wall) | Do not start up the appliance beside the magnetic-stripe virtual wall. |
PRODUCT SPECIFICATIONS
Voltage: 14.4V DC
Current: 2500mA
Adaptor input: 100-240V~ 50/60Hz
Adaptor Output: 19V =0.6A
Charging time: Around 3-5hrs.
Continuously working time: 90min.
Max. transmitting power: 20 dBm
Frequency range: 2.400 2.4835GHz
Hereby, Emerio FOB Limited declares that the radio equipment type RVC-124120.1 is in compliance with Directive 2014/53 /EU.
The full text of the EU declaration of conformity is available at the following internet address: www.emerio.eu
GUARANTEE AND CUSTOMER SERVICE
Before delivery our devices are subjected to rigorous quality control. If, despite all care, damage has occurred during production or transportation, please return the device to your dealer. In addition to statutory legal rights, the purchaser has an option to claim under the terms of the following guarantee:
For the purchased device we provide 3 years guarantee, commencing from the day of sale. If you have a defective product, you can directly go back to the point of purchase.
Defects which arise due to improper handling of the device and malfunctions due to interventions and repairs by third parties or the fitting of non-original parts are not covered by this guarantee. Always keep your receipt, without the receipt you can't claim any form of warranty. Damage caused by not following the instruction manual, will lead to a void of warranty, if this results in consequential damages then we will not be liable.
Neither can we hold responsible for material damage or personal injury caused by improper use if the instruction manual is not properly executed. Damage to accessories does not mean free replacement of the whole appliance. In such case please contact our service department. Broken glass or breakage of plastic parts is always subject to a charge. Defects to consumables or parts subjected to wearing, as well as cleaning, maintenance or the replacement of said parts are not covered by the warranty and are to be paid.
ENVIRONMENT FRIENDLY DISPOSAL

Recycling - European Directive 2012/19/EU
This marking indicates that this product should not be disposed with other household wastes. To prevent possible harm to the environment or human health from uncontrolled waste disposal, recycle it responsibly to promote the sustainable reuse of material resources. To return your used
device, please use the return and collection systems or contact the retailer where the product was purchased.
They can take this product for environmental safe recycling.
DISPOSE OR IN FIRE OR SHORT CIRCUIT.
Manufactured by: Emerio Deutschland GmbH

- PARTS DESCRIPTION
- HOW TO CHARGE
- 1: Manual charging
- Automatic recharging
- Note:
- OPERATING
- A Button " and " in the main unit
- Cleaning tips:
- B Remote control
- C WI-FI FUNCTION (The guide for APP may not be updated regularly due to software version upgrade or other reasons. This instruction is used as a guide only.)
- More information
- Operation
- Charge:
- Find:
- Timer:
- Cleaning record:
- Settings:
- MOPPING FUNCTION
- CLEANING
- Cleaning of dustbin and filter
- Cleaning of mopping components.
- Cleaning of suction inlet, side brush, wheels, cliff sensors, transparent window and the surface of the appliance
- COMMON FAULTS
- PRODUCT SPECIFICATIONS
- GUARANTEE AND CUSTOMER SERVICE
- ENVIRONMENT FRIENDLY DISPOSAL
Brand : Emerio
Model : RVC124120
Category : Robot vacuum