
IAN 068573 - Uncategorized CRIVIT - Free user manual and instructions
Find the device manual for free IAN 068573 CRIVIT in PDF.

| Product Type | Kick Scooter |
| Brand | Crivit |
| Model | IAN 068573 |
| Maximum Weight Capacity | 100 kg |
| Handlebar Height Adjustment | 4 settings, 72 - 97.5 cm |
| Total Length | 82 cm |
| Weight | 2.97 kg |
| Wheel Diameter | 144 mm |
| Bearings | ABEC 7 |
| Age Recommendation | 14 years and older |
| Intended Use | Recreational, not for traffic or jumps |
| Folding Mechanism | Yes, with quick-release locking |
| Brake Type | Rear foot brake |
| Kickstand | Yes, foldable |
| Wheel Replacement | Possible, requires 5 mm Allen keys |
| Bearing Replacement | Possible, standard ball bearings |
| Maintenance | Clean and dry after use, oil bearings |
| Warranty | 3 years |
| Safety Equipment Recommended | Helmet, wrist, elbow, knee guards, shoes |
Frequently Asked Questions - IAN 068573 CRIVIT
User questions about IAN 068573 CRIVIT
0 question about this device. Answer the ones you know or ask your own.
Ask a new question about this device
Download the instructions for your Uncategorized in PDF format for free! Find your manual IAN 068573 - CRIVIT and take your electronic device back in hand. On this page are published all the documents necessary for the use of your device. IAN 068573 by CRIVIT.
USER MANUAL IAN 068573 CRIVIT
To put the product back into its transport condition 5
Use 5
Maintenance 6
Care, Storage 7
Disposal Information 7
3 Years Warranty 7

Important!
Carefully read through the instruction manual prior to use. Be sure to keep these instructions to read again later!
Contents
1 x Instruction manual 1 x Aluminium Scooter
Technical Data
Maximum weight capacity: 100 kg Extendible height of the handlebars: 4 settings (72 - 97.5 cm) Total length: 82 cm Weight: 2.97 kg Wheels: ø 144 mm Bearings: ABEC 7
Intended Use
This product is a piece of sports equipment and is not suitable for children under 14 years of age! The product contains small parts, which could be swallowed by children. As a piece of sporting equipment, it requires concentration as well as a high degree of motor skills. This product has been constructed for recreational use for a maximum weight capacity of up to 100 kg and is not suitable for jumps. This product does not comply with traffic regulations and may not be used in traffic. Find out about the legal provisions prior to use.

Safety Information WARNING!
Risk of suffocation for children! Do not allow children to play with the packaging material or the product without supervision.
Risk of injury!
• The product should always be put together by adults due to small parts!
• The product may only be used by one person at a time.
- Examine the product for damage or wear and tear prior to each use. Always check to make sure that the connecting elements and the locking pins, as well as the folding mechanism and the adjusted height setting of the steering column, are secure. The product must not be used if it is in less than perfect condition!
• Make sure that screws and nuts maintain their self-locking properties.
- Do not alter the product in such a way that your safety might be put at risk.
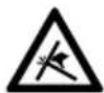
Risk of pinched fingers!
- Be aware of pinching and shearing hazards.
• Always wear suitable protective equipment (helmet, hand, wrist, elbow and knee guards) as well as shoes!
• Always be considerate of other people!
- Only use the product on suitable surfaces that are smooth, clean and dry. Ride as far away from other road users as possible. Stay away from downhill terrain, steps and open bodies of water.
- Never ride in the dark or in poor visibility.
- The brake will get hot if it is continuously used. To prevent burns, do not touch the brake before it has cooled down.
- Do not allow your child to use the product without supervision, as children cannot evaluate the potential risks.
Avoiding Damage to the Product!
- Avoid water, oil, pot holes and very rough surfaces.
Assembly
(Images are examples for all product variations)
The product is delivered folded up in its transport condition. To make it ready to ride, proceed as follows:
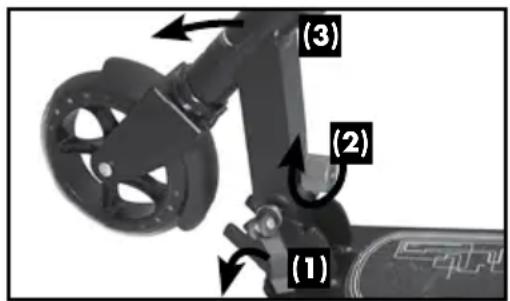
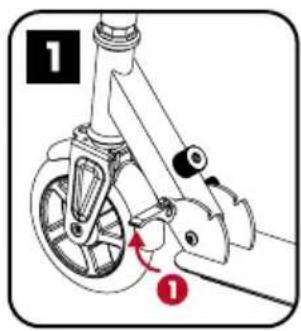
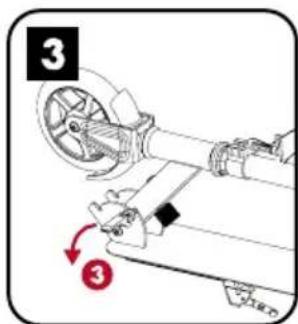
Unfold
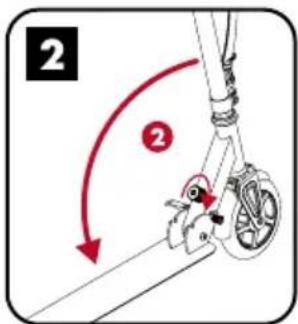
- Release the lower quick locking mechanism (1).
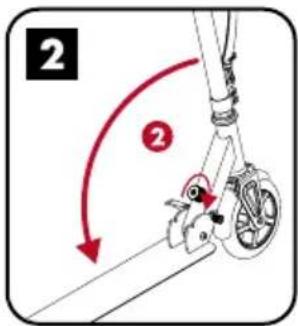
- Turn the knob (2) clockwise and press the steering post (3) forward until it locks into place.
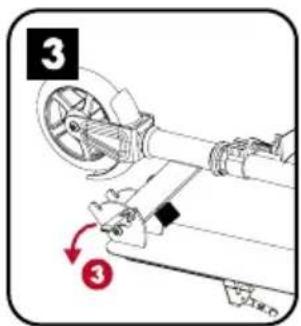
- Secure the folding mechanism by clamping the quick locking mechanism into place.
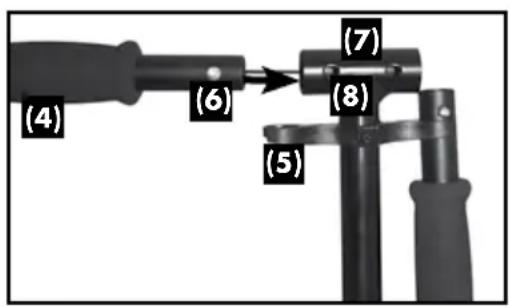
Attach handlebars
- Release the handlebars (4) from the holders (5).
- Press down on the locking buttons (6) on the handlebars and push the handlebars into the T-pipe (7) on both sides of the steering column. The locking buttons must audibly click into the designated holes (8).
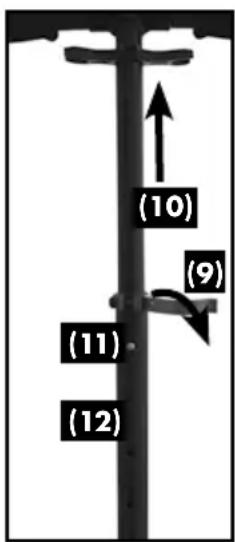
Adjusting the steering post height
The steering post can be adjusted to four different heights.
Only use the product after clicking the locking button into one of the four holes and securing the steering post with the quick-release fastener!
- Loosen the quick-release fastener (9) on the steering post.
- Pull the steering post (10) upward until the locking button (11) locks into one of the four holes (12).
- Secure the steering post by tightening the quick-release fastener.
Steering head bearing
The steering head bearing is preset at the time of delivery. In the event the handlebar has too much play after some time or become too stiff, have the steering head bearing adjusted by a speciality retailer or a bicycle shop.
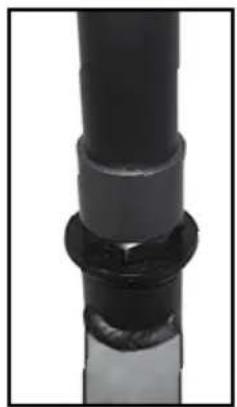
natural_image
Close-up of a black cylindrical pipe joint with a flanged end (no text or symbols visible)To put the product back into its transport condition
- Release the quick locking mechanism on the steering column, press the locking button, push the steering column all the way down, then clamp the quick locking mechanism into place.
-
Press the locking buttons on the handlebars, pull the handlebars out of the T-pipe and attach them to the holders.
-
1 Activate lower quick release.
2 Turn knob clockwise, press steering post toward the deck until it locks.
3 Fasten lower quick release.
Use
Riding, braking, parking
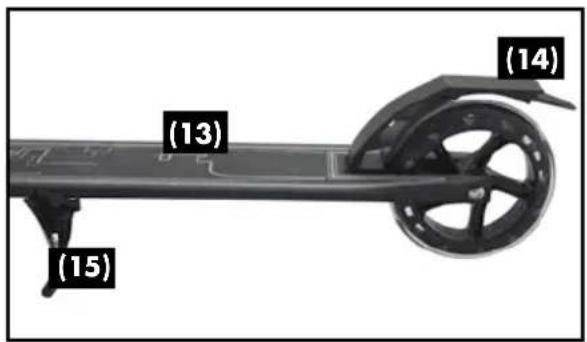
- Place one leg on the deck (13) and regularly push off with the other leg for momentum.
- Step on the brake plate to brake (14).
• Unfold the kickstand (15) to park.
The product may only be parked on a smooth surface.
Maintenance
Replacing the wheels
Important!
Please observe the technical data.
Wheels that have a different diameter can change the riding properties and, in some cases, possibly endanger the user. Do not use wheels that cannot be perfectly mounted. Never mount wheels that are larger than the product's original wheels.
Wheels wear out. This wear and tear results from many factors, for example the ground, the user's size and weight, the weather conditions, the material of the wheels and their durability. It is thus necessary to replace them from time to time.
- Loosen the axial screws using two size 5 Allen keys.
- Pull out the axel screws and remove the wheel.
- Mount the new wheel and secure it with the axle screws.
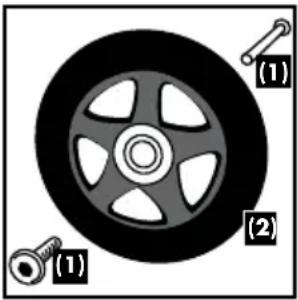
Axle bolts (1)
Wheel (2)
After replacing:
Do not use if the wheel slides sideways after replacing! Make sure that all screws are still secure and have not loosened after the first few minutes of riding. Tighten the wheel again to make sure that it rides smoothly and that no noises are coming from the bearings.
Exchanging the ball bearings
- Remove the wheels as previously described (page 6).
- Push out a bearing by applying pressure to the spacer using a hexagon socket screw key and remove the spacer.
- Push out the other bearing by applying pressure using a hexagon socket screw key.
- Push a new bearing into place. Turn over the wheel, insert the spacer and then push a second new bearing into place.
- Reattach and secure the wheels.
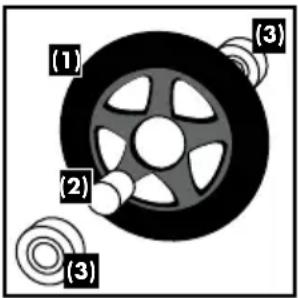
Wheel (1)
Bearing (2)
Spacer (3)
Care, Storage
It is recommended that the product be thoroughly cleaned and dried after being used.
Remove small stones or other objects that may have remained on your wheels. Dry off wet or damp ball bearings with a clean cloth. Oil the bearings from the outside with a suitable bearing oil to prevent rusting. Always store the product in a dry place.
Disposal Information
Dispose of the product and all corresponding components through an approved waste disposal company or through your municipal waste disposal provider. Please observe the currently valid regulations. In case of doubt, ask your waste disposal provider about environmentally sound disposal.
3 Years Warranty
The product was manufactured with the greatest care and regular testing. This product comes with a 3-year warranty as of the date of purchase. Please keep the receipt.
The warranty only covers material and production errors and will not cover improper or inappropriate handling. Your legal rights, in particular statutory rights are not restricted with this warranty. In the event of a warranty matter, please contact us free of charge via our service-hotline or send us an email. In any case, we will be more than happy to provide you with personal advice. In the event of a warranty matter, defect parts can be shipped cash on delivery to the indicated service-address in coordination with our service-colleagues. Subsequently you will promptly receive a new or repaired part free of charge. The warranty period will not be extended due to any repairs based on warranty, statutory guarantee or fair dealing. This also applies to replaced and repaired parts. Any repairs required after the warranty has expired are chargeable.
IAN: 68573
Service-address
Product hotline 00800-88080808 (Mon.-Fri. 10am - 4pm, free phone)
PSB LOGISTICS MANAGEMENT LTD • Unit B3 Site b
The Bowman Centre Arncott, OX25 1NZ Oxon
gb@nws-service.com
- www.nws-service.com -
PL INSTRUKCJA OBSŁUGI
Zakres dostawy 9
Dane techniczne 9
natural_image
Close-up of a black cylindrical pipe fitting with a flanged end (no text or symbols visible)Używanie
Konserwacja
Wymiana kółek
Ważne!
natural_image
Diagram of a car wheel with two labeled parts (1) and (2), no text or symbols present.Śruby osiowe (1)
Kółko (2)
Po wymianie
natural_image
Close-up of a black cylindrical pipe fitting with a flanged end (no text or symbols visible)Karbantartás
A kerekek cseréje
Fontos!
natural_image
Diagram of a car wheel with two labeled parts (1) and (2), no text or symbols present.Tengelycsavarok(1)
Görgő (2)
A kerékcsere után:
natural_image
Close-up of a black cylindrical pipe fitting with a flanged end (no text or symbols visible)Zlaganje izdelka v transportni položaj
-
Sprostite hitri zapah na krmilu, pritisnite blokirni gumb, krmilo potisnite popolnoma navzdol in ga fiksirajte s hitrim zapahom.
-
Pritisnite na blokirne gumbe ročajev, te izvlecite iz T-cevi in pritrdite na držala.
-
1 Sprostite hitro zapiralo.
-
umb zavrtite v smeri urinega kazalca, potisnite krmilni drog, dokler se ne zaskoči.
3 prite hitro zapiralo.

uporaba
Vožnja, zaviranje, parkiranje
Vzdrževanje
Zamenjava kolesc
Pomembno!
natural_image
Diagram of a car wheel with two labeled parts (1) and (2), no text or symbols present.Osni vijaki (1)
Kolo (2)
Po zamenjavi:
natural_image
Close-up of a black pipe fitting with a flanged end (no text or symbols visible)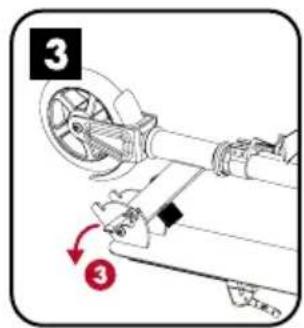
Použití
Údržba
Výměna koleček
natural_image
Diagram of a car wheel with two labeled parts (1) and (2), no text or symbols present.Osové šrouby (1)
Kolečko (2)
Po výměně:
natural_image
Close-up of a black cylindrical pipe fitting with a flanged end (no text or symbols visible)Údržba
Výmena koliesok
Dôležité upozornenie!
Dodržiavajte Technické údaje.
natural_image
Diagram of a car wheel with two labeled parts (1) and (2), no text or symbols present.Osové skrutky (1)
Koliesko (2)
Po výmene:
natural_image
Close-up of a black cylindrical pipe joint with a flanged end (no text or symbols visible)Verwendung
Wartung
natural_image
Diagram of a car wheel with two labeled parts (1) and (2), no text or symbols present.


- Important!
- Contents
- Technical Data
- Intended Use
- Safety Information WARNING!
- Risk of injury!
- Risk of pinched fingers!
- Avoiding Damage to the Product!
- Assembly
- (Images are examples for all product variations)
- Unfold
- Attach handlebars
- Adjusting the steering post height
- The steering post can be adjusted to four different heights.
- Only use the product after clicking the locking button into one of the four holes and securing the steering post with the quick-release fastener!
- Steering head bearing
- To put the product back into its transport condition
- Use
- Riding, braking, parking
- Maintenance
- Replacing the wheels
- After replacing:
- Exchanging the ball bearings
- Care, Storage
- Disposal Information
- Years Warranty
- IAN: 68573
- Service-address
- PL INSTRUKCJA OBSŁUGI
- Używanie
- Konserwacja
- Wymiana kółek
- Ważne!
- Po wymianie
- Karbantartás
- A kerekek cseréje
- Fontos!
- A kerékcsere után:
- Zlaganje izdelka v transportni položaj
- uporaba
- Vožnja, zaviranje, parkiranje
- Vzdrževanje
- Zamenjava kolesc
- Pomembno!
- Po zamenjavi:
- Použití
- Údržba
- Výměna koleček
- Po výměně:
- Výmena koliesok
- Dôležité upozornenie!
- Po výmene:
- Verwendung
- Wartung
Brand : CRIVIT
Model : IAN 068573
Category : Uncategorized