
PHDB 4 C3 - Uncategorized PARKSIDE - Free user manual and instructions
Find the device manual for free PHDB 4 C3 PARKSIDE in PDF.

| Product Type | Petrol Pressure Washer |
| Model | PHDB 4 C3 |
| Brand | Parkside |
| Engine Type | 1-cylinder, 4-stroke, air-cooled, pull starter |
| Displacement | 208 cm³ |
| Nominal Output | 4.1 kW (5.57 HP) at 3600 rpm |
| Fuel Type | Unleaded petrol (E10 compatible) |
| Fuel Tank Capacity | 3.6 L |
| Engine Oil Volume | 0.6 L (5W40 or 15W40) |
| Working Pressure | 18 MPa (180 bar) |
| Max Working Pressure | 22 MPa (220 bar) |
| Flow Rate | 8.3 L/min (max 10 L/min) |
| Max Water Supply Temperature | 40 °C |
| Suction Height | 1 m |
| High-Pressure Hose Length | 8 m |
| Dimensions (L x W x H) | 645 mm × 570 mm × 970 mm |
| Weight | Approx. 31 kg |
| Sound Power Level (LWA) | 106.9 dB(A) (guaranteed 109 dB(A)) |
| Sound Pressure Level | 93.6 dB(A) |
| Hand-Arm Vibration | 4.72 m/s² (K=1.5 m/s²) |
| Safety Devices | Relief valve, safety valve, thermal valve |
| Self-Priming | Yes, from containers or natural sources |
| Included Nozzles | Red (0°), Yellow (15°), Green (25°), White (40°), Black (low-pressure) |
| Warranty | 3 years |
Frequently Asked Questions - PHDB 4 C3 PARKSIDE
User questions about PHDB 4 C3 PARKSIDE
0 question about this device. Answer the ones you know or ask your own.
Ask a new question about this device
Download the instructions for your Uncategorized in PDF format for free! Find your manual PHDB 4 C3 - PARKSIDE and take your electronic device back in hand. On this page are published all the documents necessary for the use of your device. PHDB 4 C3 by PARKSIDE.
USER MANUAL PHDB 4 C3 PARKSIDE
natural_image
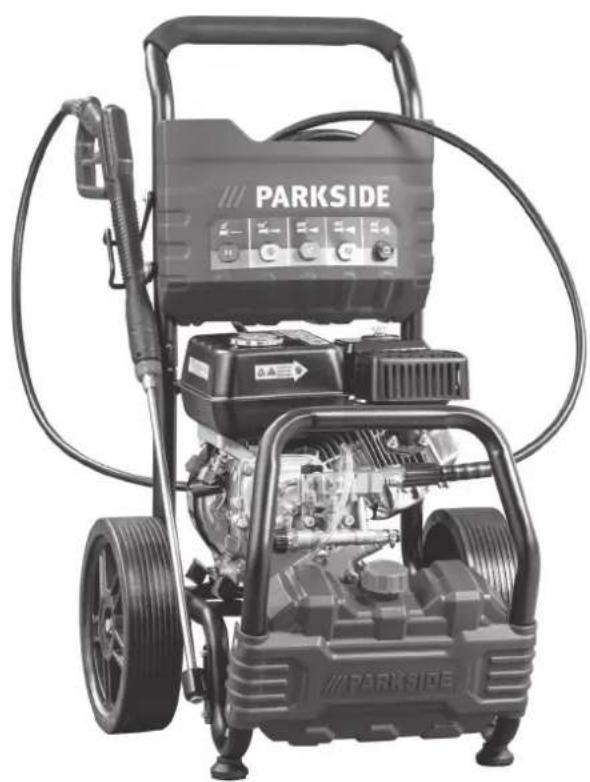
Exterior view of a Parkside water purifier with visible branding and mechanical components (no text or symbols on the equipment body)IDROPULITRICE AD ALTA PRESSIONE PHDB 4 C3
IT MT
IDROPULITRICE AD ALTA PRESSIONE
Translation of the original instructions WARNING! READ THE OPERATING INSTRUCTIONS BEFORE USING THE MACHINE/APPLIANCE.
IAN 305750

IT MT
Before reading, unfold both pages containing illustrations and familiarise yourself with all functions of the device.
DE AT CH
GB / MT Translation of the original instructions Page 19
natural_image
Mechanical assembly diagram showing motor and gear components (no text or labels visible)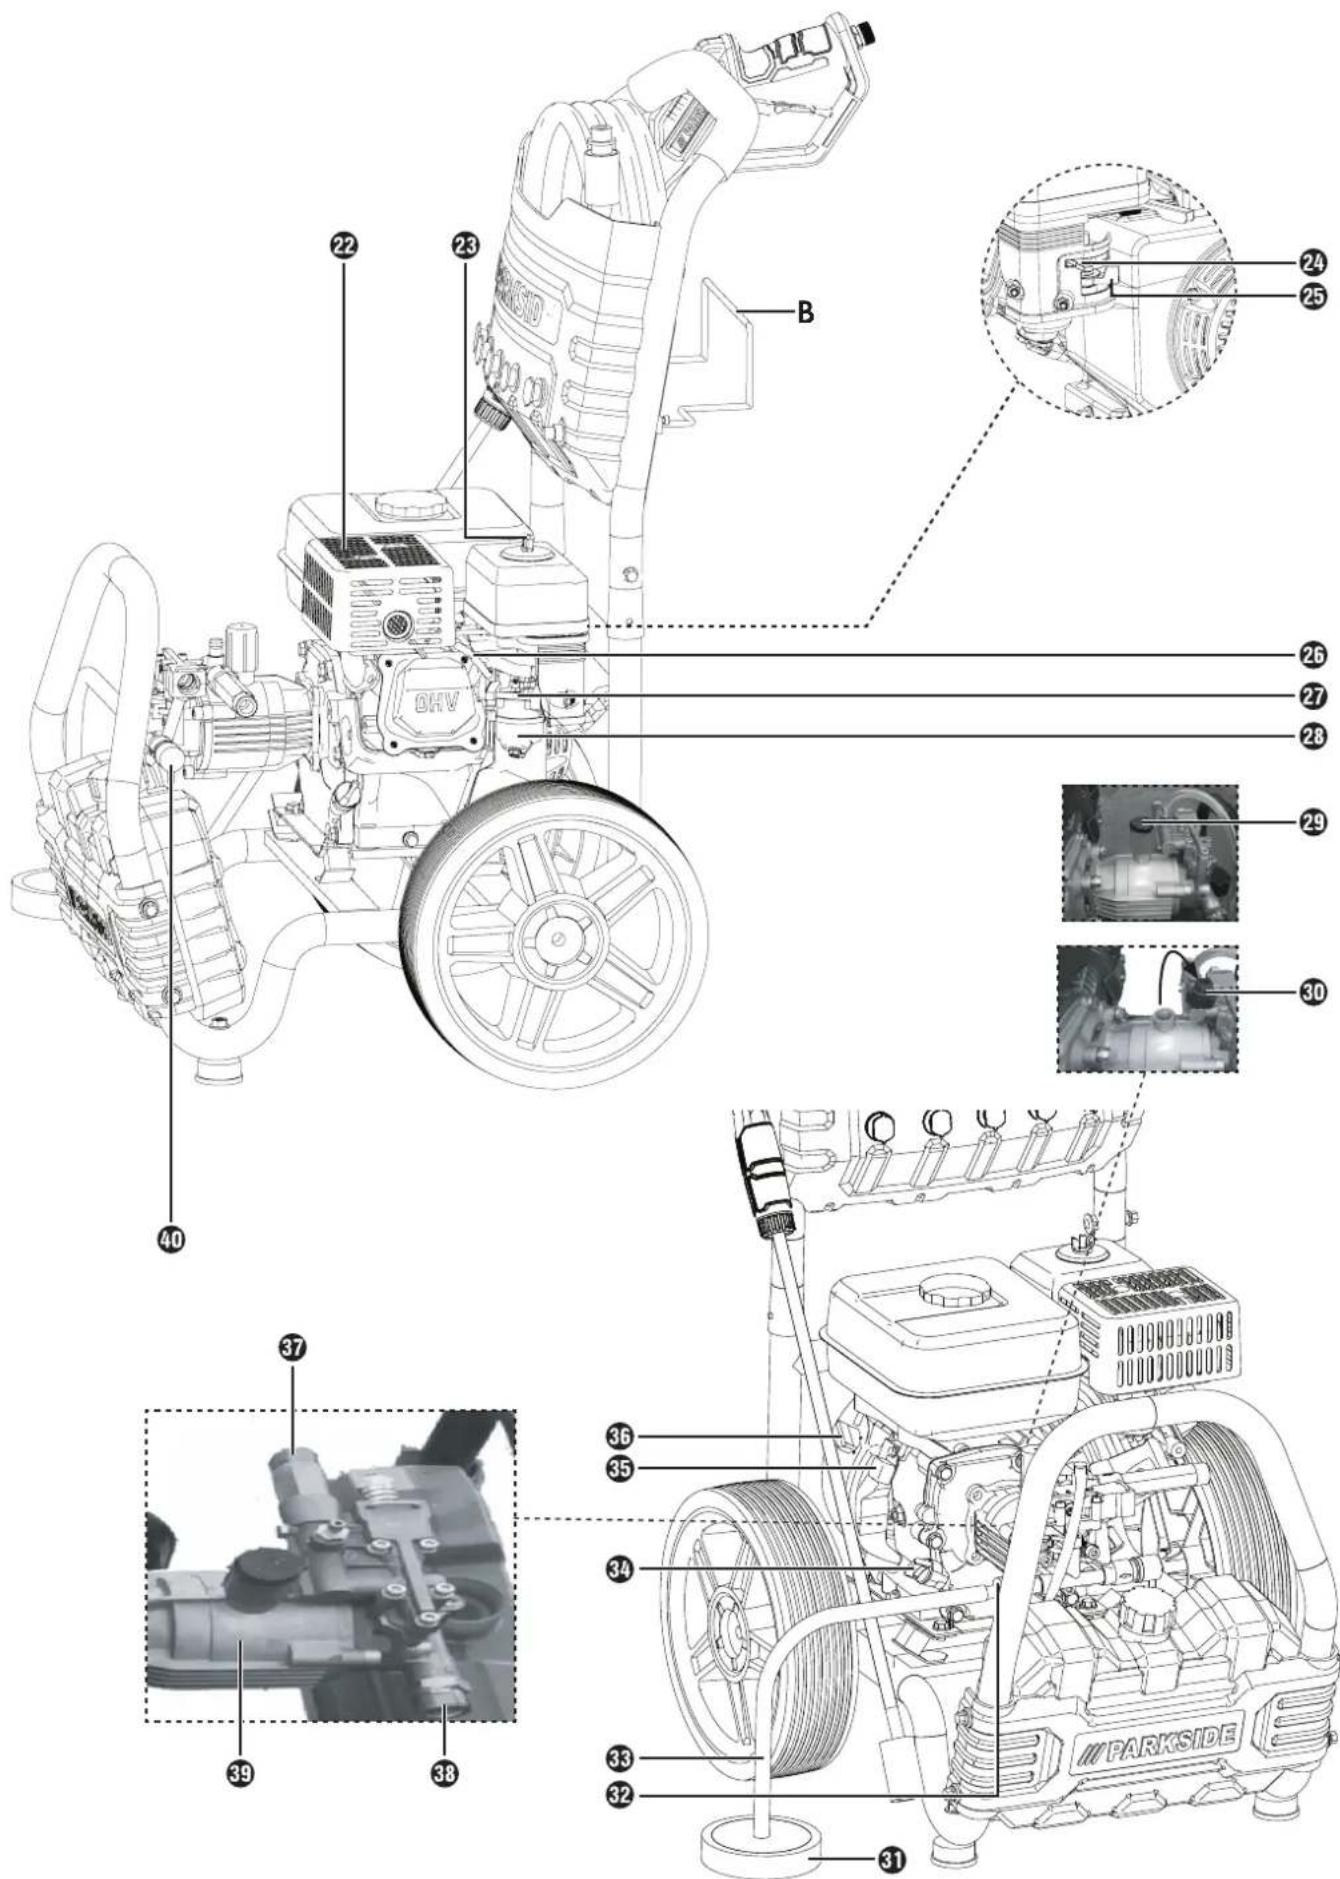
Indice
Introduzione 2
Uso conforme 2
Rischi residui 2
Dotazione 2
natural_image
Close-up of a firearm with attached metal bracket and lever mechanism (no visible text or symbols)natural_image
Close-up of mechanical components with no visible text or symbolsnatural_image
Close-up of a black, glossy, curved object with a small white protrusion at the top (no text or symbols visible)KOMPERNASS HANDELS GMBH
BURGSTRASSE 21
DE-44867 BOCHUM
GERMANIA
www.kompernass.com
Smaltimento

Package contents. 21
Technical data 21
Safety instructions for high-pressure cleaners .... 2 3
Hazard levels 23
Water connection 23
For appliances with a hand-arm vibration value > 2.5 m/s ^2
(see technical data)....25
Use 25
Transport 26
Maintenance 26
Accessories and spare parts 26
High-temperature water and petrol engine appliances. ..... 27
Safety instructions....27
Safety devices 28
Relief valve. 28
Safety valve. 28
Thermal valve 28
Before use....28
Fitting the handle 28
Fitting the hose holder 28
Mount the hose holder 28
Fitting the upper spray gun holder on the handle ..... 2 8
Fitting the lower spray gun holder on the tubular frame ..... 2 8
Fitting the wheels 28
Fitting the rubber feet. 28
Fitting the hand spray gun, the jet pipe and the nozzle.....29
Operation....29
Checking the oil level of the engine....29
Bleeding the oil tank 29
Engine 29
Adding fuel 29
Water connection 29
Drawing water out of a container 29
Self-priming from open tanks/containers and natural water sources 30
Bleeding the appliance 30
Use 30
Filling oil/petrol. 30
Starting the engine 30
Turning the engine off 31
Starting the appliance 31
Setting operating pressure and flow rate. 31
Changing the nozzle. 31
Use with a cleaning agent....31
Interrupting operation 32
Turning off the appliance. 32
Transport 32
Storage 32
Frost protection 32
Cleaning and maintenance....32
Maintenance intervals 32
Maintenance work 33
Engine 33
Troubleshooting....34
Engine will not start 34
Appliance does not generate sufficient pressure. 34
Appliance is leaking, water dripping from under appliance...34
Cleaning agent is not drawn in 34
Kompernass Handels GmbH warranty....35
Service 35
Importer....35
Disposal....36
Replacement parts 36
Translation of the original Conformity Declaration 36
PETROL PRESSURE WASHER PHDB 4 C3 Introduction
Congratulations on the purchase of your new appliance. You have chosen a high-quality product. The operating instructions are a part of this product. They contain important information about safety, usage and disposal.
Before using the product, please familiarise yourself with all operating and safety instructions. Use the product only as described and for the range of applications specified. Please also pass these operating instructions on to any future owner.
Intended use
This appliance is designed for cleaning:
machines, vehicles, buildings, tools, façades, terraces, garden equipment, etc.
- for low-pressure cleaning with a cleaning agent (e.g. cleaning machines, vehicles, buildings, tools),
- for high-pressure cleaning without a cleaning agent (e.g. cleaning façades, terraces, garden equipment).
Self-priming when using alternative water sources
This appliance is self-priming and allows the suction of water from containers and natural sources. It is IMPORTANT that the filter on the water inlet is cleaned and in place, and that only clean water is sucked in.
Any other use that is not expressly permitted in these operating instructions may damage the appliance and represents a serious risk for the user.
Please make sure that you pay attention to the restrictions in the safety instructions. Pay attention to the national regulations which may restrict the use of the machine.
Any other uses of or modifications to the machine are deemed to be improper usage and may result in serious physical injury.
Not intended for commercial use.

DANGER!
▶ Risk of injury! When using at petrol filling stations or other danger areas, comply with all corresponding safety regulations.
NOTE
▶ Waster water that is contaminated with oil should not be released into the soil, open water or down drains. Therefore, only wash engines and vehicle underbodies at suitable sites that have oil separators.

CAUTION! Water quality requirements:
■ Only clean water may be used as a high-pressure medium. Contamination can lead to premature wear or residues in the appliance. If recycling water is used, the following thresholds may not be exceeded.
| pH value 6.5...9.5 | |
| Electrical conductivity* Conductivity | Fresh water +1200 μS/cm |
| Settleable solids** < 0.5 mg/l | |
| Filterable substances*** < 50 mg/l | |
| Hydrocarbons < 20 mg/l | |
| Chloride < 300 mg/l | |
| Sulphate < 240 mg/l | |
| Calcium < 200 mg/l | |
| Overall hardness | < 28 °dH < 50 °TH < 500 ppm (mg CaCO_3 /l) |
| Iron | < 0.5 mg/l |
| Manganese | < 0.05 mg/l |
| Copper | < 2 mg/l |
| Active chlorine | < 0.3 mg/l |
| Free of unpleasant odours | |
| *Maximum in total 2000 μS/cm **Sample volume 1 l, sedimentation time 30 min ***No abrasive substances | |
Residual risks

CAUTION!
■ Even if used correctly, it is not possible to exclude non-apparent residual risks entirely.
■ Injuries due to slipping on waste water.
Injuries or property damage due to the high-pressure water jet.
Features
① High-pressure hose
② Quick connector
3 Hose holder
4 Nozzles (red, yellow, green, white, black)
5 Air filter
6 Filler cap
⑦ Fuel tank
8 Tubular frame
9 Filler cap for cleaning agent tank
10 Cleaning agent tank
⑪ Cleaning agent hose
12 Rubber feet
13 Lower spray gun holder
14 Tyres
15 Oil drain screw
16 Jet pipe
17 Pull starter
18 Hand spray gun
19 Upper spray gun holder
20 Trigger
21 Trigger lock
22 Exhaust silencer
23 Wing nut
24 Choke
25 Fuel tap
26 Spark plug/Spark plug connector
27 Carburettor
28 Float chamber
29 Oil plug
30 Transport oil plug
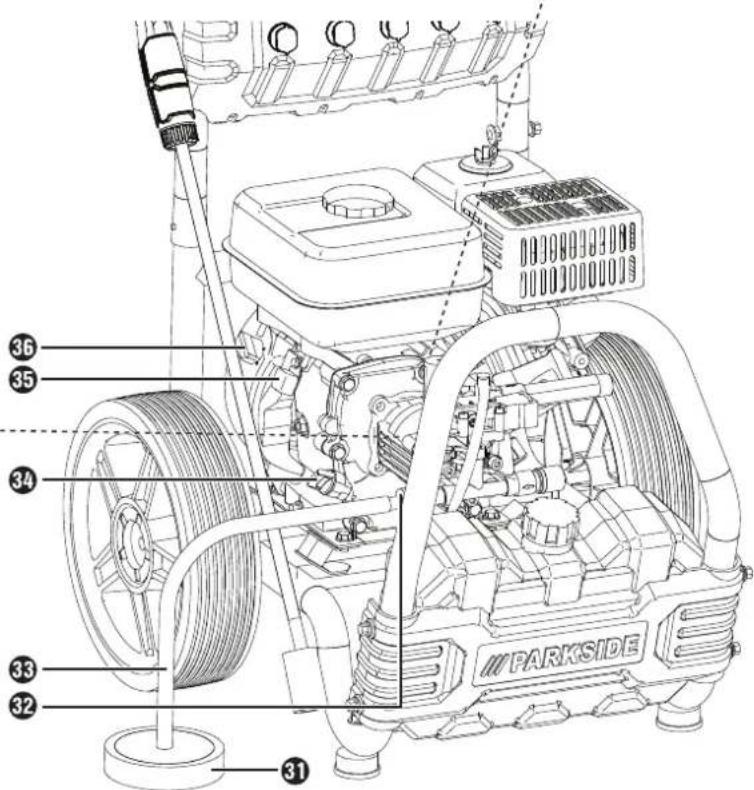
31 Intake filter
32 Hose connection adapter (pre-assembled)
33 Water suction hose
34 Oil inlet/dipstick
35 Automatic oil switch-off
36 On/Off switch
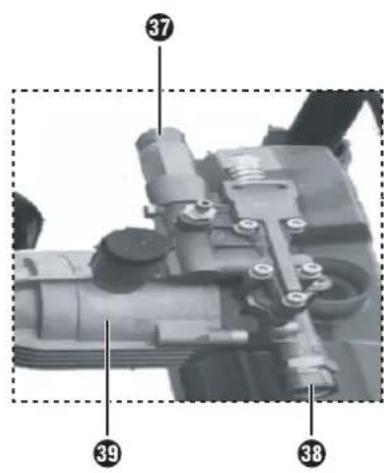
37 Water outlet
38 Water inlet
39 High-pressure pump
40 Temperature relief valve
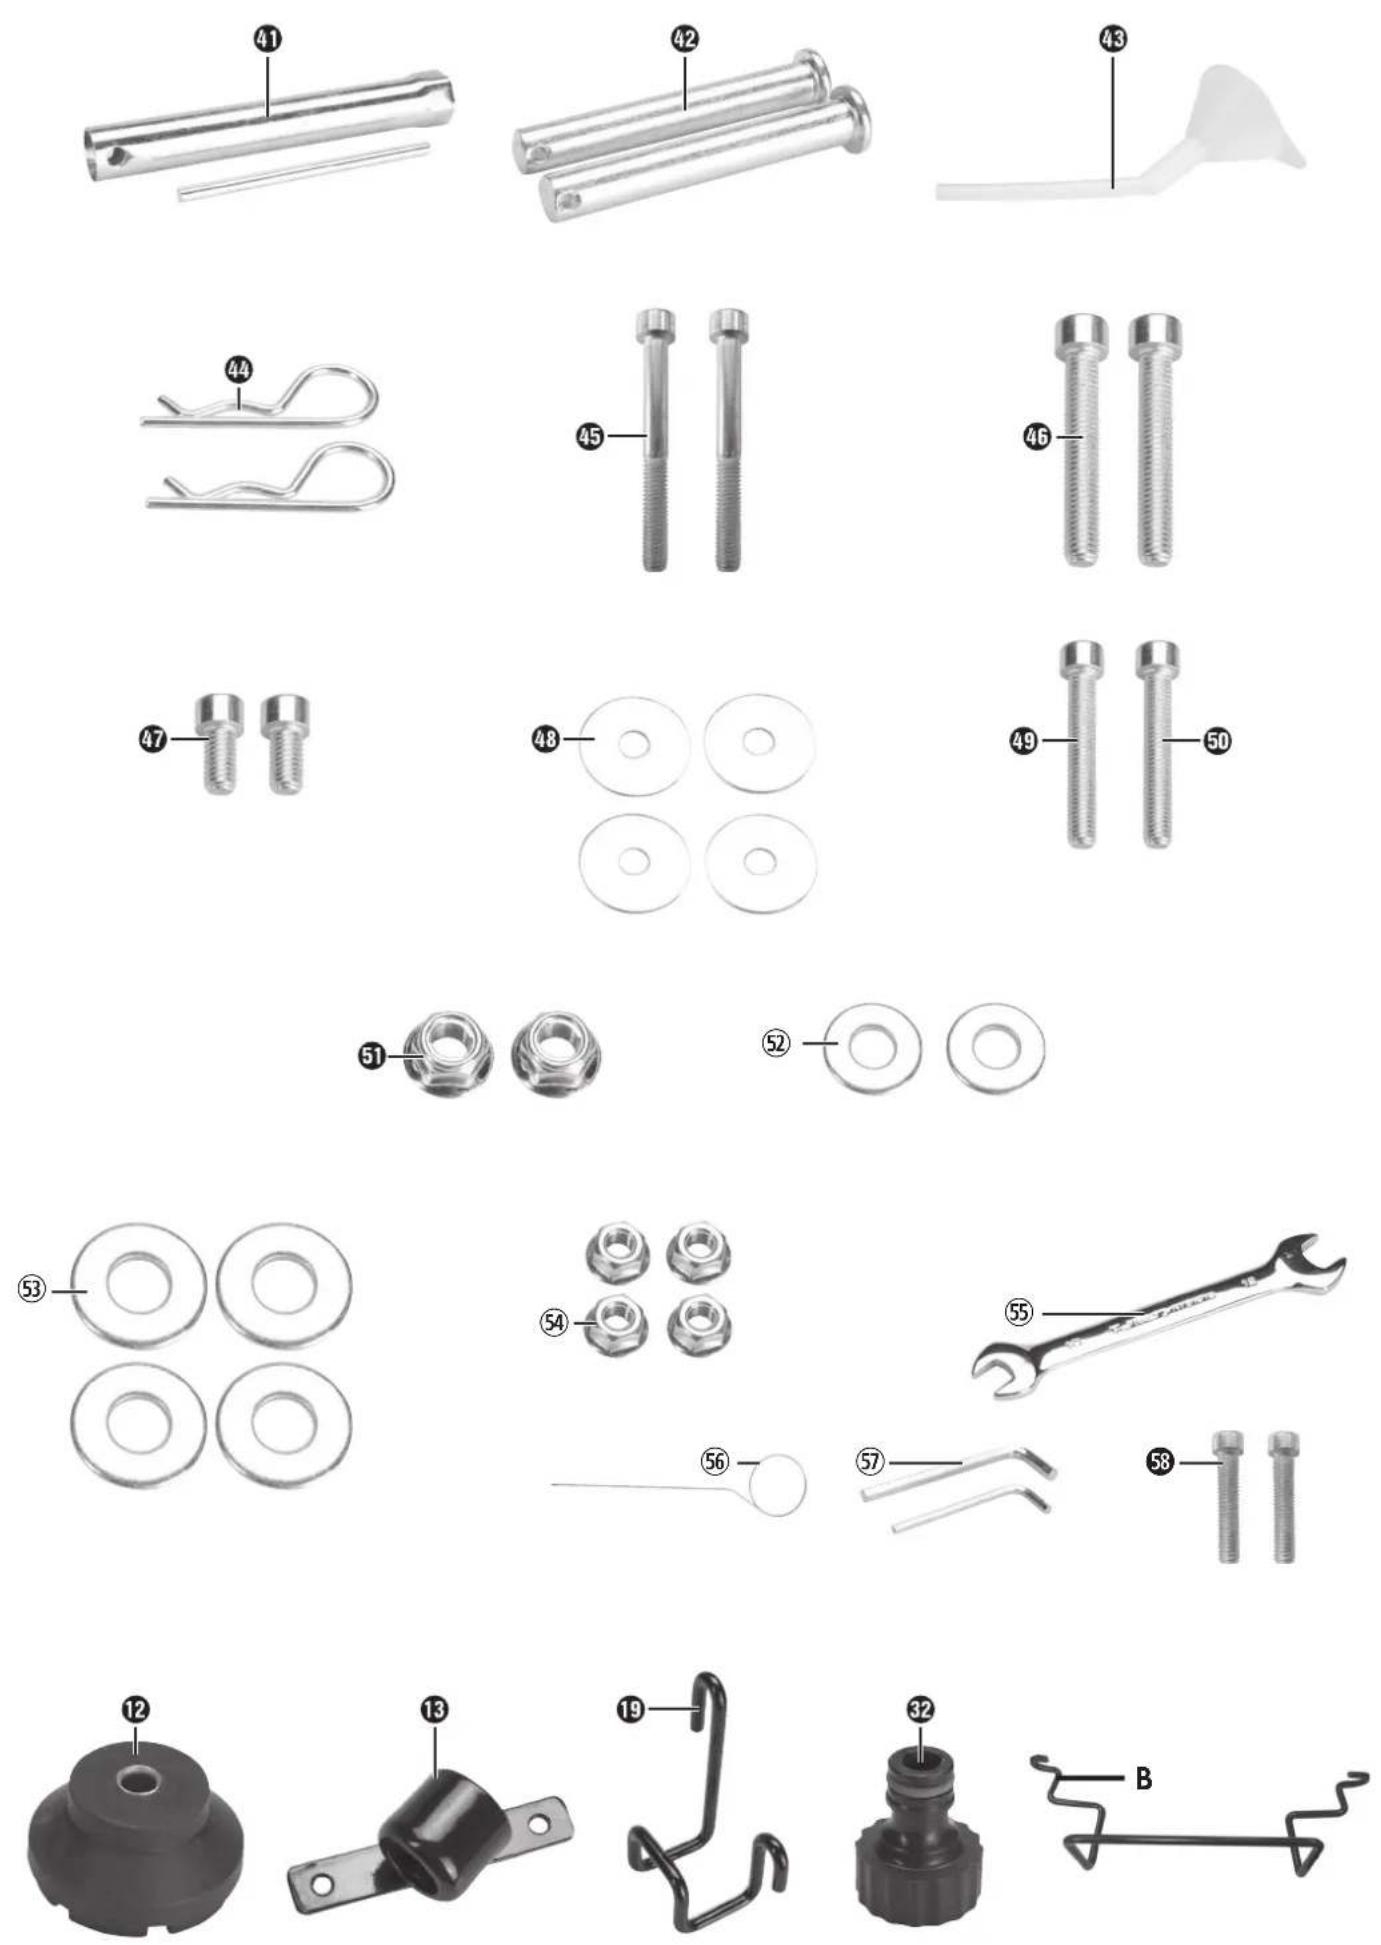
④ Spark plug spanner
42 2x axles
43 Funnel
44 2x R-clips
45 2x screws (M6 x 55) (upper spray gun holder)
46 2x screws (M8 x 48)
47 2x screws (M6 x 12) (lower spray gun holder)
48 4x washers (∅ 22 x ∅ 6)
49 1x screws (M6 x 45)
50 1x screws (M6 x 45)
51 2x nuts (M8)
52 2x washers (∅ 16 x ∅ 8.3)
53 4x washers (∅ 24 x ∅ 12.5)
54 4x nuts (M6)
55 Open end wrench (SW 10/12)
56 Nozzle cleaner needle (can be found in the operating instructions)
57 Allen key (M5/M6)
58 2x screws (M6 x 30)
A Curved handle
B Hose holder
Package contents
1 engine unit
2 x wheels, ∅ 300 mm x 80 mm
1 x high-pressure hose 8 m, max. pressure 25 MPa (250 Bar), max. 60°C, flexible
1 x self-primer hose, ∅ 18 mm (external) / ∅ 13 mm (1/2" internal) x 3 m, with filter
1 x hand spray gun, max. pressure 28 MPa (280 Bar), max. 60°C
1 x lance pipe
4 x high-pressure nozzle, (red, yellow, green, white)
1 x low-pressure nozzle / cleaning nozzle (black)
2 x rubber feet
1 x spark plug spanner
1 x open end wrench (SW 10/12)
2 x Allen keys (M5/M6)
2 x spray gun holder
1 x funnel
1 x nozzle cleaner needle (can be found in the operating instructions)
1 x assembly material
1 x hose holder
1 operating manual
Technical data
| Engine | ||
| Type 1 cylinder | 4-stroke air-cooled, pull starter | |
| Displacement cm | ^3 | 208 |
| Nominal output at 3600 rpm | kW (HP) 4.1 / 5.57 | |
| Normal operating speed | rpm 3600 | |
| Fuel tank l 3.6 | ||
| Fuel *suitable for E10 fuel | Petrol, unleaded | |
| Fuel consumption at full load | l/h 2.0 | |
| Oil volume - engine l | 0.6 | |
| Oil type - engine l | 5 W 40 | |
| Cut-out function at low oil level | ||
| Spark plug | LD F7RTC | |
| Water connection | ||
| Supply temperat-ure max. | °C | 40 |
| Supply pressure max. | MPa (bar) | 0.6 (6) |
| Pump (self-priming) | ||
| Working pressure | MPa (bar) | 18 (180) |
| Max. working pressure | MPa (bar) | 22 (220) |
| Flow rate | l/min | 8.3 |
| Max. flow rate | l/min | 10 |
| Opening tem-perature thermal valve | °C | >45 |
| Inlet connection | G3/4" | |
| Outlet connection M | 22 x 1.5 | |
| Suction height | m | 1 |
| Self-pumping start time | min | 1 |
| Dimensions and weight | ||
| Length x width x height | mm | 645 mm × 570 mm × 970 mm |
| Typical operating weight | kg | approx. 31 |
Noise emission:
Noise measurement value determined in accordance with EN 60335-2-79.
The A-rated noise level is typically as follows:
| Sound pressure level L | _PA : | 93.6 | dB | (A) |
| Uncertainty K | _PA : | 2.5 | dB | |
| Sound power level L | _WA : | 106.9 | dB | (A) |
| Uncertainty K | _WA : | 2.5 | dB | |
| Guarantee sound power level L | _WA : | 109 | dB | (A) |
| Uncertainty K | _WA : | 2.5 | dB |

Wear ear protection to prevent hearing damage!
Vibration values (vector total of three directions) determined in accordance with EN 60335-2-79:
Hand-arm vibration value: vibration emission value
$$ = 4. 7 2 \mathrm{m} / \mathrm{s} ^ {2} $$
Uncertainty K = 1.5 m/s ^2
NOTE
The vibration level specified in these instructions has been measured in accordance with the standardised measuring procedure specified in EN 60335-2-79 and can be used to make equipment comparisons. The specified vibration emission value can also be used to make an initial exposure estimate.
WARNING!
The vibration level varies in accordance with use and may be higher than the value specified in these instructions in some cases. There is a risk of underestimation of the vibration load if the appliance is used regularly in this manner. To estimate the vibration load during a specific working period accurately, periods during which the appliance is switched off (or running, but not being used) must also be taken into account. This can significantly reduce the vibration load over the total working period.
Explanation of the symbols on the appliance!

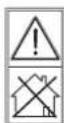
Warning! Read the operating instructions before use!
Warning! Poisonous CO (carbon monoxide) vapours! Do not use the appliance in confined spaces!
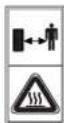
Attention! Hot surfaces! Risk of burns! Keep a safe distance away!
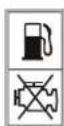
Do not refuel during operation!

Add oil before first use!

Wear protective gloves!

Wear safety shoes!

Wear hearing protection!

Wear safety goggles!

Read the operating instructions!

Attention! Hot surfaces! Risk of burns!

Warning! The machine is not suitable for connection to drinking-water supply.

Sound power level LWA data in dB.

Warning! Do not inhale exhaust fumes!

Fire, naked flames and smoking are prohibited!

High-pressure jets can be dangerous if misused. Do not aim at people, animals, active electrical equipment or at the appliance itself.

CHOKE: OPEN/CLOSE
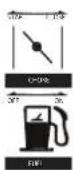
PETROL: ON/OFF

Add oil / Check oil level
Do not use the appliance if there is no oil visible in the oil tank.

Safety instructions for high-pressure cleaners

Important! Ready the safety instructions carefully before using the appliance for the first time and adhere to it at all times. Store these safety instructions carefully for later use or to pass on to the next owner.
- Before using the appliance for the first time, read the operating instructions and pay close attention to the safety instructions.
- The warning and safety signs on the appliance provide important information for safe operation.
-In addition to the notices in these operating instructions, all general safety and accident prevention legislation must also be complied with.
-Keep plastic wrapping away from children. There is a risk of suffocation!
■ Comply with the relevant national legislation for the use of liquid jet sprayers.
■ Comply with the relevant national legislation for the prevention of accidents. Liquid jet sprayers must be inspected regularly and the result of the inspection noted in writing.
Hazard levels
DANGER!
Indicates an imminently dangerous situation which will result in serious bodily injury or death.
WARNING!
Indicates a potentially dangerous situation which could result in serious bodily injury or death.
ATTENTION!
- Indicates a potentially dangerous situation that can result in minor injury.
CAUTION!
- Indicates a potentially dangerous situation that can result in property damage.
Water connection
DANGER!
The high-pressure hose may not be used if damaged. A damaged high-pressure hose must be replaced immediately. Only hoses and connectors recommended and approved by the manufacturer may be used. Order No. see operating manual.
- The screw connections of all connection hoses must be leak-tight.
WARNING!
- Observe the regulations of your water supply company.
DANGER!
- Inspect the appliance and the working equipment before use for operational safety and for proper condition. Do not use the appliance if a connecting pipe or important parts of the appliance are damage, e.g. safety devices, high-pressure hoses, hand spray guns.
▶ Never prime with liquids containing solvents or undiluted acids and solvents! These include petrol, paint thinners or heating oil. The spray mist is highly flammable, explosive and poisonous. Do not use acetone, undiluted acids or solvents as they can damage the materials used in the appliance. - When using the appliance in hazardous areas (e.g. petrol filling stations) comply with the relevant safety regulations. Operation in explosive atmospheres is prohibited.
- The appliance must be set up on a firm, flat surface.
▶ All live components in the working area must be protected from spray water.
The trigger of the hand spray gun must not be jammed during use.
▶ High-pressure jets can be dangerous if misused. Do not aim at people, animals, active electrical equipment or at the appliance itself.
DANGER!
▶ Vehicle tyres/tyre valves may only be cleaned at a minimum spray distance of 30 cm. Otherwise the vehicle tyres/tyre valves could be damaged by the high-pressure jet. The first sign of damage is a discolouration of the tyre. Damaged vehicle tyres are a source of danger.
- When using cleaning agents, comply with the safety data sheet of the cleaning agent manufacturer, especially the information on personal safety equipment.
DANGER!
▶ Only cleaning agents that have been approved by the appliance manufacturer may be used. This appliance was designed to be used with the cleaning products that were supplied or delivered by the manufacturer. The use of other cleaning agents or chemicals can impair the safety of the appliance.
- Keep cleaning agents out of reach of children!
- Do not open the cover while the engine is running.
▶ During longer working breaks, switch off the appliance at the main switch/appliance switch.
WARNING!
- Do not aim the jet at others or yourself to clean clothing or footwear.
▶ Materials containing asbestos or other substances that are harmful to health may not be sprayed.
▶ Before cleaning, carry out a risk assessment of the surface to be cleaned to ascertain the safety and health safety requirements. Take all necessary protective measures. - With short jet pipes there is a risk of injury as a hand could accidentally come into contact with the high-pressure jet. If the jet pipe being used is shorter than 75 cm, a needle jet nozzle or rotor nozzle may not be used.
CAUTION!
▶ If a sound pressure level over 80 dB(A) is specified in the appliance operating instructions (technical specifications), wear hearing protection.
▶ Wear suitable protective clothing and safety glasses to protect yourself from water splashes and dirt.
The recommended cleaning agent may not be used undiluted. The products are operationally safe as they contain no environmentally harmful substances. If the cleaning agent gets into your eyes, rinse immediately with plenty of water and consult a doctor at the earliest opportunity if you swallow any.
▶ After hot water operation, allow the hoses to cool down or operate the appliance for a short while using cold water.
For appliances with a hand-arm vibration value > 2.5 m/s ^2 (see technical data)
DANGER!
▶ Using the appliance for a long time can lead to vibration-related circulation disorders of the hands. It is not possible to determine a generally applicable time limit for use as this is affected by a number of variables:
- Personal predisposition to poor circulation (frequently cold fingers, tingling in the fingers).
-Low ambient temperature. Wearing warm gloves protects the hands.
-A very tight grip impairs the circulation.
-Uninterrupted operation is not ideal: take regular breaks.
In the event of regular, prolonged use of the appliance coupled with the repeated occurrence of certain symptoms (e.g. tingling in the fingers, cold fingers), we recommend consulting a doctor.
Use
WARNING!
▶ High-pressure hoses, fittings and couplings are important for machine safety. Use only the high-pressure hoses, fittings and couplings recommended by the manufacturer.
▶ Water that has flowed through the non-return valve is not drinkable.
▶ Machines driven by a combustion engine may not be used in interior rooms unless an adequate ventilation system that is approved by the responsible national occupational health and safety authorities has been installed.
- With gas or oil-fired machines it is important that sufficient ventilation is provided and that the exhaust gases are properly extracted.
DANGER!
The operator must use the appliance properly. They must take local conditions into account and pay attention to others, especially children, when working with the appliance.
- This appliance may never be left unattended while it is in operation.
The appliance may only be used by people who have been instructed in its use or whose ability to operate it has been demonstrated and who are expressly tasked with its use. This appliance may not be used by minors.
- This machine may be used by persons with limited physical, sensory or mental capabilities or lack of experience and knowledge, provided that they are under supervision or have been told how to use the machine safely and are aware of the potential risks.
- This appliance may not be used by children or people who are untrained in its use.
- Do not use the appliance if other people are in range unless they are wearing personal protective clothing.
▶ Children should be supervised to ensure that they do not play with the appliance.
▶ Always use suitable gloves when working on the appliance.
The water jet being ejected from the jet pipe creates a recoil force. The angled jet pipe causes the force to be exerted upwards. Hold the gun and the jet pipe firmly.
▶ Using angled spray equipment can help to reduce recoil and twisting forces.
WARNING!
The use of high-pressure cleaners can lead to the formation of aerosols. Inhalation of aerosols can be hazardous to health. Grade FFP2 filter masks (or higher) are suitable for protection from water-based aerosols.
Transport
DANGER!
- When transporting the machine, make sure that the engine is switched off and the appliance is firmly secured.
Maintenance
DANGER!
- Switch off the appliance before carrying out any cleaning or maintenance work or when exchanging components.
▶ Before all work on the appliance and accessories, depressurise the high-pressure system. - Corrective maintenance may only be carried out by approved customer service centres or specialists in this area who are familiar with all the relevant safety regulations.
Accessories and spare parts
DANGER!
▶ To prevent hazards, repairs and the installation of replacement parts may only be carried out by authorised customer service centres.
▶ Use only spare parts that have been approved by the manufacturer. Original spare parts and accessories offer a better guarantee that the appliance can be operated safely and reliably.
High-temperature water and petrol engine appliances
DANGER!
▶ Use only the fuel specified in the operating instructions. The use of non-approved fuels increases the risk of explosion.
- When refuelling petrol engine devices, take care not to get any fuel on the hot surfaces.
▶ Always observe the special safety instructions for petrol engine appliances contained in the operating instructions!
- When operating the appliance in interior rooms, sufficient ventilation and exhaust gas extraction must be ensured (risk of poisoning).
▶ The exhaust opening must not be blocked.
▶ Ensure that no exhaust gas emissions occur in the immediate vicinity of the air inlets.
WARNING!
- Do not bend over or touch the exhaust outlet. During burner operation do not touch the boiler. (Risk of burns).
Safety instructions
DANGER!
▶ Do not operate the high-pressure cleaner if fuel has been spilt. Move the appliance to another location and avoid all spark generation.
- Do not store, spill or use fuel in the vicinity of open flames or appliances such as ovens, boilers, water heaters, etc. that have a pilot flame or could generate sparks.
- Keep easily inflammable objects and substances away from the exhaust silencer (at least 2 m).
- Do not operate the engine without the exhaust silencer and check and clean this regularly (replace if necessary).
- Do not use the engine in wooded, bushy or grassy terrain unless the exhaust pipe is fitted with a spark arrestor.
▶ Except during adjustment work, do not run the engine without an attached air filter or without the cover over the intake manifold.
- Do not make any adjustments to the regulator springs, controller rods or other parts that could increase the engine speed.
- Risk of burns! Do not touch the hot exhaust silencer, cylinder or cooling fins.
- Keep your hands and feet away from all moving or rotating parts.
- Risk of poisoning! Do not operate the appliance in confined spaces.
- Do not use any unsuitable fuels as these can be dangerous.
Safety devices
The safety devices are designed to protect the user and may not be deactivated or repurposed.
Relief valve
If the hand spray gun is closed, the relief valve opens and the high-pressure pump routes the water back to the pump suction side. This prevents the permissible working pressure from being exceeded.
■ The relief valve is set and sealed at the factory. It may only be adjusted by the customer service.
Safety valve
The safety valve opens if the permissible maximum allowable working pressure is exceeded (see technical specifications); the water flows out.
The safety valve is set and sealed at the factory. It may only be adjusted by the customer service.
Thermal valve
The thermal valve protects the high-pressure pump from impermissible warming in circulation operation if the hand spray gun is closed.
The thermal valve opens if the maximum permissible temperature of 68^ C is exceeded and drains the hot water.
Before use
NOTE
▶ Exercise caution when unpacking, transporting and storing due to the high weight of the machine.
▶ These activities should be carried out by two people.
▶ Make sure that the appliance is standing on a level and flat surface while unpacking, and during assembly, storage as well as during operation, inspection, maintenance and when at a standstill.
Fitting the handle
Insert the handle A on the base frame of the device. Press the two pushbuttons on the base frame and push the handle A completely until it clicks into place.
Fitting the hose holder
Fit the hose holder ③ onto the handle A by aligning the holes in the two components.
Fix the hose holder 3 in place on the handle A with two screws 49 50 and two nuts 54 (on the right side, see fold-out page). Use the supplied open end wrench 55 and allen key 57 for assistance.
Mount the hose holder
◆ Attach hose holderB to bow handle A.
Use two screws 58 and two washers 41b attach the hose holder B to the bow handle A.
Fitting the upper spray gun holder on the handle
Use two screws 45 two washers 6nd two nuts 54 to fit the upper spray gun holder 19 onto the handle A.

natural_image
Close-up of a firearm with attached metal bracket and mounting bracket (no visible text or symbols)Fitting the lower spray gun holder on the tubular frame
Use two screws 47 attach the lower spray gun holder 13 onto the tubular frame 8.

Fitting the wheels
♦ Push a washer⑤3 onto the axle ④2.
♦ Push the axle 42 from outside through the wheel 14 and place another washer 53 on the axle 42.
Now guide the axle with the wheel from the outside into the tubular frame 8 and secure it with the R-clip 44
♦ Repeat the process on the opposite side.

natural_image
Close-up of a mechanical component with no visible text or symbolsFitting the rubber feet
Attach the rubber feet 12 with the screw,asher 52 and nuts 51 onto the tubular frame 8.
Use the supplied open end wrench 55 and allen key 57 for assistance.

natural_image
Close-up of a glossy black object with a small white object on top (no text or symbols visible)Fitting the hand spray gun, the jet pipe and the nozzle
DANGER!
▶ Risk of injury! Appliance, supply pipes, high-pressure hose and connections must be in perfect working order. If the equipment is not in perfect working order, the appliance may no longer be used.
Connect the jet pipe 16 to the hand spray gun 18.
♦ Tighten the screws of the jet pipe by hand.
Fit the nozzle 4 onto the jet pipe 16. Ensure that it clicks into place correctly.
◆ Fit the high-pressure hose 1 onto the hand spray gun 18.
◆ Mount the high pressure hose ① to the water outlet ③7.
Operation
Checking the oil level of the engine
■ Check the oil level before each use.
Do not use the appliance if there is no oil visible on the dipstick 34.
■ Add oil as required. Use only engine oil (15W40).
Place the appliance on a flat, level surface and remove all dirt from around the oil inlet/dipstick 34.
Use the dipstick 34 to measure the oil level.
Unscrew the dipstick 34 and wipe it clean with a cloth.
Put the dipstick 34 back into the oil inlet without screwing it in.
Pull the dipstick 34 back out and check the oil level.
Check that the oil level is somewhere between the minimum and maximum levels (marked as L for low and H for high on the dipstick 34).
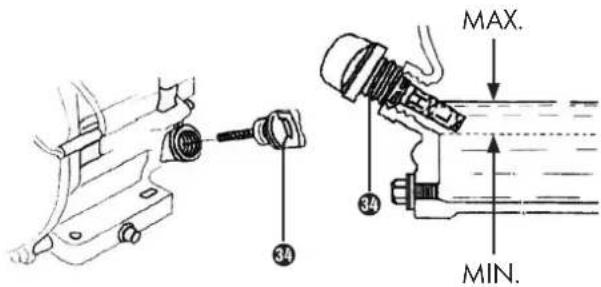
To fill up the oil, take the supplied funnel 43 and pour the oil slowly into the oil inlet 34. Do not overfill!
◆ Wait a minute until the oil has settled before measuring the oil level again as described above.
♦ Screw the dipstick back into the oil inlet.
CAUTION!
▶ Do not overfill the oil. A too high oil level can cause engine damage. The maximum fill level for the tank is 0.6 litres.
NOTE
The engine is equipped with an oil level sensor. The oil level sensor switches the engine off if the oil level is too low and prevents a restart. If the engine cuts out although the oil level is correct, check whether the petrol-powered high-pressure cleaner is standing straight.
Bleeding the oil tank
CAUTION!
Before first use the bleed valve on the oil tank needs to be replaced. On delivery, a black transport oil plug 30 is screwed in which has to be replaced by the supplied red oil plug 25.
Engine
Observe the section "Safety instructions"!
■ Before use, read the manufacturer's operating instructions and pay close attention to the safety instructions.
- Checking the oil level of the engine.
Do not use the appliance if the oil level has fallen below "MIN".
■ Add oil as required.
■ Fill the fuel tanl ^7 with unleaded petrol. Do not use a 2-stroke mixture.
Adding fuel
⚠️ DANGER! RISK OF FIRE AND EXPLOSION!
▶ Never refuel in confined spaces or when the engine is running or still hot.
▶ Do not smoke while refuelling.
▶ Do not use any 2-stroke mixture.
▶ Do not refuel in the vicinity of open flames or sparks.
▶ Do not spill fuel – use a funnel.
▶ Wipe up any spilt fuel.
▶ After refuelling, close the fuel canister and the tank properly.
◆ Fill the fuel tank⑦ with unleaded petrol.
♦ Add fuel up to the red mark.
Water connection
See technical specifications for the connection data.
■ Connect the supply hose (minimum length 7.5 m, minimum diameter 3/4") to the water connection on the appliance and to the water supply (e.g. tap).
■ Turn on the water supply.
NOTE
The water supply hose is not included in the delivery.
Drawing water out of a container
DANGER!
▶ Never draw water from a drinking water container. Never prime with liquids containing solvents such as paint thinners, petrol or oil. Atomised spray from solvent is highly flammable, explosive and toxic.
Connect the suction hose 33 (diameter at least 3/4") with the filter 31 (accessories) to the water connection 38.
Self-priming from open tanks/containers and natural water sources
Use the self-priming equipment supplied.
-Intake filter31
-3 m reinforced suction hose ^33
With this accessory the appliance can draw water to max. 1 m above the water surface. This can take up to 1 minute.
♦ Immerse the 3 m suction hose Ⓤ33 completely underwater to get the air out.
Connect the suction hose 33 to the appliance and ensure that the intake filter 31 remains underwater.
- Run the appliance without the hand spray gun 18 attached until water flows evenly out of the high-pressure hose 1.
If no water flows out after 1 minute, switch the appliance off and check the appliance. Once the water flows, switch off the appliance and attach the hand spray gun 18 and the jet pipe 15 so you can work.
It is important that the hose and coupling are of a good quality, tightly fitted and that the seals are undamaged and inserted straight. Leaky connections can impair the suction.
Bleeding the appliance
◆ Remove the nozzle4
◆ Start the engine (see "Starting the engine").
◆ Pull the trigger 20 on the hand spray gun 18 several times.
Allow the appliance to run until the water comes out of the jet pipe without any air bubbles.
◆ Switch off the appliance and screw the nozzle back on.
Use
WARNING!
▶ Switch off the appliance before making any adjustments or carrying out maintenance work.
DANGER! RISK OF EXPLOSION! DO NOT SPRAY FLAMMABLE LIQUIDS!
▶ Place the appliance on a firm surface.
The high-pressure cleaner may not be operated by children. (Risk of accidents due to improper use of the appliance).
▶ The appliance generates a lot of noise.
Risk of hearing damage. Always wear suitable hearing protect when working with the appliance.
The water jet coming out of the high-pressure nozzle exerts recoil force on the gun. An angled jet pipe can also cause torque. Therefore, hold the jet pipe and gun firmly in your hands.
▶ Never aim the water jet at people, animals, the appliance itself or electrical components.
▶ Vehicle tyres/tyre valves may only be cleaned at a minimum spray distance of 30 cm. Otherwise the vehicle tyres/tyre valves could be damaged by the high-pressure jet. The first sign of damage is a discolouration of the tyre. Damaged vehicle tyres are a source of danger.
▶ Materials containing asbestos or other substances that are harmful to health may not be sprayed.
▶ To protect the operator from water spray, wear suitable protective clothing.
▶ Always ensure that all hose connection are screwed tight.
▶ The trigger of the hand spray gun must not be jammed during use.
Filling oil/petrol
When you use the appliance for the first time, unscrew the red oil inlet screw 34 and add approx. 0.6 l engine oil (15W40). Use the funnel 43 to do this.
Unscrew the filler cap ⑥ and add standard commercial lead-free petrol to the fuel tank ⑦. The tank has a maximum capacity of 3.6 l. Add fuel up to the red mark.
Starting the engine
CAUTION!
▶ Before first use, add engine oil (15W40, approx. 0.6 l) and fuel (regular unleaded petrol).
◆ Check the fuel and oil levels; top up as necessary.
◆ Provide adequate ventilation for the appliance.
◆ Ensure that the spark plug/spark plug connector 26 are firmly fitted.
CAUTION!
-
When starting using the pull starter 17 there can be a kickback that can cause injuries to your hand.
■ Wear protective gloves when starting.
Open the fuel tap 25; to do this, move the fuel tap 25 to the "ON" position.
◆ Move the On/Off switch36o the "ON" position.
♦ Set the choke 24 to position I \ I (in the left position). -
Start the engine with the pull starter⑰pull firmly on the handle to do this. If the engine does not start, pull the starter again.
◆ After starting, push the choke 24 back in (in the right position).
NOTE
The procedure described in this section is suitable for both a cold start and a warm start.
Turning the engine off
◆ Run the appliance for a short while without load before you switch it off so that the appliance can "aftercool".
◆ Move the On/Off switch 36 to the "OFF" position.
◆ Close the fuel tap ^25
Starting the appliance
♦ Switch on the water supply.
◆ Start the engine with the trigger2open.
NOTE
▶ You can remove the jet pipe 16 or the nozzle 4 to make starting easier.
◆ Run the engine for 1 minute to warm it up.
Setting operating pressure and flow rate
■ The pressure and flow rate are fixed on this appliance and cannot be changed.
Changing the nozzle
DANGER!
▶ Before changing the nozzle, switch off the appliance and pull the trigger 2 to depressurise the appliance.
◆ Remove the nozzle4
◆ Fit the new nozzle ^4
Use with a cleaning agent
WARNING!
▶ Switch off the appliance before making any adjustments or carrying out maintenance work.
WARNING!
▶ Unsuitable cleaning agents can damage the appliance and the object to be cleaned.
Use only recommended cleaning agents that are suitable for high-pressure cleaners.
This appliance is suitable for operation with the cleaning agents recommended by the manufacturer. The use of other cleaning agents or chemicals can have a negative effect on the safety of the machine.
The recommended cleaning agents are primarily those that are suitable for use with high-pressure cleaners. These are available in DIY and car accessory stores.
◆ Hang the cleaning agent hose in a container with cleaning agent.
♦ Replace the high-pressure nozzle with low-pressure nozzle (black).
-0^ nozzle - red:
Extremely strong, precise jet. Cleans only a small area.
Do not use for cleaning wood!
-15° nozzle - yellow:
Strong 15° jet for intensive cleaning of small surfaces.
Use only on surfaces and materials that can withstand high pressures.
-25° nozzle - green:
25° jet for intensive cleaning of larger surfaces.
-40° nozzle - white:
40^ jet for cleaning large surfaces.
- Chemicals nozzle - black:
Low-pressure nozzle for the application of cleaning agents.
Recommended cleaning methods
-Dissolving dirt:
Spray the cleaning agent sparingly and leave to work for 1–5 minutes but do not let it dry.
-Removing dirt:
Rinse off the dissolved dirt using a high-pressure jet.
After using with a cleaning agent
Leave the appliance engine running and pull the trigger 20 for at least 1 minute to rinse itself.
Interrupting operation
Release the trigger 20 on the hand spray gun 18.
NOTE
- When you let go of the trigger 2of the hand spray gun, engine continues idling.
◆ For longer interruptions (several minutes), switch off the engine.
◆ Pull the trigger 20 until the appliance is depressurised. - Secure the hand spray gun18 against accidental activation using the trigger lock 21.
Turning off the appliance
After use with salt water (brine) run tap water through the opened hand spray gun for at least 2–3 minutes to rinse the appliance.
Release the trigger 20 on the hand spray gun 18.
◆ Move the On/Off switch 36 to the "OFF" position.
◆ Close the fuel tap ^25
♦ Switch off the water supply.
◆ Pull the trigger 20 until the appliance is depressurised.
- Secure the hand spray gun18 against accidental activation using the trigger lock 21.
◆ Unscrew the water supply hose from the appliance.
Transport
CAUTION! RISK OF INJURY AND DAMAGE!
▶ Take the weight of the appliance into account during transport.
◆ Wind up the high-pressure hose ① and place it in the hose holder ③.
Place the jet pipe 16 into the lower spray gun holder 13. Hang the hand spray gun 18 in the upper spray gun holder 19
♦ Push the appliance by the handle A.
When transporting the appliance in vehicles, secure the appliance against rolling away, slipping or tipping in accordance with the applicable guidelines.
Storage
CAUTION! RISK OF INJURY AND DAMAGE!
▶ Take the weight of the appliance into account when storing.
■ The appliance may only be stored indoors.
Frost protection
CAUTION! RISK OF DAMAGE!
▶ Freezing water in the appliance can destroy parts of the appliance.
▶ Preferably store the appliance in a heated room in winter.
When storing in an unheated room, comply with the following instructions:
Drain the water
◆ Unscrew the water supply hose and the high-pressure hose ①.
◆ Run the appliance for max. 1 minute until the pump and the lines run dry.
◆ Unscrew the hose connection adapter32
Flush the appliance with antifreeze
NOTE
▶ Follow the handling instructions of the antifreeze manufacturer.
◆ Pump a standard commercial antifreeze through the appliance. This will provide a certain level of corrosion protection.
Cleaning and maintenance
NOTE
The maintenance schedule below lists only maintenance work on the high-pressure pump. In addition, maintenance work on the engine must also be taken into consideration.
⚠️ DANGER! RISK OF INJURY DUE TO ACCIDENTAL STARTING OF THE APPLIANCE.
▶ Before working on the appliance, turn the engine switch to "0/OFF" and pull off the spark plug connector.
▶ RISK OF BURNS! Do not touch the hot exhaust silencer, cylinder or cooling fins.
Maintenance intervals
Before use
◆ Check the oil level using the dipstick ^34
If the oil appears milky (water in the oil) contact customer service immediately.
◆ Check the high-pressure hose ① for damage (risk of bursting).
Replace a damaged high-pressure hose ① immediately.
Every 25 operating hours
◆ Check the oil level using the dipstick ^34
If the oil appears milky (water in the oil) contact customer service immediately.
Every 50 operating hours
◆ Check the oil level using the dipstick ^34
If the oil appears milky (water in the oil) contact customer service immediately.
◆ Clean the strainer in the hose connection adapter ^32
♦ Clean the intake filter31
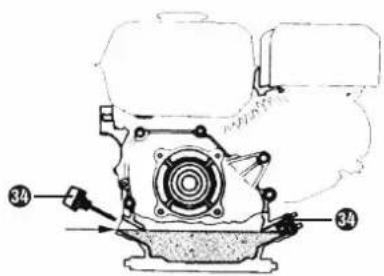
Check the fastenings between the engine and the frame for cracks and have any cracked fastenings replaced by customer service.
Maintenance work
Changing the engine oil
◆ Prepare an approx. 1 litre container to collect the oil.
◆ Unscrew the oil drain screw ^15
◆ Allow the oil to drain out into the container.
NOTE
▶ Old oil must be disposed of in an environmentally friendly manner or handed in to an authorised collection point.
♦ Screw the oil drain screw 15 back in.
Pour new oil slowly into the opening on the oil inlet 34. Fill the oil slowly so that air bubbles can escape.
See technical specifications for oil type and fill quantity.
Engine
CAUTION!
▶ Switch off the appliance immediately and contact customer service:
-If you notice unusual vibrations or noises.
-If the engine seems overloaded or misfires.
- Keep all protective equipment, air vents and the engine housing as free of dust and dirt as possible. Wipe the appliance with a clean cloth or blow it out with low-pressure compressed air.
■ We recommend cleaning the appliance after every use.
■ Clean the appliance regularly with a damp cloth and a little soft soap. Do not use any cleaning agents or solvents as these can damage the plastic surfaces of the appliance. Make sure that no water can penetrate into the interior of the appliance.
Air filter
■ Clean the air filter⑤ regularly; replace if necessary.
To do this, open the air filter 5 by removing the wing nut 23 and then pulling out the air filter 5.
■ Remove the filter elements.
- Do not use any aggressive cleaning agents or petrol to clean these elements.
■ Clean the elements by knocking them out on a flat surface. In the event of severe soiling, wash with a soap solution and then rinse in clear water and allow to dry.
■ Assembly is done in the reverse order.
Spark plug
Check the spark plug/spark plug connector 2 for the first time after 20 operating hours for contamination and clean if necessary with a wire brush. Afterwards, service the spark plug after every 50 hours of operation.
◆ Pull of the spark plug connector 26 with a twisting motion.
◆ Remove the spark plug 26 with the supplied spark plug spanner.
◆ Assembly is done in the reverse order.
Automatic oil switch-off
The automatic oil switch-off 35 activates if there is too little engine oil and switches the engine off. If this happens, the engine cannot be restarted or switches off again after a short while. A restart is only possible after the oil has been topped up (see section "Oil change, checking the oil level (before each use)").
Preparation for storage
■ Empty the fuel tank⑦ using a petrol suction pump.
■ Start the engine and leave it running until the remaining petrol has been used up.
■ Change the oil after every season. To do this, drain the old engine oil from the warm engine and refill with new oil.
■ Remove the spark plug 26. Use an oil can to fill approx. 20 ml oil in the cylinder. Pull the pull starter 17 slowly so that the oil coats the inside of the cylinder. Screw the spark plug 26 back in.
■ Store the appliance in a well-ventilated location.
Preparation for transport
■ Empty the fuel tank into a suitable container using a petrol suction pump.
If still operational, leave the engine running until the remaining petrol has been used up.
■ Remove the engine oil from the warm engine (as described).
■ Remove the spark plug connector 26 from the spark plug 26.
- Secure the appliance against slipping using securing straps.
Troubleshooting
⚠️ DANGER! RISK OF INJURY DUE TO ACCIDENTAL STARTING OF THE APPLIANCE.
Before working on the appliance, turn the On/Off switch 36 to "OFF" and pull off the spark plug connector 26. RISK OF BURNS! Do not touch the hot exhaust silencer, cylinder or cooling fins.
Engine will not start
| Fault Cause Remedy | ||
| Engine cannot be started | Automatic oil switch-off 35 activated. | Check oil level, add engine oil. |
| Soot deposit on spark plug 26. Clean or replace spark plug . Spark plug gap 0.7-0.9 mm | ||
| No fuel. Add fuel. | ||
Appliance does not generate sufficient pressure
| Fault Remedy | |
| Running speed of the engine too low. Check running speed of the engine | (see technical specifications). |
| Low-pressure nozzle (4) is fitted. Fit high-pressure nozzle ( ). | 4 |
| Nozzle 4 blocked/eroded. Clean/replace nozzle . | 4 |
| Intake filter 31 contaminated. | Clean intake filter 31 |
| Air in the system. | Bleed the appliance (see "Use"). |
| Water supply quantity too low. | Check water supply (see technical specifications). |
| Supply lines to high-pressure pump 39 leaking or blocked. | Check all supply lines to high-pressure pump 39 |
Appliance is leaking, water dripping from under appliance
■ The high-pressure pump ^39 is leaking.
NOTE
▶ Max. permissible is 3 drops per minute. For more serious leaks, have the appliance checked by customer service.
Cleaning agent is not drawn in
| Fault Remedy | |
| High-pressure nozzle (4) is fitted. | Fit low-pressure nozzle (4) |
| Cleaning agent hose 11 leaking or blocked. | Inspect/clean cleaning agent hose 11 |
NOTE
If the fault cannot be remedied, the appliance must be checked by customer service.
This appliance has a 3-year warranty valid from the date of purchase. If this product has any faults, you, the buyer, have certain statutory rights. Your statutory rights are not restricted in any way by the warranty described below.
Warranty conditions
The validity period of the warranty starts from the date of purchase. Please keep your original receipt in a safe place. This document will be required as proof of purchase.
If any material or production fault occurs within three years of the date of purchase of the product, we will either repair or replace the product for you at our discretion. This warranty service is dependent on you presenting the defective appliance and the proof of purchase (receipt) and a short written description of the fault and its time of occurrence.
If the defect is covered by the warranty, your product will either be repaired or replaced by us. The repair or replacement of a product does not signify the beginning of a new warranty period.
Warranty period and statutory claims for defects
The warranty period is not prolonged by repairs effected under the warranty. This also applies to replaced and repaired components. Any damage and defects present at the time of purchase must be reported immediately after unpacking. Repairs carried out after expiry of the warranty period shall be subject to a fee.
Scope of the warranty
This appliance has been manufactured in accordance with strict quality guidelines and inspected meticulously prior to delivery.
The warranty covers material faults or production faults. The warranty does not extend to product parts subject to normal wear and tear or fragile parts such as switches, batteries, baking moulds or parts made of glass.
The warranty does not apply if the product has been damaged, improperly used or improperly maintained. The directions in the operating instructions for the product regarding proper use of the product are to be strictly followed. Uses and actions that are discouraged in the operating instructions or which are warned against must be avoided.
This product is intended solely for private use and not for commercial purposes. The warranty shall be deemed void in cases of misuse or improper handling, use of force and modifications/repairs which have not been carried out by one of our authorised Service centres.
Warranty claim procedure
To ensure quick processing of your case, please observe the following instructions:
- Please have the till receipt and the item number (e.g. IAN 12345) available as proof of purchase.
- You will find the item number on the type plate, an engraving on the front page of the instructions (bottom left), or as a sticker on the rear or bottom of the appliance.
If functional or other defects occur, please contact the service department listed either by telephone or by e-mail.
■ You can return a defective product to us free of charge to the service address that will be provided to you. Ensure that you enclose the proof of purchase (till receipt) and information about what the defect is and when it occurred.
NOTE
For Parkside and Florabest tools, please send us only the defective item without the accessories (e.g. battery, storage case, assembly tools, etc.).

You can download these instructions along with many other manuals, product videos and software on www.lidl-service.com.
Service
GB Service Great Britain
Tel.: 0800 404 7657
E-Mail: kompernass@lidl.co.uk
MT Service Malta
Tel.: 80062230
E-Mail: kompernass@lidl.com.mt
IAN 305750
Importer
Please note that the following address is not the service address. Please use the service address provided in the operating instructions.
KOMPERNASS HANDELS GMBH
BURGSTRASSE 21
DE - 44867 BOCHUM
GERMANY
www.kompernass.com
Disposal

The packaging is made from environmentally friendly material
and can be disposed of at your local recycling plant.
The appliance and its accessories are made from various materials, such as metal and plastic.
Your local community or municipal authorities can provide information on how to dispose of the appliance.
Dispose of the packaging in an environmentally friendly manner.
Note the labelling on the packaging and separate the packaging material components for disposal if necessary. The packaging material is labelled with abbreviations (a) and numbers (b) with the following meanings:
1-7: Plastics,
20-22: Paper and cardboard,
80-98: Composites

Your local community or municipal authorities can provide information on how to dispose of the worn-out product.
Environmental protection
- Carefully empty the petrol and oil tank and dispose of your appliance at a recycling plant. The plastic and metal parts used can be separated and recycled.
■ Dispose of waste oil and petrol at a waste collection centre; do not dump these into the sewerage or drainage system.
■ Dispose of contaminated maintenance material and working materials at a collection point provided for this purpose.
Replacement parts
Ordering replacement parts
The following information should be provided when ordering spare parts:
■ Type of appliance
■ Item number of the appliance
■ Appliance ID number
Current prices and information are available at
www.kompernass.com
NOTE
■ Replacement parts which are not listed can be ordered via our service hotline.
■ Use only spare parts that have been approved by the manufacturer. Original spare parts and accessories offer a better guarantee that the appliance can be operated safely and reliably.
NOTE
▶ Replacement parts can be ordered directly from the service centre. Please provide the following details when making an order: machine type and part number.
Translation of the original Conformity Declaration
We, KOMPERNASS HANDELS GMBH, documents officer: Mr. Semi Uguzlu, BURGSTR. 21, DE - 44867 BOCHUM, GERMANY, hereby declare that this appliance complies with the following standards, normative documents and EC directives:
Machinery directive
(2006/42/EC)
Directives on noise emission
(2000/14/EC)
(2005/88/EC)
Notified body: No. 0036 TÜV SÜD Industrie Service GmbH, Westendstraße 199, 80686 Munich, Germany
Evaluation procedure for conformity as per appendix VI.
Sound power level LWA:
Measured: 106.9 dB (A) - guaranteed: 109 dB (A)
EMC (Electromagnetic Compatibility)
(2014/30/EU)
Directive on exhaust gas emissions
(2016/1628/EU)
(2017/656/EU)
Applied harmonised standards:
EN 60335-1: 2012/A11: 2014
EN 60335-2-79: 2012
EN ISO 12100:2010
EN ISO 14982:2009
Type/appliance designation:
Petrol pressure washer PHDB 4 C3
Year of manufacture: 08 - 2018
Serial number: IAN 305750
Bochum, 26/07/2018

Semi Uguzlu
- Quality Manager -
We reserve the right to technical changes in the context of further product development.
Inhaltsverzeichnis
Einleitung 38
55 Schraubenschlüssel (SW 10/12)
1 x Schraubenschlüssel (SW 10/12)
natural_image
Close-up of a firearm with attached metal bracket and chain (no visible text or symbols)natural_image
Close-up of a mechanical component with no visible text or symbolsGummifüße montieren
natural_image
Close-up of a glossy black object with a small white protrusion at the base (no text or symbols visible)KOMPERNASS HANDELS GMBH
BURGSTRASSE 21
DE - 44867 BOCHUM
GERMANY
www.kompernass.com
Entsorgung

KOMPERNASS HANDELS GMBH
BURGSTRASSE 21
DE - 44867 BOCHUM
DEUTSCHLAND / GERMANY
www.kompernass.com


- IDROPULITRICE AD ALTA PRESSIONE PHDB 4 C3
- IDROPULITRICE AD ALTA PRESSIONE
- Indice
- Introduzione 2
- Smaltimento
- Safety instructions for high-pressure cleaners .... 2 3
- Safety instructions....27
- Safety devices 28
- Before use....28
- Operation....29
- Use 30
- Transport 32
- Storage 32
- Cleaning and maintenance....32
- Troubleshooting....34
- Kompernass Handels GmbH warranty....35
- Service 35
- Importer....35
- Disposal....36
- Replacement parts 36
- Translation of the original Conformity Declaration 36
- PETROL PRESSURE WASHER PHDB 4 C3 Introduction
- Intended use
- Self-priming when using alternative water sources
- DANGER!
- NOTE
- CAUTION! Water quality requirements:
- Residual risks
- CAUTION!
- Features
- Package contents
- Noise emission:
- Wear ear protection to prevent hearing damage!
- WARNING!
- Explanation of the symbols on the appliance!
- Safety instructions for high-pressure cleaners
- Important! Ready the safety instructions carefully before using the appliance for the first time and adhere to it at all times. Store these safety instructions carefully for later use or to pass on to the next owner.
- Hazard levels
- ATTENTION!
- Water connection
- For appliances with a hand-arm vibration value > 2.5 m/s 2 (see technical data)
- Use
- Transport
- Maintenance
- Accessories and spare parts
- High-temperature water and petrol engine appliances
- Safety instructions
- Safety devices
- Relief valve
- Safety valve
- Thermal valve
- Before use
- Fitting the handle
- Fitting the hose holder
- Mount the hose holder
- Fitting the upper spray gun holder on the handle
- Fitting the lower spray gun holder on the tubular frame
- Fitting the wheels
- Fitting the rubber feet
- Fitting the hand spray gun, the jet pipe and the nozzle
- Operation
- Checking the oil level of the engine
- Bleeding the oil tank
- Engine
- Observe the section "Safety instructions"!
- Adding fuel
- ⚠️ DANGER! RISK OF FIRE AND EXPLOSION!
- Drawing water out of a container
- Self-priming from open tanks/containers and natural water sources
- Bleeding the appliance
- DANGER! RISK OF EXPLOSION! DO NOT SPRAY FLAMMABLE LIQUIDS!
- Filling oil/petrol
- Starting the engine
- Turning the engine off
- Starting the appliance
- Setting operating pressure and flow rate
- Changing the nozzle
- Use with a cleaning agent
- Recommended cleaning methods
- After using with a cleaning agent
- Interrupting operation
- Turning off the appliance
- CAUTION! RISK OF INJURY AND DAMAGE!
- Storage
- Frost protection
- CAUTION! RISK OF DAMAGE!
- Drain the water
- Flush the appliance with antifreeze
- Cleaning and maintenance
- ⚠️ DANGER! RISK OF INJURY DUE TO ACCIDENTAL STARTING OF THE APPLIANCE.
- Maintenance intervals
- Every 25 operating hours
- Every 50 operating hours
- Maintenance work
- Changing the engine oil
- Air filter
- Spark plug
- Automatic oil switch-off
- Preparation for storage
- Preparation for transport
- Troubleshooting
- Appliance is leaking, water dripping from under appliance
- Warranty conditions
- Warranty period and statutory claims for defects
- Scope of the warranty
- Warranty claim procedure
- Service
- Importer
- Disposal
- Environmental protection
- Replacement parts
- Ordering replacement parts
- Translation of the original Conformity Declaration
- Applied harmonised standards:
- Inhaltsverzeichnis
- Einleitung 38
- Gummifüße montieren
- Entsorgung
Brand : PARKSIDE
Model : PHDB 4 C3
Category : Uncategorized