L72PDT13E - DVD player Logik - Free user manual and instructions
Find the device manual for free L72PDT13E Logik in PDF.
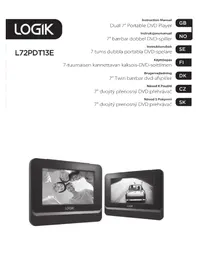


| Product Type | DVD Player |
| Brand | Logik |
| Model | L72PDT13E |
| Dimensions (approx.) | 360 x 230 x 40 mm |
| Weight (approx.) | 1.2 kg |
| Power Supply | AC 100-240V, 50/60Hz |
| Power Consumption | 10 W (typical) |
| Disc Compatibility | DVD, DVD±R/RW, CD, CD-R/RW |
| Video Output | Composite, Component, HDMI (if available) |
| Audio Output | Stereo RCA, Coaxial/Optical digital |
| Playback Features | Pause, Stop, Fast Forward/Rewind, Skip, Repeat, Shuffle |
| Region Code | Region 2 (Europe) or multi-region (check manual) |
| Remote Control | Included |
| Display | LED front panel |
| Care Instructions | Clean with soft dry cloth; avoid liquids; keep vents clear |
| Safety | Do not open; keep away from moisture; use only supplied adapter |
| Spare Parts Availability | Contact Logik support; remote and power cord commonly available |
| Repairability | Laser unit and power supply replaceable by qualified technician |
| General Information | Designed for home entertainment; supports PAL/NTSC |
Frequently Asked Questions - L72PDT13E Logik
User questions about L72PDT13E Logik
0 question about this device. Answer the ones you know or ask your own.
Ask a new question about this device
Download the instructions for your DVD player in PDF format for free! Find your manual L72PDT13E - Logik and take your electronic device back in hand. On this page are published all the documents necessary for the use of your device. L72PDT13E by Logik.
USER MANUAL L72PDT13E Logik
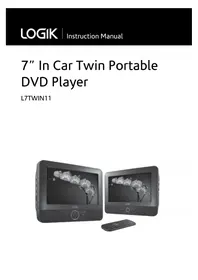
Dual 7" Portable DVD Player
Instruction Manual

Safety Warnings....7
Unpacking....11
Product Overview....12
Front View....12
Rear View....12
Top View 13
Right Side View 13
Remote Control....14
Removing the Insulating Strip from the Remote Control ....15
Battery Replacement for the Remote Control....15
Remote Control Operation Range....16
Using in a Car 17
Using the Car Power Adapter (for in-car use) 17
Mounting in a Car 18
Installation Guide....18
Power Source 19
Mains Power....19
Charging the Battery 20
Connections 20
Using Earphones....20
Using a USB Flash Drive....21
Connecting an Audio Receiver 21
Compatible Disc Types 22
Picture Supported Formats 22
Region Code 22
DVD Playback....23
Basic DVD Playback 23
DVD Playback on both DVD Players....23
Stop Playback....23
Previous and Next....24
Fast Forward and Fast Reverse 24
Pause Playback....24
Info 24
Volume Adjustment....24
All Repeat....24
Audio Channel 25
A-B Repeat....25
Subtitle Language 25
Angle Selection....25
Audio CD, JPEG Picture CD Playback....26
Loading a Disc....26
Playing an Audio CD 26
Playing MPEG4/JPEG Picture CD 27
The Playback Navigator and Settings....28
Program Playback 29
Adding files to the Program List 29
Deleting Files from the Program List 30
To Return to Browser List 30
Customising the Language Settings....31
OSD Language 31
Subtitle 31
MPEG4 Subtitle 31
Audio 31
DVD menu....31
Customising the Video Settings 32
Aspect Ratio 32
TV System 32
Picture Mode 32
Customising the Rating Settings....33
Parental control 33
Customising the Miscellaneous Settings....34
Set Password....34
Maintenance 35
Cleaning the Unit....35
Handling Discs 35
Cleaning Discs....35
Storing Discs....35
Hints and Tips....36
Specifications....38
- Read all the instructions carefully before using the unit and keep them for future reference.
- Retain the manual. If you pass the unit onto a third party make sure to include this manual.
- Check that the voltage marked on the rating label matches your mains voltage.
Damage
- Please inspect the unit for damage after unpacking.
- Do not continue to operate the unit if you are in any doubt about it working normally, or if it is damaged in any way - switch off, withdraw the mains plug and consult your dealer.
Location of Unit
- The unit must be placed on a flat stable surface and should not be subjected to vibrations.
- Do not place the unit on sloped or unstable surfaces as the unit may fall off or tip over.
- The mains socket must be located near the unit and should be easily accessible.
Temperature
- Avoid extreme degrees of temperature, either hot or cold. Place the unit well away from heat sources such as radiators or gas/electric fires.
- Avoid exposure to direct sunlight and other sources of heat.
Naked Flames
- Never place any type of candle or naked flame on the top of or near the unit.
Moisture
- To reduce the risk of fire, electric shock or product damage, do not expose this unit to rain, moisture, dripping or splashing. No objects filled with liquids, such as vases, should be placed on the unit.
- If you spill any liquid into the unit, it can cause serious damage. Switch it off at the mains immediately. Withdraw the mains plug and consult your dealer.
Ventilation
• To prevent the risk of electric shock or fire hazard due to overheating, ensure that curtains and other materials do not obstruct the ventilation vents. - Do not install or place this unit in a bookcase, built-in cabinet or in another confined space. Ensure the unit is well ventilated.
Safety
• Always disconnect the unit from the mains supply before connecting/disconnecting other devices or moving the unit. - Unplug the unit from the mains socket during a lightning storm.
Mains Adapter Cable
- Make sure the unit is not resting on top of the mains adapter cable, as the weight of the unit may damage the cable and create a safety hazard.
Interference
- Do not place the unit on or near appliances which may cause electromagnetic interference. If you do, it may adversely affect the operating performance of the unit, and cause a distorted picture or sound.
Mains Adaptor
- The mains adaptor will continue to draw electricity from the mains supply when plugged in the mains socket. In the interests of safety and to avoid unnecessary energy consumption, never leave the adaptor plugged in the mains socket while unattended for long periods of time. Disconnect the adaptor from the power supply.
Earphones
- Listening to loud sounds for prolonged periods of time may permanently damage your hearing.
- Before putting on earphones, turn the volume down then put the earphones on and slowly increase the volume until you reach a comfortable listening level.
Batteries
- Batteries used in the remote control for this unit are easily swallowed by young children and this is dangerous.
- Keep loose batteries away from young children and make sure that the battery holder tray is secure in the remote control. Seek medical advice if you believe a cell has been swallowed.
- Please dispose of batteries correctly by following the guidance in this manual.
Supervision
• Children should be supervised to ensure that they do not play with the unit and the remote control. - Never let anyone, especially children, push anything into the holes, slots, or any other openings in the case - this could result in a fatal electric shock.
DVD
• Class 1 Laser Product This unit utilizes a laser. Use of controls, adjustments, or performance of procedures other than those specified herein may result in hazardous radiation exposure. - Before moving the unit, ensure the disc tray is empty. • Always remove the disc when the unit is not in use. - Failure to do so will risk severely damaging the disc and the unit. - Do not stack devices; heat from other devices may affect the performance of the unit.

The lightning flash with arrowhead symbol, within an equilateral triangle, is intended to alert the user to the presence of uninsulated "dangerous voltage" within the unit's enclosure that may be of sufficient magnitude to constitute a risk of electric shock.

The exclamation point within an equilateral triangle is intended to alert the user to the presence of important operating and maintenance (servicing) instructions in the manual accompanying the unit.
Service
- To reduce the risk of electric shock, do not remove screws. The unit does not contain any user-serviceable parts. Please leave all maintenance work to qualified personnel.
- Do not open any fixed covers as this may expose dangerous voltages.
Maintenance
CLASS 1 LASER PRODUCT
Thank you for purchasing your new Logik Dual 7" Portable DVD Player.
We recommend that you spend some time reading this instruction manual in order that you fully understand all the operational features it offers. You will also find some hints and tips to help you resolve any issues. Read all the safety instructions carefully before use and keep this instruction manual for future reference.

Unpacking
Remove all items from the packaging. Retain the packaging. If you dispose of it, please do so according to local regulations.
The following items are included:

DVD player x 2, Remote Control (with battery) x 2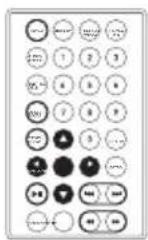
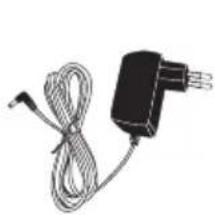
Mains Adapter x 2, Car Adapter x 1


Instruction Manual x 1, Mounting Kit x 2, Quick Start Guide x 2
Front View

- LCD Display
- Remote Control Sensor
- Speakers
Rear View
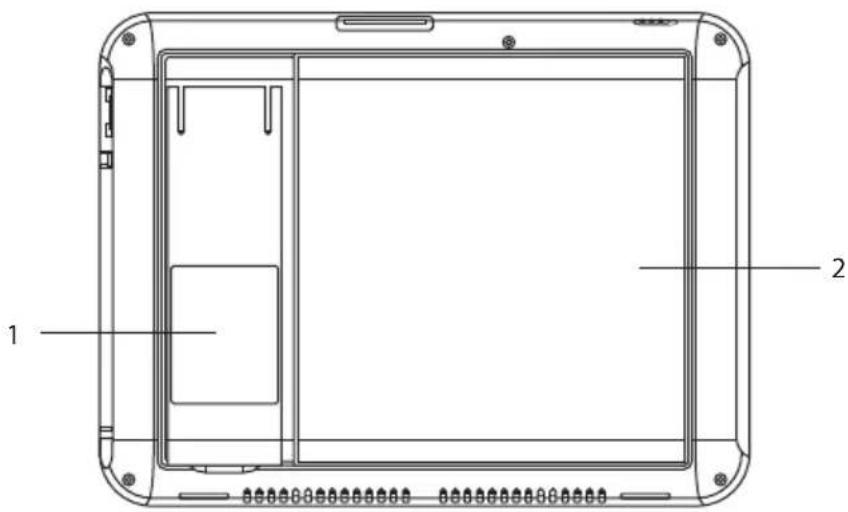
- Stand
- Disc Cover

- OPEN Switch
Slide to open the disc door.
- Buttons
- Navigates Left/Right on the menu screen and adjust certain settings. • Increases or decreases the volume.
- ▲▼ Buttons
Navigates Up/Down on the menu screen and adjusts certain settings.
- Button
Starts/pauses/resumes playback of a disc.
- ■ STOP Button
Stops playing a disc.
- Button
Selects the desired input signal source: DVD/USB.
Right Side View

- USB Socket
Inserts a USB storage device.
- AV OUT Socket
- PHONE Socket
- DC IN 12V Socket
- ON/OFF Switch
- Charging Indicator
1. DISPLAY Button
Displays the disc information during playback.
2. Power Button
Switches the unit between the ON and STANDBY modes.
3. AUDIO/ANGLE Button
- Selects one of the audio soundtracks on a DVD (if more than one is available) or to select the audio output mode on a CD. • Switches between multiple camera angles when the DVD you are playing has been programmed with multiple camera angles.
4. SUBTITLE/TITLE Button
- Selects one of the subtitle languages programmed on a DVD (if available).
- Press and hold to enter the title menu (if available).
5. MENU/ZOOM Button
- Displays the main DVD menu (if available).
- Zoom in/out the display frame.
6. STOP/SLOW Button
- Stops playing a disc.
- Selects slow speed playing and resume normal playback.
7. ◀▶(VOL -/+ ) Buttons
- Navigates Left/Right on the menu screen and adjusts certain settings. • Increases or decreases the volume.
▲▼ Buttons
- Navigates Up/Down on the menu screen and adjust certain settings.
ENTER Buttons
Confirms a selection on the menu screen.
8. ▶II Button
Starts/pauses/resumes playback of a disc.
9. MUTE Button
Silences the unit or restores the sound.
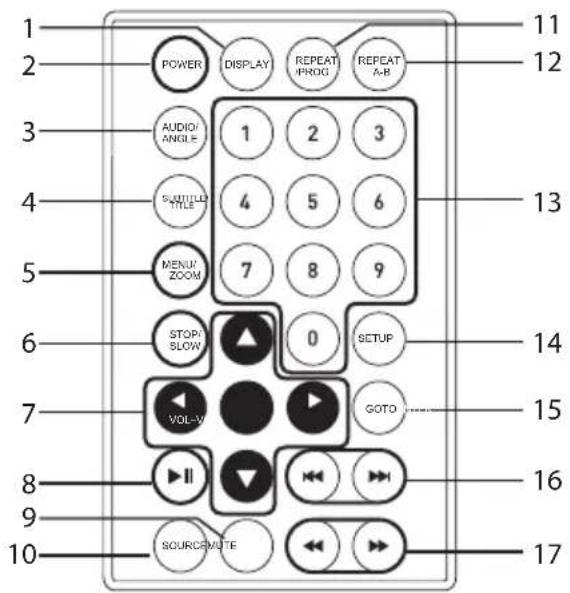
10. SOURCE Button
Selects the desired input signal source: DVD/USB.
11. REPEAT/PROG Button
- Repeat a DVD chapter, title or the entire disc.
- Repeat a CD track or the entire disc.
- Enter the DVD movie program mode (not for CD/USB mode).
12. REPEAT A-B Button
Repeat a segment between A and B on a DVD.
13. Number 0-9 Buttons
Enter parental control password or locate a title/chapter/track.
14. SETUP Button
Enter the setup menu.
15. GOTO Button
Skips to a specific location on a disc.
16. Buttons
• Skips backwards to the previous chapters/tracks/titles on a disc. • Skips forwards to next chapters/tracks/titles on a disc.
17. Buttons
Allows fast reversing/fast forwarding of the current track.

Removing the Insulating Strip from the Remote Control
GB
Remove the insulating mylar strip from the battery if the battery is being used for the first time. It is located at the bottom rear of the remote control.
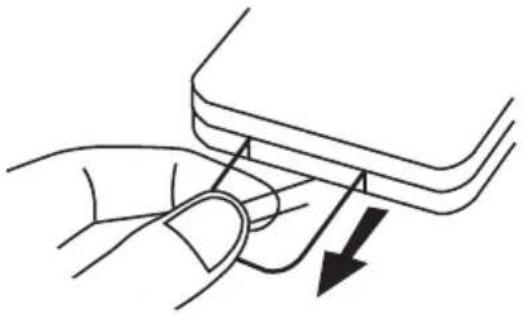

Battery Replacement for the Remote Control
The remote control requires a CR2025, 3V Lithium battery.
- Slide and hold the battery release tab in the direction of the arrow.
- Pull out the battery holder and remove the old battery.
- Replace with a new battery.
- Insert the battery holder back into the remote control.
![graph TD A["Rectangular Component"] --> B["Internal Components"] B --> C["Battery-like Device with Battery"]](/content/2026/05/759204/images/21b9225b2419342ba7ecbf389a61996115cf55ff747e6ffba90826b6de685651.jpg)
Handling the Battery
- Improper or incorrect use of batteries may cause corrosion or battery leakage, which could cause fire, personal injury or damage to property.
- Install the battery correctly in the battery compartment. Normally the battery's positive polarity (+) will face up.
- When the battery is exhausted, the remote control will not function.
- Only use the battery type indicated in this manual.
- Do not dispose of the used battery as domestic waste. Dispose of it in accordance with local regulations.
- Small button cell batteries such as the one used in the remote control are easily swallowed by young children and this is dangerous. Keep loose button cells away from young children and make sure that the battery is secure in the remote control. Seek medical advice if you believe a battery cell has been swallowed.
Handling the Remote Control
- If you are finding it difficult to remove the battery, use a paperclip to slide the battery tab.
- Do not drop the remote control.
- Do not allow anything to impact the remote control.
- Do not spill water or liquid on the remote control.
- Do not place the remote control on a wet object.
- Do not place the remote control under direct sunlight or near sources of excessive heat.
- Remove the battery from the remote control when not in use for a long period of time, as corrosion or battery leakage may occur and result in physical injury, and/or property damage, and/or fire.

Remote Control Operation Range
- The remote control sensor on the front unit is sensitive to the remote control's commands up to a maximum of 5 metres away and within a maximum of a 60° arc.
- Please note that the operating distance may vary depending on the brightness of the room.

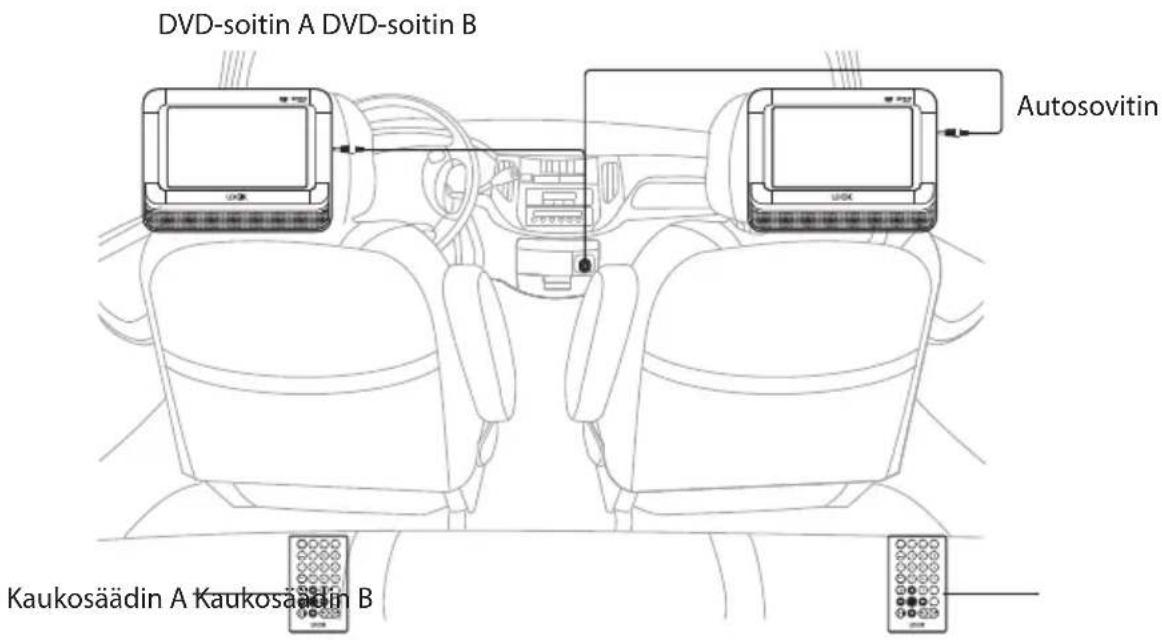
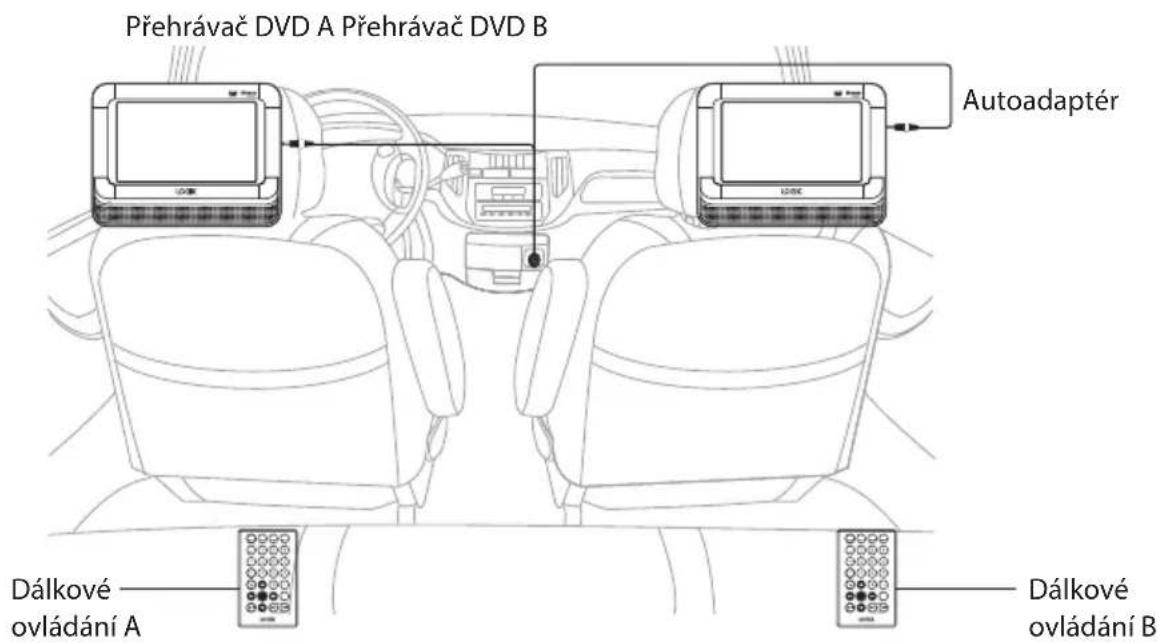
Using the Car Power Adapter (for in-car use)
The included 12V car power adapter is designed for use with vehicles that have a 12V electrical system.


- Only use the 12V car power adapter provided with the unit. Do not use in 24V vehicles. Other car adapters could damage the unit, or even your vehicle.
- Only use the included 12V car power adapter. Do not use it with any other equipment.
- In the interest of traffic safety, drivers should not operate the unit or view videos while driving.
- When the inside of the 12V car socket is dirty with ash or dust, the plug section may become hot due to poor contact. Be sure to clean the 12V car socket before use.
- After use, disconnect the 12V car power adapter from both the unit and cigarette lighter socket.
- If the unit is not properly attached to a vehicle, it may become airborne in the event of an accident and cause damage, injury, or death.
- Check your local traffic laws for rules governing the use of video devices in vehicles.
Mounting in a Car
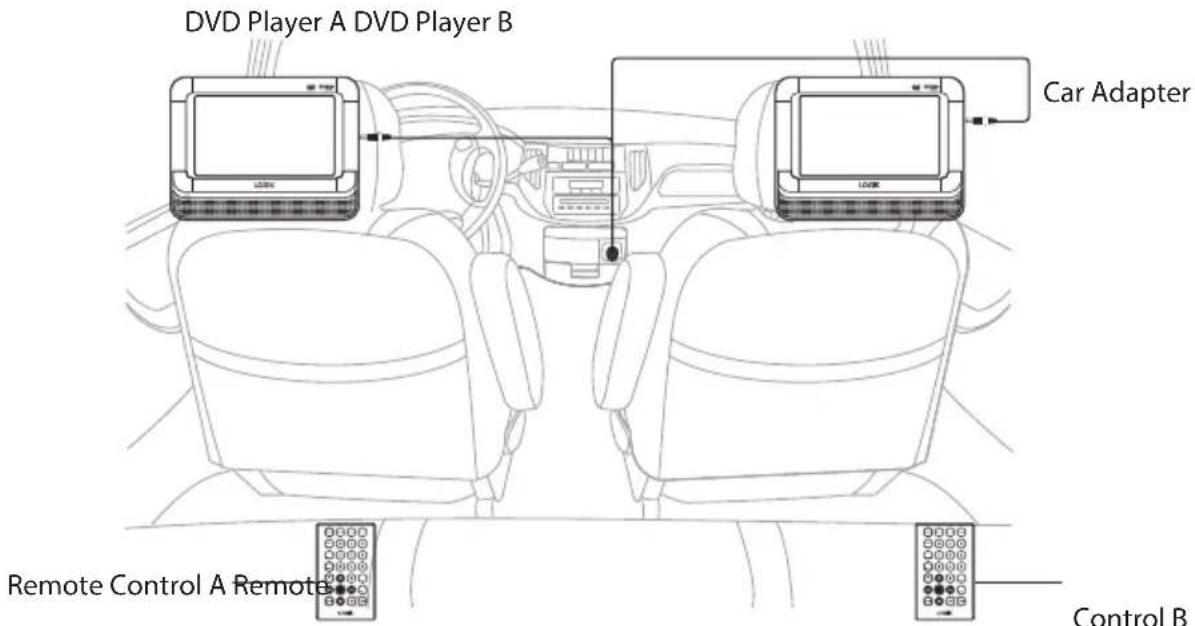
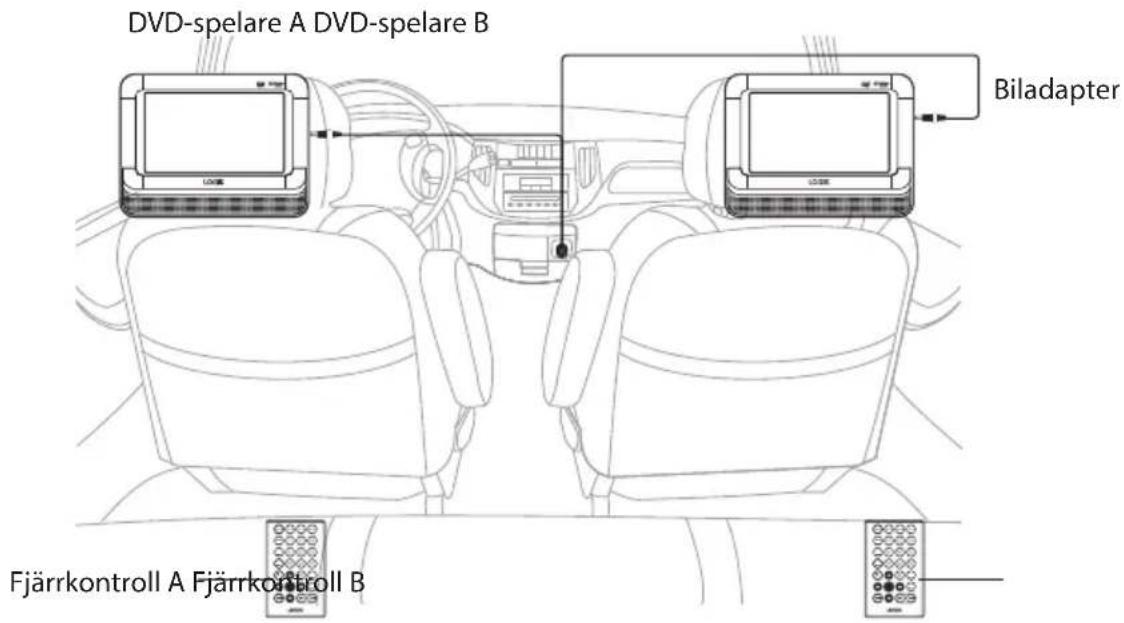
Use the supplied mounting kit to install the DVD Players on the back of the vehicle's headrests. Tightly wrap the mounting strap around the headrest.
- Insert DVD Players into a designed bags.
- Thread the mounting kit's strap ends through the strap eyelets.

- Loop the straps around the headrest, with the DVD Player facing the rear seat, then fasten the straps with the clip.

Always remember to lock the clips and tighten the straps to ensure the safety of your passengers.

Installation Guide
Mains Power
- This unit operates with a DC 12V mains adapter (included).
- Connecting the unit to any other power source may cause damage to the unit. Unwind the mains adapter to its full length. Connect the mains adapter's DC plug to DC IN socket on the unit then connect the mains adapter to the mains socket, as shown below. Make sure the mains adapter is fully inserted into the mains socket. The unit is now connected and ready to use.
- To switch the unit off completely, unplug the mains adapter from the mains socket.
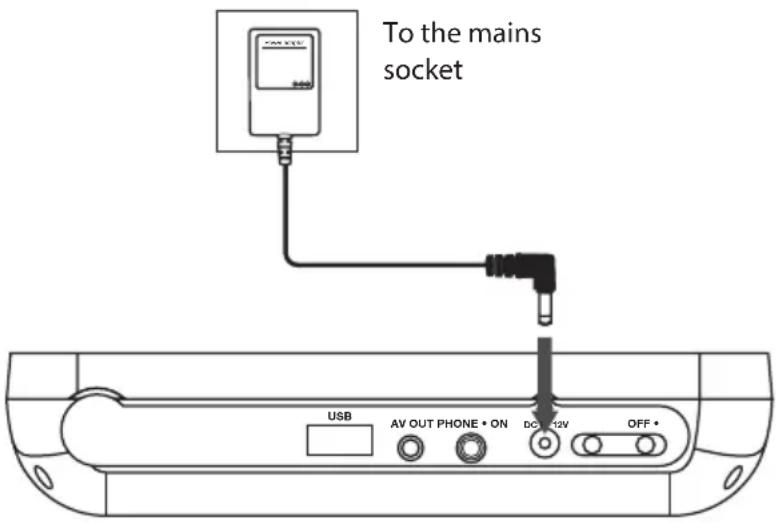
Right side of the DVD Player

- Turn off the unit before unplugging the mains adapter from the unit to avoid damaging the unit.
- When the unit is not going to be used for a long period of time, disconnect the mains adapter from the mains socket.
- The mains socket must be located near the unit and should be easily accessible. If a malfunction occurs, disconnect the plug from the mains socket at once.
- When the mains adapter is plugged in, the unit is not completely disconnected from the main power source, even when the unit is turned off.
Charging the Battery
- Connect with mains adapter or car power adapter.
- The charging indicator lights up red indicating that the battery is in charging mode. When the battery is charged to full capacity, the LED indicator goes green.
- Remove the mains adapter. The battery is now fully charged and the unit is ready to use.
* Battery Operation time from fully charged battery = Approx. 2 hours

- The battery is partially charged at shipment. We suggest that for first time use fully charge the battery. It may take up to 4 hours to fully charge the battery.
- Every time you see the low battery ( [ ] ) indication on the screen, you must connect your mains adapter to the unit and the mains socket. The battery will now start to recharge.
- The battery will charge slower when the DVD player is in use.
- It is recommended to turn off the power while the battery is charging.

Connections
Using Earphones
Turn down the volume before connecting the earphones. Slowly raise the volume with the earphones on until you reach your desired volume. When earphones are connected, the speaker is automatically disabled.

Earphones (not included)

Avoid excessive volume levels and listening to sound for a long period of time when using headphones, as this may impair your hearing.
Using a USB Flash Drive
You can play music or view JPEG files from USB flash drives.
- Connect the USB flash drive directly to the USB Slot on the unit.
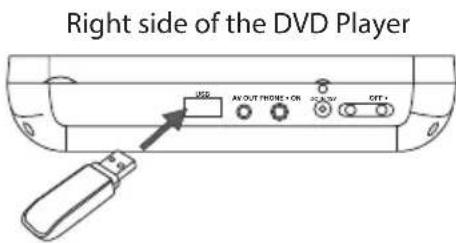
- In STOP mode, press the button on the unit or the SOURCE button on the remote control. Press the buttons on the unit or the remote control to select "USB" and then press the button on the unit or press the ENTER button on the remote control to access the data in the drive.
- Use the ▲▼ buttons on the unit or the remote control to select a desired file and then press the ▶ button on the unit or press the ENTER button on the remote control to start playback.
To remove the USB drive, press the ■ button on the unit or the STOP/SLOW button on the remote control to stop playback. Remove the USB flash drive, the unit will then automatically return to disc mode.
Connecting an Audio Receiver
For better sound quality, you may not want to play a DVD audio through your audio receiver.

| Disc Types Disc Logo Recorded Content | ||
| DVD-VIDEO (Digital Versatile Disc) |  | AUDIO + VIDEO |
| DVD±RW (Audio/Video format or JPEG files) |  | AUDIO + VIDEO + JPEG |
| DVD±R (DVD Recordable - Audio/Video format or JPEG files) |  | AUDIO + VIDEO + JPEG |
| CD-R (CD Recordable - Audio/Video format or JPEG files) |  | AUDIO + VIDEO + JPEG |
| CD-RW (CD-Rewritable - Audio/Video format or JPEG files) |  | AUDIO + VIDEO + JPEG |
| AUDIO-CD (Compact Disc Digital Audio) |  | AUDIO |
Picture Supported Formats
JPEG
• The file extensions must be .jpg and not .jpeg - Pictures encoding must comply with JPEG/ISO format.

- Only finalised discs of DVD-R and DVD-RW multi-border are supported.
- Both finalised and un-finalised discs of DVD+R and DVD+RW multi-border are not supported.
- Some recorded files may not be able to be played due to the type and format of disc or condition of the recording.
Region Code
Both the DVD player and the discs are coded by region. These regional codes must match in order to play the disc. If the codes do not match, the disc will not play.
The Region Number for this DVD player is described on the bottom of the DVD player.
| Disc Type DVD-VIDEO | |
| Region code |  ___ ___ |

Ensure that the screen protection film is removed before use.
This instruction manual explains the basic instructions for operating this unit. Some DVDs are produced in a manner that allows for specific or limited operation during playback. Therefore, this unit may not respond to all operating commands. This is not a defect.
Please refer to the instructions accompanying the specific DVD in question for more information about the options available on that DVD.
"①" may appear on the screen during operation. A "②" means that the desired operation is not permitted by the unit or disc.
Basic DVD Playback
- Slide the ON/OFF switch to the ON position.
- Slide the OPEN switch to open the disc cover.
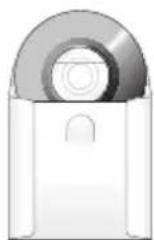
- Hold the disc by its sides and carefully place it onto the disc holder with the label side facing up. Gently push the disc down until you hear a "click".
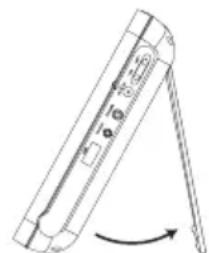
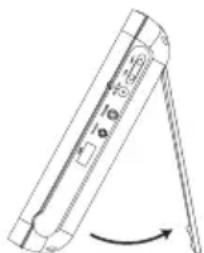
- Close the disc cover. Use the stand located at the rear of the unit or hold the DVD player in your hands (be careful not to touch the unit's disc door). The unit starts playback if the disc does not have any menus recorded on it. If the disc has one or more titles recorded on it, a menu screen will appear on the screen.
- To play a title, press the ◀▲▼► / 0-9 buttons on the remote control to highlight the title and then press the ►II button on the unit or the remote control.


DVD Playback on both DVD Players
To playback DVD movies on both DVD Player A and DVD Player B, two DVDs are required. One DVD must be inserted in DVD Player A, and one DVD must be inserted in DVD Player B.

It is recommended that the DVD Player being viewed is directly connected to the mains.
Stop Playback
- Press the ■ button on the unit or the STOP/SLOW button on the remote control to go to pre-stop mode, the TV screen will display "■STOP". With some discs, the unit can recall the stopped location, such as on DVDs.
- Press the ▶II button on the unit or the remote control to resume playback from the location where playback was stopped or from the beginning of the disc.
- Press the ■ button on the unit or the STOP/SLOW button on the remote control twice to stop completely.
Previous and Next
- During playing, press the button on the unit or the button on the remote control to go back to the start of the previous chapter. Each press of this button will skip a chapter until the start of the disc.
- Each press of the ▼ button on the unit or the ▶ button on the remote control during playing will skip the current chapter and play the next one.
Fast Forward and Fast Reverse
- Press the buttons on the remote control to fast reverse / fast forward through the disc. Each time the buttons on the remote control are pressed, the fast reverse / fast forward motion speed changes. There are 4 levels of speed available: x2, x4, x8 and x16.
- Press the ▶II button on the unit or the remote control to resume normal playback.
Pause Playback
- Press the button on the unit or the remote control to pause playback (still mode). The sound will be muted during still mode.
- Press the ▶II button again to resume normal playback.
Info
While playing the disc, press the DISPLAY button on the remote control to go to the information menu if this function is available on the disc.
Volume Adjustment
- Press the ◀/VOL- or ▶/VOL+ button on the remote control to adjust the volume on the unit.
- Press the MUTE button on the remote control to switch the sound off, the player will display "✗". Press the MUTE button on the remote control again.
All Repeat
Press the REPEAT/PROG button on the remote control repeatedly to select different repeat modes.
| Menu Description | |
| First Press Repeat Chapter | |
| Second Press Repeat Title | |
| Third Press Repeat off |
Audio Channel
Press the AUDIO/ANGLE button on the remote control repeatedly to select different audio languages.
A-B Repeat
Repeat a section between points A and B within a Title / Chapter / Track.
- Press the REPEAT A-B button to choose a starting point A.
- Press the REPEAT A-B button again to set an ending point B and complete the setting. The selected section A-B will be repeated.
- Press the REPEAT A-B button the third time to cancel and exit, the RepAB OFF will display on the screen.
Subtitle Language
Press the SUBTITLE/TITLE button on the remote control repeatedly to switch between different subtitle languages that are available on the disc.
Angle Selection
Some DVDs contain scenes which have been shot from a number of different angles. For these discs, the same scene can be viewed from each of these different angles.
- While you are playing a DVD with different angles recorded, press and hold the AUDIO/ANGLE button on the remote control to view the number of current angles available.
- Press and hold the AUDIO/ANGLE button on the remote control button repeatedly to change the scene to the next recorded angle.
• After approximately two seconds, playback will continue from the new angle you selected.
- If no button is pressed within 10 seconds, playback continues without changing the current angle.

- This function can only be used for discs on which scenes shot from multiple angles have been recorded.
- If only one angle is recorded, 1/1 is displayed.
Loading a Disc
- Slide the ON/OFF switch to the ON position.
- Slide the OPEN switch to open the disc cover.
- Hold the disc by its sides and carefully place it onto the disc holder with the label side facing up. Gently push the disc down until you hear a "click" sound.
- Close the disc cover. Use the stand located at the rear of the unit or hold the DVD player in your hands (be careful not to touch the unit's disc door).
Playing an Audio CD
- Press the buttons on the unit or the remote control to highlight an audio track file and then press the button on the unit or the remote control to playback.
- If the files are inside a folder, press the ▶II button on the unit or the ▶ button on the remote control to enter into the folder.

- Press the ▲ button on the unit or the remote control repeatedly to select the Root folder and then press the button on the unit or the ENTER button on the remote control to return to the upper menu.
- To stop playback, press the ■ button on the unit or the STOP/SLOW button on the remote control.
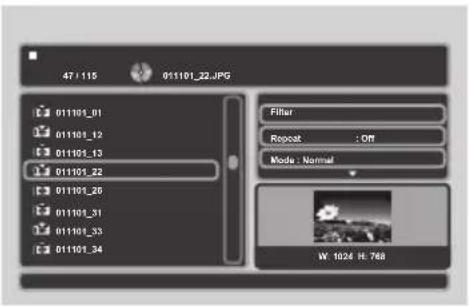
- Press the buttons on the unit or the remote control to highlight a MPEG/JPEG file and then press the button on the unit or the ENTER button on the remote control to slide show the picture or playback the MPEG4 video.
- If the files are inside a folder, select the folder and then press the ▶II button on the unit or the ENTER button on the remote control to enter into the folder.
- In stop mode, press the ▲ button on the unit or the remote control to select the Root folder and then press the ▶II button on the unit or the ENTER button on the remote control to return to the upper level.
- To play the MPEG4 file or slideshow the picture, press the ▶II button on the unit or the ENTER button on the remote control.

- Press the ◀▶ buttons on the unit or the ◀▶ (VOL -/+) buttons on the remote control to rotate the photo by 90°/180°/270° clockwise or anti-clockwise during photo playback, or to fast backward or forward during MPEG4 playback.
- All rotation effects will be cancelled after exiting the slideshow mode.
- Press the ■ button on the unit or the STOP/SLOW button on the remote control to return to the playlist browser.
The Playback Navigator and Settings
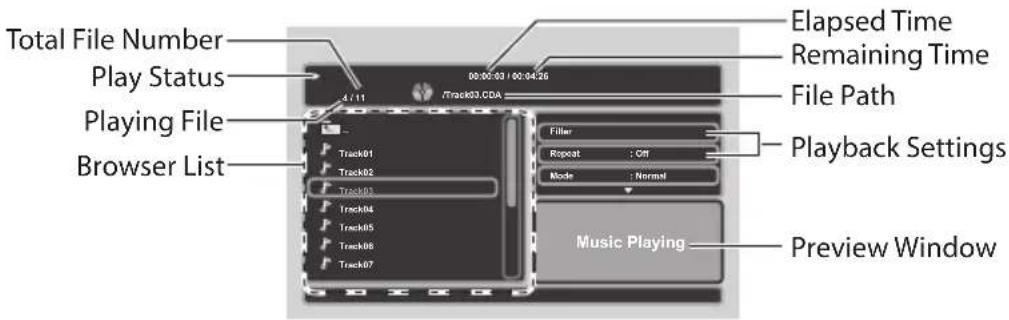
- In stop mode, press the ▶ button on the unit or the ▶ /VOL + button on the remote control to enter the right screen of the playback settings of the navigator.
- Press the ▲▼ buttons on the unit or the remote control to select the items. Always confirm by pressing the ▶II button on the unit or the ENTER button on the remote control.
- For Filter setting, press the ▶II button on the unit or the ENTER button on the remote control to bring up the drop-down menu, and press the ▶ buttons on the unit or the remote control to select an option, then press the ▶ button on the unit or the ENTER button on the remote control.
| Menu Options Description | ||
| Filter | Audio, Photo, Video | Allows you to sort the file format displayed in the browser list.The filter settings will sort out the file types being displayed in the Browser list on the left screen of the navigator.To leave the settings, press thebutton on the unit or theVOL- button on the remote control. |
| Repeat Off, Single, Folder• To set the repeat mode of the playing files. | ||
| Mode Normal, Shuffle, Music Intro | To set the file playing sequence in the Disc mode.Music Intro mode to playback the start of every song. Just like browsing the music list on the Disc. | |
| Edit Mode— | Allow you to select the files to be programmed in the program list.Refer to “Program playback” section on the next page. | |
| Program View | Program view, Browser view | Switch to view all files in the current directory or the selected files in the program list.Refer to “Program playback” section on the next page. |
| Add to Program | Add to program, Clear program | Add or delete the selected files in the program list.Refer to “Program playback” section on the next page. |
* In Audio CD mode, the browser will hide the "Filter" function in Repeat mode.

Make sure the playback is stopped completely before using these settings.
Adding files to the Program List
- Press the ■ button on the unit or the STOP/SLOW button on the remote control twice to completely stop playback.
- Press the ▶ button on the unit or the ▶ / VOL + button on the remote control to enter the right screen of the navigator.
- Press the ▲▼ buttons on the unit or the remote control to select Edit mode, then press the ▶ button on the unit or the ENTER button on the remote control to highlight the Edit mode.
- To leave the Edit mode, press the ▶II button on the unit or the ENTER button on the remote control again to cancel the highlight.

- Press the ◀ button on the unit or the ◀/ VOL - button on the remote control to enter the left screen. Press the ▲▼ buttons on the unit or the remote control to select a file in the preview list, then press the ▶II button on the unit or the ENTER button on the remote control to tick the file.
- Press the ▶II button on the unit or the ENTER button on the remote control again to cancel the tick.
- Press the ▲▼ buttons on the unit or the remote control to select another file and press the ▶ button on the unit or the ENTER button on the remote control repeatedly to tick more files.
- Press the ▶ button on the unit or the ▶ / VOL + button on the remote control to enter the right screen, then press the ▶ buttons on the unit or the remote control to select Add to program and then press the ▶ II button on the unit or the ENTER button on the remote control to confirm. Now the ticked files have been programmed in the Program view, you can press the ▶ buttons on the unit or the remote control to select Program view and then press the ▶ II button on the unit or the ENTER button on the remote control to view the ticked files in Browser view.
- Press the ▲ buttons on the unit or the remote control to select Edit mode, then press the ▶ button on the unit or the ENTER button on the remote control to leave the Edit mode.
- Press the ◀ button on the unit or the ◀/VOL - button on the remote control to enter the left screen. Then press the ▲ buttons on the unit or the remote control to select a file you want to play from the Preview list.
- Press the ▶II button on the unit or the remote control to play the file.
Deleting Files from the Program List
- Repeat steps 1, 2 and 3 as described in "Adding files to the Program List" section.
- Press the ◀ button on the unit or the ◀ / VOL - button on the remote control to enter the left screen in Program view. Press the ▼ buttons on the unit or the remote control to select a file you want to delete, and then press the ▶ button on the unit or the ENTER button on the remote control to tick the file.

- Press the ▶ button on the unit or the ▶ / VOL + button on the remote control to enter the right screen, then press the ▶ buttons on the unit or the remote control to select Clear program to delete the ticked files in Program view.
To Return to Browser List
- Press the ▲ buttons on the unit or the remote control to select the Browser view, then press the ▶ button on the unit or the ENTER button on the remote control to change from "Browser view" to "Program view".

- The "Browser view" will display all the tracks available on the disc.
- The "Program view" will display all the selected track after programming.

- Press the ▲▼ buttons on the unit or the remote control to select Edit mode, then press the ▶II button on the unit or the ENTER button on the remote control to leave Edit mode.
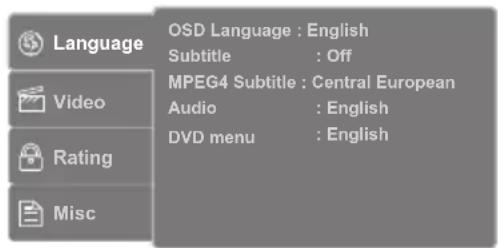
- Press the SETUP button on the remote control to display the system setup menu.
- Press the ▲ buttons on the unit or the remote control to select Language and then press the ▶ button on the unit or the ▶ / VOL + button on the remote control.
- Press the ▲ buttons on the unit or the remote control to select OSD Language / Subtitle / MPEG4 Subtitle / Audio / DVD menu and then press the ▶ button on the unit or the ENTER button on the remote control.
- Press the ▲ buttons on the unit or the remote control to select an option, then press the ▶II button on the unit or the ENTER button on the remote control to confirm.
- Press the SETUP button on the remote control to exit the menu.
OSD Language
Select the system display language.
Subtitle
Turn on/off the subtitle feature of the disc.
MPEG4 Subtitle
Select the different MPEG4 subtitle language you wish to play on the screen. If the selected language is not recorded on the disc, the player will play the top-priority language of the disc.
Audio
Select the default soundtrack you wish to play if your DVD supports multi-language sound tracks.
DVD menu
Select the default DVD menu language you wish to play on the screen. If the selected language is not recorded on the disc, the player will play the top-priority language of the disc.
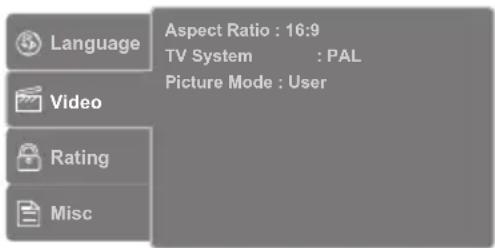
- Press the SETUP button on the remote control to display the system setup menu.
- Press the buttons on the unit or the remote control to select Video and then press the button on the unit or the VOL + button on the remote control.
- Press the buttons on the unit or the remote control to select Aspect Ratio / TV System / Picture Mode and then press the button on the unit or the ENTER button on the remote control.
- Press the buttons on the unit or the remote control to select an option, then press the button on the unit or the ENTER button on the remote control to confirm.
- Press the SETUP button on the remote control to exit the menu.
Aspect Ratio
Select the aspect ratio of the viewing screen (both internal display or external display) if the disc has more than one aspect ratio (4:3LB / 4:3PS / 16:9).
4:3: Select "Aspect Ratio: 4:3" for outputting 4:3 ratio video for a conventional size TV. Black bands might appear on the screen if playing a non 4:3 video. 16:9: Select "Aspect Ratio: 16:9" for outputting 16:9 ratio video for a widescreen TV. Black bands might appear on the screen if playing a non 16:9 video.
TV System
Select the TV playing system according to the local TV system (NTSC/PAL/Auto).
Picture Mode
Picture Mode setting allows user to adjust the picture's brightness (Standard / Bright / Soft / User).
Parental control
- Press the SETUP button on the remote control to display the system setup menu.
- Press the ▲ buttons on the unit or the remote control to select Rating and then press the ▶ button on the unit or the ▶/VOL + button on the remote control.
- Press the ▲ buttons on the unit or the remote control to select Parental control and then press the ▶ button on the unit or the ENTER button on the remote control. A password screen will appear.
- Press the 0-9 buttons on the remote control to input the old password (The factory pre-set password is "6666" for the first time setup) and then press the ▶ II button on the unit or the ENTER button on the remote control.
- Press the ▶II button on the unit or the ENTER button on the remote control to select Parental control again for Parent lock levels selection.
The parental lock levels are equivalent to the following ratings:
- Kid Safe: Kid safe.
- G: General audience; recommended as acceptable for viewers of all ages.
- PG: Parental Guidance suggested.
- PG 13: Material is unsuitable for children under the age of 13.
- PG R: Parental Guidance-restricted; recommended that parents restrict children under the age of 17 from viewing or allow children to view only when supervised by a parent or adult guardian.
- R: Restricted, children under 17 should not view unless supervised by a parent or adult guardian.
- NC 17: No children under the age of 17, not recommended viewing for children under age 17.
- Adult: Adult only.
- Press the ▶II button on the unit or the ENTER button on the remote control to confirm. (Rating 1 has the most restrictions while rating 8 can virtually playback all DVD's.)
- Press the SETUP button on the remote control to exit the menu.
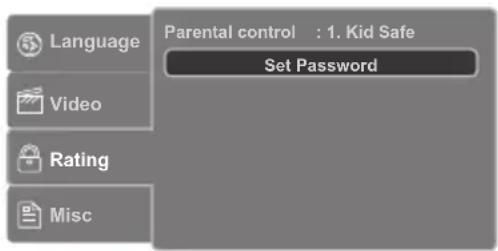
Set Password
- Press the SETUP button on the remote control to display the system setup menu.
- Press the buttons on the unit or the remote control to select Rating and then press the button on the unit or the VOL + button on the remote control.
- Press the buttons on the unit or the remote control to select Set Password.
- Press the 0-9 buttons on the remote control to input the old password (The factory pre-set password is "6666" for the first time setup) and then press the button on the unit or the ENTER button on the remote control to confirm. If you input the wrong password, the screen will show Incorrect Password.
- Press the ▶II button on the unit or the ENTER button on the remote control again, then press the 0-9 buttons on the remote control to input the new password. Press the ▶II button on the unit or the ENTER button on the remote control to confirm.
- Enter the new password again to verify. After verified, the screen will show Set Password Successful.
- Press the SETUP button on the remote control to exit the menu.


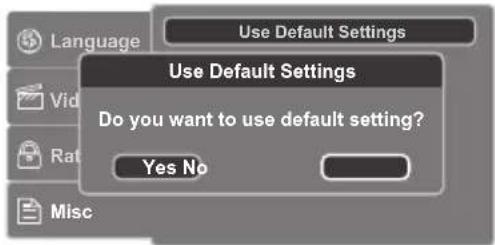
Customising the Miscellaneous Settings
- Press the SETUP button on the remote control to display the system setup menu.
- Press the buttons on the unit or the remote control to select Misc and then press the button on the unit or the ▶ / VOL + button on the remote control.
- Select "Use default Setting" and then press the ▶II button on the unit or the ENTER button on the remote control.
- Press the buttons on the unit or the (VOL -/+) buttons on the remote control to select "Yes" to reset all your settings to the factory's default except your own password, then press the button on the unit or the ENTER button on the remote control to confirm.
- Press the SETUP button on the remote control to exit the menu.

Cleaning the Unit

Ensure the unit is fully unplugged from the mains socket before cleaning.
• To clean the unit, wipe the case with a slightly moist, lint-free cloth. - Do not use any cleaning fluids containing alcohol, ammonia or abrasives. - Do not spray aerosol at or near the unit.
Handling Discs

- Do not touch the playback side of the disc.
- Do not attach paper or tape to the disc.
Cleaning Discs
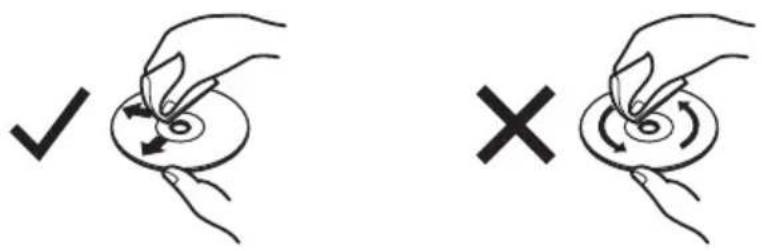
- Fingerprints and dust on the disc cause picture and sound deterioration. Wipe the disc from the centre outwards with a soft cloth. Always keep the disc clean.
- If you cannot wipe off the dust with a soft cloth, wipe the disc lightly with a slightly moistened cloth and finish with a dry cloth.
- Do not use any type of solvent such as thinner, benzine, commercially available cleaners or antistatic spray. They may damage the disc.
Storing Discs
- Do not store discs in places subjected to direct sunlight or near heat sources.
- Do not store discs in places subjected to moisture and dust such as a bathroom or near a humidifier.
- Storing discs vertically in a case, stacking discs or placing objects on discs outside of their cases may cause warping.
If a problem does occur, it may often be due to something very minor. The following table contains various tips.
| Menu Description | |
| No power. • Ensure the mains adapter is connected.• Make sure that the unit is turned on.• Make sure that you select ON mode.• Make sure the battery is charged up on the DVD player. | |
| The remote control does not function. | • Use the remote control near the unit.• Point the remote control at the remote sensor on the unit.• Replace the battery in the remote control with a new one.• Make sure the plastic sheet has been removed from the remote control.• Remove any obstacles between the remote control and the unit. |
| Very little or no sound is coming from a DVD. | • Make sure the unit is not paused. Press the ▶II button on the unit or the remote control.• Make sure the unit is not in fast-forward or fast-reverse mode. Press the ▶button on the unit or the remote control.• Make sure the AUDIO/VIDEO input/output connections are correct.• This unit does not support DTS audio decoding system. Press theAUDIO/ANGLEbutton on the remote control to change the audio setting to 2-Channel Analogue mode.• The unit has overheated. Shut it off for 30 minutes to allow it to cool down.• The volume control is too low. Increase the volume. |
No picture. • The region number of the disc doesn’t match the region number of this unit. | |
| The picture is not clear. | • The DVD is dirty. Gently clean the disc.• The disc is scratched.• Please adjust the LCD display brightness (see Video setting on page 29). |
| Loud hum or noise is heard. | • The plugs and sockets are dirty. Wipe them with a cloth slightly moistened with alcohol.• Clean the disc.• The disc is scratched or the file is corrupt. |
| The disc does not play. | There is no disc inside the unit ("No Disc" appears on the screen).Insert the disc correctly with the graphics facing up.Clean the disc.A non-valid disc has been inserted, or the disc region number does not match the region number of the unit.Condensation may have formed inside the unit due to a sudden change in temperature. Wait about an hour for it to clear and try again. |
| File from Media storage device does not play | Check the file format.This product do not support NTFS File system. |
| The unit does not respond when pressing any buttons | The unit may freeze up during use. Switch the unit off and then on again to reset the unit. |
| Model L72PDT13E | |
| Disc Format DVD+/-R, DVD+/-RW, CD, CD-R, CD-RW, JPEG Picture CD | |
| Video System PAL, NTSC | |
| Video Decompression MPEG-2, MPEG4 (maximum resolution 720x525@25/30fps) | |
| LCD Screen 7" LED Panel | |
| Audio:Audio CharacteristicDolby Digital Decoding | 2-Channel AnalogueYes |
| Speaker 2 Built-in stereo speaker | |
| Terminals: USB 2.0 x 1 (maximum 8GB),AV OUT Socket x 1, Headphone Socket x 1 | |
| Power Adapter:Power SupplyPower Consumption | AC 100-240V 50/60Hz (Mains Adapter)Max. 15W |
| Remote Control Infra-red with one CR2025 (3V) battery | |
| Battery Capacity 1300 mah re-chargable battery | |
| Battery Operation Time Approx. 2 hours | |
| Weight: 0.6 kg | |
| Dimensions: | 212 mm (W) x 35 mm (D) x 160 mm (H) |
Features and specifications are subject to change without prior notice.
DVD player x 2
Remote control (with battery) x 2

Power adapter x 2 Car adapter x 1
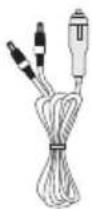
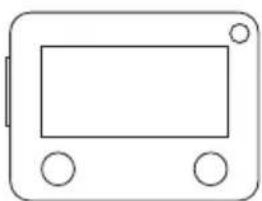


User manual x 1 Mounting kit x 2 Quick start guide x 2
NO

Product overview
Front view

4. DC INN connector for 12 V DC
5. ON/OFF switch
6. Charging indicator
NO
Remote control
1. VIS button

Replacing the battery in the remote control
The remote control requires a 3 V lithium battery of type CR2025.
Handle the battery

open to standing
DVD player x 2


User manual x 1, Mounting kit x 2, Quick start guide x 2
Front view

11. REPEAT/PROG button

Battery replacement in the remote control
Handle the battery
Installation guide


FI
![graph TD A["Rectangular Component"] --> B["Internal Components"] B --> C["Battery-like Package with Battery"] C --> D["Final Battery package"]](/content/2026/05/759204/images/560ffb92e74d4272af0adad5b23c3ab48d764b59986a03b43a371114c8106469.jpg)
Installation guide
open to stand
DVD player x 2 Remote control (with battery) x 2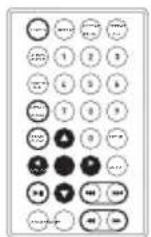

Power adapter x 2 Auto adapter x 1


DK
![graph TD A["Rectangular Component"] --> B["Internal Components"] B --> C["Battery-like Component with Battery symbol"]](/content/2026/05/759204/images/4f0d46372bdcc738364c7e1e1ea667ef9ddffd9e2b4589069825948569be9518.jpg)

open so it stands
DVD player x 2


CZ
![graph TD A["Rectangular Component"] --> B["Internal Components"] B --> C["Device with Battery"] C --> D["Cell with Battery"] D --> E["Cell with Battery"]](/content/2026/05/759204/images/979b4b53a65f9511d23f3dd0a8e83c509d839952875b2f961c46379d2a7dc3ad.jpg)
Handling the battery
Installation guide

open stand
DVD player, 2 pcs

![graph TD A["Rectangular case with internal connector"] --> B["Device with battery"] B --> C["Cell with coin symbol"] C --> D["Battery-like package with internal contacts"]](/content/2026/05/759204/images/d9e9648d2efe2f7e67cc69187193cba9fb4790f8d588ec45de170ae285ed3fc3.jpg)

- Fingerprints and dust on the disc degrade the quality of the picture and sound. Wipe the disc with a soft cloth from the center toward the edges. Always keep the disc clean.
- If dust cannot be removed with a soft cloth, wipe the disc lightly with a slightly damp cloth and finish with a dry cloth.
- Do not use any solvents such as thinner, benzine, commercially available cleaning agents, or antistatic spray. These chemicals may damage the disc.
Storing discs
This symbol on the product or in the instructions means that your electrical and electronic equipment should be disposed at the end of its life separately from your household waste. There are separate collection systems for recycling in the EU. For more information, please contact the local authority or your retailer where you purchased the product.
Rovi Proprietary Rights
This item incorporates copy protection technology that is protected by U.S. patents and other intellectual property rights of Rovi Corporation. Reverse engineering and disassembly are prohibited.
Restriction on Use & Rovi Trade Mark Rights
Use of the copyright protection technology contained in this product must be authorised by Rovi Corporation and is intended for home and other limited viewing uses only unless otherwise authorised by Rovi Corporation. The names "Rovi Corporation" and "Macrovision" are protected by trademarks.
Notes for battery disposal
Your product contains batteries covered by the European Directive 2006/66/EC, which cannot be disposed of with normal household waste. Please inform yourself about the local rules on separate collection of batteries. The correct disposal of batteries helps prevent potentially negative consequences on the environment and human health.

- DAMAGE
- LOCATION OF UNIT
- TEMPERATURE
- NAKED FLAMES
- MOISTURE
- VENTILATION
- SAFETY
- MAINS ADAPTER CABLE
- INTERFERENCE
- MAINS ADAPTOR
- EARPHONES
- BATTERIES
- SUPERVISION
- DVD
- SERVICE
- MAINTENANCE
- UNPACKING
- FRONT VIEW
- REAR VIEW
- RIGHT SIDE VIEW
- DISPLAY BUTTON
- POWER BUTTON
- AUDIO/ANGLE BUTTON
- SUBTITLE/TITLE BUTTON
- MENU/ZOOM BUTTON
- STOP/SLOW BUTTON
- ◀▶(VOL -/+ ) BUTTONS
- ▲▼ BUTTONS
- ENTER BUTTONS
- II BUTTON
- MUTE BUTTON
- SOURCE BUTTON
- REPEAT/PROG BUTTON
- REPEAT A-B BUTTON
- NUMBER 0-9 BUTTONS
- SETUP BUTTON
- GOTO BUTTON
- BUTTONS
- REMOVING THE INSULATING STRIP FROM THE REMOTE CONTROL
- BATTERY REPLACEMENT FOR THE REMOTE CONTROL
- HANDLING THE BATTERY
- HANDLING THE REMOTE CONTROL
- REMOTE CONTROL OPERATION RANGE
- USING THE CAR POWER ADAPTER (FOR IN-CAR USE)
- MOUNTING IN A CAR
- INSTALLATION GUIDE
- MAINS POWER
- CHARGING THE BATTERY
- CONNECTIONS
- USING EARPHONES
- USING A USB FLASH DRIVE
- CONNECTING AN AUDIO RECEIVER
- PICTURE SUPPORTED FORMATS
- JPEG
- REGION CODE
- ENSURE THAT THE SCREEN PROTECTION FILM IS REMOVED BEFORE USE
- BASIC DVD PLAYBACK
- DVD PLAYBACK ON BOTH DVD PLAYERS
- STOP PLAYBACK
- PREVIOUS AND NEXT
- FAST FORWARD AND FAST REVERSE
- PAUSE PLAYBACK
- INFO
- VOLUME ADJUSTMENT
- ALL REPEAT
- AUDIO CHANNEL
- A-B REPEAT
- SUBTITLE LANGUAGE
- ANGLE SELECTION
- LOADING A DISC
- PLAYING AN AUDIO CD
- THE PLAYBACK NAVIGATOR AND SETTINGS
- ADDING FILES TO THE PROGRAM LIST
- DELETING FILES FROM THE PROGRAM LIST
- TO RETURN TO BROWSER LIST
- OSD LANGUAGE
- SUBTITLE
- MPEG4 SUBTITLE
- AUDIO
- DVD MENU
- ASPECT RATIO
- TV SYSTEM
- PICTURE MODE
- PARENTAL CONTROL
- SET PASSWORD
- CUSTOMISING THE MISCELLANEOUS SETTINGS
- CLEANING THE UNIT
- HANDLING DISCS
- CLEANING DISCS
- STORING DISCS
- NO
- PRODUCT OVERVIEW
- DC INN CONNECTOR FOR 12 V DC
- ON/OFF SWITCH
- CHARGING INDICATOR
- REMOTE CONTROL
- VIS BUTTON
- REPLACING THE BATTERY IN THE REMOTE CONTROL
- HANDLE THE BATTERY
- BATTERY REPLACEMENT IN THE REMOTE CONTROL
- ROVI PROPRIETARY RIGHTS
- RESTRICTION ON USE & ROVI TRADE MARK RIGHTS
- NOTES FOR BATTERY DISPOSAL
Brand : Logik
Model : L72PDT13E
Category : DVD player