L2HDVD17 - DVD player Logik - Free user manual and instructions
Find the device manual for free L2HDVD17 Logik in PDF.
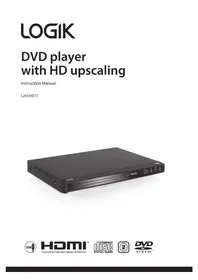


| Product Type | DVD Player |
| Brand | Logik |
| Model | L2HDVD17 |
| Dimensions (W x D x H) | Approx. 430 x 260 x 45 mm |
| Weight | Approx. 2 kg |
| Power Supply | 110-240V AC, 50/60Hz |
| Power Consumption | Less than 10 W (standby < 1 W) |
| Disc Compatibility | DVD, DVD±R/RW, CD, CD-R/RW, MP3, JPEG |
| Video Outputs | Composite (RCA), Component (YUV), HDMI |
| Audio Outputs | Stereo RCA, Coaxial Digital |
| Other Connectors | USB 2.0, SCART (optional) |
| Playback Formats | DVD Video, CD Audio, MPEG4, DivX |
| Remote Control | Included (battery-powered) |
| Safety Class | Class I |
| Care Instructions | Wipe with a soft, dry cloth; avoid solvents |
| Spare Parts | Remote control, power cord, user manual |
| Repairability | Contact Logik service center for repairs |
| General Information | Region code: check disc region; upscaling to 1080p |
Frequently Asked Questions - L2HDVD17 Logik
User questions about L2HDVD17 Logik
0 question about this device. Answer the ones you know or ask your own.
Ask a new question about this device
Download the instructions for your DVD player in PDF format for free! Find your manual L2HDVD17 - Logik and take your electronic device back in hand. On this page are published all the documents necessary for the use of your device. L2HDVD17 by Logik.
USER MANUAL L2HDVD17 Logik
DVD player with HD upscaling
Instruction Manual
L2HDVD17
Contents
Safety Warnings....5
Unpacking....7
Product Overview......8
Front View....8
Rear View 8
Remote Control 9
Battery Installation for the Remote Control....11
Remote Control Operation Range....12
Connections 13
Using the OPTICAL/HDMI/SCART Connection....13
Connecting to the Mains Socket....13
Using a USB Device....14
Compatible Disc Types 15
Supported Formats....15
Region Code 15
Powering ON/OFF 16
Basic Playback....16
Basic DVD Playback....16
Pause Playback 17
Volume Adjustment....17
Selecting Chapter / Title time / Chapter time....17
Stop Playback....17
Previous and Next Chapter 17
Fast Rewind and Fast Forward 17
Step....17
Repeat Mode....18
Slow 18
Angle Selection 18
Audio Channel 18
Subtitle Language 19
Info....19
Programmable Memory....19
Zoom Selection 19
Title 19
Menu 19
A-B Repeat....19
Clear....19
CD/JPEG Disc Operation....20
Playing an Audio or a JPEG Picture CD 20
Pause Playback 20
Stop Playback....20
Volume Adjustment....20
Selecting DISC GOTO / TRACK GOTO / SELECT TRACK 20
Previous and Next....20
Fast Rewind and Fast Forward 21
Image Rotation 21
Zoom....21
Slide-show Effect 21
Thumbnail Menu....21
Customising the General Settings....22
Customising the Audio Settings....23
Customising the Video Settings 24
Customising the Preferences....25
Customising the Password Settings....27
Maintenance 28
Cleaning the Unit....28
Hints and Tips ......29
Specifications....30
Read all the instructions carefully before using the unit and keep them for future reference. Retain the manual. If you pass the unit onto a third party make sure to include this manual. Check that the voltage marked on the rating label matches your mains voltage.
Damage
- Please inspect the unit for damage after unpacking.
- Do not continue to operate the unit if you are in any doubt about it working normally, or if it is damaged in any way - switch off, withdraw the mains plug and consult your dealer.
Location of Unit
- The unit must be placed on a flat stable surface and should not be subjected to vibrations.
- Do not place the unit on sloped or unstable surfaces as the unit may fall off or tip over.
- The mains socket must be located near the unit and should be easily accessible.
- This unit is designed for indoor, household use only.
Temperature
- Avoid extreme degrees of temperature, either hot or cold. Place the unit well away from heat sources such as radiators or gas/electric fires.
- Avoid exposure to direct sunlight and other sources of heat.
Naked Flames
- Never place any type of candle or naked flame on the top of or near the unit.
Moisture
- To reduce the risk of fire, electric shock or product damage, do not expose this unit to rain, moisture, dripping or splashing. No objects filled with liquids, such as vases, should be placed on the unit. Do not operate the unit with wet hands, near water or other liquid.
- If you spill any liquid into the unit, it can cause serious damage. Switch it off at the mains immediately. Withdraw the mains plug and consult your dealer.
Ventilation
- To prevent the risk of electric shock or fire hazard due to overheating, ensure that curtains and other materials do not obstruct the ventilation vents.
- Do not install or place this unit in a bookcase, built-in cabinet or in another confined space. Ensure the unit is well ventilated.
Safety
- Always disconnect the unit from the mains supply before connecting/disconnecting other devices or moving the unit.
- Unplug the unit from the mains socket before a lightning storm.
Mains Cable
- Make sure the unit is not resting on top of the mains cable, as the weight of the unit may damage the mains cable and create a safety hazard.
- If the mains cable is damaged it must be replaced by the manufacturer, its service agent, or similarly qualified persons in order to avoid a hazard.
Interference
- Do not place the unit on or near appliances which may cause electromagnetic interference. If you do, it may adversely affect the operating performance of the unit, and cause a distorted picture or sound.
Batteries
- Batteries used in the remote control for this unit are easily swallowed by young children and this is dangerous.
- Keep loose batteries away from young children and make sure that the battery holder tray is secure in the remote control. Seek medical advice if you believe a cell has been swallowed.
- Please dispose of batteries correctly by following the guidance in this manual.
Supervision
- Children should be supervised to ensure that they do not play with the unit and the remote control.
- Never let anyone, especially children, push anything into the holes, slots, or any other openings in the case - this could result in a fatal electric shock.
Class 1 Laser Product.
- This unit utilises a laser. Use of controls, adjustments, or performance of
procedures other than those specified herein may result in hazardous radiation exposure.
- Before moving the unit, ensure the disc tray is empty. • Always remove the disc when the unit is not in use.
- Failure to do so will risk severely damaging the disc and the unit.
- Do not stack devices, heat from other devices may affect the performance of the unit.



The lightning flash with arrowhead symbol, within an equilateral triangle, is intended to alert the user to the presence of uninsulated “dangerous voltage” within the unit’s enclosure that may be of sufficient magnitude to constitute a risk of electric shock.

The exclamation point within an equilateral triangle is intended to alert the user to the presence of important operating and maintenance (servicing) instructions in the manual accompanying the unit.

This symbol indicates that this product incorporates double insulation between hazardous mains voltage and user accessible parts. When servicing, use only identical replacement parts.
Service
- To reduce the risk of electric shock, do not remove screws. The unit does not contain any user-serviceable parts. Please leave all maintenance work to qualified personnel.
- Do not open any fixed covers as this may expose dangerous voltages.
Maintenance
- Ensure to unplug the unit from the mains socket before cleaning.
- Do not use any type of abrasive pad or abrasive cleaning solutions as these may damage the unit's surface. Do not use liquids to clean the unit.
Thank you for purchasing your new product.
We recommend that you spend some time reading this instruction manual in order that you fully understand all the operational features it offers. You will also find some hints and tips to help you resolve any issues.
Read all the safety instructions carefully before use and keep this instruction manual for future reference.
Unpacking
Remove all packaging from the DVD Player. Retain the packaging. If you dispose of it, please do so according to local regulations.
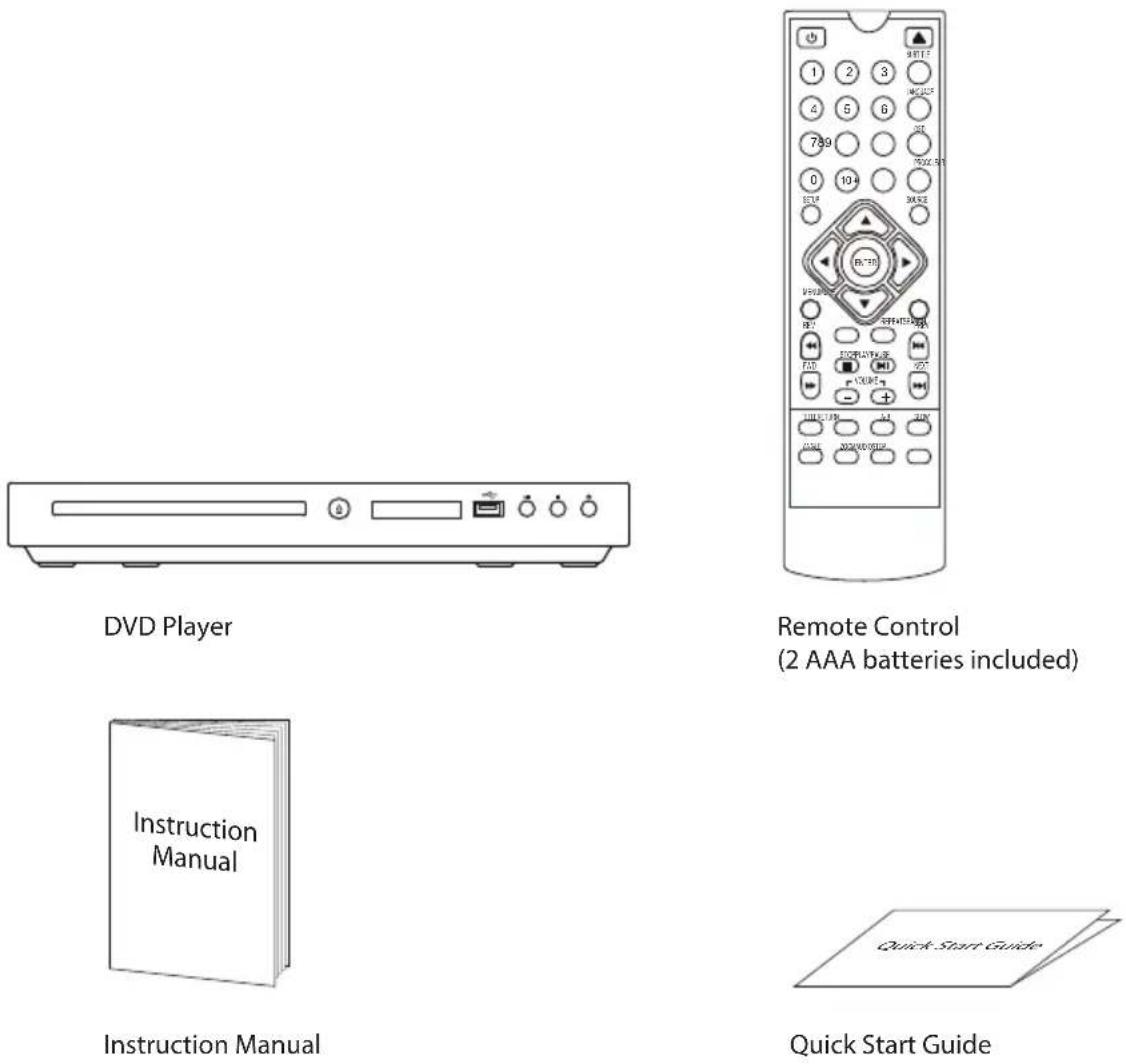

If items are missing or damaged, please contact Partmaster (UK only).
Tel: 0344 800 3456 for assistance.
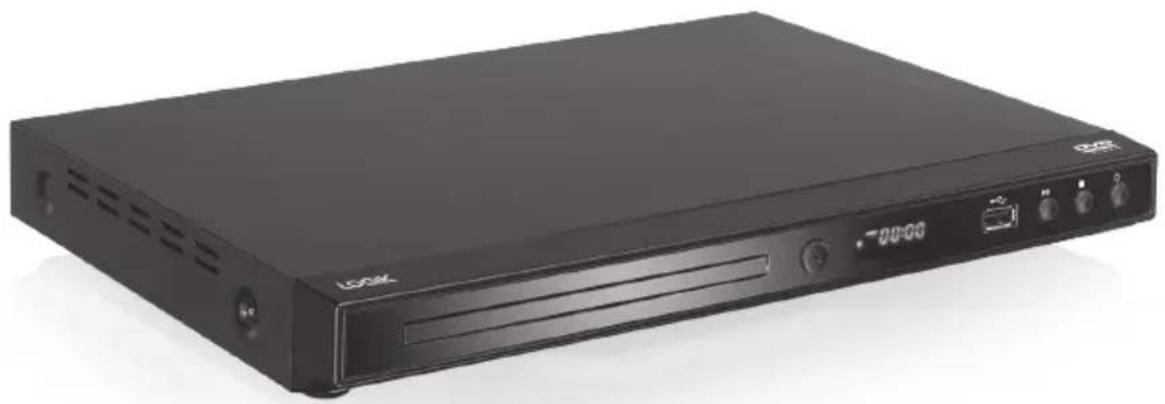
Front View

- Disc Tray
Load a disc into the disc drive.
- OPEN/CLOSE ▲ button
Open and close the disc tray.
- Display Screen
Show information about the current status of the DVD player.
- Remote Control Sensor
- USB Slot
Connection for a USB Flash Drive.
- PLAY/PAUSE ▶Button
Start playback/stop playback momentarily
- STOP button
Stop playback.
- POWER Button
Switch the unit between ON and OFF mode.
Rear View
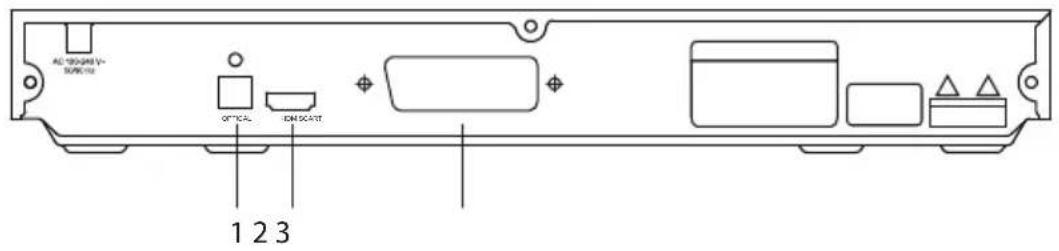
- OPTICAL Output Socket
Connect an Optical cable to a TV or a monitor equipped with an Optical input terminal.
- HDMI Output Socket
Connect an HDMI cable to a TV, a monitor or an AV amplifier equipped with an HDMI input terminal.
- SCART Output Socket
Connect a SCART cable to a TV or a monitor equipped with a SCART video input terminal.
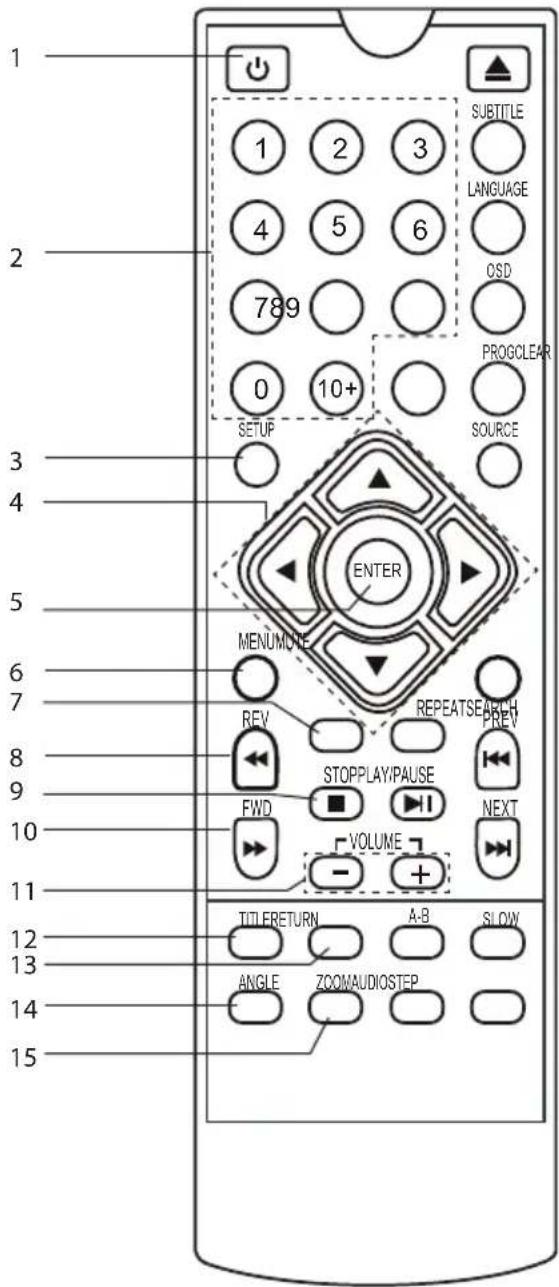
Remote Control
1. POWER ⏻
Switch the unit between ON and OFF mode.
2. 0-9, 10+
Select the numeric items in a menu.
3. SETUP
Display the Setup Menu of the DVD player.
4. CURSOR ◀ ▲ ▼ ▶
Move up, down, left and right in a menu.
5. ENTER
Confirm a selection on the menu screen.
6. MENU
Enter or exit the disc contents menu.
7. SEARCH Button
Search and start playback from a selected point on the disc.
8. REV
Fast reverse during playback.
9. STOP ■
Stop the playback.
10. FWD
Fast forward during playback.
11. VOLUME +/-
Increase and decrease the volume.
12. TITLE
Return to the previous menu or show the title menu. (If it is available in the DVD features.)
13. RETURN
Return to root menu from normal play, and then return to normal play from root menu.
14. ANGLE
Switch / change the camera angle during playback. (If it is available in the DVD features.)
15. ZOOM
Enlarge the picture on the TV.
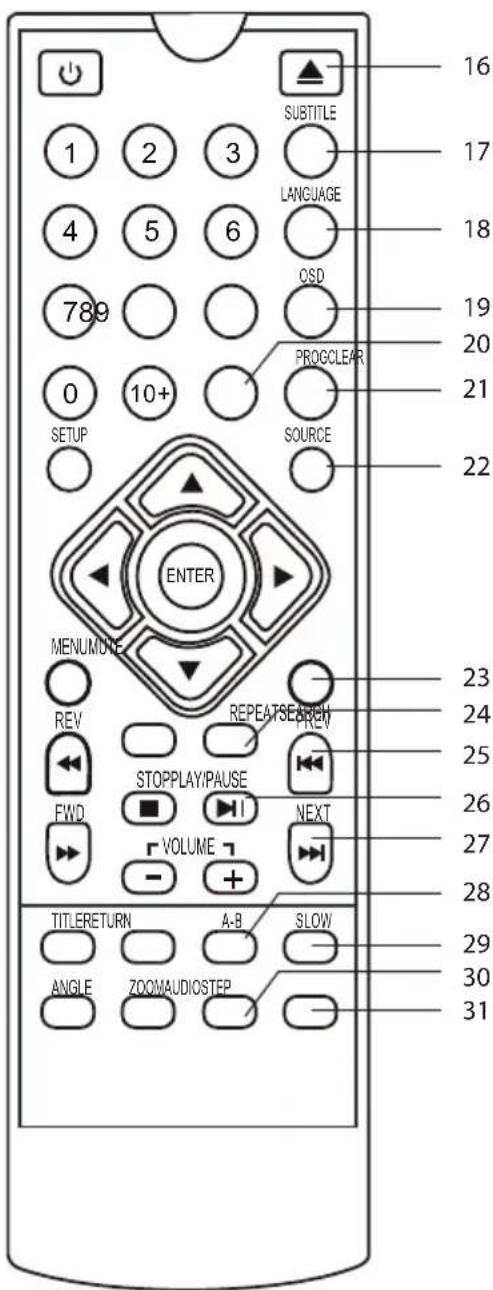
16. OPEN/CLOSE▲
Open or close the DVD disc tray.
17. SUBTITLE
Switch between different subtitle languages. (Available languages depend on the DVD features.)
18. LANGUAGE
Press to change the OSD language.
19. OSD (On Screen Display)
Display the disc information.
20. Clear
Clear previous input.
21. PROG
Programme and view the selected starting point of a chapter and title in the disc.
22. SOURCE
Switch between DVD and USB as the input source.
23. MUTE
Mute and restore audio output.
24. REPEAT
Select between different repeat modes.
25. PREVI
Return to the previous title, chapter or track.
26. PLAY / PAUSE
Play / pause / resume / playback.
27. NEXT
Skip to the next title, chapter or track.
28. A-B
Repeat playback between 2 particular points on a disc.
29. SLOW
Play the video in slow motion forwards or in reverse.
30. AUDIO
Change the audio mode.
31. STEP
Play the movie forward frame by frame.
Battery Installation for the Remote Control
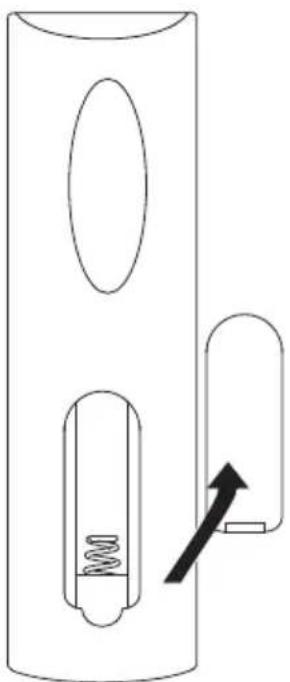
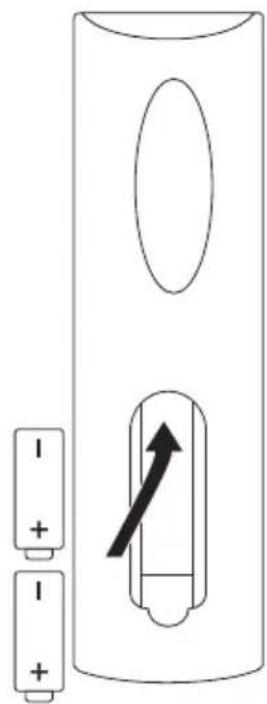
- Press and lift the back cover up to open the battery compartment of the remote control.
- Insert two AAA size batteries. Make sure the battery match those shown in the (+) and (−) ends of the battery compartment.
- Close the battery compartment cover.

Handling the Batteries
- Improper or incorrect use of batteries may cause corrosion or battery leakage, which could cause fire, personal injury or damage to property. • Only use the battery type indicated in this manual.
- When the batteries are exhausted, the remote will not function. Replace both batteries at the same time with new ones.
- Do not install new batteries with used ones and do not mix different types of batteries.
- Do not dispose of used batteries as domestic waste. Dispose of them in accordance with local regulations.
Handling the Remote Control
- Be aware of your fingernails when removing the battery cover and the battery.
- Do not drop or cause impact to the remote control. • Do not spill water or liquid on the remote control. • Do not place the remote control on a wet object.
- Do not place the remote control under direct sunlight or near sources of excessive heat.
- Remove the battery from the remote control when not in use for a long period of time, as it could cause corrosion or battery leakage and may result in physical injury and/or property damage including fire.
Remote Control Operation Range
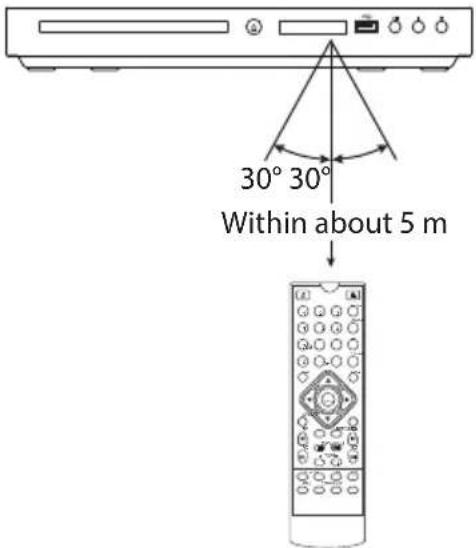
- The remote control sensor on the front unit is sensitive to the remote control's commands up to a maximum of 5 metres away and within a maximum of a 60° arc.
Please note that the operating distance may vary depending on the brightness of the room.
Using the OPTICAL/HDMI/SCART Connection
1. Connecting to a TV with an Optical Cable
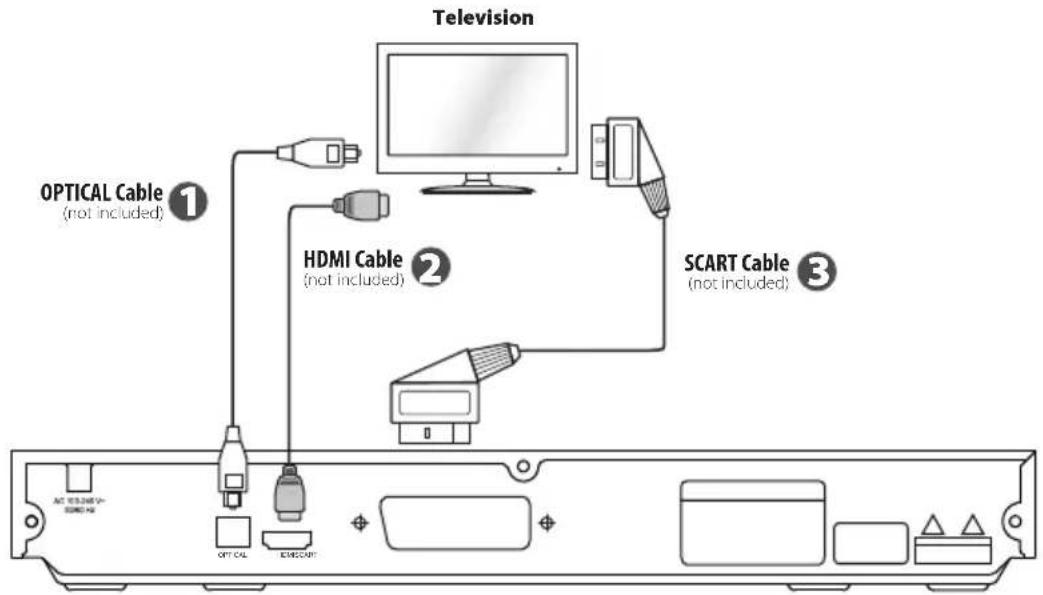
Use an Optical cable (not included) to connect between the DVD player's OPTICAL socket and the TV's OPTICAL IN socket.
2. Connecting to a TV with an HDMI Cable
Use an HDMI cable (not included) to connect between the DVD player's HDMI socket and the TV's HDMI IN socket.
3. Connecting to a TV with a SCART Cable
Use a SCART cable (not included) to connect between the DVD player's SCART socket and the TV's SCART IN socket.
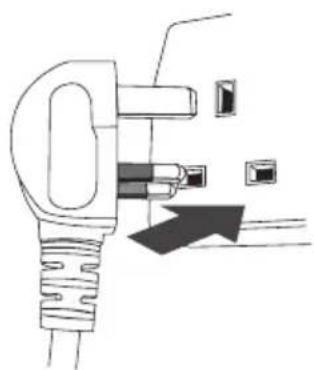
Connecting to the Mains Socket
- After all connections are properly completed, connect the mains cable into the mains socket. Never make or change any connections when the DVD player is connected to the mains socket.
- Press the POWER Button on the DVD player or remote control to turn the DVD player on.
Using a USB Device
You can play or view files from a USB device.
- Connect the USB device directly to the USB slot on the DVD player.
- Press the SOURCE button on the remote control to enter USB page.
- Press the ▲▼ button to select the desired file, and then press the ENTER button to start playback.
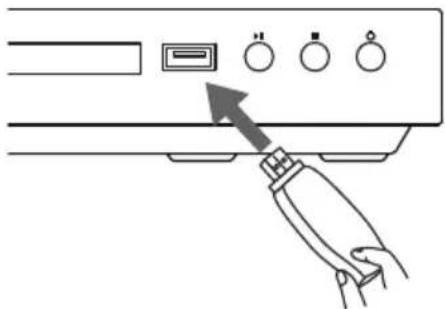
- To exit USB mode, press the SOURCE button to enter DVD mode, or remove the USB device from the unit.

If there is no disc in the unit and it is connected with a USB device, the unit will automatically switch into USB mode when it is switched on.
Compatible Disc Types
| Disc Types Disc Logo Recorded Content | ||
| DVD-VIDEO (Digital Versatile Disc) AUDIO + VIDEO |  | |
| DVD±RW (Audio/Video format or JPEG files) |  | AUDIO (MP3) + JPEG |
| DVD±R (DVD Recordable - Audio/Video format or JPEG files) |  | AUDIO (MP3) + JPEG |
| CD-R (CD Recordable - Audio/Video format or JPEG files) |  | AUDIO (MP3) + JPEG |
| CD-RW (CD-Rewritable - Audio/Video format or JPEG files) |  | AUDIO (MP3) + JPEG |
| AUDIO-CD (Compact Disc Digital Audio) AUDIO |  |
Supported Formats
JPEG
• The file extension must be .jpg and not .jpeg. • Pictures encoding must comply with JPEG format.

Some recorded files may not be playable due to their file type, formatting, or the condition of their recording.
Region Code
Both the DVD player and the discs are coded by region. These regional codes must match in order to play the disc. If the codes do not match, the disc will not play.
The Region Number for this DVD player is described on the rear panel of the DVD player.
| Disc Type DVD-VIDEO | |
| Region code |  |
When you first connect the unit to the mains socket, the unit will be in ON mode. The unit's display will show "HI", and then "LOAD".
- The LOGIK DVD logo (start-up picture) will appear on the TV's screen and the unit will start loading the disc automatically (if available).

The unit will show "NDIS" if it detects no disc in the unit.
- Press the POWER ⏻ button on the unit or the remote control to switch the unit back to OFF mode. The display will show "OFF" and then turn off.
- When the unit is in OFF mode, press the POWER ⏻ button on the unit or the remote control to switch on the unit.
- Disconnect the mains plug from the mains socket if you want to switch the unit off completely.
Basic Playback
Basic DVD Playback
- Press the OPEN/CLOSE▲ button to open the disc tray. Place a disc into the disc tray with the label facing up.
• For double-sided disc, load the side you want to play face down. - There are two different disc sizes. Place the disc in the correct guide on the disc tray. If any part of disc is placed outside of the guide, the disc may be damaged and the DVD player may malfunction. • Do not place an unplayable disc in this DVD player.
- Press the OPEN/CLOSE▲ button to close the disc tray. The playback will automatically start.
- Some discs may not playback automatically. You can press the PLAY/PAUSE▶II button to start playback.
- Depending on the disc, a menu may appear on the TV screen by pressing the MENU button. Press the ▶▲Button on the remote control to select menu options and press the ENTER button to start, or press digits to select a menu option directly.

"may appear on the screen during operation." means that the desired operation is not permitted by the unit or disc.

- The screen saver will automatically activate after 5 minutes of no activity. Press any button to exit the screen saver.
- If there is no activity in screen saver mode after 20 minutes, the unit will automatically turn off.
Pause Playback
- Press the PLAY/PAUSE▶ button on the unit or remote control to pause playback.
- Press the PLAY/PAUSE▶ button again on the unit or remote control to resume normal playback.
Volume Adjustment
- Press the VOLUME+/- button on the remote control to adjust the volume.
- Press the MUTE button on the remote control to switch the sound off, the "✗" icon will show on the display. Press the MUTE button on the remote control again or the VOLUME+/- button on the remote control to cancel this function.
Selecting Chapter / Title time / Chapter time
- Press the SEARCH button repeatedly on the remote control to display the disc information text line for Chapter / Title time / Chapter time.
- Press the 0-9, 10+ button on the remote control to enter valid Chapter / Title time / Chapter time number. The playback skips to the selected Chapter / Title time / Chapter time.
Stop Playback
- Press the STOP■ button on the unit or remote control to go to pre-stop mode. With some discs, the DVD player can recall the stopped location, such as on DVDs.
- Press the PLAY/PAUSE▶II button on the unit or remote control to resume playback from the location where playback was stopped or from the beginning of the disc.
- Press the STOP button twice to stop completely.
Previous and Next Chapter
- Press the button on the remote control to go to the previous chapter. Each press of this button will skip a chapter until the start of the disc.
- Each press of the ▶ button on the remote control during playing will skip the current chapter and play the next one.
Fast Rewind and Fast Forward
- Press the ◀ button on the remote control to fast rewind / fast forward through the disc. Each time the ◀ button on the remote control is pressed, the fast rewind / fast forward motion speed changes. There are 5 speeds: ×2, ×4, ×8, ×16 and ×32.
- Press the PLAY/PAUSE▶II button on the unit or the remote control to resume normal playback.
Step
- Press the STEP button on the remote control repeatedly to play the movie frame by frame.
- Press the PLAY/PAUSE▶ button to resume normal playback.
Repeat Mode
Press the REPEAT button on the remote control repeatedly to select different repeat modes.
| Action DVD Description CD Description USB/JPEG Disc | |||
| First Press Repeat Chapter Repeat Track Shuffle | |||
| Second Press Repeat Title Repeat All Random | |||
| Third Press Repeat All Repeat off Single | |||
| Fourth Press Repeat off – | Repeat one | ||
| Fifth Press | – | – | Repeat folder |
| Sixth Press | – | – | Folder |
Slow
Press the SLOW button on the remote control when a DVD is playing to enter slow playback. Each time you press the SLOW button on the remote control, the playback speed changes in the following sequence:
![graph TD A["Normal"] --> B["1/2"] B --> C["1/4"] C --> D["1/8"] D --> E["1/16"] E --> F["1/2"] F --> G["1/4"] G --> H["1/8"] H --> I["1/16"] I --> J["1/2"]](/content/2026/05/968695/images/963bc4e0db55de2f164fe2c061c00230d2f6c6067a205a7640f22dc7114f6645.jpg)
Angle Selection
Some DVDs contain scenes which have been shot from a number of different angles. For these discs, the same scene can be viewed from each of these different angles.
- While you are playing a DVD with different angles recorded, press the ANGLE button on the remote control to view the number of current angles available.
- Press the ANGLE button repeatedly on the remote control to change the scene to the next recorded angle.
a) After approximately two seconds, playback will continue from the new angle you selected.
![graph LR A["Initial Image"] --> B["Target"] B --> C["Final Target"]](/content/2026/05/968695/images/42a676bd6d98a1aff5086fb5523c65b077abc31c132465e5ec58fdf1db6fd8a4.jpg)

- This function can only be used for discs on which scenes shot from multiple angles have been recorded.
- If only one angle is recorded, “∅” is displayed.
Audio Channel
Press the AUDIO button on the remote control repeatedly to select different audio languages.
Subtitle Language
Press the SUBTITLE button on the remote control repeatedly to switch between different subtitle languages that are available on the disc.
Info
You can view disc information (such as current title / chapter / track number, total playing time or remaining time on the disc) without interrupting the disc playback.
During playback, press the OSD button on the remote control to show the available disc information.
Programmable Memory
| DVD, CD | Press the PROG button on the remote control to display the PROGRAM MENU. Press the 0-9, 10+ button on the remote control to input the title/chapter/track number and then press the ▲▼ button on the unit or the remote control to select START.To resume normal playback, press the PROGRAM button and press the ▲button on the unit or remote control to select STOP. |
Zoom Selection
This function allows you to enlarge or shrink the video image or picture on the screen.
During playback, press the ZOOM button repeatedly to zoom in/out the picture. (2× size, 3× size, 4× size, 1/2 size, 1/3 size, 1/4 size, normal size)
Title
Press the TITLE button on the remote control to return to the DVD title menu.
Menu
Press the MENU button on the remote control to return to the DVD main menu.
A-B Repeat
Repeat a section between points A and B within a Title / Chapter / Track.
- Press the A-B button on the remote control to choose a starting point A.
- Press the A-B button again to set an ending point B and complete the setting.
- The selected section A-B will be repeated. Press the A-B button the third time to cancel and exit.
Clear
Press the CLEAR button on the remote control to clear the input number in SEARCH or PROGRAM state.
Playing an Audio or a JPEG Picture CD
- While in ON mode, press the OPEN/CLOSE▲ button and the disc door will open.
- Place the CD/JPEG disc with the label side up into the CD compartment, and then press the OPEN/CLOSE ▲ button to close the disc door.
- If an audio CD is inserted, playback will start automatically.
If a JPEG disc is inserted, the File Browser Menu will show on the display.
• This unit can play CD, CD-R, CD-RW, and JPEG discs.
- Press the button on the remote control to select a track in CD, or press the Number 0-9, 10+ button on the remote control to play a track.
- Press the ◀ button on the remote control to select a photo in a JPEG disc, or press the Number 0-9, 10+ button on the remote control to select a photo. Press the ENTER button to start the slideshow.

Some JPEG discs may not be viewable due to the configuration and characteristics of the discs or the condition of the recording.
Pause Playback
Press the PLAY/PAUSE button to start, pause, or resume playback.
Stop Playback
- Press the STOP ■ button to stop CD playback.
- Press the MENU button to stop slideshow playback and return to the File Browser Menu.
Volume Adjustment
- Press the VOLUME+/- button on the remote control to adjust the volume.
- Press the MUTE button on the remote control to switch the sound off. Press the MUTE button on the remote control again or the VOLUME+/- button on the remote control to cancel this function.
Selecting DISC GOTO / TRACK GOTO / SELECT TRACK
- During CD playback, press the SEARCH button on the remote control to display the disc information text line for DISC GOTO / TRACK GOTO / SELECT TRACK.
- Press the 0-9, 10+ button on the remote control to enter valid Disc time / Track time / Track number. The playback skips to the selected Disc time / Track time / Select track.
Previous and Next
Press the ◀◀ button to skip to the previous track or the ▶▶ button to skip to the next track.
Fast Rewind and Fast Forward
- Press the ◀ button on the remote control to fast rewind / fast forward through the disc. Each time the ◀ button on the remote control is pressed, the fast rewind / fast forward motion speed changes. There are 5 levels of speed available: ×2, ×4, ×8, ×16 and ×32.
- Press the PLAY/PAUSE button to resume normal playback.
Image Rotation
There are four modes to rotate a picture: "Invert", "Mirror", "Rotate Clockwise", and "Contra-rotate". These operations are allowed only when a picture is being displayed normally and will be cancelled automatically when a new picture is displayed. The arrow keys are used to select the different rotation modes:
▼ - Flip horizontally (MIRROR)
◀ - Rotate -90° (CONTRAROTATE)
▲ - Flip vertically (INVERT)
- Rotate 90° (ROTATE CLOCKWISE)
Zoom
- Press the ZOOM button once to enter zoom function. Press the ◀◀▶ button to select different zoom levels between 50% to 200%.
- Press the ◀ button on the remote control to navigate in the enlarged picture.
- To resume normal viewing and continue slide-show by pressing the ZOOM button.

During zoom function, slide-show transition and image rotation are disabled.
Slide-show Effect
Press the PROG button to select different style of photo transition while playing a slideshow.
Thumbnail Menu
- While browsing an image in JPEG disc, press the STOP button to show the thumbnail menu for photo preview.
- Press the ◀▲▼▶ button on the remote control to select a photo. Press ENTER button to start the slideshow.

Quality of the pictures displayed on the screen is highly dependent on the viewing device.
Customising the General Settings
- Press the SETUP button to display the setup menu.
- Press the ◀ button to select GENERAL SETUP PAGE.
- Press the ▲ button to select the following options and then press the ◀ ▶ button to change the setting. Press ▶ II button on the unit or the remote control, or ENTER on the remote control to confirm.
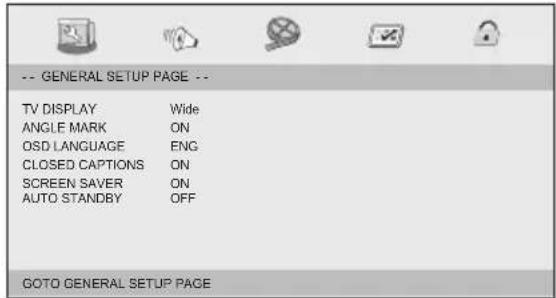
| TV DISPLAY To select the aspect ratio of the playback picture: | |
| ANGLE MARK If this is turned on, the multi-angle logo with the number of available angles will be displayed when playing a DVD that offers multiple angles. | |
| OSD LANGUAGE Allows you to select the setup menu and OSD language. | |
| CLOSED CAPTIONS | For hearing-impaired viewers, the programme can display recorded explanatory captions. |
| SCREEN SAVER | Select ON to display the screen saver. A moving DVD logo appears on a dark screen to prevent screen burn when disc playback is stopped, paused, or you have not used the DVD player or its remote control for more than 5 minutes when the power is still on.Select OFF to turn off the screen saver function. |
| LAST MEMORY | Select ON to activate the last memory function. This function is convenient when you want to continue viewing a disc from the point where you were last watching it. Unlike the resume function, the last memory function is effective even if the DVD disc has been removed from the DVD player.Select OFF to turn off the last memory function. |
| AUTO STANDBY | Select 3 HOURS or 4 HOURS to set the idle length. While idling, a pop up warning window will display for 10 seconds before the unit turns itself off. Press any button to extend the time.Select OFF to turn off the auto standby function. While idling, a pop up warning window will display for 10 seconds before the unit turns itself off. Press any button to extend the time.Select OFF to turn off the auto standby function. |
- Press the SETUP button to exit the menu.
Customising the Audio Settings
- Press the SETUP button to display the setup menu.
- Press the ◀ button to select ANALOG AUDIO SETUP PAGE.
- Press the ▲ button to select the following options and then press the ◀ ▶ button to change the setting. Press ▶ II button on the unit or the remote control, or ENTER on the remote control to confirm.
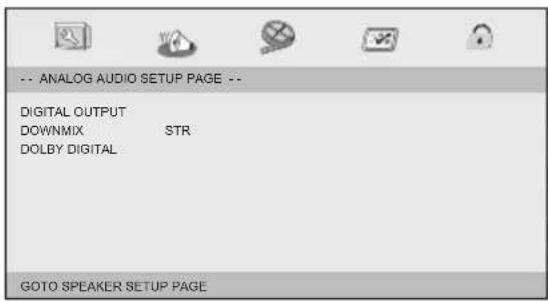
| DIGITAL OUTPUT Select the SPDIF Output.·SPDIF OffTurns off the SPDIF output.·SPDIF/RAWIf you have connected your DIGITAL AUDIO OUT to a multi-channel decoder/receiver.·SPDIF/PCMOnly if your receiver is not capable of decoding multi-channel audio. | |
| DOWNMIX Allows you to set the stereo analogue output of your DVD player.·LT/RTSelect this option if your DVD player is connected to a Dolby decoder.·STEREOSelect this option to change channel output to stereo which delivers sound from only the two front speakers. | |
| DOLBY DIGITAL · | DUAL MONOIf your amplifier / decoder has Dolby Digital output, you may select STEREO, L - MONO, R - MONO, or MIX MONO mode for your amplifier decoder.·DYNAMICDynamic range compression. |
- Press the SETUP button to exit the menu.
Customising the Video Settings
- Press the SETUP button to display the setup menu.
- Press the ◀ button to select VIDEO SETUP PAGE.
- Press the ▲ button to select the following options and then press the ◀ ▶ button to change the setting. Press ▶ II button on the unit or the remote control, or ENTER on the remote control to confirm.
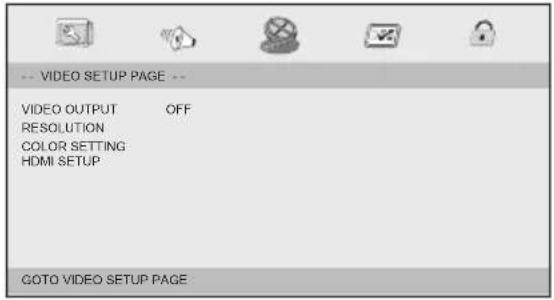
| VIDEO OUTPUT | Press the ◀ button to select between RGB or OFF. |
| RESOLUTION | Select the resolution output (480i, 480p (720), 720P (60Hz), 1080I (60Hz), 1080P (60Hz), 576i, 576P (720), 720P (50Hz), 1080I (50Hz), 1080P (50Hz)) |
| COLOR SETTING | Enter and then set the level of SHAPRNESS, BRIGHTNESS, CONTRAST, HUE and SATURATION. |
| HDMI SETUP HDMI: | ON/OFFAUDIO Source: Auto/PCMDEEP_COLOR: 24BIT/30BIT/36BIT |
- Press the SETUP button to exit the menu.
Customising the Preferences
- The preference setting is only active when there is no disc in the DVD player or the DVD player is in STOP mode. The setting will be saved and effective whenever the DVD player is turned on.
- Press the SETUP button to display the setup menu.
- Press the ◀ button to select PREFERENCE PAGE.
- Press the ▲ button to select the following options and then press the □ button to change the settings. Press ▶ button on the unit or the remote control, or ENTER on the remote control to confirm.
| TV TYPE Select the colour system that corresponds to your TV when connecting to your TV's AV outputs. This DVD player is compatible with both NTSC and PAL.PAL: Select this if the connected TV uses the PAL system. It will change the video signal of an NTSC disc and output in PAL format.Auto: Change the video signal output automatically according to the selected disc's format.NTSC: Select this if the connected TV uses the NTSC system. It will change the video signal of a PAL disc and output in NTSC format. | |
| AUDIO Allows you to choose the preferred audio language of your disc. If the preferred language is not available on the disc, the DVD player will automatically use the DVD disc's default language. | |
| SUBTITLE Allows you to choose the preferred subtitle language of your disc. If the preferred language is not available on the disc, the DVD player will automatically use the DVD disc's default language. | |
| DISCMENU | Allows you to choose the preferred menu language of your disc. If the preferred language is not available on the disc, the DVD player will automatically use the DVD disc's default language. |
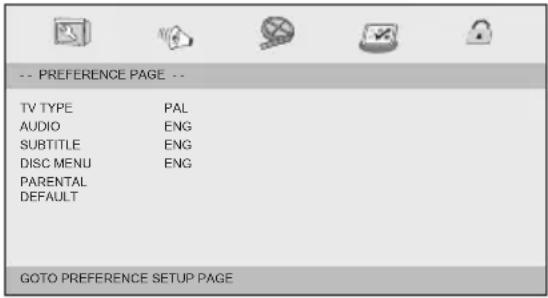
| PARENTAL This feature allows you to block disc playback with specific ratings.The rating levels are from 1 to 8 and are country dependent. You can prohibit the playing of certain discs that are not suitable for your children, or you can have certain discs played with alternative scenes.The parental lock levels are equivalent to the following ratings:1 : KID SAFE 2 : G 3 : PG 4 : PG 135 : PGR 6 : R 7 : NC17 8 : ADULTUnlock the disc by entering the 4-digit password you have set in PASSWORD setup at the PASSWORD SETUP PAGE.If you change the control level, you must input the password.(Initial password : 1369)In case you forget your password, the master password is “1369”.To disable the parental control and allow the DVD player to play all discs, select ADULT.Use the 0-9 button to enter the 4-digit password again.DVD discs that are rated above the selected level will not be played unless the 4-digit password is entered.TipsThe following disc types will not be affected by the Parental Control feature:Discs that are not coded by the disc manufacturer.Discs that are not coded by the disc manufacturer despite having a movie rating printed on the disc cover.CDs as they have no rating level indication.Most copied DVD discs or illegal DVDs. |
| DEFAULT Resets all to the manufacturer’s original settings for this DVD player.The parental lock setting will not be reset. |
- Press the SETUP button to exit the menu.
Customising the Password Settings
- Press the SETUP button to display the setup menu.
- Press the ◀ button to select PASSWORD SETUP PAGE.
- Press the ▲ button to select the following options and then press the ◀ ▶ button to change the setting. Press ▶ II button on the unit or the remote control, or ENTER on the remote control to confirm.
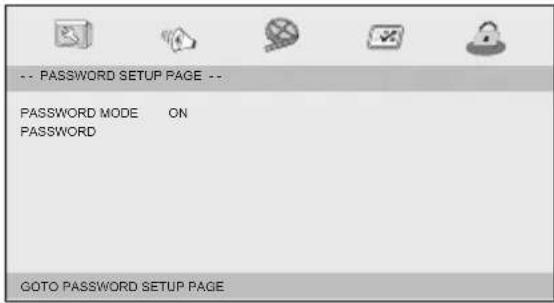
| PASSWORD MODE | Sets the password mode ON/OFF. If set to OFF, changing parental levels will not activate a password check. |
| PASSWORD A 4-digit password will be required to play a prohibited disc.If the disc is locked and the system prompts you to enter the password:Use the 0-9 button to input the current password in the OLD PASSWORD box (if the password has not yet been reset or set even after purchasing this unit, it is "1369").a) In case you forget your password, the master password is "1369".Press the number buttons to input the new password in the NEW PASSWORD box.Enter the new password again in the CONFIRM PWD box.The cursor will automatically jump to the OK button, press the ENTER button to confirm the setting. | |
- Press the SETUP button to exit the menu.
Cleaning the Unit

Ensure the unit is fully unplugged from the mains socket before cleaning.
• To clean the unit, wipe the case with a slightly moist, lint-free cloth. - Do not use any cleaning fluids containing alcohol, ammonia or abrasives. • Do not spray an aerosol at or near the unit.
Handling Discs
• Do not touch the playback side of the disc. • Do not attach paper or tape to the disc.
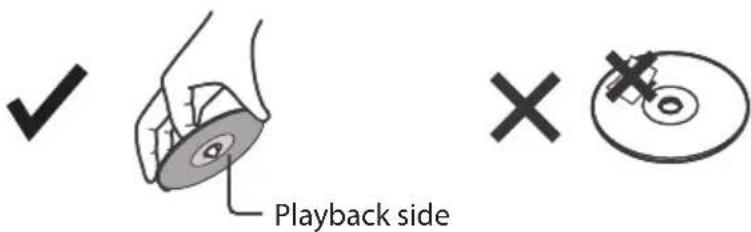
Cleaning Discs
- Fingerprints and dust on the disc cause picture and sound deterioration. Wipe the disc from the centre outwards with a soft cloth. Always keep the disc clean.
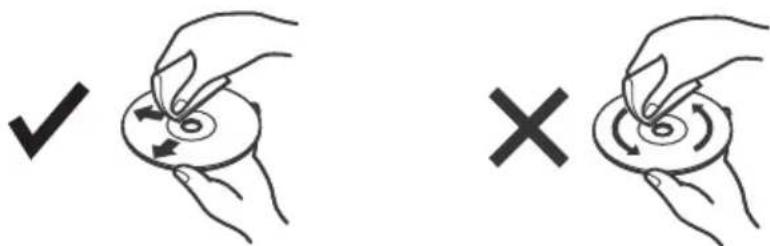
- If you cannot wipe off the dust with a soft cloth, wipe the disc lightly with a slightly moistened cloth and finish with a dry cloth.
- Do not use any type of solvent such as thinner, benzine, commercially available cleaners or antistatic spray. They may damage the disc.
Storing Discs
- Do not store discs in places subjected to direct sunlight or near heat sources.
- Do not store discs in places subjected to moisture and dust such as a bathroom or near a humidifier.
- Storing discs vertically in a case, stacking discs or placing objects on discs outside of their cases may cause warping.
| PROBLEM SOLUTION | |
| No operation can be performed with the remote control. | Check the batteries in the remote control. They may need replacing.Operate the remote control at a distance of no more than 6m.Removes batteries and hold down one or more buttons for several minutes to drain the microprocessor inside the remote control to reset it. Reinstall batteries and try to operate the remote control again. |
| Disc does not play. | Ensure that the disc is installed with the label side facing up.Check the region number of the DVD. |
| Disc Menu does not appear. | Check if the disc has a Menu. |
| No power. | Press the OPEN/CLOSE▲ button on the unit or the remote control to turn the unit on.Make sure the mains socket has power. |
| The picture is distorted or turns black and white during colour playback. | The disc does not match with the TV colour system standard (PAL/NTSC).The disc is dirty. Clean the disc.Sometimes a small amount of picture distortion may appear. This is not a malfunction of the unit. |
| The screen aspect ratio cannot be changed. | The Screen Aspect Ratio is fixed on your DVDs.Depending on the TV, it may not be possible to change the Screen Aspect Ratio.This is not a problem with the DVD player. |
| No audio. Make sure you have securely connected the DVD player and other devices.Make sure the TV and the amplifier are in good condition and are setup properly. | |
| Not able to select some items in the setup/ system menu. | Press the STOP ■ button twice before selecting the setup/ system menu.Depending on the disc availability, some menu items cannot be selected. |
| The DVD player does not start the playback. | Insert a readable disc with the playback side facing down.Check the disc type, colour system (PAL/NTSC) and region code.Check for any scratches or smudges on the disc.Press SETUP button to turn off the setup menu.Enter the password in order to change the parental rating level or to unlock the disc for playback.Moisture may have condensed inside the system. Remove the disc and leave the system turned on for about an hour.Disconnect the mains cable from the mains socket for a few minutes. Reconnect the mains cable and try to operate the DVD player. |
| Picture freezes momentarily during playback. | Check the disc for fingerprint or scratches, and clean with a soft cloth wiping from centre to edge. |
| The unit switches off when it has been idle for a few minutes | If there is no-activity after 20 minutes, the unit will automatically enter standby mode. Press the button on the unit or the remote control to switch on the unit. |
Specifications
| Model L2HDVD17 | |
| Power AC 100V - 240V, 50/60Hz | |
| Power Consumption (in Standby mode) | <0.5 W |
| VF Signal System PAL/NTSC | |
| Power Consumption <10W | |
| Operating Temperature | 5°C to 35°C |
| Dimensions 322 mm (W) × 250 mm (D) × 45 mm (H) | |
| Unit Weight 1118 g | |
Features and specifications are subject to change without prior notice.
Team Knowhow
Help with all life's kit*
For general information about appliance
and handy hints and tips, please visit:
www.TeamKnowhow.com/discover
or call 0344 561 1234
Partmaster
CO.UK
Visit Partmaster.co.uk today for the easiest way to buy electrical spares and accessories.
With over 1 million spares and accessories available we can deliver direct to your door
the very next day. Visit www.partmaster.co.uk or call 0344 800 3456 (UK customers only).
Calls charged at National Rate.
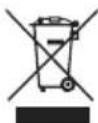
The symbol on the product or its packaging indicates that this product must not be disposed of with your other household waste. Instead, it is your responsibility to dispose of your waste equipment by handing it over to a designated collection point for the recycling of waste electrical and electronic equipment. The separate collection and recycling of your waste equipment at the time of disposal will help conserve
natural resources and ensure that it is recycled in a manner that protects human health and the environment.
For more information about where you can drop off your waste for recycling, please contact your local authority, or where you purchased your product.
Rovi Proprietary Rights
This item incorporates copy protection technology that is protected by U.S. patents and other intellectual property rights of Rovi Corporation. Reverse engineering and disassembly are prohibited.
Restriction on Use & Rovi Trade Mark Rights
Use of the copyright protection technology contained in this product must be authorised by Rovi Corporation and is intended for home and other limited viewing uses only unless otherwise authorised by Rovi Corporation. The names "Rovi Corporation" and "Macrovision" are protected by trademarks.
Notes for battery disposal
The batteries used with this product contain chemicals that are harmful to the environment. To preserve our environment, dispose of used batteries according to your local laws or regulations. Do not dispose of batteries with normal household waste.
For more information, please contact the local authority or your retailer where you purchased the product.
The terms HDMI and HDMI High-Definition Multimedia Interface, and the HDMI Logo are trademarks or registered trademarks of HDMI Licensing Administrator, Inc. in the United States and other countries.
All trademarks are the property of their respective owners and all rights are acknowledged.
DSG Retail Ltd. (co. no. 504877)
1 Portal Way, London, W3 6RS, UK
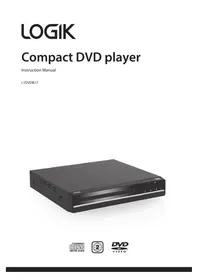
- DVD PLAYER WITH HD UPSCALING
- CONTENTS
- SAFETY WARNINGS
- UNPACKING
- PRODUCT OVERVIEW
- CONNECTIONS
- USING A USB DEVICE
- COMPATIBLE DISC TYPES
- POWERING ON/OFF
- BASIC PLAYBACK
- CD/JPEG DISC OPERATION
- CUSTOMISING THE GENERAL SETTINGS
- CUSTOMISING THE AUDIO SETTINGS
- CUSTOMISING THE VIDEO SETTINGS
- CUSTOMISING THE PREFERENCES
- CUSTOMISING THE PASSWORD SETTINGS
- MAINTENANCE
- HINTS AND TIPS
- SPECIFICATIONS
- DAMAGE
- LOCATION OF UNIT
- TEMPERATURE
- NAKED FLAMES
- MOISTURE
- VENTILATION
- SAFETY
- MAINS CABLE
- INTERFERENCE
- BATTERIES
- SUPERVISION
- CLASS 1 LASER PRODUCT
- SERVICE
- THANK YOU FOR PURCHASING YOUR NEW PRODUCT
- FRONT VIEW
- REAR VIEW
- REMOTE CONTROL
- POWER ⏻
- SETUP
- CURSOR ◀ ▲ ▼
- ENTER
- MENU
- SEARCH BUTTON
- REV
- STOP
- FWD
- VOLUME
- TITLE
- RETURN
- ANGLE
- ZOOM
- OPEN/CLOSE▲
- SUBTITLE
- LANGUAGE
- OSD (ON SCREEN DISPLAY)
- CLEAR
- PROG
- SOURCE
- MUTE
- REPEAT
- PREVI
- PLAY / PAUSE
- NEXT
- A-B
- SLOW
- AUDIO
- STEP
- BATTERY INSTALLATION FOR THE REMOTE CONTROL
- HANDLING THE BATTERIES
- HANDLING THE REMOTE CONTROL
- REMOTE CONTROL OPERATION RANGE
- USING THE OPTICAL/HDMI/SCART CONNECTION
- CONNECTING TO A TV WITH AN OPTICAL CABLE
- CONNECTING TO A TV WITH AN HDMI CABLE
- CONNECTING TO A TV WITH A SCART CABLE
- CONNECTING TO THE MAINS SOCKET
- SUPPORTED FORMATS
- JPEG
- REGION CODE
- BASIC DVD PLAYBACK
- PAUSE PLAYBACK
- VOLUME ADJUSTMENT
- SELECTING CHAPTER / TITLE TIME / CHAPTER TIME
- STOP PLAYBACK
- PREVIOUS AND NEXT CHAPTER
- FAST REWIND AND FAST FORWARD
- REPEAT MODE
- ANGLE SELECTION
- AUDIO CHANNEL
- SUBTITLE LANGUAGE
- INFO
- PROGRAMMABLE MEMORY
- ZOOM SELECTION
- A-B REPEAT
- PLAYING AN AUDIO OR A JPEG PICTURE CD
- SELECTING DISC GOTO / TRACK GOTO / SELECT TRACK
- PREVIOUS AND NEXT
- IMAGE ROTATION
- SLIDE-SHOW EFFECT
- THUMBNAIL MENU
- CLEANING THE UNIT
- HANDLING DISCS
- CLEANING DISCS
- STORING DISCS
- TEAM KNOWHOW
- PARTMASTER
- ROVI PROPRIETARY RIGHTS
- RESTRICTION ON USE & ROVI TRADE MARK RIGHTS
- NOTES FOR BATTERY DISPOSAL
Brand : Logik
Model : L2HDVD17
Category : DVD player