ZSB1400B - Blender Zelmer - Free user manual and instructions
Find the device manual for free ZSB1400B Zelmer in PDF.

| Product Type | Stand Blender |
| Brand | Zelmer |
| Model | ZSB1400B |
| Jug Capacity | 1500 ml |
| Jug Material | Glass |
| Blade Material | Stainless Steel |
| Number of Speeds | 5 |
| Quick Start Programs | PULSE, TURBO, ICE |
| Max Continuous Operation | 2 minutes |
| Rest Time Between Cycles | 10 minutes |
| Max Noise Level | 85 dB/A |
| Voltage | 220-240 V |
| Power Frequency | 50/60 Hz (typical) |
| Power Consumption | 700 W (estimated) |
| Safety Features | Auto shut-off, overheat protection, non-slip feet |
| Dishwasher Safe Parts | No (hand wash recommended) |
| Accessories Included | Grinder attachment with container and blade |
| Cord Storage | Yes, compartment at base |
| Energy Saving Mode | Yes (auto standby after 1 minute) |
| Usage | Domestic only |
Frequently Asked Questions - ZSB1400B Zelmer
User questions about ZSB1400B Zelmer
0 question about this device. Answer the ones you know or ask your own.
Ask a new question about this device
Download the instructions for your Blender in PDF format for free! Find your manual ZSB1400B - Zelmer and take your electronic device back in hand. On this page are published all the documents necessary for the use of your device. ZSB1400B by Zelmer.
USER MANUAL ZSB1400B Zelmer
- Ektronikovpens variperis 2.5 xvolves proven, 2.1 x volus 10, dvl., A3, 1, 12.
- Proprietant spirofloxacin 1, 100ml
- Laxford's radiocapsule 2. Sospinal tube 3. Parac TU20 PULSE SLICE & Wireless trans-
- Chorovský-Tiřína pana 2. Sotobovský Roh and 3. Fické TURSO PULSE KI.
- Návěně věr (děně věr)
- Hellen's name and name of the 2018-2020 (2018)
-
Form 24 (CABIL) section, 2. Form 24 (CABIL) section, 3. Form 24 (CABIL) section, 4. Form 24 (CABIL) section, 5. Form 24 (CABIL) section, 6. Form 24 (CABIL) section, 7. Form 24 (CABIL) section, 8. Form 24 (CABIL) section, 9. Form 24 (CABIL) section, 10. Form 24 (CABIL) section, 11. Form 24 (CABIL) section, 12. Form 24 (CABIL) section, 13. Form 24 (CABIL) section, 14. Form 24 (CABIL) section, 15. Form 24 (CABIL) section, 16. Form 24 (CABIL) section, 17. Form 24 (CABIL) section, 18. Form 24 (CABIL) section, 19. Form 24 (CABIL) section, 20. Form 24 (CABIL) section, 21. Form 24 (CABIL) section, 22. Form 24 (CABIL) section, 23. Form 24 (CABIL) section, 24. Form 24 (CABIL) section, 25. Form 24 (CABIL) section, 26. Form 24 (CABIL) section, 27. Form 24 (CABIL) section, 28. Form 24 (CABIL) section, 29. Form 24 (CABIL) section, 30. Form 24 (CABIL) section, 31. Form 24 (CABIL) section, 32. Form 24 (CABIL) section, 33. Form 24 (CABIL) section, 34. Form 24 (CABIL) section, 35. Form 24 (CABIL) section, 36. Form 24 (CABIL) section, 37. Form 24 (CABIL) section, 38. Form 24 (CABIL) section, 39. Form 24 (CABIL) section, 40. Form 24 (CABIL) section, 41. Form 24 (CABIL) section, 42. Form 24 (CABIL) section, 43. Form 24 (CABIL) section, 44. Form 24 (CABIL) section, 45. Form 24 (CABIL) section, 46. Form 24 (CABIL) section, 47. Form 24 (CABIL) section, 48. Form 24 (CABIL) section, 49. Form 24 (CABIL) section, 50. Form 24 (CABIL) section,
-
Окторгосанта, в калю 25 окоргостей
- 计算式计算 12 的多项式 12 的多项式 12 的多项式 12 的多项式 12 的多项式 12 的多项式 12 的多项式 12 = 12
- Свердловский уреждения 2. Свердловский обертам 3. Формой ПРОД РУЛЗЕЯ СС
- Недретальная
- 2000-2004 and 2. 2005-2006 were
- 2006-2007, 2008-2009, and 2010-2011 were
- 2011-2014 was training and training
经
zelmer
华安大通100%
SB1000
MIKSER KIELICHOWY bte-der / sand blanche
zelmer
natural_image
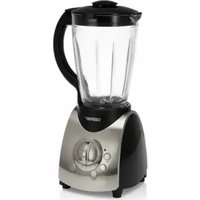
Exterior view of a modern kitchen blender with clear glass and black casing (no text or symbols visible)SB1000
P1 DESILICIA UZHOUWANG
PROSERKELCHOWY 6-8
NAVED KPOUJI
STOUN MOOD
NAYCU NA OSSUHJ
STOCKWATER 21-22
CHI 152740 AII JIAI AS
KEETHES MINDA
1980.15.15 用 1748
natural_image
Product photo of a blender with pink liquid, accompanied by small bowls of coffee beans and a glass of fruit (no visible text or symbols)zelmer
www.ohm@
A


B
C

©
D
E

PL
Stanewski Island!
Cohakam, n; non range 100% (with only 50% of the 100% of the 25% of the 75% of the 25% of the 75% of the 25% of the 75% of the 25% of the 75% of the 25% of the 75% of the 25% of the 75% of the 25% of the 75% of the 25% of the 75% of the 25% of the 75% of the
Molary operation of the process outcome survey

do ramos with rela abez adipomby
In the way of the
The following described information is provided in the following form:
The following table is in English:
“
covate number scales
The following table provides the original text:
The following table is provided in the image:
• a table of the company's operations.
and also, and may not be
(1) _1 (2) _1 (3) _1 (4) _1 (5) _2 (6) _3 (7) _4 (8) _5 (9) _6 (10)
The company's shareholding structure is 100% of the company's current shareholding.
We believe that, you would have
The following table is provided in the image. The text in the source image is illegible and contains no discernible characters or punctuation. Therefore, no valid OCR text can be generated from this image.
(4) 10:25:26
[Illegible Text]
10.2.1.1.
the most common knowledge, diet, diet pure
文具部(第10章)
(1) 2017年1月25日

[Unreadable]
1
The following is the following:
[Unreadable]
Notes
Dane techniczne
MONTÁŽ SEKACÍ JEDNOTKY

DEMONTÁŽ SEKACÍ JEDNOTKY

MONTÁŽ SEKACEJ JEDNOTKY

DEMONTÁŽ SEKACEJ JEDNOTKY

Congratulations on your choice of our appliance, and welcome among the users of Zelmer products.
Please read this instruction manual carefully. Pay special attention to important safety instructions. Keep this instruction manual for future reference.
Safety operation instructions
Make sure that the following guidelines have been understood.
Before using the device, read the whole content of the manual.

Danger! / Warning! Health hazard
Always place the appliance on flat, plain surface.
Always unplug the appliance when it is not in use and before cleaning.
Do not operate the appliance if the cord, the housing or the handle is visibly damaged. In such a case, return the appliance to a service center.
the non-detachable part of the cord is damaged, it should be replaced by the producer or at a proper service point or by a qualified person in order to avoid any hazards.
The appliance should be repaired by trained staff only. Improper repair can result in serious hazard for a user. In case of defects we recommend you to contact qualified service desk.
Do not immerse motor housing in water or any other liquid; do not use it in bathroom and outdoors.
- switch the appliance off, pressing the "①" button before removing the lid from the jug or the jug from the motor unit. Wait until blades have come to a complete standstill.
Switch the appliance off, and unplug it from the mains before assembling or disassembling accessories or touching parts that move during operation.
Do not use stand blender without feeder opening stopper.
Do not put your hands inside the jug, even if it is removed for cleaning, as the cutting blades are still dangerous – very sharp.
Do not put any objects (spoon, etc.) into the jug, when the blender is connected to power supply.
Do not wash the cutting blades directly with hand.
Use the soft brush for washing metal parts, especially the sharp blades.
This appliance is not intended for use by persons (including children) with reduced physical, sensory or mental capabilities, or lack of experience and knowledge, unless they have been given supervision
or instruction concerning use of the appliance by a person responsible for their safety.
Children should be supervised to ensure that they do not play with the appliance.

Caution!
Not observance can result in damage to possessions
Connect the appliance to 220-240 V mains supply.
Do not unplug by pulling on cord.
The supplying cord shall not be hanged over the edge of the table or board, nor touch any hot surface.
Do not fill the jug in with boiling liquids.
Keep the stand blender and supplying cord away from hot surfaces and burners.
it is possible, store the stand blender away from direct sun radiation and glow-like light.
Never store the blender with the lid on the jug. Moisten the lid sealing ring with water, and place the lid on the blender jug before use.
Do not fill the jug over 1500 ml mark – in such case, the content of the jug can lift the lid when the motor starts up.
Do not overflow the jug. In case the liquid gets under the motor housing, it can be vacuumed into the motor, causing its damage.
After 2 minutes of work stop operation of appliance for at least 1 minute, allowing the engine to cool down.
The process of mixing can have a maximum of ten two-minute work cycles.
Do not operate when the jug is empty, as it can get overheated.
The temperature of mixed ingredients should not exceed 60°C.

stion
Information on the product and suggestions for its use
The stand blender is intended for domestic usage only. In case it is used for gastronomic business purposes, warranty terms and conditions change.
During first start-up the appliances can emit some odours. It is a normal phenomenon, which should be over after a time.
Technical specification
Technical parameters are indicated on the nameplate of the product.
Admissible time of uninterrupted operation: 2 minutes.
The time interval between two successive processes of mixing: 10 minutes.
Maximum noise level: 85 dB/A.
The stand blender is built in 2nd isolation class. It does not require connection to the socket equipped with grounding pin.
The stand blender meets the requirements of standards in force.
The appliance meets the requirements of the directives:
Low Voltage Device (LVD) - 2006/95/EC. -
– Electromagnetic compatibility (EMC) – 2004/108/EC.
The product is marked with CE mark on the nameplate.
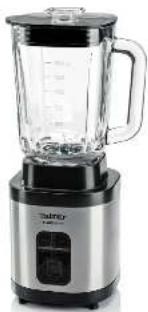
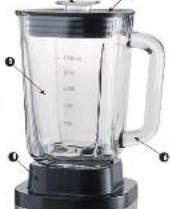
Appliance elements

1 Motor unit
2 Control panel
3 Anti-slip foot
4 Cord storage compartment
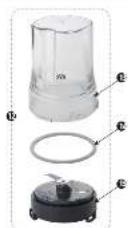
5 Blender jug with level indication
6 Jug handle
7 Jug lid
8 Jug base
9 Lid stopper with level indication
10 Blade unit
11 Sealing ring
12 Grinder
13 Grinder container
14 Grinder sealing ring
15 Grinder base with blade unit
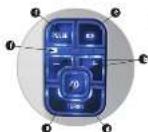
CONTROL PANEL
a ON/OFF button ①
b “-” and “+” buttons
“PULSE” button – enables the user to run the momentary blending programme at a preset speed
d "TURBO" button – enables the user to run the blending programme at a maximum speed
e "ICE" button – enables the user to run the ice-crushing programme
f Blade rotation speed indicator
The number of illuminated diodes depends on a blade rotation speed (the higher the rotation speed, the more diodes will be on).
Controls and Operation

PREPARING THE APPLIANCE FOR OPERATION
Wash the blender jug (5), lid (7) and stopper (9) in warm water with washing-up liquid, rinse thoroughly and dry before the first use (or after the stand blender was stored unused for a long period of time).

Be careful with the sharp blades.
CONTROL PANEL
The blender has an illuminated control panel, which goes on after the blender jug has been mounted (the cord is plugged into the mains socket). When the panel illumination is on, the appliance is ready for use.
You can use “−” and “+” to select one of 5 available blade rotation speeds. Blade rotation speed indicator shows the selected rotation speed, displaying 1 to 5 illuminating diodes depending on the rotation speed. Press the ON/OFF button
① to run the appliance at the chosen speed.
The appliance has been equipped with quick start programmes for user comfort. You can choose between three programmes: "PULSE", "ICE" and "TURBO", using appropriate buttons on the control panel.
ENERGY SAVING MODE
If no actions are taken for 1 minute in the stand-by mode or when the appliance is no longer in use, the stand blender will go to the energy saving mode (control panel illumination goes out). If any button is pressed, the appliance will return to the normal working mode (the control panel illumination goes on).
stand blender is designed for chopping and mixing various kinds of products. It can be used to prepare soups, sauces and milk shakes, you can also mix vegetables, fruits and meat, as well as pound cooked ingredients into food for the infants.
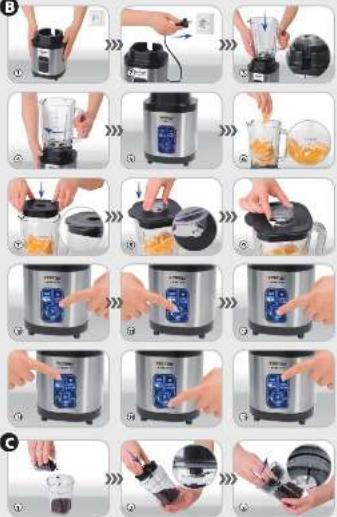
① Place the motor unit (1) on a dry, level and stable surface near a mains socket. Make sure that the motor unit is placed out of the reach of children.
Do not let the cord hang over the edge of a table or work surface to prevent accidental pulling or catching.
② Plug the cord into the mains socket.
③ Mount the blender jug (5) onto the motor unit so that the protruding element in the jug base fits in the cut-out in the motor unit (1).
④ Turn the blender jug clockwise (5) to lock it in place.
⑤ Control panel illumination goes on.
⑥ Put ingredients into the blender jug (5). Do not exceed the 1500 ml line on the blender jug. If the line is exceeded, the content of the jug may raise jug lid (7) when the motor is on.

The way you insert the ingredients into a blender's jug is free, but better results are obtained by adding the hard components at first.
⑦ Place the lid (7) onto the jug (5) before use so that its protruding element fits in the cut-out in the jug. Press the lid hard.

sten the sealing ring with water before placing the lid (7).
⑧ Insert the lid stopper (9) into the opening in the lid. Protruding elements on the lid stopper must fit in the cut-outs in the jug lid.
⑨ Turn the cover cap (9) in the clockwise direction until it is locked.

not start the stand blender without the lid stopper (9) in place, especially if you want to blend solid ingredients, as they might be ejected through the opening.
⑩ Select the required blade rotation speed using “-” and “+” buttons. 1 to 5 diodes will illuminate depending on the selected speed.
⑪ Start the appliance, pressing the ON/OFF button ① The button will start blinking.

After 2 minutes of work stop operation of appliance for at least 1 minute, allowing the engine to cool down. The process of mixing can have a maximum of ten two-minute work cycles.
⑫ When the appliance is no longer in use, switch it off using the ON/OFF button ①
QUICK START PROGRAMMES

s the required button to use one of the three available quick start programmes ("PULSE", "ICE", "TURBO").
⑬ "PULSE"
Pressing the "PULSE" button will cause the appliance to run in the momentary work mode (it will run in cycles for 6-7 seconds with 6-7-second intervals) at a preset speed. To stop the appliance, press the "PULSE" button again.
⑭ "TURBO"
The appliance will start processing ingredients at a maximum speed, if the "TURBO" button is pressed and held. To stop the appliance, release the "TURBO" button. The appliance will stop immediately.
15 "ICE"
You can use the "ICE" programme to crush ice. This function allows to obtain small pieces of ice of similar size.

I sure that the stand blender is clean before using it to crush ice. Should it be dirty, wash it thoroughly with clean water. Any washing-up liquid residues may affect the taste of the crushed ice and the taste of a drink, to which such ice will be added.
To obtain the best results of running the appliance in the "ICE" mode, use 10-25 ice cubes per load (the cubes should not be bigger than 2 cm in size). Add also ca. 15 ml (1 teaspoonful) of cold, fresh water. Place the jug lid and insert the stopper, and then press the "ICE" button to run the appliance in the momentary work mode (it will run in cycles for 6-7 seconds with 6-7-second intervals). When the appliance has completed ca. 5 crushing cycles, press the "ICE" button again to stop the appliance. If you are still dissatisfied with the results of crushing, because you want the ice to look like snow, press and hold the "TURBO" button for a couple of seconds.

Always pour some water into the jug before you start crushing ice.

Immediately after the crushing of ice or use a mixer with loads of ice do not wash the blender pitcher in hot water, because a large temperature difference can break the glass.
After operation
When the appliance is no longer in use, switch it off pushing the ON/OFF button Ⓙ
Use one hand to hold the motor unit (1) and the other one to grab the jug holder (6).
Turn the jug anticlockwise, so that the protruding element on the jug base fits in the cut-out in the motor unit. Remove the blender jug from the motor unit.
Remove the lid (7) from the blender jug (5), pulling the locked stopper with level indication.
●nplug the appliance from the mains socket if you do not intend to use it any longer.
Grinder

The grinder has been designated for grinding and milling of such ingredients as pepper, coffee beans, rice, wheat, sesame seeds, nuts (shelled), etc., as well as for chopping meat.

grinder has not been designated for grinding down very hard ingredients such as ice cubes or nutmeg.

r use the grinder for grinding sugar as this may damage the appliance.

re chopping, remove the veins, membranes and fat from the meat, and then chop it into pieces of approx. 2x2 cm in size.
① Put the ingredients into the grinder container.

not exceed the maximum content level indicated on the grinder container.
② Put the grinder base (15) with blade unit into the grinder container (13). Make sure that the grinder base sealing ring is fixed tightly to the narrowing in the grinder container.
③ Grab the clutch cover, and turn the grinder base with blade unit anticlockwise, until you feel the resistance.

twisting direction is shown at the bottom of the grinder base with blade unit.
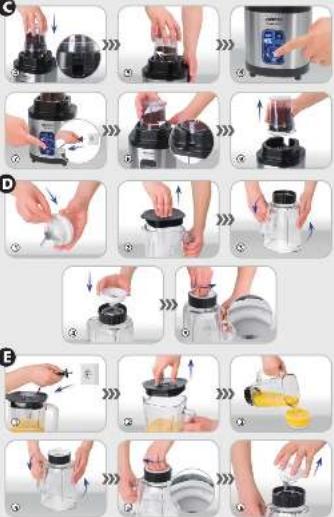
④ Turn the grinder upside down, and mount it onto the motor unit (1), so that one of the protruding elements in the grinder lid fits in the cut-out in the motor unit.
⑤ Turn the grinder (12) clockwise to lock it in place, until you feel the resistance. The control panel illumination will go on.
⑥ Run the appliance.

recommend you to use the "TURBO" programme or set the appliance at the maximum speed.

the lowest speed to obtained the best results of grinding nuts.

the mill to grind one type of product only. Grinding of various products immediately one after another without careful washing may result in diffusion of odour and/or flavour from one product to another one.

grinder should not be running continuously for more than 30 seconds. Switch the appliance off after 30 seconds, and wait another 30 seconds before you run it again.
⑦ When the grinding has been finished, switch the appliance off pressing the ON/OFF button. Inplug the appliance from the mains socket.
⑧ Turn the grinder anticlockwise so that the protruding element in the grinder lid fits in the cut-out in the motor unit.
⑨ Remove the grinder from the motor unit.
Open the grinder, following the instructions set forth in section ③, but in a reverse order.

ays wash the grinder container and the base with blade unit in warm water with washing-up liquid immediately after use. Wipe the grinder sealing ring with a damp cloth.
Cleaning and maintenance

the appliance immediately after use to prevent the deposits inside the blender jug.
Pour approx. 750 ml of water into the blender jug (5) and start the appliance for about 10 seconds by pressing and holding the "TURBO" button.
Remove the water from the blender jug (5), turn it upside down and allow it to dry.
Wash the jug (5), lid (7), stopper (9) and blade unit (10) in warm water with washing-up liquid, if necessary.
Binse it under the stream of clean, running water, and dry it.
you left the pitcher for a long time without cleaning and the pieces of mixed ingredients stuck to the inside of the pitcher, use a nylon brush.
Do not wash the blender jug (5), lid (7), stopper (9), coffee grinder (12) or blade unit (10) in a dishwasher. Aggressive cleaning agents may damage the surface of the accessories.
Wipe the motor unit (1) casing with a soft, damp cloth.

- immerse the motor unit (1) in water or any other liquid.
Do not clean the motor unit casing (1) with aggressive detergents, such as emulsion, milk, paste, etc. They can remove the graphic symbols.
Never clean the glass blender jug (5) and the grinder container (13) with coarse sponges.
Dry all elements of the appliance thoroughly after washing.
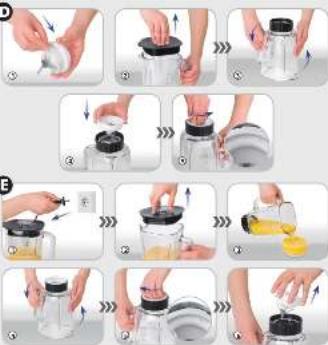
BLADE UNIT ASSEMBLY

① Place the sealing ring (11) onto the blade unit flange (10).
② Remove the lid (7) from the blender jug (5), pulling the locked stopper with level indication (9).
③ Turn the blender jug (5) "upside down", and put it on a stable, level surface.
④ Insert the blade unit (10) into the opening at the bottom of the blender jug (5).
⑤ Hold the blender jug (5) with one hand, and turn the blade unit anticlockwise with the other hand, until you feel the resistance.

twisting direction is shown at the bottom of the blade unit.

BLADE UNIT DISASSEMBLY
① Unplug the appliance from the mains socket.
② Remove the lid (7) from the blender jug (5) pulling the locked stopper with level indication (9).
③ Remove the content of the blender jug (5).
④ Clean the blender jug (see "Cleaning and Maintenance"). Turn the blender jug (5) upside down, and put it on a stable, level surface.
⑤ Hold the blender jug (5) with one hand, and turn the blade unit clockwise with the other hand.

twisting direction is shown at the bottom of the blade unit of the blender.
⑥ Carefully remove the blade unit (10) with the sealing ring (11).

Be careful with the sharp blades.
Ecology – Environment protection
Each user can protect the natural environment. It is neither difficult nor expensive.
In order to do it: put the cardboard packing into recycling paper container; put the polyethylene (PE) bags into container for plastic.

When worn out, dispose the appliance to particular disposal centre, because of the dangerous elements of this appliance, which can be hazardous for natural environment.
Do not dispose into the domestic waste disposal!!!
The manufacturer/importer does not accept any liability for any damages resulting from unintended use or improper handling.
The manufacturer/importer reserves his rights to modify the product any time in order to adjust it to law regulations, norms, directives or due to construction, trade, aesthetic or other reasons, without notifying in advance.

- SB1000
- zelmer
- Stanewski Island!
- [Unreadable]
- Dane techniczne
- MONTÁŽ SEKACÍ JEDNOTKY
- DEMONTÁŽ SEKACÍ JEDNOTKY
- MONTÁŽ SEKACEJ JEDNOTKY
- DEMONTÁŽ SEKACEJ JEDNOTKY
- Safety operation instructions
- Danger! / Warning! Health hazard
- Caution!
- Not observance can result in damage to possessions
- stion
- Information on the product and suggestions for its use
- Technical specification
- Appliance elements
- CONTROL PANEL
- Controls and Operation
- PREPARING THE APPLIANCE FOR OPERATION
- ENERGY SAVING MODE
- QUICK START PROGRAMMES
- ⑬ "PULSE"
- ⑭ "TURBO"
- "ICE"
- After operation
- Grinder
- Cleaning and maintenance
- BLADE UNIT ASSEMBLY
- BLADE UNIT DISASSEMBLY
- Ecology – Environment protection
Brand : Zelmer
Model : ZSB1400B
Category : Blender