Avance Collection HR1659 - Blender PHILIPS - Free user manual and instructions
Find the device manual for free Avance Collection HR1659 PHILIPS in PDF.

| Product Type | Hand blender with multifunctional attachments |
| Brand | Philips |
| Model | Avance Collection HR1659 |
| Main Functions | Blending, mixing, pureeing, chopping, kneading, shredding, slicing, cube cutting |
| Speed Settings | Variable speed ring (1-20) plus Turbo button for maximum speed |
| Attachments | Blender bar, compact chopper (bowl + blade), food processor (bowl + lid + pusher), kneading accessory, double-sided shredding/slicing disc, cube cutter, beaker with lid |
| Beaker Capacity | 1000 ml (with lid) |
| Chopper Bowl Max Capacity | Up to 120 g meat or 100 g nuts |
| Food Processor Bowl Max Capacity | Up to 500 g flour for kneading, 500 g vegetables for cube cutting |
| Safety System | Locking mechanism ensures appliance only operates when properly assembled |
| Noise Level | Lc = 79 dB(A) |
| Cleaning | Motor unit, chopper lid, and food processor lid wiped with damp cloth; other parts dishwasher safe (blades hand wash recommended) |
| Accessories Available Separately | XL chopper lid, bowl, blade unit; beaker with lid; pusher for cube cutter; anti-slip ring for food processor bowl |
| Power Source | AC mains (voltage varies by country) |
Frequently Asked Questions - Avance Collection HR1659 PHILIPS
User questions about Avance Collection HR1659 PHILIPS
0 question about this device. Answer the ones you know or ask your own.
Ask a new question about this device
Download the instructions for your Blender in PDF format for free! Find your manual Avance Collection HR1659 - PHILIPS and take your electronic device back in hand. On this page are published all the documents necessary for the use of your device. Avance Collection HR1659 by PHILIPS.
USER MANUAL Avance Collection HR1659 PHILIPS
Register your product and get support at
www.philips.com/welcome
HR1659

natural_image
Black Philips electric shaver with a digital display and control panel (no visible text or symbols on the device body)PHILIPS

natural_image
Diagram of three open panels with grid patterns and directional arrows indicating rotation or movement (no text or symbols)
 |  | 28 | |
 |  |  | √ |
 |  |  | |
 |  |  | √ |
 |  |  | |
 |  |  | |
 |  |  | |
 |  |  |  |
 |  |  | |
 |  |  | |
 |  |  |
ENGLISH 6
БЪЛГАРСКИ 16
ČEŠTINA 26
EESTI 36
HRVATSKI 45
MAGYAR 55
КАЗАКША 65
LIETUVIŠKAI 75
LATVIEŠU 85
POLSKI 95
ROMÂNĂ 105
РУССКИЙ 115
SLOVENSKY 126
SLOVENŠČINA 136
SRPSKI 145
УКРАЇНСЬКА 155
Introduction
Congratulations on your purchase and welcome to Philips! To fully benefit from the support that Philips offers, register your product at www.philips.com/welcome.
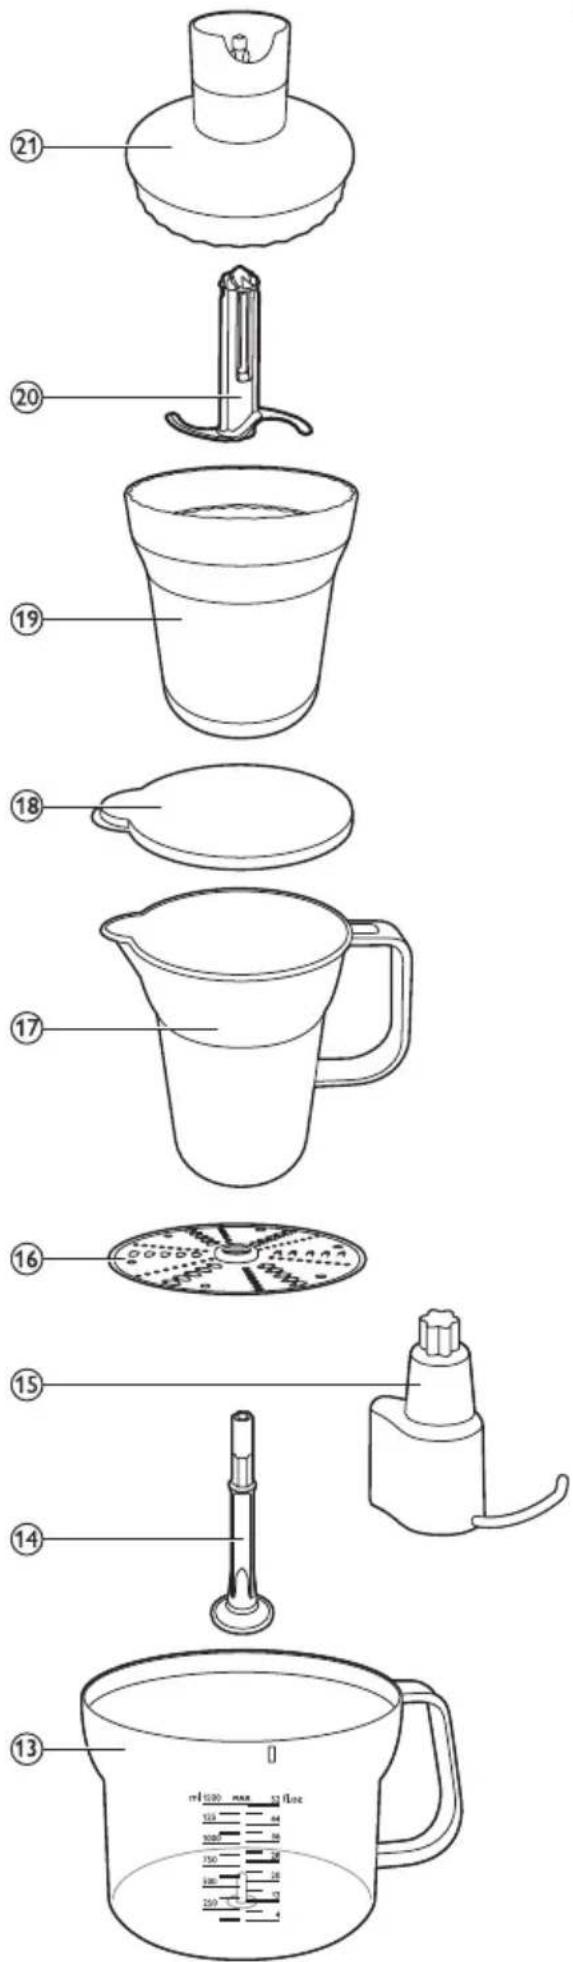
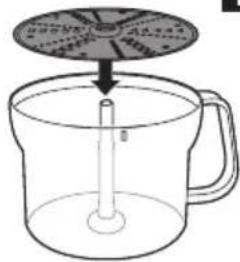
General description (Fig. 1)
1 Speed ring
2 On/off button
3 Turbo button
4 Motor unit
5 Release button
6 Blender bar with integrated blade unit
7 Protection cap
Food processor
8 Pusher
9 Lid of food processor bowl
10 Cube cutter blade unit
11 Cube cutter
12 Pusher for cleaning the cube cutter grid
13 Food processor bowl
14 Tool holder for disc
15 Kneading accessory
16 Double-sided shredding/slicing disc
Beaker
17 Beaker
18 Beaker lid
Compact chopper
19 Chopper bowl
20 Chopper blade unit
21 Chopper lid
Important
Read this user manual carefully before you use the appliance and save it for future reference.
Danger
- Never immerse the motor unit, the chopper lid and the food processor lid in water or any other liquid, nor rinse them under the tap. Only use a moist cloth to clean these parts.
Warning
- Check if the voltage indicated on the appliance corresponds to the local mains voltage before you connect the appliance.
- Do not use the appliance if the plug, the mains cord or other parts are damaged.
- If the mains cord is damaged, you must have it replaced by Philips, a service centre authorised by Philips or similarly qualified persons in order to avoid a hazard.
- Avoid touching the cutting edges of the integrated blade unit of the blender bar, especially when the blender bar is attached to the motor unit. The cutting edges are very sharp.
- Never use the chopper blade unit without the chopper bowl.
-
If the appliance is damaged, always have it replaced with one of the original type, otherwise your guarantee is no longer valid.
-
This appliance is not intended for use by persons (including children) with reduced physical, sensory or mental capabilities, or lack of experience and knowledge, unless they have been given supervision or instruction concerning use of the appliance by a person responsible for their safety.
- Children should be supervised to ensure that they do not play with the appliance.
- Do not allow children to use the appliance without supervision.
- Never let the appliance operate unattended.
- Be careful to avoid splashing when you process hot ingredients.
- Never use your fingers or an object (e.g. a spatula) to push ingredients down the feeding tube while the appliance is operating. Only use the pusher for this purpose.
- None of the accessories are suitable for use in the microwave.
- Be very careful when you handle or clean the blade units and the double-sided shredding/slicing disc. Their cutting edges are very sharp. Be especially careful when you clean them and when you empty the chopper bowl and the food processor bowl.
- If the blade units get stuck, unplug the appliance before you remove the ingredients that block the blade units.
Caution
- Switch off the appliance and disconnect it from the mains before you assemble, disassemble, store and clean it.
- Never use any accessories or parts from other manufacturers or that Philips does not specifically recommend. If you use such accessories or parts, your guarantee becomes invalid.
- This appliance is intended for household use only. If the appliance is used improperly or for professional or semi-professional purposes or if it is not used according to the instructions in the user manual, the guarantee becomes invalid and Philips refuses any liability for damage caused.
- Keep the motor unit away from heat, fire, moisture and dirt.
- Never fill the beaker, the chopper bowl or the food processor bowl with ingredients that are hotter than 80^ C/175°F.
- Do not exceed the quantities and processing times indicated in the tables.
- Do not exceed the maximum indications on the chopper bowl and food processor bowl.
- Only process ingredients listed in the ‘quantities and processing times’ tables of the corresponding accessories. Do not process frozen food of fruits with stones or pips.
- If you notice that the handle becomes hot (hotter than 50^ C/122°F), unplug the appliance and let it cool down for at least 60 minutes.
- Noise level: Lc= 79 dB(A).
Safety system
The food processor accessory is equipped with a built-in safety system. This safety system ensures that you can only switch on the appliance if you have assembled it correctly. For correct assembly, please read sections 'Kneading accessory', 'Double-sided shredding/slicing disc' and 'Cube cutter' in chapter 'Using the appliance'.
Electromagnetic fields (EMF)
This Philips appliance complies with all standards regarding electromagnetic fields (EMF). If handled properly and according to the instructions in this user manual, the appliance is safe to use based on scientific evidence available today.
Before first use
Thoroughly clean the parts that come into contact with food before you use the appliance for the first time (see chapter 'Cleaning').
Preparing for use
1 Let hot ingredients cool down before you process them with the appliance (max. temperature 80^ C/ 175^ F).
2 If you use the hand blender or the chopper, cut large ingredients into cubes of approx. 2cm before you process them. If you use the food processor with the slicing/shredding disc or the cube cutter, cut the ingredients into pieces that fit into the feeding tube. Take care that the chunks are not too big to prevent them from getting stuck in the tube.
3 Assemble the appliance properly.
Using the appliance
Hand blender
The hand blender is intended for:
- blending fluids, e.g. dairy products, sauces, fruit juices, soups, mixed drinks and shakes.
- mixing soft ingredients, e.g. pancake batter or mayonnaise.
- pureeing cooked ingredients, e.g. for making baby food.
1 Put the ingredients in the beaker.
See the table for the recommended quantities and processing times.
Blending quantities and processing times
Ingredients Blending quantity Time Speed
Fruits & vegetables 100-200g 30sec. Turbo
Baby food, soups & sauces 100-400ml 60sec. 15-20
Batters 100-500ml 60sec. 15-20
Shakes & mixed drinks 100-1000ml 60sec. 15-20
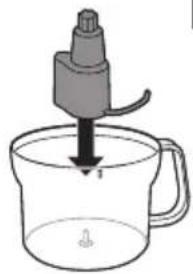
2 Attach the blender bar to the motor unit ('click') (Fig. 2).
3 Put the plug in the wall socket.
4 Immerse the blade guard completely in the ingredients.
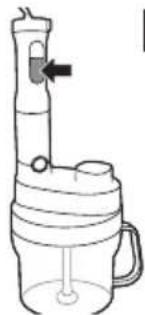
5 Press and hold the on/off button or the turbo button to let the appliance operate (Fig. 3).
- When you use the on/off button, you can adjust the speed with the speed ring. The higher the speed, the shorter the processing time required.
- The speed ring has settings from 1 (low speed) to 20 (high speed).
- When you use the turbo speed button, the appliance operates at maximum speed. In this case, you cannot adjust the speed with the speed ring.
6 Move the appliance slowly up and down and in circles to blend the ingredients (Fig. 4).
Compact chopper
The chopper is intended for chopping ingredients such as nuts, meat, onions, hard cheese, boiled eggs, garlic, herbs, dry bread etc.
Be very careful when you handle the chopper blade unit, its cutting edges are very sharp. Be particularly careful when you remove the blade unit from the chopper bowl, when you empty the chopper bowl and during cleaning.
Caution: Do not process more than 1 batch without interruption. Let the appliance cool down for 5 minutes before you continue processing.
Note: Cut large ingredients into cubes of approx. 2cm before you process them.
1 Put the blade unit in the chopper bowl (Fig. 5).
2 Put the ingredients in the chopper bowl.
See the table for the recommended quantities and processing times.
Compact chopper quantities and processing times
| Ingredients Chopping quantity Time Speed | |||
| Onions 100g 5 × 1sec. 5 | |||
| Eggs 2 5 × 1sec. 5 | |||
| Meat 120g (max.) 5sec. turbo | |||
| Herbs 20g 5 × 1sec. 10-15 | |||
| Nuts and almonds 100g 20sec. | turbo | ||
| Garlic | 50g 5 × 1sec. turbo | ||
| Parmesan cheese | 50-100g (max.) | 15sec. | turbo |
3 Put the chopper lid on the chopper bowl (Fig. 6).
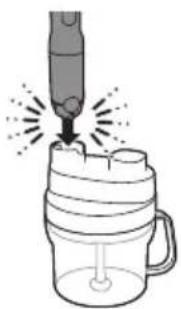
4 Fasten the motor unit onto the chopper lid ('click') (Fig. 7).
5 Put the plug in the wall socket.
6 Press and hold the on/off button or the turbo speed button to let the appliance operate.
- When you use the on/off button, you can adjust the speed with the speed ring. The higher the speed, the shorter the processing time required.
- The speed ring has settings from 1 (low speed) to 20 (high speed).
- When you use the turbo speed button, the appliance operates at maximum speed. In this case, you cannot adjust the speed with the speed ring.
Note: If the ingredients stick to the wall of the chopper bowl, unplug the appliance and loosen dry ingredients from the wall with a spatula or by adding some liquid (e.g. if you are making pesto).
Food processor
Kneading accessory
The kneading accessory is intended for kneading pasta dough and cake mixture.
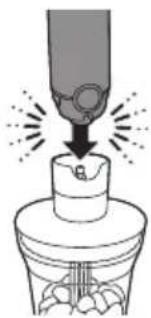
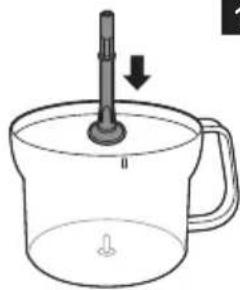
1 Place the kneading accessory in the food processor bowl. (Fig. 8)
2 Put the ingredients in the bowl.
See the table below for recommended quantities and processing time.
Tip: For the best results, first put the liquid ingredients in the bowl and then add the dry ingredients.
Kneading quantities, processing time and speed settings
Recipe Quantity of flour Time Speed
Pasta dough 500g 60sec Turbo
Cake mixture 200g 60sec Turbo
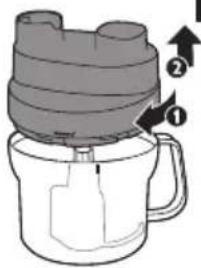
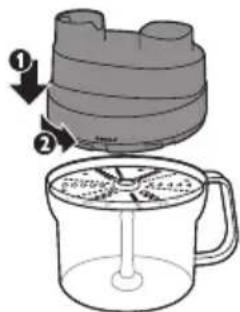
3 Put the lid on the bowl (1). Turn the lid anticlockwise (2) to fix it. (Fig. 9)
4 Fasten the motor unit onto the lid of the bowl ('click') (Fig. 10).
5 Put the pusher in the feeding tube.
Note: The pusher prevents splashing.
6 Press and hold the turbo button to let the appliance operate. (Fig. 11)
When you use the turbo speed button, the appliance operates at maximum speed. In this case, you cannot adjust the speed with the speed ring.
Note: Always let the appliance cool down for 30 minutes after kneading one batch.
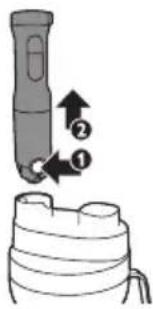
7 After processing, press the release button on the motor unit (1) and remove the motor unit from the food processor lid (2). (Fig. 12)
8 Turn the lid clockwise (1) and remove it from the bowl (2). (Fig. 13)
Double-sided shredding/slicing disc
The double-sided shredding/slicing disc is intended for slicing or shredding vegetables like cucumber, carrots, potatoes, leeks and onions and certain kinds of cheese. Simply turn the disc to switch between the two functions of the disc.
Never process hard ingredients like ice cubes with the disc.
The cutting edges of the disc are very sharp. Do not touch them.
1 Place the tool holder in the food processor bowl (Fig. 14).
2 Place the double-sided shredding/slicing disc on the tool holder with the desired side pointing upwards (Fig. 15).
3 Put the lid on the bowl (1). Turn the lid anticlockwise (2) to fix it ('click') (Fig. 16).
4 Put the ingredients in the feeding tube.
- Pre-cut large ingredients into chunks that fit in the feeding tube.
- Fill the feeding tube evenly for the best results.
- When you have to process a large amount of ingredients, process small batches and empty the bowl between batches.
- To shred cheese, e.g. Parmesan, Gouda or Emmentaler, the cheese should be at refrigerator temperature.
5 Fasten the motor unit onto the lid of the bowl ('click') (Fig. 17).
6 Put the pusher onto the ingredients in the feeding tube.
7 Press and hold the turbo speed button to let the appliance operate (Fig. 18).
- When you use the turbo speed button, the appliance operates at maximum speed. In this case, you cannot adjust the speed with the speed ring.
8 Press the pusher lightly onto the ingredients in the feeding tube.
9 After processing, press the release button on the motor unit (1) and remove the motor unit from the food processor lid (2). (Fig. 12)
10 Turn the lid clockwise (1) and remove it from the bowl (2). (Fig. 19)
Cube cutter
The cube cutter is intended for cutting raw and cooked vegetables and fruit into small cubes.
Do not process hard ingredients like fruit with stones, meat with bones or frozen ingredients.
They could block and damage the cube cutter.
Tip: If you want to process different ingredients without cleaning the cube cutter in between, always start with the softest ingredients. For instance, for a fruit salad, start with banana, continue with mango and end with apples.
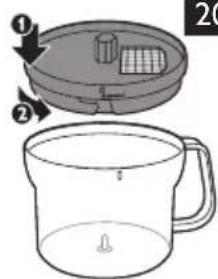
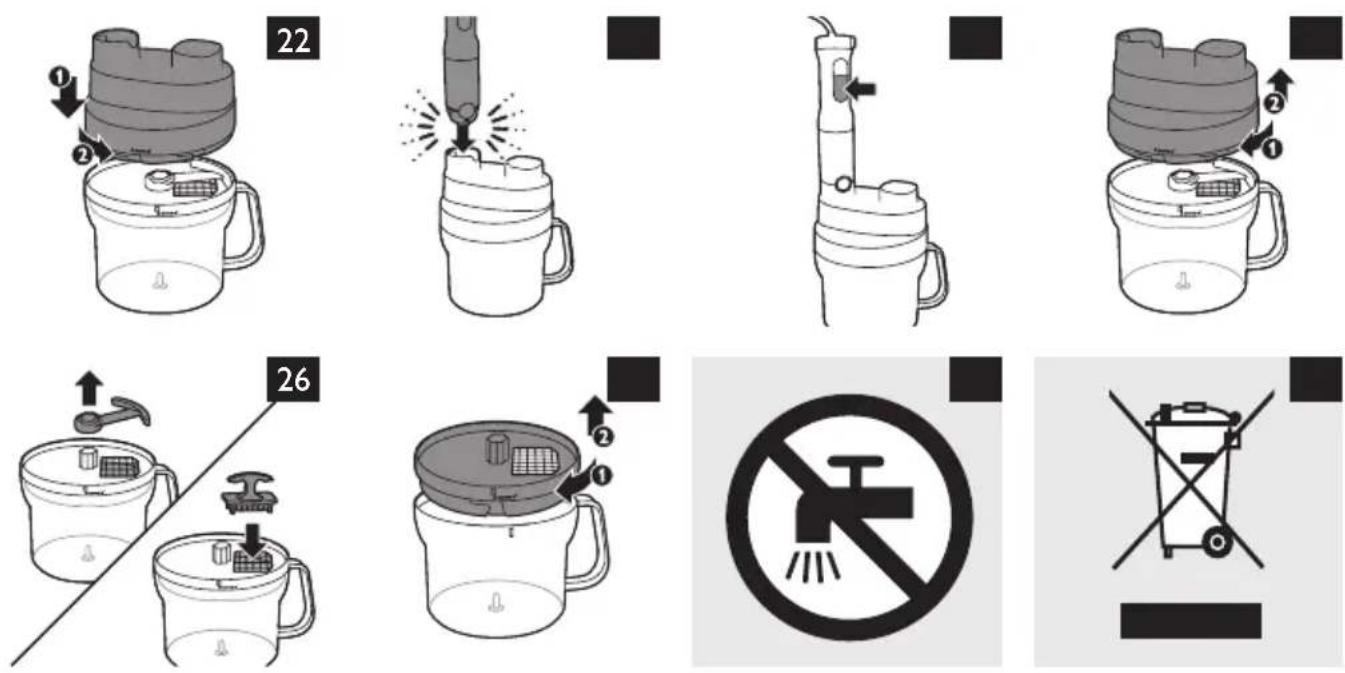
1 Place the cube cutter on the bowl (1) and turn it anticlockwise to fix it (2). (Fig. 20)
2 Attach the cube cutter blade with the logo pointing upwards onto the cube cutter (Fig. 21).
The cutting edges of the cube cutter blade and grid are very sharp, so handle them with care!
3 Put the lid on the bowl (1). Turn the lid anticlockwise (2) to fix it. (Fig. 22)
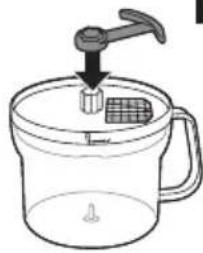
4 Fasten the motor unit onto the lid of the bowl ('click') (Fig. 23).
Note: If it does not click into position, check if you have assembled the cube cutter blade in the right position and if you have fixed the cube cutter properly.
5 Put the ingredients in the feeding tube.
See the table below for the recommended quantities.
- Pre-cut large ingredients into chunks that fit loosely in the feeding tube.
- When you have to process a large amount of ingredients, process small batches (max. 250g) and shake the bowl slightly to distribute the cut ingredients in the bowl. Empty the bowl after processing 500g.
Cube cutter quantities
Cooked ingredients Max. amount
Potatoes 500g
Carrots 500g
Beetroots 500g
Celery 500g
Raw ingredient Max. amount Raw ingredient Max. amount
| Potatoes 500g Bell peppers | 500g | |
| Carrots | 500g Tomatoes | 500g |
| Beetroots | 500g Celery | 500g |
| Courgette | 500g Apples | 500g |
| Cucumber | 500g Mango | 500g |
| Pumpkin | 500g Pears | 500g |
| Aubergine | 500g Bananas | 500g |
| Kohlrabi | 500g | |
ENGLISH12
6 Press and hold the turbo button to switch on the appliance. (Fig. 24)
When you use the turbo speed button, the appliance operates at maximum speed. In this case, you cannot adjust the speed with the speed ring.
7 Press the pusher lightly onto the ingredients in the feeding tube.
Note: If ingredients get stuck, unplug the appliance, detach the motor unit, open the lid by turning it clockwise and remove the ingredients that are stuck in the feeding tube.
8 After processing, press the release button on the motor unit (1) and remove the motor unit from the food processor lid (2). (Fig. 12)
Always let the appliance cool down for 30 minutes after processing.
9 Turn the lid clockwise (1) and remove it from the bowl (2) (Fig. 25).
10 Remove the cube cutter blade. Then use the special pusher supplied to push the ingredients that are stuck in the grid into the bowl. (Fig. 26)
11 Detach the cube cutter by turning it clockwise (1) and remove it from the bowl (2). Then empty the bowl. (Fig. 27)
Cleaning (Fig. 28)
Do not immerse the motor unit, the chopper lid and the food processor lid in water, nor rinse them under the tap. Use a moist cloth to clean them (Fig. 29).
Never use scouring pads, abrasive cleaning agents or aggressive liquids such as petrol or acetone to clean the appliance.
Clean the blade units, the cube cutter and the double-sided shredding/slicing disc very carefully. Their cutting edges are very sharp.
1 Unplug the appliance.
2 Press the release button on the motor unit to remove the accessory you have used.
3 Disassemble the accessory.
Tip: You can also remove the rubber ring from the chopper bowl for extra thorough cleaning.
4 See the cleaning table for further instructions.
If you clean the blender bar in the sink, always detach the motor unit before cleaning.
Tip: For quick cleaning of the blender bar, pour warm water with some washing-up liquid into the beaker, insert the blender bar and let the appliance operate for approx. 10 seconds.
Tip: For easy cleaning of the cube cutter, push any remaining ingredients out of it with the pusher supplied.
Ordering accessories
If you need to replace an accessory or want to purchase an additional accessory, go to your Philips dealer or visit www.philips.com/shop. If you have problems obtaining accessories, please contact the Philips Consumer Care Centre in your country.
Accessories available
Accessory Service code no.
XL chopper lid 4203 035 95661
XL chopper bowl 4203 035 95671
XL chopper blade unit* 4203 035 95681
Beaker with lid 4203 035 95731
Pusher for cleaning cube cutter grid 4203 035 97121
Anti-slip ring for food processor bowl 4203 035 97131
*Including protection cap
Environment
- Do not throw away the appliance with the normal household waste at the end of its life, but hand it in at an official collection point for recycling. By doing this you help to preserve the environment (Fig. 30).
Guarantee and service
If you need service or information or if you have a problem, please visit the Philips website at www.philips.com or contact the Philips Consumer Care Centre in your country. You find its phone number in the worldwide guarantee leaflet. If there is no Consumer Care Centre in your country, go to your local Philips dealer.
Frequently asked questions
Question Answer
The appliance produces an unpleasant smell, feels hot to the touch or produces smoke. What should I do? The appliance may produce an unpleasant smell or emit a little smoke if it has been used too long. Switch off the appliance and let it cool down for 60 minutes. If the problem persists, please contact the Philips Consumer Care Centre.
Can I process boiling hot ingredients? Let the ingredients cool down to approximately 80^ C/ 175^ F before you process them.
Which size should the ingredients have before I process them? If you use the hand blender or the chopper, cut large ingredients into cubes of approx. 2cm before you process them. If you use the food processor with the slicing/shredding disc or with the cube cutter, cut the ingredients into pieces that fit loosely into the feeding tube.
Can I process very hard ingredients in the appliance? You can chop small amounts of hard ingredients such as Parmesan and chocolate. Processing extremely hard ingredients such as bones and fruit with stones or frozen food or ice cubes causes damage to the appliance.
Why does the appliance suddenly stop working? Some hard ingredients may block the blade unit. Release the on/off button, unplug the appliance, detach the motor unit and remove the ingredients that block the blade unit.
Question Answer
I cannot attach the motor unit onto the food processor lid. What should I do?
Check if the cube cutter blade unit is assembled with the logo pointing upwards. Check if the cube cutter and the lid are locked into position.
I cannot disassemble the food processor lid. What should I do?
First you have to detach the motor unit by pushing the release button. Then you can detach the food processor lid by turning it clockwise.
Recipes
Pancake filling
Ingredients:
- 120g honey
- 100g prunes
1 Put the honey in the fridge for several hours.
2 Put the prunes in the XL chopper bowl and pour the honey over them.
3 Press the turbo button and chop for 5 seconds.
Vegetable salad
Ingredients:
- 350g potatoes
- 150g carrots
- 150g celery
- 150g green peas
- 100g pickles
- 150g mayonnaise
- 3 eggs
- 2tbsp vinegar
- Salt and pepper
1 Boil the eggs for approx. 12 minutes and let them cool down.
2 Peel the potatoes, carrots and celery, cut them into chunks that fit into the feeding tube. Then use the cube cutter to cut the ingredients into cubes.
3 Cook the vegetable cubes and the green peas in boiling salted water for approx. 10-15min.
4 Cut the pickles and the cooked eggs with the cube cutter. Before cutting the eggs, clean the cube cutter grid.
5 Let the cooked vegetables cool down to room temperature and mix them with the cut pickles and eggs. Then add mayonnaise and vinegar, season with pepper and stir gently to mix the ingredients.
Tip: You can mix the salad with different kinds or meat or fish, or you can use the salad as stuffing for tomatoes or wrap it into a slice of ham.
Fruit salad
Ingredients:
- 2 bananas
- 2 apples
-
1 mango
-
juice of 1 orange
- juice of 12 lemon
- 20ml maraschino
1 Peel the banana.
2 Peel the apple, cut it into 4 parts and remove the stalk and the core.
3 Peel the mango and remove the stone.
4 Cut all fruit with the cube cutter. Start with the softest fruits and continue with harder fruits.
5 Mix the salad with the orange and lemon juice and add maraschino.
Tip: Store the fruit salad in the fridge for about 1 hour and serve with whipped cream and a mint leaf.
Въведение
natural_image
Illustration of a tool being inserted into a workpiece, showing motion and spark (no text or symbols)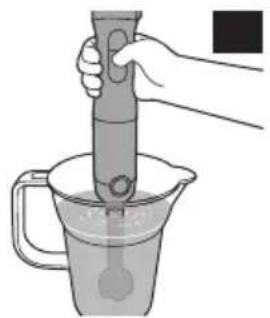
natural_image
Illustration of a hand using a pipette to test liquid in a container (no text or symbols)
natural_image
Illustration of a hand using a pipette to lift a container with arrows indicating rotation (no text or symbols)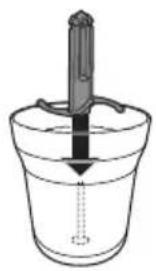
natural_image
Simple line drawing of a bucket with a rod inserted into it, no text or symbols present6

natural_image
Illustration of a mechanical device pressing down into a glass with ice cubes (no text or symbols)67
natural_image
Diagram of a mechanical press or clamping device with a downward force and sparkles, no text or symbols present.The image is too blurry to recognize any text content.
natural_image
Illustration of a mechanical device being inserted into a glass cup with a downward arrow indicating force (no text or symbols)The image is too blurry to recognize any text content.

The image is too blurry to recognize any text content.

natural_image
Illustration of a hand using a tool to press or brush into a mug (no text or symbols)10

natural_image
Line drawing of a portable water dispenser with handle and spout (no text or symbols)The image is too blurry to recognize any text content.
The image is too blurry to recognize any text content.
The image is too blurry to recognize any text content.
14
natural_image
Simple line drawing of a laboratory glassware setup with a rod inserted into a cup, showing liquid level and a downward arrow (no text or symbols)14
15
The image is too blurry to recognize any text content.
natural_image
Illustration of a pipette dispensing liquid into a jar with a handle (no text or symbols)The image is too blurry to recognize any text content.
18
natural_image
Simple line drawing of a laboratory apparatus with a funnel and beaker (no text or symbols)18

19
20
natural_image
Simple line drawing of a faucet pouring liquid into a glass with a grid inside (no text or symbols)The image is too blurry to recognize any text content.

natural_image
Diagram showing three open panels with grid patterns and curved arrows indicating rotation or movement (no text or symbols)