Pfirst LG16-200 - Shower system Pfister - Free user manual and instructions
Find the device manual for free Pfirst LG16-200 Pfister in PDF.

User questions about Pfirst LG16-200 Pfister
0 question about this device. Answer the ones you know or ask your own.
Ask a new question about this device
Download the instructions for your Shower system in PDF format for free! Find your manual Pfirst LG16-200 - Pfister and take your electronic device back in hand. On this page are published all the documents necessary for the use of your device. Pfirst LG16-200 by Pfister.
USER MANUAL Pfirst LG16-200 Pfister
Handheld Shower Package
Paquete De Ducha De Mano
natural_image
Line drawing of a handheld telephone handset with cord and base (no text or symbols)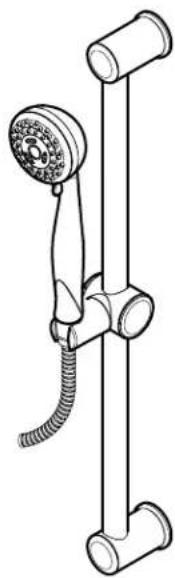
natural_image
Line drawing of a single hand shower device with coiled tube and cylindrical connectors (no text or symbols)


Pfister ^20
Pfister® Lifetime Mechanical & Pfinish Warranty Covers Pfinish & Pfunction for as Long as You Own Your Home (Commercial Applications Limit the Duration of the Warranties Provided Below) Pfister® provides the following Warranties for its products. Proof of Purchase may be required in order to obtain any of the benefits set forth below.
Limited Warranties: Pfister® warrants that for as long as the original purchaser owns the home in which the Pfister® product (the "Product") is originally installed, the Product will be free of all defects in material and workmanship that would impair the intended and proper use of the Product. If the Product is installed in a commercial application, the above mechanical warranty shall be limited for a period of ten (10) years from the date of purchase of the Product.
Pfister 3 warrants against deterioration of the Product's finish for as long as the original purchaser owns the home in which the Product is originally installed. If the Product is installed in a commercial application, the above finish warranty for Products that do not contain the Pforever finish shall be limited to a period of ten (10) years from the date of purchase.
Exclusive Remedy: In the event of any defect in the Product that breaches the foregoing warranties, Pfister®, at its option, will repair or replace the defective part of the Product. Repair or replacement of the Product is the exclusive remedy.
For any remedy under this warranty, Pfister® is to be notified describing the problem. In order to notify Pfister® and receive assistance or service under this warranty, the original purchaser may: (1) call 1-800-Pfaucet (1-800-732-8238) for a consumer service representative who can assist you, or (2) write customer service department c/o Pfister® Inc., 19701 DaVinci, Lake Forest, CA 92610, and include a description of the problem, model number, your name, address, phone number and approximate date of purchase, or (3) email Pfister®'s customer service department by going to www.Pfisterfaucets.com, or (4) notify the location or distributor from which the Product was purchased. In any case, you may be required to return the Product to Pfister® for inspection and proof of purchase may be required.
Limitations and Exclusions:
Pfister 3 WILL NOT BE LIABLE FOR ANY OTHER DAMAGES OR LOSSES, INCLUDING, BUT NOT LIMITED TO, INCIDENTAL AND/OR CONSEQUENTIAL DAMAGES, REGARDLESS OF THE LEGAL THEORY ASSERTED, INCLUDING ANY CLAIM OR BREACH OF WARRANTY HEREUNDER OR ANY OTHER CAUSE, AND WHETHER ARISING IN CONTRACT OR IN TORT (including negligence and strict liability).
Pfister® has the right to discontinue or modify any product at any time. Some states do not allow limitations or exclusions of incidental or consequential damages, so the above limitations or exclusions may not apply to you. This warranty gives you specific legal rights, and you may also have other rights which vary from state to state.
The above warranties do not cover damage resulting from improper maintenance, repair, cleaning or installation, misuse, abuse, alterations, accidents or acts of God.

Pfister ^x
Thank you for purchasing this Pfister product. All Pfister products are carefully engineered, and factory tested to provide long trouble-free use under normal conditions. This product is easy to install using basic tools and our easy to follow illustrated instructions. If you have any questions regarding this product, call 1-800-Pfaucet (1-800-732-8238).
1 BEFORE PROCEEDING

WARNING: Read all the instructions completely before proceeding. Pfister recommends calling a professional if you are uncertain about installing this product! This product should be installed in accordance with all local and state plumbing and building codes.
natural_image
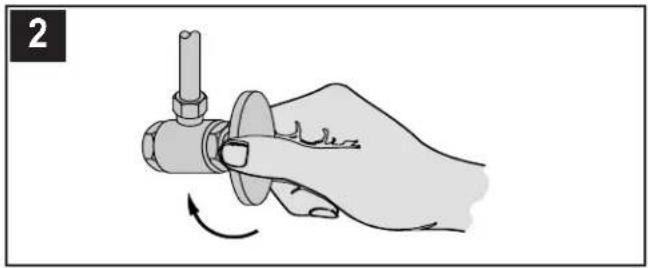
Hand holding a mechanical component with a rotating arrow indicating rotation (no text or symbols)2 SHUT OFF WATER SUPPLY
Locate water supply inlets and shut off the water supply valves. These are usually found under the sink or near the water meter. If you are replacing an existing faucet, remove the old faucet from the sink and clean the sink surface thoroughly.
natural_image
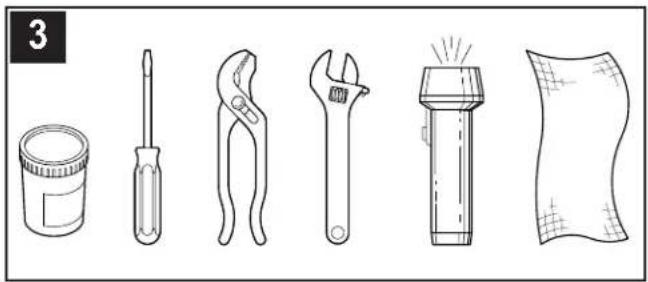
Line drawings of six different tools and components: a paint can, screwdriver, pliers, wrench, flashlight, and fabric (no text or symbols)3 TOOLS RECOMMENDED
- Plumber's putty • Slotted screwdriver • Pliers - Adjustable wrench • Flashlight • Cloth Your installation may require new supply lines and / or shut-off valves or other additional tools.
text_image
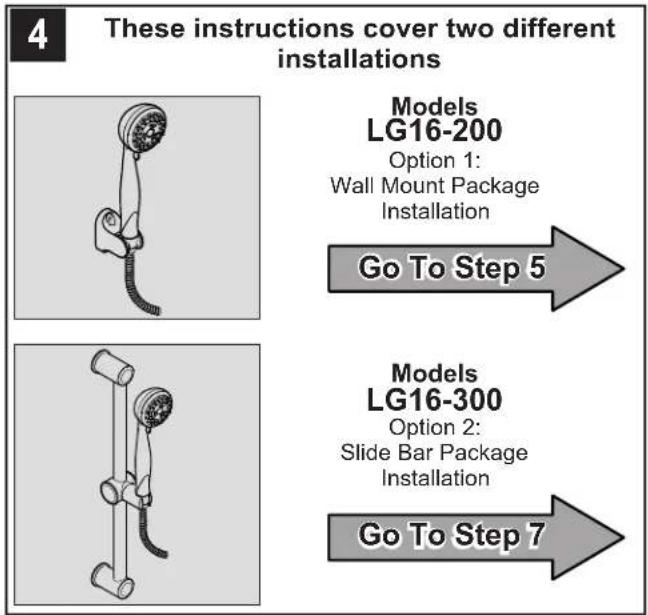
4 These instructions cover two different installations Models LG16-200 Option 1: Wall Mount Package Installation Go To Step 5 Models LG16-300 Option 2: Slide Bar Package Installation Go To Step 7WALL MOUNT PACKAGE INSTALLATION
flowchart
graph TD
    A["5"] --> B["27/32""]
    B --> C["5A"]
    C --> D["5B"]
    D --> E["O"]
    D --> F["O"]
    C --> G["O"]
    style A fill:#f9f,stroke:#333
    style B fill:#ccf,stroke:#333
    style C fill:#cfc,stroke:#333
    style D fill:#fcc,stroke:#333
    style E fill:#cff,stroke:#333
    style F fill:#ffc,stroke:#333
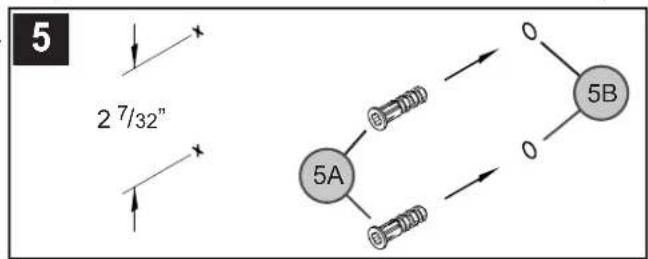
5 HOLE LOCATIONS
Determine desired location for Wall Mount and tap screw hole locations as shown. Holes must be aligned vertically. Drill two ^1/4 holes. If installing into a stud, drill two ^1/8 hole and do not use Anchors (5A). Insert Anchors (5A) into Holes (5B) and tap flush with wall.
text_image
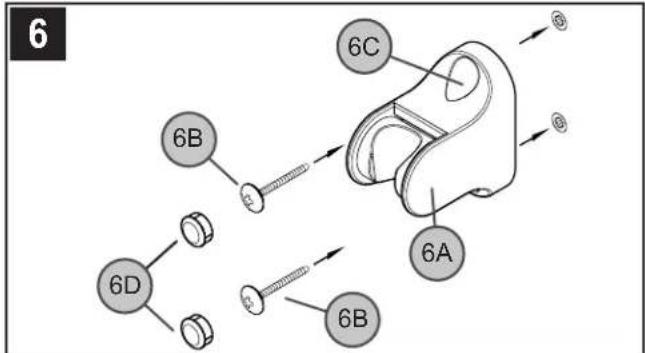
6 6B 6C 6D 6A 6B6 WALL MOUNT INSTALLATION
Place Wall Mount (6A) onto wall and insert Mounting Screws (6B) through Wall Mount Holes (6C) and tighten until Wall Mount (6A) is flush with the wall. Do Not Over Tighten! Insert Buttons (6D) into Holes (6C).

flowchart
graph LR
    A["STOP"] --> B["Go To Step 11"]
SLIDE BAR PACKAGE INSTALLATION

WARNING: To reduce risk of injury, Slide Bar must not be used as grab bar or for support.
flowchart
graph TD
    A["7A"] --> B["7B"]
    C["7A"] --> D["7B"]
    style A fill:#ccc,stroke:#333
    style B fill:#fff,stroke:#333
    style C fill:#ccc,stroke:#333
    style D fill:#ccc,stroke:#333
    note1["26 3/4"] --> A
    note2["O"] --> B
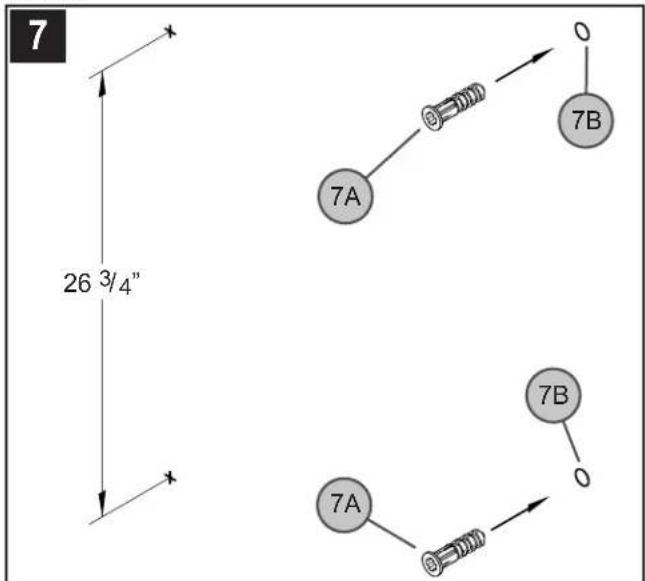
7 HOLE LOCATIONS
Determine desired location for Slide Bar and tap screw hole locations as shown. Holes must be aligned vertically. Drill two 14 " holes. If installing into a stud, drill two 18 " hole and do not use Anchors (7A). Insert Anchors (7A) into Holes (7B) and tap flush with wall.
text_image
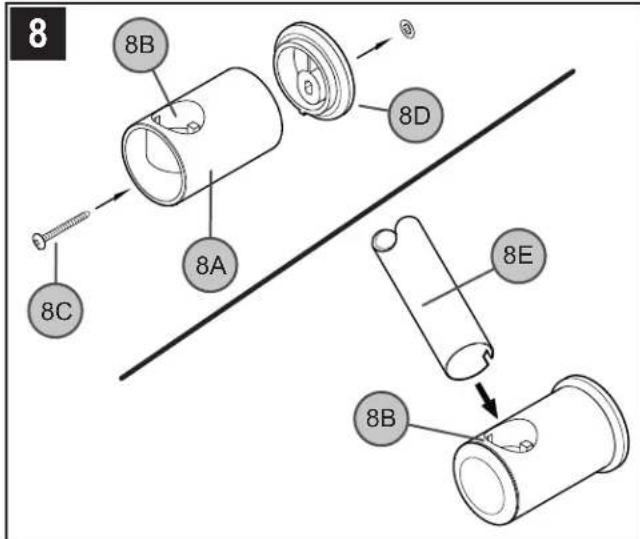
8 8B 8C 8A 8D 8E 8B8 BOTTOM POST AND BAR INSTALLATION
Orient Bottom Post (8A) so that the Support Socket (8B) faces up. Insert Mounting Screw (8C) through the hole on Bottom Post (8A) and Back Flange (8D) and tighten until is flush with the wall. Do Not Over Tighten! Insert one end of Bar (8E) into Support Socket (8B).
text_image
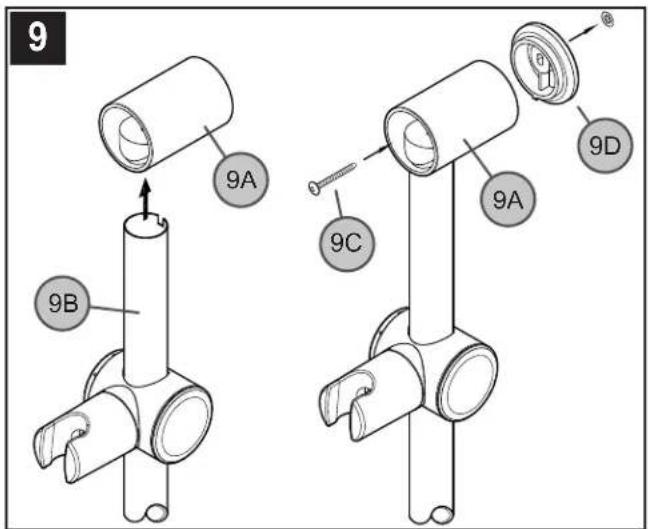
9 9A 9B 9C 9D 9A9 TOP POST AND BAR INSTALLATION
Insert the Top Post (9A) into the other end of the Bar (9B). Insert Mounting Screw (9C) through the hole on Top Post (9A) and Back Flange (9D) and tighten until is flush with the wall. Do Not Over Tighten!
ENGLISH
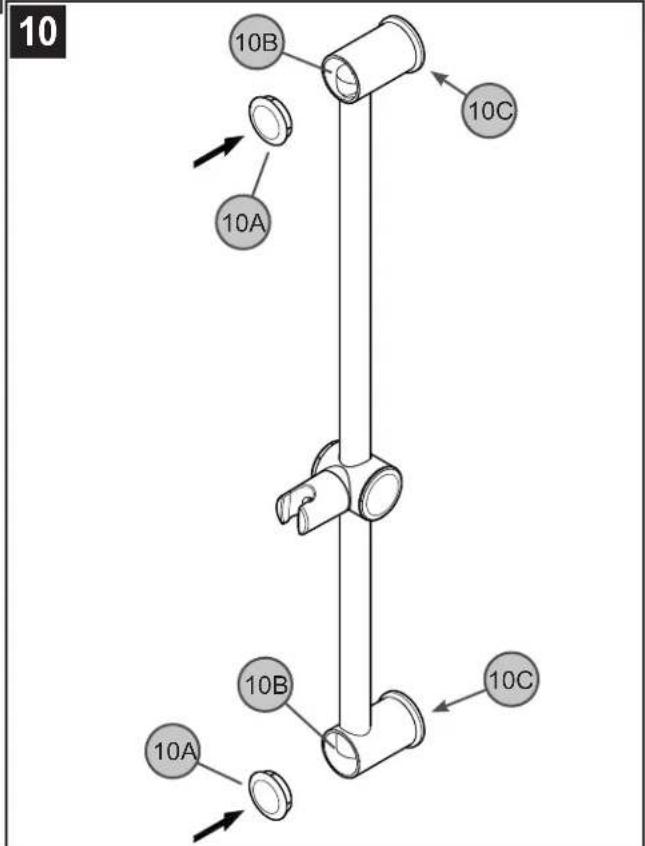
Insert Decorative Buttons (10A) into Posts (10B). Apply with a small bead of silicone around outer edge where post meets wall (10C).
text_image
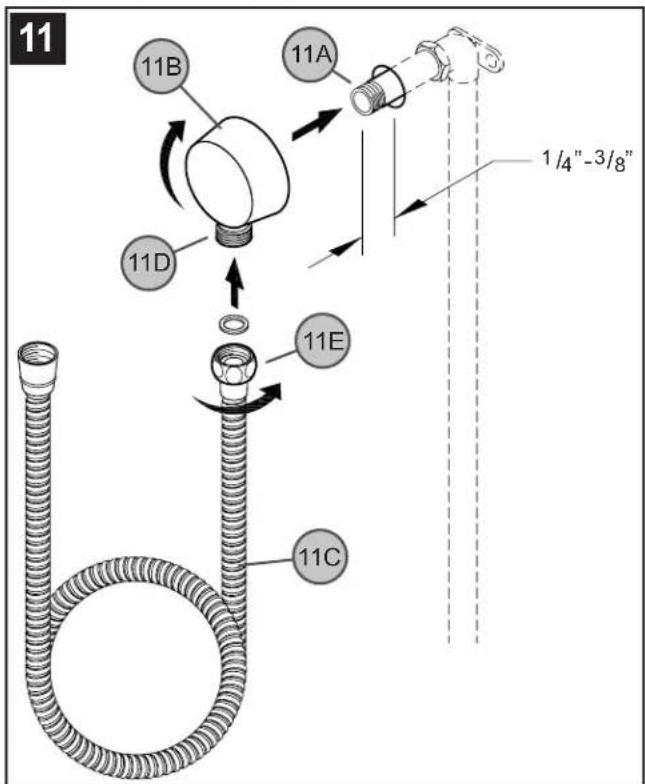
11 11B 11A 11D 11E 11C 1/4"-3/8"11 DROP ELBOW & HOSE INSTALLATION
Apply PTFE plumbers tape on both ends of Pipe Niple (11A) (not included). Screw Pipe Niple (11A) into the elbow inside the wall. The Pipe Niple (11A) is to project ^1/4 , ^3/8 from the finished wall. Screw Drop Elbow (11B) onto Pipe Niple (11A) and tighten until Drop Elbow is properly positioned and flush to the finished wallConnect Hose (11C) into the Drop Elbow Outlet (11D) by turning Metal Hose Fitting (11E).
natural_image
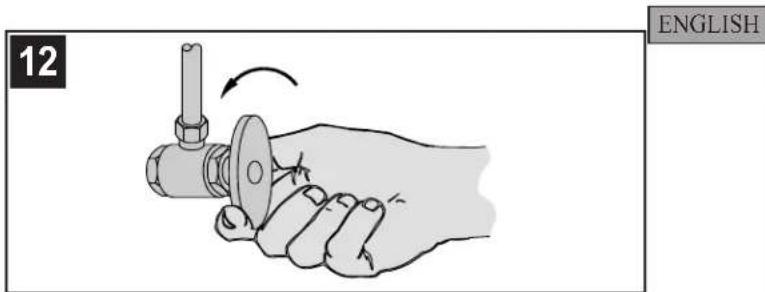
Illustration of a hand holding a mechanical component with an arrow indicating rotation (no text or symbols)12 UNIT START UP
Turn on hot and cold water supplies, and check all connections for leaks.
text_image
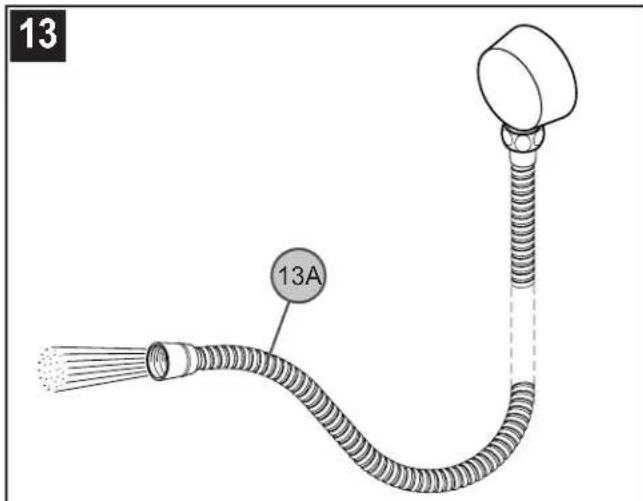
13 13A13 FINAL FLUSHING
For final flushing, turn valve on and allow water to run through the Hose (14A) for several minutes. Allow water to run for several minutes until all foreign maTter clears the line.
text_image
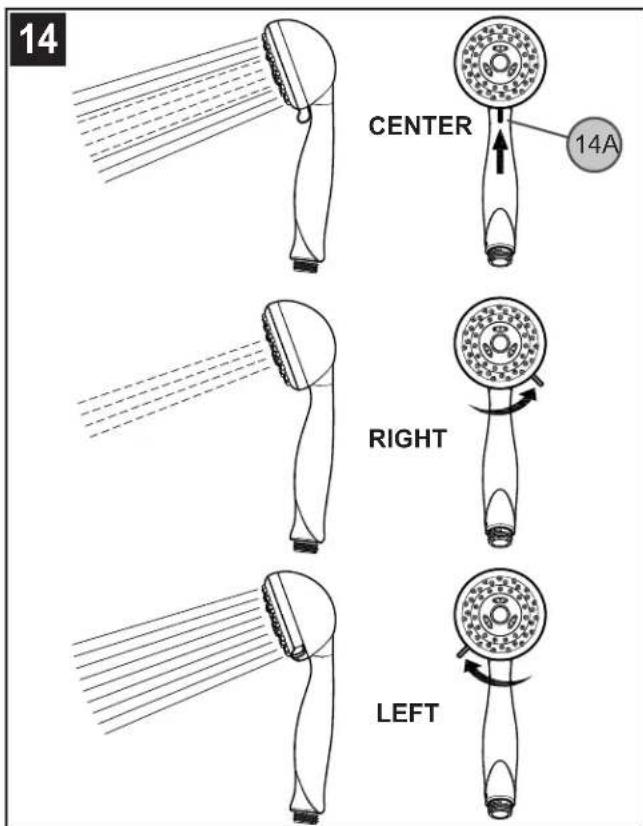
14 CENTER 14A RIGHT LEFT14 HAND SHOWER FUNCTION
To adjust spray, turn switch (14A) to a desired spray pattern.
Center: Pulsating with Full Spray.
Right: Pulsating.
Left: Full Spray.
text_image
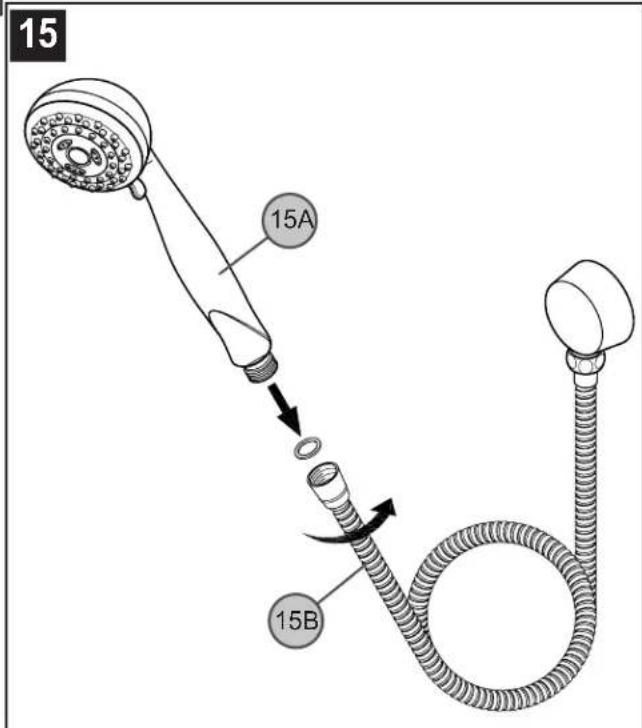
15 15A 15B15 SHOWER HEAD INSTALLATION
Thread Hand Shower (15A) onto Hose (15B).

Make sure Hand Shower (15A) is securely tightened to Hose(15B).

CAUTION: Maintenance
DISASSEMBLY
- Replacement parts may be available at the store where you purchased your faucet.
- When replacement parts are not available, please write or call Pfister Consumer Service.
- Always turn off water and relieve pressure before working on your faucet.

NOTE: Trim Care
Cleaning Instructions:
For all Handles and decorative finishes, use only a soft damp cloth to clean and shine. Use of polish, detergents, abrasive cleaners, organic solvents or acid may cause damage. Use of other than a soft damp cloth will nullify our warranty!
Special Trim:
Trim products which contain Porcelain or other similar substance are not acceptable for public areas or Commercial use. Installation of Said Trim is at Users Risk!

1-800-PFAUCET (1-800-732-8238)
For Toll-Free Pfaucet information call 1-800-PFAUCET (1-800-732-8238)
or visit www.pfisterfaucets.com
- Installation Support
• Care and Warranty Information
natural_image
Illustration of a hand holding a mechanical component with a rotating arrow indicating rotation (no text or symbols)natural_image
Line drawings of six different tools and objects: a paint can, screwdriver, pliers, wrench, flashlight, and fabric (no text or symbols)flowchart
graph TD
    A["5A"] --> B["5B"]
    B --> C["O"]
    C --> D["O"]
    D --> E["O"]
    E --> F["O"]
    F --> G["O"]
    G --> H["O"]
    H --> I["O"]
    I --> J["O"]
    J --> K["O"]
    K --> L["O"]
    L --> M["O"]
    M --> N["O"]
    N --> O["O"]
    O --> P["O"]
    P --> Q["O"]
    Q --> R["O"]
    R --> S["O"]
    S --> T["O"]
    T --> U["O"]
    U --> V["O"]
    V --> W["O"]
    W --> X["O"]
    X --> Y["O"]
    Y --> Z["O"]
    Z --> AA["O"]
    AA --> AB["O"]
    AB --> AC["O"]
    AC --> AD["O"]
    AD --> AE["O"]
    AE --> AF["O"]
    AF --> AG["O"]
    AG --> AH["O"]
    AH --> AI["O"]
    AI --> AJ["O"]
    AJ --> AK["O"]
    AK --> AL["O"]
text_image
7 26 3/4" 7A 7B 7A 7B Otext_image
9 9A 9B 9C 9D 9Anatural_image
Illustration of a hand holding a mechanical component with a rotating arrow indicating rotation (no text or symbols)2 COUPURE DE L'ARRIVÉE D'EAU
natural_image
Line drawings of six different tools and objects: a paint can, screwdriver, pliers, wrench, flashlight, and fabric (no text or symbols)3 OUTILLAGE RECOMMANDÉ
text_image
9 9A 9B 9C 9D 9Anatural_image
Illustration of a hand holding a mechanical component with an arrow indicating rotation (no text or symbols)12 MISE EN SERVICE DE L'APPAREIL
Hardware & Home Improvement