Kenzo LG42-DF0 - Faucet Pfister - Free user manual and instructions
Find the device manual for free Kenzo LG42-DF0 Pfister in PDF.

User questions about Kenzo LG42-DF0 Pfister
0 question about this device. Answer the ones you know or ask your own.
Ask a new question about this device
Download the instructions for your Faucet in PDF format for free! Find your manual Kenzo LG42-DF0 - Pfister and take your electronic device back in hand. On this page are published all the documents necessary for the use of your device. Kenzo LG42-DF0 by Pfister.
USER MANUAL Kenzo LG42-DF0 Pfister
CONSERVE
Engineered to use 30% less water without compromising the water experience
Thank you for purchasing this Pfister product. All Pfister products are carefully engineered, and factory tested to provide long trouble-free use under normal conditions. This product is easy to install using basic tools and our easy to follow illustrated instructions. If you have any questions regarding this product, call 1-800-Pfacute (1-800-732-8238).
1 BEFORE PROCEEDING

WARNING: Read all the instructions completely before proceeding. Pfister recommends calling a professional if you are uncertain about installing this product! Product should be installed in accordance with all local and state plumbing and wiring codes.
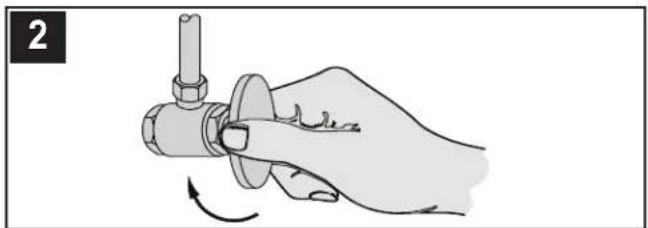
2 SHUT OFF WATER SUPPLY
Locate water supply inlets and shut off the water supply valves. These are usually found under the sink or near the water meter. If you are replacing an existing faucet, remove the old faucet from the sink and clean the sink surface thoroughly.
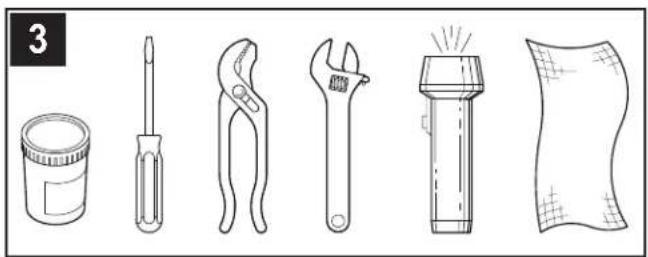
3 TOOLS RECOMMENDED
- Plumber's putty - Slotted screwdriver - Adjustable wrench
- Pliers - Flashlight - Cloth
- Bucket
Your installation may require new supply lines and / or shut-off valves or other additional tools.
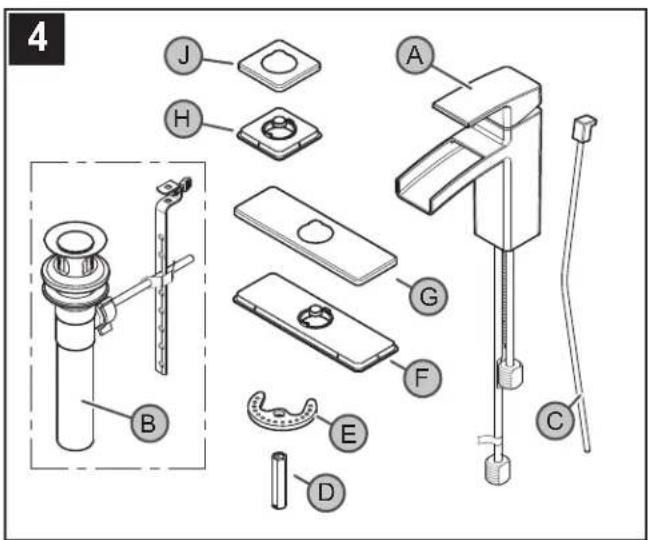
4 CHECKING THE CONTENTS OF THE BOX
Upon opening the box, check to ensure that all of the following items are included.
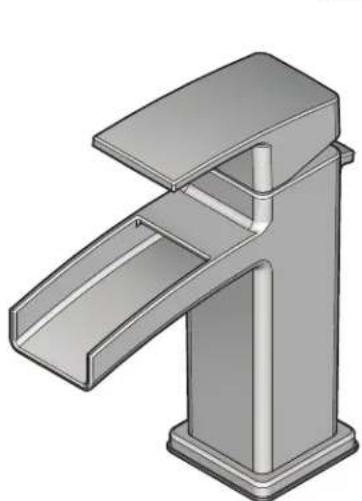
A Spout Body
B Pop-Up Assembly
C Pop-Up Rod
D Long Nut
E Mounting Washer
F Putty Plate
G Deck Plate H Seal Base J Spout Base
If any of these items are missing, please contact Price Pfister Consumer Service at 1-800-Pfacute (1-800-732-8238).
FAUCET INSTALLATION
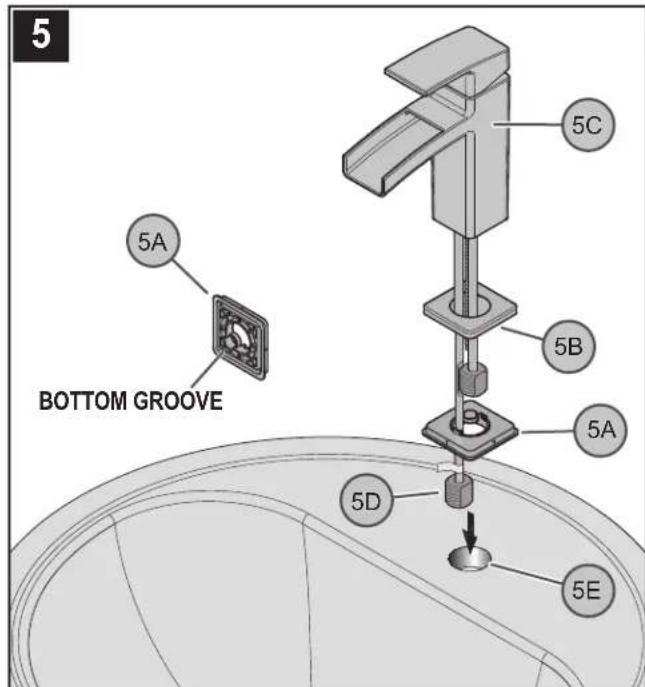
5 INSTALLING FAUCET WITH SINGLE HOLE MOUNTING
Following manufacturer's recommendations on use, apply plumber's putty into putty groove in bottom of Seal Base (5A). Ensure that Seal Base (5A) is pressed onto Spout Base (5B). Place Spout Base (5B) and Seal Base (5A) onto the bottom of Faucet Body (5C). From above sink, insert Faucet Supply Tubes (5D) through Hole (5E) on sink.
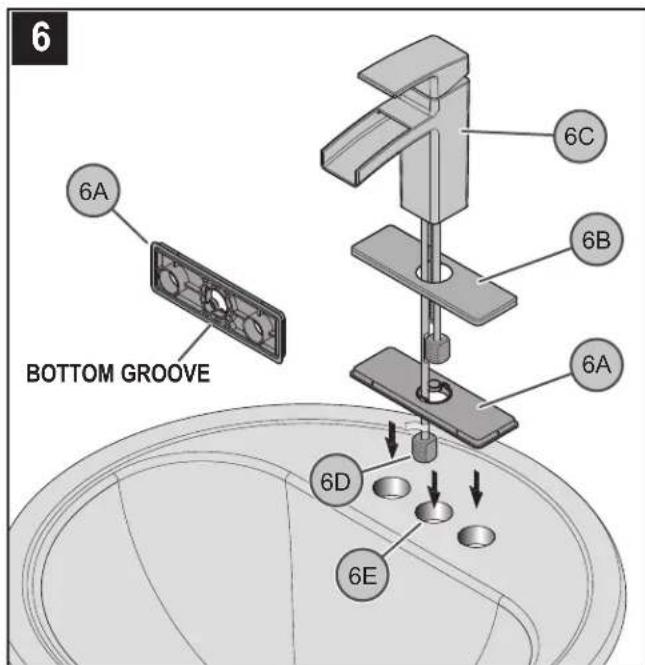
6 INSTALLING FAUCET WITH DECK PLATE
Following manufacturer's recommendations on use, apply plumber's putty into putty groove in bottom of Putty Plate (6A). Ensure that the Plastic Putty Plate (6A) is pressed on the Deck Plate (6B). Assemble Deck Plate (6B) and Putty Plate (6A) to Faucet Body (6C). From above sink, insert Faucet Supply Tubes (6D) through Hole (6E) on sink.
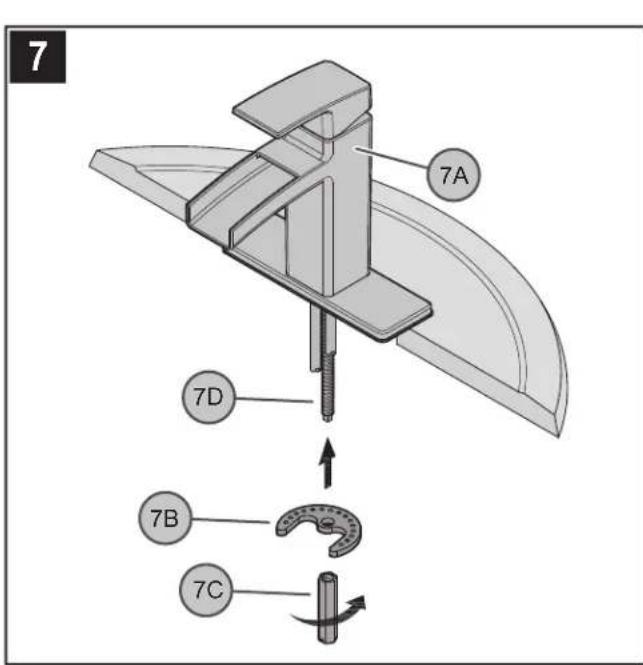
7 SECURING FAUCET
From underneath sink, secure Faucet Body (7A) by placing Metal Washer (7B) and threading Long Nut (^7 / _16Hex.)(7C) onto Mounting Post (7D). Make sure that the bumps on Metal Washer (7B) are facing up. Firmly hand tighten Long Nut (7C). Secure Long Nut (7C) not to exceed a 1/4 turn.
Caution: Do not over tighten!
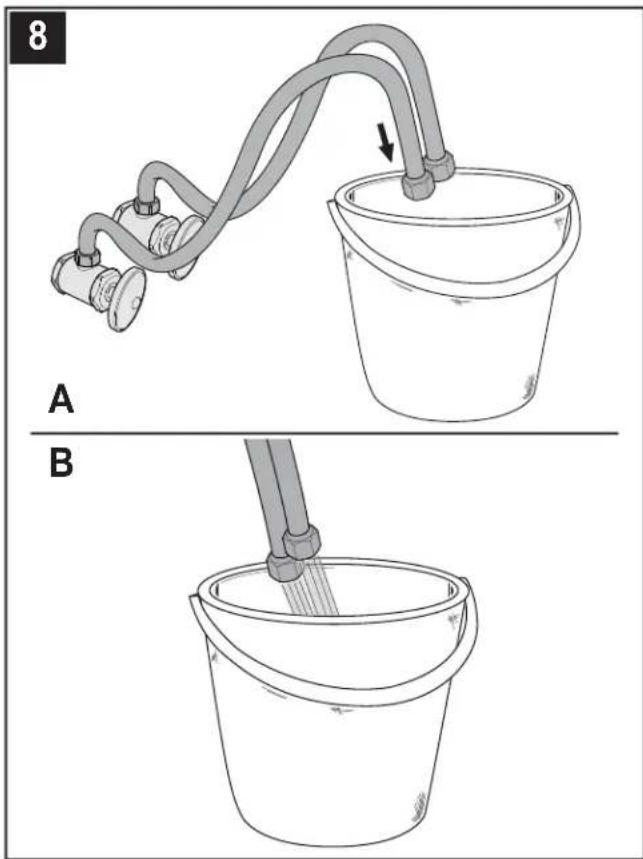
8 FLUSH WATER LINES
A. Point lines into Bucket. TURN WATER BACK ON.
B. Flush the water lines. Allow water to run for at least 30 seconds. TURN WATER
BACK OFF BEFORE CONTINUING INSTALLATION.
ENGLISH
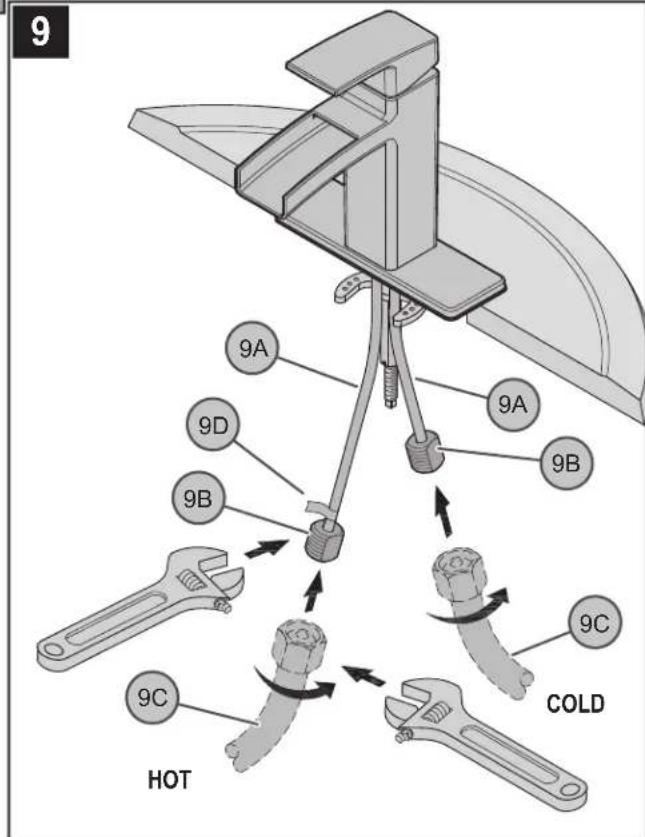
9 WATER SUPPLY LINES
Gently separate hot and cold Supply Tubes (9A), approximately three inches apart. Connect water Supply Lines (9C) to Faucet Inlets (9B). Hot water supply line goes to hot inlet fitting indicated by red tag (9D). (Supply lines not included). Follow manufacturer's instructions when installing supply lines. Hold the Faucet Inlets (9B) steady using an adjustable wrench while tightening Supply Lines (9C). Do not twist Supply Tubes (9A)!
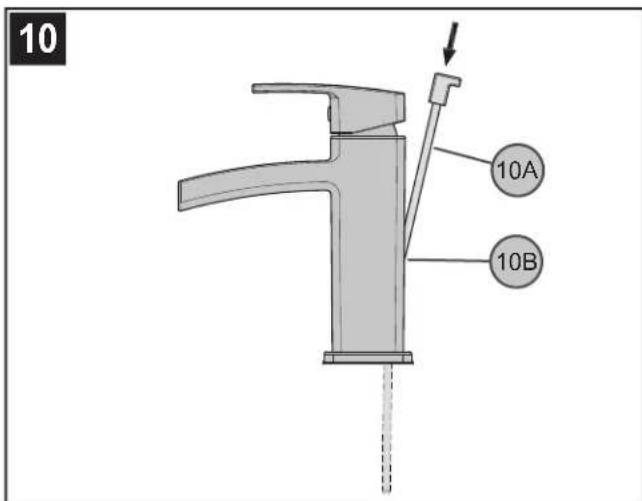
10 POP-UP ROD CONNECTION
Insert Lift Rod (10A) into hole at the back of Faucet Body (10B).
DRAIN BODY INSTALLATION
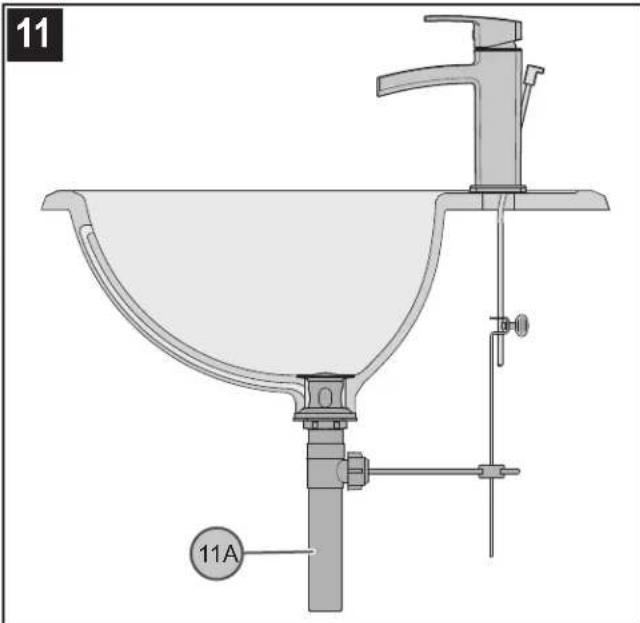
11 POP-UP INSTALLATION
Install and adjust Pop-Up (11A) using separate instructions supplied with the Pop-Up assembly.
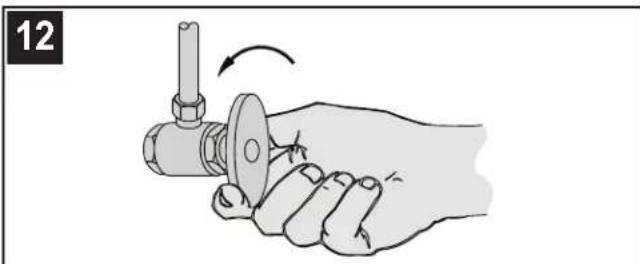
12 UNIT START UP
Turn on hot and cold water supplies, and check for leaks above and below the sink.
FAUCET FUNCTIONS
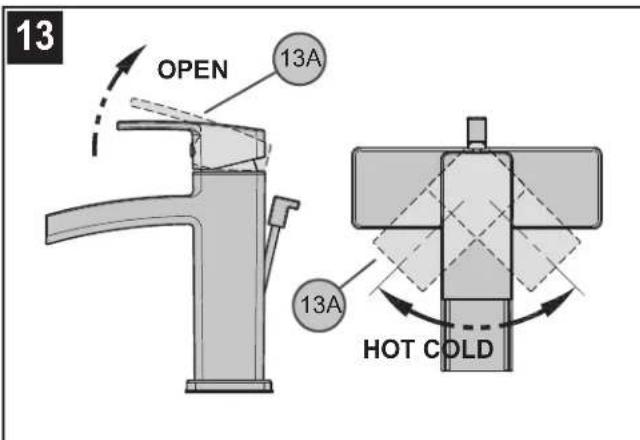
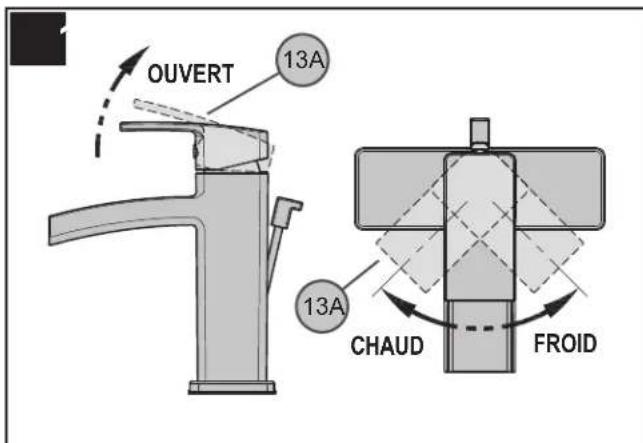
13 VALVE FUNCTION
By lifting the Lever Handle (13A) up, the valve will be activated allowing water to flow. The water flow will increase by continuing to lift up the Lever Handle (13A). By rotating the Lever Handle counter-clockwise, the water temperature will decrease to cold flow only. By rotating the Lever Handle clockwise, the water temperature will increased to hot flow only.
ENGLISH
MAINTENANCE & CARE
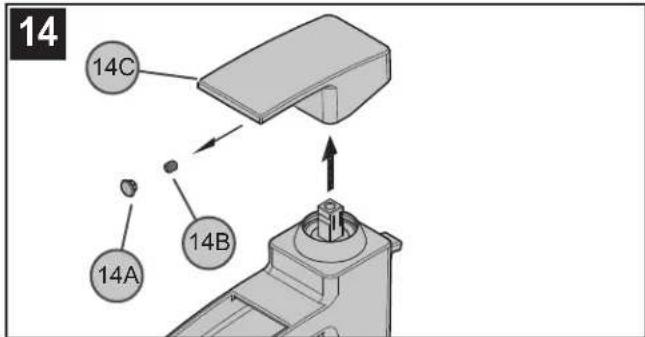
14 HANDLE REMOVAL
Turn off water before proceeding! Detach Decorative Button (14A). Using a 3/32 Hex wrench, loosen Set Screw (14B) and remove Handle (14C).

15 CARTRIDGE REPLACEMENT
Turn off water supplies and relieve pressure before working on your faucet. Remove handle (see figure 14). Remove the Dome Cap (15A) by unscrewing counterclockwise. Using pliers, unscrew the retainer ring (15B). Carefully remove the Cartridge (15C) by pulling it straight up and out. Reassemble valve by reversing steps.
CAUTION: Maintenance
DISASSEMBLY
- Replacement parts may be available at the store where you purchased your faucet.
- When replacement parts are not available, please write or call Price Pfister Consumer Service.
- Always turn off water and relieve pressure before working on your faucet.
NOTE: Trim Care
Cleaning Instructions:
For all Handles and decorative finishes, use only a soft damp cloth to clean and shine. Use of polish, detergents, abrasive cleaners, organic solvents or acid may cause damage. Use of other than a soft damp cloth will nullify our warranty!
Special Trim:
Trim products which contain Porcelain or other similar substance are not acceptable for public areas or Commercial use. Installation of Said Trim is at Users Risk!

1-800-PFAUCET (1-800-732-8238)
For Toll-Free Pfacet information call
1-800-PFAUCET (1-800-732-8238)
or visit www.pfisterfaucets.com
Installation Support
Care and Warranty Information
G Plaque de surface H
J Base du bec
FONCTIONNEMENT DES ROBINETS
13 FONCTIONNEMENT DU ROBINET