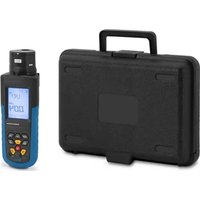
SBS-RS-9000 - Measuring equipment STEINBERG - Free user manual and instructions
Find the device manual for free SBS-RS-9000 STEINBERG in PDF.


| Product Type | Radiation Analyzer |
| Brand / Model | Steinberg SBS-RS-9000 |
| Detected radiation types | α, β, γ and X |
| Measurement range (dose rate) | 0.001 μSv/h to 1,000 μSv/h |
| Accuracy | < 10 % (less than 500 μSv/h); < 20 % (less than 600 μSv/h) |
| Sensor | Geiger-Mueller GM tube with halogen compensation |
| Display | 4-digit LCD screen with bar graph, dose indicators, date, time, alarm, radiation type |
| Internal memory | 4000 data groups with time stamp |
| Bluetooth transmission | Range 10 m, real-time transmission of one measurement per second |
| Software | Real-time data transmission, analysis and recording |
| Dimensions | 20 x 7 x 5 cm |
| Weight | 0.8 kg |
| Power supply | 4 AA alkaline batteries 1.5 V |
| Operating temperature | 0 °C to 50 °C |
| Cleaning and maintenance | Soft, non-corrosive cloth; avoid water and humidity; remove batteries if not used for a long time |
| Safety | Read warnings: do not repair yourself, keep out of reach of children, avoid shocks and humidity |
| Repairability | Repairs exclusively by the manufacturer's service; use original parts |
| General information | Manual available for free download at notice-facile.com; automatic translation possible |
Frequently Asked Questions - SBS-RS-9000 STEINBERG
User questions about SBS-RS-9000 STEINBERG
0 question about this device. Answer the ones you know or ask your own.
Ask a new question about this device
Download the instructions for your Measuring equipment in PDF format for free! Find your manual SBS-RS-9000 - STEINBERG and take your electronic device back in hand. On this page are published all the documents necessary for the use of your device. SBS-RS-9000 by STEINBERG.
USER MANUAL SBS-RS-9000 STEINBERG
line
| x | y | | ---- | --- | | 12 | 10 |6.4.5. Aufräumen
6.7. Hinweis
This User Manual has been translated for your convenience using machine translation. Reasonable efforts have been made to provide an accurate translation; however, no automated translation is perfect nor is it intended to replace human translators. The official User Manual is the English version. Any discrepancies or differences created in the translation are not binding and have no legal effect for compliance or enforcement purposes. If any questions arise related to the accuracy of the information contained in the User Manual, please refer to the English version of those contents which is the official version.
Technical data
| Parameter description | Parameter value |
| Product name | Radiation Scanner |
| Model | SBS-RS-9000 |
| Ray types | α, β, γ and X ray, |
| Measuring Range (Auto-selection) | Radiation dose rate: 0.001 Sv/h - 1000μSv/hPulse dose rate: 0-4000cpm, 0-4000cpsAccumulated radiation dose value: 0.001 μSv - 9999SvAccumulated Pulse dose rate: 0- 9999 |
| Sensitivity | α-ray — from 4.0 Megavoltβ-ray — from 0.2 Megavoltγ-ray — from 0.02 MegavoltX-ray -from 0.02 Megavolt |
| Accuracy | <10% (less than 500μSv/h)<20% (less than 600μSv/h); |
| Selection of rays | Combination selection of α, B, γ, X rays |
| Sensor | Halogen compensating detector (G.M Geiger counter tube) |
| Output port | Wireless Bluetooth Transmission (Space transmission distance is 10m) |
| Average time | Manual or automatic adjustable between 8 to 120 seconds |
| Display | Large 4bit digital LCD display with bar graph indications as below: Radiation dose rate, Pulse dose rate, Accumulated radiation dose rate, Accumulated pulse dose rate, Time, date, Alarm value, Max radiation dose rate, Type of rays, Dynamic measuring icon, Battery indication etc. |
| Alarm Function | Free to set the value of beep alarm, default setup is205μSv/hr |
| Normal radiation value of natural environment | Less than 0 to 0.2μSv/h |
| Internal Memory | Auto-save 4000 groups of datas, record one group of date per second with detailed info as date, time, reading and unit |
| Bluetooth Transmission | Transmit one group of date every second with date, time, value and unit indicated |
| Software | Real time data transmission, analysis and recording |
| Working Temp | 0°C- 50°C |
| Dimensions | 20x7x5 cm |
| Weight | 0,8 kg |
| Power supply | 4 x 1.5V "AA" Alkaline batteries |
Sievert (Mark is Sv, unit: 1Sv=100rem)
Rem (Roentgen equivalent man)
μSv/h (Unit of ray radiation dose rate)
1SV=100Rem
1rem=1cSv=10mSv
1μR/h=10μSv/h
1mR/h = 10mSv/h
CPS: pulse times per second (In the pulse rate model, pulse has constantly been measured by counter tube and translated into pulse rate).
CPM: pulse counts per minute(In the pulse rate model, pulse has constantly been measured by counter tube and translated into pulse rate.
1. General description
The user manual is designed to assist in the safe and trouble-free use of the device. The product is designed and manufactured in accordance with strict technical guidelines, using state-of-the-art technologies and components. Additionally, it is produced in compliance with the most stringent quality standards.
DO NOT USE THE DEVICE UNLESS YOU HAVE THOROUGHLY READ AND UNDERSTOOD THIS USER MANUAL.
To increase the product life of the device and to ensure trouble-free operation, use it in accordance with this user manual and regularly perform maintenance tasks. The technical data and specifications in this user manual are up to date. The manufacturer reserves the right to make changes associated with quality improvement.
Legend
 | The product satisfies the relevant safety standards. |
 | Read instructions before use. |
 | The product must be recycled. |
 | WARNING! or CAUTION! or REMEMBER! Applicable to the given situation (general warning sign). |
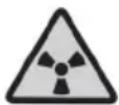 | Nuclear radiation icon, it warns that people must be careful and operate as instructions when getting close to the radiation source. |

PLEASE NOTE! Drawings in this manual are for illustration purposes only and in some details may differ from the actual product.
2. Usage safety

ATTENTION!
Read all safety warnings and all instructions. Failure to follow the warnings and instructions may result in serious injury or even death.
The terms "device" or "product" are used in the warnings and instructions to refer to: Radiation Scanner
a) If you are unsure about whether the product is operating correctly or if you find damage, please contact the manufacturer's service centre.
b) Only the manufacturer's service centre may make repairs to the product. Do not attempt to make repairs yourself!
a) Keep packaging elements and small assembly parts in a place not available to children.
b) Device repair or maintenance should be carried out by qualified persons, only using original spare parts. This will ensure safe use.
c) Clean the device regularly to prevent stubborn grime from accumulating.
d) It is forbidden to interfere with the structure of the device in order to change its parameters or construction.
e) Keep the device away from sources of fire and heat.
f) Protect the product from shocks and other mechanical impacts that may damage it.
g) Do not use the product in high humidity, under water or in contact with water: the product is not waterproof.
h) Do not leave the product for a long time near devices that generate strong magnetic fields, such as magnets or electric motors, or in places where strong electrical magnetic signals are generated, such as transmitter towers.
i) Do not take measurements near mobile phones and microwave ovens, it may affect the readings of the instrument.
j) Do not charge batteries that are not suitable for recharging.
k) Do not mix different types of batteries, as well as the old ones with used ones.
I) Batteries must be mounted according to the direction of polarization indicated on the device and battery symbols.
m) Worn batteries must be removed from the device and disposed of in a safe manner compliant with the law provisions.

ATTENTION! Despite the safe design of the device and its protective features, and despite the use of additional elements protecting the operator, there is still a slight risk of accident or injury when using the device. Stay alert and use common sense when using the device.
3. Scope of the device's application
The product has functions as data logger, Bluetooth communication data transmission, and powerful software for data evaluation.
It can detect , , and X ray; it also can detect radiation pulse times.
The product is outside the scope of the MDD 93/42/EEC regulations for medical devices.
The user is liable for any damage resulting from unintended use of the device.
4. Device description
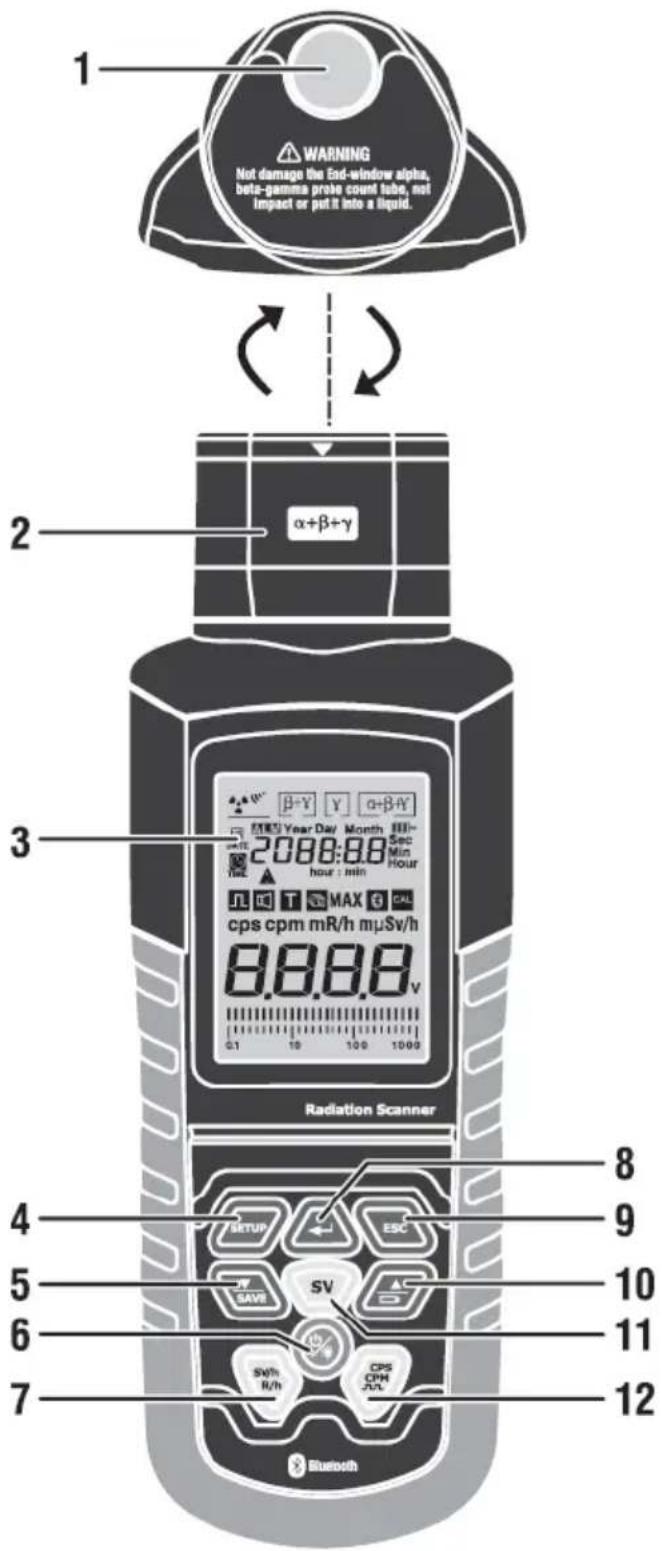
1 - Sensor Window of Testing Rays
2 - Measurement Two-way Rotation Selector Switch
3 - LCD Display
4 - SETUP Button
5 - Enter/Confirm Button
6 - Exit Button
7 - Data Storage Record/Parameter Setting Down Button
8 - SV Unit Accumulating Count/Timing Measuring Button
9 - Power Consumption Measurement of Batter/Parameter Setting Up Button
10 - Power/Back Light Button
11 - SV/h and R/h Unit Measuring Switch Button
12 - CPS/CPM/Pulse Counting Measurement Unit Switch Button
LCD display symbol description
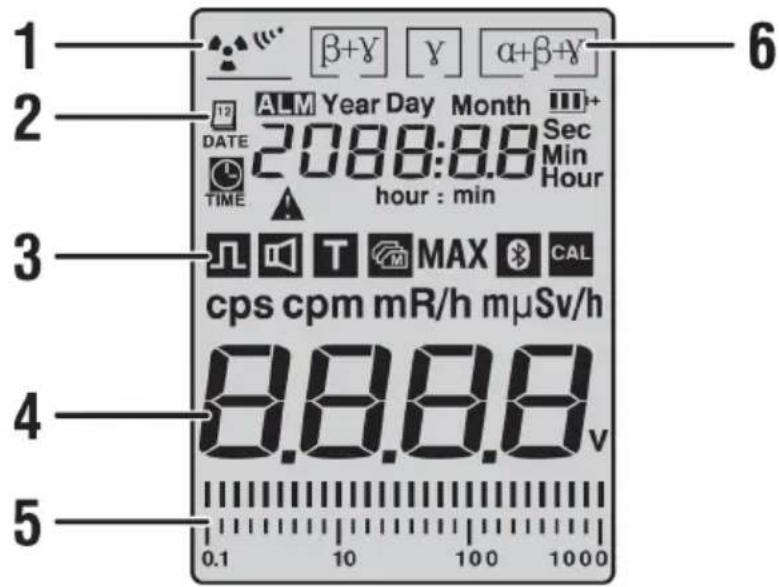
1 - Boot Nuclear Radiation Ray Measuring (Dynamic Icon Indication)
2 - Real-Time Date/Time Indication
3 - Measuring Function Indication
4 - Measurement Reading and Unit Indication
5 - Simulating Bar of Measurement Reading Indication
6 - Measuring Ray Type Instruction
5. Device use
5.1. Ray selection switch
- The multi-function digital nuclear radiation scanner adopts high precision Geiger counter tube, reliably measures not only rays, but , and X rays as well.
- By the ray select rotation switch, we can select the measuring rays by choice.
1) Switch to the middle for detecting the y ray.
2) Switch to the left for detecting + ray.
3) Switch to the right for detecting ++ ray.
4) Switch at any position, it can detect X rays.
- When switch to the middle , rays will be blocked unless the scanner is very close to the radiation source.
- Under normal conditions, the meter can detect the current radiation value quickly and accurately when the sensor window of rays aim at radiation source.
Attention: Be careful when rotating the switch to avoid damage to the sensor.
5.2. Power Source and Back Light Switch Button
- Press the Power/Back Light Button for 2 seconds, it will beep shortly, and activate the LCD display; Press again the Power/Back Light Button for 2 seconds to shut down the LCD display.
- After turn it on, and press the Power/Back Light Button, the LCD back light will be activated, press again, the back light will be shut off.
- To save energy, the backlight will be automatically shut off 1 minutes after be activated.
Note: The stored data will still be saved after turn it off, but the stored data will be lost if it is turned off Inappropriate.
5.3. Sv/h and Rem/h button for current radiation dose rate
1) Press the Button and into standard mode, it displays the current measurement value ( Sv/h).
- The measurement results could be read in data mode, and bar graph as well.
- The bar graph on the lower corner of display will change as the reading fluctuating and is distributed in scales as 0.1, 1, 10, 100.
- If the reading is too low, the bar graph will be show in a line.
2) Sv/h and Rem/h unit conversion, press the button for conversion, which is based on the formula: 10 Sv/h=1mRem/h .
5.4. Sv dose accumulation
- The digital nuclear radiation scanner could also do the measurement, recording the accumulated radiation dose at specific time.
- The initial unit is Sv, and it will automatically convert to mSv or Sv as the measured dose rate getting higher.
5.5. Button for Dose Rate accumulation
- Press the SV Button and enter into the regular infinite dose rate accumulation calculation mode with dose rate icon (μSv) on the display; Press the SV Button again and enter into timing measurement mode (default value is 60 minutes); Press the SV Button once again to stop the timing measurement mode with a beep warning and it displays the current accumulated measurement value; Press the SV Button one more time, it will return to regular infinite dose rate accumulation calculation mode.
- Under the timing measurement mode, press this button for 2 seconds for setting the measuring time, then it displays dose icon (μSv) and time unit icon “min”; Now, the display will indicate 3 numbers as 060 as default value, which means 60 minutes, and the maximum is 999 minutes.
- The first digit(the hundreds) will be in flashing state for setting directly.
Press ⬇ „Enter“ button once to set tens digit.
Press ← „Enter“ button the second time to set single digit.
Press ESC „ESC” button and return to the previous state.
Press “Enter” button for the 3rd time to confirm the time setup and shows the current setting value.
Press ← „Enter” button for the 4th time into dose accumulative working state, and the icon “TIME” on the top left corner starts flashing.
press SAVE „down” button or ▲ „up” button to adjust the display value.
- Once the measurement time is set, there will be a short beep sound as remind at the end of the measurement. It displays dose accumulative value at that time, and the TIME icon shows and stops flashing. If it is not coming to the timing time yet, press SV Button into non-timing accumulation state or recording state. if long press this button, you will re-enter into the timing setup mode.
Two methods for stopping the measurement:
- Under non-timing condition, short press SV Button for the 2nd time, stops the accumulate measurement, and into timing measurement; during the process of the timing measurement, short-pressing this button will stop accumulative measurement state.
- Choosing other operation mode to zero the measurement results.
5.6. Pulse counting
- The multi-function digital nuclear radiation scanner can be also used as an ordinary Gaiger counter.
- Under the setting, it only records received pulse and calculate pulse, it will not be switched to Sv (Dose equivalent unit, 1Sv=100Rem).
- The meter shows the received accumulative value of the pulse on LCD.
5.7. Pulse counting measuring button
1) In radiation ray pulse rate testing mode, radiation ray pulse is constantly measured by counter tube and then transfer into pulse rate.
2) Press the CPS/CPM Button once and then press the button again into pulse rate unit switch between CPS and CPM.
CPS: Pulse number per second CPM: Pulse number per minute
3) Press the CPS/CPM Button for the 3rd time into pulse counting mode, and it will display the pulse icon.
4) Press the CPS/CPM Button again (the 4th time) to end pulse counting, there will be a beep sound as a remind of entering into timing pulse counting mode, and shows the pulse and timing flashing icon on display; press this button again to stop pulse counting; pressing once again will return to CPS pulse counting function.
5) Long press the CPS/CPM Button for two seconds or under "pulse" measurement mode, and will enter into measuring time setup mode, and the
screen shows “pulse” and “time” icon, at this time, the display shows three digits, default value is 060, means 60 minutes, max to 999 minutes, and the first digit (the hundreds) is in blinking state, and this value can be set directly.
- Press ← „Enter” button for the first time to set tens digit.
- Press ← „Enter” button for the second time to set single digit.
- Press ESC „ESC” button and return to the previous state.
- Press “Enter” button the third time to confirm and complete time input and show the current setting value.
- Press ← „Enter” for the fourth time, enter into timing dose accumulative working state, and the icon “time” on the top left corner starts blasting.
- Press SAVE „down” key or “up” key to adjust the display value.
- If measurement time is set, there will be a short beep sound at end of the measurement.
- By then, it will display the measured accumulative value at that time, meanwhile, the time icon will be shown and stops flashing.
Two methods for stopping the measurement:
- Under not-timing condition, short press the CPS/CPM Button for the 4th time, end of the accumulative measurement, and into timing measurement; during the timing measurement, short press this button to stop the accumulative measuring state.
- Choosing other operation mode, then measuring results disappear.
5.8. Menu setup
- Press the SETUP Button into menu setting interface: Date, Time, Alarm, Pulse volume, Average time set (T), Bluetooth wireless data transmission (BT).
- 1 minute after press the button and left it untouched, it will automatically return to “μSv/h” measurement mode.
| Date format | Year, Month, Day |
| Time format | Hour, Minute, Second |
| Alarm threshold | 1 to 999μSv/h, default value 205μSv/h |
| Pulse sound | ON/OFF |
| Time setting for average radiation measurement | The setup can change the processing reaction time of the meter against radiation source with setup range from 8s to 120s.With the increasing of radiation dose rate, it will automatically and proportionally reduce the average time according to the current setting average time.When the setting time is 8s and the radiation strength is more than 5μSv/h, the fastest response time can reach is 2s, factory default time is 30s. |
| Bluetooth data transmission | ON and OFF |
5.9. Date Setup
1) Press the "SETUP" button once, select "DATE" icon by pressing the Up or Down button, and the icon will be in flashing state.
2) Press the "ENTER" button to confirm your choice and press the "ENTER" Button again for setup of "Year", "Month" and "Day", for example, when "Year" icon is flashing, press the Up or Down button to adjust the value, then press the "ENTER" button to confirm.
3) Press the "ENTER" button and set "Month", when "Month" icon is flashing, press the Up or Down button to adjust the value, then confirm the setup by pressing "ENTER".
4) Press the "ENTER" button for the 3rd time to set "Day", the method is the same as above.
5) After finishing setting, press the "SETUP" button and return to main menu, select the next setup or press the "ESC" button to exit.
5.10. Time Setup
1) Press the "SETUP" button once, select "TIME" icon through the Up or Down button.
2) Same method of Date setup as above (Hour, Minute, Second).
5.11. Alarm Threshold Value Setup (default value is 205uSv/h)
1) Press the "SETUP" button once, then select "ALM" (BL) icon through the Up or Down button.
2) Then, the "ALM" icon will flash, press the "SETUP" button to confirm your option, and press the "SETUP" button once again to set the single digit, ten digit and hundred digit.
3) The related digit will flash and can be adjusted by pressing the Up or Down button.
4) After completing the setting, press the "SETUP" button and return to main menu.
- When the measurement value is more than your set value, there will be continuous beep sound.
- Default value is 205 Sv / h .
5.12. Pulse sound ON&OFF Setup
1) Press the "SETUP" button once and select "☐" icon by pressing the Up and Down button.
2) The icon “☐” will be flashing and press the “ENTER” button to confirm your option.
3) It will display "OFF" and "ON" and in flashing sate, and then select pulse sound ON or OFF state via the Up and Down button and press the "ENTER" Button to confirm your choice.
4) After the setting, press the "SETUP" Button to return to main menu, select next menu or press the "ESC" Button to exit.
5) When radiation ray has been detected, there will be a "tick" sound, and the stronger the radiation signal is, the faster the response frequency will be.
5.13. Setup of average time of radiation measurement (default value is 30s)
1) Press the SETUP button once, select “T” icon by the Up and Down button, and “T” icon will be flashing.
2) Press the "ENTER" button to confirm your option, press the "ENTER" button again to adjust the time, single, tens, and hundreds that flashing, by the Up and Down Button.
3) After the setting, press the "SETUP" button to return to the main menu, select the next menu or press the "ESC" button to exit.
Note: Default value is 30s.
5.14. Data storage (SAVE)
1) Press the "SAVE" button once, and it will automatically save the current measuring dose rate value.
- Record mode is to record a measuring value every other minute, with max record memory of 4000 group of data (including real-time date, time, measurement value and measurement unit).
- When the record memory is full, the meter will automatically refresh the first recorded groups of data and circulating record the data again.
2) Press the "SAVE" button again and will exit data storage mode.
5.15. Bluetooth data transmission (BT)
1) Press the "SETUP" button once, select "✗" icon by the Up or Down button, and icon will be flashing.
2) Press the "ENTER" button to confirm your option, and it will shows OFF and ON on the display.
3) By pressing the Up or Down button again to select "On" or "Off" of the Bluetooth.
4) After complete the setting, press the "ESC" button to exit, and it will show "💡" icon on the display.
5) If not press the "SAVE" button during the transmission, the Bluetooth measuring data is real-time measurement.
6) If press the "SAVE" button, it will automatically record the measurement data during the transmission.
Note: For the connection with PC, please refer to the software operation instruction.
5.16. Battery Voltage Detection function
- The multi-function digital nuclear radiation scanner uses 4 pcs 1.5V “AA” Alkaline batteries. - If the power supply is too low (Less than 4.8V), the battery icon will indicate accordingly by flashing and reducing, by then, replacing the same battery is suggested.
1) Press the Battery Detection Button, it will display the internal battery voltage, normal voltage is 4.8 to 6.0V. 2) Press the ESC Button to exit battery voltage detection function.
Note: When battery is seriously exhausted, the meter will automatically power-off and the stored date will be lost.
6. Software Operation
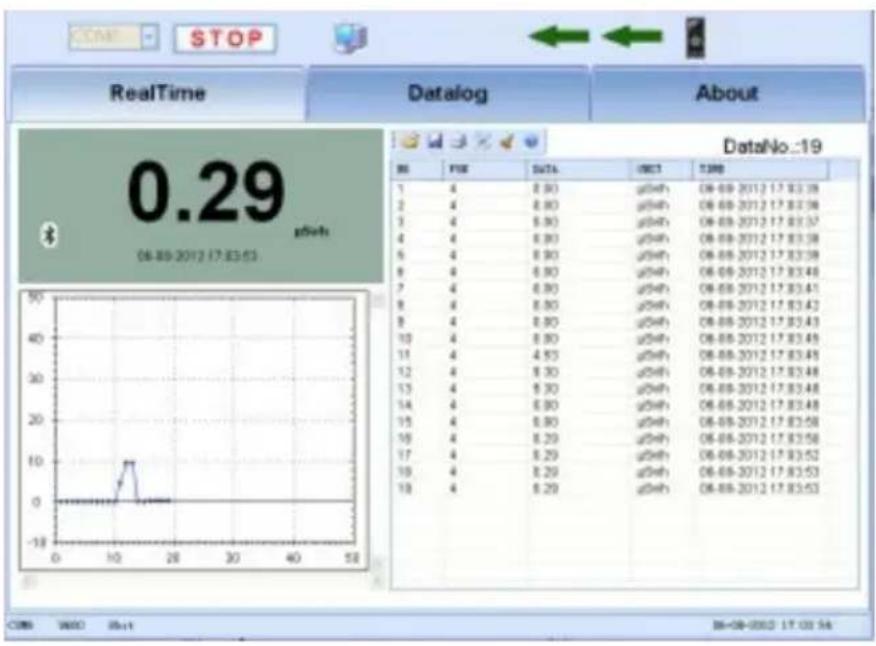
Transmitted from Radiation Detector, program startup interface effects.
6.1. Connect
• Install the software supplied on the CD with the device
- Turn on the Bluetooth function on the device according to section 5.15.
• Make sure you have Bluetooth enabled on your PC.
• Pair the device with your PC
- Open the radiation scanner software on your PC
- Select the port (BLE) corresponding to the Bluetooth device, select the device (DT-9501) and click “” to connect the instrument for data collection.
- It shows that the connection is interrupted if the program has no connection or communication failure.
- When the program connection is normal, it can start to collect data.
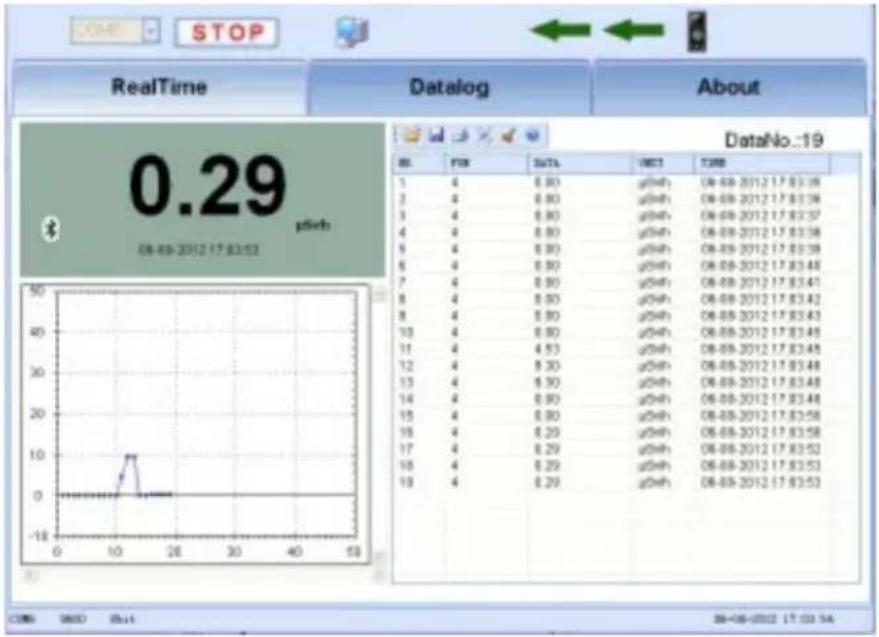
- The upper left display the current value, the lower left is the data graph, the right is the list data.
line
| Date Range | Value | |---|---| | 06-08-2012 17:03:14 | 0.29 | | 06-08-2012 17:03:14 | 0.29 |6.2. User View Graph
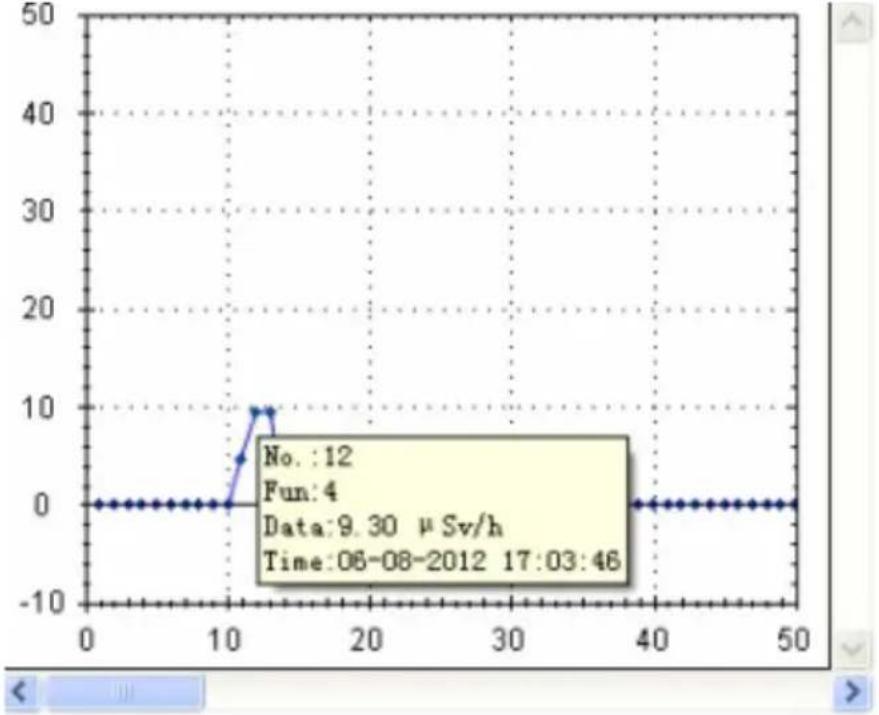
- The X-axis represents the data points, corresponding to the NO. values in the list data, the Y-axis represents the current data point value.
- Move the mouse over a data point to display detailed data information.
- Users can click the left mouse button to zoom in and check the data, can click the right mouse button to move the graph, can use the scroll bar to locate the data area quickly.
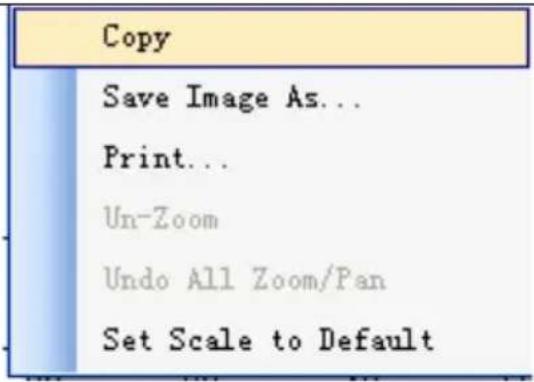
- Users can click the right mouse button in the curve area to display the curve "QuickManu".
line
| x | y | | ---- | --- | | 12 | 10 |- “QuickManu” provides copy image, save image, printing images, image display, etc.
6.3. Data Table Operation
After the program collects the data, the data will be recorded in the data table and presented to the user for reference.
6.4. Data Table Menu
6.4.1. Open Data
- The user clicks "☐" to open the data saved by the user,
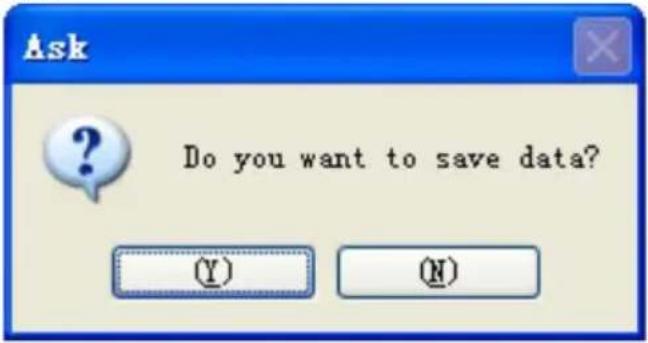
- If data is already stored in before open the program, the program will ask whether the client saves the current data or not.
- If the user does not save the data, the program will automatically clean up all data after opening.
- If the program is connected before opening, in order to avoid affect the data which user saved before, after the user clicks the open button, the program will automatically disconnect.
6.4.2. Save Data
- The user can click “” to save the recorded data to user-specified folder.
- The program provides excel files and TXT files to save the data, different storage formats can be selected.
6.4.3. Print Data
- The user clicks “” the program will start the print preview interface.
• After viewing the data, the user can click the print button to print the current table data.
6.4.4. Setting
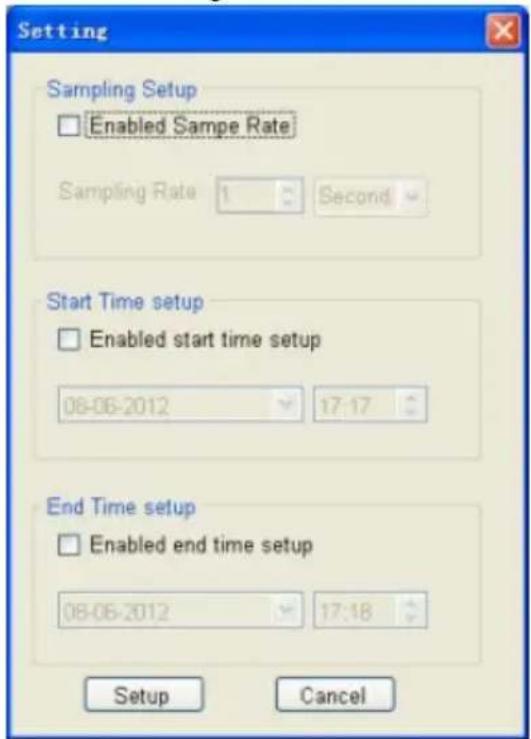
- The user clicks “” to enter the setting interface of the program,
- In the setting interface, the user can set the sampling rate, if the user need to collect data regularly or end the collection regularly, you can check Start Time Setup and End Time Setup, after user setting the time, the program will start or end automatically.
- The end time set by the user must be greater than the start time.
6.4.5. Clean Up
The user can click “” to clean up the previous collected data.
6.4.6. Help
The user clicks "?" to open the program's help documentation.
6.5. Datalog
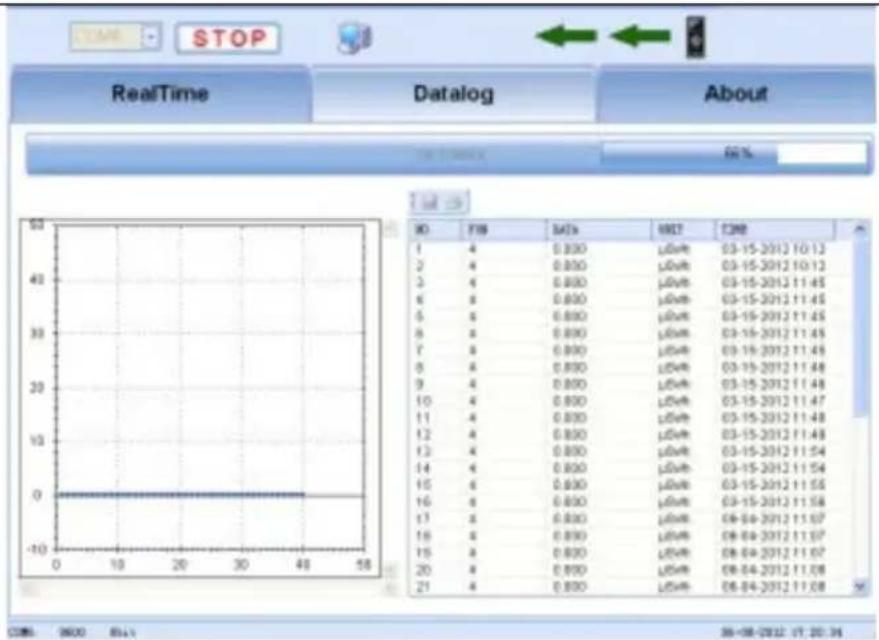
• After the user selects Datalog, user can enter the instrument Datalog data collection.
- Click Get Datalog, the program will automatically collect the existing datalog data.
line
| X | Y | |---|---| | 1 | 4 | | 2 | 4 | | 3 | 4 | | 4 | 0.000 | | 5 | 0.000 | | 6 | 0.000 | | 7 | 0.000 | | 8 | 0.000 | | 9 | 0.000 | | 10 | 0.000 | | 11 | 0.000 | | 12 | 0.000 | | 13 | 0.000 | | 14 | 0.000 | | 15 | 0.000 | | 16 | 0.000 | | 17 | 0.000 | | 18 | 0.000 | | 19 | 0.000 | | 20 | 0.000 | | 21 | 0.000 | The chart displays a constant value of 0 across all x-values from 1 to 58, with no variation in the data series or labels for the x-axis variable.6.6. About
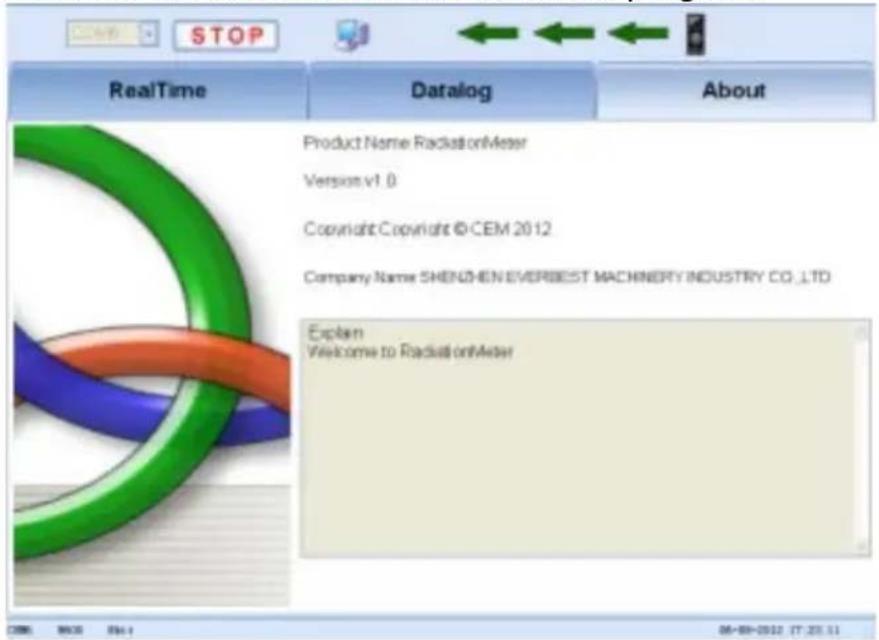
The user can check the relevant information about the program.
6.7. Notice
- The program does not limit the number of collection, if the user needs to keep the Excel file, the data collected by the user cannot be exceed than 65000 data, otherwise the program will not be able to export the excel file normally.
- The normal connection status of the program is displayed as shown in the figure, when the program can't collect the data for a long time, the program will automatically disconnect, the user needs to check the communication status between the program and the instrument, such as checking whether the port is correct, whether the Bluetooth of the instrument is turned on, etc.

flowchart
graph LR
    A["Computer Icon"] <--> B["Arrow Left"]
    B <--> C["Arrow Right"]
    C <--> D["Arrow Left"]
    D <--> E["Arrow Right"]
7. Cleaning and maintenance
a) Use only non-corrosive cleaners to clean the surface.
b) After cleaning the device, all parts should be dried completely before using it again.
c) Store the unit in a dry, cool place, free from moisture and direct exposure to sunlight.
d) Do not spray the device with a water jet or submerge it in water.
e) Use a soft cloth for cleaning.
f) Do not leave the battery in the device if it will not be used for a longer period of time.
g) Use a soft, damp cloth for cleaning.
Safe removal of batteries and rechargeable batteries
1.5V AAA batteries are installed in the devices.
Remove used batteries from the device using the same procedure by which you installed them.
Recycle batteries with the appropriate organisation or company.
Disposing of used devices
Do not dispose of this device in municipal waste systems. Hand it over to an electric and electrical device recycling and collection point. Check the symbol on the product, instruction manual and packaging. The plastics used to construct the device can be recycled in accordance with their markings. By choosing to recycle you are making a significant contribution to the protection of our environment. Contact local authorities for information on your local recycling facility.

6.4.2. Zapisz dane
6.4.5. Posprzątać
line
| X | Y | |---|---| | 1 | 0.800 | | 2 | 0.800 | | 3 | 0.800 | | 4 | 0.800 | | 5 | 0.800 | | 6 | 0.800 | | 7 | 0.800 | | 8 | 0.800 | | 9 | 0.800 | | 10 | 0.800 | | 11 | 0.800 | | 12 | 0.800 | | 13 | 0.800 | | 14 | 0.800 | | 15 | 0.800 | | 16 | 0.800 | | 17 | 0.800 | | 18 | 0.800 | | 19 | 0.800 | | 20 | 0.800 | | 21 | 0.800 | The chart displays a constant value of 0 across all x-values from 1 to 58 on the horizontal axis, with no variation or trend over time. The y-axis is labeled with the same x-axis position, but it is inferred based on the legend 'μ₀m'. The title 'Stop' and axis labels are in English: 'RealTime', 'Datalog', and 'About'. The table below shows the corresponding 'FIM' and 'SADx' values for each x-value.6.6.0
6.7. Ogłoszenie
line
| x | y | | ---- | --- | | 12 | 10 |6.4.2. Uložit data
6.4.5. Uklidit
line
| X | Y | |---|---| | 1 | 0.000 | | 2 | 0.000 | | 3 | 0.000 | | 4 | 0.000 | | 5 | 0.000 | | 6 | 0.000 | | 7 | 0.000 | | 8 | 0.000 | | 9 | 0.000 | | 10 | 0.000 | | 11 | 0.000 | | 12 | 0.000 | | 13 | 0.000 | | 14 | 0.000 | | 15 | 0.000 | | 16 | 0.000 | | 17 | 0.000 | | 18 | 0.000 | | 19 | 0.000 | | 20 | 0.000 | | 21 | 0.000 | The chart displays a constant value of 0 across all X-axis points from 1 to 58. The Y-axis represents the magnitude of the measured variable (likely a normalized or scaled value) for each data point. There is no variation in the data series due to the absence of explicit numerical labels or time intervals.6.6.0
6.7. Oznámení
line
| x | y | | ---- | --- | | 12 | 10 |6.4.5. Nettoyer
6.7. Avis
line
| x | y | | ---- | --- | | 12 | 10 |6.4.5. Ripulire
6.7. Avviso
line
| x | y | | ---- | --- | | 12 | 10 |6.4.5. Limpiar
6.7. Aviso
line
| x | y | | ---- | --- | | 12 | 10 |6.4.5. Takarítás
line
| X | Y | |---|---| | 1 | 4 | | 2 | 4 | | 3 | 4 | | 4 | 4 | | 5 | 4 | | 6 | 4 | | 7 | 4 | | 8 | 4 | | 9 | 4 | | 10 | 4 | | 11 | 4 | | 12 | 4 | | 13 | 4 | | 14 | 4 | | 15 | 4 | | 16 | 4 | | 17 | 4 | | 18 | 4 | | 19 | 4 | | 20 | 4 | | 21 | 4 | The chart displays a constant value of 0 across all x-values from 0 to 58. The y-axis is labeled with values ranging from -10 to 52. The table below shows the corresponding data points (μ) for each x-value between them.6.6. A oldalról
6.7. Értesítés
line
| x | y | | ---- | --- | | 12 | 10 |6.4.2. Gem data
6.4.5. Ryd op
Brugeren kan klikke på " " for at rydde op i de tidligere indsamlede data.
6.4.6. Hjælp
6.7. Bemærk
For the disposal of the device please consider and act according to the national and local rules and regulations.
CONTACT
expondo Polska sp. z o.o. sp. k.
- Aufräumen
- Hinweis
- General description
- DO NOT USE THE DEVICE UNLESS YOU HAVE THOROUGHLY READ AND UNDERSTOOD THIS USER MANUAL.
- Legend
- Usage safety
- ATTENTION!
- Scope of the device's application
- Device description
- LCD display symbol description
- Device use
- Ray selection switch
- Power Source and Back Light Switch Button
- Sv/h and Rem/h button for current radiation dose rate
- Sv dose accumulation
- Button for Dose Rate accumulation
- Two methods for stopping the measurement:
- Pulse counting
- Pulse counting measuring button
- Menu setup
- Date Setup
- Time Setup
- Alarm Threshold Value Setup (default value is 205uSv/h)
- Pulse sound ON&OFF Setup
- Setup of average time of radiation measurement (default value is 30s)
- Data storage (SAVE)
- Bluetooth data transmission (BT)
- Battery Voltage Detection function
- Software Operation
- Connect
- User View Graph
- Data Table Operation
- Data Table Menu
- Open Data
- Save Data
- Print Data
- Setting
- Clean Up
- Help
- Datalog
- About
- Notice
- Cleaning and maintenance
- Safe removal of batteries and rechargeable batteries
- Disposing of used devices
- Zapisz dane
- Posprzątać
- 6.6.0
- Ogłoszenie
- Uložit data
- Uklidit
- Oznámení
- Nettoyer
- Avis
- Ripulire
- Avviso
- Limpiar
- Aviso
- Takarítás
- A oldalról
- Értesítés
- Gem data
- Ryd op
- Hjælp
- Bemærk
- CONTACT
Brand : STEINBERG
Model : SBS-RS-9000
Category : Measuring equipment