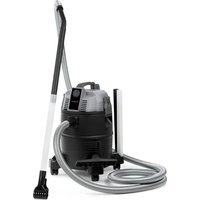
Lakeside Powerplus - Pond Cleaner Waldbeck - Free user manual and instructions
Find the device manual for free Lakeside Powerplus Waldbeck in PDF.


| Brand | Waldbeck |
| Model | Lakeside Powerplus |
| Product type | Pond cleaner and wet/dry vacuum |
| Power supply | 230 V ~ 50 Hz |
| Power | 1400 W |
| Container capacity | 35 L |
| Cable length | 4.5 m |
| Item numbers | 10033423, 10033424 |
| Main functions | Automatic pond/pool cleaning (30-second cycles), wet and dry vacuuming in manual mode |
| Included accessories | Suction hose with handle, extension tubes (4 parts), pond suction nozzles, small hand nozzle, universal floor nozzle, drain hose, collection bags, filter sponges, paper filter bags, wheels |
| Intended use | Cleaning ponds, pools, indoor and outdoor floors (water and dust) |
| Safety instructions | Keep a safety distance of 2 m from water, use with FI circuit breaker (30 mA), do not vacuum flammable/toxic substances |
| Maintenance and cleaning | Clean the container and bag with water and mild detergent; check hoses for blockages; clean and dry the filter sponge |
| Maximum water temperature | 35 °C |
| Motor protection | Sponge filter for water vacuuming; paper filter bag for dry vacuuming |
| Manufacturer | Chal-Tec GmbH, Wallstraße 16, 10179 Berlin, Germany |
| Recycling | Do not dispose of with household waste; take to a collection point for electrical and electronic equipment |
Frequently Asked Questions - Lakeside Powerplus Waldbeck
User questions about Lakeside Powerplus Waldbeck
0 question about this device. Answer the ones you know or ask your own.
Ask a new question about this device
Download the instructions for your Pond Cleaner in PDF format for free! Find your manual Lakeside Powerplus - Waldbeck and take your electronic device back in hand. On this page are published all the documents necessary for the use of your device. Lakeside Powerplus by Waldbeck.
USER MANUAL Lakeside Powerplus Waldbeck
INHALTSVERZEICHNIS
natural_image
Symbol of a trash bin crossed with a diagonal line, no text or numbers presentBerlin Brands Group UK Limited
PO Box 42
272 Kensington High Street
London, W8 6ND
United Kingdom
Dear Customer,
Congratulations on purchasing this equipment. Please read this manual carefully and take care of the following hints to avoid damages. Any failure caused by ignoring the items and cautions mentioned in the instruction manual is not covered by our warranty and any liability. Scan the QR code to get access to the latest user manual and other information about the product:

CONTENT
Safety Instructions 14
Product Overview 15
Fields Of Application 16
Start-up and Operation 17
Cleaning and Care 18
Disposal Considerations 19
Manufacturer & Importer (UK) 19
TECHNICAL DATA
| Item number 10033423, 10033424 | |
| Power supply 230 V ~ 50 Hz | |
| Power consumption 1400 W | |
| Cable length 4.5 m | |
| Volume (collecting container) 35 L |
SAFETY INSTRUCTIONS
- The power supply must correspond to the product specifications. If necessary, ask for information from your local electricity supplier regarding connection regulations. Do not connect the Vacuum cleaner or the net cable, if these do not meet the mentioned regulations (the voltage specification on the type plate must match the net voltage)!
- The Vacuum cleaner must be connected to an earthing contact socket for reasons relating to European safety standards. The electric circuit must have a fault-current circuit breaker (FI-switch/30mA). Further information is available from your local electricity specialist.
- Never leave the device unattended
- Never carry or pull the device by the connecting cable!
- The device must be fully assembled before use.
- Do not cut off the net plug and do not shorten the cable. Your guarantee becomes invalid if this is not observed!
- Pay attention in case of outside operation that plug and socket are dry.
- Never touch the net plug with wet hands!
- Always switch off the Vacuum cleaner at first and pull out the net plug before cleaning the device. Do not immerse the motor part into water for cleaning purposes or clean with a water jet!
- This device is suitable for vacuuming water with a temperature of up to max.35°C.
- Replacement of the net cable is not possible. The device must not be operated in the case of a defect cable or housing! In this case, please contact your dealer.
- Do not pull the device behind you by the hose during operation; except on smooth surfaces in the case of wet and dry vacuuming operations.
- Do not suck up easy flammable, explosive, poisonous or health hazardous materials with the Vacuum cleaner.
- Also, we take no responsibility for any damage to persons and objects, caused by incorrect use of the device or by not observing this operating instruction.
- Packing parts may be dangerous (e.g. plastic bags). Therefore, store away from children, domestic animals, etc.
- If the device is switched on, Do not hold the suction nozzle close to sensitive body parts like eyes, ears or mouth.
- Before emptying the vessel, switch off the device at first and pull out the net plug.
- The device should be positioned with a clearance of 2 m to the water in the case of pond or pool cleaning.
Intendes Use
- The Vacuum cleaner is suitable for application as a pond and pool vacuuming device and can also be used as wet and dry vacuuming device.
- It is not suitable for professional use.
- Not suitable for emptying ponds, pools and other containers!
PRODUCT OVERVIEW
1
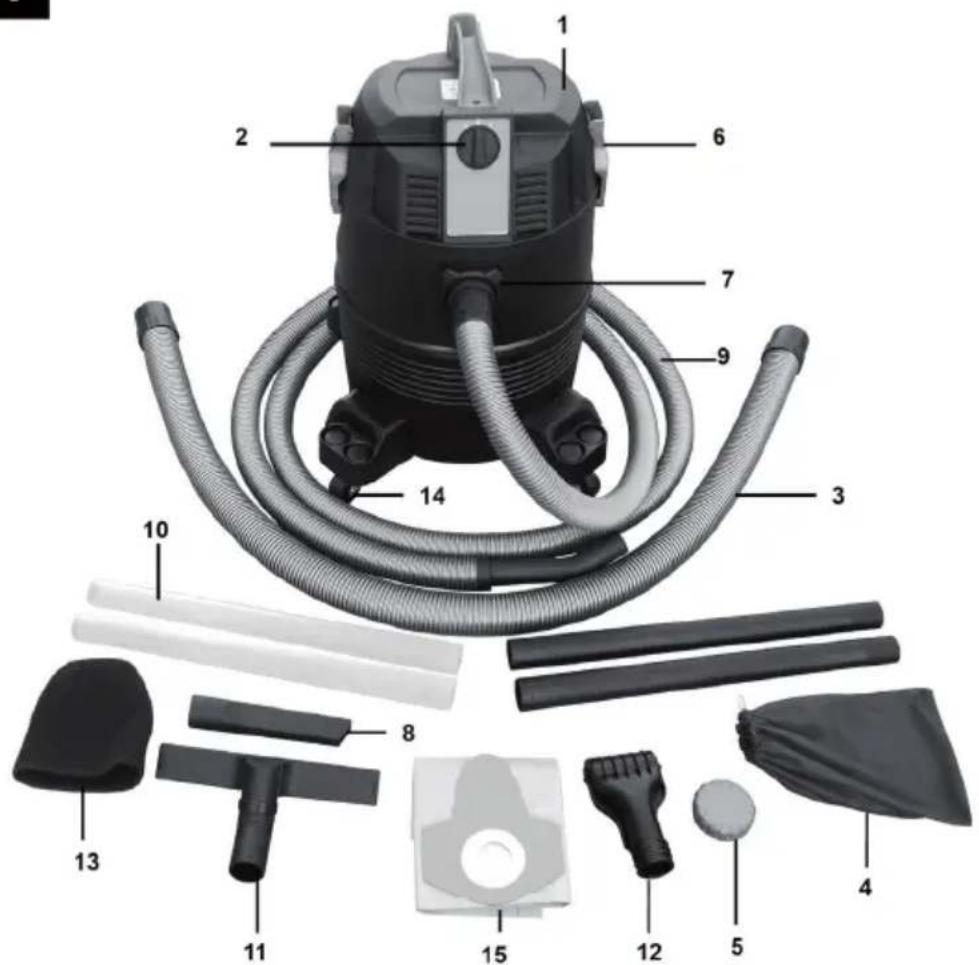
1 Motor head
2 ON/OFF switch
3 Drain hose
4 Dirt collecting bag
5 Blanking plug (change pond/pool operation to wet/dry operation)
6 Locking clips
7 Suction nozzle
8 Suction nozzle small
9 Suction hose with handle
10 Suction tube extension (4 pieces)
11 Universal bottom nozzle; also for liquids/ carpets
12 Suction nozzle pond
13 Filter sponge for motor (2 pieces: for pond/pool and wet vacuuming)
14 Rollers
15 Paper filter bag (for dry vacuuming operation)
FIELDS OF APPLICATION
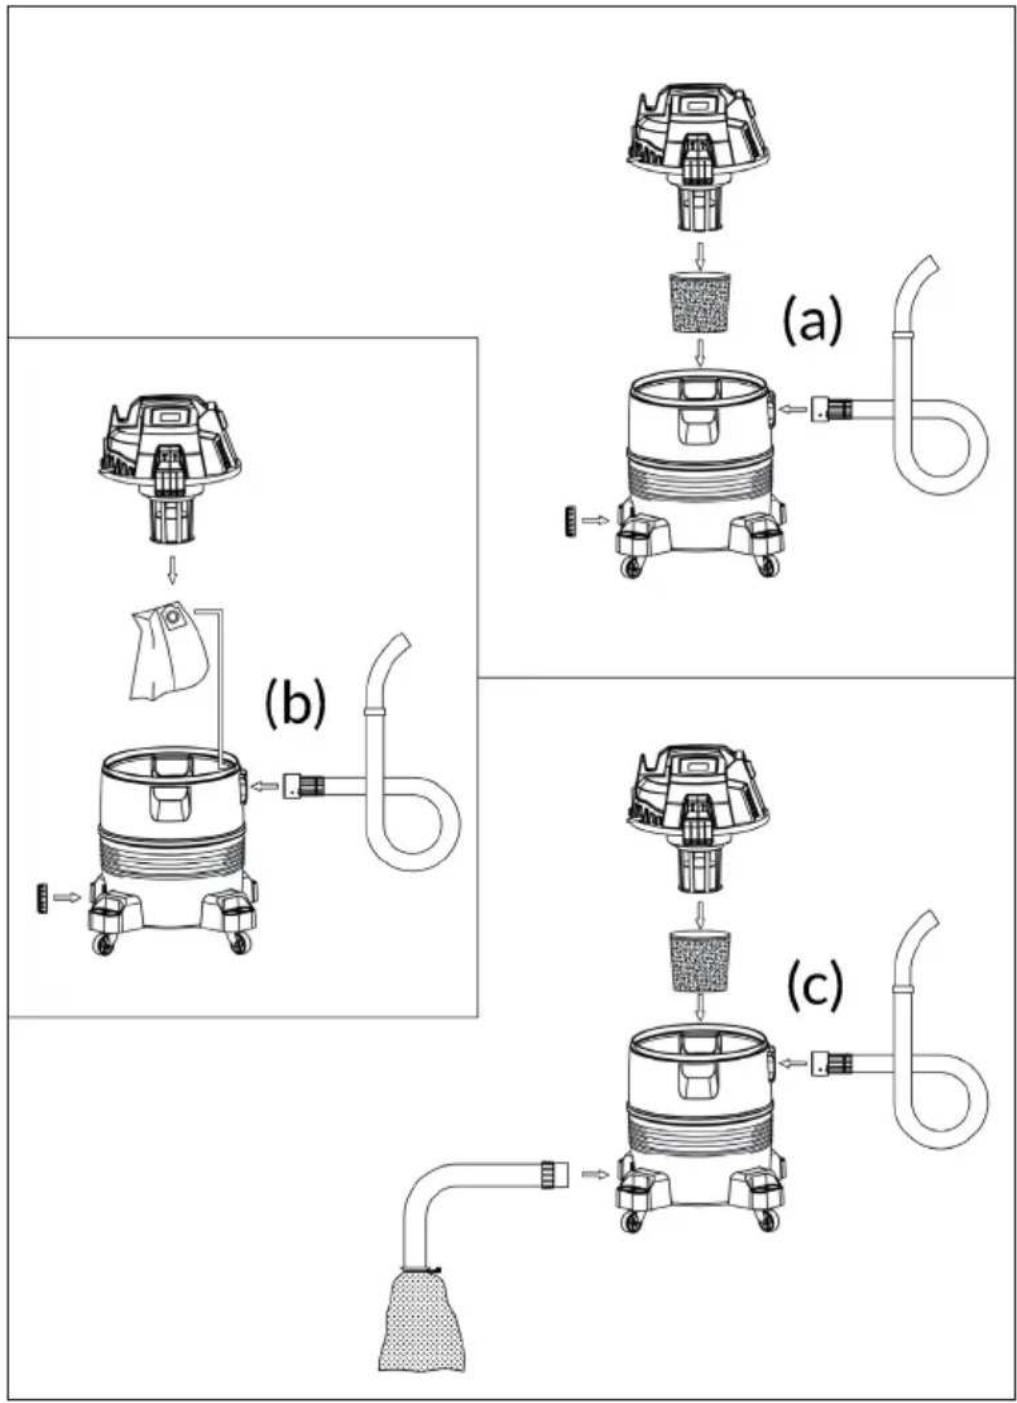
flowchart
graph TD
    A["1: Pump"] --> B["2: Bag with Paper"]
    B --> C["3: Filter with Container"]
    C --> D["4: Outlet of Air Fan"]
    style A fill:#f9f,stroke:#333
    style B fill:#ccf,stroke:#333
    style C fill:#cfc,stroke:#333
(a) As an indoor wet vacuum cleaner
(b) As a dry vacuum cleaner with dust bag
(c) As an outdoor pond and pool vacuum cleaner
START-UP AND OPERATION
- Please read the operating instruction thoroughly.
- Remove all accessories and packages from the vessel.
- Check before and after use that the switch is in position (0) OFF.
- Always use the device with the filter insert suitable for the relevant application.
Using the device for pond and pool vacuuming
- Position the device at a safety clearance of 2 m away from the pond.
- Place the drain hose (3) in such a way that the water can easily flow either back into the pond or to a suitable location in the garden.
- Open the two locking clips on the side and pull the filter sponge motor (13) with the cord upwards above the motor protective grid. Tighten and lock the cord for tight seat. After this, return the motor and close the two clips.
- Connect the plug-in connector of the suction hose (9) with the bayonet catch at the top of the container and lock the connection by a half turn to the right.
- Assemble the suction nozzle (12) and the relevant number of suction tube extensions for the application with the suction tube connection and, after this, turn the switch (2) to II AUTOMATIC to switch on the device.
- After a working interval of approximately 30 seconds, the device switches off for approximately 30 seconds in order to empty the filled collecting vessel. During this time, you can look for the following location to be cleaned and place the vacuuming device accordingly.
- The device operates now continuously after this time interval.
- Coarse dirt will be collected in the dirt collecting bag (4), which you can attach to the end of the drain hose (3). Depending on the degree of dirt, the dirt collecting bag (4) should be cleaned regularly; preferably at the end of each application.
- It is up to you to decide if the water, filtered with the dirt collecting bag, should be returned to the pond or drained into the garden.
- If you want to interrupt or finish your work, turn the switch again into position (0) OFF. Always pull out the plug, if the device is not used.
- Dirt and water should be thoroughly removed from the inside of the collecting vessel after the end of each application.
Using the device for wet and dry vacuuming
- Fit the blanking plug (5) at the outlet of the collecting vessel.
- For wet vacuuming: Fasten the filter sponge for the motor (13) (see pond and pool vacuuming device).
- For dry vacuuming: Fasten the paper filter bag (15) to the inside of the upper opening of the collecting vessel.
- For switching on the device, turn the switch (2) to I, MANUAL. In this position, the device operates continuously in continuous operation without interval switching.
- Check the filling level of the collecting vessel from time to time and, if necessary, empty or replace it.
- Switch off the device after use (0), pull out the net plug and clean collecting vessel as well as filter inserts.
Switching/Operating Modes
| Switch position 0 Motor off |
| Switch position I Manual operation (ON/OFF) for wet/dry vacuuming operation |
| Switch position II Automatic operation for pond and pool cleaning |
• After switching on, the motor will suck for 30 seconds.
• b) Motor stops after approximately 30 seconds to drain.
• Auto Start after 30 seconds.
- Repetition (a) and (b) to OFF (0).
CLEANING AND CARE
- Thoroughly clean the collecting vessel and dirt collecting bag (4) with water and, possibly, with a little mild household cleaner.
- Check suction hose (9), suction tubes and drain hose (3) occasionally for possible blocking or dirt residues and remove them.
- Carefully wash the filter sponge for the motor (13) with water and possibly, with a mild household cleaner and dry it afterwards.
DISPOSAL CONSIDERATIONS
natural_image
Symbol of a trash bin crossed with a diagonal line, no text or numbers presentIf there is a legal regulation for the disposal of electrical and electronic devices in your country, this symbol on the product or on the packaging indicates that this product must not be disposed of with household waste. Instead, it must be taken to a collection point for the recycling of electrical and electronic equipment. By disposing of it in accordance with the rules, you are protecting the environment and the health of your fellow human beings from negative consequences. For information about the recycling and disposal of this product, please contact your local authority or your household waste disposal service.
MANUFACTURER & IMPORTER (UK)
Manufacturer:
Chal-Tec GmbH, Wallstrasse 16, 10179 Berlin, Germany.
Importer for Great Britain:
Berlin Brands Group UK Limited
PO Box 42
272 Kensington High Street
London, W8 6ND
United Kingdom
Estimado cliente:
ÍNDICE DE CONTENIDOS
flowchart
graph TD
    A["1: Pump with lid"] --> B["2: Bag with cloth"]
    B --> C["3: Filter with filter unit"]
    C --> D["4: Outlet of filter unit"]
    D --> E["5: Outlet of filter unit"]
    E --> F["6: Outlet of filter unit"]
natural_image
Symbol of a trash bin crossed with a diagonal line, representing no waste or discharge (no text or labels)Berlin Brands Group UK Limited
PO Box 42
272 Kensington High Street
London, W8 6ND
United Kingdom
Cher client,
SOMMAIRE
flowchart
graph TD
    A["1: Pump with lid"] --> B["2: Bag with cloth"]
    B --> C["3: Filter with filter unit"]
    C --> D["4: Outlet of filter unit"]
    D --> E["5: Outlet of filter unit"]
    E --> F["6: Outlet of filter unit"]
natural_image
Symbol of a trash bin crossed with a diagonal line, no text or numbers presentBerlin Brands Group UK Limited
PO Box 42
272 Kensington High Street
London, W8 6ND
United Kingdom
Gentile cliente,
INDICE
natural_image
Symbol of a trash bin crossed with a diagonal line, no text or numbers presentPRODUTTORE E IMPORTATORE (UK)
Produttore:
Chal-Tec GmbH, Wallstraße 16, 10179 Berlino, Germania.
Berlin Brands Group UK Limited
PO Box 42
272 Kensington High Street
London, W8 6ND
United Kingdom

bar
| Category | Value | |---|---| | Category 1 | 100 | | Category 2 | 100 | | Category 3 | 100 | | Category 4 | 100 | | Category 5 | 100 | | Category 6 | 100 | | Category 7 | 100 | | Category 8 | 100 | | Category 9 | 100 | | Category 10 | 100 | | Category 11 | 100 | | Category 12 | 100 | | Category 13 | 100 | | Category 14 | 100 | | Category 15 | 100 | | Category 16 | 100 | | Category 17 | 100 | | Category 18 | 100 | | Category 19 | 100 | | Category 20 | 100 | | Category 21 | 100 | | Category 22 | 100 | | Category 23 | 100 | | Category 24 | 100 | | Category 25 | 100 | | Category 26 | 100 | | Category 27 | 100 | | Category 28 | 100 | | Category 29 | 100 | | Category 30 | 100 | | Category 31 | 100 | | Category 32 | 100 | | Category 33 | 100 | | Category 34 | 100 | | Category 35 | 100 | | Category 36 | 100 | | Category 37 | 100 | | Category 38 | 100 | | Category 39 | 100 | | Category 40 | 100 | | Category 41 | 100 | | Category 42 | 100 | | Category 43 | 100 | | Category 44 | 100 | | Category 45 | 100 | | Category 46 | 100 | | Category 47 | 100 | | Category 48 | 100 | | Category 49 | 100 | | Category 50 | 100 | | Category 51 | 100 | | Category 52 | 100 | | Category 53 | 100 | | Category 54 | 100 | | Category 55 | 100 | | Category 56 | 100 | | Category 57 | 100 | | Category 58 | 100 | | Category 59 | 100 | | Category 60 | 100 | | Category 61 | 100 | | Category 62 | 100 | | Category 63 | 100 | | Category 64 | 100 | | Category 65 | 100 | | Category 66 | 100 | | Category 67 | 100 | | Category 68 | 100 | | Category 69 | 100 | | Category 70 | 100 | | Category 71 | 100 | | Category 72 | 100 | | Category 73 | 100 | | Category 74 | 100 | | Category 75 | 100 | | Category 76 | 100 | | Category 77 | 100 | | Category 78 | 100 | | Category 79 | 100 | | Category 80 | 100 | | Category 81 | 100 | | Category 82 | 100 | | Category 83 | 100 | | Category 84 | 100 | | Category 85 | 100 | | Category 86 | 100 | | Category 87 | 100 | | Category 88 | 100 | | Category 89 | 100 | | Category 90 | 100 | | Category 91 | 100 | | Category 92 | 100 | | Category 93 | 100 | | Category 94 | 100 | | Category 95 | 100 | | Category 96 | 100 | | Category 97 | 100 | | Category 98 | 100 | | Category 99 | 100 | | Total (Total) = [sum of values] / [sum of values] * [sum of values] * [sum of values] * [sum of values] * [sum of values] * [sum of values] * [sum of values] * [sum of values] * [sum of values] * [sum of values] * [sum of values] * [sum of values] * [sum of values] * [sum of values] * [sum of values] * [sum of values] * [sum of values] * [sum of value] * [sum of values] * [sum of values] * [sum of values] * [sum of values] * [sum of values] * [sum of values] * [sum of values] * [sum of values] * [sum of values] * [sum of values] * [sum of values] * [sum of values] * [sum of values] * [sum of values] * [sum of values] * [sum of values] * [total]
- INHALTSVERZEICHNIS
- Dear Customer,
- CONTENT
- SAFETY INSTRUCTIONS
- Intendes Use
- PRODUCT OVERVIEW
- FIELDS OF APPLICATION
- START-UP AND OPERATION
- Using the device for pond and pool vacuuming
- Using the device for wet and dry vacuuming
- Switching/Operating Modes
- CLEANING AND CARE
- DISPOSAL CONSIDERATIONS
- MANUFACTURER & IMPORTER (UK)
- Manufacturer:
- Importer for Great Britain:
- Estimado cliente:
- ÍNDICE DE CONTENIDOS
- Cher client,
- SOMMAIRE
- Gentile cliente,
- INDICE
- PRODUTTORE E IMPORTATORE (UK)
- Produttore:
Brand : Waldbeck
Model : Lakeside Powerplus
Category : Pond Cleaner