
Park Ranger - Chaise de travail mobile Waldbeck - Free user manual and instructions
Find the device manual for free Park Ranger Waldbeck in PDF.


| Product Type | Gardening Tractor Scoot / Work Seat |
| Brand | Waldbeck |
| Model | Park Ranger |
| Weight Capacity (Seat) | 400 lbs (181 kg) |
| Weight Capacity (Plastic Tray) | 5 lbs (2.3 kg) |
| Seat Features | Swivels 360°, height adjustable by turning seat post |
| Seat Height Adjustment | Twist seat clockwise or counterclockwise to raise/lower |
| Handle Type | Extendable for pulling, retractable as hand hold; 3-position |
| Tire Type | Pneumatic (air-filled), valve stems facing outward |
| Maximum Tire Pressure | 30 psi |
| Frame Material | Steel |
| Tray Material | Plastic |
| Tray Features | Pre-drilled drain holes to prevent rust |
| Basket Included | Yes, rear storage cage |
| Assembly Required | Yes, full assembly needed |
| Recommended Tools | Large flathead screwdriver, 12 in. wrench or adjustable wrench, adjustable slip-jaw pliers |
| Safety Notes | Not for children; max 400 lbs seat load; max 5 lbs tray load; do not use on inclines; do not overinflate tires; do not operate if damaged |
| Manufacturer | Chal-Tec GmbH, Wallstr. 16 10179 Berlin, Germany |
Frequently Asked Questions - Park Ranger Waldbeck
User questions about Park Ranger Waldbeck
0 question about this device. Answer the ones you know or ask your own.
Ask a new question about this device
Download the instructions for your Chaise de travail mobile in PDF format for free! Find your manual Park Ranger - Waldbeck and take your electronic device back in hand. On this page are published all the documents necessary for the use of your device. Park Ranger by Waldbeck.
USER MANUAL Park Ranger Waldbeck
natural_image
Green and black toy car with perforated seat and wheels, no visible text or symbols10030404
natural_image
Green and black toy car with perforated seat and wheels, no visible text or symbolsCongratulations on purchasing this equipment. Please read this manual carefully and take care of the following hints on installation and use to avoid technical damages. Any failure caused by ignoring the items and cautions mentioned in the operation and installation instructions are not covered by our warranty and any liability.
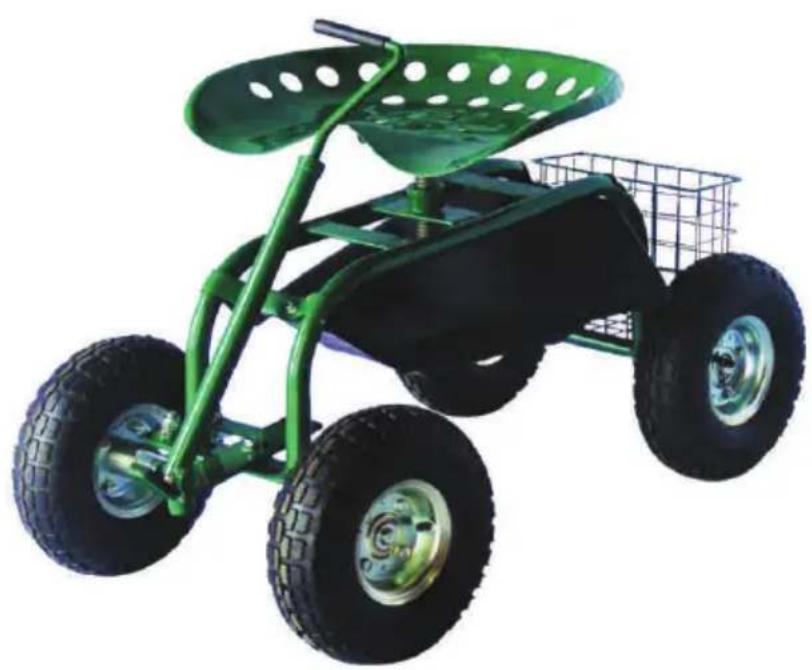
Our back-saving Tractor Scoot lets you garden from a seated position virtually anywhere in your yard or garden. Use the extendable handle to pull the Scoot behind you like a wagon. When retracted, the handle serves as a sturdy hand hold. The swivelling, tractor-style seat has been lowered to give you better access when planting and harvesting. The hefty, steel frame and pneumatic tires ensure a smooth, stable ride.
Safety Notes
- Not for use or for play by children.
- Do not overinflate tires.
- Do not use on inclines as work seat may tip and cause injury.
- Do not load the work seat with more than 400 lbs.
- Do not load plastic tray with more than 5 lbs.
- Do not operate if any part is damaged or broken.
- Test tire pressure before use. Keep tire pressure at, or just below the maximum pressure of 30 psi.
Parts List
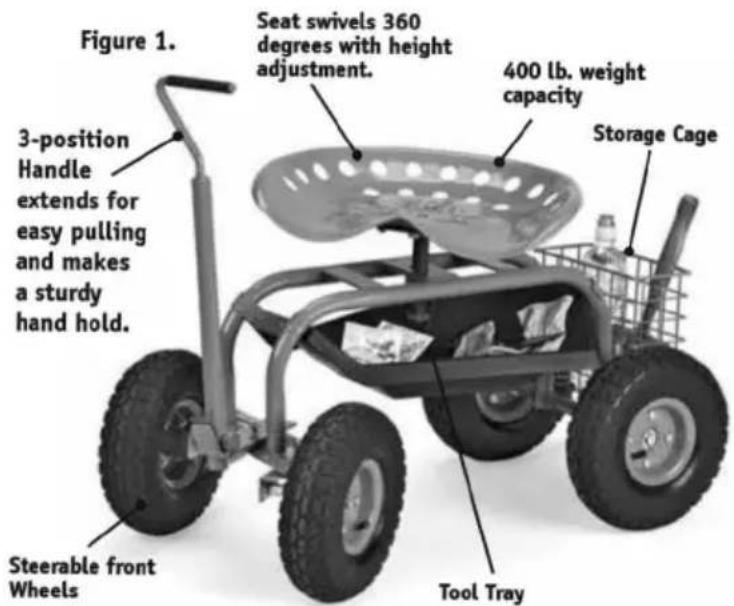

Installation
Assembly instructions:
Tools Needed: Large flat head (slotted) screwdriver, 12 in. wrench or adjustable wrench, adjustable slip jaw pliers.
Step 1:
Unwrap the Tractor Scoot parts outside or in a well ventilated area. (The wheels are made from vulcanized rubber and will emit an odor for the first couple days.) Identify and organize all parts before assembly (see Parts List below). You might want to use the plastic tray to hold the hardware during assembly. Note that washers and nuts come pre-attached to the bolts to make identification easier.
Step 2
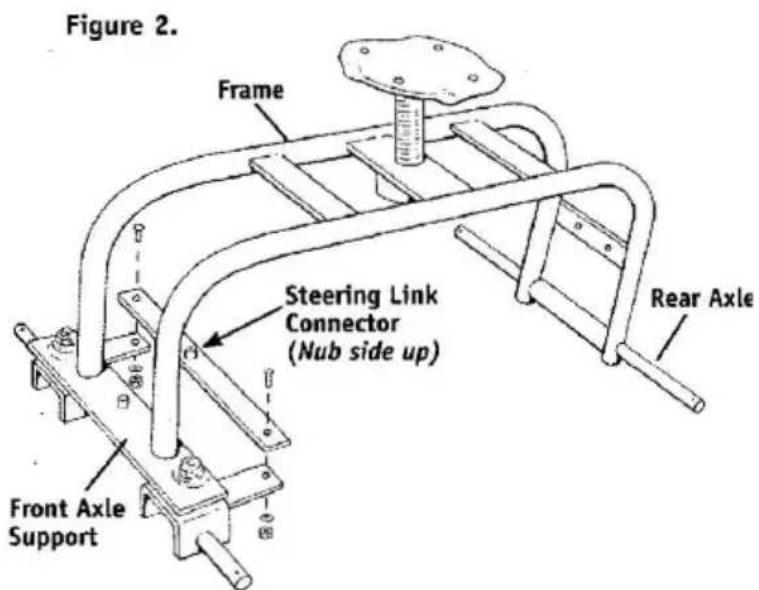
Insert the Rear Axle into the back of the frame (Figure 2).
Step 3
Place the steering link connector (nub side up) onto the front axle support assembly. Secure with two 8x20 mm bolts, two 8mm washers, and two 8mm nuts as shown (Fig. 2). Use slip-jaw (adjustable pliers) to hold the head of the bolt while tightening the nut with a wrench (Note that you will first need to undo the nuts and washers from the bolts.)
Step 4
Slide one axle sleeve onto each end of the rear axle (Figure 3, Exploded View). Using the washers packaged with the cotter pins, mount a washer, followed by a wheel (with valve stem facing out), onto each end of the rear axle. Slide another washer onto each end of the axle. Open and slide a cotter pin through the pre-drilled hole at the end of the axle. (Open the cotter pin and wrap the ends of the pin back around tile axle to secure the wheels.).

Step 5
Mount a washer, followed by a wheel (with valve stem facing out), onto each end of the front axle. Slide another washer onto each end of the axle followed by a cotter pin (flg 3).
Note: Axle sleeves are not used on the front axle.
Step 6
Remove the 8mm nut and washer, and large washer from the pre-welded bolt on the front axle support. Place the handle over the pre-welded bolt and secure with the large washer, small washer and nut as shown (Fig.: 1a). Hand tighten.
Important: Do not over-tighten bolts on the steeringmechanism or the steering may „freeze up."
Pull the tractor scoot to make sure the handle moves freely left and right. If the handle does not steer well or seems stiff, you may need to slightly loosen one or both of the nuts on the handle.
Step 7
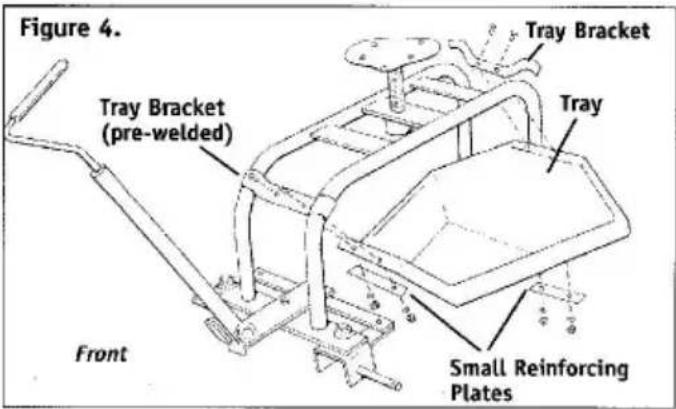
Using the small 6x15 mm bolts, nuts and washers, attach the tray (front first) to the frame using the small reinforcing plate. Place the plate under the front rim of the tray lining up the holes with the pre-drilled holes in the (pre-welded) front tray bracket (Figure 4). (It helps to rest the back of the Tray on the back tires (or support while lining up the parts in the front.) Hold each nut with a wrench or pliers while tightening each bolt with a flat head (slotted) screwdriver.
Step 8
Repeat Step 6 to attach the back of the tray using the scoot tray bracket and small reinforcing plate. Fully tighten all nuts on the tray.

Note: Pre-drilled holes through the floor of the tray allow rainwater to drain and keep tools from rusting.
Step 9
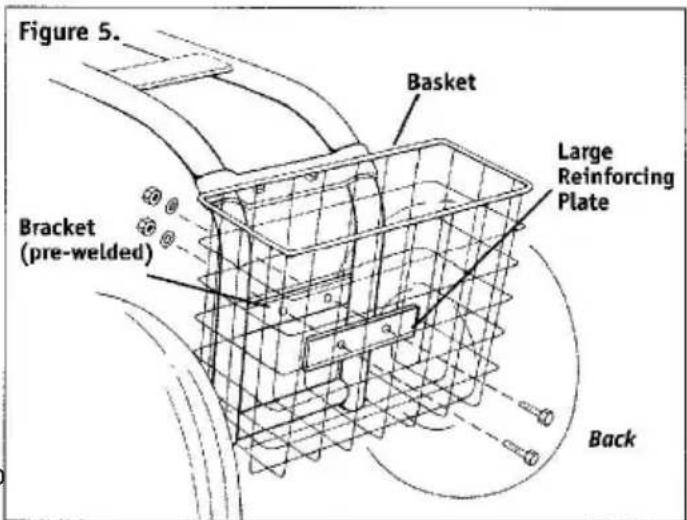
Centre the basket between the back wheels, lining up the bottom of the Basket with the bottom of the back axle. Attach the basket with two 8x20mm bolts, nuts, washers and large reinforcing plate. Line up the plate and hardware with the holes in the pre-welded bracket located on the back of the frame (Figure 5). Use pliers and a wrench to fully tighten the bolts until the Basket is securely in place.
Step 10
Attach the seat to the seat post with four 10x15mm bolts, nuts and washers. Use pliers and a flat head screwdriver to fully tighten the bolts in place. Note that the threaded stern of the seat post has a washer and cotter pin pre-installed. Check by looking under the seat to make sure the cotter pin is wrapped around the axle and secure (Figure 6).
The seat may be raised or lowered to a desired height simply by turning it clockwise or counterclockwise. For the most comfort, we recommend adjusting the seat to a height where your feet rest level on the ground and your legs are parallel with the ground.
natural_image
Green toy car with perforated seat and two large tires, no visible text or symbolsProducer: Chal-Tec GmbH, Wallstr. 16 10179 Berlin, Germany


Brand : Waldbeck
Model : Park Ranger
Category : Chaise de travail mobile