Ventura - Radio Waldbeck - Free user manual and instructions
Find the device manual for free Ventura Waldbeck in PDF.


| Product type | Digital radio DAB/DAB+, FM, Internet |
| Brand | Waldbeck |
| Model | Ventura |
| Article number | 10037493, 10037494, 10037495 |
| Power supply | AC adapter 9 V DC, 3000 mA |
| Standby power consumption | Less than 1 W |
| Dimensions (W x H x D) | 240 x 138 x 176 mm |
| Display | 2.8 inch TFT color, 320 x 240 pixels |
| Radio frequencies | DAB/DAB+: Band III 174-240 MHz; FM: 87.5-108 MHz (RDS) |
| Wi-Fi | 802.11 b/g/n, 2.4 GHz, encryption WEP/WPA/WPA2, WPS |
| Bluetooth | Version 4.x? (2402-2480 MHz, max power 3.5 dBm) |
| Sockets and ports | Headphone output 3.5 mm, AUX input, AUX output, USB port, DAB/FM antenna |
| Supported audio codecs | AAC, MP3, FLAC |
| Main functions | DAB/FM/Internet radio, Bluetooth Streaming, Spotify Connect, UNDOK, alarm, sleep timer, equalizer, 20 presets per source |
| Remote control | Yes, with LR03 (AAA) batteries included |
| Electrical safety | Do not open the housing, do not expose to water, overload protection |
| Maintenance and cleaning | Clean with a soft cloth, do not use abrasive products |
| Spare parts and repairability | AC adapter and remote control available; repair by qualified personnel only |
| General information | Use in temperate climate; recycle according to local regulations |
Frequently Asked Questions - Ventura Waldbeck
User questions about Ventura Waldbeck
0 question about this device. Answer the ones you know or ask your own.
Ask a new question about this device
Download the instructions for your Radio in PDF format for free! Find your manual Ventura - Waldbeck and take your electronic device back in hand. On this page are published all the documents necessary for the use of your device. Ventura by Waldbeck.
USER MANUAL Ventura Waldbeck
In inter via radio in inter
Radio Int
Rao 493
aUC
www.auna-multimedia.com

INHALT
Technische Daten 4
BEDIENUNG
Inbetriebnahme
Ein/Auschalten
https://www.spotify.com/connect/third-party-licenses
Für Android (Google Play)
For Android system (Google Play)
Digital radio screen
Senderliste
-
To tune to Presets 1 to 4, press the corresponding numbered button on the front panel or on the remote control (1 to 4).
-
To access presets 5 to 20 on the front panel press the 5+ button, turn the Select dial right or left to scroll through the list of presets, then push and release the Select dial to tune to the selected preset.
EINSTELLUNGEN
natural_image
Symbol of a trash bin with crossed lines indicating no waste, and a solid black rectangle below (no text or labels)Unit 6 Riverside Business Centre
Brighton Road
Shoreham-by-Sea
BN43 6RE
United Kingdom
https://use.berlin/10037493
Dear Customer,
Congratulations on purchasing this equipment. Please read this manual carefully and take care of the following hints to avoid damages. Any failure caused by ignoring the items and cautions mentioned in the instruction manual are not covered by our warranty and any liability. Scan the QR code to get access to the latest user manual and other information about the product.

CONTENTS
Specifications 32
Safety Instructions 34
Product Description 36
Remote Control 38
Getting started 41
Operation 42
Listening to Internet Content 43
Streaming BT Audio 45
Spotify Connect 46
UNDOK 47
Listening to DAB or FM Radio 48
Using Radio Presets 49
Settings 50
Disposal Considerations 55
SPECIFICATIONS
| Item number 10037493, | 10037494, 10037495 |
| Radio: Digital (DAB/DAB+), FM and internet radio (via Wi-Fi). | |
| Frequencies Digital Band III 174–240 MHz,FM 87.5-108 MHz (with RDS). | |
| Display 2.8", 320 x 240, TFT colour display | |
| WLAN Wi-Fi: 802.11b, 802.11g and 802.11n supported with WEP and WPA/WPA2 encryption, WPS 2.412 GHz – 2.472 GHz (channels 1 to 13).Maximum power: 16.00 dBm (EIRP) 0.5 MB broadband speed recommended. | |
| Media streaming Audio codecs supported include AAC, MP3, FLAC. | |
| Mains power adapter 9 V DC, 3000 mA | |
| Output connectors: 3.5 mm stereo phone out socket | |
| Power consumption Standby mode: <1 W. | |
| Dimensions 240 x 138 x 176 mm | |
The specification presents only as a reference. The value of weight and size are approximation. Our product is improved ceaselessly and the specification and function may be changed without prior notice.
EXPLANATION OF THE WARNING SYMBOLS

CAUTION
RISK OF ELECTRIC SHOCK DO NOT OPEN

AUTION: TO REDUCE THE RISK OF ELECTRIC SHOCK AND SERIOUS PERSONAL INJURY, DO NOT REMOVE ANY COVER. NO USER-SERVICABLE PARTS INSIDE. REFER SERVICING TO QUALIFIED SERVICE PERSONNEL ONLY.
WARNING. TO REDUCE THE RISK OF FIRE OR ELECTRICAL SHOCK, DO NOT EXPOSE THIS PRODUCT TO WATER, RAIN OR MOISTURE.
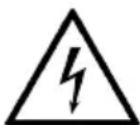
Triangle with lightning plus explanation as follows:
DANGEROUS VOLTAGE: The lightning flash with arrowhead symbol within the equilateral triangle is intended to alert the user to the presence of uninsulated dangerous voltage within the product's enclosure that may be of sufficient magnitude to constitute a risk of electric shock to persons.

Triangle with exclamation point plus explanation as follows:
ATTENTION: The exclamation point within the equilateral triangle is intended to alert the user to the presence of important operating and maintenance (servicing) instructions in the literature accompanying this product.
SAFETY INSTRUCTIONS
Read these instructions. All uses guidelines must be read before using the device. Keep the instructions for future use.
- Children over the age of 8 and persons with reduced physical, sensory or mental capabilities or those with a lack of experience and knowledge may only use the device if they are instructed on how to do so by a person responsible for their safety, or if they are supervised and understand the hazards associated with the use of the device.
- Use and security guidelines must be respected.
- The device must not be used near water or be put in contact with moisture.
- Make sure has no liquid is spilled on device and device openings.
- Move device carefully, avoid shocks.
- Do not block the breakdown of the device outputs.
- Do not place the device near from a heat source (e.g. radiator). Do not expose it to the Sun.
- Plug the device as indicate on this information form.
- This device has a connection with overload protection. Replacement should only be done by an experienced technician or the device manufacturer.
- For cleaning the device, please follow the recommendations of the manual.
- The power cord should be unplugged when not using for a long period of time.
- The device shall be repaired by a qualified person when:
a. the power cord is damaged,
b. objects have fallen into the apparatus or a liquid has been spilled into device,
c. device was exposed to the rain,
d. device does not work correctly without notable exterior change,
e. device is broken.
- The user shall not try to maintain the device beyond that which is described in this manual.
- The device must not be exposed to dripping or splashing and that no objects filled with liquids, such as vases, shall be placed on apparatus.
- To be completely disconnect the power input, the mains plug of apparatus must be disconnected from the mains, as the disconnect devices is the mains plug of apparatus.
- The mains plug of apparatus should not be obstructed OR should be
easily accessed during intended use.
- Excessive sound pressure form earphones and headphones can cause hearing loss.
- No naked flame sources such as lighted candles should be placed on the apparatus;
- Attention should be drawn to the environmental aspects of battery disposal;
- The device can be used in moderate climates.
PRODUCT DESCRIPTION
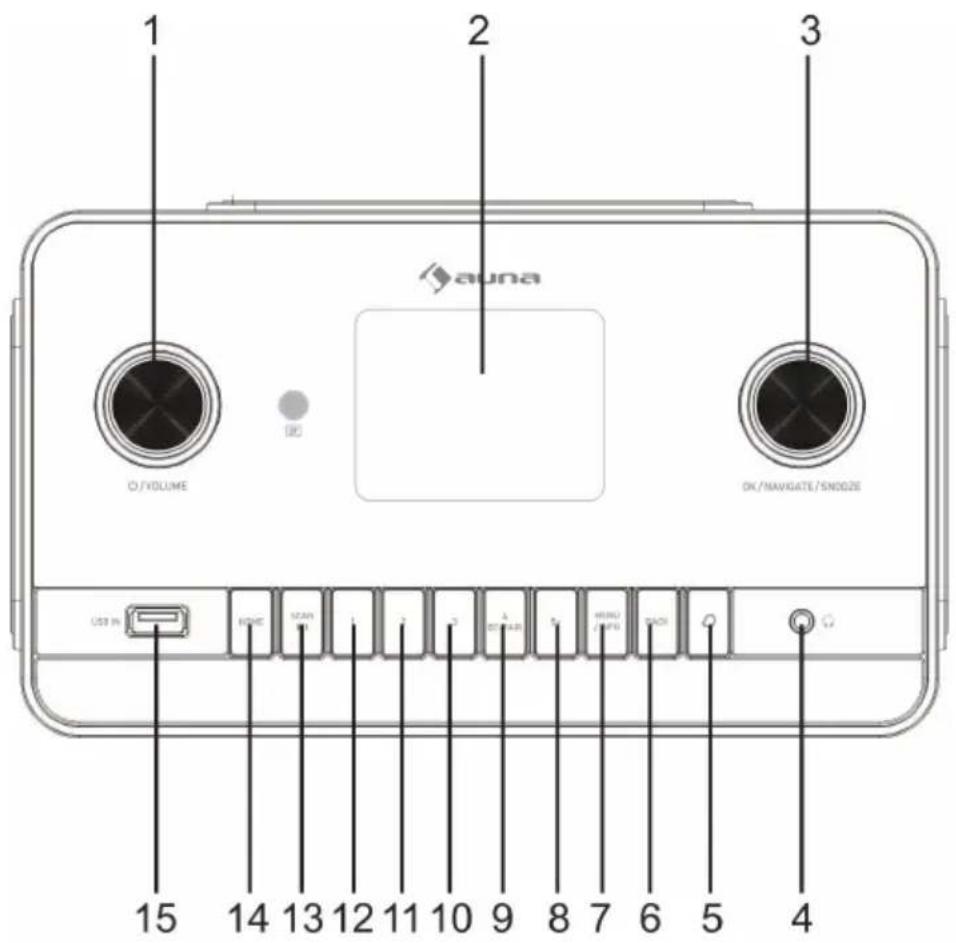
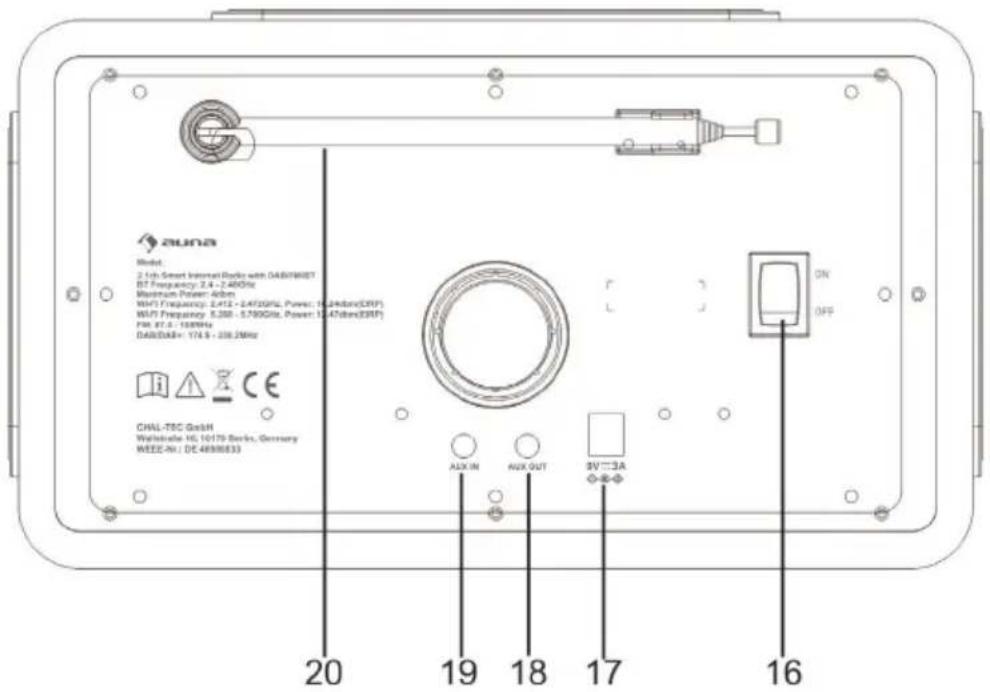
1 STANDBY/ VOLUME dial
2 TFT display
3 OK/NAVIGATE DIAL/SNOOZE
4 PHONE jack
5 ALARM SET button
6 BACK button
7 MENU/INFO button
8 PRESET 5+/PROG button
9 PRESET 4 button
BT PAIR button
10 PRESET 3 button
11 PRESET 2 button
12 PRESET 1 button
13 SCAN button
PLAY/PAUSE button
14 HOME button
15 USB jack
16 POWER ON/OFF switch
17 DC IN jack
18 AUX OUT jack
19 AUX IN jack
20 DAB/FM ANT
REMOTE CONTROL
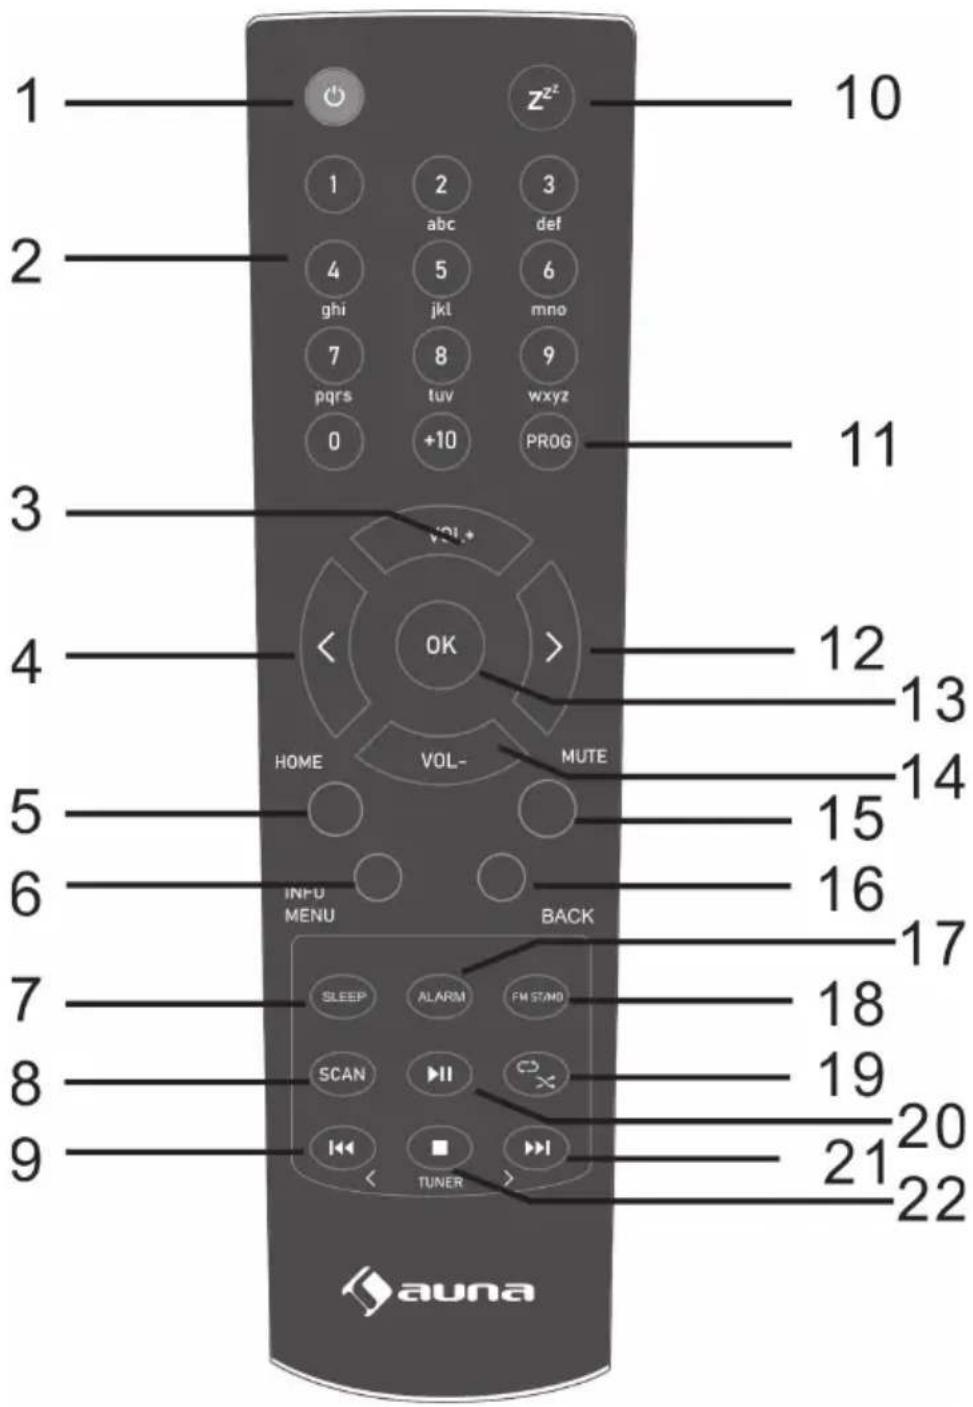
1 ON/STANDBY button
2 NUMERIC button
3 VOLUME + button
4 CURSOR DOWN button
5 HOME button
6 MENU/INFO button
7 SLEEP button
8 SCAN button
9 USB/BT SKIP PREVIOUS / FM TUNE- button
10 SNOOZE button
11 PROG button
12 CURSOR UP button
13 OK button
14 VOLUME - button
15 MUTE button
16 BACK button
17 ALARM button
18 FM ST/MONO button
19 REPEAT/RANDOM button
20 PLAY/PAUSE button
21 USB/BT SKIP NEXT/FM TUNE+ button
22 STOP button
Putting the batteries into the remote
- Open the battery cover.
- Insert the supplied battery according to the terminal indicated in the battery compartment. When inserting or removing the battery, push it towards the (−) battery terminals.
- Close the cover.
Attention
- Remove the battery if the unit will not be used for a long period of time. This will prevent potential damage due to battery leakage.
- Do not use rechargeable battery (nickel-cadmium battery, etc.).
• Installing the battery incorrectly may cause the unit to malfunction. - Batteries (battery pack or batteries installed) shall not be exposed to excessive heat such as sunshine, fire or the like.
Notes concerning use:
- Replace the battery if the operating distance is reduced or if the operation becomes erratic. Purchase an "AAA" size battery (LR03)
- Periodically clean the transmitter on the remote control and the sensor on the unit with a soft cloth.
- Exposing the sensor on the unit to strong light may interfere with operation. Change the lighting or the direction of the unit if this occurs.
- Keep the remote control away from moisture, heat, shock, and vibrations.
GETTING STARTED
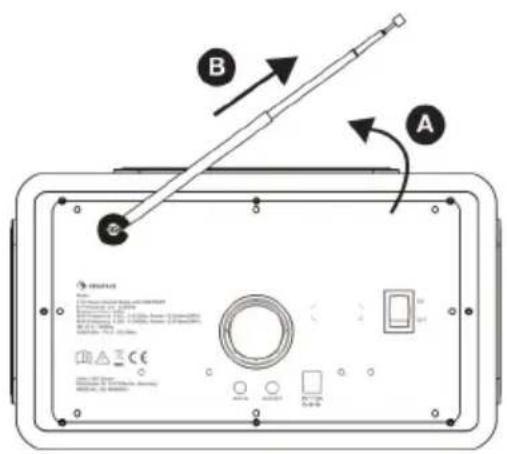
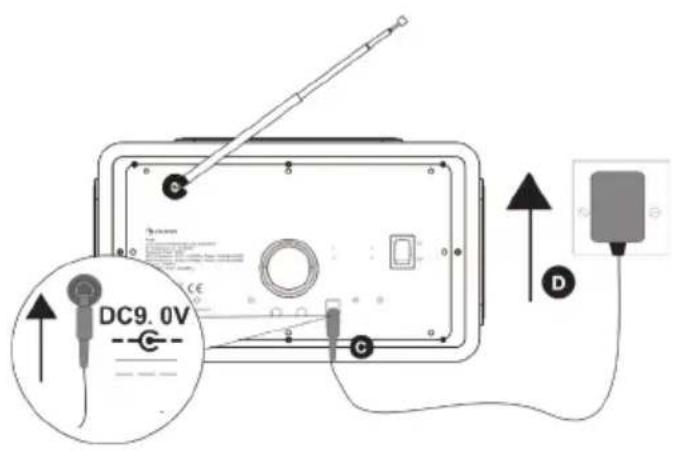
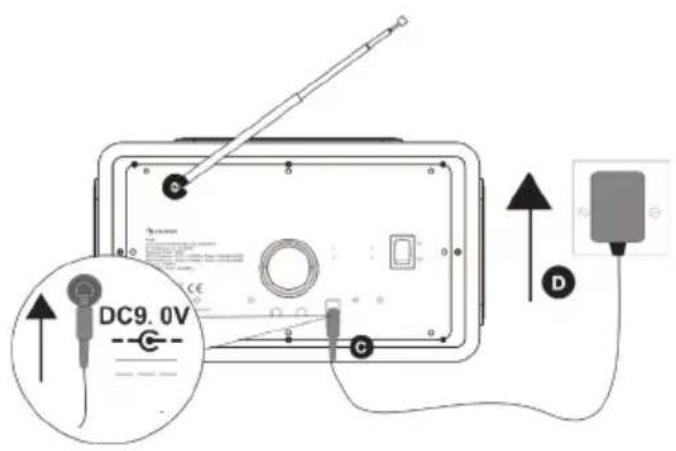
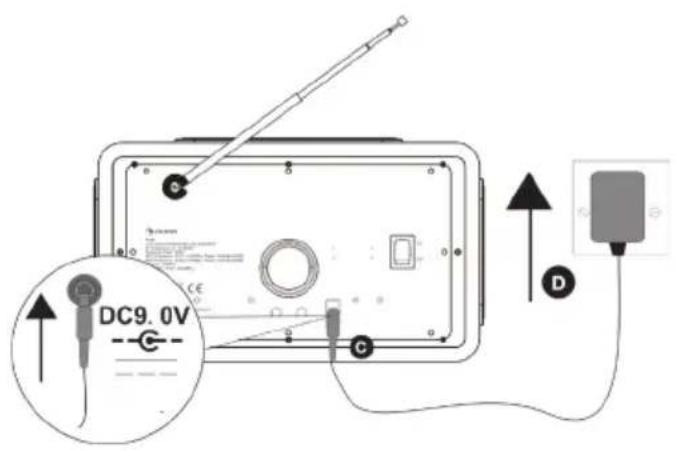
- Unclip the aerial and fully extend it (steps A and B).
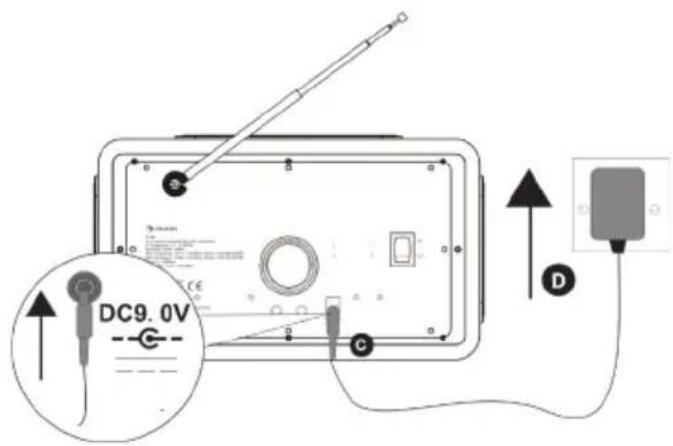
Insert the jack of the supplied mains adapter into the socket on the rear of the radio (C).
Plug the mains adapter into the mains supply (D)
- Press the Standby button to power on.
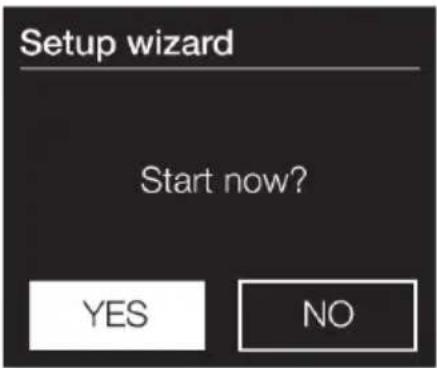
- The first time you switch on you will be asked if you would like to run the setup wizard, which will help you connect to your Wi-Fi. If you want to run the setup wizard now, turn and press the Select dial to select 'Yes' and follow the prompts on screen. To set up later, turn and press the Select dial to select 'No'.
OPERATION
POWER ON/OFF
When you first connect the unit to the mains socket, the unit will be in standby mode after showing "auna"
POWER button
Main unit operation:
- Press the Power button for Turn on the Internet radio
- Press hold the Power button for 2 seconds to switch 'standby'
Remote control operation
- In Off (standby) mode, tap the POWER Button on remote control to turn the unit ON. The unit will turn on.
- To turn the unit (standby), tap the POWER button on remote control again.
Adjusting and muting the volume
Turn the Volume dial to increase or decrease the volume.
EQ operation
You can enjoy different EQ sound effect modes.
- Press and hold the MENU button on main unit or remote control and turn and press the Select dial to select 'System settings'.
- Turn and press the NAVIGATE dial to or use the Select up/down buttons on the remote control to select the 'Equalizer'.
- Press the OK Button on main unit or remote control to select.
- Turn and press the NAVIGATE dial to or use the Select zp/down buttons on the remote control to choose between 'Flat', 'Jazz', 'Rock', 'Movie', 'Classic', 'Pop'.
Setting the bass and treble manually
- Press and hold the Menu button to view the main menu.
- Turn and press the Select dial to select 'System settings' > 'Equalizer' > 'My EQ setup'.
- Turn and press the Select dial to choose 'Bass' or 'Treble'.
- Turn and press the Select dial to set the level from '-6dB' (low) to '+6dB' (high).
LISTENING TO INTERNET CONTENT
You can connect the Connect 150 MK II to your network to access to thousands of internet radio stations and podcasts from around the world. Once connected to the internet you can also access additional subscription services such as Spotify, which provides you with instant access to millions of music tracks.
Thousands of radio stations around the world broadcast online. To listen to an internet radio station or podcast:
- Press the HOME button to display the 'function' menu.
- Turn and press the NAVIGATE dial to select 'Internet radio'.
- Press and hold the MENU button to view the main menu.
- Turn and press the NAVIGATE dial to select one of the following options:
Station list: Select this option to see a list of currently available Internet stations or listen to podcasts (see 'Station list' below for more information).
System settings: Select this option to change settings
Main menu: Select this option to view main menu.
Station list: You can listen to a range of radio. Turn and press the Select dial to select one of the following options.
Last listened: Select this option to tune into the last station you were listening to.
Search: Select this option to search for an internet radio station. Turn and press the NAVIGATE dial to highlight and select characters. Select 'BKSP' to delete a character. Turn and press the Select dial to start searching for an internet station. To cancel your search, turn and press the Select dial to select 'CAN'.
Location: Select this option to browse for an internet radio station based in your country. Turn and press the NAVIGATE dial to select 'All stations' to view all local based stations in alphabetical order. To browse for a station based on genre, turn and press the Select dial to select the genre you want to browse for.
Popular: Select this option to browse for a music radio station.
Discover: Tap Search when browsing the station list to search for stations by Origin, Genre, Language these. Use the NAVIGATE dial to set your options and tap Go to see the list of results.
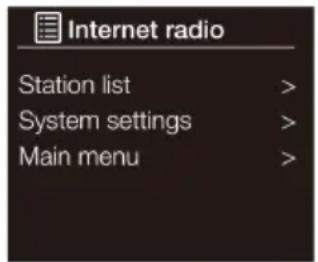
Internet radio menu
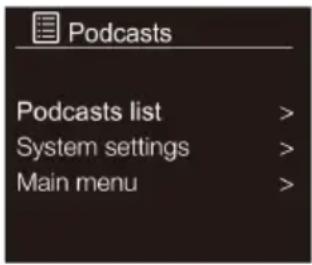
Podcasts menu
Podcasts
Podcasts are prerecorded audio shows on a wide variety of subjects such as comedy, arts, business, and culture, for you to enjoy anytime.
Thousands of radio stations around the world broadcast online. To listen to an Podcasts station or podcast:
- Press the HOME button to display the 'function' menu.
- Turn and press the NAVIGATE dial to select 'Podcasts'.
- Press and hold the MENU button to view the main menu.
- Turn and press the NAVIGATE dial to select one of the following options:
Podcasts list: Select this option to see a list of currently available Internet stations or listen to podcasts (see 'Station list' below for more information).
System settings: Select this option to change settings.
Main menu: Select this option to view main menu.
STREAMING BT AUDIO
Streaming using Bluetooth
You can use Bluetooth to stream any audio from your phone or tablet.
Pairing a mobile device
Before you can stream audio, you will need to pair your phone or tablet.
Note: Bluetooth pairing varies on different mobile devices. See your mobile device manual for specific information.
To pair using Bluetooth:
- Press the Home button and turn and press the Select dial to select 'Bluetooth'.display the Bluetooth input display and the Bluetooth icon will start to flash.
Note: If the Bluetooth icon is displayed, is already connected to another Bluetooth device. See below for more information.
- On your mobile device, select the option to add a new Bluetooth device. On some mobile devices you may need to select the search or scan option.
- Start the pairing process on your mobile device. Do this by selecting 'Connect 150' from the list of available devices that appear on the mobile device's screen. Your mobile device will connect to automatically once paired.
- After selecting your favorite song, press PLAY/PAUSE Button on the unit to play or pause the song.
Disconnecting a mobile device
You can only have one mobile device connected to via Bluetooth at any one time. If you want to stream audio from a different mobile device, you will need to disconnect any mobile device that is currently connected to via Bluetooth first.
To disconnect a mobile device:
- Press and hold the BT PAIR Button for 3 seconds or turn off the Bluetooth function of device currently paired with Connect 150 then repeat step 3 above.
- Turn and press the Select dial to select 'Yes' to disconnect your mobile device.
If your mobile device goes out of Bluetooth range (this is usually around 10m (30ft)) the mobile device's Bluetooth connection is disconnected
automatically. To manually disconnect your mobile device, you will need to open the Bluetooth settings on your mobile device (see your mobile device's manual f or more information).
When you disconnect a mobile device. Will remain in the 'Bluetooth' source. To listen to another source, e.g. digital radio, press the Function button to display the home menu and turn and press the Select dial to choose the source you want to listen to.
SPOTIFY CONNECT
Your new device has Spotify Connect built in
Use your phone, tablet or computer as a remote control for Spotify. Go to spotify.com/connect to learn how.

Licenses
The Spotify Software is subject to third party licenses found here:
https://www.spotify.com/connect/third-party-licenses
All listed brands are trademarks of their companies. Errors and omissions excepted, and subject to technical change. Our general terms of delivery and payment are applied.
UNDOK
The device gives a feature of network remote by smartphone or tablet in iOS or Android system. By downloading the assigned app named UNDOK, you can view all the modes the device.
Search UNDOK from Google Play or Apple Store, and install it to your smartphone or tablet.
For Android system (Google Play Store)
Before using the UNDOK app, make sure the device and the smartphone / tablet are in the same WiFi network.
Launch the app. The app initializes and scans for Internet Radio in the network. Tap the device to make the connection.
When prompted, enter the current PIN code. The default PIN is "1234".
You can view and edit the current PIN on the Internet Radio in the menu
Select your desired mode in the main page. You may then control the selected mode on your smartphone / tablet and on the display of the device simultaneously.
NOTE: Be aware that if another smartphone / tablet with the app in the same network have access with the device, the original connection will be cut off.
LISTENING TO DAB OR FM RADIO
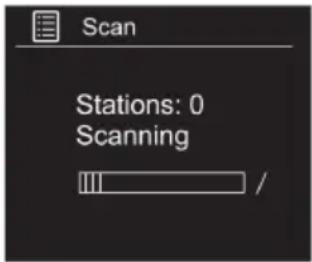
Changing DAB stations
Press the Home button and turn and press the NAVIGATE dial to select 'DAB radio' from the Home screen. During the scan the display will show "Scanning...". The first time you select DAB radio, Will perform an auto tune to find all available stations and will tune into one when finished.
Station List
- Press and hold the Menu button to view the main menu.
- Turn and press the NAVIGATE dial to select 'station list'.
- A list of DAB stations will show on the display.
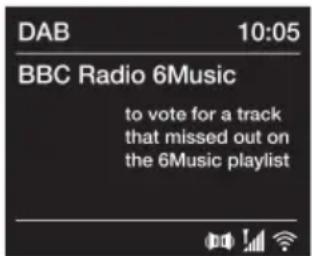
Digital radio screen
Auto scan
- Press and hold the Menu button to view the main menu.
- Turn and press the Select dial to select 'Scan'.
- All the stations that have been found will be stored automatically
Manual tuning
As well as the auto tune function, you can manually tune the receiver. This can help you when aligning your aerial or when adding stations that were missed while auto tuning.
- Press and hold the Menu button to view the main menu.
- Turn and press the Select dial to select 'Manual Tuning'.
Prune Invalid
You may remove all unavailable stations from the list.
- Press and hold the Menu button to view the main menu.
- Turn and press the Select dial to select 'Prune invalid'.
- Press Select dial to select YES and press select button to confirm. Or select NO to cancel.
DRC (Dynamic Range Compression)
If you are listening to music with high dynamic range in a noisy environment, you may wish to compress the audio dynamic range.
- Press and hold the Menu button to view the main menu.
- Turn and press the Select dial to select ' DRC
- Press Select dial to select DRC high/low/off and press OK button to
confirm the setting.
Changing FM stations
Seek tuning
- Press the Home button and turn and press the Select dial to select 'FM radio' from the Home screen.
- Press the Select dial to seek to the next FM radio station that has a strong signal.
Manual tuning
- Press the Home button and turn and press the Select dial to select 'FM radio' from the Home screen.
- Press and hold the Select button to enter manual tuning mode.
- Turn the Select dial to step up or down 0.05 MHz
![Recall from Preset 1. BBC Radio 1 2. BBC Radio 2 3. Absolute radio 4. [Not set] 5. [Not set]](/content/2026/03/557958/images/152244b72d04866efbf919ea9da84870c68612dd2b21c1894cb4b8ca71136e16.jpg)
Selecting a preset
USING RADIO PRESETS
You can store up to 20 DAB, 20 FM and 20 internet radio stations for quick access.
To quick-store a station to a preset button (1-4)
Tune to the DAB, FM or internet radio station you want to store. Press and hold one of the numbered Preset buttons (1-4) on remote control for two seconds until you see a message to confirm that the preset has been stored.
To store a station to the preset list (5-20)
- Tune to the DAB or FM radio station you want to store.
- Hold the 5+ button to view the numerical list of stored presets, then turn and press the Select dial to choose any Preset number between 5 and 20. You can overwrite existing presets. Press the OK button on main unit or remote control to store the preset
To recall a preset when listening to digital radio, FM radio or internet radio
- To tune to Presets 1 to 4, press the corresponding numbered button on the front panel or on the remote control (1 to 4).
- To access presets 5 to 20 on the front panel press the 5+ button, turn the Select dial right or left to scroll through the list of presets, then push and release the Select dial to tune to the selected preset.
SETTINGS
Setting an alarm
- Press and hold the MENU button on main unit or remote control and turn and press the Select dial to select 'Main Menu'.
- Turn and press the NAVIGATE dial to select 'Alarms'
- Turn and press the NAVIGATE dial to select 'Alarm 1' or 'Alarm 2'.
- Turn the Select dial to scroll through each alarm setting. If you want to change a setting, press the Select dial. You can set the following alarm options:
| Enable Turn and press the Select dial to choose when you want the alarm to repeat. The available options are 'Off', 'Daily', 'Once', 'Weekends' or 'Weekdays'. |
| Time Turn and press the Select dial to adjust the hour of the alarm. Note: If you have set to use the 12 hour time format, make sure that you select the 'AM' or 'PM' version of the hour before pressing the Select dial. Repeat to set the minutes of the alarm. |
| Mode Turn and press the NAVIGATE dial to choose between 'Buzz', 'Internet radio', 'DAB', 'FM'. |
| Volume Turn and press the NAVIGATE dial to set the volume when the alarm sounds. |
| Save Turn and press the NAVIGATE dial to save the alarm. |
Sleep setting
This function allows you to program the unit to turn to standby mode by itself after a set period of time.
- Tap the SLEEP button on remote control, the sleep time icon "SLEEP" appears on the display.
- Repeatedly tap the SLEEP button to select a sleep time. The unit will turn off after "Sleep off-15mins - 30mins - 45mins - 60mins" Wait for 3 seconds after your selection for the unit to confirm the selection, the unit will play for the selected length of time then automatically turn off.
- To cancel the sleep timer, tap the SLEEP button repeatedly until timer shows "OFF", the sleep time icon "SLEEP" disappears on the display.
Snoozing a sounding alarm
To snooze a sounding alarm, press the Select dial. The display will show a countdown timer to show how long the alarm will snooze for. To adjust the amount of time the alarm will be snoozed by, press the Select dial to change the snooze duration in 5 minute intervals up to 15 minutes, and then 30 minutes.
To cancel a snoozing alarm press the Standby button.
Time and date settings
The clock will automatically set itself using your Network, digital or FM radio signal. If the time or date does not update automatically, you can manually set it using this option.
Note: Any time or date updates received by a digital broadcast will override manual settings.
Setting the time and date manually
- Press and hold the MENU button to view the main menu.
- Turn and press the NAVIGATE dial to select 'System settings' > 'Time/Date'.
- Turn and press the NAVIGATE dial to choose 'Set Time/Date'.
- Turn and press the NAVIGATE dial to set the day of the month. Repeat to set the month and year.
- Turn and press the NAVIGATE dial to set the hour. Repeat to adjust the minutes.
Note: If you have set the time format to 12 hour time format, make sure that you select the 'AM' or 'PM' version of the hour before pressing the NAVIGATE dial.
Time and date synchronization options
You can synchronize the time and date on the FM, digital radio or network signal.
To specify the clock synchronization options:
- Press and hold the MENU button to view the main menu.
- Turn and press the NAVIGATE dial to select 'System settings' > 'Time/Date'.
- Turn and press the NAVIGATE dial to choose 'Auto update'.
- Turn and press the NAVIGATE dial to choose between the 'Update from DAB', 'Update from FM', 'Update from Network' and 'No Update' clock synchronization options.
Changing the time format
- Press and hold the MENU button to view the main menu.
- Turn and press the NAVIGATE dial to select 'System settings' > 'Time/Date'.
- Turn and press the NAVIGATE dial to choose 'Set format'.
- Turn and press the NAVIGATE dial to choose between '12' or '24' hours.
Changing the time zone
- Press and hold the MENU button to view the main menu.
- Turn and press the NAVIGATE dial to select 'System settings' > 'Time/Date'.
- Turn and press the NAVIGATE dial to choose 'Set time zone'.
- Turn and press the NAVIGATE dial to choose your Time zone
Daylight saving time options
- Press and hold the MENU button to view the main menu.
- Turn and press the NAVIGATE dial to select 'System settings' > 'Time/Date'.
- Turn and press the NAVIGATE dial to choose 'Daylight savings'.
- Turn and press the NAVIGATE dial to choose 'On' if you want to enable daylight savings time. Turn and press the NAVIGATE dial to choose 'Off' if you want to disable daylight savings time.
Changing your preferred language
You can select the language for menus and options.
- Press and hold the MENU button on main unit or remote control and turn and press the Select dial to select 'Main Menu'.
- Turn and press the NAVIGATE dial to choose 'System settings' > 'Language'.
- Turn and press the NAVIGATE dial to select a menu language.
Backlight
You can adjust the duration that the screen is illuminated for and the brightness of the screen when it times out.
To adjust the duration of the screen backlight before dimming:
- Press and hold the MENU button on main unit or remote control and turn and press the Select dial to select 'Main Menu'.
-
Turn and press the NAVIGATE dial to choose 'System settings' > 'Backlight'.
-
Turn and press the NAVIGATE dial to choose 'Timeout'.
- Turn and press the NAVIGATE dial to choose a timeout setting. To specify that the backlight should always remain on, choose 'On'.
Power-on level
- Press and hold the MENU button on main unit or remote control and turn and press the Select dial to select 'Main Menu'.
- Turn and press the NAVIGATE dial to choose 'System settings' > 'Backlight'.
- Turn and press the NAVIGATE dial to choose 'On Level'.
- Turn and press the NAVIGATE dial to choose between 'High', 'Medium' or 'Low'.
Dim level in standby
- Press and hold the MENU button on main unit or remote control and turn and press the Select dial to select 'Main Menu'.
- Turn and press the NAVIGATE dial to choose 'System settings' > 'Backlight'.
- Turn and press the NAVIGATE dial to choose 'Standby Level'.
- Turn and press the NAVIGATE dial to choose between 'Medium' or 'Low'.
Carrying out a factory reset
Resetting removes all presets, stored stations, alarms and resets all other options to default settings.
- Press and hold the MENU button on main unit or remote control and turn and press the Select dial to select 'Main Menu'.
- Turn and press the NAVIGATE dial to choose 'System settings' > 'Factory Reset'.
- Turn and press the NAVIGATE dial to select 'Yes' to reset factory settings. Select 'No' if you do not want to reset to factory settings.
Network setting
Connecting to your Wi-Fi using the setup wizard
- Press and hold the Menu button to view the main menu.
- Turn and press the Select dial to select 'System settings' > 'Network' > 'Network wizard'.
- Turn and press the Select dial to select your region. Will search for available Wi-Fi networks.
- Turn and press the Select dial to select the name (SSID) of your Wi-Fi network. If your network requires a key, follow steps 5-6.
- Enter your network key or password by turning and pressing the Select dial to highlight and select characters. If you want to delete the last character, turn the Select dial to select 'BKSP' and push to confirm.
- Turn and press the Select dial to select 'OK'. will connect to your network.
Helpful hint: Your Wi-Fi key is case sensitive, make sure to enter it exactly as shown.
DISPOSAL CONSIDERATIONS
natural_image
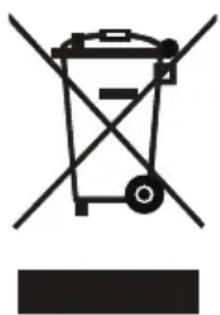
Simple line drawing of a trash bin with crossed x- and y-axes, no text or symbols present.If there is a legal regulation for the disposal of electrical and electronic devices in your country, this symbol on the product or on the packaging indicates that this product must not be disposed of with household waste. Instead, it must be taken to a collection point for the recycling of electrical and electronic equipment. By disposing of it in accordance with the rules, you are protecting the environment and the health of your fellow human beings from negative consequences. For information about the recycling and disposal of this product, please contact your local authority or your household waste disposal service.
This product contains batteries. If there is a legal regulation for the disposal of batteries in your country, the batteries must not be disposed of with household waste. Find out about local regulations for disposing of batteries. By disposing of them in accordance with the rules, you are protecting the environment and the health of your fellow human beings from negative consequences.
DECLARATION OF CONFORMITY

Manufacturer:
Chal-Tec GmbH, Wallstrasse 16, 10179 Berlin, Germany.
Importer for Great Britain:
Chal-Tec UK limited Unit 6 Riverside Business Centre Brighton Road Shoreham-by-Sea BN43 6RE United Kingdom
The complete declaration of conformity of the manufacturer can be found at the following link: https://use.berlin/10037493
Cher client, chère cliente,
SOMMAIRE
Fiche technique 62
FONCTIONNEMENT
Mise en marche
https://www.spotify.com/connect/third-party-licenses
Pour Android (Google Play)
Changer les stations DAB
Digital radio screen
Liste des stations
DRC (Dynamic Range Compression)
natural_image
Symbol of a trash bin with crossed lines indicating no waste or discharge, and a solid black rectangle below (no text or labels)DÉCLARATION DE CONFORMITÉ

Fabricant :
Chal-Tec GmbH, Wallstraße 16, 10179 Berlin, Allemagne.
Unit 6 Riverside Business Centre
Brighton Road
Shoreham-by-Sea
BN43 6RE
Royaume Uni
CONTENIDO
Datos técnicos 90
FUNCIONAMIENTO
https://www.spotify.com/connect/third-party-licenses
Para Android (Google Play)
Para el sistema Android (Google Play)
Digital radio screen
natural_image
Symbol of a trash bin with crossed lines indicating no waste, and a solid black rectangle below (no text or labels)Chal-Tec UK limited.
Unit 6 Riverside Business Centre
Brighton Road
Shoreham-by-Sea
BN43 6RE
Reino Unido
INDICE
Dati tecnici 112
UTILIZZO
Messa in funzione
https://www.spotify.com/connect/third-party-licenses
Per Android (Google Play)
For Android system (Google Play)
Digital radio screen
Elenco emittenti
natural_image
Symbol of a trash bin with crossed lines and a horizontal bar below (no text or labels)Unit 6 Riverside Business Centre
Brighton Road
Shoreham-by-Sea
BN43 6RE
Regno Unito
natural_image
Abstract white logo design on dark background, resembling stylized letter 'S' or wave form (no text or symbols)
- aUC
- INHALT
- BEDIENUNG
- Inbetriebnahme
- Senderliste
- EINSTELLUNGEN
- Dear Customer,
- CONTENTS
- EXPLANATION OF THE WARNING SYMBOLS
- CAUTION
- SAFETY INSTRUCTIONS
- PRODUCT DESCRIPTION
- REMOTE CONTROL
- Putting the batteries into the remote
- Attention
- Notes concerning use:
- GETTING STARTED
- OPERATION
- POWER ON/OFF
- POWER button
- Main unit operation:
- Remote control operation
- Adjusting and muting the volume
- EQ operation
- Setting the bass and treble manually
- LISTENING TO INTERNET CONTENT
- Podcasts
- STREAMING BT AUDIO
- Streaming using Bluetooth
- Pairing a mobile device
- To pair using Bluetooth:
- Disconnecting a mobile device
- To disconnect a mobile device:
- SPOTIFY CONNECT
- Licenses
- UNDOK
- LISTENING TO DAB OR FM RADIO
- Changing DAB stations
- Station List
- Auto scan
- Manual tuning
- Prune Invalid
- DRC (Dynamic Range Compression)
- Changing FM stations
- Seek tuning
- USING RADIO PRESETS
- To quick-store a station to a preset button (1-4)
- To store a station to the preset list (5-20)
- To recall a preset when listening to digital radio, FM radio or internet radio
- SETTINGS
- Setting an alarm
- Sleep setting
- Snoozing a sounding alarm
- Time and date settings
- Setting the time and date manually
- Time and date synchronization options
- Changing the time format
- Changing the time zone
- Daylight saving time options
- Changing your preferred language
- Backlight
- Power-on level
- Dim level in standby
- Carrying out a factory reset
- Network setting
- Connecting to your Wi-Fi using the setup wizard
- DISPOSAL CONSIDERATIONS
- DECLARATION OF CONFORMITY
- Manufacturer:
- Importer for Great Britain:
- Cher client, chère cliente,
- SOMMAIRE
- FONCTIONNEMENT
- Mise en marche
- Changer les stations DAB
- Liste des stations
- DÉCLARATION DE CONFORMITÉ
- Fabricant :
- CONTENIDO
- FUNCIONAMIENTO
- INDICE
- UTILIZZO
- Messa in funzione
- Elenco emittenti
Brand : Waldbeck
Model : Ventura
Category : Radio