SKMB 1000 A1 - Food Processor SILVERCREST - Free user manual and instructions
Find the device manual for free SKMB 1000 A1 SILVERCREST in PDF.

| Product type | Food processor |
| Brand / Model | SilverCrest SKMB 1000 A1 |
| Power supply | 220-240 V ~50-60 Hz |
| Power | 1000 W |
| Mixing bowl capacity | 3.0 L (max) |
| Blender jug capacity | 1.0 L (max) |
| Speeds | 7 speeds + pulse (M) |
| Main functions | Mix, whisk, beat, stir, knead, blend, grate, fine grate, slice, weigh |
| Integrated scale | Up to 5 kg / 5 L (gradation 1 g/ml) |
| Integrated timer | Adjustable up to 15 min |
| Accessories included | Whisk, flat beater, dough hook, blender jug with lid and measuring cup, slicing-grating attachment with 3 discs (grater, slicer, fine grater), pusher, anti-splash guard |
| Blade material | Stainless steel (blender jug blades and discs) |
| Dishwasher safe | Mixing bowl, anti-splash guard, whisks, dough hook, blender jug, lid, seal, measuring cup, slicing-grating attachment, pusher, connector and discs (except base unit and covers) |
| Safety | Overheat protection, automatic shut-off, safety lock, protected blades |
| Warranty | 3 years |
| Weight | Approx. 5 kg (not officially specified) |
| Dimensions (approx.) | 30 x 25 x 40 cm |
Frequently Asked Questions - SKMB 1000 A1 SILVERCREST
User questions about SKMB 1000 A1 SILVERCREST
0 question about this device. Answer the ones you know or ask your own.
Ask a new question about this device
Download the instructions for your Food Processor in PDF format for free! Find your manual SKMB 1000 A1 - SILVERCREST and take your electronic device back in hand. On this page are published all the documents necessary for the use of your device. SKMB 1000 A1 by SILVERCREST.
USER MANUAL SKMB 1000 A1 SILVERCREST
GB Operating instructions
PREMIUM STAND MIXER
For EU market: Imported for GB market by:
HOYER Handel GmbH Lidl Great Britain Ltd
Kühnehöfe 12 Lidl House · 14 Kingston Road
22761 Hamburg Surbiton · KTS 9NU
GERMANY
Stand der Informationen · Status of information · Version des information
natural_image
Technical line drawings of three mechanical components with no visible text or symbols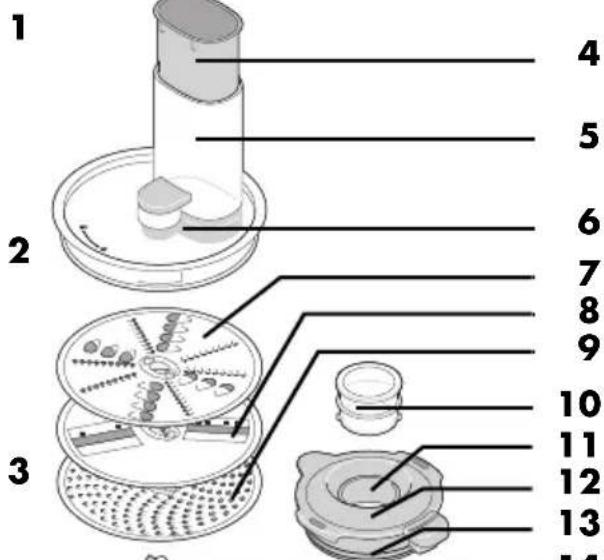

Inhalt
natural_image
Mechanical component diagram showing a rotating arm mechanism with no visible text or symbolsnatural_image
Mechanical component diagram showing a rotating arm mechanism with no visible text or symbols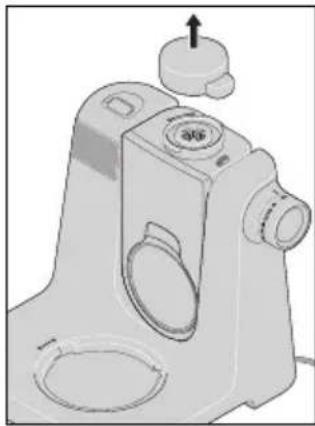
natural_image
3D rendered mechanical component with no visible text or symbolsnatural_image
Technical line drawing of a kitchen mixer with handle and control panel (no text or symbols)natural_image
Technical line drawing of a mechanical component with circular base and curved side (no text or symbols)natural_image
Mechanical assembly diagram showing a rotating component with a magnified inset view (no text or symbols)Zutaten einfüllen
natural_image
Technical line drawing of a kitchen mixer with handle and control panel (no text or symbols)natural_image
Mechanical device diagram showing a press or press mechanism with no visible text or symbolsnatural_image
Technical illustration of a mechanical device with a central component and a vertical rod inserted (no text or symbols)natural_image
Technical illustration showing a mechanical assembly with a circular component and a cylindrical device (no text or symbols present)natural_image
Mechanical device with a cylindrical component inserted into a dial, showing internal components (no text or symbols visible)Arbeitsprozess
natural_image
Mechanical component diagram showing a rotating arm mechanism with no visible text or symbols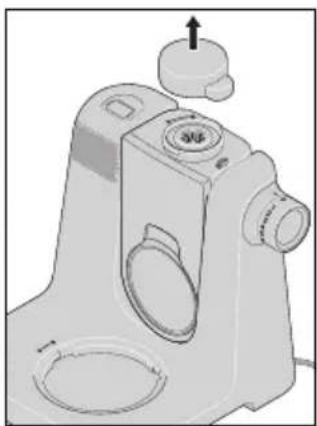
natural_image
3D rendered mechanical component with no visible text or symbolsnatural_image
Illustration of a blender with a measuring tool and control panel (no text or symbols)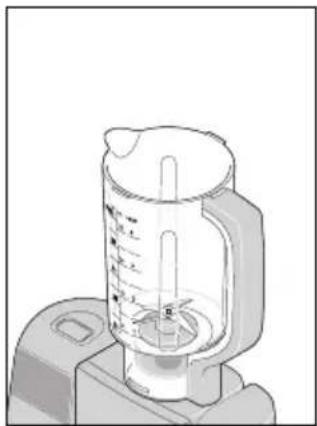
natural_image
Illustration of a blender with a measuring cup and lid (no text or symbols)natural_image
Mechanical assembly diagram showing a lid and kettle with a black arrow indicating a component (no text or symbols present)natural_image
Mechanical component diagram showing a piston-like assembly with a black arrow indicating rotational direction (no text or symbols)Arbeitsprozess
- Overview 35
- Intended purpose 36
- Safety information 37
- Items supplied 41
- Unpacking and setting up 41
- Overview of functions ...... 42
- Basic operation 44
7.1 Positions of the drive arm.... 44
7.2 Safety functions 44
7.3 Power supply.... 45
7.4 Switching the device on/off and selecting speed 45
7.5 Pulse function 45
- Display 46
- Timer 46
- Scale 47
- Using the mixing tools 48
- Using the food processor 50
- Using the blender jug 52
- Cleaning and servicing the device 54
14.1 Cleaning the base unit.... 54
14.2 Cleaning in the dishwasher 54
14.3 Cleaning the accessories 54
14.4 Cleaning the blender jug 55
14.5 Storage 55
- Recipes 55
15.1 Green smoothie 55
15.2 Mascarpone cream 55
15.3 Pizza dough.... 56
15.4 Basic batter recipe 56
15.5 Basic yeast dough recipe 57
15.6 Basic waffle recipe.... 57
15.7 Basic shortcrust pastry recipe.... 57
15.8 Basic cocoa sponge recipe 58
15.9 Cucumber salad 58
15.10Potato pancakes 59
- Trouble-shooting 59
- Disposal 61
- Technical specifications 61
- Warranty of the HOYER Handel GmbH 62
1. Overview
1 Whisk
2 Beater
3 Dough hook
4 Food pusher
5 Food chute
6 Lid (for the food processor attachment)
7 Rasping disc (usable from both sides: fine/coarse)
8 Slicing disc (usable from both sides: fine/coarse)
9 Grating disc
10 Measuring cup
11 Refill opening
12 Lid (of the blender jug)
13 Seal
14 Connector
15 Blender jug
16 Food processor attachment
17 Release button (for the drive arm)
18 Touch display for scale and timer
19 Drive for the food processor attachment (under the cover)
20 M 0 - 7 Speed control with on/off function
21 Drive arm
22 Socket for the mixing tools
23 Power cable with mains plug
24 Base unit
25 Eject button (for the mixing tools)
26 Cover (for the food processor drive)
27 Mixing bowl
28 Filling opening
29 Splash guard
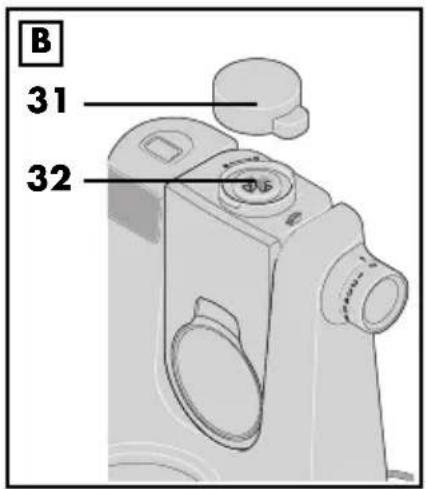
Figure A
30 Cable spool
Figure B
31 Cover (for the blender jug drive)
32 Drive for the blender jug (under the cover)
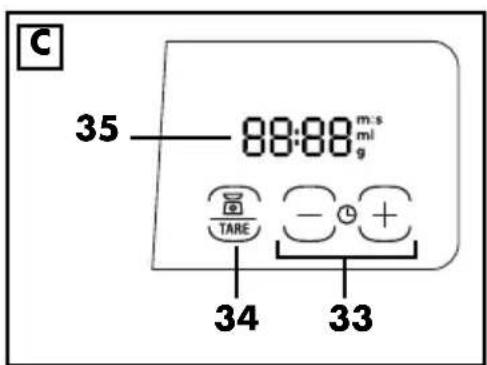
Figure C
33 Turn on the timer, set the time, and set the time to 0
34 ☐/TARE Switch on the scales, set to O (tare), change the unit (g/ml)
35 Display (for scale and timer)
Thank you for your trust!
Congratulations on the purchase of your new food processor.
For safe handling of the product and in order to get to know the entire range of features:
- Read these operating instructions thoroughly prior to initial use.
- Above all, observe the safety information!
- The device should only be used as described in these operating instructions.
- Keep this copy of the operating instructions for reference.
- If you pass the device on to someone else, please include this copy of the operating instructions. The operating instructions are a part of the product.
We wish you a lot of joy with your new food processor!
Symbols on the device

The food-safe material of devices with this symbol will not change the taste or smell of food.
2. Intended purpose
The food processor is designed for blending, whisking, whipping, stirring, kneading, mixing, grating, rasping, slicing, and weighing food and ingredients.
The device is designed for private, domestic use. The device must only be used indoors. This device must not be used for commercial purposes.
Foreseeable misuse
WARNING! Risk of material damage!
- The food processor should not be used continuously...
- with the mixing tools for longer than 10 minutes,
- with the food processor for no longer than 5 minutes,
- with the blender jug for longer than 3 minutes.
After this, the device must remain switched off until it has cooled down to room temperature. - Do not use the blender jug for processing particularly hard foodstuffs, such as frozen food, bones, nutmeg, cereal grains or coffee beans.
3. Safety information
Warnings
If necessary, the following warnings are used in these operating instructions:

DANGER! High risk: failure to observe this warning may result in injury to life and limb.
WARNING! Moderate risk: failure to observe this warning may result in injury or serious material damage.
CAUTION: low risk: ignoring this warning may result in minor injuries or damage to property.
NOTE: circumstances and specifics that must be observed when handling the device.
Instructions for safe operation
- This device must not be used by children.
- Children must not play with the device.
- The device and the power cable must be kept away from children.
- This device can be used by people with restricted physical, sensory or intellectual abilities or people without adequate experience and/or understanding if they are supervised or instructed on how to use this device safely and if they are aware of the resulting dangers.
- If the mains power cable of this device should become damaged, it must be replaced by the manufacturer, the manufacturer's customer service department or a similarly qualified specialist, in order to avoid any hazards.
- The device must not be immersed in water.
- This device is not intended to be operated using an external timer or a separate remote control system.
- The device must be disconnected from the power supply if left unattended and prior to assembly, disassembly or cleaning.
- Note that the blades of the blender jug and the grating, rasping, and slicing discs are very sharp:
- Never touch the blades with your bare hands in order to avoid cuts.
- When rinsing by hand, use water which is so clear that you are able to see the working tools properly in order to ensure that you do not injure yourself on the very sharp blades.
- When removing and inserting the working tools, make sure that you do not touch the blades.
- Be careful not to touch the blades when removing blockages and unprocessed ingredients from the grating, rasping, and slicing discs.
- When emptying and cleaning the blender jug, take care not to touch the blades.
- Prior to the replacement of accessories or attachments which move when in operation, the device must be switched off and disconnected from the mains power supply.
- The working tools (the mixing tools, the grating, rasping, and slicing discs, and the blades of the blender jug) continue to rotate after switching off. Wait for the device to come to a standstill before unlocking and opening the lid.
- Misuse of the device may result in injuries.
-
Depending on type of use, the device is intended for the following maximum operating times without interruption:
-
max. 10 minutes mixing/kneading with the mixing tools,
- max. 5 minutes with the grating, rasping, and slicing discs,
- max. 3 minutes mixing in the blender jug.
After this, the device must remain switched off until it has cooled down to room temperature.
- Caution is required when pouring hot liquid into the blender jug. The sudden formation of steam could cause it to be ejected from the blender jug.
- Only use the device if all lids are correctly fitted and/or the safety guard is in the position described.
- Always use a suitable utensil to push the food downwards, e.g. a spatula.
- Never put your hand inside the blender jug when the jug is inserted.
- This device is equally intended for use in the home and in applications similar to the home, such as for example...
... in kitchens for staff in shops, offices and other commercial settings;
... on agricultural properties;
... by customers in hotels, motels and other residential facilities;
... in bed-and-breakfast establishments.
- Please take note of the chapter on cleaning (see "Cleaning and servicing the device" on page 54).

DANGER for children!
- Packing materials are not children's toys. Children should not be allowed to play with the plastic bags. There is a risk of suffocation.

DANGER to and from pets and livestock!
Electrical devices can represent a danger to pets and livestock. In addition, animals can also cause damage to the device. For this reason you should keep animals away from electrical devices at all times.

DANGER! Risk of electric shock due to moisture!
- The device must never be operated in the vicinity of a bathtub, a shower, a filled washbasin or similar items.
- The base unit, the power cable and the mains plug must not be immersed in water or other liquids.
- Protect the base unit against moisture, water drops and water splashes.
- If liquid should enter the base unit, pull out the mains plug immediately. Have the device checked before reusing.
- Never touch the device with wet hands.
- If the device falls into water, disconnect the mains plug immediately. Only then is it safe to remove the device.

DANGER! Risk of electric shock!
- Only plug the mains plug into the wall socket after the device has been completely assembled.
- Only connect the mains plug to a properly installed and easily accessible wall socket whose voltage corresponds to the specifications on the rating plate.
The wall socket must still be easily accessible after the device is plugged in.
- Ensure that the power cable cannot be damaged by sharp edges or hot spots. Do not wrap the power cable around the device.
- Even after it has been switched off, the device is not completely disconnected from the mains power supply. In order to fully disconnect it, pull out the mains plug.
- Ensure that the power cable never becomes a trip hazard, and that nobody can get caught up in or step on it.
- Keep the power cable away from hot surfaces (e.g. hot plates).
- When using the device, ensure that the power cable cannot be trapped or crushed.
- When removing the mains plug from the wall socket, always pull on the plug and never the cable.
-
Pull the mains plug out of the wall socket:
-
when a malfunction occurs
- when you are not using the food processor
- prior to assembling or disassembling the food processor
- prior to cleaning the food processor
-
during thunderstorms
-
Do not use the device if there is visible damage to the device, accessories or the power cable.
- In order to avoid any hazards, do not make modifications to the device.

DANGER! Risk of injury from cutting!
- Never reach into the rotating blades. Do not touch rotating parts with spoons or similar utensils. Keep long hair and loose clothing away from the rotating parts. Please remember that the blades contin-
ue to turn for a short time after switching off the device.
- Note that the blades of the blender jug and the grating, rasping, and slicing discs are very sharp. Never touch the blades with your bare hands in order to avoid cuts.
- When washing manually, the water should be sufficiently clear so that you can see the blade assembly easily to avoid injuries caused by the very sharp blades.

DANGER of hand injuries by crushing!
- Never reach between the drive arm and the housing while the drive arm is moving.

DANGER from rotating parts!
- Do not touch rotating parts with spoons or similar utensils. Keep long hair and loose clothing away from the rotating parts.
- Always ensure that the speed control is set to 0 before you plug the mains plug into the wall socket.
- Switch the device off and pull out the mains plug from the wall socket before you exchange accessories or attachments that move while in operation.
- If the blender jug is not in place, the cover must be placed over the blender jug drive. Otherwise the device will not work, in order to avoid injuries.

DANGER! Risk of injury through burning!
- If hot ingredients are in the blender jug, they could be ejected and cause burns. Therefore:
- Place the measuring cup in the refill opening.
- Only use low speed settings, never the turbo function.
- After switching off, wait approx. 10 seconds before carefully and slowly opening the lid.
WARNING! Risk of material damage!
- Place the device exclusively on a level, dry, non-slip and waterproof surface, so that it can neither fall nor slip off.
- Never place the device on a hot surface, e.g. a hot plate.
- Do not change the position of the device, as long as there is still food or dough in the device.
- Note the information in these operating instructions on the maximum filling volumes, maximum ingredient quantities, maximum operating times and the recommended speed settings.
- Never overfill the blender jug or mixing bowl, since otherwise the contents could be ejected. Overflowing liquid would flow onto the surface. You should therefore place the device on a waterproof surface.
- Do not apply too much pressure to the grating, rasping, and slicing discs. Apply an even pressure so that the motor does not become blocked.
- Please note that the blades of the grating, rasping, and slicing discs can scratch delicate surfaces.
- Do not operate the device when it is empty, as this causes the motor to overheat and may result in it becoming damaged.
-
Only use the original accessories.
-
Do not use any astringent or abrasive cleaning agents.
- The beater and dough hook have a non-stick coating. Do not damage them with sharp, pointed or scratching objects (e.g. knife, scourer).
The device is fitted with non-slip plastic feet. As furniture is coated with a variety of different varnishes and acrylics, and treated with different cleaning agents, it cannot be completely ruled out that components are contained in some of these substances that could damage and soften the plastic feet. If necessary, place a non-slip mat under the device. - Do not exert too much pressure or load on the device and the scale. The maximum load is 20 kg.
4. Items supplied
1 food processor, base unit 24
1 splash guard 29
1 mixing bowl 27
1 dough hook 3
1 w h i s k 1
1 beater 2
1 blender jug 15 with:
- l i d 12
- seal 13
- measuring cup 10
1 food processor attachment 16 with:
- lid 6
- food pusher 4
- connector 14
- grating disc 9
- rasping disc 7
- slicing disc 8
1 complete copy of the operating instructions (on the Internet)
1 copy of the short manual (enclosed with the device)
5. Unpacking and setting up
NOTE: when the device is used the first few times, some odour may be generated by the device due to the heating of the motor. This is harmless. Please ensure adequate ventilation.
- Remove all packing material.
- Check to ensure that all parts are present and undamaged.
- Clean the device prior to its first use! (see "Cleaning and servicing the device" on page 54)
- Figure C: wind the excess power cable 23 around the cable spool 30 on the underside of the base unit 24.
- Place the base unit 24 on a level, dry and waterproof surface, so that the device can neither fall nor slip off.
CAUTION:
- Overflowing liquid would flow onto the surface. You should therefore place the device on a waterproof surface.
NOTE: the device may move slightly while you are processing large quantities of dough.
6. Overview of functions
| Working tool Speed | Function Notes | ||
| Dough hook 3 4 | - Kneading of dough (e.g. yeast dough) | Max. quantity yeast dough: 1642 gMax. operating time: 10 minutes | |
| Beater 2 5 - 6 | - Mixing of light batter (e.g. sponge mixture, pancake batter)- Beating together butter and sugar | Max. quantity batter: 1203 gMax. operating time: 10 minutes | |
| Whisk 1 7 | - Whipped cream- Egg white- Mayonnaise- Whipping butter to a froth | Max. quantity cream: 500 mlMax. quantity egg white: approx. 12Max. operating time: 10 minutes | |
| Blender jug 15 7 / M | - Blending and chopping soft or liquid ingredients | Max. quantity: 1000 mlMax. quantity of ice: 100 gMax. operating time: 3 minutesNot suitable for particularly hard foods such as frozen foods, bones, nutmegs, cereal grains or coffee beans. It is also not suitable for chopping meat, onions, nuts, almonds and herbs. | |
| Working tool Speed | Function Notes | ||
| Grating disc 9 | 3 - 4 | - Grating, for example, hard cheese (e.g. Parmesan), raw potatoes- Not suitable for semi-hard or soft cheeses | Max. operating time:5 minutesThe blades being used must be pointing upwards.For optimal processing, add the ingredients to the machine while it is running.Work with light, even pressure to avoid overloading the device. |
| Rasping disc 7 | - Can be used from both sides: coarse/fine- Rasping, for example, apples, carrots, courgettes, sliced cheese (e.g. Gouda)- Use the coarse side for soft ingredients- Not suitable for hard ingredients such as hard cheese or nuts | ||
| Slicing disc 8 | - Can be used from both sides: coarse/fine- Cutting slices of cucumbers, apples, cooked and cooled potatoes, etc.- Not suitable for hard ingredients such as hard cheese or nuts | ||
7. Basic operation
7.1 Positions of the drive arm
NOTE: when moving the drive arm 21, make sure that your hand is not between the drive arm and the housing.
The food processor has 3 drives for the different functions:
- The socket for the mixing tools 22
- Drive 32 for the blender jug 15 under the cover 31
- Drive 19 for the food processor attachment 16 under the cover 26.
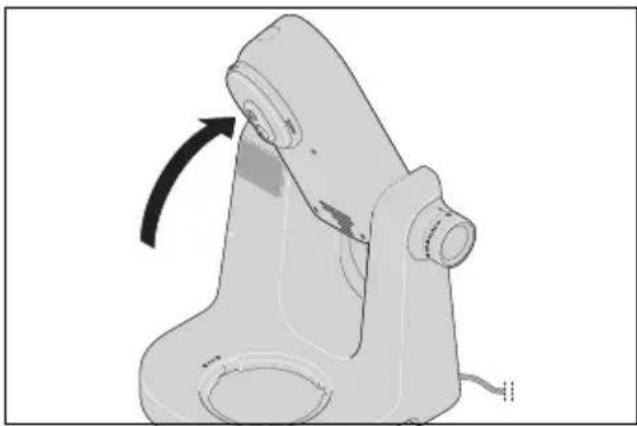
When you press the release button 17, the drive arm 21 can be moved into 3 different positions:
- The horizontal position is for using the mixing tools (dough hook 3, beater 2, whisk 1) and for using the food processor attachment 16.
- To attach the splash guard 29 and insert the mixing tools, fold the drive arm 21 up into an inclined position.
natural_image
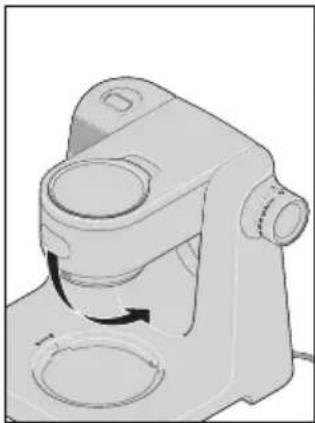
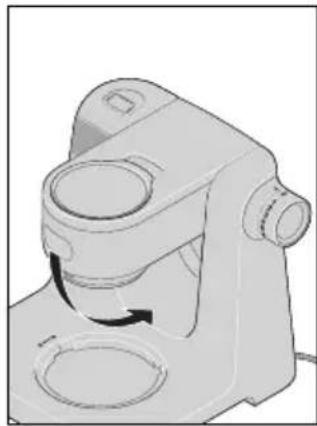
Mechanical component diagram showing a rotating arm with a black arrow indicating rotational motion (no text or symbols)- To use the blender jug 15, fold the drive arm 21 down completely into a vertical position.
natural_image
Mechanical component diagrams showing a rotating mechanism and a close-up view of the same device (no text or symbols present)7.2 Safety functions
The device has several safety functions, which are described below.
Functions only when correctly assembled
The device only works when the cover 31 is in place or the blender jug 15 and lid 12 are correctly assembled.
Functions only when drive arm is correctly positioned
The device only works when the drive arm 21 is correctly locked in the horizontal or vertical position and the release button 17 has been fully depressed.
Overheating protection
The device has an overheating protection system. If the motor becomes too hot, the device automatically switches itself off:
- Switch off the device.
- Pull out the mains plug 23.
- Allow the device to cool down to room temperature.
When the device has cooled down sufficiently, it can be switched on again.
7.3 Power supply

DANGER! Risk of electric shock!
- Only connect the mains plug 23 to a properly installed and easily accessible wall socket whose voltage corresponds to the specifications on the rating plate. The wall socket must still be easily accessible after the device is plugged in.
NOTE: when the device is used the first few times, some odour may be generated by the device due to the heating of the motor. This is harmless. Please ensure adequate ventilation.
- Assemble the device for the desired function.
- Check that the speed control 20 is set to O (off).
- Plug the mains plug 23 into a suitable wall socket. The wall socket must remain easily accessible at all times after connection.
An audio signal sounds and the indicators on the display 18 light up briefly. - Pull out the mains plug 23 before cleaning the device.
7.4 Switching the device on/off and selecting speed
WARNING! Risk of material damage!
- The mixing mechanism may be operated for a maximum of 10 minutes, the blender for a maximum of 3 minutes and the food processor for a maximum of 5 minutes at a time. You must then allow the device to cool down to room temperature.
NOTE: the device may move slightly while you are processing large quantities of dough.
- Switch the device on by turning the speed control 20 clockwise.
- Start at a slightly lower speed, and slowly increase to the desired speed (see "Overview of functions" on page 42).
- Reduce the speed to 1 - 2 when you are adding ingredients during operation through the filling opening 28 or the refill opening 11.
- Set the speed control 20 to 0 to switch the device off.
NOTE: the ideal speed depends not only on the working tool but also on the consistency of the mixture. The more liquid the contents, the faster you can blend them.
7.5 Pulse function
- Hold the speed control 20 in the M position to temporarily switch the speed to the highest setting (7).
- Release the speed control 20 to stop the device.
8. Display
The display 35 shows the values for the timer or the scale.
To the right of the value, the unit displays the current function:
- g or ml: the scale is active.
- m:s : the timer is active.
Below are the buttons/keys:
- 33 for the timer
- /TARE 34 for the scale
- After connecting the mains plug, briefly press any button 33/34 to activate the scale.
- When you switch on the food processor using the speed control 20, the timer is automatically activated.
- To switch from timer to scale, hold down the button 📄/TARE 34 until the second acoustic signal sounds.
- To switch from scale to timer, hold down one of the buttons - + 33 until the second acoustic signal sounds.
The display 18 switches off automatically after 15 minutes of inactivity.
9. Timer
WARNING! Risk of material damage!
- The mixing mechanism may be operated for a maximum of 10 minutes, the blender for a maximum of 3 minutes and the food processor for a maximum of 5 minutes at a time. You must then allow the device to cool down to room temperature.
The built-in timer starts automatically when the food processor is switched on using the speed control 20. The time is counted up on the display 35. After 15 minutes, the process stops automatically. An audio signal sounds.
- If you interrupt the process by setting the speed control 20 to 0, the timer will stop. When restarting, the timer continues to run.
- Press both buttons -0+ 33 simultaneously to set the timer to zero (00:00).
- After the device has stopped automatically, set the speed control 20 to 0.
Presetting the timer
Alternatively, you can set a time after which the device should stop automatically.
- You can set the timer before starting the device or at any time while the device is running.
- The setting is made in 30-second increments.
-
The maximum time that can be set is 15 minutes.
-
To activate the timer, press and hold one of the buttons ⏻+ 33 until the second acoustic signal sounds. On the right side of the display 35, you will see m:s.
-
Use the buttons ⏻⊕ 33 to set the desired time.
-
Each press of the button changes the time by 30 seconds (00:30).
- Hold down a button to change the time more quickly.
The time display flashes during setting. The set time is saved automatically.
- Start the device with the speed control 20. The time is counted down.
- If you interrupt the process by setting the speed control 20 to 0, the timer will stop. When restarting, the timer continues to run.
- When the time has elapsed, an audio signal sounds and the device stops automatically. Set the speed control 20 to 0.
10. Scale
The built-in kitchen scale weighs in increments of 1 g up to 5 kg (5000 g) or in increments of 1 ml up to 5 l (5000 ml).
The scale is ready for use when the food processor is connected but not switched on.
The scale weighs ingredients in both the mixing bowl 27 and the blender jug 15.
NOTES:
- To ensure the best measuring accuracy, make sure that the food processor is standing freely and is not exposed to any stress or contact when weighing the ingredients. If necessary, wait until the display no longer changes.
- If the maximum weight of 5 kg (5 litres) is exceeded, appears on the display 35 ---- and an audio signal sounds.
Easy weighing
- The device is connected but not started.
- Press and hold the button ☑/TARE 34 to switch on the scale. After a short time, g or ml will appear on the right side of the display 35.
- If you want to switch between g and ml, hold down the button 📄/TARE 34 until the display changes.
- Before weighing ingredients, the display must be set to 0 g / 0 ml. If necessary, briefly press the button 📄/TARE 34 to set the display to zero.
- Now place the ingredients in the mixing bowl 27 or the blender jug 15. The weight is displayed. If necessary, wait a moment until the display no longer changes.
- The scale function is automatically stopped when the device is started.
Weighing with the tare function
The tare function allows you to reset the scale display to 0 g / 0 ml at any time. This is helpful for weighing several ingredients in succession.
-
Once you have weighed an ingredient, press the button ☑/TARE 34 briefly. 0 g or 0 ml is displayed.
-
Now you can add the next ingredient and weigh it.
-
You can repeat these steps for more ingredients.
11. Using the mixing tools
Lifting up the drive arm
- Press the release button 17 and fold the drive arm 21 upwards into the slanted position until it clicks into place and the release button pops out again.
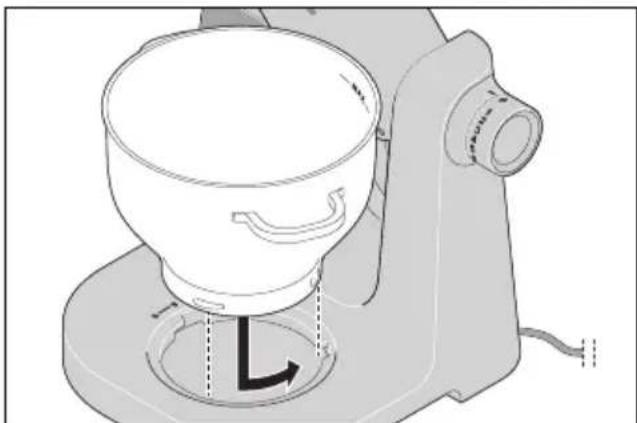
Inserting the mixing bowl
-
Place the mixing bowl 27 into the base unit 24 so that the MAX marking is at the back, slightly offset to the right.
-
The indentations on the lower edge must fit into the recesses on the base unit.
- The indentation beneath the left handle should point toward the open lock symbol 🔒
natural_image
Technical line drawing of a kitchen mixer with handle and control panel (no text or symbols)- Turn the mixing bowl 27 slightly anticlockwise until it is firmly in place.
- The indentation under the left handle then points to the closed lock symbol 🔒
Mounting the splash guard
CAUTION:
- Never use the mixing bowl 27 without the splash guard 29 attached. The material you are mixing could otherwise be ejected.
- Place the splash guard 29 onto the drive arm 21 from below. The open lock symbol on the splash guard and the dot (●) on the drive arm point towards each other.
- Press the splash guard against the drive arm and turn it towards the closed lock symbol 🔒
natural_image
Technical line drawing of a mechanical component with a circular base and curved side, showing no text or symbols.Inserting the mixing tool
-
Select the appropriate mixing tool:
-
Dough hook 3: for heavy doughs, e.g. bread dough
- Beater 2: for medium to light doughs, e.g. cake mix or pancake batter.
- Whisk 1: for whipping cream, egg whites etc.
For further information: see "Overview of functions" on page 42.
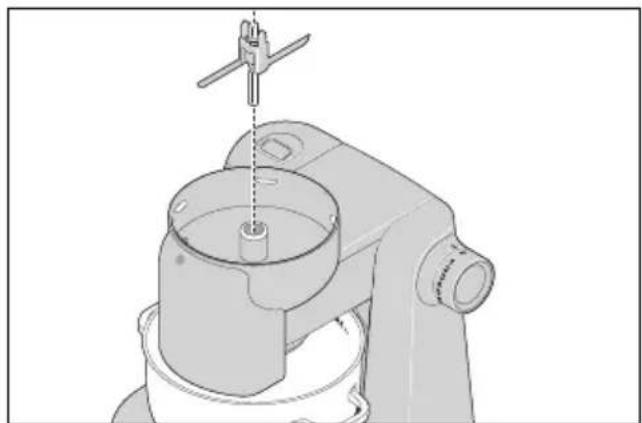
- Insert the mixing tool 1/2/3 from below into the socket 22 so that it fits securely. To fit the hexagon, you may need to slightly rotate the mixing tool.
natural_image
Technical illustration of a mechanical device with a magnified inset showing a component (no text or symbols)Adding ingredients
- You can add ingredients into the mixing bowl 27 while the drive arm 21 is lifted up.
-
During mixing, you can add ingredients through the filling opening 28 in the splash guard 29:
-
Reduce the speed to 1 - 2.
- Add the ingredients.
Lowering the drive arm
- Press the release button 17 and move the drive arm 21 to the horizontal position. The release button 17 pops out again.
Operation
- Connect the mains plug 23 to a wall socket.
- Select the desired speed setting using the speed control 20.
- Once the process is complete, set the speed control 20 to 0 and disconnect the mains plug 23.
Dismantling the device
- Press the release button 17 and fold the drive arm 21 upwards into the slanted position until it clicks into place and the release button pops out again.
- Press the eject button 25 to remove the mixing tool 1/2/3.
- Turn the splash guard 29 so that the open lock symbol on the splash guard and the dot (●) on the drive arm 21 are facing each other, and remove it downwards.
- Turn the mixing bowl 27 a little bit clockwise and take it off.
- Remove the processed food.
- Press the release button 17 and move the drive arm 21 to the horizontal position. The release button 17 pops out again.
- Clean all of the accessories that have been used immediately if possible.
12. Using the food processor
Food preparation
- Cut the food small enough to fit snugly into the food chute 5. Elongated foods (such as carrots, cucumbers, courgette) can be processed whole. These are placed upright into the food chute. They should fill the width of the food chute as much as possible so that they are unable to fall over.
Inserting the mixing bowl
- Place the mixing bowl 27 into the base unit 24 so that the MAX marking is at the back, slightly offset to the right.
- The indentations on the lower edge must fit into the recesses on the base unit.
- The indentation beneath the left handle should point toward the open lock symbol 🔒
natural_image
Technical line drawing of a kitchen mixer with handle and control panel (no text or symbols)- Turn the mixing bowl 27 slightly anticlockwise until it is firmly in place.
- The indentation under the left handle then points to the closed lock symbol 🔒
Lowering the drive arm
- Press the release button 17 and move the drive arm 21 to the horizontal position. The release button 17 pops out again.
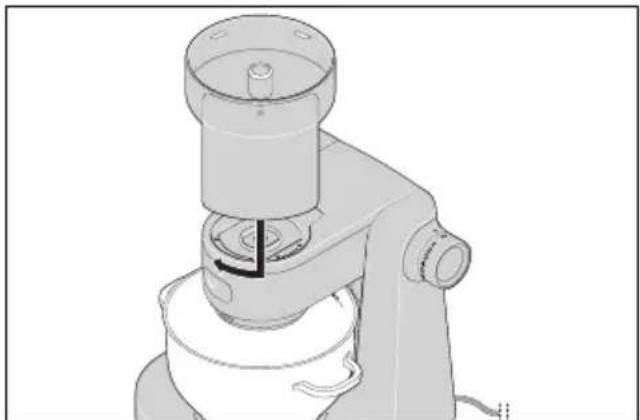
Assembling the food processor
NOTE: no mixing tool 1/2/3 may be inserted.
-
Remove the cover 26.
-
Place the food processor attachment 16 on the drive 19 so that the ejector chute is pointing slightly to the right. Turn the food processor attachment clockwise until it is firmly in place.
natural_image
Mechanical device diagram showing a press or clamping mechanism with no visible text or symbols- Insert the connector 14 with the longer metal side facing downwards so that the hexagon fits into the drive 19.
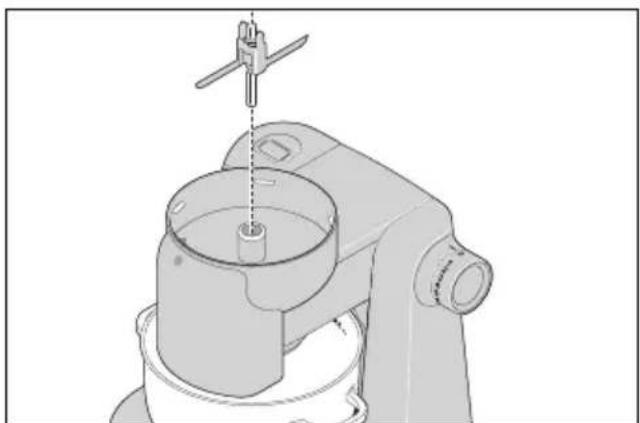
natural_image
Technical illustration of a mechanical device with a central component and a vertical rod inserted (no text or symbols)-
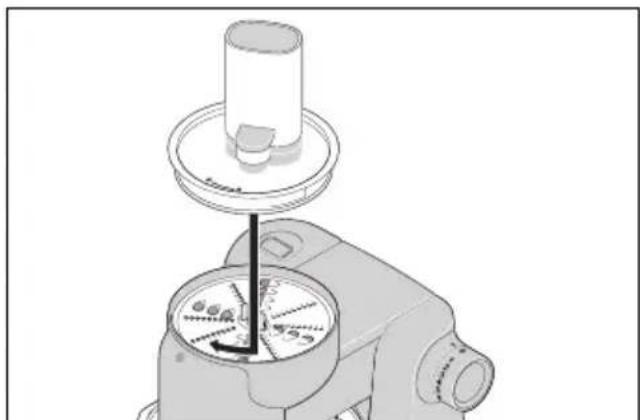
Select the appropriate disc:
-
Rasping disc 7,
- Slicing disc 8 or
- Grating disc 9
The rasping disc 7 and the slicing disc 8 can be used from both sides: one side is coarse, the other side is fine.
- Place the selected grating, rasping, or slicing disc 7/8/9 onto the connector 14 so that the blades you want to use are facing upward.
- The two plastic tabs on the connector must protrude through the matching holes in the disc at the top.

natural_image
Technical illustration showing mechanical assembly with circular components and a cylindrical housing (no text or symbols)-
Place the lid 6 onto the food processor attachment 16 so that the open lock symbol on the lid aligns with the dot (●) on the food processor attachment.
-
Turn the lid clockwise until it clicks into place. The closed lock symbol indicates the location of the dot (●).
natural_image
Mechanical device with a cylindrical component mounted on top, showing internal components and a dial (no text or symbols visible)Operation
-
Connect the mains plug 23 to a wall socket.
-
Select the desired speed setting (3 - 4) using the speed control 20.
-
Fill the prepared ingredients into the food chute 5 portion by portion and press them down with the food pusher 4 using light, even pressure.
- Ingredients with a long shape, such as carrots, courgettes, cucumbers can be pressed down without a food pusher if they protrude from the top of the food chute 5.
- Once the process is complete, set the speed control 20 to 0 and disconnect the mains plug 23.
Dismantling the device
-
Turn the entire food processor attachment 16 slightly anticlockwise and remove it.
-
Turn the lid 6 anticlockwise until the open lock symbol on the lid points to the dot (●) on the food processor attachment 16, then remove it.
-
Grasp the connector 14 in the middle and lift it out of the food processor attachment 16 together with the grating, rasping, or slicing disc 7/8/9.
-
Carefully remove the grating, rasping, or slicing disc 7/8/9 from the connector 14.
-
Turn the mixing bowl 27 a little bit clockwise and take it off.
-
Use a tool such as a dough scraper to remove the processed food from the mixing bowl 27 and the individual parts of the food processor.
-
Clean all of the accessories that have been used immediately if possible.
-
Replace the cover 26.
13. Using the blender jug

DANGER! Risk of injury from cutting!
- Please remember that the blades of the blender jug 15 are very sharp:
- Never touch the blades with your bare hands in order to avoid cuts.
- When emptying the blender jug 15, ensure not to touch the blades.
WARNING! Risk of material damage!
Do not use the blender jug for processing particularly hard foodstuffs, such as frozen food, bones, nutmeg, cereal grains or coffee beans.
Fold the drive arm into the vertical position.
- Press the release button 17 and fold the drive arm 21 down completely until it clicks into place and the release button pops out again.
natural_image
Mechanical component diagram showing a rotating arm mechanism (no text or symbols)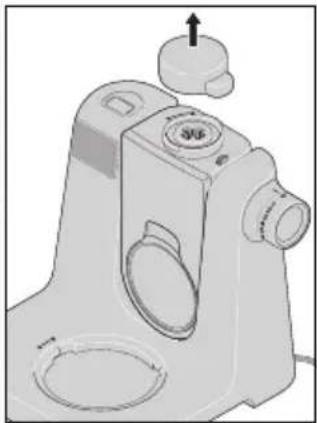
natural_image
3D rendered mechanical component with no visible text or symbols- Remove the cover 31.
Mounting the blender jug
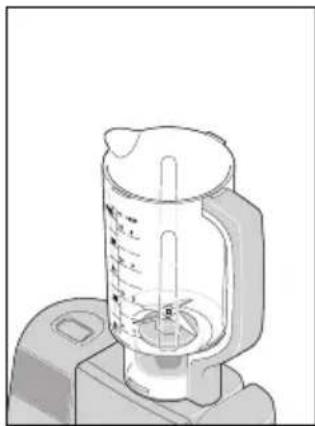
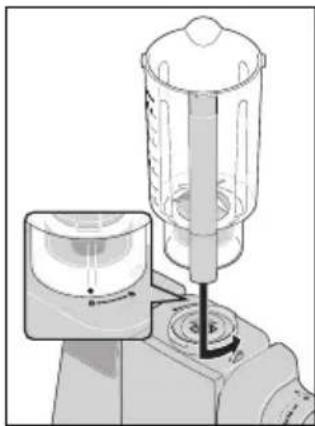
- Place the blender jug 15 on the drive 32 so that the spout and the dot mark (●) on the lower edge point towards the open lock symbol 📊 on the device.
- If this does not work, gently rotate the blender jug 15 back and forth.
natural_image
Illustration of a blender with a measuring tool and control panel (no text or symbols)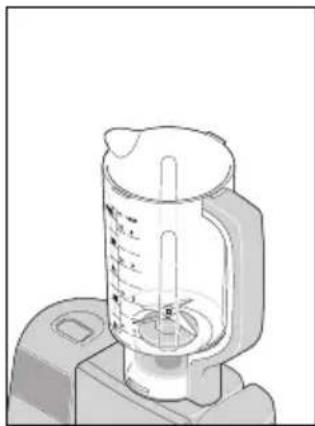
natural_image
Illustration of a blender with a measuring cup and lid (no text or symbols)- Turn the blender jug 15 anticlockwise until it is firmly in place. The spout and the dot mark (●) now point to the closed lock symbol 🔒
Adding ingredients
- First add the liquid ingredients to the blender jug 15, and then the solid ones.
- Cut the solid ingredients into small pieces in advance, so that the pieces do not get jammed in the blades.
Mounting the lid
NOTES:
- For safety reasons, the blending process will only start when the lid 12 is correctly mounted.
• To make it a little easier to close the lid 12, place a few drops of cooking oil onto a cloth and rub it over the seal 13.
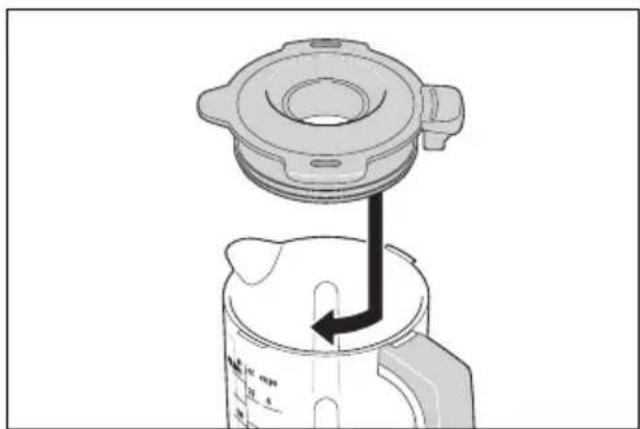
- Place the lid 12 slightly distorted onto the blender jug 15.
natural_image
Mechanical assembly diagram showing a kettle with a lid and arrow indicating motion direction (no text or symbols)- Rotate the lid 12 clockwise until it stops.
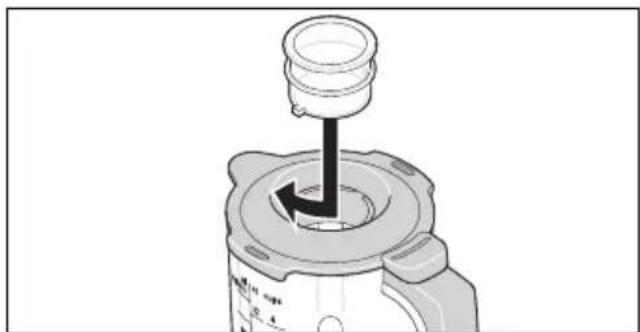
Inserting the measuring cup
You can measure small quantities of ingredients with the measuring cup 10. When turned upside down, it fits perfectly into the refill opening 11.
-
Place the measuring cup 10 so that the small plastic nibs fit into the recesses on the refill opening.
-
Rotate the measuring cup 10 clockwise until it stops.
natural_image
Mechanical component diagram showing a piston-like assembly with a black arrow indicating direction (no text or symbols)Operation
- Connect the mains plug 23 to a wall socket.
- Select the desired speed setting using the speed control 20.
- During blending, you can add ingredients through the refill opening 11 in the lid 12:
- Reduce the speed to 1 - 2.
- Turn the measuring cup 10 anticlockwise and remove it.
- Add the ingredients.
- Replace the measuring cup 10 such that the small plastic nibs fit into the recesses at the refill opening 11.
-
Turn the measuring cup 10 clockwise until it is firmly in place.
-
Once the process is complete, set the speed control 20 to 0 and disconnect the mains plug 23.
Dismantling the device
- Turn the measuring cup 10 anticlockwise and remove it.
- Turn the lid 12 anticlockwise and remove it.
- Turn the blender jug 15 clockwise and remove it.
- Carefully remove the processed ingredients from the blender jug 15 (using a dough scraper, for example).
- Clean all of the accessories that have been used immediately if possible.
- Place the cover 31 so that the arrow symbol on the cover aligns with the arrow symbol on the device (▶◀). Press the cover down firmly.
NOTE: if the cover 31 is not securely in place, the mixing tools and the food processor cannot be used. This is a safety function.
14. Cleaning and servicing the device

DANGER! Risk of electric shock!
- Pull the mains plug 23 out of the wall socket before each cleaning.
- Never immerse the base unit 24 in water.

DANGER! Risk of injury from cutting!
Note that the blades of the blender jug 15 and the grating, rasping, and slicing discs 7/8/9 are very sharp. Never touch the blades with your bare hands in order to avoid cuts.
- When rinsing by hand, use water which is so clear that you are able to see the working tools properly in order to ensure that you do not injure yourself on the very sharp blades.
WARNING! Risk of material damage!
- Never use any abrasive, corrosive or scouring cleaning agents. These might damage the device.
NOTES:
- Certain foods or spices (e.g. curry, carrots) may discolour the plastic parts (e.g. the blender jug 15, measuring cup 10, lid 6 or splash guard 29). This is not a device error and is harmless to health.
- Please note that water drops may still be present on the accessories after drying. Allow all parts to air dry completely.
14.1 Cleaning the base unit
- Clean the base unit 24 with a damp cloth. You can also use a little detergent.
- Wipe with a clean cloth with clear water.
- Do not use the base unit 24 until it has completely dried.
14.2 Cleaning in the dish-washer
The following parts are dishwasher-safe:
- Mixing bowl 27
- Splash guard 29
-WH h i s k 1 - Beater 2
- Dough hook 3
- Blender jug 15
- L i d 12
- Seal 13
- Measuring cup 10
- Food processor attachment 16
- L i d 6
- Food pusher 4
- Connector 14
- Rasping disc 7
- Slicing disc 8
- Grating disc 9
The following parts must never be cleaned in a dishwasher:
| - | B | a | s | e | u | n | i | t | 24 |
| - | C | o | v | e | r | 26 | |||
| - | C | o | v | e | r | 31 |
14.3 Cleaning the accessories
- Remove coarse food residues.
- Rinse the blender jug 15 or the mixing bowl 27 with warm water and pour away the water.
-
Remove the seal 13 from the lid 12 for cleaning.
-
Clean all accessories by hand in a sink with dishwater. You can also clean the parts that are dishwasher-safe in the dishwasher.
- When cleaning by hand, rinse all parts with clean water.
- Allow all parts to dry completely before reassembling, putting them away or reusing them.
14.4 Cleaning the blender jug
Clean the blender jug 15 as soon as possible after use.
- Fill the blender jug 15 about halfway with warm water mixed with detergent and place it on the base unit 24.
- Put the lid 12 and the measuring cup 10 back in place.
- Set the speed control 20 briefly to M several times.
- Remove the blender jug 15 from the base unit 24.
- Pour out the dishwater.
- Rinse the blender jug 15 under clear water.
- Allow the blender jug 15 to dry completely before you use it again.
14.5 Storage
- Allow all parts to dry completely before placing them in storage.
- Store the device so that it is protected against dust and dirt and out of the reach of children.
• Figure A: you can wind up the power cable 23 in the cable spool 30 on the underside of the base unit 24.
15. Recipes
The following abbreviations are used in the recipes:
$$ \begin{array}{l} \text { tsp } = \text { teaspoon } \ \text { tbsp } = \text { tablespoon } \ \end{array} $$
15.1 Green smoothie
Ingredients for 2 portions
12 apple
12 r i p e p e
12 cucumber
12 lemon (juice and some grated lemon peel)
l o r a n g
30 g baby spinach
1 small piece of ginger (approx. 2 g)
Preparation
- Wash, clean and cut the apple, pear and cucumber into pieces.
- Wash and sort baby spinach.
- Chop the ginger finely.
- Put all ingredients into the blender jug 15.
- Start on speed 2 - 3, then set to M several times. Finally increase the speed until the desired consistency is achieved.
- Best enjoyed fresh!
15.2 Mascarpone cream
Ingredients
2 eggs
2 tbsp fine sugar
1 tbsp sweet wine (e.g. Madeira)
250 g mascarpone
12 untreated orange (juice and some grated orange peel)
Preparation
- Separate the eggs.
- Add the egg whites to a fat-free mixing bowl and whip them with the whisk until stiff. Increase the speed to 7.
- Add the whipped egg whites to another bowl and store it in a cool place.
- In the mixing bowl, whip the egg yolks with sugar and sweet wine with the whisk at speed 6 until foamy.
- Reduce the speed to 3 and alternately add spoonfuls of mascarpone and orange juice.
- Fold in the grated orange peel and the whipped egg whites by hand.
- For decoration, sprinkle a few thin strips of orange peel onto the finished cream.
- Place the cream in the refrigerator until you are ready to enjoy it. Consume the mascarpone cream within 24 hours.
Tip: layer the mascarpone cream with fresh seasonal fruit or compote in dessert glasses.
15.3 Pizza dough
Ingredients
| 250 | g | wheat | flour |
| 34 tsp salt | |||
| 12 cube fresh yeast | |||
| 120 | ml | lukewarm | water |
| 12 tsp brown sugar |
some flour for kneading and rolling
Preparation
- Mix flour and salt in the mixing bowl and make a depression in the middle.
-
Mash and mix the yeast and sugar in the water with a fork and stir until everything is dissolved. Pour this mixture into the depression.
-
Work the mixture with the dough hook at speed 3 until large lumps of dough have formed.
- Continue kneading by hand until the dough becomes smooth.
- Form a ball of dough and leave to rise under a cover in a warm place until it has doubled in size.
- Knead the dough once more, roll it out and top as desired.
15.4 Basic batter recipe
Ingredients for 1 loaf tin (approx. 30 cm)
| 300 | g | soft | butter |
| 300 | g | sugar | |
| 5 | large | eggs | |
300 g plain flour (type 405)
1 tsp baking powder
Additionally soft butter for the tin
Preparation
- Preheat the oven to 175^ C (top/bottom heat).
- Grease the loaf tin or line it with baking paper.
- To make the batter, cut the butter into small pieces and place in the mixing bowl with the sugar.
- Insert the beater and splash guard and mix the ingredients for approx. 30 seconds on speed 4.
- Then mix the mixture on speed 6 for approx. 5 minutes to form a soft mass.
- Stir in the eggs one at a time on speed 3 for approx. 30 seconds.
- Then continue to stir on speed 6 for approx. 40 seconds.
- Mix the flour with the baking powder and sieve it over the mass.
-
Mix all the ingredients on speed 3 for approx. 40 seconds to form a smooth batter.
-
Pour the batter into the tin and smooth it out with a spatula.
- Bake the cake for approx. 65 minutes.
- Test to see if it is done about 10 minutes before the end of the baking time. To do this, prick the centre of the cake with a wooden skewer. The cake is done when no more batter sticks to the skewer.
- Before removing the cake from the tin, leave it to cool in the tin for approx. 10 minutes.
15.5 Basic yeast dough recipe
Ingredients
500 g wheat flour (type 550)
1 cube fresh yeast
60 g butter
1 pinch salt
1 tsp sugar
200 - 250 ml lukewarm milk
2 eggs
Preparation
-
Mix flour and salt in the mixing bowl and make a depression in the middle.
-
Mash and mix the yeast and sugar in the lukewarm milk with a fork and stir until everything is dissolved. Pour this mixture into the depression.
-
Add the remaining ingredients to the mixing bowl.
-
Knead the dough with the dough hook for 1 minute on speed 2 and then for 5 minutes on speed 3.
-
Form the dough into a ball and let it rest for 40 minutes in a mixing bowl.
-
Preheat the oven to 200 °C (top/bottom heat).
-
Roll the dough out on a baking tray and top it to taste.
-
Bake the dough at 200 °C for 25 - 30 minutes in the preheated oven.
15.6 Basic waffle recipe
Ingredients for 4 portions
125 g room temperature
75 g sugar
1 packet vanilla sugar
2 large eggs
250 g wheat flour
12 tsp baking powder
180 ml buttermilk
2 tbsp liquid honey
Preparation
-
Place the butter, sugar and vanilla sugar in the mixing bowl.
-
Insert the beater and splash guard and mix the ingredients for approx. 30 seconds on speed 4 until smooth.
-
Add eggs, flour and baking powder and mix the mixture for approx. 30 seconds on speed 3.
-
Then stir for 2 minutes on speed 6.
-
Gradually work the buttermilk into the batter on speed 3.
-
Add the honey and continue to mix for approx. 1 minute on speed 6.
-
Pour the batter in portions into a hot, greased waffle iron and spread.
-
Bake the waffles until golden brown.
15.7 Basic shortcrust pastry recipe
Ingredients
| 250 | g | flour | |
| 125 | g | cold | butter |
| 1 pinch | sa lt | ||
| 1 | egg | ||
| 150 | g | sugar | |
Preparation
-
Add all ingredients into the mixing bowl and knead with the beater on speed 3 for approx. 3 - 4 minutes to form a short pastry dough.
-
Place the dough in the refrigerator for 30 minutes.
- Preheat the oven to 200 °C (top/bottom heat).
- Grease the springform cake tin and sprinkle lightly with flour.
- Roll out the dough between two plastic wraps (to a diameter of approx. 30 cm) and place it into the springform cake tin.
- Bake the dough at 200 °C for 15 minutes in the preheated oven.
15.8 Basic cocoa sponge recipe
Ingredients
| 4 | large | eggs |
| 1 pinch | salt |
| 150 | g | icing |
| 25 | g | cocoa |
| 50 g flour |
| 75 | g | cornflour |
1 tsp baking powder
Baking paper for the tray
Preparation
- Preheat the oven to 225 °C (top/bottom heat).
- Separate the eggs.
- Add the egg whites to a fat-free mixing bowl and whip them with the whisk until stiff. Increase the speed to 7.
- Add the whipped egg whites to another bowl and store it in a cool place.
- Add the egg yolks with the icing sugar to a mixing bowl and whip it with the whisk on speed 6 until creamy.
- Mix cocoa powder, flour, cornflour and baking powder and sieve the mixture over the egg yolk crème.
-
Add 1/3 of the whipped egg whites and mix with a beater until smooth.
-
Fold in the remaining whipped egg whites with a wooden spoon until all ingredients are combined.
- Line a baking tray with baking paper and spread the batter on it.
- Bake the dough at 225 °C for 12 minutes in the preheated oven.
- Turn the sponge out onto a tea towel.
- Brush the baking paper with a little cold water and carefully peel it off.
15.9 Cucumber salad
Ingredients
| 1 cucumber | |
| 150 g natural yoghurt | |
| 3 tbsp white wine vinegar | |
| 3 tbsp sunflower oil | |
| 1-2 tsp | mustard |
| 1 pinch | salt |
| 1 pinch | sugar |
Preparation
- Combine the natural yoghurt, the white wine vinegar, the sunflower oil, mustard, salt and sugar in the blender jug 15.
- Put the lid on and stir on speed 2 - 3.
- If desired, the yoghurt dressing can also be refined with dill or other herbs.
- Wash the cucumber, cut off the ends and peel thinly, as desired.
- Cut the cucumber into thin slices using the fine side of the slicing disc 8. Select the speed setting 3 - 4.
- Mix the cucumber slices and yoghurt dressing, cover the salad and leave to stand for approx. 10 minutes.
15.10 Potato pancakes
Ingredients
1 kg potatoes
1 large egg
1-2 tbsp flour
12 tsp salt
cooking fat
Preparation
-
Peel and wash the potatoes.
-
Grate the potatoes using the grating disc 9. Select the speed setting 3 - 4.
-
Place the potatoes into a cloth and press out the liquid.
-
Mix the grated potatoes with egg, flour and salt.
-
Heat some cooking fat in a frying pan.
-
Use a small ladle to transfer a part of the potato mass to the hot fat and press flat with a spatula.
-
Fry the potato pancakes on both sides until golden brown.
16. Trouble-shooting
If your device fails to function as required, please try this checklist first. Perhaps there is only a minor problem, and you can solve it yourself.

DANGER! Risk of electric shock!
- Do not attempt to repair the device yourself under any circumstances.
| Fault Possible causes / action | |
| No function | Has the device been connected to the power supply?Check the connection.The food processor can only be started if certain accessories have been assembled correctly (see “Safety functions” on page 44).Is the speed control 20 set to 0?If not, set it to 0 before setting the desired speed.Has the overheating protection switched off the device (see “Overheating protection” on page 44)? |
| The device vibrates strongly or moves during operation. | Please note the maximum quantities and the recommended preparation of the food.The suction feet must be clean and dry, and the device must stand on a firm, level surface. |
| A mixing tool 1/2/3 or a grating, rasping, or slicing disc 7/8/9 is rubbing against the container. | Switch off immediately, disconnect the mains plug 23 and check that all accessories are correctly assembled. |
| Mixing tools 1/2/3 or blender jug 15: the working tool does not turn only turns with great difficulty. | Switch off immediately, remove the mains plug 23 and check the following:- Has the maximum amount been exceeded?- Food too tough or too hard?- Is there an blockage (e.g. sinew, gristle) in the container?- Are the pieces of the ingredients too large? |
| When folding up the drive arm 21 the mixing tool 1/2/3 hits the mixing bowl 27. | Wait until the mixing tool 1/2/3 has come to a complete standstill before unlocking the drive arm 21. The mixing tool keeps moving until it reaches the parking position so that it does not hit the mixing bowl 27 when the drive arm is raised. |
| Food Processor: the grating, rasping, or slicing disc 7/8/9 stops rotating. | Switch off immediately, remove the mains plug 23 and check the following:- Have you applied too much pressure?- Is there a foreign object in the device? |
| Food Processor: ingredient residues remain on top of the grating, rasping, or slicing disc 7/8/9. | Not a fault, small residues remain for technical reasons. |
| Food Processor: the ingredients are no longer being correctly processed. | Switch off, remove the mains plug 23 and check the following carefully:- Have ingredients become trapped in the blades? If so, please remove them.- Was the grating disc 9 not inserted with the blades facing upwards? If not, flip it over. |
| Indicator E2 or E3 | Switch off, remove the mains plug 23 and reconnect. |
17. Disposal
This product is subject to the provisions of European Directive 2012/19/EC. The symbol showing a wheelie bin crossed through indicates that the product requires separate refuse collection in the European Union. This applies to the product and all accessories marked with this symbol. Products identified with this symbol may not be discarded with normal household waste, but must be taken to a collection point for recycling electric and electronic appliances.
This recycling symbol marks e.g. an object or parts of the material as valuable for recycling. Recycling helps to reduce the consumption of raw materials and protect the environment.


Packaging
When disposing of the packaging, make sure you comply with the environmental regulations applicable in your country.
- Technical specifications
| Model: SKMB 1000 A1 | |
| Mains voltage: 220 - 240 V ~50 - 60 Hz | |
| Protection class: II | ☐ |
| Power rating: 1000 watts | |
| Power consumption when switched off: | ≤ 0.5 W |
| Mixing bowl:max. filling volume (MAX marking): 3.0 L | |
| Blender jug:max. filling volume (max. marking): 1.0 L | |
| Maximum load for dough hook 3: | Yeast dough:max. 1642 g |
| Maximum load for beater 2: | Batter:max. 1203 g |
| Scale capacity: up to | max. 5 kg |
| Max. continuous operation (short cycle):- Food processor: 10- Food processor: 5 m- Blender: 3 minutes | (indicates how long the device is permitted to run continuously)minutesminutes |
Symbols used
 | Double insulation |
 | With the CE marking, HOYER Handel GmbH declares the conformity with EU guidelines. |
 | This symbol reminds you to dispose of the packaging in an environmentally friendly manner. |
 PAP PAP | Recyclable materials are marked with the recycling symbol (3 arrows). The material can be specified by the recycling number in the centre (here: 21) and/or an abbreviation (here: PAP). |
| ~ | AC voltage |
 | The symbol identifies parts that can be cleaned in the dishwasher. |
 | It is a recyclable product which is subject to an extended producer responsibility and for which the rules of waste separation apply. |
 | With the UKCA marking, HOYER Handel GmbH declares that the product is in conformity with the UKCA requirements. |
 | The symbol identifies the product manufacturer. |
Subject to technical modifications.
19. Warranty of the HOYER Handel GmbH
Dear Customer, your device is provided with a 3 year warranty starting with the purchase date. In the event of product defects, you are entitled to statutory rights against the vendor. These statutory rights are not restricted by our warranty presented in the following.
Warranty conditions
The warranty period starts with the purchase date. Please keep the original purchase receipt in a safe place. This document is required to verify the purchase.
If within three years from the purchase date of this product a material or factory defect occurs, the product will be repaired or replaced by us – at our discretion – free of charge to you, or the purchase price will be refunded. This warranty implies that within the period of three years the defective device and the purchase receipt are presented, including a brief written description of the defect and the time it occurred.
If the defect is covered by our warranty, the repaired or a new product will be returned to you. No new warranty period starts with a repair or replacement of the product.
Warranty period and statutory claims for defects
The warranty period is not extended when the warranty has been claimed. This also applies to replaced and repaired parts. Any damages and defects already existing at the time of purchase must be reported immediately upon unpacking. Repairs arising after the expiration of the warranty period are subject to a charge.
Warranty coverage
The device was produced carefully according to strict quality guidelines and tested diligently prior to delivery.
The warranty applies to material or factory defects.
Excluded from the warranty are wear parts subject to normal wear and damages to fragile parts, e.g. switches, lamps or other parts manufactured from glass.
This warranty expires if the product is damaged, not used as intended or not serviced. For the proper operation of the product, all instructions listed in the operating instructions must be observed carefully. Any form of use and handling that is advised against in the operating instructions or warned against must always be avoided.
The product is only intended for private and not for commercial use. In the case of incorrect and improper treatment, use of force and interventions not performed by our authorised Service Centre, the warranty shall cease.
Handling in case of a warranty claim
In order to ensure prompt processing of your matter, please observe the following notes:
- Please keep the article number
IAN: 513794_2501 and the purchase receipt as a purchase verification for all inquiries. - The article number can be found on the rating plate, an engraving, the title page of your instructions (in the bottom left), or as a label on the rear or underside of the device.
- If faulty operation or other defects occur, first contact the Service Centre listed in the following by telephone or email.
- Then, you are able to send a product reported as defective free of charge to the service address specified to you, including the purchase receipt and the information on the defect and when it occurred.
At www.lidl-service.com you can download this and many other manuals, product videos and installation software.

This QR code takes you directly to the Lidl Service website (www.lidl-service.com), where you can enter the article number (IAN)
513794_2501 to open your user instructions.

Service Centre
GB Service Great Britain
Tel.: 0800 404 7657
E-Mail: hoyer@lidl.co.uk
IE Service Ireland
Tel.: 1800 101010
E-Mail: hoyer@lidl.ie
MT Service Malta
Tel.: 80062230
E-Mail: hoyer@lidl.com.mt
CY Service Cyprus
Tel.: 8009 4241
E-Mail: hoyer@lidl.com.cy
IAN: 513794_2501

Supplier
Please note that the following address is no service address. First contact the aforementioned Service Centre.
HOYER Handel GmbH
Kühnehöfe 12
22761 Hamburg
GERMANY
Sommaire
1 protection anti-projections 29
1 bol mélangeur 27
natural_image
Mechanical component diagram showing a rotating arm mechanism with no visible text or symbolsnatural_image
Mechanical component diagram showing a rotating arm mechanism (no text or symbols)
natural_image
3D mechanical component diagram showing a valve with ports and a central knob (no text or symbols)natural_image
Technical line drawing of a kitchen mixer with control panel and base mount (no text or symbols)Monter la protection anti-projections
ATTENTION :
natural_image
Technical line drawing of a mechanical component with a circular base and curved side, showing no text or symbols.natural_image
Technical illustration of a mechanical device with a magnified inset showing a component (no text or symbols)natural_image
Technical line drawing of a kitchen mixer with handle and control panel (no text or symbols)natural_image
Mechanical device diagram showing a press or clamping mechanism with no visible text or symbolsnatural_image
Technical illustration of a mechanical device with a central component and a vertical rod inserted (no text or symbols)natural_image
Two technical diagrams showing a mechanical device with a circular component and a cylindrical device with internal components, both without any text or symbols.natural_image
Mechanical device with a cylindrical component inserted into a dial, showing internal components and motion indicators (no text or symbols)Processus
natural_image
Mechanical component diagram showing a rotating arm mechanism with no visible text or symbols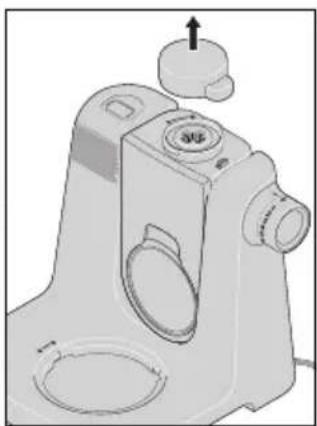
natural_image
3D mechanical component diagram showing a valve mechanism with no visible text or symbols- Retirez le cache 31.
Mettre le bol mixeur en place
natural_image
Illustration of a blender with a handle and control knob (no text or symbols)
natural_image
Illustration of a blender with a measuring cup and lid (no text or symbols visible)natural_image
Mechanical assembly diagram showing a lid and kettle with a black arrow indicating a component (no text or symbols present)natural_image
Mechanical component diagram showing a cylindrical assembly with a black arrow indicating rotation or force direction (no text or symbols)Processus
natural_image
Mechanical component diagram showing a rotating arm mechanism with no visible text or symbolsnatural_image
Mechanical component diagram showing a rotating arm mechanism with no visible text or symbols
natural_image
3D mechanical component diagram showing a housing with mounting holes and a central knob (no text or symbols)natural_image
Technical line drawing of a kitchen mixer with handle and control panel (no text or symbols)natural_image
Technical line drawing of a mechanical component with a circular base and curved side, showing no text or symbols.natural_image
Technical illustration of a mechanical device with a dial and mesh component (no text or symbols)natural_image
Technical line drawing of a kitchen mixer with control panel and base mount (no text or symbols)natural_image
Mechanical device diagram showing a press or clamping mechanism with no visible text or symbolsnatural_image
Technical illustration of a mechanical device with a handle and internal components (no text or symbols)natural_image
Technical illustration showing a mechanical assembly with a circular component and a cylindrical device (no text or symbols present)natural_image
Mechanical device with a cylindrical component inserted into a dial, showing internal components (no text or symbols visible)Werkproces
natural_image
Mechanical component diagram showing a rotating arm mechanism (no text or symbols)
natural_image
3D mechanical component diagram showing a valve mechanism with no visible text or symbolsnatural_image
Diagram of a blender with a measuring tool and control panel (no text or symbols)
natural_image
Illustration of a blender with a measuring cup and lid (no text or symbols)natural_image
Mechanical assembly diagram showing a kettle with a lid and arrow indicating force application (no text or symbols)natural_image
Mechanical component diagram showing a piston-like assembly with a black arrow indicating direction (no text or symbols)Werkproces
natural_image
Mechanical component diagram showing a rotating arm mechanism with no visible text or symbolsnatural_image
Technical illustration of a mechanical component with two views (top and side), showing internal components and a knob (no text or symbols)natural_image
Technical line drawing of a kitchen mixer with handle and control panel (no text or symbols)natural_image
Technical line drawing of a mechanical component with circular base and curved side features (no text or symbols)Wktadanie widetek
natural_image
Technical illustration of a mechanical device with a dial and handle, showing internal components (no text or symbols)Wlewanie składników
natural_image
Technical line drawing of a kitchen mixer with handle and control panel (no text or symbols)natural_image
Mechanical device diagram showing a press or clamping mechanism with no visible text or symbolsnatural_image
Technical illustration of a mechanical device with a central component and a vertical rod inserted (no text or symbols)natural_image
Illustration of a computer mouse with a hand holding a pen, next to a circular diagram showing internal components (no text or symbols)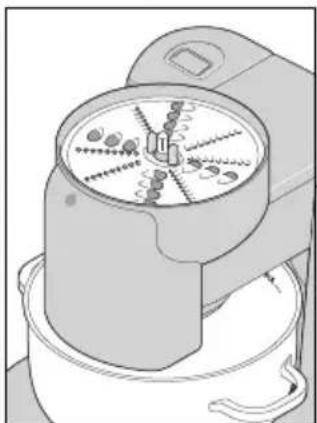
natural_image
Illustration of a mechanical device with internal components and no visible text or symbolsnatural_image
Mechanical device with a cylindrical component inserted into a dial, showing internal components (no text or symbols visible)Praca
natural_image
Technical illustration of a mechanical device with no visible text or symbols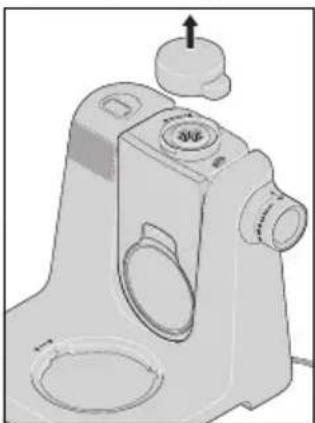
natural_image
3D rendering of a mechanical device with no visible text or symbols- Zdjąć ostone 31.
natural_image
Diagram of a blender with a handle and base, showing mechanical components (no text or symbols)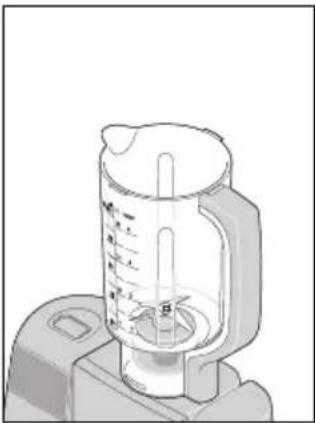
natural_image
Illustration of a blender with a side handle and lid, no text or symbols presentnatural_image
Mechanical assembly diagram showing a lid and kettle with an arrow indicating rotation (no text or symbols)natural_image
Mechanical component diagram showing a piston-like assembly with a black arrow indicating rotation (no text or symbols)Praca
natural_image
Mechanical component diagram showing a rotating arm mechanism with no visible text or symbolsnatural_image
Technical illustration of a mechanical component with two views (top and side), showing internal parts and a knob (no text or symbols)natural_image
Technical line drawing of a kitchen mixer with handle and control panel (no text or symbols)natural_image
Technical line drawing of a mechanical component with a circular base and curved side, showing no text or symbols.natural_image
Mechanical assembly diagram showing a rotating component with a magnified inset view (no text or symbols)Plnění surovin
natural_image
Technical line drawing of a kitchen mixer with handle and control panel (no text or symbols)natural_image
Mechanical device diagram showing a press or clamping mechanism with no visible text or symbolsnatural_image
Technical illustration of a mechanical device with a central component and a vertical rod inserted (no text or symbols)natural_image
Technical illustration showing a mechanical assembly with a circular component and a cylindrical device (no text or symbols present)natural_image
Mechanical device with a cylindrical component inserted into a dial, showing internal components and motion indicators (no text or symbols)Pracovní proces
natural_image
Mechanical device with rotating arm and circular ports (no text or symbols)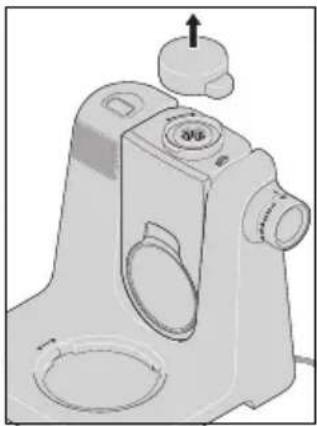
natural_image
3D rendered mechanical component with no visible text or symbols- Sejměte kryt 31.
natural_image
Illustration of a blender with a handle and control panel, no text or symbols present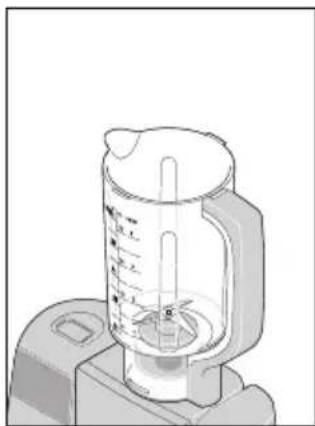
natural_image
Illustration of a blender with a measuring cup and lid (no text or symbols)natural_image
Mechanical assembly diagram showing a kettle with a lid and arrow indicating motion direction (no text or symbols)natural_image
Mechanical component diagram showing a piston-like assembly with a black arrow indicating direction (no text or symbols)Pracovní proces
natural_image
Mechanical component diagram showing a rotating arm with a curved arrow indicating rotation (no text or symbols)natural_image
Mechanical component diagram showing a rotating arm mechanism with no visible text or symbols
natural_image
3D rendered mechanical component with no visible text or symbolsnatural_image
Technical line drawing of a kitchen mixer with handle and control panel (no text or symbols)natural_image
Technical line drawing of a mechanical component with a circular base and curved side, showing no text or symbols.natural_image
Mechanical device with a circular component and a separate mechanical component (no visible text or symbols)Naplnenie prisad
natural_image
Technical line drawing of a kitchen mixer with handle and control panel (no text or symbols)natural_image
Technical illustration of a mechanical device with a central component and base (no text or symbols visible)- Nasad'te spojku 14 dlhšou kovovou stranou nadol tak, aby šesthran zapa-dol do pohonu 19.
natural_image
Technical illustration of a mechanical device with a central component and a vertical rod inserted (no text or symbols)natural_image
Technical illustration showing a mechanical assembly with a dial and tool, no text or symbols presentnatural_image
Diagram of a mechanical device with a cylindrical component inserted into a dial, showing internal components and motion arrows (no text or symbols)Pracovný proces
natural_image
Technical illustration of a mechanical device with no visible text or symbols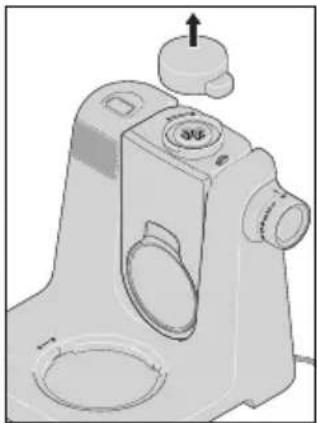
natural_image
3D rendered mechanical component with no visible text or symbols- Odoberte kryt 31.
natural_image
Illustration of a blender with a lid and base, showing mechanical components (no text or symbols)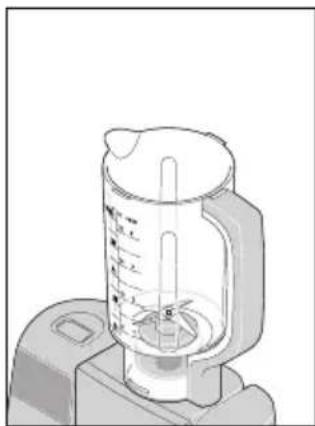
natural_image
Illustration of a blender with a measuring cup and lid (no text or symbols)natural_image
Mechanical assembly diagram showing a kettle with a lid and arrow indicating motion direction (no text or symbols)natural_image
Mechanical component diagram showing a piston-like assembly with a black arrow indicating direction (no text or symbols)Pracovný proces
natural_image
Mechanical component diagram showing a rotating arm mechanism with no visible text or symbolsnatural_image
Technical illustration of a mechanical component with two views (top and side), showing internal parts and a knob (no text or symbols)natural_image
Technical line drawing of a kitchen mixer with handle and control panel (no text or symbols)natural_image
Technical line drawing of a mechanical component with a circular base and curved side, showing no text or symbols.natural_image
Mechanical device with a rotating wheel and a separate mechanical component (no text or symbols visible)Añadir ingredientes
natural_image
Technical line drawing of a kitchen mixer with handle and control knob (no text or symbols)natural_image
Technical illustration of a mechanical device with a cylindrical component and base mount (no text or symbols)natural_image
Technical illustration of a mechanical device with a central component and a vertical tool above it (no text or symbols)natural_image
Technical illustration showing a mechanical assembly with a circular component and a cylindrical device (no text or symbols present)natural_image
Mechanical device with a cylindrical component inserted into a dial, showing internal components and motion indicators (no text or symbols)Proceso de trabajo
natural_image
Mechanical component diagram showing a rotating arm mechanism (no text or symbols)
natural_image
3D rendering of a mechanical device with ports and a knob (no text or symbols visible)- Retire la tapa 31.
natural_image
Illustration of a blender with a handle and spool, showing mechanical components (no text or symbols)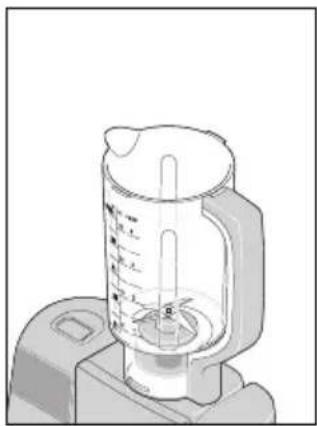
natural_image
Illustration of a blender with a side panel and control knob (no text or symbols)natural_image
Mechanical assembly diagram showing a kettle with a lid and arrow indicating motion direction (no text or symbols)natural_image
Mechanical component diagram showing a piston-like structure with an arrow indicating force or direction (no text or symbols)Proceso de trabajo
natural_image
Mechanical component diagram showing a lever mechanism with an arrow indicating rotational motion (no text or symbols present)- For at anvende blandebeholderen 15 klappes drivarmen 21 helt ned i lodret position.
natural_image
Mechanical component diagram showing a rotating arm mechanism with no visible text or symbols
natural_image
3D rendered mechanical component with no visible text or symbolsnatural_image
Technical line drawing of a kitchen mixer with handle and control panel (no text or symbols)natural_image
Technical line drawing of a mechanical component with circular base and curved side (no text or symbols)natural_image
Mechanical assembly diagram showing a rotating component with a magnified inset view (no text or symbols)natural_image
Technical line drawing of a kitchen mixer with handle and control panel (no text or symbols)natural_image
Mechanical device diagram showing a press or press mechanism with no visible text or symbolsnatural_image
Technical illustration of a mechanical device with a central component and a vertical rod inserted (no text or symbols)natural_image
Technical illustration showing a mechanical assembly with a dial and clamping tool (no text or symbols)natural_image
Mechanical device with a cylindrical component inserted into a dial, showing internal components and motion indicators (no text or symbols)Arbejdsproces
natural_image
Mechanical device with rotating shaft and circular ports, no visible text or symbols
natural_image
3D rendered mechanical component with no visible text or symbolsnatural_image
Illustration of a blender with a measuring tool and control panel (no text or symbols)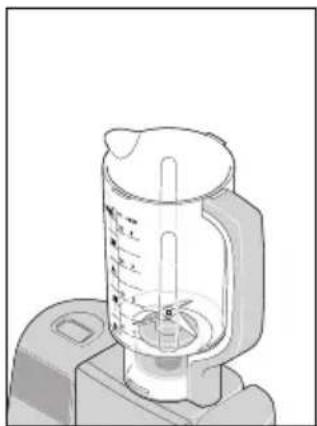
natural_image
Illustration of a blender with a measuring cup and lid (no text or symbols)natural_image
Mechanical assembly diagram showing a lid and kettle with a black arrow indicating a component (no text or symbols present)natural_image
Mechanical component diagram showing a piston-like assembly with a black arrow indicating rotational direction (no text or symbols)Arbejdsproces
natural_image
Mechanical component diagram showing a rotating arm mechanism with no visible text or symbolsnatural_image
Mechanical component diagram showing a rotating arm mechanism (no text or symbols)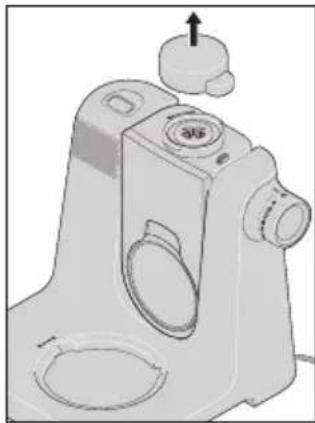
natural_image
3D rendered mechanical component with no visible text or symbolsnatural_image
Technical line drawing of a kitchen mixer with handle and control knob (no text or symbols)natural_image
Technical line drawing of a mechanical component with a circular base and curved side, showing no text or symbols.natural_image
Technical illustration of a mechanical device with a magnified inset showing a component (no text or symbols)natural_image
Technical line drawing of a kitchen mixer with handle and control panel (no text or symbols)natural_image
Mechanical device diagram showing a press or press mechanism with no visible text or symbolsnatural_image
Technical illustration of a mechanical device with a central component and a vertical rod inserted (no text or symbols)natural_image
Diagram showing a mechanical device interacting with a circular component, no text or symbols present
natural_image
Illustration of a kitchen appliance with a circular fan and side blades (no text or symbols)natural_image
Mechanical device with a cylindrical component inserted into a dial, showing internal components and motion indicators (no text or symbols)natural_image
Mechanical component diagram showing a rotating arm mechanism with no visible text or symbols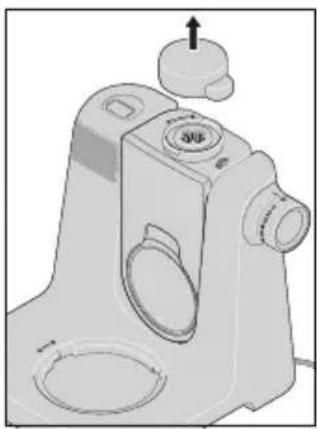
natural_image
Technical illustration of a mechanical device with no visible text or symbolsnatural_image
Illustration of a blender with a lid and base, showing mechanical components (no text or symbols)
natural_image
Illustration of a blender with a measuring cup and lid (no text or symbols)natural_image
Mechanical assembly diagram showing a kettle with a lid and arrow indicating motion direction (no text or symbols)natural_image
Mechanical component diagram showing a piston-like assembly with a black arrow indicating direction (no text or symbols)natural_image
Mechanical component diagram showing a rotating arm with a curved arrow indicating rotation (no text or symbols)natural_image
Technical illustration of a mechanical component with two views (top and side), showing internal parts and a knob (no text or symbols)natural_image
Technical line drawing of a kitchen mixer with handle and control panel (no text or symbols)natural_image
Technical line drawing of a mechanical component with circular base and curved side (no text or symbols)natural_image
Technical illustration of a mechanical device with a dial and mesh component (no text or symbols)natural_image
Technical line drawing of a kitchen mixer with handle and control panel (no text or symbols)natural_image
Mechanical device diagram showing a press or clamping mechanism with no visible text or symbolsnatural_image
Mechanical device diagram showing a cylindrical component with a pointer and a vertical rod above it (no text or symbols)natural_image
Technical illustration showing a mechanical assembly with a circular component and a cylindrical device (no text or symbols present)natural_image
Diagram of a mechanical device with a cylindrical component inserted into a dial, showing internal components and motion indicators (no text or symbols)Munkafolyamat
natural_image
Mechanical component diagram showing a rotating arm mechanism (no text or symbols)
natural_image
3D mechanical component diagram showing a valve mechanism with no visible text or symbolsnatural_image
Illustration of a blender with a measuring tool and control panel (no text or symbols)