
YT-852092 - Robot mower Yato - Free user manual and instructions
Find the device manual for free YT-852092 Yato in PDF.

| Product Type | Robotic Lawn Mower |
| Brand | Yato |
| Model | YT-852092 |
| Rated Voltage | 20 V DC |
| Cutting Width | 180 mm |
| Cutting Height | 20 – 60 mm, adjustable |
| Maximum Working Area | 800 m² |
| Maximum Slope | 36% |
| Blade Rotation Speed | 2800 min⁻¹ |
| Perimeter Wire Length | 170 m |
| Sound Pressure Level (LpA) | 30.74 dB(A) |
| Sound Power Level (LwA) | 51 dB(A) |
| Electrical Insulation Class | III |
| Protection Rating (robot) | IPX5 |
| Protection Rating (charging station) | IPX4 |
| Weight | 7.4 kg |
| Battery Type | Li-Ion |
| Battery Voltage | 18 / 20 V DC |
| Battery Capacity | 4 Ah / 72 Wh |
| Charging Time | 75 min |
| Working Time | 150 min |
| Charging Station – Input Voltage | 20 V DC |
| Charging Station – Input Current | 3 A |
| Charger – Input Voltage | 100 – 240 V~ |
| Charger – Rated Power | 76 W |
Frequently Asked Questions - YT-852092 Yato
User questions about YT-852092 Yato
0 question about this device. Answer the ones you know or ask your own.
Ask a new question about this device
Download the instructions for your Robot mower in PDF format for free! Find your manual YT-852092 - Yato and take your electronic device back in hand. On this page are published all the documents necessary for the use of your device. YT-852092 by Yato.
USER MANUAL YT-852092 Yato
natural_image
Black YATO robotic lawn mower with visible blade and head (no text or symbols on body)CE
natural_image
Line drawing of a pair of scissors with a spool inset showing the same blade (no text or symbols)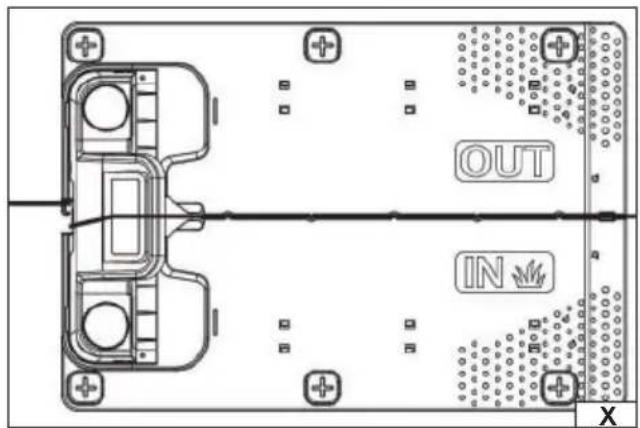
natural_image
Diagram showing a hammer striking down a surface with three droplets, no text or symbols presentPL EN DE RU UA LT LV CZ SK HU RO ES FR IT NL GR BG PT HR AR
natural_image
Line drawing of a hand placing a circular object on a vehicle wheel (no text or symbols)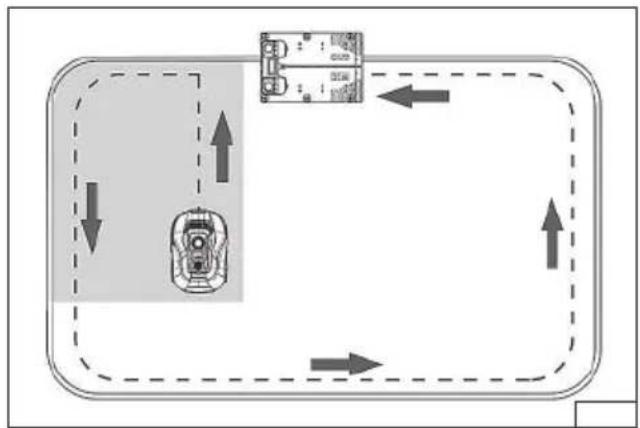
flowchart
graph TD
    A["Top Left Side"] --> B["Left Side"]
    B --> C["Right Side"]
    C --> D["Bottom Right Side"]
    D --> E["Bottom Left Side"]
    E --> F["Left Side"]
    F --> G["Right Side"]
    G --> H["Bottom Right Side"]
    H --> I["Bottom Left Side"]
    I --> J["Left Side"]
    J --> K["Right Side"]
    K --> L["Bottom Right Side"]
    L --> M["Bottom Left Side"]
    M --> N["Left Side"]
    N --> O["Right Side"]
    O --> P["Bottom Right Side"]
    P --> Q["Bottom Left Side"]
    Q --> R["Left Side"]
    R --> S["Right Side"]
    S --> T["Bottom Right Side"]
    T --> U["Bottom Left Side"]
    U --> V["Left Side"]
    V --> W["Right Side"]
    W --> X["Bottom Right Side"]
    X --> Y["Bottom Left Side"]
    Y --> Z["Left Side"]
    Z --> AA["Right Side"]
    AA --> AB["Bottom Right Side"]
    AB --> AC["Bottom Left Side"]
    AC --> AD["Left Side"]
    AD --> AE["Right Side"]
    AE --> AF["Bottom Right Side"]
    AF --> AG["Bottom Left Side"]
    AG --> AH["Left Side"]
    AH --> AI["Right Side"]
    AI --> AJ["Bottom Right Side"]
PL
-
mowing robot
-
charging station
-
power supply
-
station pegs
-
border wire
-
wire pins
-
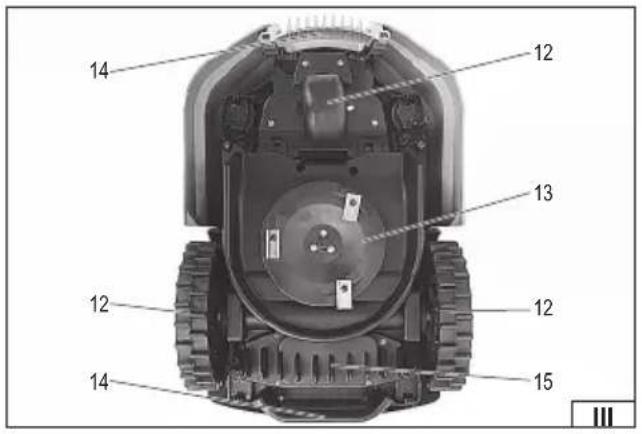
knives
-
screws
-
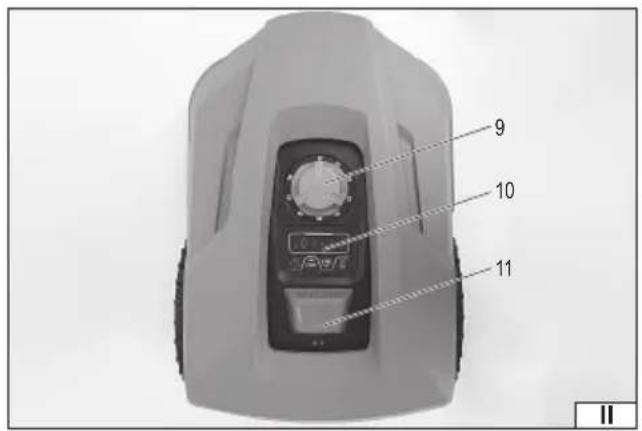
height adjustment knob
-
control panel
-
emergency STOP button
-
wheel
-
knife blade
-
carrying handle
-
battery compartment
DE
Read the operating instruction
Attention - Do not touch the rotating blade!
Beware of ejected objects
Before adjustment, cleaning or maintenance, switch off the device and disconnect it from the charging station.
This symbol indicates that waste electrical and electronic equipment (including batteries and storage cells) cannot be disposed of with other types of waste. Waste equipment should be collected and handed over separately to a collection point for recycling and recovery, in order to reduce the amount of waste and the use of natural resources. Uncontrolled release of hazardous components contained in electrical and electronic equipment may pose a risk to human health and have adverse effects for the environment. The household plays an important role in contributing to reuse and recovery, including recycling of waste equipment. For more information about the appropriate recycling methods, contact your local authority or retailer.
PRODUCT CHARACTERISTICS
The robotic lawnmower is an electronic device designed for automatic lawn care. An adjustable cutting height range and a blade system ensure even mowing within the designated area. The device works with a charging station, to which it automatically returns to recharge its battery, enabling fully autonomous operation. Thanks to wireless connectivity, the robotic lawnmower can be controlled via a mobile app. Proper, reliable, and safe operation of the device depends on proper use, therefore:
Before starting work, read the entire manual and keep it.
The supplier is not liable for any damage or injury resulting from using the product for purposes other than its intended use, or failure to follow safety regulations or the instructions in this manual. Using the product for purposes other than its intended use also voids the user's warranty and guarantee rights.
EQUIPMENT
The product is delivered complete, but requires preparation before use, as described later in this manual. The mowing robot comes with accessories: a charging station with charger, mounting pegs, spare blades and screws, boundary wire, and wire pegs.
TECHNICAL DATA
| Parameter Unit of measurement Value | ||||
| Catalog number YT-852091 YT-852092 YT-852093 | ||||
| Nominal voltage [V DC] 20 20 20 | ||||
| Cutting width [mm] 180 180 180 | ||||
| Cutting height [mm] 20 - 60 20 - 60 20 - 60 | ||||
| Maximum work area [m] | ^2 500 800 1000 | |||
| Maximum slope of the terrain [%] | 36 36 36 | |||
| Rated speed | [min ^-1 ] | 2800 | 2800 | 2800 |
| Length of the border wire | [m] | 130 170 200 | ||
| Noise level | ||||
| - Sound pressure LpA ± K | [dB(A)] | 30,74 ± 3,0 | 30,74 ± 3,0 | 30,74 ± 3,0 |
| - Sound power LwA ± K | [dB(A)] | 51 ± 3,0 | 51 ± 3,0 | 51 ± 3,0 |
| Electrical insulation class | III | III | III | |
| Degree of protection | IPX5 | IPX5 | IPX5 | |
| Mass | [kg] | 7,2 | 7,4 | 7,4 |
| Battery | ||||
| - Battery type | Li-Ion | Li-Ion | Li-Ion | |
| - Rated/maximum voltage | [V DC] | 18 / 20 | 18 / 20 | 18 / 20 |
| - Capacity / Energy | [Ah] / [Wh] | 2 / 36 | 4 / 72 | 5 / 90 |
| - Charging time | [min] 95 75 85 | |||
| - Working time | [min] 80 | 150 165 | ||
| Charging station | ||||
| - Input voltage | [V DC] 20 20 20 | |||
| - Input current | [A] | 1,1 | 3 | 3 |
| - Output voltage | [V DC] 20 20 20 | |||
| - Output current | [A] | 1,1 | 3 | 3 |
| - Electrical insulation class | III | III | III | |
| - Degree of protection | IPX4 | IPX4 | IPX4 | |
| Charger | ||||
| - Input voltage | [V~] | 100 - 240 | 100 - 240 | 100 - 240 |
| - Network frequency | [Hz] | 50 / 60 | 50 / 60 | 50 / 60 |
| - Rated power | [W] | 28 76 76 | ||
| - Output voltage | [V DC] 20 20 20 | |||
| - Output current | [A] | 1,1 | 3 | 3 |
| - Electrical insulation class | II | II | II | |
| - Degree of protection | IP67 IP67 | IP67 | ||
The declared noise emission value has been measured using a standard test method and can be used to compare one tool with another. The declared noise emission value can be used in a preliminary exposure assessment.
EN
Note: Safety measures to protect the operator must be established and are based on an assessment of exposure under actual conditions of use (including all parts of the operating cycle, such as the time when the tool is switched off or idling, and the time of activation).
SAFETY INSTRUCTIONS FOR USING ROBOTIC LAWN MOWERS
IMPORTANT! Read carefully before use and retain for future reference.
Teaching
Before first use, read the entire manual carefully and retain it for future reference. Familiarize yourself with the proper use of the device.
The device must not be operated by children or anyone unfamiliar with the operating instructions. This device is not a toy. The device may be used by children aged 8 years and over and by persons with reduced physical or mental capabilities, provided they have received appropriate training and are under adult supervision. Cleaning and maintenance must not be performed by children.
Never use the mower near other people, especially children or pets. Before starting work, designate a safety zone that is off-limits to people and pets. Schedule the mower for times when people or animals are less active in the garden.
This device is intended solely for automatic lawn mowing in residential environments, within designated work areas. This product must not be used for commercial purposes. Use only as intended and as configured by the manufacturer. Do not transport objects, children, or animals on the device. Do not use the robotic lawnmower for any gardening tasks other than mowing the lawn. Any modifications to the design, safety systems, or software are prohibited.
Use this product only with original accessories supplied by the manufacturer.
Preparation
Always wear protective clothing and footwear when using this product. Do not operate the device barefoot or in open sandals. Avoid wearing worn, loose clothing, or clothing with hanging straps or ribbons. Loose clothing can become caught in moving parts of the device, potentially causing injury.
Thoroughly inspect the area where the machine will be used and remove all objects that could fall into the machine, such as stones, toys, tools, and branches. Caught objects can damage the machine and can also be thrown at high speeds, endangering the operator and the surrounding area.
Define the work area with a boundary wire or virtual boundary system, depending on the product model. Do not route the wire through areas accessible to unauthorized personnel.
Route the work boundary so that slopes, walls, and drop-offs are beyond the robot's reach. In narrow passages, adhere to guidelines regarding minimum widths and boundary wire routing. Otherwise, there is a risk of the robot getting stuck or colliding with obstacles.
Before use, always check the guard, blades, and screws for wear or damage. Replace worn or damaged parts if necessary.
Before use, inspect the power cord and extension cord for damage or wear. If the cord becomes damaged during use, disconnect it from the power source. Do not touch the cord before
EN
disconnecting the power supply. Do not use the appliance if the cord is damaged or frayed.
Make mains connections to a grounded socket with differential protection. Avoid connecting to the mains using low-quality extension cords and power strips.
Installation
Place the charging station on a stable, level surface, in a location that allows for easy entry and exit of the robot. Do not install in puddles, depressions, or flood zones. Keep the station away from heat sources and fl ammable materials.
Install the boundary wire loop according to the instructions. Do not connect the loop to other systems or alter the signal parameters. Secure access to ponds, swimming pools, steep slopes, and roads - route the boundary wire defining the work area so that the robot does not run into obstacles.
Use
Avoid mowing wet grass. Do not use during storms or heavy rainfall. Do not use the mowing robot while the irrigation system is running.
Do not use on excessively steep slopes.
Do not use the device with damaged covers or housings.
Be careful when turning on the appliance and make sure your feet are away from the cutting element.
Do not lift or tilt the machine during start-up or operation. Do not carry the machine with the engine running. If moving the machine is necessary, stop the machine, wait until the blade has come to a complete stop, and then use the carrying handles.
Keep hands and feet away from rotating parts. Do not reach under the housing with hands or feet. Do not touch moving parts.
If necessary, immediately press the emergency STOP button. Then turn off the device and disconnect it from the charging station.
Ensure that all moving parts have stopped before cleaning, inspecting, repairing, or striking the device with a foreign object. Inspect the device for damage and repair if necessary before restarting. If the device begins to vibrate excessively, turn it off immediately and inspect for damage, loose parts, or necessary repairs.
Do not cover the robot or charging station. Do not use near flammable materials. Do not disable or bypass safety systems (sensors, emergency STOP button, locks). Protect your PIN code and anti-theft settings; do not share security information with unauthorized users.
Software updates should only be performed from sources indicated by the manufacturer.
Do not modify the device's built-in radio module or induction loop system.
Maintenance, transport and storage
Maintain all blades and screws in good condition to ensure the unit operates safely.
After finishing work, frequently check the blade guard for wear and damage. Objects caught in the blade can enter the robot at high speeds. This can damage the robot.
Be careful when adjusting the device to avoid getting your fingers caught between the moving blades.
EN
After use, always leave the device turned off to allow it to cool down before using it again. Disconnect the boundary wire from the charging station sockets.
Be careful when handling the blades, even when the drive is disengaged, as the blades may still be rotating. Always wait until the blade blades have come to a complete stop before proceeding.
Replace worn or damaged parts in a timely manner to maintain safety. Use only original spare parts and accessories. Wear protective gloves when replacing blades.
Do not use a high-pressure washer to clean the robot or the charging station.
Before transporting or storing for long periods, clean the robot, secure the blades, and disconnect the charging station and power supply from the mains. Store in a dry place.
Do not leave the battery fully discharged for extended periods. Charge the battery before storing.
Noise-related risks
The device is designed to reduce the risk of user exposure to noise as much as possible. However, it is not possible to completely eliminate these hazards. Furthermore, people in the vicinity of the device are also exposed to noise hazards.
The risk can be reduced by following these guidelines:
- use the product in accordance with its intended purpose as described in the instructions;
- make sure that the device is in good condition and is regularly maintained;
- use appropriate and well-sharpened knives;
- plan your work so that you can take frequent breaks.
Residual risk
Even if all safety precautions are followed during operation, a potential risk of injury remains. Due to the product's design, hazards and injuries may still occur due to improper operation, improper maintenance, or unexpected impact from thrown objects.
Battery Charging Safety Instructions
Warning! Before charging, make sure the power supply body, cable, and plug are not cracked or damaged. Do not use a faulty or damaged charging station and power supply! Only use the charging station and power supply provided with the battery to charge the battery. Using a different power supply or charging station may cause a fire or damage to the tool. Do not charge the battery near heat sources and do not cover the charging station and power supply. Charge the battery only in a dry, ventilated place, out of reach of unauthorized persons, especially children. Do not use the charging station and power supply without constant adult supervision! If you need to leave the charging area, disconnect the charging station by unplugging the power supply from the wall socket. If smoke, an unusual odor, etc. are emitted, immediately disconnect the charging station and power supply from the power source.
The device is shipped with an uncharged battery, so before use, it should be charged according to the procedure described below using the included charging station and power supply. Li-ion batteries do not exhibit the so-called „memory effect,” allowing them to be recharged at any time. However, it is recommended to discharge the battery during normal operation and
EN
then charge it to full capacity. If, due to the nature of the operation, this is not possible every few or a dozen cycles, it should be recharged at least every few to a dozen cycles. Under no circumstances should batteries be discharged by shorting the electrodes, as this causes irreversible damage! Also, do not check the battery's charge status by shorting the electrodes and checking for sparks.
Do not disassemble or puncture the battery casing. Do not throw the battery into a fire. Immediately remove a damaged, swollen, or overheated battery from use and take it to a service center or recycling center.
Battery storage
To extend the battery's lifespan, ensure proper storage conditions. The battery can withstand approximately 500 charge-discharge cycles. The battery should be stored in a temperature range of 0 to 30 degrees Celsius, with a relative humidity of 50% . For long-term storage, charge the battery to approximately 80% capacity. For longer-term storage, recharge the battery periodically, approximately once a year. Avoid over-discharging the battery, as this will shorten its lifespan and may cause irreversible damage.
During storage, the battery will gradually discharge due to leakage. The self-discharge process depends on the storage temperature; the higher the temperature, the faster the discharge. Improper storage of batteries can result in electrolyte leakage. In the event of a leak, contain the leak with a neutralizing agent. If electrolyte comes into contact with eyes, rinse thoroughly with water and seek immediate medical attention. Do not use a tool with a damaged battery.
When the battery is completely worn out, it should be taken to a specialist waste disposal facility.
Battery transportation
Lithium-ion batteries are legally considered hazardous materials. The user of the device with the battery can transport it by road. No additional requirements are required. If transport is outsourced to third parties (e.g., by courier), the regulations regarding the transport of hazardous materials must be followed. Before shipping, please consult a qualified person.
It is prohibited to transport devices with damaged batteries. During transport, removed batteries must be removed from the tool and exposed contacts must be protected, for example, with insulating tape. Batteries must be secured in the packaging so that they do not shift within the packaging during transport. National regulations regarding the transport of hazardous materials must also be observed.
PRODUCT SERVICE
Preparing for work
The product should be unpacked and all packaging materials removed. It is recommended that you retain all packaging materials for future use during transportation or storage.
Check that no parts of the product have been damaged during transport. Any damage observed, such as cracks or deformation, will disqualify the product from further use until the damaged parts are repaired or replaced.
It is recommended to place all parts on a flat, hard and clean surface.
During installation, personal protective equipment such as protective clothing, gloves and eye protection should be worn.
Note: Before installing the device, make sure it is turned off and disconnected from the charging station.
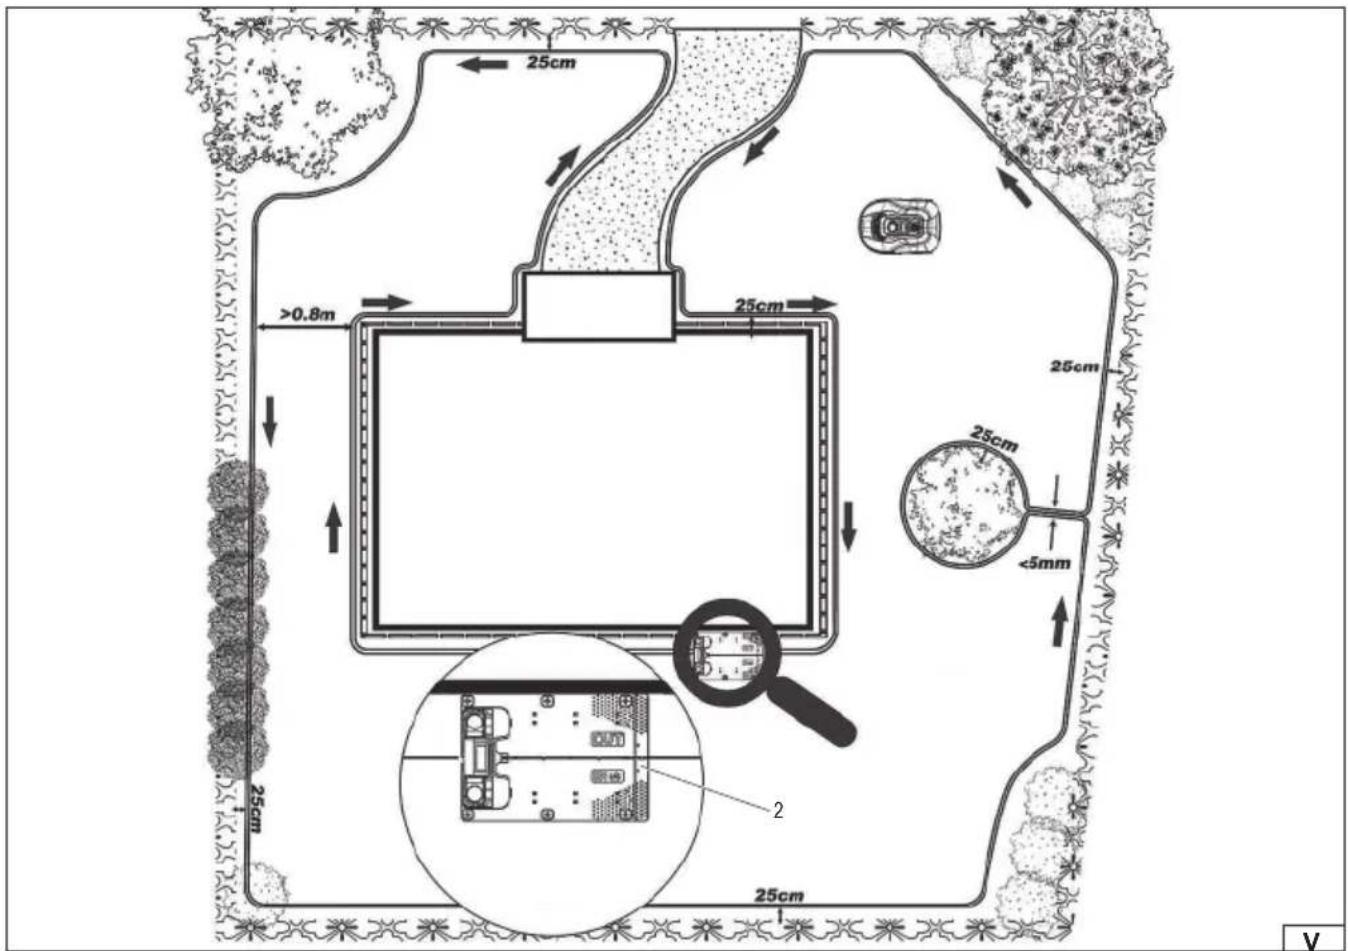
Installing the charging station (V)
The charging station can be placed near your home or garage, close to a power source. When laying the boundary wire, leave
EN
at least 1m of straight section free of corners and obstacles in front of the charging station to allow the robot to park properly in the station (VI).
The charging station must be placed on a level surface. It cannot be placed on a sloped surface or in any location where its components may bend. It is recommended that the charging station be located within the range of a wireless network to ensure proper communication with the mowing robot.
It is recommended that the power supply be placed on the wall at least 30 cm high, and its cable routed outside the mower's operating area. Ensure the power supply cable is not tangled or stretched.
The charging station can be equipped with the YT-852094 garage (available separately), i.e. a roof that provides additional protection for the station and the mowing robot against rain and external factors.
Installation of the boundary wire
Lay the boundary wire in a loop around the working area. Remember to maintain a distance of 25 cm between the wire and any wall or other obstacles (VI). For this purpose, you can use the included measuring tape (VII), which should be cut out from the packaging. If the obstacle is level with the lawn and the mower can safely pass over it, such as a driveway or sidewalk, an 8 cm gap between the obstacle and the boundary wire (VIII) is sufficient.
Strip approximately 10 mm of insulation from one end of the boundary wire (IX). Connect one end of the boundary wire to the RED terminal (OUT wire output), then feed the wire through the slot in the charging station base (X).
Cut off the excess wire. Strip approximately 10 mm of insulation from the other end of the wire, then connect it to the BLACK terminal (IN wire input).
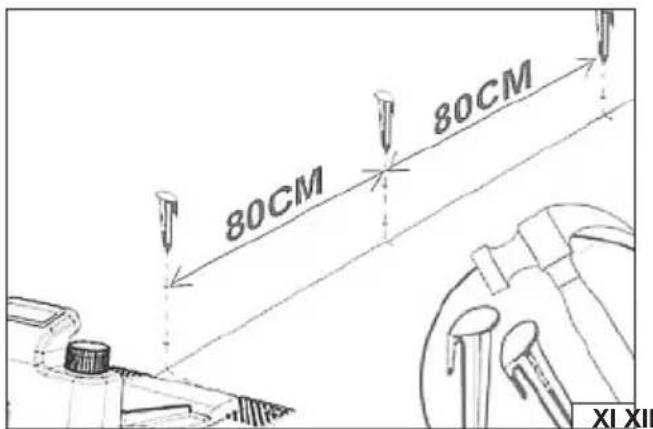
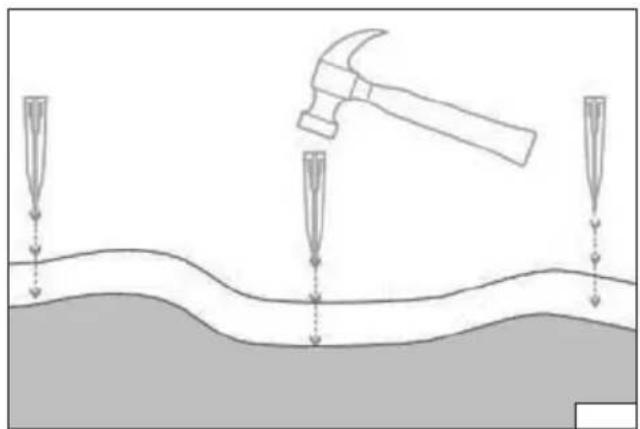
After laying the boundary wire loop, secure it to the ground using pegs. Drive the pegs approximately 80 cm apart (XI), using a hammer (available separately) (XII).
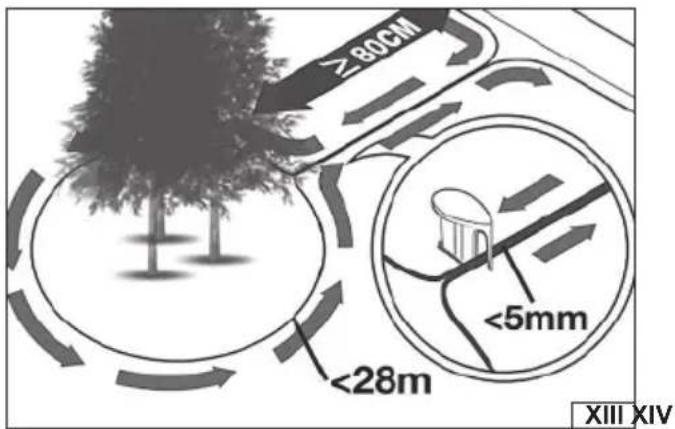
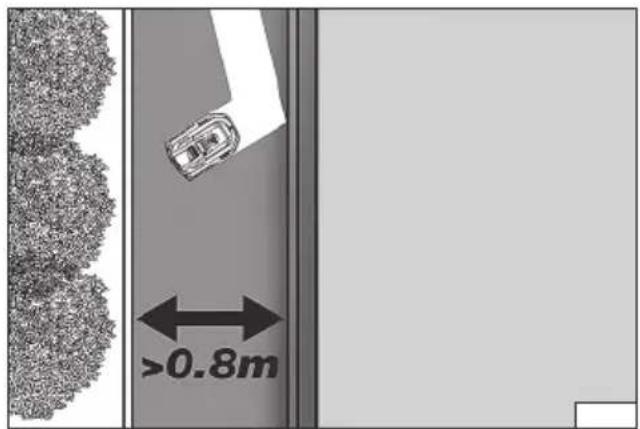
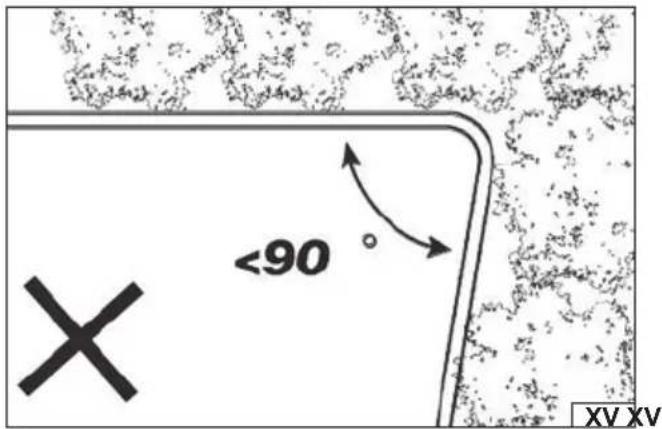
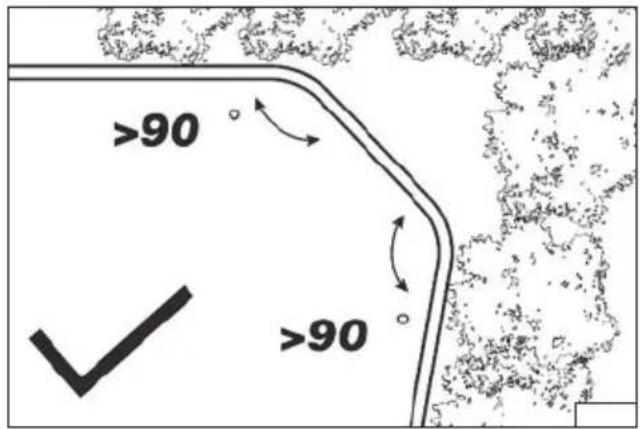
To avoid obstacles, shrubs, or trees, you can lay the boundary wire in an island shape (XIII). Remember to maintain a minimum width of 0.8 m (XIV) for the robotic lawnmower to navigate. At corners, the boundary wire should form an angle of 90 degrees or greater to allow the robot to pass smoothly (XV).
If the cable is laid on a sloping area, please note that the maximum slope can be 36%.
If necessary, the set can be equipped with additional accessories (available separately): boundary wire YT-852095, wire pins YT-852097, wire connectors YT-852098.
Charging the battery
Note: Before connecting the power supply to the mains, ensure that the boundary wire is correctly routed and that the power supply is properly connected to the charging station. Clean the charging station and its terminals of any dirt and dust using a soft, dry cloth.
The device has a built-in battery charge indicator - an indicator light marked with a battery symbol. The more indicator lights, the more charged the battery. If the indicator lights are off, it means the battery is discharged.
Connect the power supply to the charging station and then the power supply to a power outlet.
Note: If the green LED lights up after connecting the charging station to the mains, it indicates the battery is fully charged. In this case, charging will not begin.
Plug the power adapter into an outlet. The LED indicator on the charging base will glow bright green. The color of the indicator light can indicate different robot statuses, as shown in the table:
| LED indicator light Meaning Solution | ||
| It doesn’t light up No power | Check that the power supply is properly connected to the power station and to the power source. | |
| Steady green light The robot’s battery is fully charged - | ||
| Green flashing light The robot’s battery is charging - | ||
| Red flashing light | The boundary wire is not connected properly or has been broken. | Check that both ends of the boundary wire are properly connected to the charging station sockets. Check that the wire is not broken. |
Note: To reduce power consumption, the boundary wire signal is disabled while the battery is charging. The signal will be restored when the robot leaves the charging station. To extend battery life, the charging station will stop charging after the battery reaches 100% and resume charging when the voltage drops to 95%.
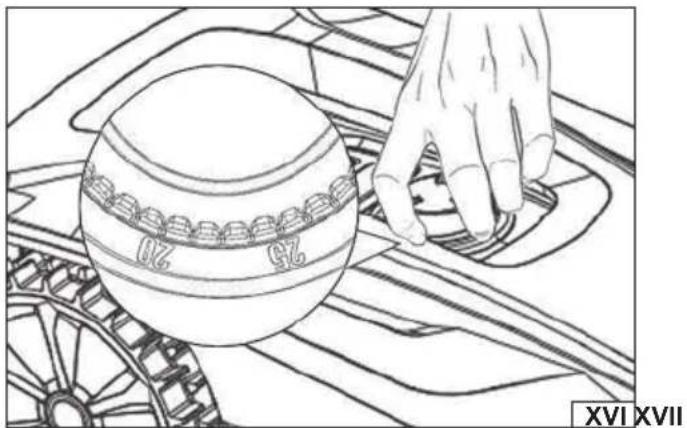
Setting the cutting height (XVI)
The robotic lawnmower is equipped with a knob that allows you to quickly and easily adjust the cutting height. Turn the knob to set the desired height. The arrow on the knob indicates the current height.
Warning! If you need to change the cutting height while operating, always turn off the machine first, wait for the blade to stop rotating, and then proceed to change the cutting height. Accidentally engaging the blade while changing the cutting height can result in serious injury.
Working with a mowing robot
Before starting work, prepare the area to be cut. Check that the mowing area is free of any obstacles that could be caught in the
EN
blade and damaged or thrown, posing a hazard to the operator or bystanders.
Check the work area for electrical cables that could be cut by the blade. Damage to an electrical cable creates a shock hazard, which could result in serious injury or death.
Make sure that no bystanders, especially children or pets, are present in the work area. If such persons appear during operation, immediately stop the machine and warn those present of the hazard.
Check the grass length and adjust the mowing height. Never cut more than 1/3 of the grass length. If the grass is very tall, cut it in stages. Mow regularly, ensuring that the grass height does not exceed the mower's capacity.
Never cut wet grass. Wet grass tends to stick inside the blade chamber, which can impair the robotic lawnmower's proper operation. Wet grass can also cause the user to slip and fall.
Inspect all components of the robotic lawnmower before use. If damage is observed, do not attempt to operate the mower until it has been repaired or replaced. Check that the ventilation openings are clear. If necessary, clean them with a soft brush or paint-brush. Do not use sharp or metal objects.
Check screw connections for looseness. Tighten if necessary.
Check that the transport handles are clean and free of grease and other contaminants. If necessary, clean them with a soft cloth. During operation, the operation of the device should be checked regularly to reduce the risk of accidents.
After finishing work, turn off the device, wait for the blade to stop and the device to cool. Before performing maintenance.
Warning! If a foreign object strikes the robot during operation, immediately turn off the device, wait for the blade to stop and the mechanism to cool. Then, inspect the device for damage. If damage is detected, do not continue operation until it has been repaired. Excessive vibration during operation may be caused by damage to the robot. Stop operation, turn off the device, and inspect the product.
Connecting to a wireless network
Install the dedicated mobile app on your smartphone by scanning the QR code included in the manual, appropriate for your operating system. Follow the prompts displayed in the app to connect the device to your wireless network.
Starting the mowing robot
Place the robotic lawnmower on a flat, even, and firm surface. Make sure the working area is free from any obstacles that the blade could contact.
The tool is battery powered and will not start if the battery is dead or incorrectly installed.
When starting the mower for the first time, check that the working area is properly connected. Set the cutting height to the maximum setting (60 mm). Place the mowing robot within the working area.
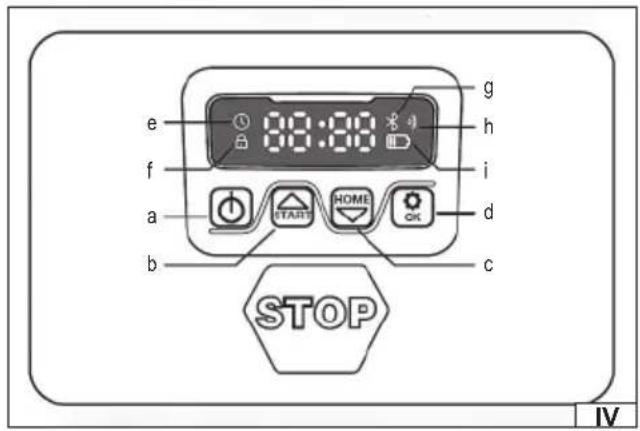
Press the power button (a) on the control panel (IV) to turn on the device. For first-time use, enter the PIN code 0000 by pressing the OK button four times while each 0 flashes on the display. The PIN code can be changed. The PIN code change procedure is described later in this manual. If the PIN code is entered incorrectly 10 times in a row, an alarm will sound and the robot will shut down.
Note: The robot will turn off automatically if no additional action is taken after turning the device on with the power switch.
Press the START button and then OK to start the robot.
Press the HOME button and then OK to park the robot in the charging station.
The robotic lawnmower will operate continuously until its battery is depleted. At that point, it will return to the charging station. Once charging is complete, the robot will automatically resume mowing or remain in the charging station, according to the set mowing schedule.
SETTINGS
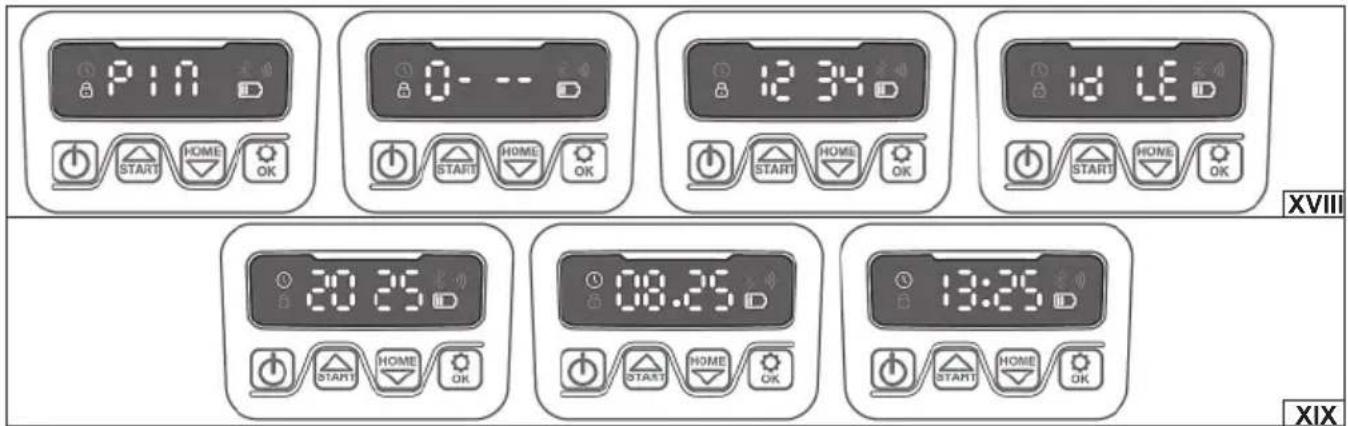
Changing your PIN (XVIII)
To change your PIN, press and hold the START and HOME buttons for 3 seconds. The padlock symbol will flash on the display. PIN1 will appear on the display, indicating that you need to enter your current PIN. Use the up and down arrow keys to enter the digits of your current PIN, confirming each digit with the OK button. PIN2 will appear on the display, indicating that you need to enter a new PIN. Enter your new PIN. The IdLE symbol will appear on the display, confirming that the new PIN has been set correctly.
Change of date and time (XIX)
Correctly setting the date and time allows you to enter the mowing robot's work schedule. To set the year, press and hold the START button for 5 seconds until the clock symbol and year digits appear on the display, e.g., 2025. Use the up and down arrow keys to enter the year digits. Confirm your selection with the OK button. The month and day digits will then appear on the display, e.g., 08:25. Enter the month and day digits and confirm your selection with the OK button. The month and day digits will then appear on the display, e.g., 08:25. Enter the month and day digits and confirm your selection with the OK button. The time digits will then appear on the display, e.g., 13:25. Enter the hours and minutes and confirm your selection with the OK button. The IdLE symbol will then appear on the display, confirming that the new date and time have been set correctly.
Changing the mowing start time
The default mowing start time is 9:00 a.m. To change it, press and hold the START button and the button with the settings symbol for 3 seconds.
Use the up and down arrow keys to enter the time digits and press OK to confirm. The IdLE symbol will appear on the display and a beep will sound, confirming that the new default mowing start time has been set correctly.
EN
Changes in daily mowing time
The default daily mowing time is 8 hours. The operating hours range from 1 to 24 hours. To change the operating time, press and hold the settings button for 3 seconds.
Use the up and down arrow keys to enter the operating hours and confirm with the OK button. The IdLE symbol will appear on the display and a beep will sound, confirming that the new default daily mowing time has been set correctly.
Change in the number of working days per week
The default number of days the robot works per week is 5. You can choose from 3, 5, or 7. To change the number of days, press and hold the settings button for 3 seconds.
Use the up and down arrow keys to enter the number of operating hours and confirm your selection with the OK button. The IdLE symbol will appear on the display and a beep will sound, confirming that the new default number of operating days per week has been set correctly.
Changing the rain sensor setting
The rain sensor allows the robot to automatically stop mowing and park in the charging station when rainfall is detected. The time after which the robot resumes operation can be set in the mobile app.
Press and hold the HOME button for 3 seconds. The display will show RAIN - rain sensor settings. Press OK to open the settings menu. On the display, you can select ON (enabled) or OFF (disabled) and confirm your selection by pressing OK.
Changing the multi-zone setting
The multiple zones feature allows you to start mowing sequentially from different starting points. Custom starting points can be set in the mobile app by selecting a percentage of the boundary wire length. For example, setting a value of 40% for zone one means the robot will first mow the area 40% of the boundary wire's length, followed by the remaining areas of the lawn. Models YT-852091 and YT-852092 allow you to set 2 starting points, while the YT-852093 allows you to set 4 starting points.
Hold the HOME button for 3 seconds. RAIN will appear on the display. Use the up and down arrow buttons to toggle the setting to ZONE (multi-zone function). Press OK to open the settings menu. On the display, you can select ON (enabled) or OFF (disabled) and confirm your selection by pressing OK.
Software update
You can update the device's software to the latest version using the mobile app. The robot is equipped with FOTA (Firmware Over The Air) functionality, which allows for wireless software updates. To update, ensure the robot is connected to a wireless network and follow the steps described in the app.
PRODUCT MAINTENANCE
Note: Before performing any maintenance, ensure the product is turned off and disconnected from the charging station.
Always wear protective gloves during all maintenance activities.
If any maintenance operation is not described in the manual, it means that it should be performed at an authorized manufacturer's service center.
The product should be cleaned after each use. Remove grass debris with a soft brush, paintbrush, or cloth. Clean the ventilation holes, ensuring they are unobstructed. More stubborn dirt can be removed with an air jet at a pressure of no more than 0.3 MPa. Never use chemicals, alkaloids, abrasives, or aggressive detergents to clean the product. The product must not be cleaned with a water jet or by immersing it in water.
Check the wear and damage of the robotic lawnmower's blades. If excessive wear or damage is observed, replace the blades. Always replace the blade with an original one, identical to the one originally installed on the device. Only using original spare parts ensures product safety. Blade replacement should be performed by an experienced user. If in doubt, contact an authorized manufacturer's service center.
Using a screwdriver, unscrew the knife retaining screw. Remove the old knife. Clean the knife mounting if necessary. Install the new knife, paying attention to the blade direction. Secure the knife by tightening the screw firmly. Always replace the knife set to ensure smooth operation of the rotating blade. If necessary, the set can be supplemented with additional YT-852096 knife sets (available separately).
After each use and cleaning of the blades, coat the cutting edges with a thin layer of light machine oil. This will reduce corrosion and extend the blades' life. If mowing is done daily, the blades should be replaced every six weeks. This will ensure proper operation of the robotic lawnmower and an evenly mowed lawn.
After use, clean the device of grass and debris. Be especially careful to clean the wheels to prevent them from blocking or restricting the device's mobility.
If the charging station power supply cable is damaged, it must be replaced by an authorized manufacturer's service center. The cable cannot be repaired and must be replaced. Working with a damaged cable is prohibited.
PRODUCT STORAGE AND TRANSPORT
Note: Always turn off and unplug the product before storing or transporting it. Clean according to the instructions.
Store in a dark, dry, and well-ventilated area. Keep out of reach of children. Store the product at a temperature between 10 and 30 degrees Celsius. It is recommended to store the product in its original packaging or in other dust-protective packaging.
EN
Before transporting the product, set the cutting height to the highest setting. Transport the product by its handles. During transport, protect the product from impacts and strong vibrations. Secure the product to prevent slipping or tipping during transport.
Troubleshooting
Below is a table of problems and their possible solutions:
| Error code Cause Solution | ||
| E1 | The mowing robot is outside the working area | 1. Place the mowing robot inside the working area.2. Check that the wires are properly installed in the socket with the red and black connectors.3. If the error persists, contact the manufacturer's service center. |
| E2 Wheel drive blocked | 1. Turn off the device and move it to an area free of obstacles.2. Turn on the device and press START and then OK.3. If the error persists, turn off the device, turn the robot so that the blade is facing up and check whether there is anything blocking the rotation of the wheels.4. Remove the blocking factor, turn the robot into the working position, turn on the device and press START and then OK. | |
| E3 Blocked rotation of the cutter head | 1. Turn off the device.2. Turn the robot over so that the blade is facing up and check for any obstructions in the blade head's rotation. If the head or motor is damaged, contact the manufacturer's service center.3. Remove the blocking factor.4. Turn the robot into working position and move it to a working area with shorter grass or increase the cutting height.5. Turn on the device and press START and then OK. | |
| E4 Crash sensor still active | 1. Turn off the device.2. Move the robot to an area free of obstacles.3. Remove the top cover and check the magnets on the inside of the cover. If any magnets are missing, contact the manufacturer's service center.4. If the magnets are properly installed, check that the rubber connection between the cover and the mowing robot is secure. If it is loose, tighten it.5. Turn on the device and press START and then OK. | |
| E5 The mowing robot is raised | 1. Turn off the device.2. Move the robot to an area free of obstacles.3. Turn on the device and press START and then OK.4. If the error persists, turn off the device.5. Turn the robot over with the blade facing up and check if there is anything causing the front wheel to slip.6. Remove the blockage and turn the robot into the working position. Turn on the device and press START and then OK. | |
| E6 The robot is turned with the blade facing up | 1. Turn the robot into the working position.2. Turn on the device and press START and then OK.3. If the error persists, contact the manufacturer's service center. | |
| E7 Tilt sensor always active | 1. Turn off the device.2. Check that the slope of the working area does not exceed the permissible limit.3. Move the robot to a fl at area.4. Turn on the device and press START and then OK.5. If the error persists, contact the manufacturer's service center. | |
| E8 Parking error at charging station | 1. Check that there is 1m of free space in front of the charging station.2. Check that the charging station is placed on a fl at, even surface.3. Check that the charging station is not crooked.4. If the error persists, contact the manufacturer's service center. | |
| E9 The mowing robot is stuck in place | 1. Move the robot to an area free of obstacles.2. If the error persists, contact the manufacturer's service center. | |
| BP Battery protection | 1. Check the battery temperature. If it is too high, wait until it cools down. If it is too low, wait until the temperature is above 5°C.2. If the error persists, contact the manufacturer's service center. | |
| E11 No signal on the boundary wire | 1. Place the robotic lawnmower inside the working area. Check the indicator light on the charging station. If it is red, it means that the boundary wire is not properly connected to the charging station.2. If the cable is connected correctly and the light is still red, check whether the cable is broken.3. If the error persists, contact the manufacturer's service center. | |
| E12 Battery problem Please contact the manufacturer's service center. | ||
| E13 Loading problem | 1. Check if the charging socket is dirty.2. If the error persists, contact the manufacturer's service center. | |
| E14 Exceeding the workspace | 1. Reduce the working area to the size indicated in the instructions.2. If the error persists, contact the manufacturer's service center. | |
| EE Unknown problem | 1. Turn the device off and on again.2. If the error persists, contact the manufacturer's service center. | |
| LOCK Constantly entering the wrong PIN | 1. Leave the device turned on for 10 minutes.2. After 10 minutes, you can enter your PIN again.3. If you have forgotten your PIN code, please contact the manufacturer's service center. | |
PRODUKTMERKMALE
PRODUKTA RAKSTUROJUMS
CARACTÉRISTIQUES DU PRODUIT
PRODUCTOPSLAG EN TRANSPORT
DECLARATION OF CONFORMITY
0925/YT-852091/EC/2025
We declare and guarantee with full responsibility that the following products:
Robotic lawn mower; 20 V DC; 2800 min ^-1 ; 180 mm; item no. YT-852091
Robotic lawn mower; 20 V DC; 2800 min ^-1 ; 180 mm; item no. YT-852092
Robotic lawn mower; 20 V DC; 2800 min ^-1 ; 180 mm; item no. YT-852093
meet requirements of the following European Standards / Technical Specifications:
EN 50636-2-107:2015 + A1:2018 + A2:2020 + A3:2021 |
EN 60335-1:2012 + A11:2014 + A13:2017 + A1:2019 + A2:2019 + A14:2019 + A15:2021 | EN 301 489-1 V2.2.3 |
EN 301 489-3 V2.3.2 | EN 301 489-17 V3.3.1 | EN 303 447 V1.1.1 | EN 303 447 V1.3.1 | EN 300 328 V2.2.2 |
EN IEC 62311: 2020 | EN 62233:2008 | EN IEC 55014-1:2021 | EN IEC 55014-2:2021 | EN IEC 61000-3-2:2019 + A1:2021 |
EN 61000-3-3:2013 + A1:2019 + A2:2021 | EN IEC 60335-2-29:2021 + A1:2021
and fulfill requirements of the following European Directives:
2006/42/EC Machinery and safety elements
2014/53/EU RED
2011/65/EU Restriction of the Use of Certain Hazardous Substances
2014/35/EU Low voltage directive
2014/30/EU Electromagnetic compatibility (EMC) Directive
No. 1907/2006 REACH
Serial number: concern all serials numbers of item(s) mentioned in this declaration
The person authorized to compile the technical file:
Agnieszka Rędziak
(Place and date of issue)
V-CE PREZES ZARZADU
JAN SZMIDT
(Name and signature of authorized person)
TOYA S.A.
DECLARATION OF CONFORMITY
0925/YT-852091/EC/2025
We declare and guarantee with full responsibility that the following products:
Robotic lawn mower; 20 V DC; 2800 min ^-1 ; 180 mm; item no. YT-852091
Robotic lawn mower; 20 V DC; 2800 min ^-1 ; 180 mm; item no. YT-852092
Robotic lawn mower; 20 V DC; 2800 min ^-1 ; 180 mm; item no. YT-852093
fulfil requirements of the following European Directive: 2000/14/WE
Conformity assessment procedure:
Manufacturer quality-control system, examination of the manufacturer's technical file and periodical inspection by notified body
Notified body:
Measured sound power level on an equipment representative for this type: 51 dB(A)
Guaranteed sound power level for this equipment: 55 dB(A)
conformity and references of the other Community Directives applied:
2006/42/EC Machinery and safety elements
2014/53/EU RED
2011/65/EU Restriction of the Use of Certain Hazardous Substances
2014/35/EU Low voltage directive
2014/30/EU Electromagnetic compatibility (EMC) Directive
No. 1907/2006 REACH
Wrocław, 2025.09.11
(Place and date of issue)
V-CE PREZES ZARZADU
JAN SZMIDT
(Name and signature of authorized person)
TOYA S.A.
