YT-82076 - Cordless drill Yato - Free user manual and instructions
Find the device manual for free YT-82076 Yato in PDF.

| Product type | Cordless drill (screwdriver) |
| Brand | Yato |
| Model | YT-82076 |
| Rated voltage | 18 V DC |
| No-load speed | 0 - 4000 min⁻¹ |
| Tool holder | Hexagonal 6.35 mm (1/4") |
| Weight | 1.49 kg |
| Battery | Li-ion 18 V, capacity 4 Ah (not included, sold separately) |
| Charger | Input 200-240 V~, 50/60 Hz, output 21.5 V DC / 2.2 A (not included, sold separately) |
| Sound pressure level | 72 dB(A) ± 3 |
| Sound power level | 80 dB(A) ± 3 |
| Vibration level | 1.63 m/s² ± 1.5 |
| Protection degree | IPX0 |
| Compatible screw strip size | Diameter 3.5 - 4.2 mm, length 25 - 55 mm |
| Main functions | Screwing and unscrewing, reversible rotation direction, switch lock, overload clutch |
| Supplied equipment | Two heads (for single screws and strip), screwdriver bits, extension adapter |
| Safety | Wear protective glasses and gloves; use on insulated gripping surfaces |
| Maintenance | Clean with air jet (≤0.3 MPa), brush or dry cloth; do not use chemicals |
| Repairability | Repairs by authorized workshop with original parts only |
Frequently Asked Questions - YT-82076 Yato
User questions about YT-82076 Yato
0 question about this device. Answer the ones you know or ask your own.
Ask a new question about this device
Download the instructions for your Cordless drill in PDF format for free! Find your manual YT-82076 - Yato and take your electronic device back in hand. On this page are published all the documents necessary for the use of your device. YT-82076 by Yato.
USER MANUAL YT-82076 Yato
NL ACCU BANDSCHROEFMACHINE
natural_image
Exterior view of a YATO-based electric drill putter with attached power cord (no text or symbols visible)CE
PL EN DE RU UA LT LV CZ SK HU RO ES FR IT NL GR BG PT HR AR
natural_image
Close-up of a drill bit with a pointed tip, shown from two angles (no text or symbols visible)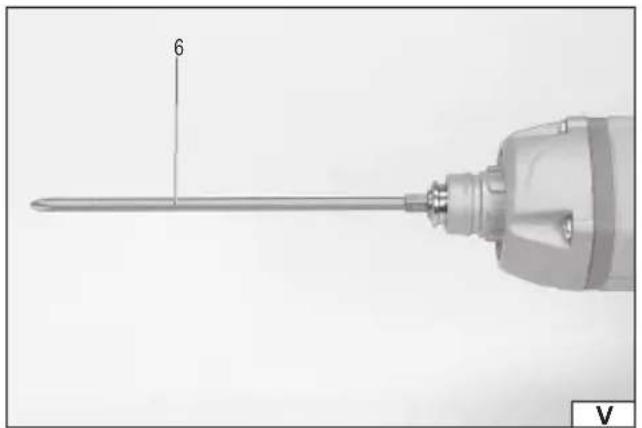
natural_image
Close-up of a screwdriver with a pointed tip and a cylindrical head, no visible text or symbols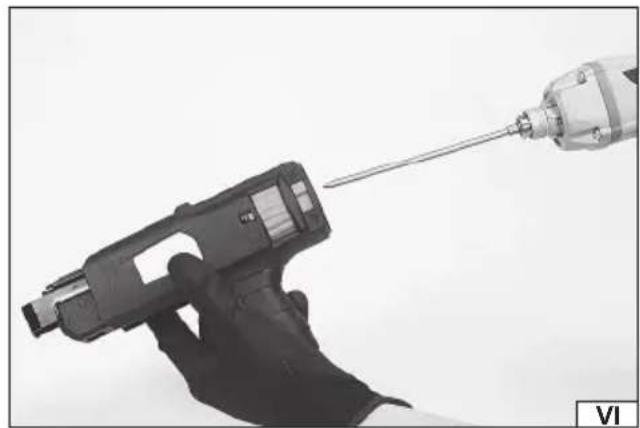
natural_image
Close-up of a hand holding a handheld tool with a drill bit being inserted (no visible text or symbols)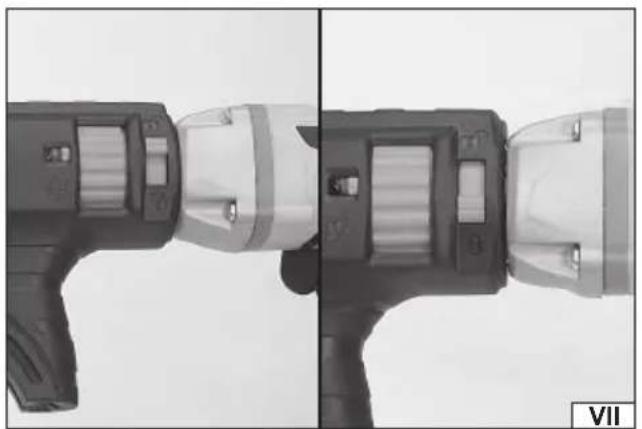
natural_image
Close-up of a handheld device with transparent lens and black handle, showing internal components (no visible text or symbols)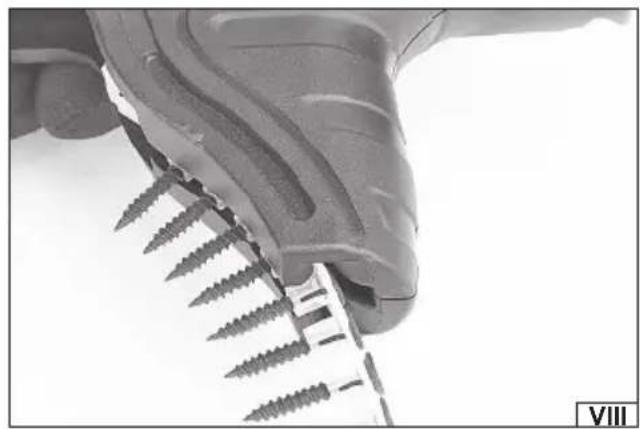
natural_image
Close-up of a hand holding a screwdriver, showing teeth and metal fasteners (no text or symbols visible)natural_image
Exterior view of a handheld electric gun with spiked arm (no text or symbols visible)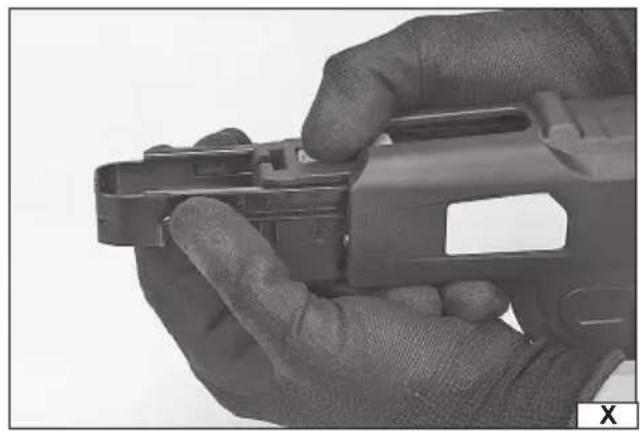
natural_image
Close-up of a hand holding a handgun, showing mechanical components and grip (no text or symbols visible)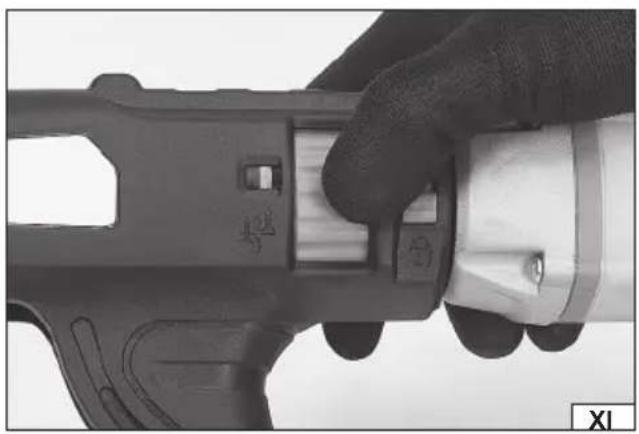
natural_image
Close-up of a hand holding a firearm with a wrist strap (no visible text or symbols)
natural_image
Close-up of a hand holding a handheld tool with black gloves and a white base (no visible text or symbols)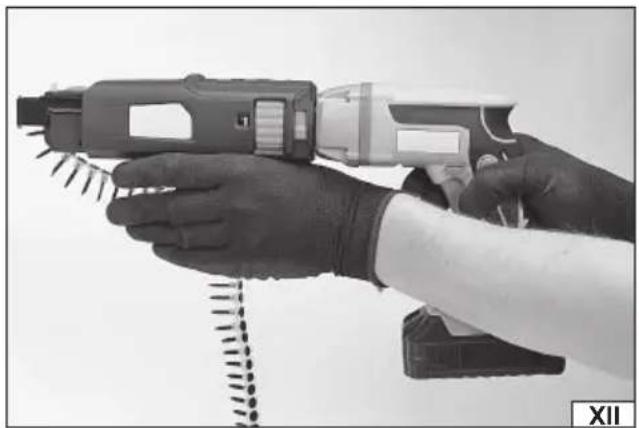
natural_image
Close-up of a gloved hand holding a handheld electric shaver tool, with pins inserted (no visible text or symbols)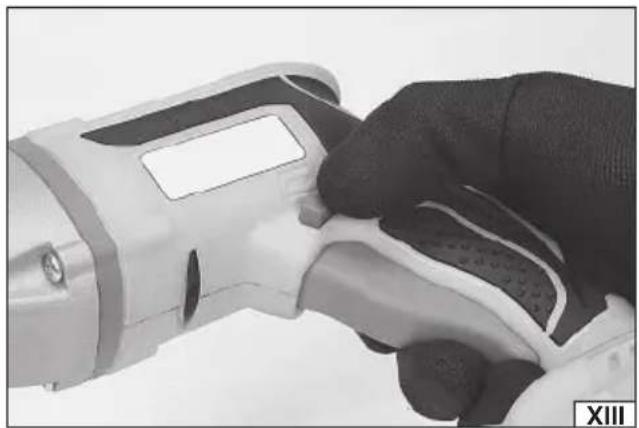
natural_image
Close-up of a hand holding a handheld electric shaver (no visible text or symbols)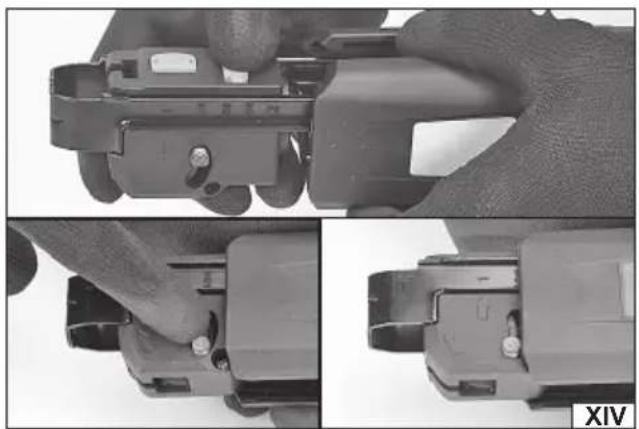
natural_image
Close-up of hands adjusting a mechanical component, showing three views (top, front, side) with no visible text or symbols.PL
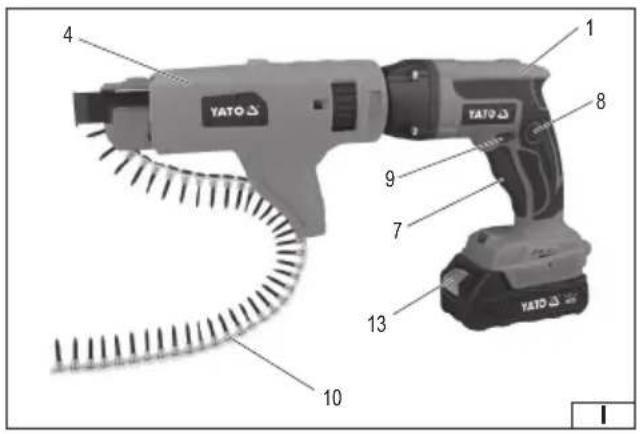
- screwdriver
- tool holder
- single screw attachment
- tape screw attachment
- extension adapter
- screwdriver bit
- electric switch
- switch lock
- direction of rotation switch
- screw tape
- battery charger
- battery charge indicator
- battery latch
DE
Read the operating instruction
Wear protective goggles
This symbol indicates that waste electrical and electronic equipment (including batteries and storage cells) cannot be disposed of with other types of waste. Waste equipment should be collected and handed over separately to a collection point for recycling and recovery, in order to reduce the amount of waste and the use of natural resources. Uncontrolled release of hazardous components contained in electrical and electronic equipment may pose a risk to human health and have adverse effects for the environment. The household plays an important role in contributing to reuse and recovery, including recycling of waste equipment. For more information about the appropriate recycling methods, contact your local authority or retailer.
YT-828500, YT-828501, YT-828502, YT-828503, YT-828504
A cordless screwdriver is a tool designed for screwing and unscrewing screws using commercially available screwdriver bits. It is possible to screw in plasterboard, wood and wood-based materials. The correct, reliable and safe operation of the tool depends on proper use, therefore:
Before using the tool, read the entire manual and keep it.
The supplier is not liable for any damage resulting from failure to comply with the safety regulations and recommendations of this manual.
EQUIPMENT
The tool is equipped with two heads for working with single screws and for working with screws in a tape. The equipment includes screwdriver bits designed to work with both types of heads. The equipment does not include screws.
Note! The YT-82075 product is supplied with one battery and a charging station. The product with the catalog number: YT-82076 is not supplied with a battery and a charging station.
TECHNICAL PARAMETERS
| Parameter Unit of measurement Value | ||
| Catalogue number YT-82075, YT-82076 | ||
| Operating voltage [V] 18 DC | ||
| Rated speed [min | ^-1 ] 0 - 4000 | |
| Noise level | ||
| - Sound pressure L_pA ± K_pA | [dB(A)] 72 ± 3 | |
| - Sound power L_wA ± K_wA | [dB(A)] 80 ± 3 | |
| Vibration level a _H ± K [m/s | ^2 ] 1.63 ± 1.5 | |
| Degree of protection IPX0 | ||
| Mass [kg] 1.49 | ||
| Tool holder [mm / °] hexagonal 6.35 / 1/4 | ||
| Screw size on tape ( diameter x length) | [mm] | 3.5 - 4.2 x 25 - 55 |
| Battery* | ||
| - Type | Li-Ion | |
| - Capacity | [Ah] | 4 |
| - Charging time** | [h] | 2 |
| Charger* | ||
| - Input voltage | [V~] | 200 - 240 |
| - Network frequency [Hz] | 50/60 | |
| - Rated current | [A] | 1.5 |
| - Output voltage | [V] | 21.5 DC |
| - Output current | [A] | 2,2 |
* only for models equipped with a battery and charger
** the charging time given applies only to the battery capacity listed in the table
The declared noise emission value has been measured using a standard test method and can be used to compare one tool with another. The declared noise emission value can be used in a preliminary exposure assessment.
The declared vibration total value has been measured using a standard test method and can be used to compare one tool with another. The declared vibration total value can be used in a preliminary assessment of exposure.
Note! Vibration emission during tool operation may differ from the declared value depending on how the tool is used.
Note! Safety measures to protect the operator must be defined that are based on an assessment of exposure in the actual conditions of use (including all parts of the operating cycle, such as times when the tool is switched off or idle and activation time).
GENERAL POWER TOOL SAFETY WARNINGS
Warning! Please read all safety warnings, illustrations and specifications provided with this power tool. Failure to follow them may result in electric shock, fire or serious injury.
EN
Save all warnings and instructions for future reference.
The term "power tool" used in the warnings refers to all corded and cordless electric power tools.
Workplace safety
Keep your work area clean and well lit. Clutter and poor lighting can cause accidents.
Do not operate power tools in explosive atmospheres, such as in the presence of flammable liquids, gases or fumes.
Power tools create sparks which may ignite the dust or fumes.
Do not allow children or bystanders into the work area. Loss of concentration can cause loss of control.
Electrical safety
The plug on the electric cord must match the outlet. Do not modify the plug in any way. Do not use any plug adapters with grounded power tools. An unmodified plug that matches the outlet reduces the risk of electric shock.
Avoid body contact with grounded surfaces such as pipes, radiators, and refrigerators. Grounding your body increases the risk of electric shock.
Do not expose power tools to precipitation or moisture. Water or moisture entering a power tool will increase the risk of electric shock.
Do not overload the power cord. Do not use the power cord to carry, pull, or disconnect the plug from the wall outlet.
Keep the power cord away from heat, oil, sharp edges, and moving parts. A damaged or entangled power cord increases the risk of electric shock.
When working outdoors, use extension cords designed for outdoor use. Using an extension cord designed for outdoor use reduces the risk of electric shock.
If using a power tool in a damp environment is unavoidable, a residual current device (RCD) should be used as protection against supply voltage. The use of an RCD reduces the risk of electric shock.
Personal safety
Stay alert, watch what you are doing and use common sense when operating a power tool. Do not use a power tool while tired or under the influence of drugs, alcohol or medication. Even a moment of inattention while operating a power tool can result in serious personal injury.
Use personal protective equipment. Always wear eye protection. The use of personal protective equipment such as dust masks, non-skid safety shoes, hard hats, and hearing protection reduces the risk of serious personal injury.
Prevent accidental starting. Ensure that the power switch is in the "off" position before connecting to power source and/or battery pack, picking up or carrying the power tool. Carrying a power tool with your finger on the switch or energizing a power tool that has the switch in the "on" position can result in serious injury.
Remove any wrench or key that is used to adjust the power tool before turning it on. A wrench or key left attached to a rotating part of the power tool may result in serious injury.
Do not overreach or overextend. Maintain proper posture and balance at all times. This will make it easier to control the power tool in the event of unexpected situations while working.
Dress appropriately. Do not wear loose clothing or jewelry. Keep hair and clothing away from moving parts of the power tool. Loose clothing, jewelry, or long hair can be caught in moving parts.
If devices are provided for the connection of dust extraction or dust collection facilities, ensure that these are connected and used correctly. The use of dust extraction reduces the risk of dust-related hazards.
Don't let the experience gained from frequent use of the tool cause you to become careless and ignore safety rules.
Careless action can cause serious injuries in a split second.
Use and care of power tools
Do not overload the power tool. Use the correct power tool for the selected application. The correct power tool will provide better and safer work when used for the designed load.
Do not use a power tool if the power switch does not turn it on and off. A tool that cannot be controlled with the power switch is dangerous and must be repaired.
Disconnect the plug from the power outlet and/or remove the battery pack if detachable from the power tool before making any adjustments, changing accessories, or storing the tool. Such precautions will prevent the power tool from being switched on accidentally.
Store the tool out of the reach of children, do not allow persons unfamiliar with the power tool or these instructions to use the power tool. Power tools are dangerous in the hands of untrained users.
Maintain power tools and accessories. Check the tool for misalignment or binding of moving parts, breakage of parts and any other condition that may affect the power tool's operation. Any damage should be repaired before using the power tool. Many accidents are caused by poorly maintained tools.
Cutting tools should be kept clean and sharp. Properly maintained cutting tools with sharp edges are less likely to bind and are easier to control during operation.
Use power tools, accessories and attachments etc. in accordance with these instructions, taking into account the type and conditions of work. Use of tools for work other than those designed may result in a hazardous situation.
EN
Keep handles and gripping surfaces dry, clean and free from oil and grease. Slippery handles and gripping surfaces do not allow safe operation and control of the tool in hazardous situations.
Repairs
Have your power tool repaired only by authorized service centers, using only original spare parts. This will ensure proper safety of your power tool.
ADDITIONAL SAFETY WARNINGS FOR SCREWDRIVER
Hold power tools by insulated gripping surfaces when performing an operation where the fastener may contact hidden wiring or its own cord. A fastener contacting a live wire may make exposed metal parts of the power tool live and could give the operator an electric shock.
Battery Charging Safety Instructions
Caution! Before starting to charge, make sure that the body of the power supply, the cable and the plug are not cracked or damaged. It is forbidden to use a faulty or damaged charging station and power supply! Only the charging station and power supply provided in the set may be used to charge batteries. Using another power supply may cause a fire or destroy the tool. The battery may only be charged in a closed, dry room protected from access by unauthorized persons, especially children. Do not use the charging station and power supply without constant adult supervision! If it is necessary to leave the room where charging is taking place, disconnect the charger from the mains by unplugging the power supply from the mains socket. If smoke, a suspicious smell, etc. is emitted from the charger, immediately remove the charger plug from the mains socket!
The drill-driver is supplied with an uncharged battery, therefore, before starting work, it should be charged according to the procedure described below using the included power supply and charging station. Li-lon batteries do not exhibit the so-called "memory effect", which allows them to be charged at any time. However, it is recommended to discharge the battery during normal operation and then charge it to full capacity. If, due to the nature of the work, it is not possible to treat the battery in this way every time, then it should be done at least every few or a dozen cycles of work. Under no circumstances should batteries be discharged by short-circuiting the electrodes, as this causes irreversible damage! The battery charge status should also not be checked by short-circuiting the electrodes and checking for sparking.
Battery storage
To extend the battery life, ensure proper storage conditions. The battery can withstand about 500 charge-discharge cycles. The battery should be stored in a temperature range of 0 to 30 degrees Celsius, with a relative humidity of 50% . To store the battery for a longer period of time, it should be charged to about 70% of its capacity. In the case of longer storage, the battery should be charged periodically, once a year. Do not over-discharge the battery, as this shortens its life and may cause irreversible damage. During storage, the battery will gradually discharge due to leakage. The self-discharge process depends on the storage temperature, the higher the temperature, the faster the discharge process. If the batteries are not stored properly, the electrolyte may leak. In the event of a leak, secure the leak with a neutralizing agent, in the event of contact with the eyes, rinse the eyes thoroughly with water and then seek medical attention immediately. It is forbidden to use the tool with a damaged battery.
When the battery is completely worn out, it should be taken to a specialist waste disposal facility.
Battery transportation
Lithium -ion batteries are considered hazardous materials by law. The user of the tool can transport the tool with the battery and the batteries themselves by land. No additional conditions need to be met. In the event of entrusting transport to third parties (e.g. shipping by courier), the regulations for the transport of hazardous materials must be followed. Before shipping, contact a person with appropriate qualifications on this matter.
It is forbidden to transport damaged batteries. During transport, dismantled batteries must be removed from the tool, and exposed contacts must be protected, e.g. with insulating tape. Batteries must be secured in the packaging in such a way that they do not move inside the packaging during transport. National regulations regarding the transport of hazardous materials must also be observed.
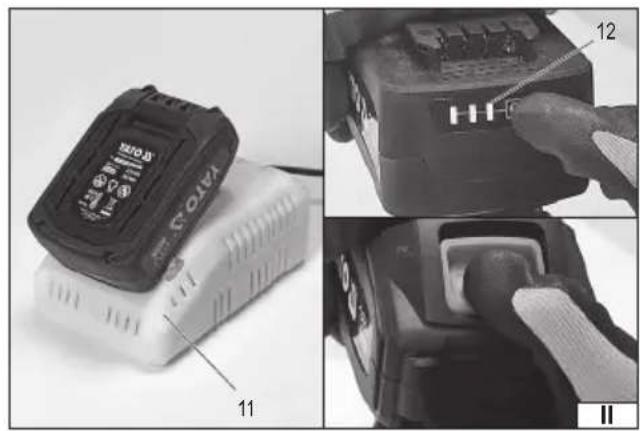
Battery charging
Insert the battery into the charger socket (II).
Connect the charger to a wall outlet.
There is a charger operation indicator light near the battery socket, as described in the „Charger operation indicator” table. After charging is complete, disconnect the power supply plug from the electrical outlet. Slide the battery out of the charging station by pressing and holding the battery latch button, and then slide the battery out of the charger socket.
| Green color Red color Work Status | ||
| continuous light waiting for loading | ||
| continuous light | loading | |
| continuous light battery charged | ||
YT-828500, YT-828501, YT-828502, YT-828503, YT-828504
| Green color Yellow color* | Red color Work Status | ||
| waiting for loading | |||
| pulsating loading | |||
| continuous light battery charged | |||
| pulsating battery overheating | |||
| continuous light | battery | ||
| pulsating charger overheating | |||
| continuous light | charger damaged | ||
*only in model with catalog number YT-828502
Power battery
Ion batteries can be used for power supply: YT-82842, YT-82843, YT-82844, YT-828461, YT-828462, YT-828463, YT-828464, YT-828465, which can only be charged using YATO chargers: YT-828498, YT-828499, YT-828500, YT-828501, YT-828502, YT-828503, YT-828504.
It is prohibited to use other batteries with a different rated voltage and that do not fit into the device's battery slot. It is prohibited to modify the slot and/or battery to fit them.
Insert the battery into the power socket with the contacts facing the inside of the tool until the battery latch engages. Make sure the battery does not slide out during operation. Disconnect the battery by pressing and holding the latch, then sliding the battery out of the tool housing.
PREPARING FOR WORK
NOTE! All activities listed in this chapter must be performed with the supply voltage disconnected - the battery must be disconnected from the tool!
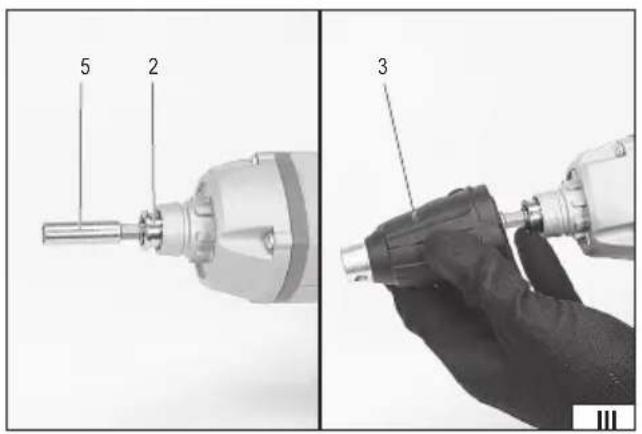
Assembling a screwdriver for working with single screws
(III) into the screwdriver socket.
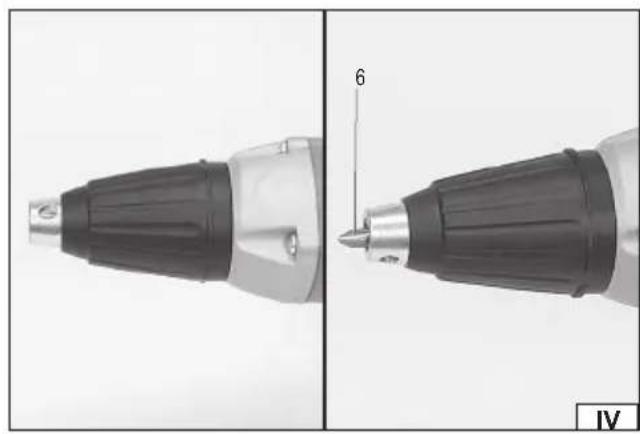
Install the screwdriver bit holder cover (III). Press the cover all the way in so that the mounting spline is completely hidden (IV). Install a short screwdriver bit (IV) in the adapter socket. It is possible to install a bit of any length, but only if a standard short bit of approx. 25 mm in length is used, the cover will rest on the surface during screwing and will prevent the conical screw head from protruding beyond the surface into which it is screwed.
The screwdriver is ready to use.
Assembly of a screwdriver for working with screws on tape
Insert a long screwdriver bit (V) into the screwdriver socket. The screwdriver comes with a Phillips bit, the most commonly used bit. If you need a bit of a different shape, you should get a bit of the same length and round cross-section.
Install the screw attachment on the tape (VI). Press the attachment all the way in so that the mounting spline is completely invisible (VII), and then secure it in the mounting by moving the lock towards the closed padlock symbol (VII).
The screw tape should be inserted into the guide in the attachment (VIII), and then moved to the guide in the front of the attachment. The tape should be inserted until the first screw is in the center of the attachment hole. The tape mounted as shown in the illustration (IX) will ensure smooth sliding of the screw tape.
There is a button on the front of the attachment. Pressing and holding this button (X) allows you to extend the metal guide, marked with a number. The number indicates the length of the screw in millimeters.
At the rear of the guide there is a knob (XI) which can be used to adjust the depth of the screw inside the range set by extending the guide. The arrows and the screw symbol next to the knob show the direction of rotation to increase or decrease the depth of the screw.
Note! Regardless of the selected screwdriver equipment version, it is recommended to perform screwing tests on waste material of the same hardness as the target material. The test will allow you to precisely select the desired screwing depth.
EN
Always hold the screwdriver with both hands (XII) while screwing. With a firm and secure grip that will allow you to control the tool. If the screw is caught, the tool may rotate in the direction opposite to the spindle rotation. A firm and secure grip will prevent the screwdriver from being torn out of the operator's hands.
When using the attachment for working with screws on a tape, the front part of the guide should be placed against the screwing point. Then press the switch and after starting the engine, press the screwdriver against the screwing point. After screwing in the screw, move the screwdriver away from the screwing point. The tape will automatically move so that the next screw in the tape is opposite the screwdriver bit.
The screwdriver has the ability to change the direction of rotation using the switch located above the switch (XIII). The arrows on the screwdriver housing show the direction of screwing in or unscrewing screws with right-hand thread.
Using the switch lock
The switch lock is recommended for long-term screwing. To do this, press the lock button with your thumb while holding the switch and release the switch.
To deactivate the lock, simply press the electric switch.
Useful tips for screwing and unscrewing
When screwing, it is recommended to make a pilot hole the same diameter as the screw shank. Otherwise, the materials into which the screws will be screwed may be damaged.
In soft materials, you can screw in screws that are specially designed for this purpose without making a pilot hole, but it is recommended to test screwing on scrap materials. Screws for direct screwing should be pointed, which will make screwing easier.
When screwing in small and light workpieces, they should be secured before starting work, e.g. using clamps or vices.
Always first place the screwdriver tip against the screw head and only then start the tool. Otherwise, the screwdriver tip and/or the screw may be damaged. This can also lead to dangerous situations and lead to serious injuries.
The screwdriver starts rotating the spindle with the screwdriver bit holder only after lightly pressing it together with the screw into the material into which the screw is screwed. It is possible to regulate the rotation speed by means of the force of pressing the electric switch. Maximum rotation is achieved when the switch is pressed to the maximum.
Drilling
Drilling using a screwdriver is prohibited.
The screwdriver is equipped with an overload clutch that starts working when the screwdriver reaches maximum torque. Due to this, the drill may stop, break or destroy the material being processed during drilling.
Lock against accidental use
The attachment is equipped with a lock that allows you to lock the attachment to prevent accidental or unauthorized use. To activate the lock, press the second button (XIV) located on the front of the attachment and then slide out its mechanism. Move the locking lever down (XIV), this will lock the attachment mechanism, which will prevent accidental use.
MAINTENANCE AND INSPECTIONS
NOTE! Before starting any adjustments, technical service or maintenance, disconnect the battery from the tool. After finishing work, check the technical condition of the power tool by visually inspecting it and assessing: the body and handle, the electric cable with the plug and strain relief, the operation of the electric switch, the patency of the ventilation slots, the sparking of the brushes, the noise level of the bearings and gears, the start-up and the smoothness of the operation. During the warranty period, the user may not add any power tools or replace any components or parts, as this will void the warranty. Any irregularities observed during the inspection or during work are a signal to carry out repairs at a service point. After finishing work, the housing, ventilation slots, switches, additional handle and covers should be cleaned, for example, with an air jet (with a pressure of no more than 0.3 MPa), a brush or a dry cloth without using any chemicals or cleaning fluids. Clean the tools and handles with a dry, clean cloth.
DE
WERKZEUGMERKMALE
YT-828500, YT-828501, YT-828502, YT-828503, YT-828504
YT-828500, YT-828501, YT-828502, YT-828503, YT-828504
YT-828500, YT-828501, YT-828502, YT-828503, YT-828504
YT-828500, YT-828501, YT-828502, YT-828503, YT-828504
YT-828500, YT-828501, YT-828502, YT-828503, YT-828504
YT-828500, YT-828501, YT-828502, YT-828503, YT-828504
YT-828500, YT-828501, YT-828502, YT-828503, YT-828504
YT-828500, YT-828501, YT-828502, YT-828503, YT-828504
YT-828500, YT-828501, YT-828502, YT-828503, YT-828504
YT-828500, YT-828501, YT-828502, YT-828503, YT-828504
YT-828500, YT-828501, YT-828502, YT-828503, YT-828504
YT-828500, YT-828501, YT-828502, YT-828503, YT-828504
YT-828500, YT-828501, YT-828502, YT-828503, YT-828504
YT-828500, YT-828501, YT-828502, YT-828503, YT-828504
YT-828500, YT-828501, YT-828502, YT-828503, YT-828504
YT-828500, YT-828501, YT-828502, YT-828503, YT-828504
YT-828500, YT-828501, YT-828502, YT-828503, YT-828504
DEKLARACJA ZGODNOŚCI DECLARATION OF CONFORMITY DECLARATIE DE CONFORMITATE
0425/YT-82075/EC/2025
We declare and guarantee with full responsibility that the following products:
meet requirements of the following European Standards / Technical Specifications:
and fulfill requirements of the following European Directives:
2006/42/WE Machinery and safety elements
2014/30/UE Electromagnetic compatibility (EMC) Directive
Directiva privind compatibilitatea electromagnetică (EMC) (H.G. nr. 487/2016)
2011/65/UE Restriction of the Use of Certain Hazardous Substances
Serial number: concern all serials numbers of item(s) mentioned in this declaration
The person authorized to compile the technical file: