
RCW 4 - Vacuum Cleaner Kärcher - Free user manual and instructions
Find the device manual for free RCW 4 Kärcher in PDF.

| Product type | Window cleaning robot |
| Brand | Kärcher |
| Model | RCW 4 |
| Weight (without cable) | 1.5 kg |
| Nominal voltage | 14.8 V |
| Backup battery capacity | 650 mAh (Li-Ion) |
| Backup battery life | 40 min |
| Cleaning speed | 2 min 30 s per m² |
| Detergent tank volume | 150 ml |
| Operating pressure | 3000 Pa |
| Minimum glass size | 40 x 40 cm |
| Minimum glass thickness | 2 cm |
| Ambient temperature | 5 °C to 40 °C |
| Relative humidity | 20 % to 60 % |
| Noise level | <67 dB(A) |
| Protection class | II |
| Frequency | 50/60 Hz |
| Supply voltage | 100-240 V (via adapter) |
| Safety cable length | 4 m |
| Cleaning modes | Quick, Intensive, Spot, Polishing, Manual |
| Functions | Voice synthesis, remote control, automatic navigation, return to starting point |
| Included accessories | Remote control, power adapter with extension cable, safety cord, microfiber cloth, RM 503 cleaning product (125 ml), filling bottle |
| Cloth maintenance | Washable at 40 °C, without fabric softener |
Frequently Asked Questions - RCW 4 Kärcher
User questions about RCW 4 Kärcher
0 question about this device. Answer the ones you know or ask your own.
Ask a new question about this device
Download the instructions for your Vacuum Cleaner in PDF format for free! Find your manual RCW 4 - Kärcher and take your electronic device back in hand. On this page are published all the documents necessary for the use of your device. RCW 4 by Kärcher.
USER MANUAL RCW 4 Kärcher
natural_image
White square electronic device with black and yellow casing, featuring a circular display and a black button (no visible text or symbols)Deutsch 4
English 13
Français 22
Italiano 32
Español 42
Português 51
Nederlands 61
Türkçe 70
Svenska 79
Suomi 87
Norsk 96
Dansk 104
Eesti 113
Latviešu 122
Lietuviškai 131
Polski 140
A
natural_image
Diagram of a USB cable with an open padlock and an upward arrow indicating connection (no text or symbols)
natural_image
Close-up of a mechanical component with droplets and a magnified inset showing a red arrow (no text or symbols)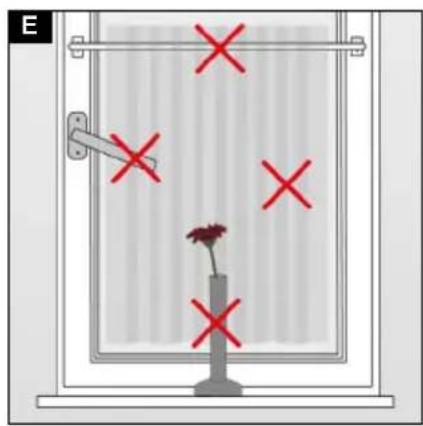
natural_image
Simple line drawing of a window with red X marks and a small flower in the vase (no text or symbols)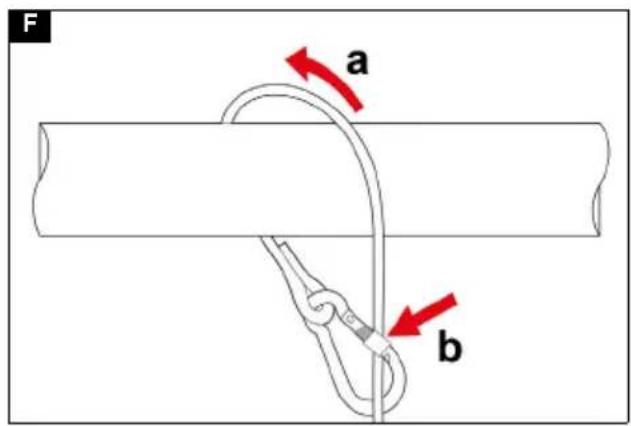
natural_image
Illustration of a hand holding a switch next to a wall-mounted device, with a red arrow pointing to the switch (no text or symbols present)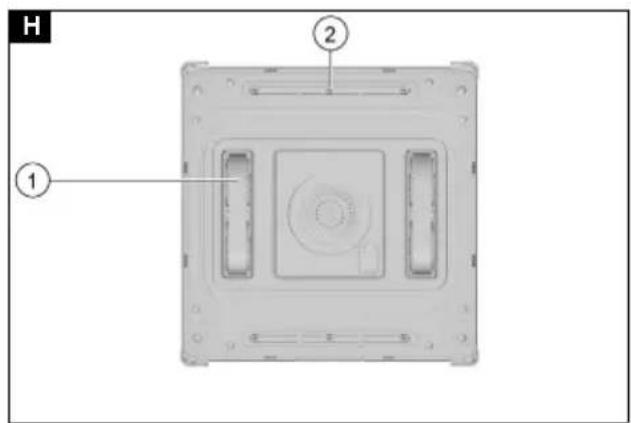
Inhalt
KÄRCHER Home & Garden App 4
| KÄRCHER Home & Garden App | 13 |
| General notes | 13 |
| Intended use | 14 |
| Environmental protection | 14 |
| Scope of delivery | 14 |
| Accessories and spare parts | 14 |
| Safety devices | 14 |
| Device description | 15 |
| Voice output | 16 |
| Remote control | 16 |
| Remote control batteries | 16 |
| Initial startup | 18 |
| Operation | 18 |
| Care and service | 19 |
| Transport and storage | 19 |
| Troubleshooting guide | 19 |
| Warranty | 21 |
| EU Declaration of Conformity | 21 |
| Technical data | 22 |
| Technical data for emergency supply battery pack | 22 |
| Power consumption in OFF mode | 22 |
KÄRCHER Home & Garden App
With the KÄRCHER Home & Garden app, you benefit from the following advantages when using your device:
• Application tips & expert knowledge
- Product information, overview of accessories and operating instructions
• Support and service contact
- Online shop - exclusive offers and much more Scan the code on the packaging or download the KÄRCHER Home & Garden app from your app store and conveniently register your product.
General notes
Read the original instructions before using the device for the first time and act in accordance with it. Keep the original in-
structions for future reference or for future owners.
- If the operating instructions and safety instructions are not observed, the device can be damaged and dangers could arise for users and other persons.
- Notify the dealer immediately in the case of shipping damage.
- Check the package contents when unpacking for missing accessories or for damage.
Hazard levels
⚠️DANGER
- Indication of an imminent threat of danger that will lead to severe injuries or even death.
⚠ WARNING
- Indication of a potentially dangerous situation that may lead to severe injuries or even death.
△CAUTION
- Indication of a potentially dangerous situation that may lead to minor injuries.
ATTENTION
- Indication of a potentially dangerous situation that may lead to damage to property.
Safety instructions
⚠️ DANGER • Never touch the mains plug and socket with wet hands. • Check the power supply cable and mains plug for damage each time before use. Have a damaged power supply cable/mains plug immediately replaced by authorized Customer Service personnel or a qualified electrician. Do not put the device into operation with a damaged power supply cable/mains plug.
- Never touch contacts or lines. • Only use original Kärcher detergents and do not use the cleaning robot on wet glass surfaces, otherwise it could slip or fall. - Do not insert any metal objects into openings, battery terminals or connection sockets.
⚠ WARNING • Persons with reduced physical, sensory or mental capabilities and persons lacking experience and knowledge may only use the appliance if they are properly supervised, have been instructed on use of the appliance safely by a person responsible for their safety, and understand the resultant hazards involved. • Children must be supervised to prevent them from playing with the appliance. • Children from the minimum age of 8 may use the appliance if they are properly supervised or have been instructed in its use by a person responsible for their safety, and if they have understood the resultant hazards involved. • Children may only perform cleaning work and user maintenance under supervision. • Children must not play with the appliance. • The appliance contains electrical components - do not clean the appliance under running water. • Do not pull or carry the device by the mains cable. Do not use the mains cable as a carrying handle. Do not close a door over the mains cable and do not pull the mains cable around sharp edges or corners. Do not run the device over the mains cable. Keep the mains cable away from hot surfaces.
⚠️ CAUTION • Switch off the device and unplug the mains plug before performing cleaning/maintenance. • Do not use the appliance if it has been dropped beforehand, is visibly damaged or if it is leaking. • Never leave the device unsupervised while it is in operation.
ATTENTION • Do not expose the device or battery to high temperatures • Do not use the device in swimming pools which contain water. • Only use the detachable mains adapter supplied:
| EU J652-2403000EX |
| UK J652-2403000BX |
Intended use
The cleaning robot is designed for cleaning vertical, framed glass surfaces with a maximum inclination of ±45^ , as well as smooth, flat hard surfaces such as mirrors and furniture fronts.
The device is suitable for regular maintenance cleaning, not for basic cleaning. Pre-cleaning is required for heavy soiling (e.g. bird droppings, heavy pollen, window paint).
Only use the device in private households.
Environmental protection

The packing materials can be recycled. Please dispose of packaging in accordance with the environmental regulations.

Electrical and electronic devices contain valuable, recyclable materials and often components such as batteries, rechargeable batteries or oil, which - if handled or disposed of incorrectly - can pose a potential danger to human health and the environment. However, these components are required for the correct operation of the device. Devices marked by this symbol are not allowed to be disposed of together with the household rubbish.
Notes on the content materials (REACH)
Current information on content materials can be found at: www.kaercher.de/REACH
Scope of delivery
The scope of delivery for the appliance is shown on the packaging. Check the contents for completeness when unpacking. If any accessories are missing or in the event of any shipping damage, please notify your dealer.
Accessories and spare parts
Only use original accessories and original spare parts. They ensure that the appliance will run fault-free and safely.
Information on accessories and spare parts can be found at www.kaercher.com.
Safety devices
△CAUTION
Risk of injury due to missing or modified safety devices!
Safety devices are provided for your own protection. Do not bypass, remove or render ineffective any safety devices.
Safety rope
The correctly fitted 4 m safety rope can prevent the cleaning robot from falling to the ground freely in case of a vacuum loss.
Emergency supply battery
As the cleaning robot holds onto the glass surface with self-generated negative pressure, there is a risk of it crashing if the power supply is interrupted.
When fully charged, the built-in emergency supply battery provides enough power for a period of at least 40 minutes to hold the cleaning robot in place on the glass surface by means of negative pressure.
The cleaning robot contains a Li-Ion battery pack.
⚠️DANGER
Risk of explosion
Risk of injury and damage due to exploding battery pack.
Charge, use and store only undamaged and fully functional battery packs. Modifications and changes not authorised by the manufacturer are prohibited. Any other use is prohibited. The user shall be liable for hazards arising as a result of improper use.
Note
The battery pack can be replaced by the user. Follow the instructions below or, if in doubt, contact KÄRCHER Service.
Replacing the battery pack:
1 Disconnect the device from the power supply and remove the cleaning pad.
2 Open the casing of the cleaning robot by unscrewing the screws on the back.
3 Localise the battery pack.
4 Disconnect the socket plug connection on the device board.
5 Unscrew the screws of the battery pack cover and remove the cover.
6 Remove the used battery pack, insert a new one and connect the plug to the device circuit board.
7 Reassemble the device and ensure that no hoses or other components are crushed or damaged.
Information on disposing of the battery pack:
- Dispose of the battery pack at the end of its service life in accordance with the applicable regulations.
Information on transporting the battery pack:
The lithium-ion battery is subject to the requirements of dangerous goods regulations. The battery pack can be transported by the user in public traffic areas without any further restrictions. When shipping by third parties (transport companies), special requirements for packaging and labelling must be observed. Do not use the battery pack if the casing is damaged. Tape off open contacts. Pack the battery tightly and securely. The battery pack must not be able to move in the packaging.
⚠️DANGER
Risk of explosion
A defective or non-functional battery pack must not be mailed and must be disposed of on site in accordance with the applicable regulations.
Observe the national regulations.
Safety instructions for emergency supply battery
⚠️ DANGER • Never touch the mains plug and socket with wet hands. • Never touch contacts or lines.
- Never insert conductive objects, e.g. screwdrivers or similar, into the charging socket on the appliance. ● Batteries can be swallowed by children or persons with reduced physical, sensory or mental capabilities due to lack of experience or knowledge. Keep batteries out of the reach of children and these persons. Swallowing a battery is an emergency that requires immediate medical treatment. ● Do not expose the device and battery to strong sunlight, heat or fire. ● Danger of explosion. Do not charge non-rechargeable batteries.
⚠ WARNING • Immediately replace a damaged charger or a charging cable with original parts. • Do not charge any damaged batteries. Replace damaged or degraded batteries with batteries approved by KÄRCH-ER. • Only use the charger to charge approved batter-
ies. ● Leaking battery fluid may cause skin irritation, burns, or eye damage. Batteries contain toxic substances that can cause health problems if swallowed or inhaled. Always wear gloves when handling a leaking battery to avoid skin contact. If the spilled liquid has come into contact with skin or eyes, rinse the affected areas immediately and thoroughly with water and seek medical advice. ● Short-circuiting the battery terminals (+/-) can lead to an explosion and ignition. Do not short-circuit the terminals (+/-) on the battery or the device. Do not store batteries in metal containers or with other metal parts. ● Only use the detachable mains adapter supplied with this device to charge the battery.
⚠️ CAUTION • Batteries contain hazardous substances that can cause serious environmental damage. Do not dispose of batteries with household rubbish, but properly at a collection point or recycling centre.
ATTENTION • Fully charge the battery before using the device for the first time. • Only use and store the charger in dry rooms. • Remove used or defective batteries from the device and dispose of them according to local regulations. • The battery compartment of the device is technically secured against accidental opening. Open and close the battery compartment as described in the operating instructions for the device. • Do not use damaged or modified batteries. • When installing batteries, ensure the correct polarity (+/-) according to the markings in the battery compartment or on the electrical plug connections.
Device description
Depending on the model, the scope of delivery and colour may differ (see packaging imprint).
See graphics page for illustrations.
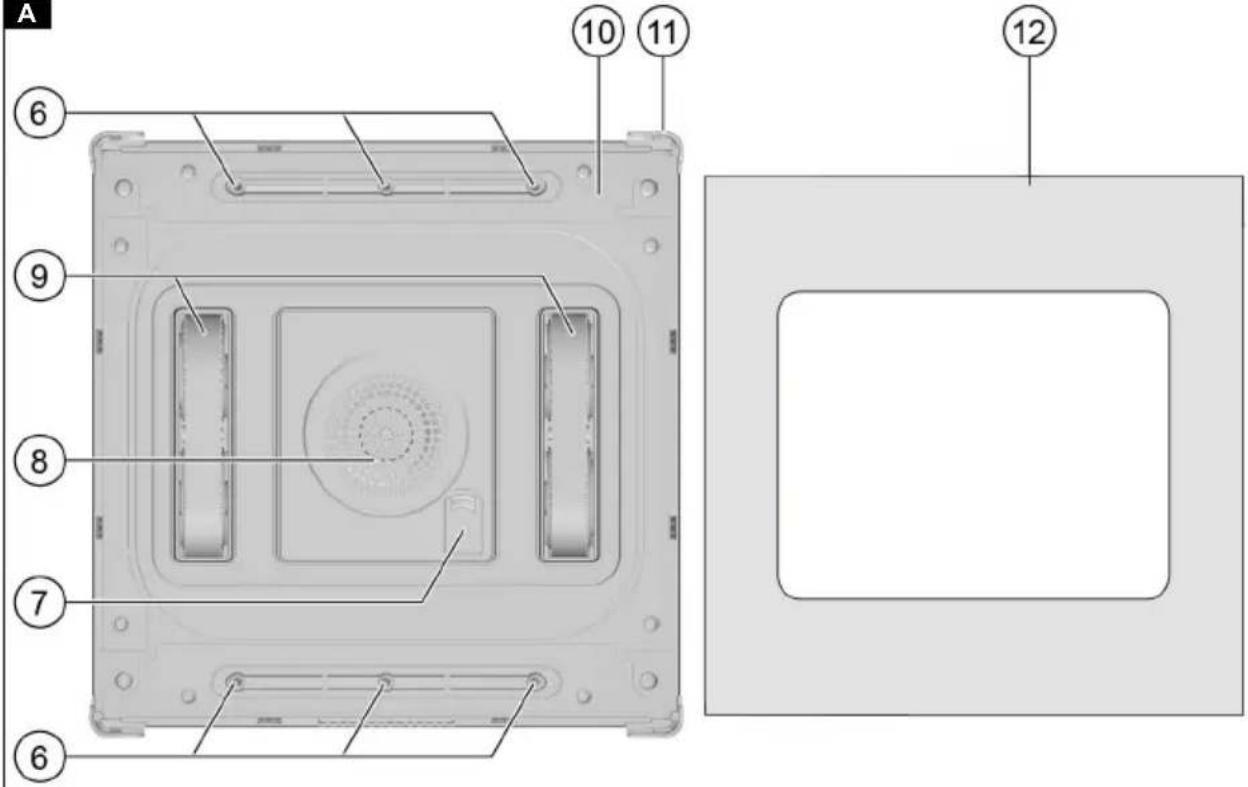
Illustration A
① Safety eyelet
② Mains cable
③ Emergency supply battery
④ Handle
5 On / Off button with status LED
⑥ Spray nozzles
⑦ Tank cover
⑧ Air intake opening
⑨ Belt drive
⑪Edge sensor
12 Microfibre wiper cloth
⑬ Voice output
⑭ Power supply unit with extension cable
⑮ Remote control
16 Detergent RM 503 (125 ml)
⑰ Filling bottle
18 Safety rope with cabiner hooks
⑩ Velcro surface for attaching the wiper cloth
Voice output
The cleaning robot outputs user information as speech (in addition to the LED display).
A list of possible messages can be found under "Voice output and LED codes".)
Note
You can change the language of the messages. To do this, press and hold the voice output button for 3 seconds.
The device must be connected to the mains but not attached to the windscreen.
Repeat the process until the desired language is selected.
The following languages are available:
| EN DE | FR ES PL | IT RU |
Subject to changes without notice.
The cleaning robot saves the setting until a new entry is made.
Remote control
The cleaning robot can also be controlled using the remote control.
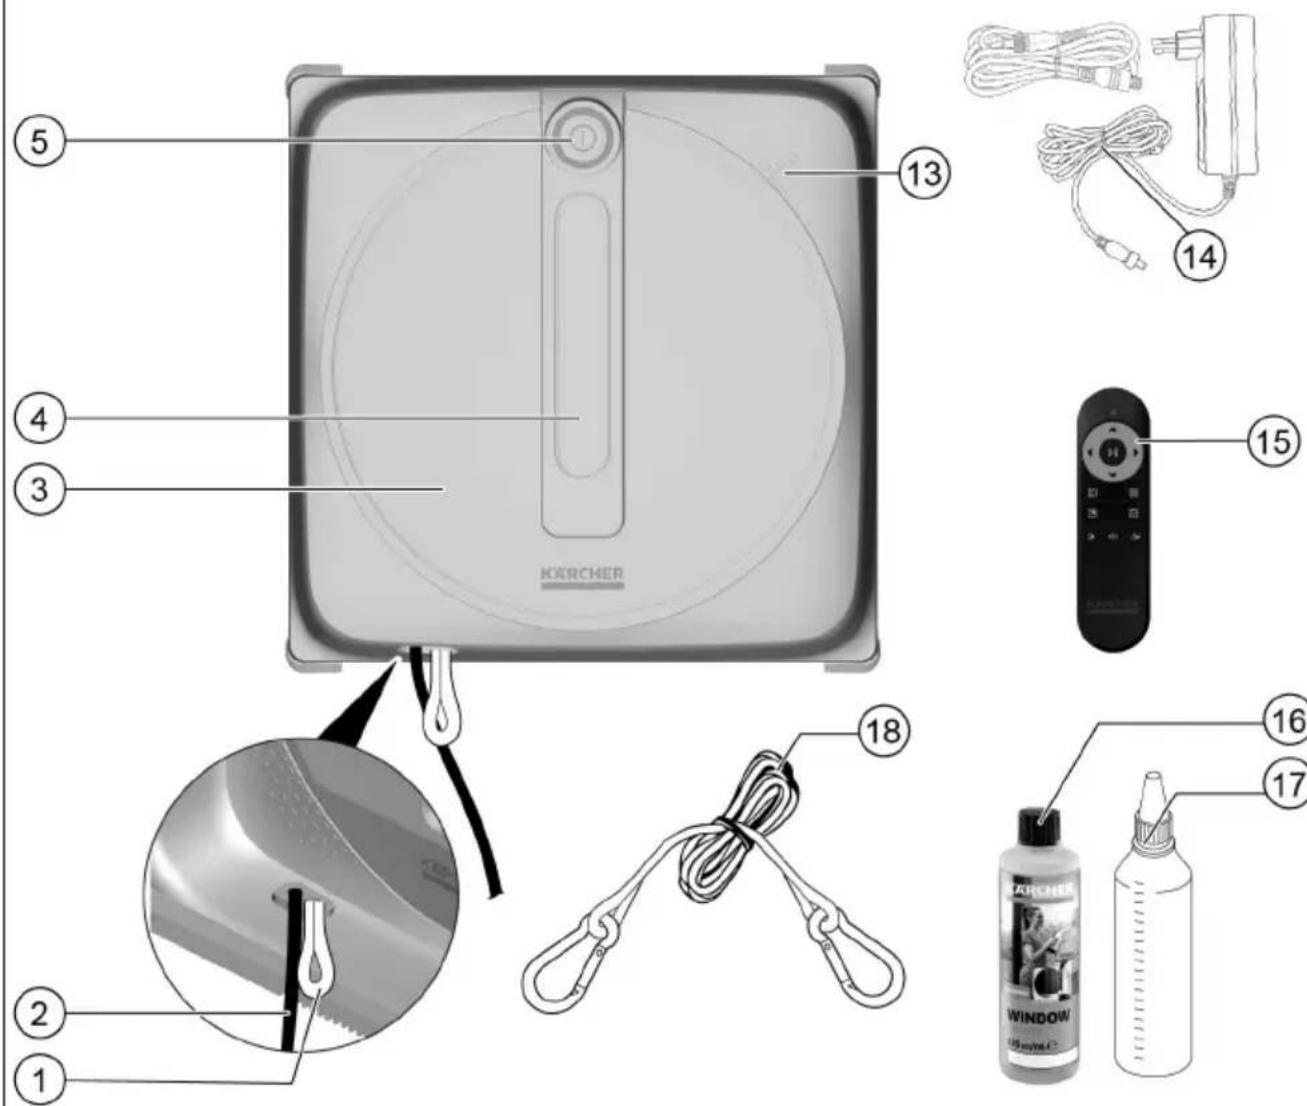
Illustration B
① Automatic spray function On / Off
② Spot cleaning
③ Quick cleaning
④ Arrow keys for manual control
⑤ Start / Pause
⑥ Intensive cleaning
⑦ Polishing
⑧ Manual spray function
⑨ Voice output On / Off
Start / Pause button (5)
The function of the Start / Pause button depends on the situation in which the cleaning robot finds itself:
- The cleaning robot is switched on and positioned on the window. Cleaning has not started.
— Short button press: The quick clean starts.
— Briefly pressing the On / Off button on the cleaning robot has the same function as the Start / Pause button on the remote control. - The cleaning robot is in automatic cleaning mode:
— Short button press: The cleaning mode is paused.
— Press the button again briefly: Cleaning mode continues.
Voice output button On / Off (9)
- Short button press: The voice output is deactivated.
- Press the button again briefly: The voice output is activated.
- Long button press (3 s with mains cable connected and suction switched off): The language changes.
Arrow keys for manual control (4)
The device can be moved forwards, backwards, right and left manually using the arrow buttons.
- Short button press: The cleaning robot moves in the desired direction until the Pause button is pressed or the window frame is reached.
- Pressing an arrow button immediately cancels any automatic cleaning mode.
- While the cleaning robot is being moved manually, the automatic water stream is deactivated.
Automatic cleaning mode buttons (2)/(3)/(6)/(7)
- Short button press: The selected cleaning mode is started.
- If one of the buttons is pressed while a cleaning programme is running, the active programme is deleted and the newly selected programme is started from the beginning.
Automatic spray function button On / Off (1)
- Short button press: The automatic spray function is deactivated.
- Press the button again briefly: The automatic spray function is activated.
- If the automatic water stream button is pressed, the automatic spray function remains deactivated until the button is pressed again or the cleaning robot is switched off and on again.
Manual spray function button (8)
- Short button press: The cleaning robot sprays a single water stream.
Remote control batteries
Note
- The remote control is powered by 2 AAA batteries.
• Non-rechargeable batteries must not be recharged. - Different types of batteries or new and used batteries must not be mixed.
- Insert the batteries with the correct polarity.
- Used batteries must be removed from the remote control and disposed of safely.
- If the device is stored unused for a long period of time, the batteries should be removed.
- The supply terminals must not be short-circuited.
- Open the battery compartment cover on the back of the remote control and remove or insert the AAA batteries.
Function and operation
The device consists of the cleaning robot and the remote control.
The remote control is used to control the device manually, select the cleaning mode and switch the voice output on or off.
The cleaning robot adheres to the glass surface to be cleaned via a self-generated vacuum and moves it down automatically.
6 spray nozzles distribute the cleaning solution precisely and evenly on the wiper cloth with the help of a pump.
Cleaning is carried out by wiping the moistened wiper cloth over the glass surface.
The device has various cleaning modes.
In automatic mode, the cleaning robot travels along the glass surface in overlapping paths and stops automatically when cleaning is complete.
The cleaning navigation system ensures that the glass surface is evenly travelled over and cleaned thanks to systematic route planning.
The position memory function ensures that the device automatically returns to the starting point for easy removal from the glass surface after cleaning.
In manual cleaning mode, the cleaning robot is controlled using the arrow buttons.
Operation requires a KÄRCHER microfibre cleaning cloth and KÄRCHER window cleaning detergent RM 503.
Cleaning modes
The device has various cleaning modes.
Quick cleaning (automatic mode):
Single pass over the glass surface in horizontal movements.
Intensive cleaning (automatic mode):
Move across the glass surface in horizontal and vertical strokes, then polish and clean the edges.
Spot cleaning (automatic mode):
Back and forth movements on a small surface.
Polishing (automatic mode):
Single pass over the glass surface in horizontal movements, followed by an edge cleaning.
Manual cleaning:
Manual driving using the arrow buttons on the remote control.
User guide (voice output and LED codes)
The cleaning robot indicates various operating states and errors with voice output, light and signal tones.
| LED Sound / Voice output Meaning | |||
| Start / Stop blue, pulsating Signal | one Press the On / Off button on the d | cleaningrobot to start the cleaning robot. | |
| Please attach the robot to the window. | A notification appears one minute after the cleaning robot has started if the robot has not been attached to the glass surface. | ||
| Signal tone Press the On / Off button | on the cleaningrobot to switch the cleaning robot off. | ||
| - Hold the device, then press the button to detach it. | 1 minute after the end of cleaning, provided the cleaning robot has not been removed from the glass surface. | ||
| Operation Blue Begin fast cleaning. | Press the button for quick cleaning mode on the remote control. | ||
| Begin intensive cleaning. Press the button for intensive cleaning on the remote control. | |||
| Begin spot cleaning. Press the button for spot cleaning on the remote control. | |||
| Begin finishing mode. Press the button for polishing on the remote control. | |||
| Continue cleaning. Press the start button on the remote control. | |||
| Automatic water dispensing on. | Press the button for automatic water dispensing on the remote control. | ||
| Signal tone Press the button for manual spray jet on the remote control. | |||
| blue, pulsating Pause cleaning. | Press the pause button on the remote control. | ||
| - Cleaning completed. Cleaning finished. | |||
| Settings | Blue | Voice on. | Press the button for voice output on the remote control. |
| Voice off. | Press the button for voice output on the remote control. | ||
| - Language selection Press the button for voice output on the remote control for longer than 3 seconds. | |||
| Warning / Error | blue, flashes | Please refill the water tank. | Tank empty. |
| red, flashing | Please connect the power cable. | Mains cable not connected or power supply interrupted. | |
| red, flashing | The safety battery is low. Please do not disconnect the power cable until it is fully charged. | Emergency supply battery discharged / charging. | |
| red, flashing | Error message | Error occurred in the device. For trouble-shooting, see "Help with faults". | |
| Green | - | Emergency supply battery is charged. | |
| green, flashing | - | Emergency supply battery is being charged. | |
Initial startup
Establish the power supply.
Note
The enclosed power supply unit can be connected directly to the cleaning robot. In most cases, however, it will be advisable to use the extension cable supplied.
-
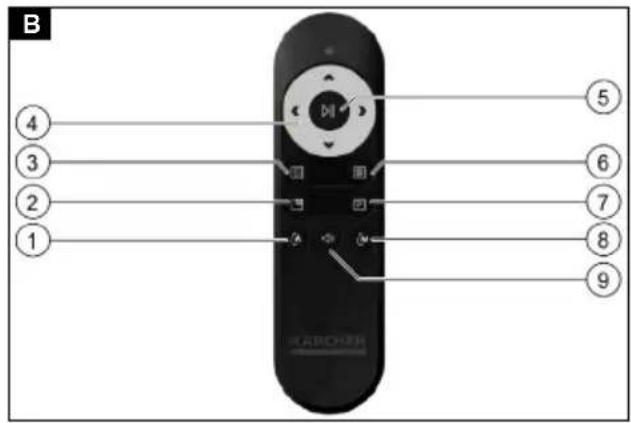
Insert the hollow plug into the socket of the device / extension cable.
-
Tighten the screw connection firmly.
Illustration C
ATTENTION
Risk of damage
If the connection is not properly screwed down, the power supply may be interrupted by the movement of the device and the device may fall uncontrollably after the emergency supply battery has been drained.
Therefore, make sure that the power supply is screwed on correctly.
Filling the detergent tank
Note
For optimal cleaning results and safe driving characteristics, only use original KÄRCHER window cleaning detergent. If other detergents are used (e.g. alcohol), it can lead to functional impairments.
-
Mix the cleaning solution. To do this, pour the detergent concentrate into the filling bottle and dilute with water according to the instructions on the label.
-
Fill the tank.
Note
To maintain a stable air pressure, do not overfill the tank.
Illustration D
a Open the tank cap.
ATTENTION
Risk of damage due to liquid intrusion
Cleaning fluid entering the ventilation openings can cause damage to the robot.
When filling, make sure that no cleaning fluid runs into the ventilation openings.
b Fill the tank to max. 80% using the filler bottle.
- Close the tank cap and press it on.
Attaching the microfibre wiper cloth
-
Place the wiper cloth straight and flat on the Velcro surface of the cleaning robot.
-
Ensure that the edge sensors and the belt drive can move freely and are not covered by the wiper cloth.
Preparing the glass surface
Note
Do not use the cleaning robot if the window seals are damaged.
- Remove any objects that protrude into the movement area of the cleaning robot and could hinder its movements.
Illustration E
Obstacles can be, e.g.:
• Curtains and drapes
- Objects on windowsills
- Window handles
• Window pictures and stickers
- Fasteners attached to the glass surface or adjacent framee.g. such as suction cups or hooks for net curtain rods etc.
-
Check the glass surface for heavy soiling, such as-dried bird droppings or thick pollen buildup.
-
Pre-clean heavily soiled glass surfaces.
Note
Allow the pre-cleaned surfaces to dry completely before attaching the cleaning robot.
Operation
Securing the movement space of the cleaning robot
Ensure that the movement space of the cleaning robot is not restricted during operation.
The movement space can be limited by, for example:
- Shutters and blinds lowered accidentally or automatically
- Adjacent hinged or sliding doors and windows opening or closing accidentally or automatically
● Windows, doors, curtains and drapes, etc., moving accidentally or as a result of drafts
Attaching the safety rope
-
Check the safety rope and carabiner hooks for damage and contamination before each use.
a Replace damaged parts immediately.
b Clean dirty parts. -
Check the safety rope for knots and twists; remove them if present.
-
Attach the safety rope:
ATTENTION
Attach the safety rope so that it cannot get into the movement area of the cleaning robot. If the robot runs over the strap, it could detach from the glass surface and fall down.
Illustration F
a Loop the safety rope around a suitable, stable point (e.g. around window handles, curtain rail, table leg, wall or ceiling hooks).
b Hook the carabiner hook into the safety rope and tighten the safety catch.
c Attach the second carabiner hook to the loop on the cleaning robot and tighten the safety catch.
⚠ WARNING
Always tighten the safety latch, otherwise the carabiner hook can come loose from the cleaning robot during various movements.
Note
If no suitable fixing point is available, the safety rope can also be clamped in the window. To do this, open the window, clamp the safety rope at the top and bottom and close the window firmly.
Note
Make sure that there is always enough safety rope so that the cleaning robot can cross the entire window.
Starting cleaning
⚠️DANGER
Caught in the safety rope or mains cable
Strangulation by safety rope or mains cable Keep children and pets away from the safety rope and mains cable.
⚠ WARNING
Risk of injury due to the cleaning robot falling.
The cleaning robot can detach from the window pane and fall down in the event of a malfunction or an accident, e.g. heavy rain or wind.
Operate the cleaning robot only with the supplied, functioning, undamaged and correctly installed safety rope.
Always keep a sufficiently large area under the cleaning robot free of people and pets while it is attached to a glass surface.
Always maintain visual and acoustic contact with the cleaning robot while it is in operation, in order to keep the hazard zone free and be able to remove it from the glass surface if necessary.
Remove the cleaning robot from the glass surface when a malfunction is visible or indicated by sound signals, and in the event of strong wind or precipitation when in use outdoors.
△CAUTION
Risk of injury from the rotating belt drive
There is a risk of crushing injuries from the rotating belt drive.
Keep body parts such as fingers and hair as well as loose clothing such as ties and scarves away from the belt drive.
-
Preparing the cleaning robot:
a Fill the detergent tank.
b Attach the microfibre wiper cloth. -
Attach the safety rope.
-
Fit the power cable.
-
Insert the mains plug into a mains socket.
-
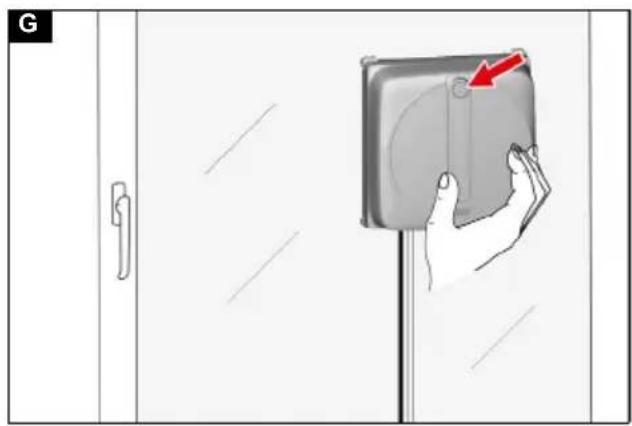
Position the cleaning robot vertically on the glass surface and hold the on / off button until the motor starts and the robot adheres firmly to the pane.
Note
Place the cleaning robot at mid-height on the glass surface, maintaining a distance from the frame.
Illustration G
- Start the quick cleaning programme by briefly pressing the on / off button or use the remote control to select the desired cleaning programme. Cleaning starts.
Note
We recommend observing the cleaning robot the first time it is used on a new surface to check whether it recognises the edges and frames correctly or whether there are any obstructions.
Finishing cleaning
- Briefly press the Start / Pause button on the remote control or the On / Off button on the device. The robot can be manually navigated to the desired position using the arrow buttons on the remote control.
Note
At the end of an automatic cleaning programme, the cleaning robot stops at its original position.
- Remove the cleaning robot from the glass surface: Illustration G
a Hold the cleaning robot by the handle and press the On / Off button 2 - for 3 seconds.
b Wait until the motor noise stops and the vacuum has been released.
c Remove the cleaning robot from the glass surface.
- Transfer the cleaning robot to another glass surface:
a Clean the underside of the cleaning robot, especially the sensors, spray nozzles and belt drive.
b Change or turn the wiper cloth if necessary.
c If necessary, remove the safety rope and attach it to a new position.
d Start the cleaning.
- Finishing the cleaning:
a Pull out the mains plug.
b Remove the safety rope.
c Remove the wiper cloth.
d Drain the detergent tank.
ATTENTION
Risk of damage due to liquid intrusion
Cleaning fluid entering the ventilation openings can cause damage to the robot.
Make sure that no cleaning fluid runs into the ventilation openings.
- Clean the cleaning robot, see Cleaning the cleaning robot.
Care and service
Cleaning the cleaning robot
△CAUTION
Risk of injury from the rotating belt drive
There is a risk of crushing injuries from the rotating belt drive.
Keep body parts such as fingers and hair as well as loose clothing such as ties and scarves away from the belt drive.
-
Remove the microfibre wiper cloth and wash it out or wash it in the washing machine at up to 40 °C without fabric softener.
-
Clean the belt drive, sensors, and spray nozzles with a damp cloth.
Illustration H
① Belt drive
② Spray nozzles
③ Edge sensors
ATTENTION
Risk of damage due to liquid intrusion
Liquid entering the ventilation openings can cause damage to the robot.
Do not hold the cleaning robot under running water.
- If necessary, clean the casing of the cleaning robot with a damp cloth.
Transport and storage
△CAUTION
Failure to observe the weight
Risk of injury and damage
Be aware of the weight of the device during transport and storage.
Only store the device indoors.
Troubleshooting guide
You can remedy minor faults using the following overview.
If in any doubt, please contact your authorised Customer Service.
⚠️DANGER
Risk of electric shock.
Internal parts of the device can carry dangerous voltages.
Turn off the device and unplug the power supply before performing any maintenance or care tasks.
| Malfunction Cause Rectification | ||
| Cleaning robot does not stick to glass surface / error message: Insufficient vacuum | Vacuum loss 1. Check that the wiper cloth is undamaged and correctly fitted.2. Do not use the cleaning robot on wet, oily or greasy glass surfaces. Only use the robot on vertical (+/- 45°) and flat glass surfaces. Edges, gaps and uneven areas can lead to vacuum loss. | |
| The turbine does not work properly. 1. Contact Kärcher Service. | ||
| Cleaning robot slips during application | Vacuum not sufficient. 1. Check that the wiper cloth is undamaged and correctly fitted.2. Do not use the cleaning robot on wet, oily or greasy glass surfaces. Only use the robot on vertical (± 45°) and flat glass surfaces. Edges, gaps and uneven areas can lead to vacuum loss. | |
| The wiper cloth is too wet or too dirty. 1. Replace the wiper cloth. | ||
| Belt drive is wet or dirty. 1. Remove the cleaning robot from the glass surface, then clean and dry the belt drive. | ||
| The turbine does not work properly. 1. Contact Kärcher Service. | ||
| The cleaning robot stops beyond reach | Fault in the cleaning robot. 1. Use the remote control to manually bring the cleaning robot within reach and remove it from the glass surface. | |
| The cleaning robot stops | The power cable is disconnected / power failure. The cleaning robot holds onto the glass surface with the aid of the emergency supply battery. | 1. Check the mains cable and the mains plug.2. In the event of a power failure, remove the robot from the glass surface.3. Check whether the length of the mains cable and the safety rope is sufficient for the size of the glass surface. |
| Edge sensors are blocked. 1. Remove the cleaning robot from the glass surface.2. Check the sensors for obstructions and clean. | ||
| The window is too small. 1. Check whether the minimum window size of 40x40 cm is reached. | ||
| The cleaning robot does not spray water | Automatic water dispensing is deactivated. | 1. Activate automatic water dispensing with the remote control or spray water manually. |
| The water reservoir is empty. 1. Fill the water reservoir. | ||
| Air bubbles in the water reservoir. | 1. Move and turn the cleaning robot.2. Place the cleaning robot on the glass surface and start cleaning. | |
| The spray nozzle is blocked. | 1. Clean the spray nozzle and test the spray function manually using the remote control.2. Apply a drop of descaling liquid to the spray nozzle, leave to act briefly, clean the spray nozzle and test the spray function manually using the remote control. | |
| Cleaning performance is not satisfactory | Wiper cloth is soiled. 1. Remove coarse dirt from the window before use.2. Select intensive cleaning mode on the remote control.3. Change the wiper cloth after every window.4. Repeat cleaning with a clean wiper cloth.5. Clean the windows regularly. | |
| Wiper cloth loses lint on the glass. 1. To remove the lint, wash the wiper cloth in the washing machine at up to 40 °C. | ||
| Wiper cloth is too dry. 1. Spray manually several times until the wiper cloth is moistened. Make sure that the wiper cloth does not get too wet to prevent the robot from slipping on the glass surface. | ||
| Edge sensor error | Fault in the cleaning robot. | 1. Remove the cleaning robot from the glass surface.2. Remove any obstructions from the sensor and clean it.3. Check whether parts of the sensor are broken or damaged. |
| Drive error Fault in the cleaning robot. 1. Remove the cleaning robot from the glass surface.2. Check whether the belt drive is blocked.3. Clean and dry the belt drive.4. Check whether the belt drive is broken or damaged. | ||
| Gyroscope error Fault in the cleaning robot. 1. Switch off the robot. | 2. Disconnect the mains cable.3. Wait 1 minute.4. Switch on the robot.5. If the error persists, contact Kärcher Service. | |
| Battery fault Fault in the cleaning robot. 1. Connect the robot to the mains cable.2. Wait 1 hour until the emergency supply battery is charged.3. Switch on the robot.4. If the error persists, contact Kärcher Service. | ||
Warranty
The warranty conditions issued by our relevant sales company apply in all countries. We shall remedy possible malfunctions on your appliance within the warranty period free of cost, provided that a material or manufacturing flaw is the cause. In a warranty case, please contact your dealer (with the purchase receipt) or the next authorised customer service site.
(See overleaf for the address)
Further warranty information (if available) can be found in the service area of your local Kärcher website under "Downloads".
EU Declaration of Conformity
| Device Type | Frequency band, MHz | Power, max. EIRP, mW |
| RCW 4 R | radio module SRD | 2432-2471 |
Alfred Kärcher GmbH & Co. KG hereby declares that the radio device type Window Robo Cleaner complies with the 2014/53/EU directive. The full text of the EU Declaration of Conformity can be found at www.kaercher.com/int/robot-vacuums-and-mopsconformity.html.
Technical data
RCW 4
Dimensions and weights
Weight without mains cable kg 1,5
Electrical connection
Protection class II
Frequency Hz 50 / 60
Voltage V
Device performance data
Operating pressure Pa 3000
Emergency supply battery runtime min 40
Safety rope length m 4
Cleaning speed min/m² 2:30
Minimum window size cm 40 x 40
Minimum thickness of glass pane cm 2
Filling quantity
Filling quantity of detergent tank in ml 150 cleaning robot
Environmental conditions
Ambient temperature °C 5 - 40 Relative humidity % 20 - 60
Determined values in acc. with EN 60335-2-54
Sound level L_pA dB(A) <67
Subject to technical modifications.
Technical data for emergency supply battery pack
Electrical connection
| Nominal voltage | 14.8 V |
| Rated capacity (according to IEC/EN 61960) | 650 mAh |
| Charging power max. 650 mAh | |
| Battery pack type | Li-ION |
Power consumption in OFF mode
The power consumption in OFF mode is less than 0.5W.
Contenu
Application KÄRCHER Home & Garden.... 22
Scan QR Code for download and easy product registration in Home & Garden App or website.
karcher.com/register

EN – Download the Home & Garden App to register your device for full support in cleaning.
■ Control of smart products
■ Application tips & expert knowledge
■ Product information, overview of accessories and operating instructions
■ Support and service contact
■ Online shop – exclusive offers and much more
karcher.com/dealersearch
Alfred Kärcher SE & Co. KG
Alfred-Kärcher-Str. 28-40
71364 Winnenden [Germany]


