
81791 - Rangefinder VOREL - Free user manual and instructions
Find the device manual for free 81791 VOREL in PDF.


| Product type | Laser distance meter |
| Brand | VOREL |
| Model | 81791 |
| Measurement range | 0.05 to 50 m |
| Measurement accuracy | ±2.0 mm |
| Measurement units | Meters, inches, feet, feet+inches |
| Laser class | 2 |
| Laser power | < 1 mW |
| Laser wavelength | 620 to 690 nm |
| Power supply | 2 AAA batteries (3 V DC) |
| Battery life (standby) | Laser shutdown after 30 s, power off after 3 min |
| Dimensions (L x W x H) | 119 x 49 x 22 mm |
| Weight (without batteries) | 60 g |
| Protection rating | IP54 (dust and splash resistant) |
| Operating temperature | 0 °C to +40 °C |
| Storage temperature | -10 °C to +50 °C |
| Measurement functions | Single measurement, continuous measurement, area, volume, indirect measurement (single and double Pythagorean), addition/subtraction of distances |
| Memory | Last 10 measurements |
| Measurement reference | Front or rear of device (selectable) |
| Display | LCD screen with battery, laser, mode, memory, and value indicators |
| Maintenance and cleaning | Clean with a soft, slightly damp cloth. Do not immerse. |
| Safety | Class 2 laser: do not look directly, do not point at people or animals. Remove batteries if not used for extended periods. |
| Spare parts and repairability | Replace batteries with identical types. In case of defect, contact customer service. Do not disassemble the device. |
| Package contents | Distance meter, user manual, batteries (not included?) |
Frequently Asked Questions - 81791 VOREL
User questions about 81791 VOREL
0 question about this device. Answer the ones you know or ask your own.
Ask a new question about this device
Download the instructions for your Rangefinder in PDF format for free! Find your manual 81791 - VOREL and take your electronic device back in hand. On this page are published all the documents necessary for the use of your device. 81791 by VOREL.
USER MANUAL 81791 VOREL
VOREL
BY TOYA
81791
81794
81795
Read the operating instruction
PL
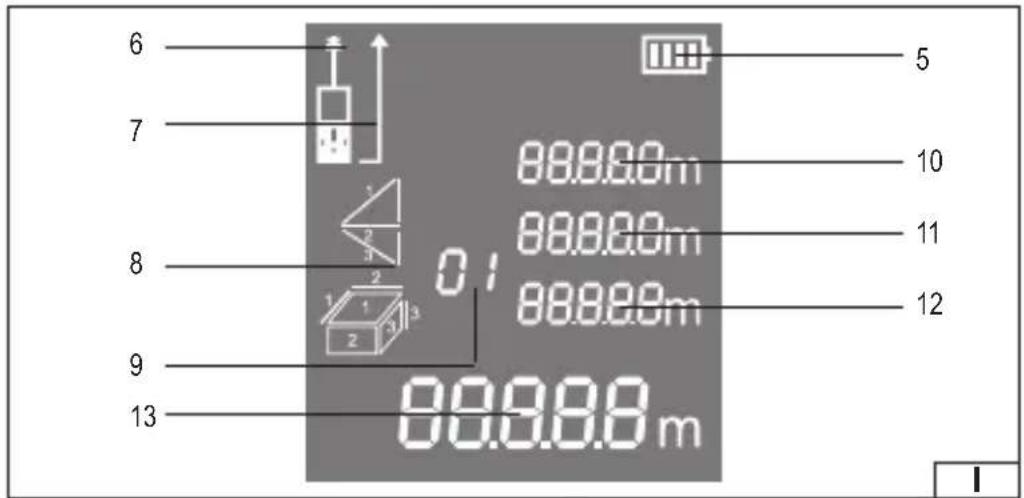
- display
- battery compartment cover
- laser pointer
- buttons
- battery indicator
- operating laser pointer symbol
- measurement base
- measurement mode
- memory bank number
- measurement value 1 / MAX
- measurement value 2 / MIN
- measurement value 3 / Δ
- total / last measurement value / calculation result
D
||
III IV

The image contains no text or characters.
V

VI
PL
CHARAKTERYSTYKA PRODUKTU
PRODUCT CHARACTERISTICS
The laser distance meter is a device that allows to measure distances with a laser beam. The measurement is done by means of a straight line. Due to many functions, direct and indirect measurements can be performed as well as calculation of area and cubic volume of rooms. Recommended for indoor use.
CAUTION! This distance meter is not a measuring instrument within the meaning of the Trade Metrology Act.
Read the entire instructions manual before the first use of the device. The instructions manual should be kept for further reference.
ACCESSORIES
The product is supplied complete and does not require assembly. Only installing the batteries is required for the device to function properly.
TECHNICAL DATA
| Parameter Unit Value | ||||
| Catalogue No. 81791 81794 81795 | ||||
| Measurement range [m] 0.05 - 50 0.05 - 80 0.05 - 100 | ||||
| Distance measurement accuracy [mm] ±2.0 | ||||
| Unit of measure meters / inches / feet / feet + inches | ||||
| Laser power [mW] < 1 | ||||
| Wavelength | [mm] | 620 - 690 | ||
| Laser class | 2 | |||
| Power supply | 3 V DC (2 x AAA) | |||
| Operating temperature | [°C] | 0 ÷ +40 | ||
| Storage temperature | [°C] | -10 ÷ +50 | ||
| Filter | [mm] | 119 x 49 x 22 | ||
| Weight (without battery) | [g] | 60 | ||
| Protection rating | IP54 | |||
GENERAL INSTRUCTIONS
Never aim a laser beam at people or animals. Do not stare into laser beam. The laser is class two and emits a beam of the wavelength and power specified in the technical data table. Such a beam does not pose a threat, but aiming it directly at the eyeball may cause eye damage. Do not try to disassemble the device yourself, as it could expose you to laser radiation. Do not modify the device, especially the laser system. Do not use the device in an environment where the ambient temperature is outside the operating range. If the instrument is stored in a temperature beyond the operating range, wait until the instrument within the operating range, before using it. The product is resistant to water and dust ingress to the extent specified by the protection degree. Never immerse the product in water or any other liquid. Do not place the device with other tools in the toolbox. Impacts can damage the distance meter. Remove the battery or accumulator from the device, if
GB
it is not used for a longer period of time. Do not store the distance meter at temperatures above 50° C, as this can damage the LCD. Use a soft, clean, slightly damp cloth to clean the device. The laser beam must reach its target, then reflect and return to the device. As a result, the measurement conditions are subject to limitations. Too bright light at the measuring point or too reflective a surface, e.g. glass, can make measurement difficult or impossible. In this case, change the measurement conditions or select the appropriate measurement method.
TOOL OPERATION
Installing and replacing batteries (II)
Open the battery compartment cover located in the bottom back part of the device. The cover is secured with a latch. Install Ni-MH batteries or accumulators in the slots. Pay attention to the correct polarity. Batteries or accumulators must always be replaced in sets. In order to ensure the correct and longest possible operation of the device, it is recommended to use branded alkaline batteries. To extend the life of batteries or accumulators, the device will turn off the laser pointer after about 30 seconds and turn off the power after about 3 minutes after any button has been pressed.
Switching the device on and off
To switch on the device press and hold button marked DIST until the indications appear on the display. Release the button, once the display has switched on. To switch off the unit press and hold button marked CLEAR/OFF. Release the button, once the display has switched off. The product always starts in a single measurement mode and remembers the previously set unit of measure and the previously entered to memory measurements. The measurements that are not saved are erased when the product is switched off, either automatically or by the user.
Changing the unit of measure
With the unit switched on, press and hold the button marked FUNC/UNITS for approximately 2 seconds. Release the button after the unit of measure has been changed on the display. The units change in the following cycle: metres / inches / feet / feet + inches.
Selecting the measurement base
It is possible to measure from the front of the device and from its back edge. The measurement base can be changed by pressing and holding the button marked +/- for about 2 seconds. The selected measurement base will be visible in graphical form on the display.
Single measurement mode
Press the button marked DIST once; this will activate the laser pointer. Aim the laser dot at place to which the distance will be measured, and then press the button marked DIST again. The distance meter measures the distance and the result is shown in the last measurement field. In case of subsequent measurements, the results of previous measurements will move up the display to the previous measurement results field and at the same they will be saved in the subsequent memory banks. You can return
GB
to the single measurement mode being in any mode by pressing the button marker CLEAR/OFF.
Continuous measurement mode
Continuous measurement is a type of direct measurement that allows measurement in motion. The distance meter moves by increasing or decreasing the measured distance, and the distance is displayed continuously. This makes it possible, for example, to determine the distance to be travelled when approaching or moving away from the surface to be measured. Switch on the device, press and hold the button marked DIST until the display shows "min" and "max". Move the distance meter reading the values on the display. The distance meter automatically saves minimum and maximum distance measures and shows them on the display. The triangle symbol ( Δ ) indicates the difference between maximum and minimum distance. To go back to the single measurement mode, press twice button marked DIST.
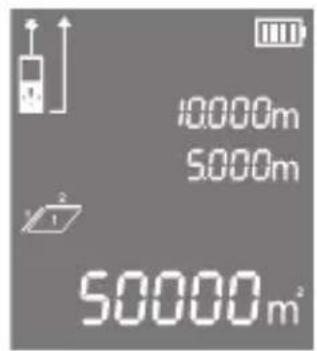
Area measurement (III)
CAUTION! It is possible to measure the area of only one rectangular area at a time. Areas with different shapes need to be divided into rectangles and then measured separately, totalling the results of the separate measurements up. Switch on the device and press the button marked FUNC/UNITS select the area measurement marked with a rectangle symbol. The display shows the measurement symbol with a flashing edge, the length of which will be measured. Perform the measurement as in the case of measurement of a single distance, and then measure the second distance. The distance measurement can be seen in the previous measurement field and the calculated area is displayed in the last measurement field. To delete the last measurement, short press the button marked CLEAR/OFF. Press this button again to can delete the previously measured distance.
Cubic volume measurement (IV)
CAUTION! It is possible to measure the area of only one cuboid at a time. Cubic volumes with different shapes need to be divided into cuboids and then measured separately, totalling the results of the separate measurements up. Switch on the device and press the button marker FUNC/UNITS to select cubic volume measurement marked with a cuboid symbol. The display shows the measurement symbol with a flashing edge, the length of which will be measured. Perform the measurement as in the measurement of a single distance, and then measure the second distance. The distance measurement can be seen in the previous measurement field and the calculated cubic volume is displayed in the last measurement field. To delete the last measurement, short press the button marked CLEAR/OFF. Press this button again to can delete the previously measured distance.
Indirect measurement
This type of measurement is used to measure distances when direct measurement is not possible, for example there are obstacles in the laser beam path. The measurement can be used to measure height when there is no direct access to the surface to be measured. Since the result of a measurement depends on calculations based on the measured indirect distances, the result of such a measurement will always have a greater error than the
GB
direct measurement. Single intermediate distances should be measured as accurately as possible, this will result in a small error in the intermediate measurement result.
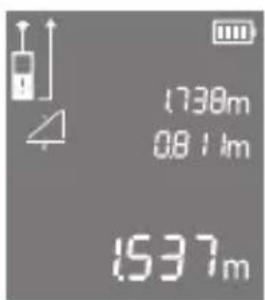
Indirect measurement - Pythagorean Theorem (V)
Switch on the device and press the button marked FUNC/UNITS to select area measurement marked with a right triangle symbol. The display shows the measurement symbol with a flashing edge, the length of which will be measured. Perform the measurement as in the case of measurement of a single distance, and then measure the second distance. The distance measured can be viewed in the previous measurement field, and the distance calculated using the Pythagorean Theorem is displayed in the last measurement field. CAUTION! The first distance measured must be greater than the second one. Otherwise, the result of measurement will be invalid.
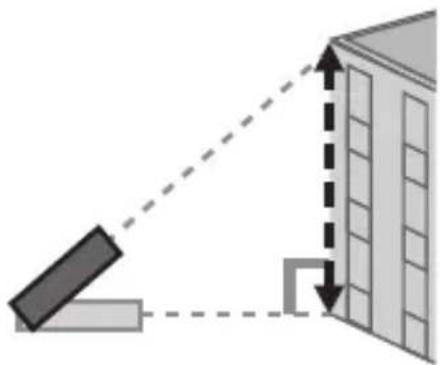
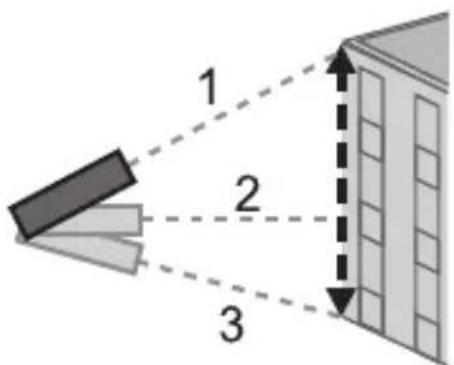
Indirect measurement - Dual Pythagorean Theorem (VI)
This type of measurement is used, when the beginning and end of a distance is located above or below the point of measurement. CAUTION! The most accurate results of measurement are obtained, when the point of measurement is located in the middle of the measured distance. Switch on the device and press the button marked FUNC/UNITS to select area measurement marked with a double right triangle symbol. The display shows the measurement symbol with a flashing edge, the length of which will be measured. Perform the measurement as in the measurement of a single distance, and then measure the second distance. The distance measured can be viewed in the previous measurement field, and the distance calculated using the Pythagorean Theorem is displayed in the last measurement field. CAUTION! The first and the third distance measured must be greater than the second one. Otherwise, the result of measurement will be invalid.
Adding and subtracting the distance
The laser distance meter enables adding and subtracting of measurements. Switch on the device and perform measurement of the first distance. Press once the button marked +/- to add distances or twice to subtract. The display will show the symbol of the mathematical operation. Then measure the second distance directly. The result of the operation appears in the last measurement field. Pressing the adding or subtracting button again allows you to take another distance measurement and add or subtract it from the previous result.
Measurement memory
The distance meter is equipped with a memory which automatically stores the last 10 measurements. Older results are deleted and automatically erased and replaced with new ones. To view the stored results, switch on the device and press the button marked FUNC/UNITS until the memory bank number appears. By pressing the +/- button you can view the values stored in successive memory banks.
GB
Error messages
| Error code Cause Solution | ||
| 402 Calculation error. | Repeat the measurement procedure according to the instructions manual. | |
| 203 Low battery. Replace the batteries or accumulators | ||
| 301 | Temperature is too high. | Cool down the device. |
| 302 | Temperature is too low. | Warm up the device. |
| 101 | Back signal too weak or measurement time too long. | Change the measurement area. |
| 102 | Back signal too strong. | Change the measurement area. |
| 201 | Workplace lighting too strong. | Measure in a less illuminated room. |
| 202 | Workplace lighting too weak. | Measure in a more illuminated room. |
| 401 Hardware error. | Turn the device on and off several times. If the error continues to occur, contact a service. | |
This symbol indicates that waste electrical and electronic equipment (including batteries and storage cells) cannot be disposed of with other types of waste. Waste equipment should be collected and handed over separately to a collection point for recycling and recovery, in order to reduce the amount of waste and the use of natural resources.
Uncontrolled release of hazardous components contained in electrical and electronic equipment may pose a risk to human health and have adverse effects for the environment. The household plays an important role in contributing to reuse and recovery, including recycling of waste equipment. For more information about the appropriate recycling methods, contact your local authority or retailer.
PRODUKTBESCHREIBUNG
CARACTÉRISTIQUES DU PRODUIT



- VOREL
- BY TOYA
- PL
- D
- CHARAKTERYSTYKA PRODUKTU
- PRODUCT CHARACTERISTICS
- ACCESSORIES
- TECHNICAL DATA
- GENERAL INSTRUCTIONS
- GB
- TOOL OPERATION
- INSTALLING AND REPLACING BATTERIES (II)
- SWITCHING THE DEVICE ON AND OFF
- CHANGING THE UNIT OF MEASURE
- SELECTING THE MEASUREMENT BASE
- SINGLE MEASUREMENT MODE
- CONTINUOUS MEASUREMENT MODE
- AREA MEASUREMENT (III)
- CUBIC VOLUME MEASUREMENT (IV)
- INDIRECT MEASUREMENT
- INDIRECT MEASUREMENT - PYTHAGOREAN THEOREM (V)
- INDIRECT MEASUREMENT - DUAL PYTHAGOREAN THEOREM (VI)
- ADDING AND SUBTRACTING THE DISTANCE
- MEASUREMENT MEMORY
- PRODUKTBESCHREIBUNG
- CARACTÉRISTIQUES DU PRODUIT
Brand : VOREL
Model : 81791
Category : Rangefinder