Flux Go - DJ Equipment Reloop - Free user manual and instructions
Find the device manual for free Flux Go Reloop in PDF.


User questions about Flux Go Reloop
0 question about this device. Answer the ones you know or ask your own.
Ask a new question about this device
Download the instructions for your DJ Equipment in PDF format for free! Find your manual Flux Go - Reloop and take your electronic device back in hand. On this page are published all the documents necessary for the use of your device. Flux Go by Reloop.
USER MANUAL Flux Go Reloop
To prevent fire or avoid an electric shock do not expose the device to water or fluids! Never open the housing!
WARNUNG!
Keep information for further reference!
ATTENTION! For your own safety, please read this operation manual carefully before the initial operation! All persons involved in the installation, setting-up, operation, maintenance and service of this device must be appropriately qualified and observe this operation manual in detail. This product complies with the requirements of the applicable European and national regulations. Conformity has been proven. The respective statements and documents are deposited at the manufacturer.
Before operating this equipment we ask you to carefully study and observe all instructions. Please remove the Flux Go from its packaging. Check before an initial operation to make sure that the device has not been visibly damaged during transport. If you detect any damage to the USB cable or the casing, do not operate the device. Contact your specialized dealer.
SAFETY INSTRUCTIONS
CAUTION! Please exercise particular caution when handling power voltage. This voltage rating may lead to a critical electrical shock! Any damage caused by the non-observance of this operation manual excludes any warranty claims. The manufacturer is not liable for any damage to property or for personal injury caused by improper handling or non-observance of the safety instructions.
- This device left the factory in perfect condition. To maintain this condition and to ensure a risk-free operation the user must observe the safety instructions and warnings contained in this operation manual.
- For reasons of safety and certification (CE) the unauthorized conversion and/or modification of the device is prohibited. Please note that in the event of damage caused by the manual modification to this device, any warranty claims are excluded.
- The inside of the device does not contain any parts which require maintenance, with the exception of worn parts that can be exchanged from the outside. Qualified staff must carry out maintenance, otherwise, the warranty does not apply!
- Ensure that the power will only be supplied after the device has been fully set up. Always plug in the USB plug last.
- Only use cables that comply with regulations. Observe that all jacks and bushes are tightened and correctly hooked up. Refer to your dealer if you have any questions.
- Ensure that when setting up the product the USB cable is not squashed or damaged by sharp edges.
- Disconnect the device when not in use and before cleaning! Be sure to hold the USB plug by the body. Never pull the USB cord!
- Position the device on a horizontal and stable base.
- Avoid any concussions or violent impact when installing or operating the device.
- When selecting the location of installation make sure that the device is not exposed to excessive heat, humidity, and dust. Be sure that no cables lie around openly. You will endanger your own safety and that of others!
- Do not rest any containers filled with liquid that could easily spill onto the device or its immediate vicinity. If, however, fluids should access the inside of the device, immediately disconnect the USB plug. Have the device checked by a qualified service technician before reuse. Damage caused by fluids inside the device is excluded from the warranty.
- Do not operate the device under extremely hot (in excess of 35^ C) or extremely cold (below 5^ C) conditions. Keep the device away from direct exposure to the sun and heat sources such as radiators, ovens, etc. (even during transport in a closed vehicle). Never cover the cooling fan or vents. Always ensure sufficient ventilation.
- The device must not be operated after being taken from a cold environment into a warm environment. The condensation caused at this moment may destroy your device. Do not switch on or operate the device until it has reached ambient temperature!
- Controls and switches should never be treated with spray-on cleaning agents and lubricants. This device should only be cleaned with a damp cloth. Never use solvents or cleaning fluids with a petroleum base for cleaning.
-
When relocating, the device should be transported in its original packaging.
-
At commercial facilities, the regulations for the prevention of accidents as stipulated by the organization of professional associations must be observed.
- At schools, training facilities, hobby and self-help workshops the operation of the device must be monitored with responsibility by trained staff.
- Keep this operation manual in a safe place for later reference in the event of questions or problems.
APPLICATION IN ACCORDANCE WITH REGULATIONS
- This device is a professional USB-C DVS interface. The Flux Go interface converts the control signal coming from each deck into digital audio, to be sent via USB to the Serato DJ Pro software, which decodes that signal into a stream of information based on what the DJ is doing with the control disc. A virtual “deck” replicates the movements of the control disc. Audio files loaded onto the virtual decks are then played back through the outputs of the hardware, with any manipulation of the control disc reproduced on the audio, effectively emulating vinyl control of the files loaded into the software.
- If the device is used for other purposes than those described in the operation manual, damage can be caused to the product, leading to the exclusion of warranty rights. Moreover, any other application that does not comply with the specified purpose harbors risks such as short circuits, fires, electrical shocks, etc.
MAINTENANCE
- Check the technical safety of the device regularly for damage to the USB cable or the casing, as well as for wear out of wear parts such as buttons and switches.
- If it is to be assumed that a safe operation is no longer feasible then the device must be disconnected and secured against accidental use. Always disconnect the USB cable from the outlet!
- Disconnect the USB cable from your computer.
- It must be assumed that a safe operation is no longer feasible if the device bears visible defects, if the device no longer functions, following longer storage under unfavorable conditions or after major transport stress.
DESCRIPTION
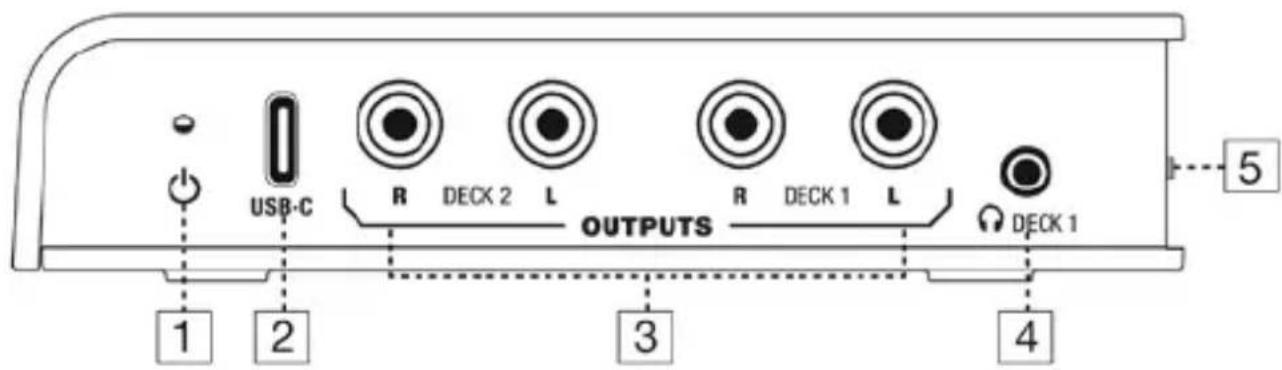
- Power LED
- USB-C Host Port
- Output RCA (Deck 1 & Deck 2)
- 3.5 mm Headphone Output (Deck 1 Signal)
- Headphone Volume Control Dial
- Ground Terminal (GND)
- Input RCA (Deck 1 & Deck 2)
- Phono/Line Source Switches
text_image
USB-C R DECK 2 L OUTPUTS R DECK 1 L DECK 1 1 2 3 4 5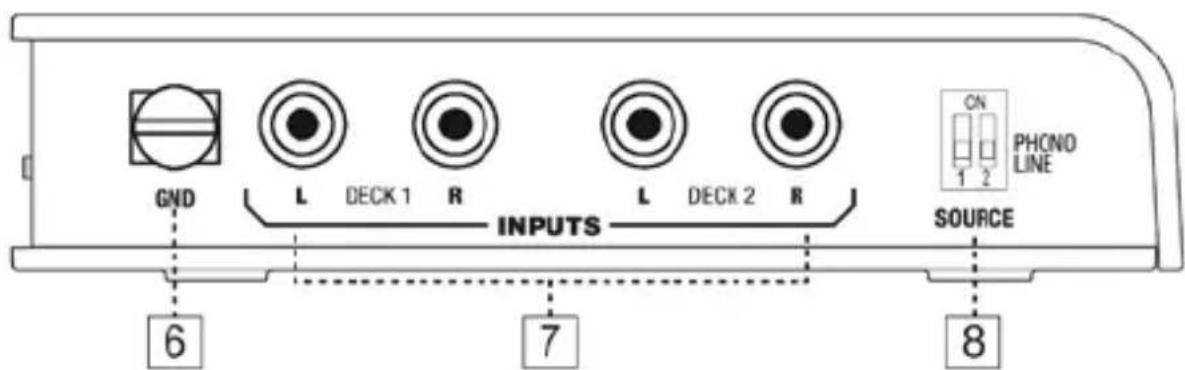
text_image
GND L DECK 1 R INPUTS L DECK 2 R SOURCE CN 1 2 PHONO LINE 6 7 8FUNCTIONS
- The USB-C host port -2- connects the Flux Go to your host device.
- The Power LED -1- lights up to indicate that the Flux Go is receiving power via the USB-C port -2-.
- The outputs -3- and inputs -7- will be connected to your mixer and playback device (Turntable/CD/Media player).
- Switch the input source between phono/line signal with the phono/line source switches -8-.
CONNECTIONS
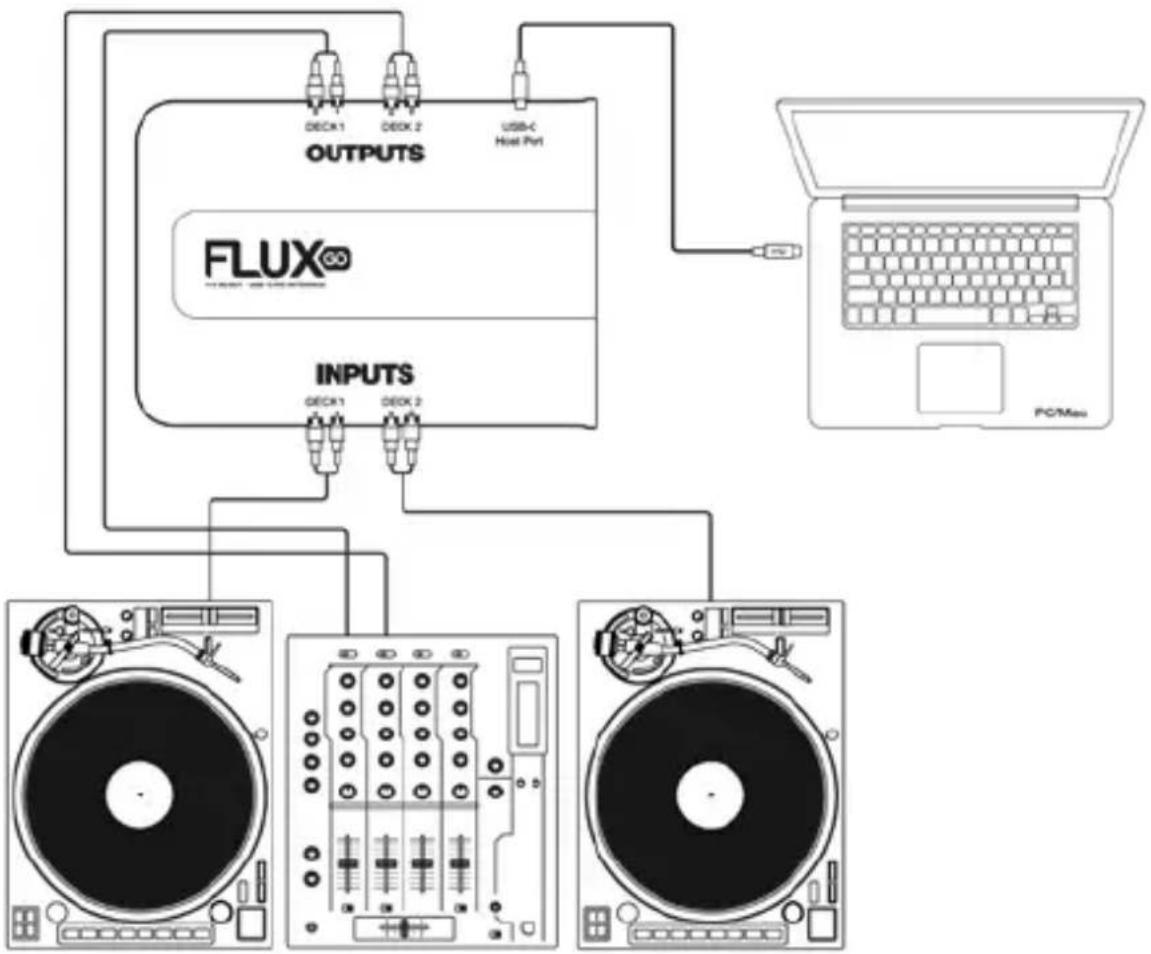
To integrate the Flux Go into a typical DJ setup, connect it to your turntables (or CD/Media players) and mixer as follows:
flowchart
graph TD
    A["FLUX"] -->|DECK1 DECK2 USB-C Host Port| B["OUTPUTS"]
    B -->|DECK1 DECK2 USB-C Host Port| C["PC/Mus"]
    C --> D["INPUTS"]
    D --> E["DC/DVD"]
    style A fill:#f9f,stroke:#333
    style B fill:#ccf,stroke:#333
    style C fill:#cfc,stroke:#333
    style D fill:#fcc,stroke:#333
    style E fill:#ffc,stroke:#333
1. INPUTS
Connect your turntables or CD players to the deck inputs -7- on the Flux Go. If you are using turntables, connect their earth wires to the ground terminal -6- on either the Flux Go or your mixer.
2. INPUT LEVEL SELECTION
Set each input to the correct input level using the phono/line switches -8-. Set the switches to UP for phono (turntables) or DOWN for line (CD/Media players).
Note: You can set both channels to either phono or line level input.
3. OUTPUTS
Connect the outputs -3- on the Flux Go to the line inputs on your mixer.
4. CONNECT THE FLUX GO TO YOUR COMPUTER
Using the provided USB cable, connect the USB-C host port -2- on the Flux Go to an available USB-C (optional: USB-A) port on your computer. Make sure you connect it directly to your computer, not through a hub or splitter to ensure stable performance.
DESKTOP SETUP
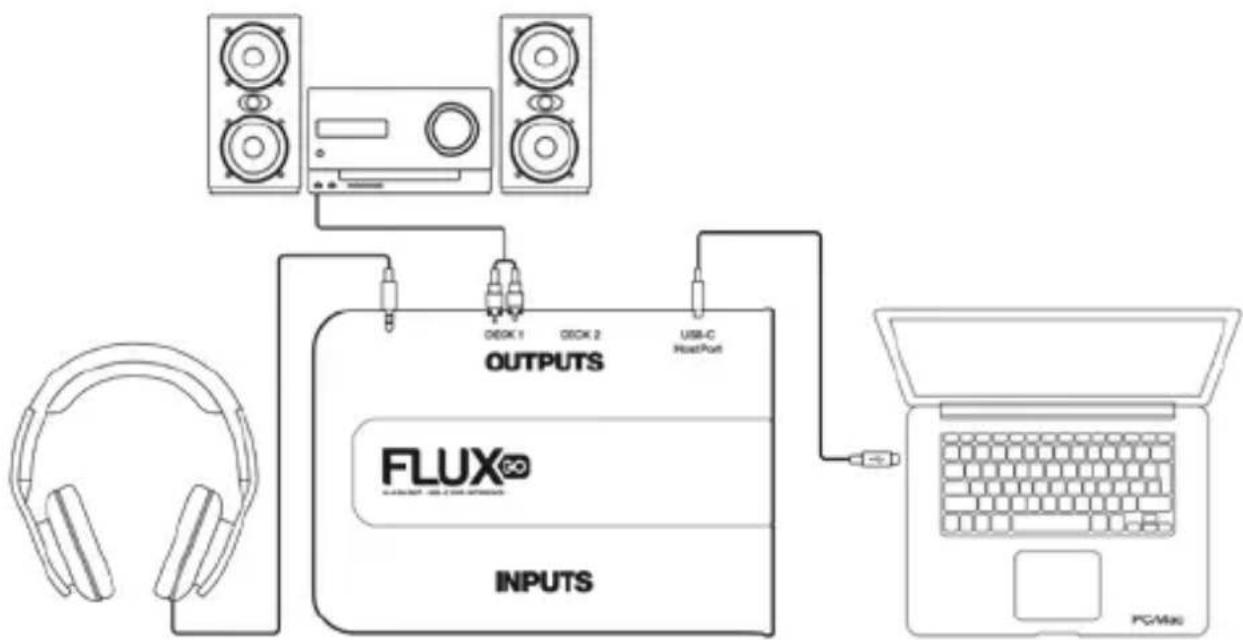
Deck 1 of the Flux Go features a dedicated 3.5 mm headphone output -4- along with a headphone volume control dial -5-, making it ideal for desktop use as a computer soundcard or headphone pre-amp.
When connected to your computer, the Flux Go can route your full system audio (e.g. media playback) through Channel/Deck 1. This allows you to conveniently monitor audio directly from the Flux Go and via the headphone output -4- and simultaneously through your speakers connected to the Deck 1 RCA outputs:
flowchart
graph TD
    A["Input"] --> B["FLUX®"]
    B --> C["OUTPUTS"]
    C --> D["Laptop"]
    E["Speaker 1"] --> F["Microcontroller"]
    G["Speaker 2"] --> H["Microcontroller"]
    I["Head/Headphones"] --> J["Headphones"]
    K["USB-C HostPort"] --> L["USB-C HostPort"]
Note: Usually most operating systems will auto select any new connected soundcard and route the audio signal through channel 1+2 (which represents Deck 1 on the Flux Go Interface). If you hear no sound coming from your computer, make sure the Flux Go is selected as the default soundcard in your Operation System settings.
SERATO DJ PRO & SERATO DVS
The Flux Go includes a built-in Serato DJ Pro and Serato DVS license. Download Serato DJ Pro from here: https://serato.com/dj/pro/downloads. Please see the recommended specifications on the download page.
After Serato DJ Pro has been installed on your computer, the software will activate itself when the Flux Go is connected. You can log in with an existing Serato account or create a new one. If you are using Windows, Serato DJ Pro will prompt you to install the required ASIO driver. Click “Install” to proceed. If this does not work, you can also manually download and install the driver from here: Flux Go ASIO driver (Windows only): www.reloop.com/reloop-flux-go If you have needle tracking issues, please see the following article on the Serato website: https://support.serato.com/hc/en-us/articles/202552220-Diagnosing-the-Scope-Views
FIRMWARE UPDATE
!! Please check for any available firmware updates on www.reloop.com/reloop-flux-go !!UPDATE INSTRUCTIONS FOR MACOS AND WINDOWS
Before proceeding, please make sure you have installed the latest Java Runtime Environment (JRE). You can download and install Java from the following link: https://www.java.com/en/download/
Note: If you are using Microsoft EDGE, you may be unable to download the Java (JRE) application. If so, please use a different browser for the download.
AFTER INSTALLING JAVA (JRE), PERFORM THE FOLLOWING STEPS:
- Please make sure Serato DJ Pro or any other application is closed before performing the update.
- Connect the Flux Go to your computer via USB.
- Launch the ReloopFirmwareUpdateApp application*, click "Open" and select the "FLUX-GO_V***.bin" firmware file from the download package. You will see the currently
installed firmware version and the new version displayed inside the updater.
4. Click "Start" and wait for the update (takes approximately 3\~5 minutes).
5. Once finished, click "Close".
The device's firmware has now been updated successfully and the Flux Go is ready to use. Note: In case of an issue or if the update takes longer than 20 minutes, disconnect the device and repeat the instructions above.
*: If you receive a warning message on macOS, proceed as follows:
- Go into your system preferences by clicking on the Apple icon and select "System Preferences".
- Select "Security & Privacy" and make sure the "General" tab is selected.
- Click "Allow".
The updater application should now open. If not, double-click the ReloopFirmwareUpdateApp application.
TECHNICAL SPECIFICATIONS
POWER / USB:
- USB audio interface with 24-bit / 44.1 kHz, 48 kHz, 96 kHz
- Class-compliant
- USB 2.0 high-speed
- Power Supply: DC 5 V / 500 mA (USB-C)
AUDIO:
- S/N Ratio (1 kHz reference input level, with A-w/20 kHz LPF, input short when no signal):
- Line input at +9 dBV, nominal 116 dB, limited ≥ 113 dB,
- Phono input at -23 dBV, nominal 97 dB, limited ≥ 94 dB
- THD + N (1 kHz reference input level, headphone volume to min, with A-w/(20 kHz LPF):
- Line input at 0 dBV, nominal ≥ 0.007%, limited ≥ 0.015%,
- Phono input at -32 dBV, nominal ≥ 0.015%, limited ≥ 0.03%
- Maximum Gain (Input 1 kHz / -50 dBV in Line mode, then reference to Phono mode):
- Phono internal gain +32 dB, nominal ± 0.5 dB, limited ± 1 dB
- Maximum Input (1 kHz input level to output level less than 1% T.H.D, with A-w/20 kHz LPF):
- Line input at +9 dBV, nominal +9 dBV, limited +8 dBV,
- Phono input at -23 dBV, nominal -23 dBV, limited -24 dBV
- Maximum Output (1 kHz input level to output level less than 1% T.H.D, headphone volume to max, with A-w/20 kHz LPF):
- Line 10K OHM / +9 dBV, nominal +9 dBV, limited +8 dBV,
- Phones 32 OHM / +3 dBV, nominal +3 dBV, limited +2 dBV
GENERAL:
- Dimensions: 115 (W) x 82 (D) x 26 (H) mm
- Weight: 168 g
- Incl.: 1x USB-C to USB-C cable, instruction manual
SERVICE AND SUPPORT
For technical questions or issues, please check our FAQ or request a support ticket: https://www.reloop.com/faqs/
text_image
USB-C R DECK 2 L OUTPUTS R DECK 1 L DECK 1 1 2 3 4 5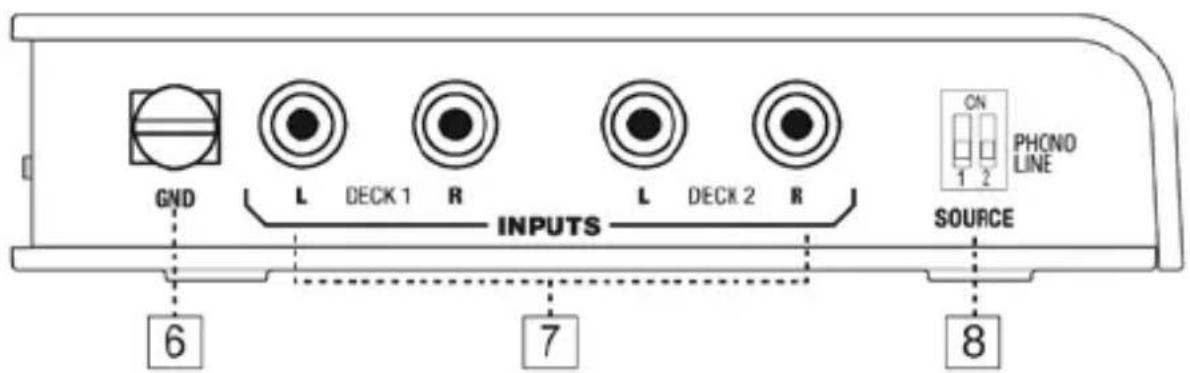
text_image
GND L DECK 1 R INPUTS L DECK 2 R SOURCE 6 7 8 CN 1 2 PHONO LINEFUNKTIONEN
flowchart
graph TD
    A["FLUX"] -->|DCCK1, DCCK2| B["OUTPUTS"]
    A -->|DCCK1, DCCK2| C["INPUTS"]
    A -->|DCCK1, DCCK2| D["PC/Mass"]
    A -->|USB-C Host Port| E["User Interface"]
    A -->|USB-C Host Port| F["User Interface"]
    A -->|USB-C Host Port| G["User Interface"]
    A -->|USB-C Host Port| H["User Interface"]
    A -->|USB-C Host Port| I["User Interface"]
    A -->|USB-C Host Port| J["User Interface"]
    A -->|USB-C Host Port| K["User Interface"]
    A -->|USB-C Host Port| L["User Interface"]
    A -->|USB-C Host Port| M["User Interface"]
    A -->|USB-C Host Port| N["User Interface"]
    A -->|USB-C Host Port| O["User Interface"]
    A -->|USB-C Host Port| P["User Interface"]
    A -->|USB-C Host Port| Q["User Interface"]
    A -->|USB-C Host Port| R["User Interface"]
    A -->|USB-C Host Port| S["User Interface"]
    A -->|USB-C Host Port| T["User Interface"]
    A -->|USB-C Host Port| U["User Interface"]
    A -->|USB-C Host Port| V["User Interface"]
    A -->|USB-C Host Port| W["User Interface"]
    A -->|USB-C Host Port| X["User Interface"]
    A -->|USB-C Host Port| Y["User Interface"]
    A -->|USB-C Host Port| Z["User Interface"]
1. EINGÄNGE
text_image
USB-C R DECK 2 L OUTPUTS R DECK 1 L DECK 1 1 2 3 4 5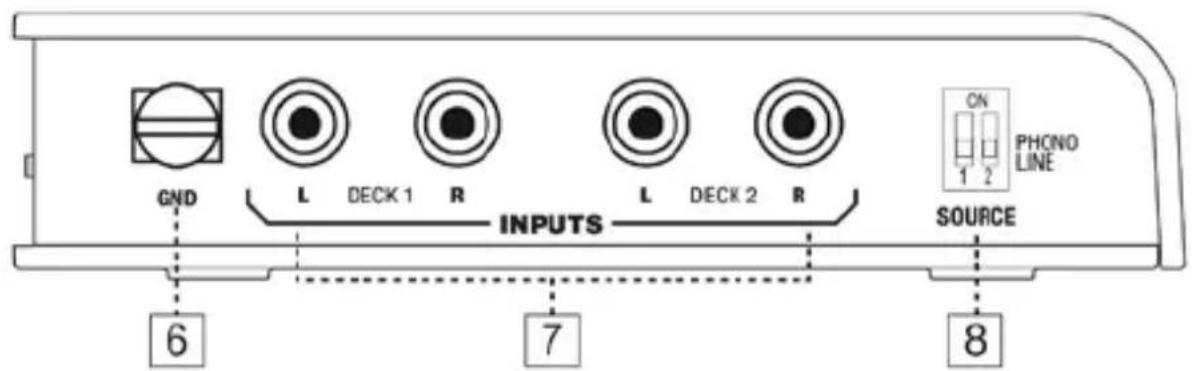
text_image
GND L DECK 1 R INPUTS L DECK 2 R SOURCE 6 7 8 ON 1 2 PHONO LINEFONCTIONS
text_image
USB-C R DECK 2 L OUTPUTS R DECK 1 L DECK 1 1 2 3 4 5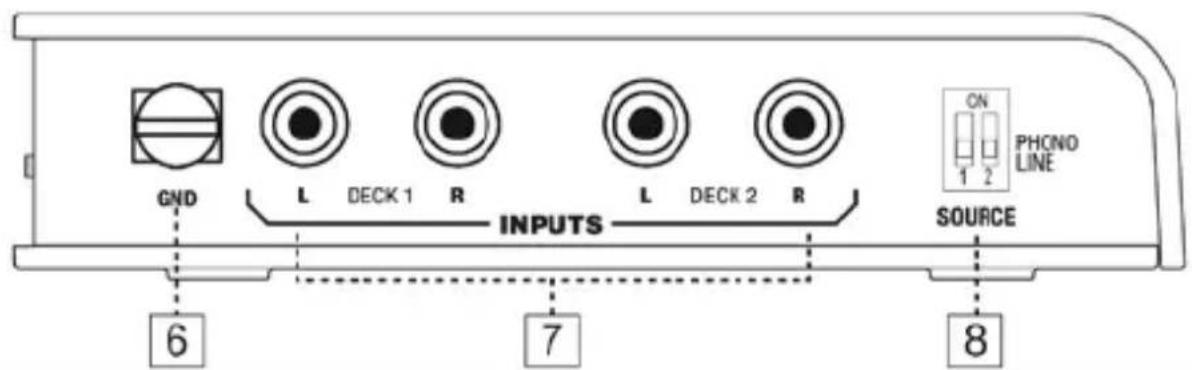
text_image
GND L DECK 1 R INPUTS L DECK 2 R SOURCE ON 1 2 PHONO LINE 6 7 8FUNCIONES
LEARN MORE ABOUT THE FULL
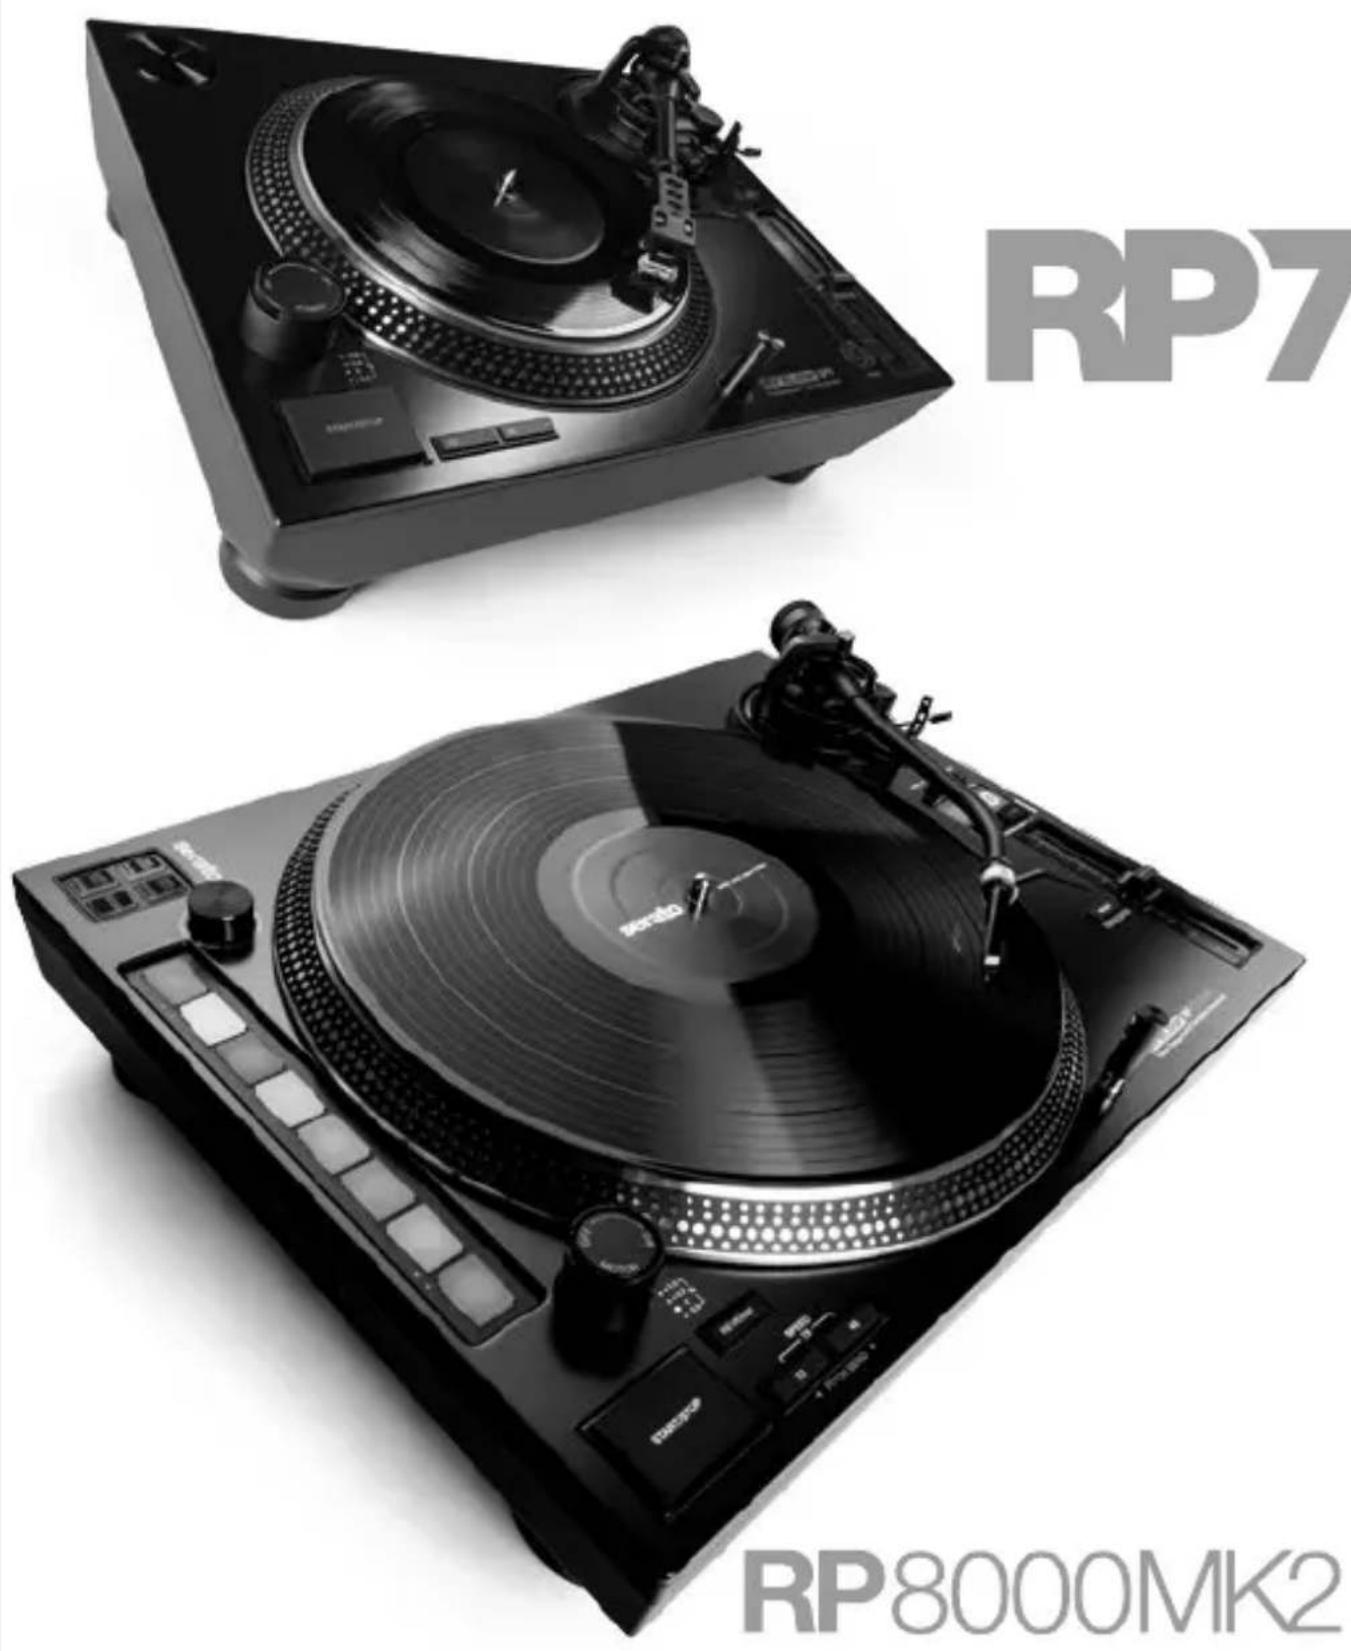
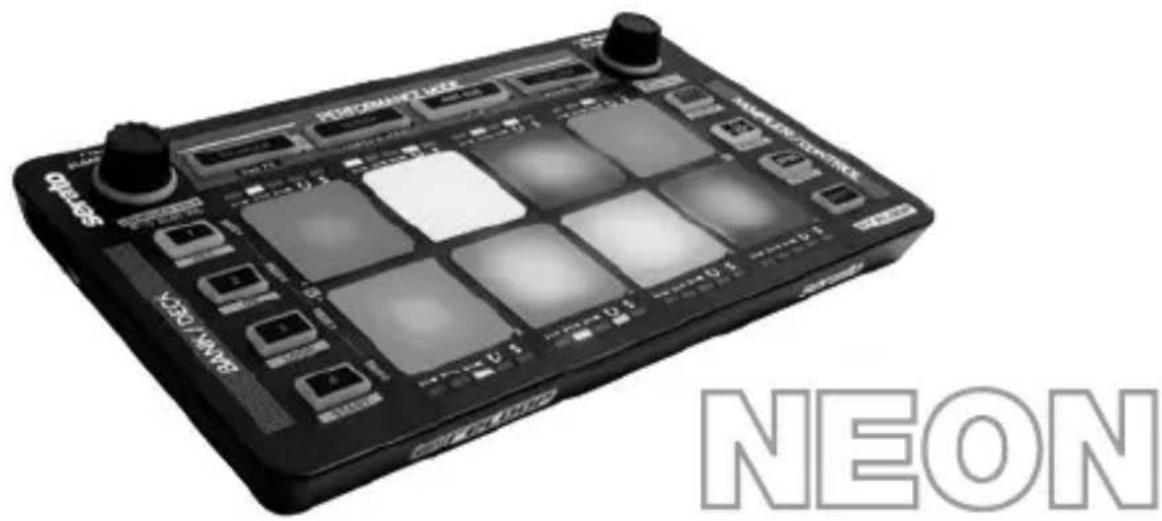
RELOOP PRODUCT RANGE
text_image
NEON Performance kHz 0.1 0.2 0.3 0.4 0.5 0.6 0.7 0.8 0.9 1.0 1.1 1.2 1.3 1.4 1.5 1.6 1.7 1.8 1.9 2.0 2.1 2.2 2.3 2.4 2.5 2.6 2.7 2.8 2.9 3.0 3.1 3.2 3.3 3.4 3.5 3.6 3.7 3.8 3.9 4.0 4.1 4.2 4.3 4.4 4.5 4.6 4.7 4.8 4.9 5.0 5.1 5.2 5.3 5.4 5.5 5.6 5.7 5.8 5.9 6.0 6.1 6.2 6.3 6.4 6.5 6.6 6.7 6.8 6.9 7.0 7.1 7.2 7.3 7.4 7.5 7.6 7.7 7.8 7.9 8.0RP7000MK2
natural_image
Black and white photo of a vintage vinyl record with a circular head and control buttons, no visible text or symbols on the device itself.Reloop Distribution
Global Distribution GmbH & Co. KG, Schuckertstrasse 28, 48153 Muenster / Germany www.reloop.com info@reloop.com
Subject to alterations. Illustrations similar to original product. Misprints expected.
DECLARATION OF CONFORMITY
English
Hereby, “Global Distribution GmbH & Co. KG” declares that this unit is in compliance with Directive 2011/65/EU, 2014/30/EU & 2014/35/EU. The full text of the EU declaration of conformity is available at the following internet address: https://www.reloop.com/product-compliance
Deutsch
Henley Designs Ltd. Unit B, Park 34, Collet OX11 7WB, Didcot, Oxfordshire, UK
JAPAN DISTRIBUTOR
Ginza Jujiya., Ltd. 2-channel USB-C audio interface Voltage: DC IN 5 V / 500 mA

This device complies with Part 15 of the FCC rules. Operation is subject to the following two conditions:
(1) this device may not cause harmful Interference, and
(2) this device must accept any interference received, including interference that may cause undesired operation.