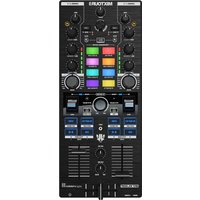
Mixtour Pro - DJ Equipment Reloop - Free user manual and instructions
Find the device manual for free Mixtour Pro Reloop in PDF.


User questions about Mixtour Pro Reloop
0 question about this device. Answer the ones you know or ask your own.
Ask a new question about this device
Download the instructions for your DJ Equipment in PDF format for free! Find your manual Mixtour Pro - Reloop and take your electronic device back in hand. On this page are published all the documents necessary for the use of your device. Mixtour Pro by Reloop.
USER MANUAL Mixtour Pro Reloop
To prevent fire or avoid an electric shock do not expose the device to water or fluids! Never open the housing!
WARNUNG!
Keep information for further reference!
ATTENTION! For your own safety, please read this operation manual carefully before the initial operation! All persons involved in the installation, setting-up, operation, maintenance and service of this device must be appropriately qualified and observe this operation manual in detail. This product complies with the requirements of the applicable European and national regulations. Conformity has been proven. The respective statements and documents are deposited at the manufacturer.
Before operating this equipment we ask you to carefully study and observe all instructions. Please remove the Mixtour Pro from its packaging. Check before an initial operation to make sure that the device has not been visibly damaged during transport. If you detect any damage to the USB cable or the casing, do not operate the device. Contact your specialized dealer.
SAFETY INSTRUCTIONS
CAUTION! Please exercise particular caution when handling power voltage. This voltage rating may lead to a critical electrical shock! Any damage caused by the non-observance of this operation manual excludes any warranty claims. The manufacturer is not liable for any damage to property or for personal injury caused by improper handling or non-observance of the safety instructions.
- This device left the factory in perfect condition. To maintain this condition and to ensure a risk-free operation the user must observe the safety instructions and warnings contained in this operation manual.
- For reasons of safety and certification (CE) the unauthorized conversion and/or modification of the device is prohibited. Please note that in the event of damage caused by the manual modification to this device, any warranty claims are excluded.
- The inside of the device does not contain any parts which require maintenance, with the exception of worn parts that can be exchanged from the outside. Qualified staff must carry out maintenance, otherwise, the warranty does not apply!
- Ensure that the power will only be supplied after the device has been fully set up. Always plug in the USB plug last.
- Only use cables that comply with regulations. Observe that all jacks and bushes are tightened and correctly hooked up. Refer to your dealer if you have any questions.
- Ensure that when setting up the product the USB cable is not squashed or damaged by sharp edges.
- Disconnect the device when not in use and before cleaning! Be sure to hold the USB plug by the body. Never pull the USB cord!
- Position the device on a horizontal and stable base.
- Avoid any concussions or violent impact when installing or operating the device.
- When selecting the location of installation make sure that the device is not exposed to excessive heat, humidity, and dust. Be sure that no cables lie around openly. You will endanger your own safety and that of others!
- Do not rest any containers filled with liquid that could easily spill onto the device or its immediate vicinity. If, however, fluids should access the inside of the device, immediately disconnect the USB plug. Have the device checked by a qualified service technician before reuse. Damage caused by fluids inside the device is excluded from the warranty.
- Do not operate the device under extremely hot (in excess of 35^ C) or extremely cold (below 5^ C) conditions. Keep the device away from direct exposure to the sun and heat sources such as radiators, ovens, etc. (even during transport in a closed vehicle). Never cover the cooling fan or vents. Always ensure sufficient ventilation.
- The device must not be operated after being taken from a cold environment into a warm environment. The condensation caused at this moment may destroy your device. Do not switch on or operate the device until it has reached ambient temperature!
- Controls and switches should never be treated with spray-on cleaning agents and lubricants. This device should only be cleaned with a damp cloth. Never use solvents or cleaning fluids with a petroleum base for cleaning.
- When relocating, the device should be transported in its original packaging.
- At commercial facilities, the regulations for the prevention of accidents as stipulated by the organization of professional associations must be observed.
- At schools, training facilities, hobby and self-help workshops the operation of the device must be monitored with responsibility by trained staff.
- Keep this operation manual in a safe place for later reference in the event of questions or problems.
APPLICATION IN ACCORDANCE WITH REGULATIONS
- If the device is used for other purposes than those described in the operation manual, damage can be caused to the product, leading to the exclusion of warranty rights. Moreover, any other application that does not comply with the specified purpose harbors risks such as short circuits, fires, electrical shocks, etc.
MAINTENANCE
- Check the technical safety of the device regularly for damage to the USB cable or the casing, as well as for wear out of wear parts such as buttons and switches.
- If it is to be assumed that a safe operation is no longer feasible then the device must be disconnected and secured against accidental use. Always disconnect the USB cable from the outlet!
- Disconnect the USB cable from your computer.
- It must be assumed that a safe operation is no longer feasible if the device bears visible defects, if the device no longer functions, following longer storage under unfavorable conditions or after major transport stress.
text_image
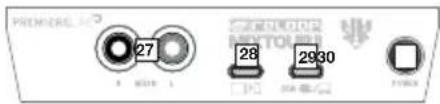
PREMERCIAL 27 28 2930
text_image
31 000745 MIPPIROG aigio eFELIOP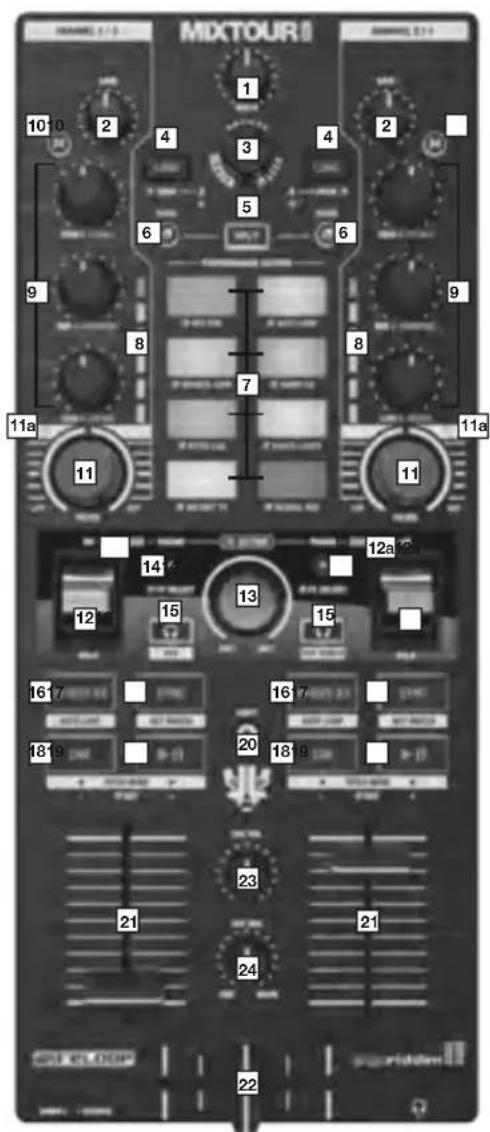
text_image
MIXTOUR 5 10 10 2 4 3 4 2 9 8 7 6 5 6 9 11a 11 11 12 14 13 15 16 17 16 17 18 19 20 18 19 21 23 21 24 22 24RUMEN
text_image
eRELOOP algoriddim
text_image
MIXTOUR 2526- Master Volume
- Channel Gain
- Browse Encoder
- Track Load Buttons
- Split Button
- Mode Buttons
- Performance Section
- VU Meter
- Equalizer (3-Band/Neural MixTM)
- Neural Mix™ Buttons
- Filter
11a. Filter On/Off LED - FX Paddles
12a. FX Paddles On/Off LED - FX Dry/Wet Control
- FX Parameter Buttons
- Headphone Cue Buttons
-
Loop In-Out-Ex Buttons
-
Sync Buttons
- Cue Buttons
- Play/Pause Buttons
- Shift Button
- Linefader
- Crossfader
- Headphone Cue Volume
- Headphone Cue Mix
- Mono/Stereo Switch
- Headphones Out (3,5 mm Jack)
- Master Out
- USB-C Power Delivery Port
- USB-C Charging / Bus Powering Port
- Power On/Off
- Kensington Lock
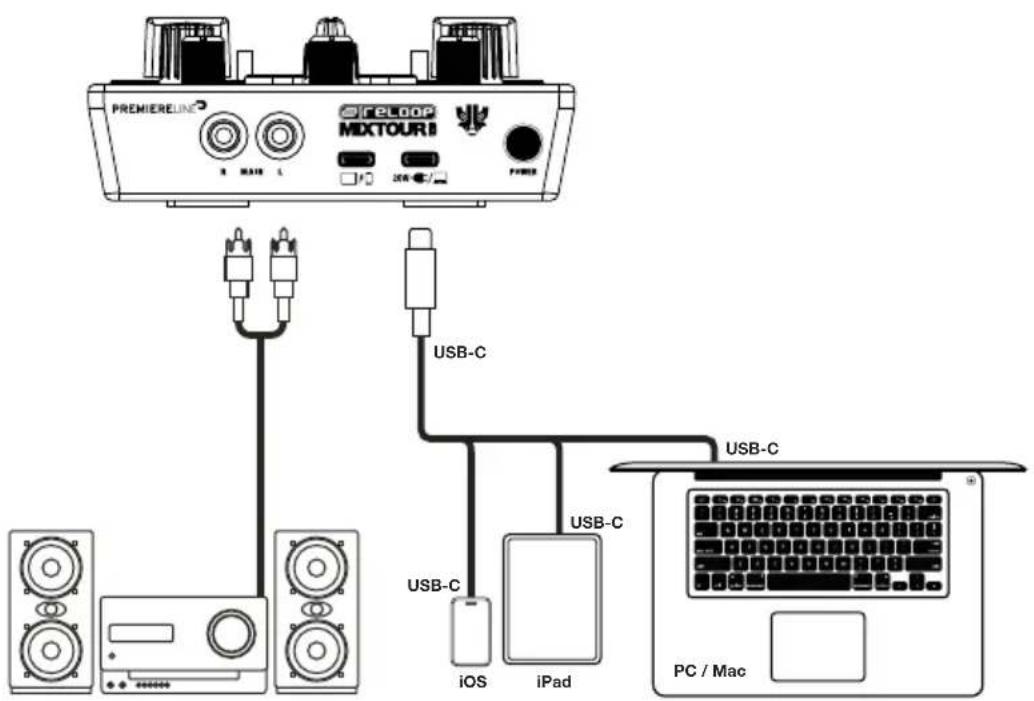
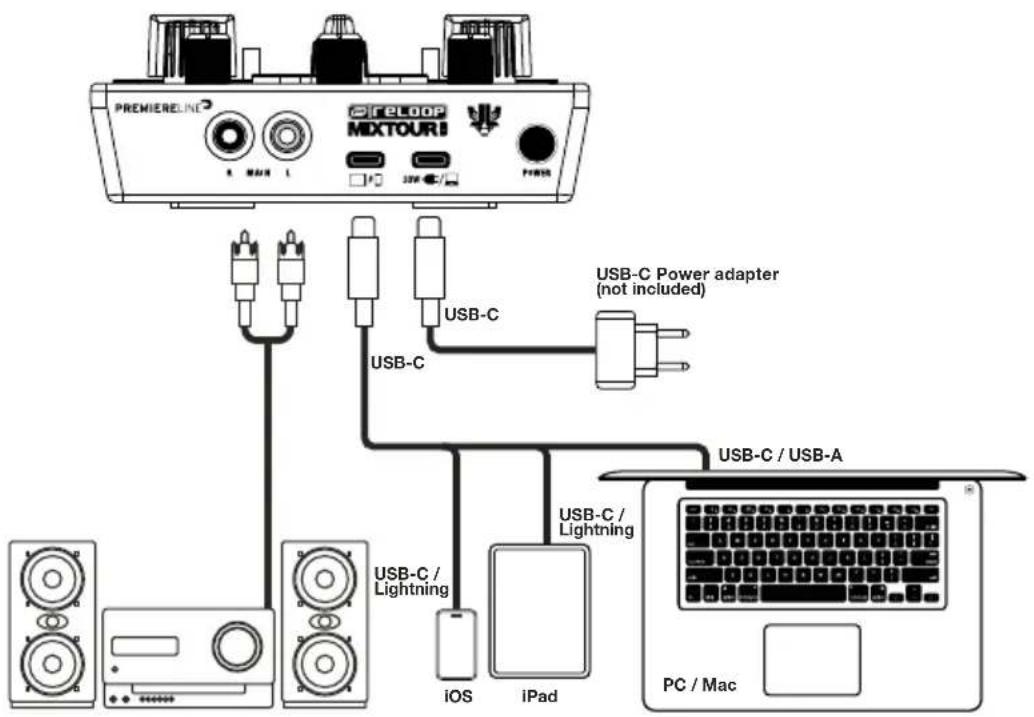
Connect your playback device's power supply to the Mixtour Pro's power port (28). If your device's power supply uses a lightning connection, use the supplied USB-C cable for this step. Your playback device will be charged by the Mixtour Pro (min. 20W power supply).
USB CONNECTION
Connect your playback device to the Reloop Mixtour Pro's USB-C Connection Port (27) using either the included USB-C cable or a Lightning to USB-C cable.
MASTER OUT
Connect your main system (e.g. active speakers) to the Master Out (RCA) (26).
NOTE
Alternatively, the Mixtour Pro can be bus-powered by USB-C devices (e.g., a laptop or iPad) with sufficient power output. In the example below, the Mixtour Pro is connected to the desired playback device via the USB-C Power Port (29).
text_image
PREMIERE LINE MIXTOURI USB-C USB-C iOS iPad PC / MacDJAY PRO INSTALLATION & CONNECTION
DJAY PRO IPAD/IPHONE INSTALLATION
- Scan the QR code or search for the djay Pro app in the App Store and download it.
- Connect your playback device to the Mixtour Pro's USB-C connection port (27) and your power supply to the Reloop Mixtour Pro's USB-C power port (28).
- Open the previously downloaded djay Pro app.
Your Mixtour Pro will be automatically detected and is ready to use.

DJAY PRO WINDOWS INSTALLATION
- Search for the djay Pro app in the Microsoft Store and download it.
- Connect your computer to the Mixtour Pro's USB-C connection port (27).
- Open the previously downloaded djay Pro app.
Your Mixtour Pro will be automatically detected and is ready to use.
An additional ASIO driver for low latency is available at www.reloop.com/downloadfinder. This driver is optional and not required for operation.
DJAY ANDROID INSTALLATION
If you want to use an Android device with the Reloop Mixtour Pro, please first check our FAQ at www.reloop.com/faqs/. Download the djay app from the Google Play Store and connect as described above.
OPERATION
The Mixtour Pro offers advanced mapping functions. For an overview of these functions, please follow this link: www.reloop.com/reloop-mixtour-pro-mapping
1. MASTER VOLUME
The Master Volume control (1) adjusts the master output volume.
2. CHANNEL GAIN
The Channel Gain (2) adjusts the channel's output volume.
3. BROWSE ENCODER
Use the Browse Encoder (3) to navigate through your music libraries. Press the Browse Encoder to confirm your selection. Press Shift (20) + Browse Encoder to go back one step in the menu. Turning the Browse Encoder while holding Mode (6) allows you to browse the track currently playing.
4. TRACK LOAD BUTTONS
Press the Track Load Button (4) to assign a track to the desired deck. Hold Mode (6) and press the Track Load Buttons to switch to decks 3 and 4. Hold Shift + press the left Track Load Button to move left through the My Collection libraries section and the right Track Load Button to move right.
5. SPLIT BUTTON
Splits the eight performance pads. The four left pads control the left channel, and the four right pads control the right channel.
6. MODE BUTTONS
Pressing the Mode Buttons (6) activates the performance mode selector. You can now select the desired performance mode by pressing the corresponding pad. Pressing Mode + a selected button activates the second-layer functions as shown on the device label.
7. PERFORMANCE SECTION
The Performance Pads (7) are colour-coded drum pads that trigger the selected performance mode. The different performance modes can be activated by holding down the Mode Button (6) and simultaneously pressing the selected performance pad mode. The following performance modes are available:
- Hot Cue Mode
This triggers the eight available cue points, and the pads light up in the corresponding colours. Pressing Shift (20) and the corresponding cue pad deletes the selected cue point.
- Auto Loop Mode
Each of the eight performance pads has a different loop length. Pressing Auto Loop Mode will activate it immediately based on the length. Pressing it again will deactivate Auto Loop.
- Bounce Loop
Press one of the eight pads to loop a track. The length of the loop varies from pad to pad.
- Sampler
Triggers the corresponding sample in the sample bank using the drum pads.
- Pitch Cue
Set the musical key for the track by pressing the pads. Hold Shift and press the pads to switch between different cue points.
- Saved Loops
A bank of up to eight hot loops per track for instant recall. These hot loops act like saved cue points. Hold Shift and press the desired pad to trigger the saved loops instantly.
- Instant FX
The drum pads have a variety of instant effects that are activated by pressing the corresponding pad.
- Neural Mix™
Use the pads to control the various Neural Mix ^TM elements.
8. EQUALIZER (3-BAND/NEURAL MIX™ EQ)
Control the channel's highs, mids and lows or the different Neural Mix™ Elements (Vocals, Harmonic, Drums).
9. NEURAL MIX™ BUTTONS
Switch between the Neural Mix ^TM equalizer or standard equalizer.
10. FILTER
The filter is off at the 12 o'clock position. Turning the filter clockwise creates a high-pass effect, and turning it anti-clockwise creates a low-pass effect.
11. FX PADDLES
Use the FX Paddles (12) to activate the previously selected effect. The effect is switched off in the centre position. If you lock the paddle in the forward position, the effect will remain on until you return the paddle to the centre position. If you only want to use the effect temporarily, you can retract the paddle for the desired effect duration. Then, when you release the FX Paddle, it will automatically return to the centre position.
12. FX DRY/WET CONTROL
The FX Control (13) allows you to adjust the FX intensity (dry/wet) of the selected effect. The effect is off in the dry position. As you turn the FX Control clockwise towards the wet position, the intensity of the effect increases. The Dry/Wet control affects both decks.
13. FX PARAMETER BUTTONS (FX SELECT)
The Parameter Buttons (14) allow you to control the parameter functions depending on the active mode (e.g. FX parameter adjustment). You can select the desired effect by pressing Mode (6) + the FX Parameter Buttons. The FX Parameter Buttons affect both decks.
14. HEADPHONE CUE BUTTONS
The Headphone Cue Buttons (15) allow you to monitor the audio signal of each channel. Pressing the left Headphone Cue Button while holding down Shift (20) activates Crossfader FX. Pressing the right Headphone Cue Button while holding down the Shift key activates tempo blend for the Crossfader FX.
15. LOOP IN-OUT-EX BUTTONS
Pressing the Loop In-Out-Ex Button (16) once sets the start point of a loop. Pressing it again sets the end point of the loop. Press a third time to exit the loop. Press Shift (20) + In-Out-Ex to set an Auto Loop.
16. SYNC BUTTONS
Press Sync (17) to automatically adjust the BPM of one track to the other deck. Press Sync again to deactivate the Sync function. Press Shift (20) + Sync to match the musical key of the track currently playing.
17. CUE BUTTONS
Use the Cue Buttons (18) to create and trigger a temporary cue point. Pressing the cue button during playback will stop playback and automatically jump back to the set cue point. If you pause playback and then press the Cue button, a new cue point is created at that track position. Hold Mode (6) and press the Cue Button to set the musical key of the track downwards. Hold Shift (20) and press the Cue Button to bend a pitch downwards.
18. PLAY/PAUSE BUTTONS
The Play/Pause Button (19) starts/pauses playback of the selected deck. Hold Mode (6) and press the Play/Pause Button to set the musical key of the track upwards. Hold Shift (20) and press the Play/Pause Button to bend a pitch upwards.
19. SHIFT BUTTON
Pressing Shift (20) + a selected button activates the corresponding second-layer functions as shown on the device label.
20. LINE FADERS
The Line Faders (21) are used to adjust the output volume of the channels.
21. CROSSFADER
The Crossfader (22) switches between the left and right channels.
22. HEADPHONE CUE VOLUME
Use the Headphone Cue Volume control (23) to adjust the volume of your headphone signal.
The Headphones Cue Mix control (24) mixes the volume balance between the channel and the master signal via the headphones.
24. MONO/STEREO SWITCH
The Mono/Stereo Switch (25) selects between stereo or mono output of the master out signal.
MINIMUM SYSTEM REQUIREMENTS
You can check the latest system requirements for iOS/iPadOS, Android, Mac or Windows at algoriddim.com.
TECHNICAL DATA
Outputs: Master RCA (unbalanced), headphone 3,5 mm stereo jack, USB-C data port
Sound Card Resolution: 4x Out USB sound card with 24-bit D/A converters
Minimum Power: USB-C DC IN 5-20V / 20W
Power delivery: max. 45W
Dimensions (W x D x H): 129 x 310 x 51 mm
Weight: 956 g
MAIN (RCA) OUTPUT
Level: 18 ± 1 dBu
THD+N: < 0.03%
S/N: < -100dB
Frequency Res.: ±2dB / 20\~20KHz
Separation: .... > 100dB
HEADPHONE (3.5MM TRS) OUTPUT @ 32OHM LOADING
Level: 4±1dBu
THD+N: < 0.03%
S/N: ....../< -100dB
Frequency Res.: ±2dB / 20\~20KHz
SCOPE OF DELIVERY
Includes USB-C to USB-C cable and instruction manual
text_image
31 eFELLOOP algorithm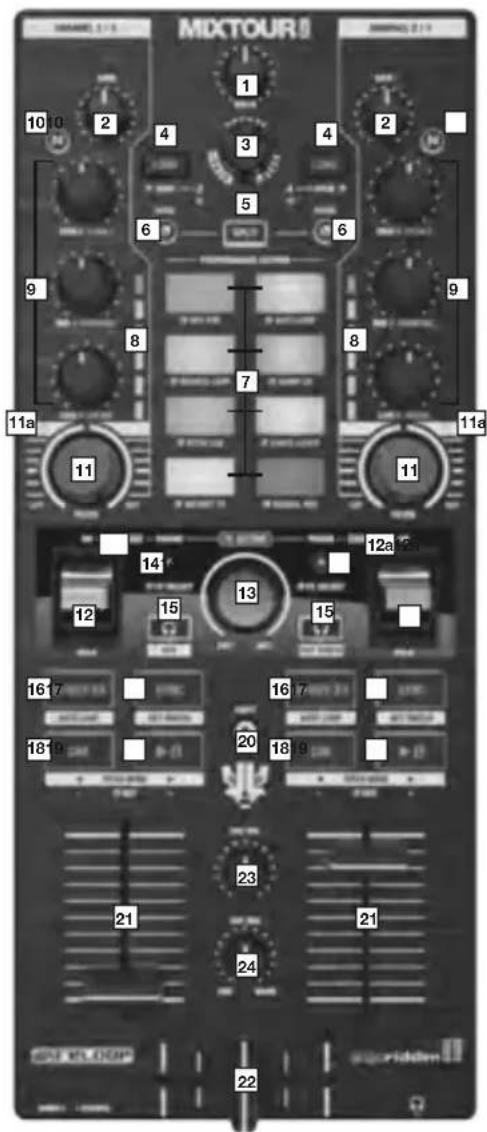
text_image
MIXTOUR II 10 10 2 4 3 4 2 6 5 6 9 8 7 8 9 11a 11 11 14 13 12a 2 12 15 15 16 17 16 17 18 19 20 18 21 23 21 24 22 SWEI MLEON
text_image
greloop algoriddim
text_image
MDCTOUR II 2526- Master Volume
- Channel Gain
- Browse Encoder
- Track Load Tasten
- Split Tasten
- Mode Tasten
- Performance Section
- VU Meter
- Equalizer (3-Band/Neural MixTM)
- Neural Mix™ Tasten
- Filter
11a. Filter On/Off LED - FX Paddles
12a. FX Paddles On/Off LED - FX Dry/Wet Control
- FX Parameter Tasten
- Headphone Cue Tasten
-
Loop In-Out-Ex Tasten
-
Sync Tasten
- Cue Tasten
- Play/Pause Tasten
- Shift Button
- Linefader
- Crossfader
- Headphone Cue Volume
- Headphone Cue Mix
- Mono/Stereo Switch
- Headphones Out (3,5 mm Jack)
- Master Out
- USB-C Power Delivery Port
- USB-C Charging / Bus Powering Port
- Power On/Off
- Kensington Lock
MINIMALE SYSTEMANFORDERUNGEN
Outputs: Master RCA (unbalanced), headphone 3,5 mm stereo jack, USB-C data port
Sound Card Resolution: 4x Out USB sound card with 24-bit D/A converters
Minimum Power: USB-C DC IN 5-20V / 20W
Power delivery: max. 45W
Dimensions (W x D x H): 129 x 310 x 51 mm
Weight: 956 g
MAIN (RCA) OUTPUT
Level: 18±1dBu
THD+N: < 0.03%
S/N: .....< -100dB
Frequency Res.: ±2dB / 20\~20KHz
Separation: .... > 100dB
HEADPHONE (3.5MM TRS) OUTPUT @ 32OHM LOADING
Level: 4±1dBu
THD+N: < 0.03%
S/N: < -100dB
Frequency Res.: ±2dB / 20\~20KHz
LIEFERUMFANG
text_image
31 eFELLOOP algorithm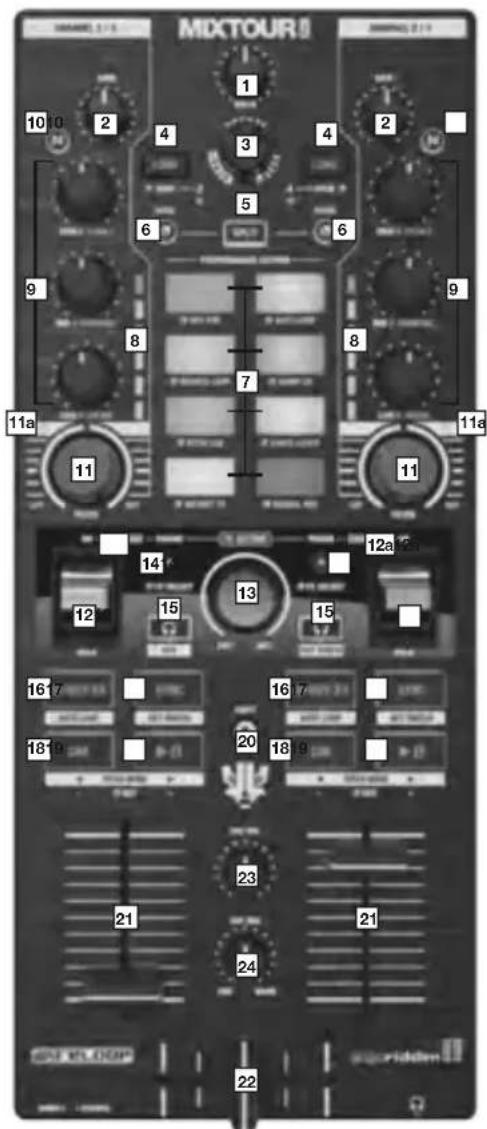
text_image
MIXTOUR II 10 10 2 4 3 4 2 6 5 6 9 8 7 8 9 11a 11 11 14 13 12a 12 12 15 15 16 17 16 17 18 19 20 18 21 21 23 21 24 22 SINHOLDUP SOPRIDDEN
text_image
greloop algoriddim
text_image
MDCTOUR 2526- Master Volume
- Channel Gain
- Browse Encoder
- Track Load Buttons
- Split Button
- Mode Buttons
- Performance Section
- VU Meter
- Equalizer (3-Band/Neural MixTM)
- Neural Mix™ Buttons
- Filter
11a. Filter On/Off LED - FX Paddles
12a. FX Paddles On/Off LED - FX Dry/Wet Control
- FX Parameter Buttons
- Headphone Cue Buttons
-
Loop In-Out-Ex Buttons
-
Sync Buttons
- Cue Buttons
- Play/Pause Buttons
- Shift Button
- Linefader
- Crossfader
- Headphone Cue Volume
- Headphone Cue Mix
- Mono/Stereo Switch
- Headphones Out (3,5 mm Jack)
- Master Out
- USB-C Power Delivery Port
- USB-C Charging / Bus Powering Port
- Power On/Off
- Kensington Lock
RACCORDEMENT DU RELOOP MIXTOUR PRO
text_image
PREMIERE.LINE MIXTOURI USB-C USB-C Power adapter (not included) USB-C / USB-A USB-C / Lightning USB-C / Lightning iOS iPad PC / MacPUISSANCE
Outputs: Master RCA (unbalanced), headphone 3,5 mm stereo jack, USB-C data port
Sound Card Resolution: 4x Out USB sound card with 24-bit D/A converters
Minimum Power: USB-C DC IN 5-20V / 20W
Power delivery: max. 45W
Dimensions (W x D x H): 129 x 310 x 51 mm
Weight: 956 g
MAIN (RCA) OUTPUT
Level: 18±1dBu
THD+N: < 0.03%
S/N: < -100dB
Frequency Res.: ±2dB / 20\~20KHz
Separation: .... > 100dB
HEADPHONE (3.5MM TRS) OUTPUT @ 32OHM LOADING
Level: 4±1dBu
THD+N: < 0.03%
S/N: < -100dB
Frequency Res.: ±2dB / 20\~20KHz
CONTENU DE LA LIVRAISON
Outputs: Master RCA (unbalanced), headphone 3,5 mm stereo jack, USB-C data port
Sound Card Resolution: 4x Out USB sound card with 24-bit D/A converters
Minimum Power: USB-C DC IN 5-20V / 20W
Power delivery: max. 45W
Dimensions (W x D x H): 129 x 310 x 51 mm
Weight: 956 g
MAIN (RCA) OUTPUT
Level: 18±1dBu
THD+N: < 0.03%
S/N: < -100dB
Frequency Res.: ±2dB / 20\~20KHz
Separation: .... > 100dB
HEADPHONE (3.5MM TRS) OUTPUT @ 32OHM LOADING
Level: 4±1dBu
THD+N: < 0.03%
S/N: < -100dB
Frequency Res.: ±2dB / 20\~20KHz
VOLUMEN DE ENTREGA
LEARN MORE ABOUT THE FULL
text_image
MIXON8PROSMART DISPLAY STAND
PREMIUM MODULAR BAG XT
natural_image
Open black plastic medical tool kit with internal compartments and buttons (no visible text or symbols)RHP15
natural_image
Black outdoor headphones with earbuds and black headband (no visible text or logos)RELOOP PRODUCT RANGE
natural_image
Two black vinyl recorders with color-coded dials and a digital dashboard interface (no visible text or symbols on the devices themselves)RP8000MK2
ELIT3
SPiN
natural_image
Two black audio/video speakers with speaker towers and sound waves (no visible text or labels)
natural_image
Exterior view of a vintage CD or DVD disc with visible branding and control knobs (no readable text beyond branding)
natural_image
Smartphone displaying a video player interface with multiple video thumbnails (no readable text or symbols)DSM3BT
eRELOOP
www.reloop.com

www.reloop.com
Reloop Distribution
Global Distribution GmbH & Co. KG,
Schuckertstrasse 28, 48153 Muenster / Germany
Fax:+49.251.6099368
Subject to alterations.
Illustrations similar to original product.
Misprints excepted.
- Apple, iPhone, iPad, Apple Music, Mac and Mac OS are registered trademarks of Apple Inc. in the U.S. and other countries
- App Store is a service mark of Apple Inc.
- iOS is a trademark containing cisco trademark signs in the U.S. and other countries
- Windows is a registered trademark of Microsoft Corporation in the U.S. and other countries
-Beatport is a trademark of Beatport, LLC. - Soundcloud is a trademark of SoundCloud Limited
- DJAY®, DJAY PRO® NEURAL MIX®, and ALGORIDDIM® are registered trademarks of Algoriddim GmbH in the United States and other countries
- NEURAL MIX is covered by patents in the United States and other countries, which are assigned to ALGORIDDIM GmbH and identified at www.algoriddim.com/patents
- Issued Patents include without limitation: US Patent No. 10,887,033 B1, US Patent No. 11,216,244 B2, US Patent No. 11,347,475 B2, JP Patent No. 6926354 B1 18:13
- Tidal is a trademark of Aspiro AB.
- Beatsource is a trademark of Beatsource, LLC.
UK Distribution:
Henley Designs Ltd.
Unit B, Park 34, Collett
OX11 7WB, Didcot, Oxfordshire, UK
CAN ICES-003(B)/
NMB-003(B)

UK CA EAC

€
Made for
iPhone | iPad
Japanese Distribution:
Portable 4-Deck DJ Controller
VOLTAGE DC 5 - 20V USB 2 - 3A
Ginza Jujiya Co., Ltd.


This device complies with Part 15 of the FCC rules. Operation is subject to the following two conditions:
(1) this device may not cause harmful Interference, and
(2) this device must accept any interference received, including interference that may cause undesired operation.