
Freemove iSize - Child seat BabyGO - Free user manual and instructions
Find the device manual for free Freemove iSize BabyGO in PDF.

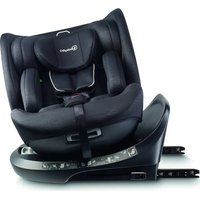
| Product type | Child car seat |
| Brand | BabyGO |
| Model | Freemove iSize |
| Category | Child car seat |
| Safety standard | i-Size (R129) |
| Orientation | Forward-facing |
| Child height (group I) | 76–105 cm (≤18 kg) |
| Child height (group II/III) | 100–150 cm |
| Restraint system (group I) | Integrated 5-point harness |
| Restraint system (group II/III) | Vehicle 3-point seat belt |
| Installation | ISOFIX + Top Tether or 3-point belt |
| Number of headrest positions | 8 adjustable heights |
| Infant insert | Included, for children <87 cm |
| Storage pouch | Yes, on the side of the base (for manual) |
| Cover cleaning | Machine washable (warm water, mild detergent) |
| Harness cleaning | Hand wash only, do not machine wash |
| Warranty | 12 months (original purchaser) |
| Recommended lifespan | 5 years max |
| Replacement after accident | Mandatory |
| Use on front seat | Prohibited if active frontal airbag |
Frequently Asked Questions - Freemove iSize BabyGO
User questions about Freemove iSize BabyGO
0 question about this device. Answer the ones you know or ask your own.
Ask a new question about this device
Download the instructions for your Child seat in PDF format for free! Find your manual Freemove iSize - BabyGO and take your electronic device back in hand. On this page are published all the documents necessary for the use of your device. Freemove iSize by BabyGO.
USER MANUAL Freemove iSize BabyGO
natural_image
Abstract logo design with a stylized lowercase 'b' inside a cloud-like outline (no text or symbols)FREEMOVE I-SIZE
FREEMOVE i-Size - Kindersitz
MONTAGEANLEITUNG
FREEMOVE i-Size - Child seat
INSTRUCTION MANUAL
MANUEL D'INSTRUCTIONS
FREEMOVE i-Size - Kinderzitje
GEBRUIKSAANWIJZING

babyGO
BabyGo Baby Products GmbH
Am Bahndamm 1-3
KEEP FOR FUTURE REFERENCE.
READ CAREFULLY.
BabyGo Baby Products GmbH
Am Bahndamm 1-3
natural_image
Line drawing of a car seatbelt with no text or symbolsFREEMOVE
Seite 04 - 19
DEUTSCH
Page 20 - 35
ENGLISH
Page 36 - 51
FRANCE
Pagina 52 - 67
NEDERLANDS

babyGO

babyGO
natural_image
Line drawing of a car comfort seat with no text or symbolsnatural_image
Line drawing of a car seat assembly (no text or symbols)WIEDERANBRINGEN DES BEZUGS
natural_image
Illustration of a hand cutting a cable with a red arrow indicating the direction (no text or symbols)
babyGO
FREEMOVE I-SIZE
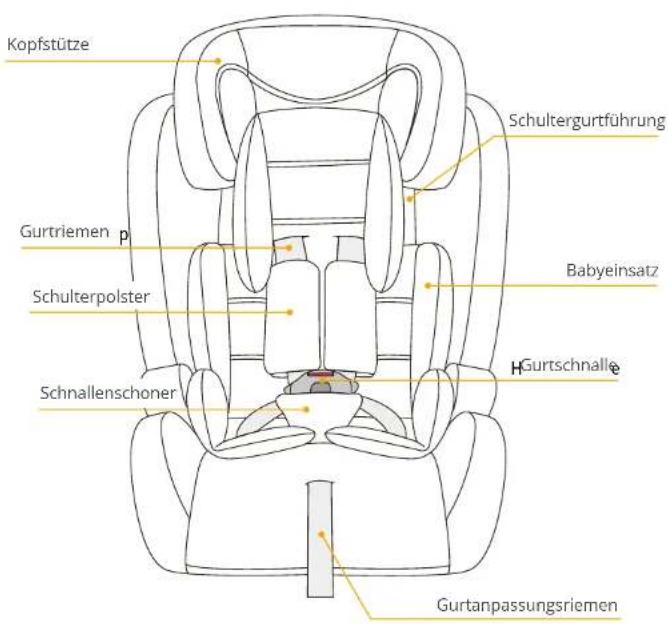
TEILEÜBERSICHT
natural_image
Line drawing of a car seat with seatbelt and seat, no text or symbols present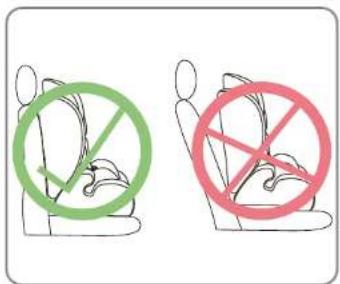
natural_image
Illustration showing a hand pressing down on a mechanical component with an arrow indicating direction (no text or symbols present)

natural_image
Line drawing of a car seat with seatbelt and seat rack (no text or symbols)
FREEMOVE I-SIZE

babyGO
natural_image
Line drawing of a car comfort seat with multiple seats and seat covers (no text or symbols)EN INSTRUCTION MANUAL
Dear Parents:
Thank you for purchasing the child seat.
Please read and follow all instructions before using the child seat.
WARNING! Read the Instruction carefully before use and keep them for future reference.
FREEMOVE I-SIZE
WARNING
READ CAREFULLY AND READ CAREFULLY AND KEEP THESE INSTRUCTIONS FOR FUTURE REFERENCE
- Please read this user manual carefully. The correct installation of the ISOFIX and Top Tether attachment systems or the 3-point harness is crucial for the safety of your child.
- For future use of the seat, it is important that you keep the user manual carefully. There is a pocket on the side of the base where the manual can be stored together with the child restraint device.
- Never leave your child unattended in the car.
- Do not use a child safety seat if the vehicle seat is equipped with a front airbag. This can be dangerous. This does not apply to so-called side airbags.

babyGO
WARNING
- Please read the user manual carefully before using this product. Improper use can compromise safety.
- Use the seat only on a forward-facing seat that is equipped with either ISO-FIX and Top Tether anchors or a 3-point harness according to ECE R16 or an equivalent standard.
- Mounting on the rear seat is recommended to enhance safety.
- The seat complies with European safety standards and is suitable for children from 76-105 cm with ISOFIX and Top Tether or from 100-150 cm with ISOFIX and a 3-point harness.
- Replace the seat after an accident, as hidden damage can compromise safety.
- The safety guarantee applies only to the Initial purchaser. Avoid purchasing used seats as their history is unknown.
• Always use the provided strap pads to ensure safety. - Secure luggage and other items in the vehicle to minimize injury risks in accidents.
- A maximum lifespan of 5 years is recommended to exclude age-related safety concerns.
- Avoid lubricating moving parts of the seat, as this can affect functionality.
- Use only original covers as they contribute to the seat's safety.
- The seat must be secured even when not in use to prevent injuries during sudden stops.
- Avoid damage from being trapped in doors, under luggage, or adjustable seats.
- Modifications to the product are prohibited and can compromise safety.
- Protect the seat from strong sunlight to avoid heat-related damage.
- Do not remove the logo to prevent damage to the cover.
- Consistently use the seat, even for short trips.
- Check the seat's compatibility with your vehicle before purchase.
- Plan breaks on long journeys to allow your child to rest.
- Set a good example as the driver by always wearing your seatbelt.
- Instruct children not to use the buckle as a toy.
- Never leave your child unattended in the child seat.
- Ensure that all vehicle occupants are wearing seatbelts and that seatbacks are locked.
FREEMOVE I-SIZE
- Secure all heavy or sharp-edged objects in the vehicle.
- Protect sensitive vehicle seat covers with an additional pad under the child seat.
- Follow additional instructions that contribute specifically to child safety, such as properly fastening the harness system and avoiding leaving the child on elevated surfaces or in the sun.

babyGO
CERTIFICATION
Read the car manual rst and check whether the car seat is equipped with ISOFIX attachment fixed anchor points, and check the size of recommended ISOFIX attachment constraints on the system if it is matched our ISOFIX attachment size.
WARNING! Only suitable when the approved vehicles are equipped with 3-point safety belts approved according to UN/ECE Regulation No. 16 or other equivalent standards.
I-size:
Child's height: 76-105cm ≤18kg
Orientation: forward-facing
Seat installation method: seatbelt only
Child restraint: 5-point harness of the child seat
I-Size booster seat:
Child's height: 100-150cm
Orientation: forward-facing
Seat installation method: seatbelt only
Child restraint: seatbelt only
FREEMOVE I-SIZE
Here is the positions of installation for your reference
Forward facing
Rear facing
Two points seat belts
√ Three points seats belts
× Front passenger seat
√ The rear vehicle seats
WARNING! If your child is secured in the vehicle seat with only a 2 point belts, he or she could sustain serious injuries possibly resulting in death. Never use in connection with a 2 point belts.
- Do not fasten the child seat on the front passenger seat with validated airbag as it will casue death or serious injury if airbag exploded. Please always secure the child seat on the rear seats.
- Do not fasten the child seat on the rear facing or lateral vehicle seats. Please refer to the following graphic when you install your child seat
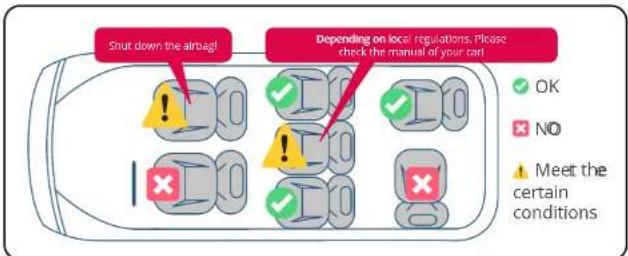
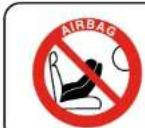
DO NOT place rear-facing child seat on front seat with airbag. IMPORTANT-DO NOT use forward facing before the child's age exceeds 15 months. DEATH OR SERIOUS INJURY can occur.

babyGO
MAINTENANCE
WASHING INSTRUCTIONS
The covers are machine washable. Wash the covers with warm water and a neutral detergent.
Note: To ensure safety, do not remove or wash the straps and shoulder pads. If these parts become dirty, clean them by hand with warm water or a neutral detergent and allow them to air dry. Alternatively, have these components replaced by customer service.


WARRANTY
The warranty period starts from the date of purchase and is valid for a period of 12 months. The warranty is only applicable to the original owner and is not transferable. The warranty is only applicable to products that have not been adapted by the user. In the case of any defects, the owner is required to return the product to the retailer. If the retailer can not solve the problem, he must return the product, complete with a clear description of the complaint and a validated purchase receipt to the manufacturer. Exchanger or return can not be demanded. Repairs do not constitute an extension to the warranty term. The manufacturer is not liable for any damages other than those on products supplied.
No warranty is given if:
• The product is not supplied complete with the validated purchase receipt to the manufacturer.
- Defects are caused by misuse or maintenance which differ from that indicated in the instruction manual.
• Repairs are carried out by third parties.
• Defects are caused by neglect.
- Damage or removal of any serial number is found.
- If there is normal wear and tear which may be expected from everyday use.
- The stated warranty terms and conditions have not been satisfied.
WASHING INSTRUCTIONS
FREEMOVE I-SIZE
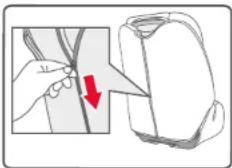
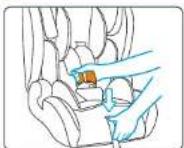
REMOVE COVER.
- Open the snap button on the cover at the lower end of the seat back, as shown in the image on the right.

natural_image
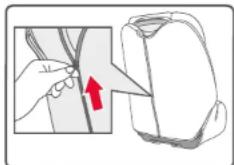
Line drawing of a car seat with four seats and two legs (no text or symbols)REATTACHING THE COVER.
- After washing, put the cover onto the shell frame.
natural_image
Illustration of a hand cutting a cable with a red arrow indicating the direction (no text or symbols present)
babyGO
FREEMOVE I-SIZE
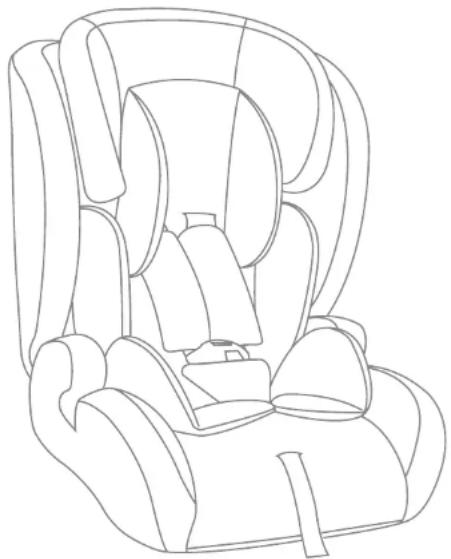
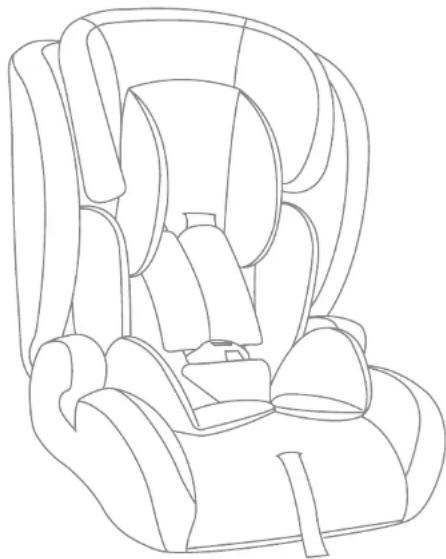
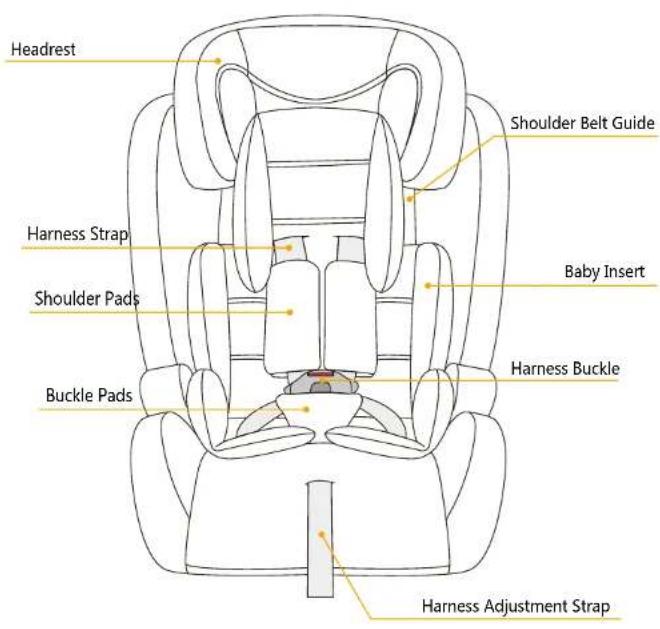
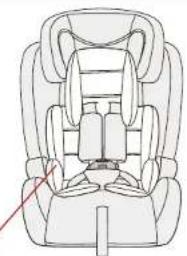
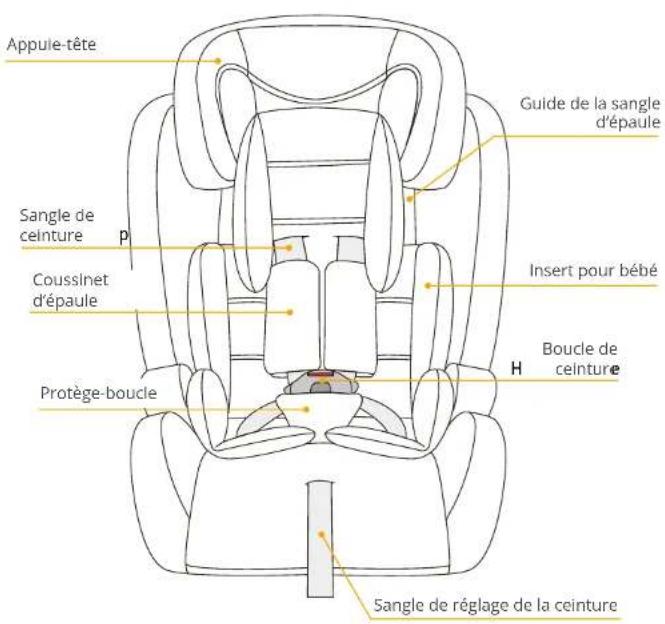
PARTS OVERVIEW

babyGO
FREEMOVE I-SIZE
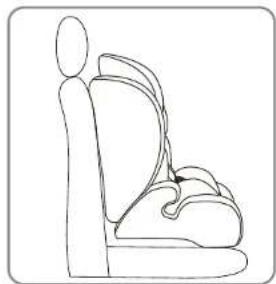
INSTALLATION
INSTALLATION OF 76-105CM INSTALLATION OF 100-150CM
natural_image
Line drawing of a car seat with seatbelt and seat, no text or symbols present

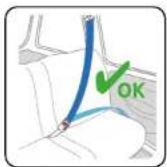
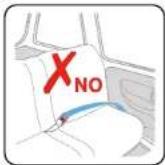
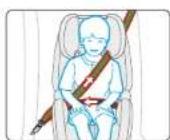
ADULT SAFETY-BELT ONLY
Warning: Do not to use any load bearing contact points other than those described in the instructions and marked in the child restraint. The belt must be routed as shown in the instructions.
natural_image
Diagram showing two steps of a mechanical or fluidic process, with no visible text or symbols.- Adjust the height of the head-rest to suit your child.
- Put the shoulder belt through the shoulder
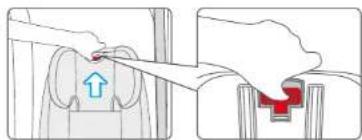
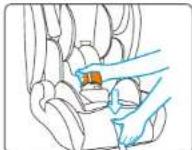
- Place your child on the car seat and pass the belts through the red waist belt guide. Fasten the car belt with an audible sound "click".
- Make sure the Lap belt is stretched as low as possible over the child's hips, and fastened into the buckle. The shoulder belt must cross midway between child's shoulder and neck.

babyGO
SECURING YOUR BABY
SECURING YOUR BABY USING THE BABY INSERT
Please use the baby insert attached to this car seat when your baby, s height is less than 87cm. The baby insert is used to provide extra comfort for very small babies, and it gives your baby the necessary support while he or she is still small.
natural_image
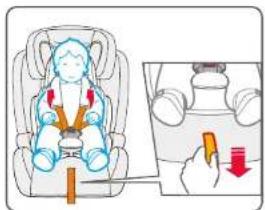
Line drawing of a car seat assembly (no text or symbols)HOW TO ADJUST THE BELTS, HEADREST AND SEAT POSITIONS
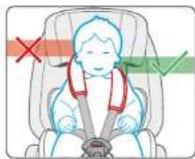
Important: The correct belt height of the shoulder belts is attained when the belt disappears into the shell slightly above the shoulder of the child. Make sure that the shoulder belts fit properly over the shoulders of the child.
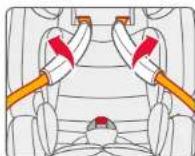
ADJUSTING THE BELTS
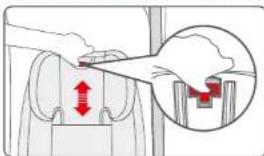
- Loosen the harness straps by pressing the release button and pulling the harness straps as far as you can. Note! Do not pull the shoulder pads.
FREEMOVE I-SIZE
EIGHT HEIGHTS OF THE HEADREST

- The headrest can be set at five different heights in group I mode. There are three additional positions in Group II & III mode once the shoulder pads and harness straps has been removed.
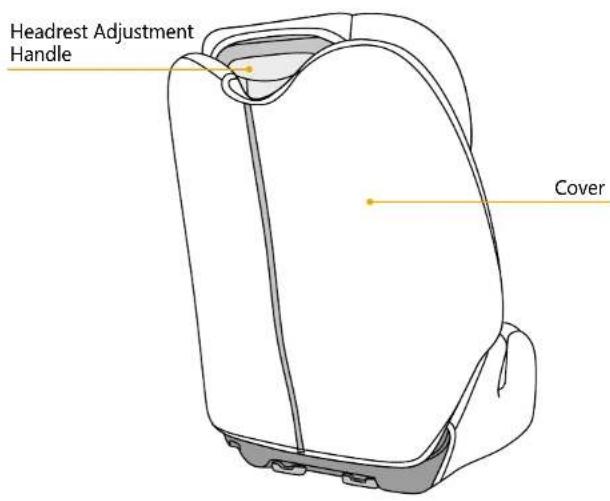
- Press and pull the handle behind headrest. It is important to make sure the head-rest fit properly to head
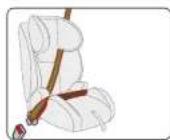
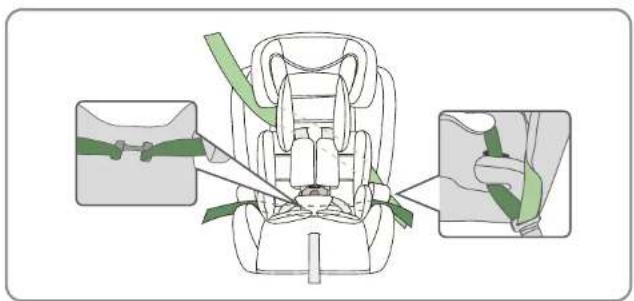
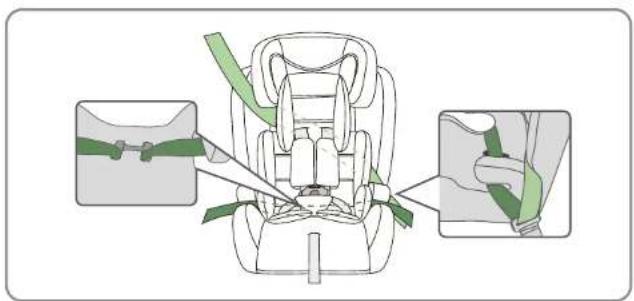
SECURING YOUR BABY USING THE HARNESS
- Loosen the harness straps by pressing the release button and pulling the harness straps as far as you can. Note! Do not pull the shoulder pads.

- Open the harness buckle, then place the harness straps to the sides of the car seat. Put the baby into the car seat.
- The correct belt height of the shoulder pads is attained when the strap disappears into the shell slightly above the shoulder of the child. Make sure that the harness straps fit properly over the shoulders of the child.

babyGO
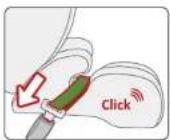
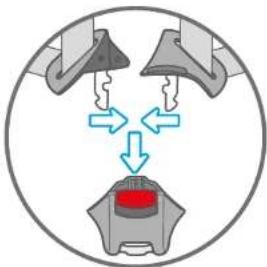
- Slide buckle tongues together and insert them in the buckle with an audible sound "click".
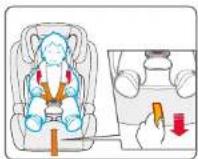
- Pull the straps tight by the harness adjustment strap, and make sure the tightness is comfortable to your kid.
Caution: Do not twist or interchange the harness straps.
TIGHTENING THE HARNESS
Pull the straps end straight towards you, not upwards or downwards.
Please pay attention to the strap end. Whilst traveling (especially outside the car) it should always be attached to the cover.
FREEMOVE I-SIZE
CHECKLIST TO ENSURE THAT YOUR BABY IS BUCKLE UP CORRECTLY.
- The harness straps of the car seat are comfortable but firmly fit around your child.
- The harness straps are adjusted correctly.
- The harness straps are not twisted.
- The buckle tongues are engaged in the harness buckle.

babyGO

natural_image
Line drawing of a car comfort seat with multiple seats and straps (no text or symbols)FR MODE D'EMPLOI
Chers parents
natural_image
Line drawing of a car seat with four seats and top seat (no text or symbols)RÉATTACHER LA HOUSSE.
natural_image
Illustration of a hand holding a cable with a red arrow pointing to it, next to a white bag (no text or symbols)
babyGO
FREEMOVE I-SIZE
APERÇU DES PIÈCES
natural_image
Line drawing of a car seatbelt seat (no text or symbols)
FREEMOVE I-SIZE
INSTALLATION POUR UNE TAILLE DE 100-150 CM AVEC CEINTURE DE SÉCURITÉ POUR ADULTES UNIQUEMENT.
natural_image
Illustration showing two steps of a mechanical or fluidic process, with no visible text or symbols.natural_image
Line drawing of a car seat with seatbelt and seatbelt (no text or symbols)COMMENT AJUSTER LES CEINTURES, L'APPUIE-TÊTE ET LA POSITION DU SIÈGE

FREEMOVE I-SIZE
LISTE DE CONTRÔLE POUR S'ASSURER QUE VOTRE BÉBÉ EST BIEN ATTACHÉ.

babyGO

natural_image
Line drawing of a car comfort seat with seats and straps (no text or symbols)natural_image
Line drawing of a car seat assembly (no text or symbols)natural_image
Illustration of a hand cutting a cable with a red arrow indicating the direction (no text or symbols present)natural_image
Line drawing of a car seatbelt seat (no text or symbols)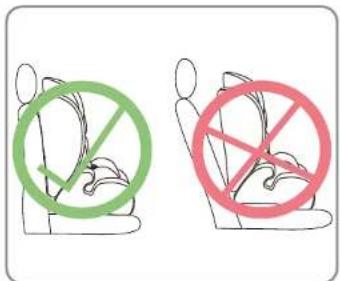
FREEMOVE I-SIZE
INSTALLATIE VOOR EEN LENGTE VAN 100-150 CM MET ENKEL DE VEILIGHEIDS-GORDEL VOOR VOLWASSENEN.
natural_image
Illustration showing a mechanical assembly with an arrow indicating direction (no text or symbols present)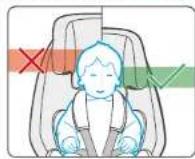
FREEMOVE I-SIZE
CONTROLELIJST OM ERVOOR TE ZORGEN DAT UW BABY GOED IS VASTGEMAAKT
natural_image
Diagram showing mechanical components with arrows indicating motion or force directions (no text or symbols)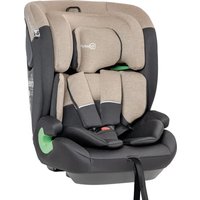
- FREEMOVE I-SIZE
- MONTAGEANLEITUNG
- INSTRUCTION MANUAL
- MANUEL D'INSTRUCTIONS
- GEBRUIKSAANWIJZING
- FREEMOVE
- babyGO
- WIEDERANBRINGEN DES BEZUGS
- EN INSTRUCTION MANUAL
- WARNING
- READ CAREFULLY AND READ CAREFULLY AND KEEP THESE INSTRUCTIONS FOR FUTURE REFERENCE
- CERTIFICATION
- I-size:
- I-Size booster seat:
- Here is the positions of installation for your reference
- MAINTENANCE
- WASHING INSTRUCTIONS
- WARRANTY
- No warranty is given if:
- REMOVE COVER.
- REATTACHING THE COVER.
- INSTALLATION
- ADULT SAFETY-BELT ONLY
- SECURING YOUR BABY
- HOW TO ADJUST THE BELTS, HEADREST AND SEAT POSITIONS
- ADJUSTING THE BELTS
- EIGHT HEIGHTS OF THE HEADREST
- SECURING YOUR BABY USING THE HARNESS
- TIGHTENING THE HARNESS
- CHECKLIST TO ENSURE THAT YOUR BABY IS BUCKLE UP CORRECTLY.
- FR MODE D'EMPLOI
- RÉATTACHER LA HOUSSE.
- INSTALLATION POUR UNE TAILLE DE 100-150 CM AVEC CEINTURE DE SÉCURITÉ POUR ADULTES UNIQUEMENT.
- COMMENT AJUSTER LES CEINTURES, L'APPUIE-TÊTE ET LA POSITION DU SIÈGE
- LISTE DE CONTRÔLE POUR S'ASSURER QUE VOTRE BÉBÉ EST BIEN ATTACHÉ.
- INSTALLATIE VOOR EEN LENGTE VAN 100-150 CM MET ENKEL DE VEILIGHEIDS-GORDEL VOOR VOLWASSENEN.
- CONTROLELIJST OM ERVOOR TE ZORGEN DAT UW BABY GOED IS VASTGEMAAKT
Brand : BabyGO
Model : Freemove iSize
Category : Child seat