
WeGo - Stroller accessory BabyGO - Free user manual and instructions
Find the device manual for free WeGo BabyGO in PDF.

| Product Type | BuggyBoard, stroller accessory |
| Brand | BabyGO |
| Model | WeGo |
| Usage | Allows a child to stand or sit on a board attached to the back of the stroller |
| Recommended age | From 15 months |
| Maximum child weight | 20 kg |
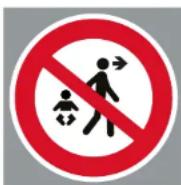
| Number of children | One child at a time |
| Safety standard | EN1888-2012 |
| Main materials | Plastic and metal |
| Wheels | Removable, snap-on attachment |
| Seat | Removable and height-adjustable |
| Attachment to stroller | By connectors and straps with attachment buckle |
| Cleaning | Mild soap and water, dry completely before use |
| Lubrication | Moving parts (wheels, joints) with external lubricant |
| Inspection of wear parts | Wheels, connectors, straps |
| Storage | Dry place, away from direct sunlight |
| Warranty | 12 months from purchase date |
| Repairability | Replaceable wear parts (wheels, connectors, straps) |
| Folding/unfolding | Do not use while folding or unfolding the stroller |
| Prohibitions | Do not use for running, skating, or as a toy |
Frequently Asked Questions - WeGo BabyGO
User questions about WeGo BabyGO
0 question about this device. Answer the ones you know or ask your own.
Ask a new question about this device
Download the instructions for your Stroller accessory in PDF format for free! Find your manual WeGo - BabyGO and take your electronic device back in hand. On this page are published all the documents necessary for the use of your device. WeGo by BabyGO.
USER MANUAL WeGo BabyGO
natural_image
Abstract logo design with a stylized lowercase 'b' inside a cloud-like shape, no text or symbols present.WEGO
Buggy Board
BEDIENUNGSANLEITUNG
Buggy Board
ASSEMBLY INSTRUCTIONS
Buggy Board
ASSEMBLY INSTRUCTIONS
Buggy Board
ASSEMBLY INSTRUCTIONS

babyGO
BabyGo Baby Products GmbH
Am Bahndamm 1-3
natural_image
Line drawing of a mechanical device with wheels and a vertical support (no text or symbols)WEGO
Seite 04 - 13
DEUTSCH
Page 14 - 23
ENGLISH
Page 24 - 33
FRANCE
Page 34 - 43
NEDERLANDS

babyGO

babyGO
natural_image
Line drawing of a four-wheeled bicycle pallet with handle and wheels (no text or symbols)natural_image
Line drawing of two identical wheels with no text or symbols
natural_image
Two identical line drawings of a stylized object with curved ends, resembling a battery or connector (no text or symbols)natural_image
Line drawing of a baby stroller with wheels and a handle (no text or symbols)Jetzt neu:
natural_image
Line drawing of hands assembling a mechanical component with a green arrow indicating the process (no text or symbols present)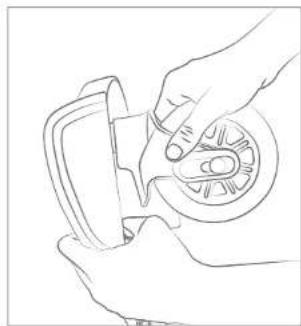
natural_image
Line drawing of hands using a tool to adjust or install a mechanical component (no text or symbols present)natural_image
Line drawing of a hand adjusting a car wheel (no text or symbols)
natural_image
Line drawing of a hand holding a car tire with a green tag (no text or symbols)natural_image
Illustration of a hand holding a medical device with a green bandage (no text or symbols)
natural_image
Hand holding a small electronic device with a green upward arrow indicating growth (no text or symbols)natural_image
Diagram showing a mechanical assembly with a green arrow pointing to a component, no visible text or symbols
natural_image
Line drawing of a hand holding a mechanical component with a green arrow indicating a specific part (no text or symbols present)natural_image
Technical line drawing of a mechanical assembly with a green arrow indicating direction (no text or symbols present)natural_image
Line drawing of a hand holding a mechanical component with a green arrow indicating a specific part (no text or symbols present)natural_image
Technical line drawing of a mechanical assembly with a piston and lever mechanism (no text or symbols)
natural_image
Line drawing of a hand using a pressure tool on a mechanical device (no text or symbols)natural_image
Line drawing of a hand operating a car chassis with wheels (no text or symbols)
natural_image
Line drawing of a hand using a handheld device to lift a cart (no text or symbols)natural_image
Line drawing of a hand using a tool to adjust or install a mechanical component (no text or symbols visible)natural_image
Illustration of a person using a mobile phone to interact with a solar panel (no text or symbols visible)natural_image
Diagram showing a mechanical assembly with arrows indicating motion, no text or symbols presentnatural_image
Line drawing of a bicycle steering wheel and suspension seat (no text or symbols)natural_image
Line drawing of a hand holding a mechanical component with a grid-patterned panel (no text or symbols)natural_image
Line drawing of a children's bicycle with wheels and suspension components (no text or symbols)natural_image
Line drawing of a car interior showing steering wheel, dashboard, and seat assembly (no text or symbols)natural_image
Line drawing of a mechanical device with wheels and handle (no text or symbols)EN INSTRUCTION MANUAL
Dear parents,
Thank you for purchasing this BuggyBoard. Please read and familiarize yourself with this instruction manual before using the BuggyBoard.
WARNING! Read the Instruction carefully before use and keep them for future reference.
WEGO
IMPORTANT
READ CAREFULLY AND KEEP THESE INSTRUCTIONS FOR FUTURE REFERENCE
THIS PRODUCT COMPLIES WITH THE STANDARD EN1888-2012.
Never leave the child unattended.
- Keep your child in sight at all times and never leave it unattended. The Kiddy Board is suitable for children from 15 months and up to a maximum weight of 20kg , in accordance with the EN1888-2012 safety standards.
- The Kiddy Board is intended for use by only one child at a time to ensure safety in accordance with EN1888-2012. Make sure all lockable parts of the Kiddy Board are properly secured to meet the safety requirements of EN1888-2012.
- Ensure your child is out of reach of the Kiddy Board while folding or unfolding it to avoid accidents in accordance with EN1888-2012. The Kiddy Board should not be used while adjusting the height to ensure compliance with the safety regulations of EN1888-2012.
- The Kiddy Board is not a toy and should not be used for play, in accordance with the safety requirements of EN1888-2012. The Kiddy Board is not intended for racing or skating to ensure compliance with the safety standards of EN1888-2012.
- The packaging of the Kiddy Board is not a toy and should not be used as such to comply with the safety standards of EN1888-2012. To ensure the safety of the Kiddy Board in accordance with EN1888-2012, do not overload it and do not use it to transport groceries or similar items.

babyGO
MAINTENANCE & CLEANING
Cleaning: Regular cleaning of the Buggy Board helps to remove dirt and deposits that could affect its function. It is best to use mild soap and water for this purpose. Ensure that the board is completely dry before using it again.
Inspection of Wear Parts: Regularly inspect the wheels, connectors, straps, and other moving parts for signs of wear or damage. Replace worn or damaged parts promptly to ensure safety.
Lubrication of Moving Parts: Occasionally lubricating the moving parts such as wheels and joints can help reduce friction and extend the life of the Buggy Board. It is best to use a high-quality lubricant suitable for outdoor use.
Check Fastenings: Ensure that the Buggy Board is securely and firmly attached to your stroller. Regularly check the attachment points and tighten screws or straps if necessary.
Storage: Store the Buggy Board in a dry place and protected from direct sunlight when not in use. This helps to protect against premature wear and extend the life of the board.
WEGO
WARRANTY
The warranty period starts from the date of purchase and is valid for a period of 12 months. The warranty is only applicable to the original owner and is not transferable. The warranty is only applicable to products that have not been adapted by the user. In the case of any defects, the owner is required to return the product to the retailer. If the retailer can not solve the problem, he must return the product, complete with a clear description of the complaint and a validated purchase receipt to the manufacturer. Exchanger or return can not be demanded. Repairs do not constitute an extension to the warranty term. The manufacturer is not liable for any damages other than those on products supplied.
No warranty is given if:
• The product is not supplied complete with the validated purchase receipt to the manufacturer.
- Defects are caused by misuse or maintenance which differ from that indicated in the instruction manual.
• Repairs are carried out by third parties.
• Defects are caused by neglect.
• Damage or removal of any serial number is found.
• If there is normal wear and tear which may be expected from everyday use.
- The stated warranty terms and conditions have not been satisfied.

babyGO
WEGO
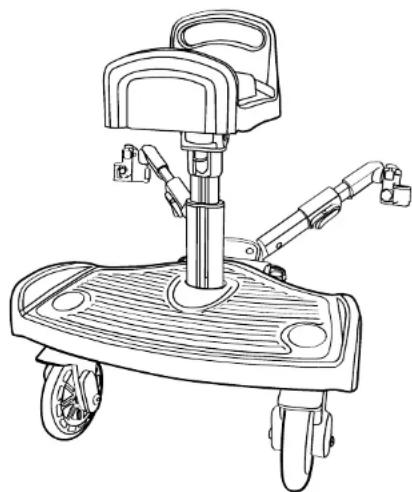
PARTS ATTACHING AND DETACHING WHEELS
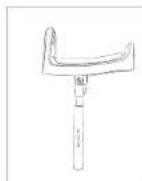
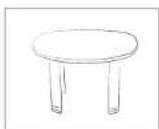
Seat
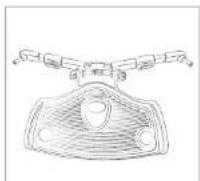
Board Wheels
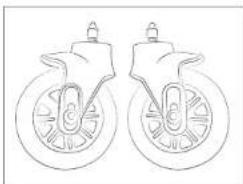
natural_image
Line drawing of two identical wheels with no text or symbols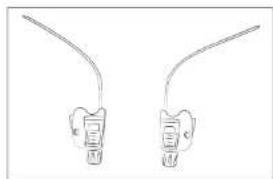
natural_image
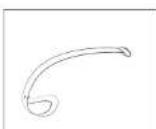
Two identical line drawings of a stylized object with curved ends, resembling a battery or connector (no text or symbols)Adjustable handlebar

Protection Fastening loop

natural_image
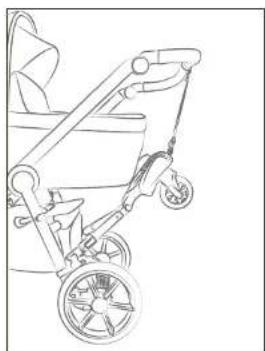
Line drawing of a baby stroller with wheels and a handle (no text or symbols)Now new:
With the fastening loop, you can now attach your Buggy Board to the handle when you don't need it.
natural_image
Line drawing of hands assembling a mechanical component with a green arrow indicating the process (no text or symbols present)
natural_image
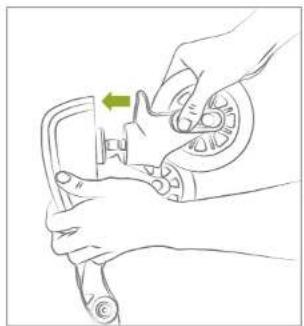
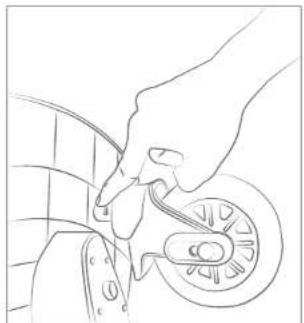
Line drawing of hands using a tool to adjust or install a mechanical component (no text or symbols present)- Wheel assembly: Insert the axle of the wheel into the designated shaft until it clicks into place. Then, gently rotate the wheel to ensure it is properly seated and locks into position.
natural_image
Line drawing of a hand adjusting a car wheel (no text or symbols)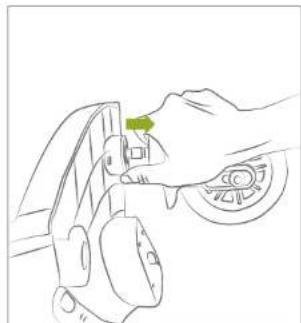
natural_image
Line drawing of a hand holding a car tire with a green tag (no text or symbols)- Removing the wheel: Press the button to turn the wheels in the direction of the arrow and release them.

babyGO
WEGO
ATTACHING AND DETACHING WHEELS ATTACHING THE SEAT
natural_image
Illustration of a hand holding a medical device with a green bandage (no text or symbols)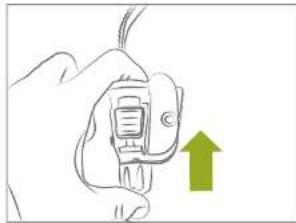
natural_image
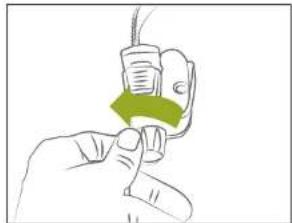
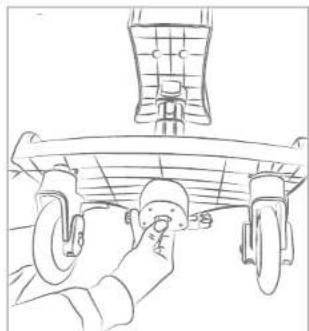
Hand holding a device with a green upward arrow indicating action (no text or symbols)Turn the nut on the Kiddy Board's pole counterclockwise.
natural_image
Line drawing of a mechanical assembly with a green arrow indicating direction (no text or symbols)
natural_image
Line drawing of a hand holding a mechanical component with a green arrow indicating a specific part (no text or symbols present)-
Repeat this process with the other side.
-
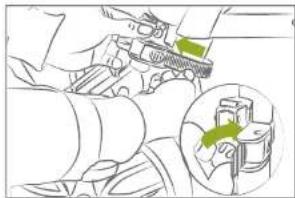
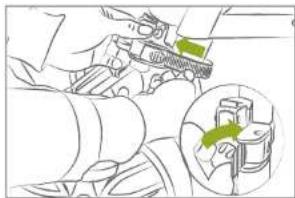
Insert the buckle on the Kiddy Board's pole into the holder on the button and tighten it. Then, securely tighten the button again.
natural_image
Technical line drawing of a mechanical assembly with a green arrow indicating direction (no text or symbols)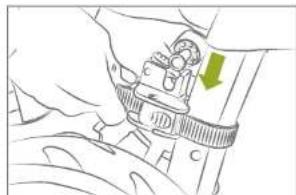
natural_image
Line drawing of a hand holding a mechanical component with a green arrow indicating a specific part (no text or symbols present)natural_image
Technical line drawing of a mechanical assembly with a piston and lever mechanism (no text or symbols)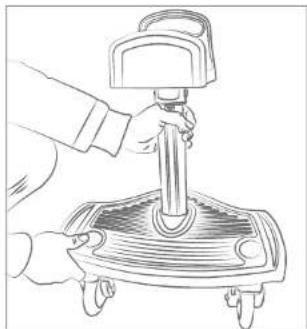
natural_image
Line drawing of a hand using a pressure tool on a mechanical device (no text or symbols)- Press the button on the bottom of the Kiddy Board and hold it down. Remove it and instead insert the previously prepared pole. Wait for it to click, indicating that the pole is securely anchored.
natural_image
Line drawing of a hand operating a car chassis with wheels (no text or symbols)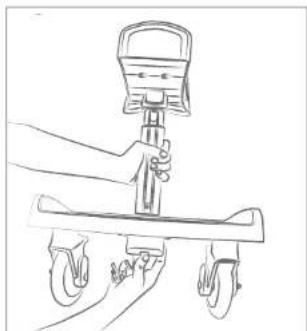
natural_image
Line drawing of a hand using a balance scale to lift a cart (no text or symbols)- Press the button underneath the board to remove the seat.

babyGO
WEGO
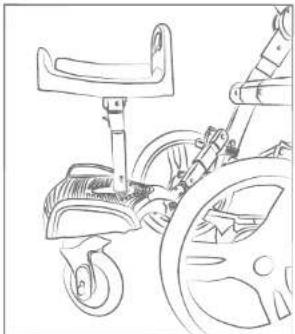
ADJUSTING THE SEAT BALANCING THE SEAT
natural_image
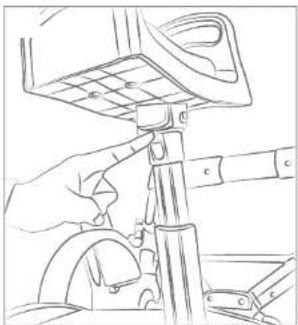
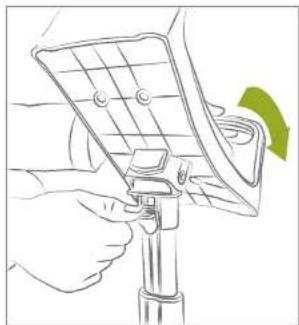
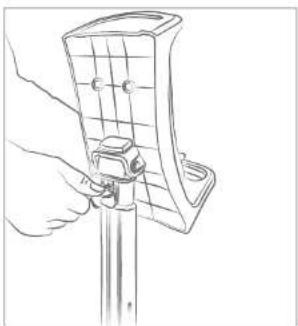
Line drawing of a hand using a tool to adjust or install a mechanical component (no text or symbols visible)- Press the switch on the pole, below the seat.
natural_image
Illustration of a hand using a mobile phone to interact with a solar panel (no text or symbols visible)- Now you can adjust the seat of your Kiddy Board.
natural_image
Line drawing of a hand holding a guitar tab with a handle (no text or symbols)- Adjust the seat to your personal preference.
natural_image
Line drawing of a children's bicycle with wheels and suspension components (no text or symbols)- Allow the seat to snap into place once it is in the horizontal position.
natural_image
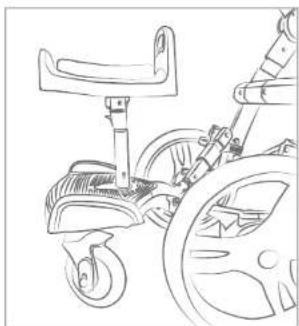
Diagram showing mechanical assembly with arrows indicating motion, no text or symbols present- Turn the knobs to open the latch.
natural_image
Line drawing of a children's bicycle with wheels and seat (no text or symbols)- Ensure that the board is in the horizontal position.

natural_image
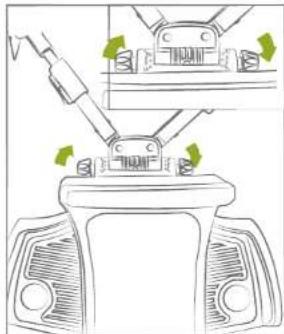
Line drawing of a car interior showing steering wheel, dashboard, and seat assembly (no text or symbols)- Align the markings on the connectors with the marking on the Kiddy Board's board in a straight line (refer to small image). Then, tighten the knobs again.

babyGO

natural_image
Line drawing of a mechanical device with wheels and handle (no text or symbols)FR INSTRUCTIONS
Chers parents,
natural_image
Line drawing of two identical bicycle wheels with no text or symbols
natural_image
Two identical line drawings of dental implants or clips, each with a curved wire and labeled points (no text or symbols present)Guidon ajustable
Protection Boucle de fixation

natural_image
Line drawing of a baby stroller with wheels and a handle (no text or symbols)natural_image
Line drawing of hands assembling a mechanical component with a green arrow indicating the process (no text or symbols present)
natural_image
Line drawing of hands using a tool to adjust or install a mechanical component (no text or symbols present)natural_image
Line drawing of a hand adjusting a car wheel (no text or symbols)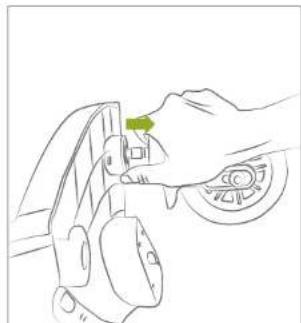
natural_image
Line drawing of a hand pressing a green clip on a car wheel (no text or symbols)natural_image
Illustration of a hand holding a medical device with a green bandage (no text or symbols)
natural_image
Hand holding a small electronic device with a green upward arrow indicating action (no text or symbols)natural_image
Illustration of a mechanical assembly with a green arrow indicating direction (no text or symbols present)
natural_image
Line drawing of a hand holding a mechanical component with a green arrow indicating a specific part (no text or symbols present)natural_image
Technical illustration of a mechanical assembly with green arrows indicating motion or force direction (no text or symbols)
natural_image
Line drawing of a hand holding a mechanical component with a green arrow indicating a specific part (no text or symbols present)natural_image
Technical line drawing of a mechanical assembly with a piston and lever mechanism (no text or symbols)
natural_image
Line drawing of a hand using a pressure tool on a mechanical device (no text or symbols)natural_image
Line drawing of a hand operating a car chassis with wheels (no text or symbols)
natural_image
Line drawing of a hand using a balance scale to lift a cart (no text or symbols)natural_image
Line drawing of a hand using a tool to adjust or install a mechanical component (no text or symbols visible)natural_image
Illustration of a person using a mobile phone to interact with a solar panel (no text or symbols visible)natural_image
Line drawing of a hand holding a tool with a grid-patterned panel (no text or symbols)natural_image
Line drawing of a children's bicycle with wheels and suspension components (no text or symbols)natural_image
Diagram of a mechanical assembly with arrows indicating motion, showing a component being inserted into a housing (no text or symbols present)natural_image
Line drawing of a bicycle steering wheel and suspension seat (no text or symbols)natural_image
Line drawing of a car interior showing steering wheel, dashboard, and seat assembly (no text or symbols)natural_image
Line drawing of a mechanical device with wheels and handle (no text or symbols)NL INSTRUCTIES
Beste ouders,
DIT PRODUCT VOLDOET AAN DE NORM EN1888-2012.
natural_image
Line drawing of two identical bicycle wheels with no text or symbols
natural_image
Two identical line drawings of a stylized object with curved ends, resembling a battery or connector (no text or symbols)Verstelbaar stuur

Bescherming Bevestigingslus

natural_image
Line drawing of a baby stroller with wheels and a handle (no text or symbols)Nu nieuw :
natural_image
Line drawing of hands assembling a mechanical component with a green arrow indicating the process (no text or symbols present)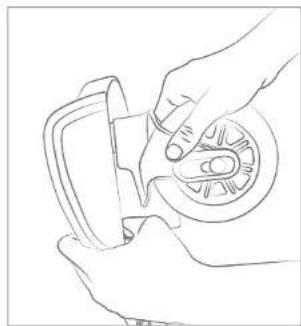
natural_image
Line drawing of hands using a tool to adjust or install a mechanical component (no text or symbols present)natural_image
Line drawing of a hand adjusting a car wheel (no text or symbols)
natural_image
Line drawing of a hand pressing a green knob on a car wheel (no text or symbols)natural_image
Illustration of a hand holding a medical device with a green bandage (no text or symbols)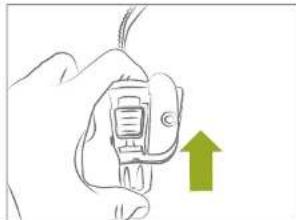
natural_image
Hand holding a small electronic device with a green upward arrow indicating action (no text or symbols)natural_image
Line drawing of a mechanical assembly with a green arrow indicating direction (no text or symbols)
natural_image
Line drawing of a hand holding a mechanical component with a green arrow indicating a specific part (no text or symbols present)natural_image
Technical line drawing of a mechanical assembly with a green arrow indicating direction (no text or symbols present)
natural_image
Illustration of a hand holding a mechanical component with a green arrow indicating a specific part (no text or symbols present)natural_image
Mechanical assembly diagram showing a hand operating a vehicle with a highlighted inset view of a piston (no text or symbols present)
natural_image
Line drawing of a hand using a handheld device to press or install a slide on a flat stand (no text or symbols)natural_image
Line drawing of a hand operating a car chassis with wheels (no text or symbols)
natural_image
Line drawing of a hand using a balance scale to lift a cart (no text or symbols)natural_image
Line drawing of a hand using a tool to adjust or install a mechanical component (no text or symbols visible)natural_image
Illustration of a hand using a mobile phone to interact with a solar panel (no text or symbols visible)natural_image
Diagram showing mechanical assembly with arrows indicating motion, no text or symbols presentnatural_image
Line drawing of a children's bicycle with wheels and seat (no text or symbols)natural_image
Line drawing of a hand holding a tool with a grid-patterned panel and a vertical rod (no text or symbols)natural_image
Line drawing of a children's bicycle with wheels and suspension components (no text or symbols)natural_image
Line drawing of a car interior showing steering wheel, dashboard, and seat assembly (no text or symbols)

- WEGO
- Jetzt neu:
- EN INSTRUCTION MANUAL
- IMPORTANT
- READ CAREFULLY AND KEEP THESE INSTRUCTIONS FOR FUTURE REFERENCE
- MAINTENANCE & CLEANING
- WARRANTY
- No warranty is given if:
- babyGO
- PARTS ATTACHING AND DETACHING WHEELS
- Now new:
- ATTACHING AND DETACHING WHEELS ATTACHING THE SEAT
- ADJUSTING THE SEAT BALANCING THE SEAT
- FR INSTRUCTIONS
- NL INSTRUCTIES
- Nu nieuw :
Brand : BabyGO
Model : WeGo
Category : Stroller accessory