
SSM 350 C1 - Hand blender SILVERCREST - Free user manual and instructions
Find the device manual for free SSM 350 C1 SILVERCREST in PDF.

| Product type | Immersion blender |
| Brand | SilverCrest |
| Model | SSM 350 C1 |
| Power | 350 W |
| Input voltage | 220-240 V~, 50-60 Hz |
| Protection class | II |
| Standby power consumption | 0.0 W |
| Speeds | 2 (normal and turbo) |
| Turbo function | Yes (high speed) |
| Maximum recommended operating time | 1 minute |
| Cooling time between cycles | 2 minutes minimum |
| Blender foot | Dishwasher-safe |
| Motor unit | Clean with a slightly damp cloth |
| Blade material | Stainless steel |
| Included accessories | Motor unit, blender foot, instruction manual |
| Warranty | 3 years |
| Use | Household use only |
| Recipes provided | 5 (pesto, smoothie, spread, milk, mayonnaise) |
| Approximate weight | Approximately 800 g |
Frequently Asked Questions - SSM 350 C1 SILVERCREST
User questions about SSM 350 C1 SILVERCREST
0 question about this device. Answer the ones you know or ask your own.
Ask a new question about this device
Download the instructions for your Hand blender in PDF format for free! Find your manual SSM 350 C1 - SILVERCREST and take your electronic device back in hand. On this page are published all the documents necessary for the use of your device. SSM 350 C1 by SILVERCREST.
USER MANUAL SSM 350 C1 SILVERCREST
STABMIXER/HAND BLENDER/MIXEUR PLONGEANT SSM 350 C1
DE AT CH
STABMIXER
Bedienungsanleitung
GB IE
HAND BLENDER
User manual
FR BE
MIXEUR PLONGEANT
Mode d'emploi
NL BE
STAAFMIXER
Gebruiksaanwijzing
PL
BLENDER RE CZNY
Instrukcja obsługi
CZ
TYČOVÝ MIXÉR
Návod na obsluhu
SK
TYČOVÝ MIXÉR
Návod na obsluhu
ES
BATIDORA DE BRAZO
DE/AT/CH
Bedienungsanleitung
Seite
5
GB/IE User manual Page 15
natural_image
Line drawing of a handheld device with buttons and a power connector, enclosed in a dashed border (no text or symbols)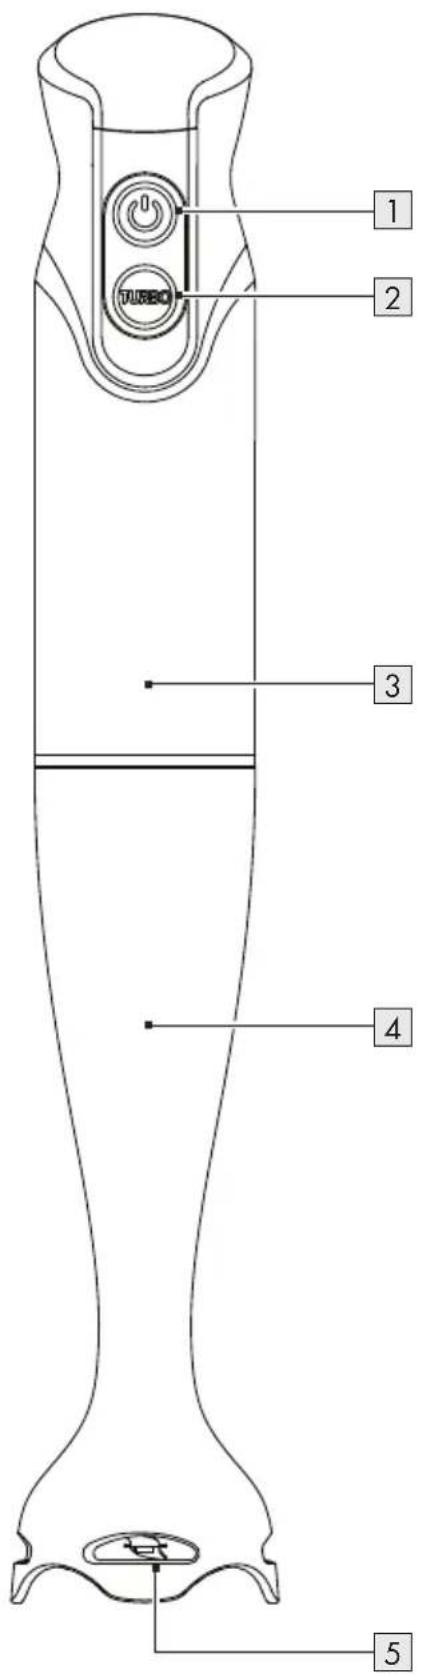
B
Warnings and symbols used Page 16
Introduction Page 16
Intended use.... Page 16
Scope of delivery.... Page 16
Description of parts ...... Page 16
Technical data Page 17
Safety instructions Page 17
Before first use Page 19
Operation.... Page 19
Assembly Page 19
Switching the product on/off.... Page 19
Off mode Page 20
Recipes Page 20
Green pesto.... Page 20
Oatmeal smoothie with fruit.... Page 20
Sweet fruit spread Page 20
Banana milk Page 20
Mayonnaise.... Page 21
Cleaning and care Page 21
Maintenance Page 21
Storage Page 21
Disposal Page 21
Warranty Page 22
Warranty claim procedure.... Page 22
Service Page 22
| Warnings and symbols usedThe following warnings are used in this user manual and on the packaging: | |||
 | DANGER! This symbol in combination with the signal word “Danger” marks a high-risk hazard that if not prevented could result in death or serious injury. | Alternating current/voltage | |
| Watts | |||
 | WARNING! This symbol in combination with the signal word “Warning” marks a medium-risk hazard that if not prevented could result in death or serious injury. | NOTE: This symbol in combination with “Note” provides additional useful information. | |
| Use the product in dry indoor spaces only. | |||
 | CAUTION! This symbol in combination with the signal word “Caution” marks a low-risk hazard that if not prevented could result in minor or moderate injury. | Food safe: This product has no adverse effect on taste or smell of the food. | |
| Symbol for a protection class II product | |||
 | CE mark indicates conformity with relevant EU directives applicable for this product. | Safety informationInstructions for use | |
HAND BLENDER
Introduction
We congratulate you on the purchase of your new product. You have chosen a high quality product. The instructions for use are part of the product. They contain important information concerning safety, use and disposal. Before using the product, please familiarise yourself with all of the safety information and instructions for use. Only use the product as described and for the specified applications. If you pass the product on to anyone else, please ensure that you also pass on all the documentation with it.
Intended use
This product is suitable for puréeing and mixing soups and other food.
The product is intended only for preparing foods.
The product is designed solely for domestic use. It is not intended for commercial use.
■ Any other use not mentioned in these instructions may cause a damage to the product or create a serious risk of injury.
The manufacturer accepts no liability for damages caused by improper use.
- Scope of delivery
☐ After unpacking the product, check if the delivery is complete and if all parts are in good condition. Remove all packaging materials before use.
□ Contact customer service if parts are missing or damaged.
1 Drive unit
1 Hand blender
1 User manual
• Description of parts
Before reading, unfold the page containing the illustrations and familiarise yourself with all functions of the product.
(Fig. A)


- Technical data
| Input voltage: | 220-240 V~, 50-60 Hz |
| Protection class: II | |
| Power consumption: 350 W | |
| Power consumption in off mode: 0.0 W | |

Safety instructions
BEFORE USING THE PRODUCT, FAMILIARISE YOURSELF WITH ALL OF THE SAFETY INFORMATION AND INSTRUCTIONS FOR USE! WHEN PASSING THIS PRODUCT ON TO OTHERS, ALSO INCLUDE ALL THE DOCUMENTS!
In the case of damage resulting from non-compliance with these operating instructions the guarantee claim becomes invalid! No liability is accepted for consequential damage! In the case of material damage or personal injury caused by incorrect handling or non-compliance with the safety instructions, no liability is accepted!
Children and persons with disabilities

⚠ WARNING! RISK OF LOSS OF LIFE OR ACCIDENT TO INFANTS AND CHILDREN!
Never leave children unsupervised with the packaging material. The packaging material represents a danger of suffocation. Children frequently underestimate the dangers. Keep children away from the product and packaging material at all times.
This product shall not be used by children. Keep the product and its cord out of reach of children.
The product can be used by persons with reduced physical, sensory or mental capabilities or lack of experience and knowledge if they have been given supervision or instruction concerning use of the appliance in a safe way and if they understand the hazards involved.
■ Children shall not play with the product.
Intended use
⚠ WARNING! Misuse may lead to injury. Use this product solely in accordance with these instructions.
⚠️Do not attempt to modify the product in any way.
Electrical safety
⚠️DANGER! Risk of electric shock! Never attempt to repair the product yourself.
In case of malfunction, repairs are to be conducted by qualified personnel only.
⚠ WARNING! Risk of electric shock! Do not immerse the product's electrical components in water or other liquids. Never hold the product under running water.
⚠ WARNING! Risk of electric shock! Never use a damaged product. Disconnect the product from the mains supply and contact your retailer if it is damaged.
⚠ WARNING! Risk of electric shock! Do not use the product next to a sink or in moist areas.
Before connecting the product to the mains supply, check that the voltage and current rating corresponds with the mains supply details shown on the product's rating label.
■ To avoid damaging the mains cord, do not squeeze, bend or chafe it on sharp edges. Keep it away from hot surfaces and open flames as well.
If the supply cord is damaged, it must be replaced by the manufacturer, its service agent or similarly qualified persons in order to avoid a hazard.
■ Pull the mains plug and not the cable itself to disconnect the product from the mains supply.
- Do not wrap the mains cord around the product. Connect the product to an easily reachable electrical outlet so that in case of an emergency the product can be unplugged immediately.
- Do not operate the product with wet hands. Do not touch the product with wet hands.
Operation
⚠ WARNING! Potential injury from misuse. Care shall be taken when handling the sharp cutting blades, emptying the containers and during cleaning.
If you notice any smoke or unusual noises, immediately disconnect the product from the mains supply. Have the product checked by a specialist before continued use.
■ Always operate the product on an even, stable and clean surface.
■ Always disconnect the appliance from the mains supply if it is left unattended and before assembling, disassembling or cleaning.
⚠ WARNING! Switch off the appliance and disconnect from mains supply before changing accessories or approaching parts that move in use.
Cleaning and storage
- Do not expose the drive unit to any dripping or splashing water.
■ Refer to the "Cleaning and care" chapter for instructions on how to clean the product.
Before first use
☐ Remove all the packaging materials.
☐ Clean the product (see "Cleaning and care").
Operation
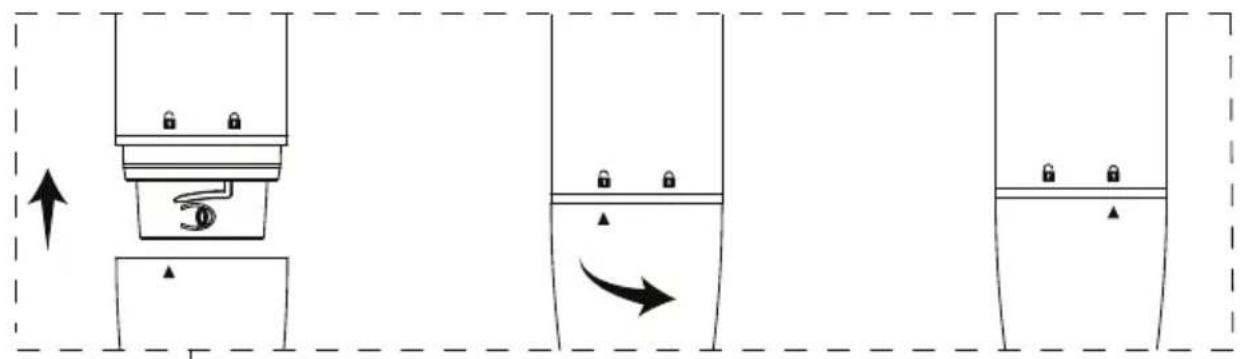
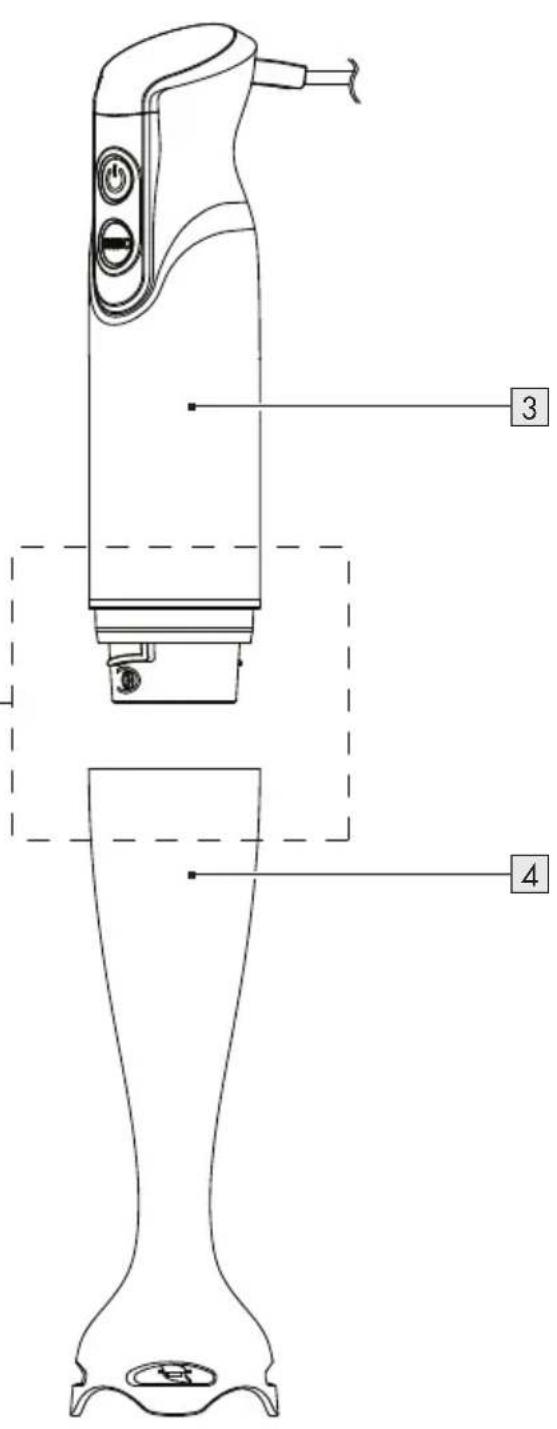
Assembly
WARNING! Risk of injury! Before assembling or disassembling the product: Pull the mains plug 6 out of the mains socket.
(Fig. B)
- Put the blender 4 on the drive unit 3. On the drive unit has to align with △ on the blender.
- Turn the blender 4 until ▽ aligns with 🔒.
☐ Dismount the blender 4 in reverse order.
- Switching the product on/off
⚠ WARNING! The product has an initial rotary impulse. Hold the product firmly during operation.
i NOTES:
-
Do not fill the product with ingredients whose temperature exceeds +70 °C.
☐ With this product you can prepare dips, sauces, soups or baby food. We suggest using the product for a maximum of 1 minute at a time and then letting it cool down.
☐ Let the product rest at least 2 minutes between cycles.
☐ After 5 continuous operation cycles: Let the product cool to the room temperature before reusing it. -
Put the blender 4 on the drive unit 3.
-
Give the food into a suitable container (such as a measuring cup).
-
Connect the mains plug 6 to a suitable mains socket.
- Switching on/Selecting the desired speed level:
| Press and hold button | Speed |
| 1 | Low |
| TURBO 2 | High |
- Switching off: Release ⏻ 1 or TURBO 2.
- After use: Wait until the blender 4 has come to a complete halt. Disconnect the mains plug 6 from the mains socket.
Off mode
☐ The product enters off mode once it is connected to the mains and no button is pressed.
☐ The product exits off mode once you press ⏻1 or TURBO 2.
☐ The product returns to off mode once you release ⏻ 1 or TURBO 2.
● Recipes
Green pesto
Ingredients
| 80 g Basil | |
| 80 ml Olive oil | |
| 2-3 tbsp Pine nuts | |
| 1-2 cloves Garlic | |
| 50 g Parmesan | |
| To taste Salt and pepper |
Preparation
- Wash the basil and shake off the water. Peel the garlic. Cut the Parmesan into small pieces.
- Add the olive oil and basil in a mixing bowl. Mix for approx 10 seconds. If necessary, divide the basil into 2 portions and mix one after the other for approx 10 seconds each.
- Add the remaining ingredients in the mixing bowl. Mix for another 25–30 seconds until the desired consistency is reached.
- Oatmeal smoothie with fruit
Ingredients
| 1 Banana | |
| 1 Kiwi | |
| 200 ml Milk or | milk substitute (e.g. oat milk, almond milk) |
| 50 g Coarse oatmeal flakes | |
| 2 tbsp | Linseed |
| 1 tsp Honey or | maple syrup |
| 80 ml | Natural yoghurt |
| Optional | Additional fruit as desired (e.g. blueberries or strawberries) |
Preparation
- Peel the banana and kiwi and cut them into small pieces.
- Add all ingredients in a mixing bowl. Mix for approx. 30-60 seconds until the desired consistency is reached.
- Sweet fruit spread
Ingredients
| 250 g | Strawberries or other fruit (fresh or frozen) |
| 1 packet (approx. 125 g) | Preserving sugar without cooking |
| 1 dash | Lemon juice |
| 1 | Vanilla pod |
Preparation
- Wash and clean the strawberries. Remove their green stems. Drain the strawberries well in a colander, so that you are rid of excess water and the spread is not too watery. Slice larger strawberries into small pieces.
- Add the strawberries in a suitable blender jug.
- Add the lemon juice.
- If desired, scrape out the pulp of a vanilla pod and add it in the blender jug.
- Add the preserving sugar without cooking in the blender jug. Mix for approx. 45-60 seconds. If there are still large pieces in the blender jug, allow the mixture to rest for 2 minutes. Mix again for another 60 seconds.
- Enjoy the fruit spread straight away or pour it into a glass jar with a screw cap. Firmly seal the glass jar.
Banana milk
Ingredients
| 1 Banana | |
| 250 ml Milk | |
| 1 tsp Sugar |
Preparation
-
Peel the banana and cut it into small pieces.
-
Add all ingredients in a mixing bowl. Mix everything until the desired consistency is reached.
Mayonnaise
Ingredients
| 250 ml Neutral | vegetable oil (e.g. rapeseed oil) |
| 2 Egg yolks |
| 15 ml Mild vinegar or lemon juice |
| To taste Salt and pepper |
Preparation
- Add the egg yolk and vinegar (or lemon juice) in a mixing bowl. Hold the product vertically in the bowl and mix with low speed.
- Add the oil in an even, thin stream (within about 1 minute) so that the oil binds to the other ingredients.
- Season with salt and pepper.
● Cleaning and care
⚠️ DANGER! Risk of electric shock! Before cleaning and maintenance: Disconnect the mains plug 6 from the mains socket.
NOTE: To maintain the product's functionality and appearance, it should be cleaned thoroughly after each use.
| Part Cleaning | |
| Drive unit 3 | WARNING! Never immerse this part in water or other liquids. Do not hold this part under running water.Disconnect the mains plug6from the mains socket before cleaning.Do not use any abrasive, aggressive cleaners or hard brushes to clean the product.Clean with a slightly damp cloth. Use a little dish soap if necessary. |
| Blender 4 | Clean this part thoroughly with hot water and dish soap.This part is suitable for dishwasher. |
☐ Before continued use and storage: Rub all parts dry with a clean cloth.
Maintenance
☐ Before each use: Check the product for any visible damage.
□ Apart from the occasional cleaning, the product is maintenance-free.
Storage
☐ When not in use, store the product in its original packaging.
☐ Store the product in a dry, secure location away from children.
● Disposal
The packaging is made entirely of recyclable materials, which you may dispose of at local recycling facilities.

e the marking of the packaging materials for waste separation, which are marked with abbreviations (a) and numbers (b) with following meaning: 1-7: plastics/20-22: paper and fibreboard/80-98: composite materials.
Product:


The product incl. accessories and packaging materials are recyclable and are subject to extended producer responsibility.
Dispose them separately, following the illustrated Info-tri (sorting information), for better waste treatment.
The Triman logo is valid in France only.

Contact your local refuse disposal authority for more details of how to dispose of your worn-out product.

protect the environment, please dispose of the product properly when it has reached the end of its useful life and not in the household waste. Information on collection points and their opening hours can be obtained from your local authority.
Warranty
The product has been manufactured to strict quality guidelines and meticulously examined before delivery. In the event of material or manufacturing defects you have legal rights against the retailer of this product. Your legal rights are not limited in any way by our warranty detailed below.
The warranty for this product is 3 years from the date of purchase. The warranty period begins on the date of purchase. Keep the original sales receipt in a safe location as this document is required as proof of purchase.
Any damage or defects already present at the time of purchase must be reported without delay after unpacking the product.
Should the product show any fault in materials or manufacture within 3 years from the date of purchase, we will repair or replace it - at our choice - free of charge to you. The warranty period is not extended as a result of a claim being granted. This also applies to replaced and repaired parts.
This warranty becomes void if the product has been damaged, or used or maintained improperly.
The warranty covers material or manufacturing defects. This warranty does not cover product parts subject to normal wear and tear, thus considered consumables (e.g. batteries, rechargeable batteries, tubes, cartridges), nor damage to fragile parts, e.g. switches or glass parts.
● Warranty claim procedure
To ensure quick processing of your claim, observe the following instructions:
Make sure to have the original sales receipt and the item number (IAN 466161_2404) available as proof of purchase.
You can find the item number on the rating plate, an engraving on the product, on the front page of the instruction manual (bottom left), or as a sticker on the rear or bottom of the product.
If functional or other defects occur, contact the service department listed below either by telephone or by e-mail.
Once the product has been recorded as defective you can return it free of charge to the service address that will be provided to you. Ensure to enclose the proof of purchase (sales receipt) and a short, written description outlining the details of the defect and when it occurred.
Service
GB Service Great Britain
Tel.:08000569216
E-Mail:owim@lidl.co.uk
IE Service Ireland
Tel.:1800200736
E-Mail:owim@lidl.ie
CE
⚠ WAARSCHUWING! Voordat

- STABMIXER/HAND BLENDER/MIXEUR PLONGEANT SSM 350 C1
- STABMIXER
- HAND BLENDER
- MIXEUR PLONGEANT
- STAAFMIXER
- BLENDER RE CZNY
- TYČOVÝ MIXÉR
- BATIDORA DE BRAZO
- Warnings and symbols used Page 16
- Introduction Page 16
- Safety instructions Page 17
- Before first use Page 19
- Operation.... Page 19
- Recipes Page 20
- Cleaning and care Page 21
- Storage Page 21
- Disposal Page 21
- Warranty Page 22
- Service Page 22
- Introduction
- Intended use
- - Scope of delivery
- • Description of parts
- Safety instructions
- Children and persons with disabilities
- ⚠ WARNING! RISK OF LOSS OF LIFE OR ACCIDENT TO INFANTS AND CHILDREN!
- Electrical safety
- Operation
- Cleaning and storage
- Before first use
- Assembly
- (Fig. B)
- - Switching the product on/off
- i NOTES:
- Off mode
- ● Recipes
- Green pesto
- Preparation
- - Oatmeal smoothie with fruit
- - Sweet fruit spread
- Banana milk
- Mayonnaise
- ● Cleaning and care
- Maintenance
- Storage
- ● Disposal
- Product:
- Warranty
- ● Warranty claim procedure
- Service
- ⚠ WAARSCHUWING! Voordat
Brand : SILVERCREST
Model : SSM 350 C1
Category : Hand blender