Centerpiece K-2264 - Sink KOHLER - Free user manual and instructions
Find the device manual for free Centerpiece K-2264 KOHLER in PDF.

User questions about Centerpiece K-2264 KOHLER
0 question about this device. Answer the ones you know or ask your own.
Ask a new question about this device
Download the instructions for your Sink in PDF format for free! Find your manual Centerpiece K-2264 - KOHLER and take your electronic device back in hand. On this page are published all the documents necessary for the use of your device. Centerpiece K-2264 by KOHLER.
USER MANUAL Centerpiece K-2264 KOHLER
Donotinstall this lavatory onaglass countertop. The weight of the lavatory may damage the glass.
Your new Kohler fixture has been designed for installation using commontools.
| K-2184Chenille | TM |
| K-2199Cantata | TM |
| K-2217 | LiniaTM |
| K-2220 | VintageTM |
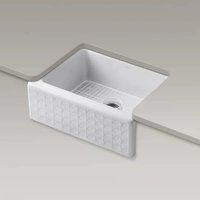
| K-2264 | CenterpieceTM |
| K-2292 | Intaglio® |
| K-2298 | CompassTM |
| K-2332 | WaterCoveTM |
| K-14156 | GarlandTM |
| K-14170-RB | ProvincialTM |
| K-14173 | FablesandFlowersTM |
| K-14234-BT | BotanicalStudyTM |
| K-14234-SP | SerpentineBronzeTM |
| K-14246-AC | OcellusCitronTM |
| K-14246-AS | OcellusSkylightTM |
| K-14270-PS | PeoniesandlvyTM |
| K-14271-WF | PrairieFlowersTM |
| K-14272-BR | Briar Rose Floral |
| K-14272-P | PheasantTM |
| K-14272-TF | AnkarasTM |
Materialsrequired:
PLUMBERS PUTTY
- NEWFAUCET(OPTIONAL)
● SHUT-OFF VALVES(OPTIONAL)
- SAFETYGLASSES
Before you remove your old fixture, unpack thenewlavatory and carefully inspect it for any damage that may have occurred. Vitreous china and nameled cast iron may chip, and you donot want to discover damage after the unit has been installed. Until you are ready to begin installation, set the lavatory back in the original packing cart on to prevent damage.
Makesureyouhaveacut-outtemplatetoaidyouinlocating yourfaucetcenterlineonthecountertop,andincuttingoutyour countertop,....
Toolsrequired:
- PUTTYKNIFE
ADJUSTABLEWRENCH
● SABERORKEYHOLESAW - PIPEWRENCH
TUBINGCUTTER - SCREWDRIVER
HACKSAW
RULER
PENCIL - DRILL
1/2"DRILLBIT
1-3/16"HOLESAW
● 1-3/8" HOLE SAW (FOR WIDESPREAD FAUCETS)
● CUT-OUT TEMPLATE (FURNISHED WITH FIXTURE)
Thebestlocationofthefaucetcenterlineisdeterminedbythree items: thesizeofthefittingorfaucetspoutescutcheons, length of faucetspout, and clearancebetweenthefaucetspoutandlavatory rim.
FAUCETLOCATION
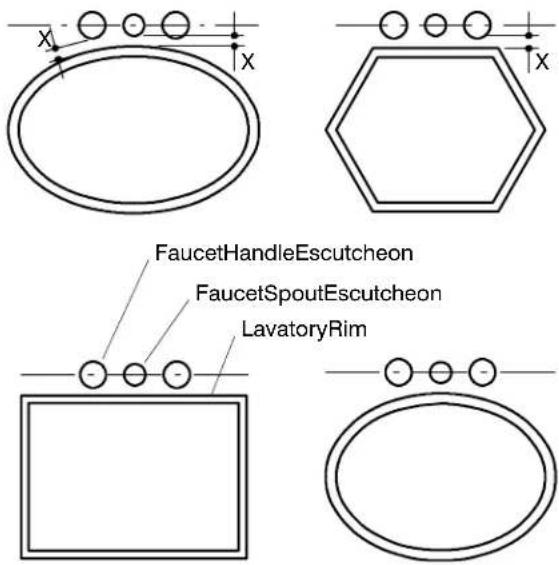
- Refer to Fig. #1. Determine if the faucet spout escutcheon or faucethandleescutcheonwillbeclosertothelavatoryrim wheninstalled.Itemstoconsiderarethesizesofthedifferentfaucetcomponentsandthelavatoryshape.Theescutcheon foundtobeclosesttothelavatoryrimwillbeusedinstep2.
text_image
FaucetHandleEscutcheon FaucetSpoutEscutcheon LavatoryRimFig.#1
-
Measure the escutcheon, front-to-back, that was found to be closest to other imin step 1. This escutcheon measurement may also be found on the faucetroughing in page.
-
Dividethefront-to-backdimensioninhalf, and add1/4". Standardsizes areshowninthechartonthenextpage. The distancefoundwillbeusedtodrawthepreliminaryfaucet centerline.
NOTE: For all front to back dimensions, round up to the nearest 1/16" (2mm) if required.
| FRONTTO BACKDIMENSION | DISTANCETODRAWCENTERLINE BEHINDREFERENCE |
| 2"(5cm)1-1/4"(3.2cm) | |
| 2-1/8"(5.4cm)1-5/16"(3.3cm) | |
| 2-1/4"(5.7cm)1-3/8"(3.5cm) | |
| 2-3/8"(6cm) | 1-7/16"(3.7cm) |
| 2-1/2"(6.4cm)1-1/2"(3.8cm) |
DRAWPRELIMINARYFAUCETCENTERLINE
NOTE: The following instructions refer to the installation of Model K-2332, in an above counter installation.
NOTE: Wall-mountfaucetinstallations: Besuretoprovide sufficient spoutoverhanginto thelavatorybasin. Makesurethat thewaterstreamisdirectedtothecenterofthelavatoryand thereissufficienthandwashingclearance.
NOTE: Countertop faucet installations: Pay special attention to the spout and handle fit clearance when locating the faucet, as noted below.
Countertopfaucetinstallations: Usethetemplatetolocatethe faucet spout hole centerline to provide adequate clearance between theedgeofthelavatoryandthespout.
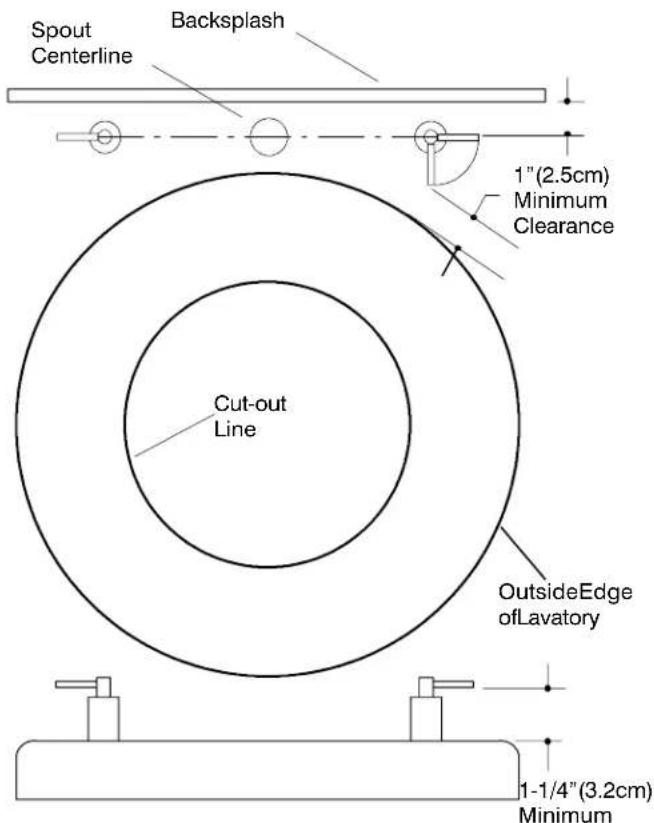
Refer to Fig. #2 . Check for adequate clearance between the backsplash, faucet spout and handles and lavatory. Kohler recommends clearanceofatleast1"(2.5cm)between:
• theinstalledlavatoryandthefaucetspout;
• theinstalledlavatoryandtheendofthefaucethandles
• thefaucetspoutandhandles,andthebacksplash.
Refer to the faucet installation instructions for the required clearance, and mark the preferred faucethole locations.
text_image
Spout Centerline Backsplash 1" (2.5cm) Minimum Clearance Cut-out Line OutsideEdge ofLavatory 1-1/4" (3.2cm) MinimumFig.#2
DRAWPRELIMINARYFAUCETCENTERLINE
- DrawthedistancedeterminedinFAUCETLOCATIONasthe preliminarycenterlineonthecut-outtemplate.Itshouldbeparallel andbehindthecut-outtemplatereferenceline(locatedonthe cut-outtemplate).
NOTE: On the full-sizerimsection found on the cut-out template, mark the preliminary faucet center lined dimension. This will be used to determine final faucet center line.
DETERMINEFINALFAUCETCENTERLINE
NOTE: If you are installing a tiled-in lavatory, proceed to Step 1B. The preliminary faucet line from DRAW PRELIMINARY FAUCETLINE esthefinalfaucetline in this case.
- Whenthispreliminaryfaucetcenterlinehasbeendrawnthe spoutmustbecheckedforthreeitems:
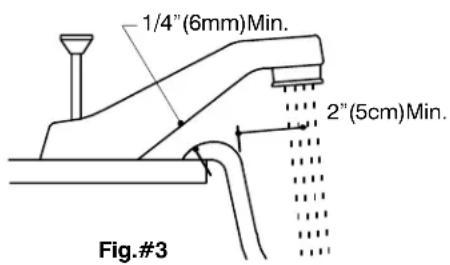
A. Refer to Fig. #2. For low profile faucet spouts, the distancebetweenthefaucetspoutandthelavatoryrimmustbea minimumof1/4" (6mm).Usethefaucetspout,thepreliminary faucet centerline, and the full size rim section on the cut-out template tocheckthis.If thereisnot1/4"(6mm)clearance,movethe preliminaryfaucetcenterlineback.Rechecktheclearanceuntilyou have1/4"(6mm).Measurethedistanceofthenewfaucetcenterline. Redrawthenewfaucetcenterlinebehindthereferencelineonthe cut-outtemplate.Remarkthisdimensiononthefullsizerimsection. Thisisthefinalfaucetcenterline.
text_image
1/4"(6mm)Min. 2"(5cm)Min. Fig.#3B. RefertoFig.#3. Checktobesurethewaterstreamwill project2"(5cm)minimumintothelavatorybasintoallowadequate areaforhandwashing. Usetheapproximatefaucetspoutangle, the finalfaucetcenterlineandthefull-sizerimsectionfromthecut-out templatetoensurethisclearance. If this cannot be accomplished, the faucet is not optimally matched for this lavatory and may not operate on this lavatory to the owner's satisfaction. You may wish to consider an alternate faucet.
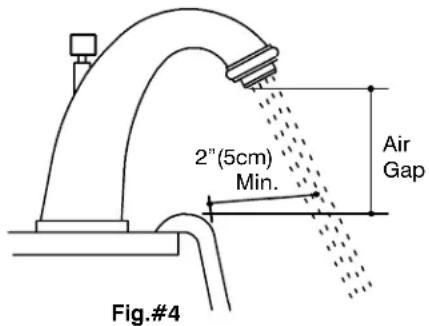
C. RefertoFig.#3. Checkforcompliancewithallstateand localplumbingcodes,includingairgapstandards.
text_image
2"(5cm) Min. Air Gap Fig.#4FAUCETCLEARANCEWITHBACKSPLASH
NOTE: 2-1/2" (6,4cm) of space is required for the Kohler Bravura widespread and Cirrus Sheetflowfaucetspouts.
- Refer to Fig. #4. Draw a line 2" (5cm) behind the final faucet centerlineonthecut-outtemplate.Thisistheminimumbacksplash locatorline.Itisdrawntoensureadequateclearancebehindthe faucetforproperinstallation.Itwillalsohelppositionthelavatoryon thecountertop.Cutalongthisbacksplashlocatorline.Savethe sectionofthecut-outtemplatewiththelavatoryrimandcut-out lines.
text_image
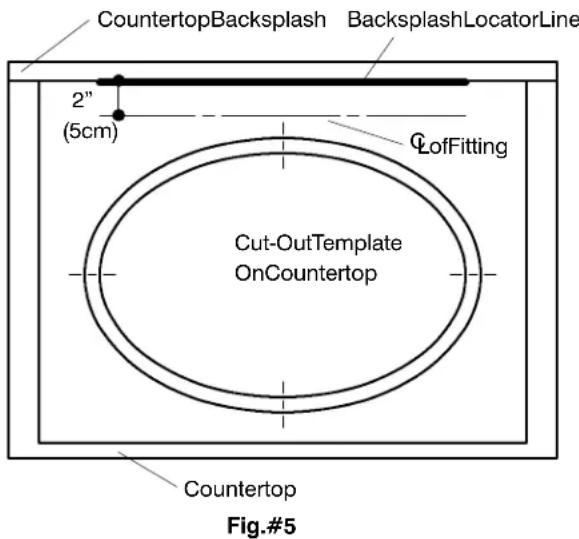
CountertopBacksplash BacksplashLocatorLine 2" (5cm) CofFitting Cut-OutTemplate OnCountertop Countertop Fig.#5INSTALLATION
- To remove old lavatory, turn off water supplies. Turn the lavatoryfaucetontodrainwaterfromthelines.Disconnectand removewatersupplytubes.Disconnectdrainandremovetrap.
CAUTION: To remove steel frame lavatories, remove clipsorfastenersunderlavatorythatholdlavatorytocounter. Donotremoveclipsthatholdframetofixture.
-
Liftlavatoryoutofcountertopwithfittinganddrainattached,if applicable.
-
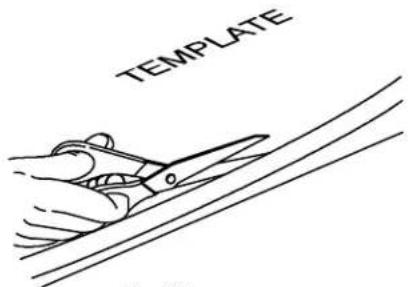
Refer to Fig. #6. Cut out inside of cut-out template with scissorsontheinsideline.
text_image
TEMPLATEFig.#6
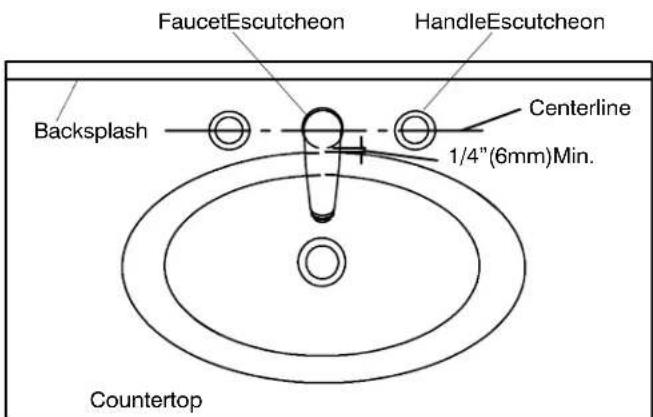
- Refer to Fig. #7 . Set the cut-out template on the countertop sothebacksplashlocatorlineistouchingthecountertop backsplash.Thecut-outtemplatecanbemovedforwardfromthis positiontogetthebestplacementofthelavatoryonthecountertop. Tracethecut-outopeningonthecountertopusingasoftleadpencil. Centerlinesareprovidedtohelpalignopening.Markthefinal centerline on the countertop using the cut-out template. Drill the faucetholesusingthefollowingcharttodeterminetheirsize.
NOTE: If there is not enough room at the front of the counter for the lavatory rim, alarger countertop is needed.
| DimensionsAreForKohlerFaucetsOnly.WhenUsingOther Faucets,Contact Supplier ForInstallationInstructionsAnd Dimensions. | ||
| FAUCET CENTERS | VALVE HOLES | SPOUT HOLE |
| 4"(10.2cm) | 1-3/16"(3cm) | 1-3/16"(3cm) |
| 6"(15.2cm)8"(20.3cm)12"(30.5cm)16"(40.6cm) | 1-3/8"(3.5cm) | 1-3/16"(3cm) |
text_image
FaucetEscutcheon HandleEscutcheon Backsplash Centerline 1/4"(6mm)Min. CountertopFig.#7
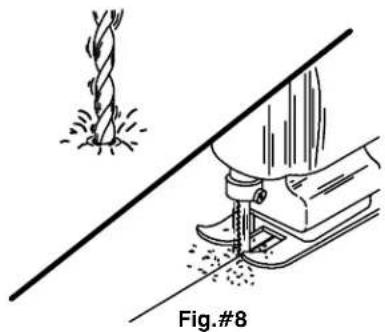
- Refer to Fig. #8 . Drill a pilot hole into the countertop using a 1/2"drill.Useasaberorkeyholesawtocutoutopeningbycarefully followingthepencilintracedfromcut-outtemplate.Temporarily position lavatory into counter, and trace a light pencil line around theoutsideedge.Thiswillserveasaguidelineforapplyingsealant. Removefixturefromcountertop.
NOTE: The rim must be traced so the sealant will cover and concealthepenciline.
natural_image
Illustration of a sewing machine needle cutting a twist drill bit, with no text or symbols present.-
Install faucet to countertop and drain to lavatory following manufacturer's instructions.
-
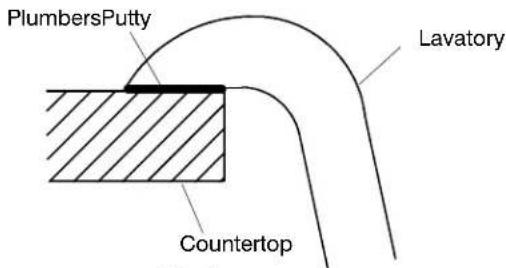
Refer to Fig. #9. Apply two ribbons of plumbers putty or other sealantonthecounterfromtheedgeoftheopeningtoedgeofrim as measured in Step 5 according to the putty manufacturer's instructions.Quicklyspreadputtyorsealantwithaputtyknife.
text_image
PlumbersPutty Lavatory CountertopFig.#9
-
Setlavatoryintoposition.Immediatelywipeawayanyexcess puttyorsealantwithadampcloth.Fillinyvoidsbetweenrimand countertop.
-
Allowputtyorsealanttosetfor30minutes.Connectsupply linesatsupplyvalvesandfitting.Assemble adjustablerainpop-up linkage. Connect drain, trap, and outlet. Turn tailpiece into drain body.Aligntrapinletwithtailpiece.Inserttrapnutandgasketonto tailpiece,andinsertintotrap.Tailpiecemustextend1"to2"intotrap. Tailpiecemayhavetobecuttofit.Turnonwaterandcheckforleaks.
-
CARE AND CLEANING. DO NOT USE ABRASIVE CLEANSERS as they may scratch the surface of this fixture. Cleanupwithanon-abrasivecleaner.Stubbornstains, paint, ortar maybe removed with turpentine or paint thinner.
CALLUSFORHELP
Here's what you need to do if you require service:
First review the installation instructions to ensure correct installation. For additional assistance in the USA, call our CustomerServiceDepartmentfordirecthelp.Youmayalsocontactusatourwebsitelistedbelow.
Call1-800-4-KOHLERwithintheU.S.
Call1-800-964-5590 within Canada
Call001-877-680-1310withinMexico
kohler.com
THE BOLD LOOK

©2003KohlerCo.
AVANTDECOMMENCER
EMPLACEMENTDUROBINET
text_image
Diagram showing a hexagon with three circles and an x-axis indicator, likely representing a geometric or mathematical concept.
text_image
Rosaced Rosac R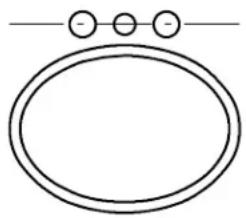
natural_image
Simple line drawing of an oval shape with three small circles above it, connected by a horizontal line (no text or symbols)Fig.#1
text_image
GABARIT Fig.#5natural_image
Diagram showing a sewing machine needle cutting a twist drill bit, with no text or symbols present.natural_image
Pure geometric diagram of a hexagon with circles and an x-axis indicator (no text or symbols)
text_image
Chapetóndelallavedelgrifo Chapetóndelsurtidor BordedellavaboFig.#1
text_image
PLANTILLA Fig.#5natural_image
Illustration of a sewing machine needle stitching a twist drill bit (no text or symbols)Fig. #7