Cursive K-14572 - Sink KOHLER - Free user manual and instructions
Find the device manual for free Cursive K-14572 KOHLER in PDF.

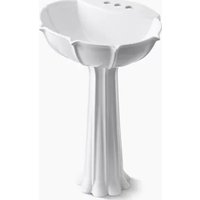
| Product Type | Undermount Lavatory |
| Brand | Kohler |
| Model | Cursive K-14572 |
| Material | Vitreous China |
| Installation Type | Undermount, tile-in, solid surface |
| Approximate Support Dimensions | 25 in (63.5 cm) x 17 in (43.2 cm) |
| Rim Thickness | 5/8 in (1.6 cm) ± 1/32 in (1 mm) |
| Maximum Clearance from Front Edge of Cabinet | 1-1/4 in (3.2 cm) |
| Faucet Hole Diameter | 1-3/8 in (3.5 cm) |
| Minimum Drain Clearance | 1-1/2 in (3.8 cm) |
| Number of Faucet Holes | 2 (standard) |
| Tools Required | Safety glasses, tape measure, pencil, 1/2" drill bit, 1-3/8" hole saw, support frame, sanding block, sandpaper, orbital sander (optional) |
| Care and Cleaning | Non-abrasive cleaner, damp cloth |
| Safety Precautions | Risk of injury: handle with care, two persons to lift the sink, wear safety glasses |
| Recommended Underlayment Materials | Minimum 3/4 in exterior plywood, tile backer board |
| Materials to Avoid | Particle board, interior plywood, drywall |
| Caulk Drying Time | Minimum 30 minutes before proceeding |
| Manual Pages | 36 |
| Available Languages | French, English, Spanish, others on request |
Frequently Asked Questions - Cursive K-14572 KOHLER
User questions about Cursive K-14572 KOHLER
0 question about this device. Answer the ones you know or ask your own.
Ask a new question about this device
Download the instructions for your Sink in PDF format for free! Find your manual Cursive K-14572 - KOHLER and take your electronic device back in hand. On this page are published all the documents necessary for the use of your device. Cursive K-14572 by KOHLER.
USER MANUAL Cursive K-14572 KOHLER
K-6573, K-14570, K-14571, K-14572, K-14573, K-14576, K-14577
Mproduct numbers are for Mexico (i.e. K-12345M)
- 1/2" or larger drill bit
• Hole saw 1-3/8"
• Support frame members - Sanding block
• Assorted sandpaper
• Orbital sander (optional)
Before You Begin

CAUTION: Riskofpersonalinjuryorproductdamage.
Handle with care. Product can break, chip, cause injury or product damage if handled carelessly. Get help lifting the sink.
☐ Read these instructions carefully before you begin this installation.
□ Observe all local plumbing and building codes.
□ Shut off the hot and cold water supplies.
□ Inspect the drain and supply tubing. Replace if necessary.
☐ Prior to installation, unpack the new sink and inspect it for damage. Return the sink to its protective carton until you are ready to install it.
☐ Due to the variety of installations possible with this sink, you may need to use procedures other than those described. Because of the variety of tiles available, you must take careful measurements prior to installation.
☐ It is very important that the proper materials are used with your sink. Proper selection of tile is critical for a secure installation. Because of the variance in tile thickness, your carpenter, tiler, and plumber must be aware of the exact type of tile you choose.
□ After selecting the tile, provide a sample to each contractor involved in the project. It is very important that the carpenter, tiler, and plumber maintain communication and discuss the requirements of the project.
Before You Begin (cont.)
☐ The cabinet and frame shown in these instructions are generic and may not represent the actual design or structure.
☐ Due to the nature of undercounter installations, Kohler Co. recommends that undercounter sink installations be performed by trained and experienced installers.
☐ To ensure a safe and damage-free installation, twopeopleshould installthesink.
☐ All information in these instructions is based on the latest product information available at the time of publication. Kohler Co. reserves the right to make revisions in the design of products without notice, as specified in the Price Book.
1. Preparation
Undercounter Installations
☐ Check to see if the faucet can be completely assembled to the countertop and the sink.
☐ Determine this by taking the countertop thickness plus the sink rim thickness, 5/8" (1.6 cm) plus or minus 1/32" (1 mm), and comparing that measurement to the available shank length between the base of the faucet assembly and the mounting nut. If the available shank length is the same or longer than needed, proceed. If not, select a thinner countertop or another faucet.
Tile-In Installations
☐ Tile backer board installed over plywood is the recommended underlayment for installing this sink. Tile should be bonded to the backer board with dry set or latex Portland mortar. Acceptable underlayments include:
- Tile backer board over 3/4" (1.9 cm) exterior grade plywood
• 3/4" (1.9 cm) exterior grade plywood
IMPORTANT! Do not use:
- Flakeboard
- Interior grade plywood
- Gypsum wallboard
Preparation (cont.)
- Consult with a tile contractor to determine the material to be used.
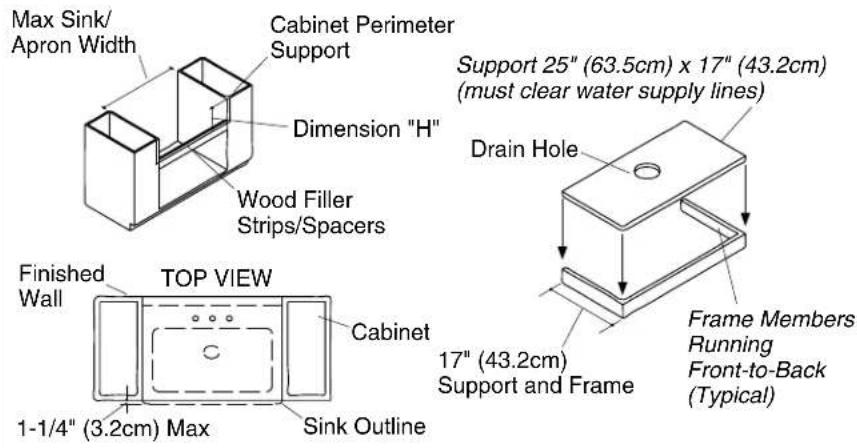
2. Cabinet/Support Frame Construction
☐ Measure the size of the sink, including the apron (the bottom of the apron is approximately 1/8'' (3 mm) wider than the top). The cabinet opening should equal the maximum sink/apron dimensions to ensure a minimum gap between the sink and the cabinet.
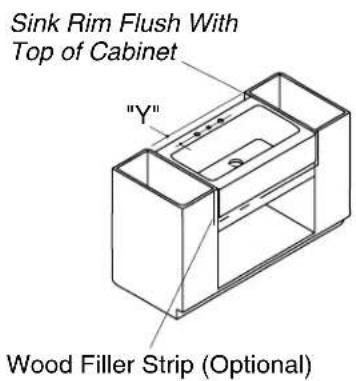
NOTE: If the sink is not available at the time of installation, make allowances to add wood filler strips or spacers to the cabinet opening after the frame and before the sink is installed.
☐ Determine if the sink will be flush with or extend slightly beyond the front of the cabinet. The sink may extend no more than 1-1/4" (3.2 cm) beyond the face of the cabinet.
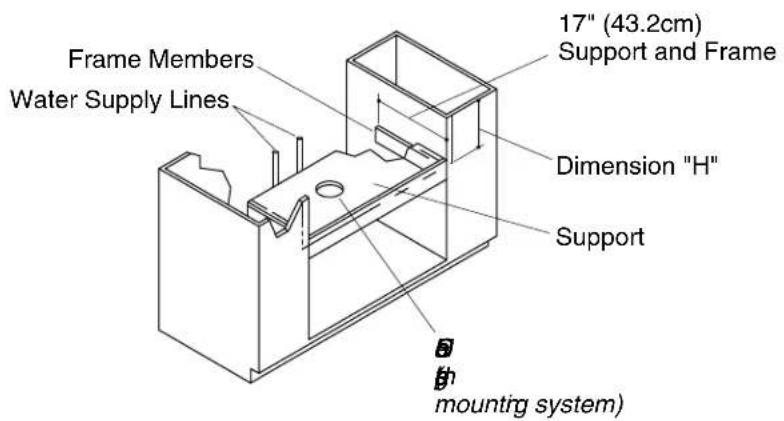
☐ Construct a wood support frame to fit inside the cabinet opening. Allow adequate clearance for the water supply lines between the support and the finished wall.
☐ Locate and cut out the drain outlet clearance hole in the support. The hole diameter must clear the garbage disposal mounting system, if used.
3. Support Frame Installation
Tile-In Installations
☐ This sink is designed to be installed flush with or slightly lower than the surrounding tile. Measure and compare the thickness of the sink rim and tile. The rim thickness on this sink is 5/8" (1.6 cm) plus or minus 1/32" (1 mm). Take these measurements into consideration when determining support frame placement (Dimension "H"). Because of the varying thickness of the tile and sink, or if adhesive or mortar bed installation is used, you may need to make allowances to shim the sink, or route the underlayment as required.
Undercounter and Solid Surface Installations
☐ Position the support frame in the cabinet opening so that when installed, the top of the sink will be level and flush with the top of the cabinet (Dimension H).
All Installations
NOTE: Ensure that the securing hardware will not penetrate through the cabinet walls.
☐ Secure the support frame to the cabinet. Position the securing hardware to allow for easy removal should the sink need to be removed or replaced.
4. Tile-In Installation

CAUTION: Riskofpersonalinjuryorproductdamage.
Large sinks are very heavy. Get help lifting the sink into place.
☐ Verify that the sink will fit in the cabinet opening. If necessary, sand the opening or add wood filler strips.
□ Install the strainer or garbage disposal to the sink according to the manufacturer's instruction.
□ Install the faucet to the sink according to the manufacturer's instructions.
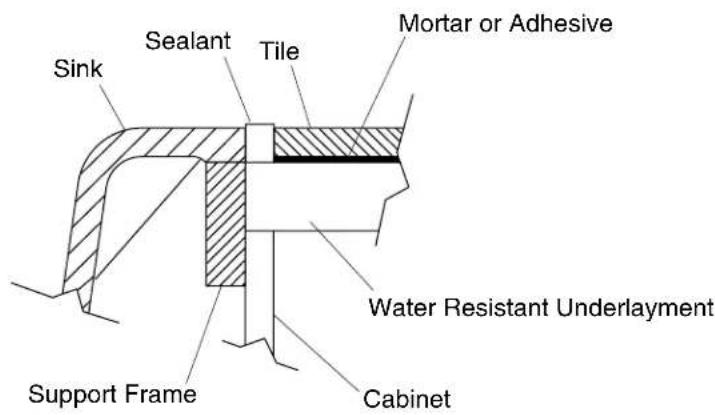
□ Apply a 1" (2.5 cm) spot of sealant at each corner of the frame where it will contact the sink.
NOTE: If using shims, additional sealant will be needed.
□ Carefully position the sink within the frame, making sure to center the sink in the cabinet.
☐ Optional: Apply sealant between the cabinet and the apron.
□ Verify that the sink is level. Adjust or shim between the sink and support if needed.
☐ Install the tile. To absorb vibration from a garbage disposal, apply sealant between the sink and tile directly next to the sink rim. This will prevent the grout around the sink from cracking.
□ Allow the sealant to cure for at least 30 minutes before proceeding.
Tile-In Installation (cont.)
☐ Connect and tighten the trap to the strainer, and complete the water supply connections to the faucet according to the instructions packed with the faucet.
□ Run water into the sink and check for leaks.
□ Clean up with a non-abrasive cleaner.
5. Undercounter/Solid Surface Preparation

CAUTION: Riskofpersonalinjuryorproductdamage. Large sinks are very heavy. Get help lifting the sink into place.
NOTE: Instructions in this section are for both undercounter and solid surface installation. Any differences are noted in the text.
NOTE: Use shims to level the sink if needed.
☐ Verify that the sink will fit in the cabinet opening. If necessary, adjust the opening by sanding the opening or adding wood filler strips.
For solid surface installation, install the faucet to the sink according to the manufacturer's instructions.
- Install the strainer or garbage disposal to the sink according to the manufacturer's instructions.
□ Apply a 1" (2.5 cm) spot of sealant at each corner of the frame where it will contact the sink.
NOTE: If using shims additional sealant will be needed.
□ Carefully position the sink within the frame, making sure to center the sink in the cabinet.
☐ Optional: Apply sealant between the cabinet and the apron.
Undercounter/Solid Surface Preparation (cont.)
☐ Verify that the sink is level. The top of the sink should be flush with the top of the cabinet to allow proper countertop installation. Adjust or shim between the sink and support if needed.
☐ Due to the various cutout sizes possible, a template is not supplied.
□ Carefully measure the countertop to determine the exact location of the cutout.
□ Carefully mark the cutout location on the countertop.
Solid Surface Installation
6. Undercounter/Solid Surface Installation

CAUTION: Riskofpersonalinjuryorproductdamage.
Large sinks are very heavy. Get help lifting the sink into place.

CAUTION: Riskofproductdamage. Do not cut, drill, or
sand the countertop while positioned over the fixture.
Both undercounter and solid surface installations are covered in these instructions. Any differences are noted in the text.
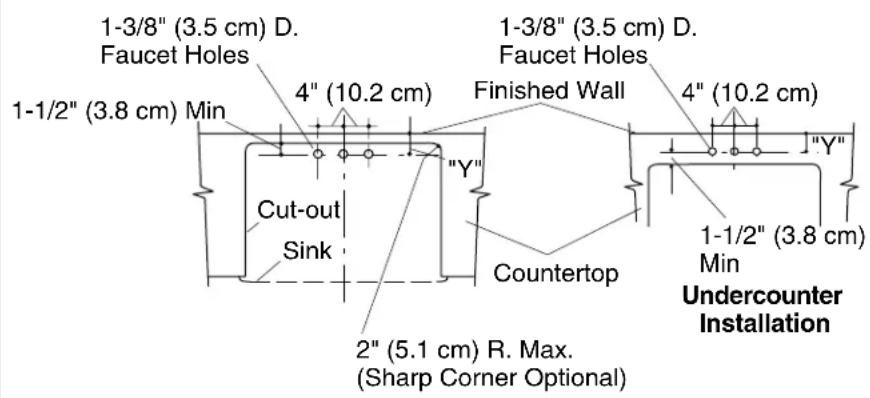
☐ Measure the distance "Y" (see illustration) from the finished wall to the center of the sink faucet holes. This dimension will be used to locate the faucet hole centerline and the back edge of the cutout on the countertop. Verify that there is adequate clearance between the faucet handles and the backsplash or finished wall to ensure proper faucet operation.
☐ From the back edge of the countertop, measure the same distance as "Y" and draw the faucet centerline. For undercounter installation, add 1-1/2" (3.8 cm) to the faucet centerline to locate the back edge of the cutout. For solid surface installation, subtract 1-1/2" (3.8 cm) from the faucet centerline to locate the back edge of the cutout.
☐ Trace the cutout opening onto the countertop using a soft lead pencil.
☐ For undercounter installation, locate the faucet holes.
☐ Cut out the opening by carefully following the pencil line.
Undercounter/Solid Surface Installation (cont.)
☐ For undercounter installation, drill the faucet holes.
☐ Sand the edge of the cutout to smooth the surface and remove all saw marks. For laminate-type countertops, waterproof all unprotected areas of wood.
□ Clean the top of the sink rim, making sure the surface is free from debris. Clean the bottom of the countertop around the cutout area, making sure the surface is smooth and free of defects.
□ Apply a generous bead of sealant around the sink rim where the sink rim will contact the countertop.
☐ Position the countertop over the sink, making sure the sealant provides a complete seal between the sink rim and the bottom of the countertop.
☐ Immediately wipe away any excess sealant with a damp cloth. Fill any voids between the rim and the countertop if needed.
□ Allow the sealant to cure for at least 30 minutes before proceeding.
For undercounter installation, install the faucet to the sink and countertop according to the manufacturer's instructions.
☐ Connect and tighten the trap to the strainer, and complete the water supply connections to the faucet according to the instructions packed with the faucet.
□ Run water into the sink and check for leaks.
□ Clean up with a non-abrasive cleaner.