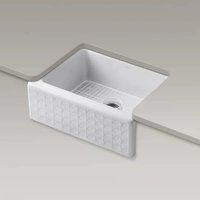
Chablis K-2081-4 - Sink KOHLER - Free user manual and instructions
Find the device manual for free Chablis K-2081-4 KOHLER in PDF.

User questions about Chablis K-2081-4 KOHLER
0 question about this device. Answer the ones you know or ask your own.
Ask a new question about this device
Download the instructions for your Sink in PDF format for free! Find your manual Chablis K-2081-4 - KOHLER and take your electronic device back in hand. On this page are published all the documents necessary for the use of your device. Chablis K-2081-4 by KOHLER.
USER MANUAL Chablis K-2081-4 KOHLER
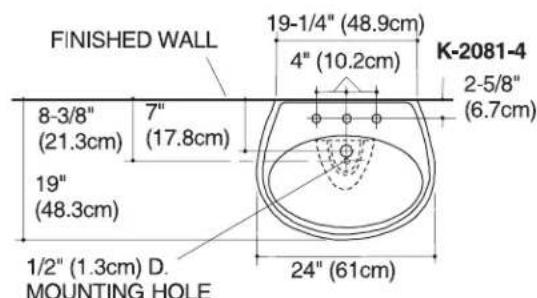
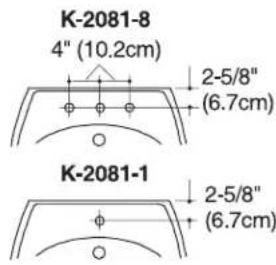
M product numbers are for Mexico (i.e. K-12345M)
Thank You For Choosing Kohler Company
We appreciate your commitment to Kohler quality. Please take a few minutes to review this manual before you start installation. If you encounter any installation or performance problems, please don't hesitate to contact us. Our phone numbers and website are listed on the back cover. Thanks again for choosing Kohler Company.
Before You Begin
□ Observe all local plumbing and building codes.
☐ Prior to installation, unpack the new lavatory and inspect it for damage. Return the lavatory to its protective carton until you are ready to install it.
These instructions are for installing the lavatory to wood frame construction. For other installations, supply suitable bracing and fastening devices of sufficient size and strength.
☐ The walls and floor must be square, plumb, and level.
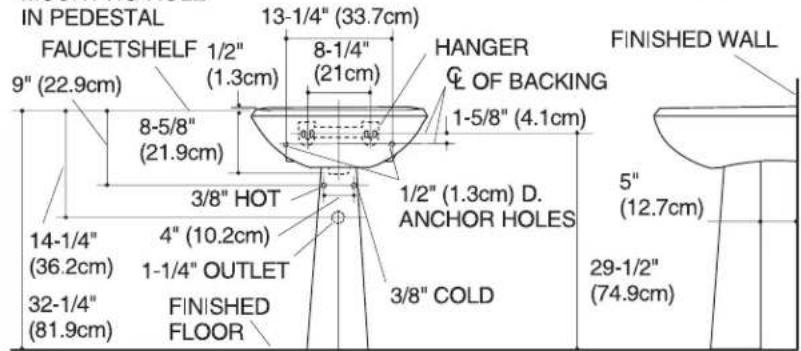
☐ Fixture dimensions are nominal and conform to tolerances in ASME Standard A112.19.2M.
1. Preparation
☐ Install the water supplies and drain piping according to the roughing-in information. Install the supply stops so the handles will not touch the pedestal when fully open.
☐ Install sufficient backing behind the finished wall to provide a secure material for the anchoring devices.
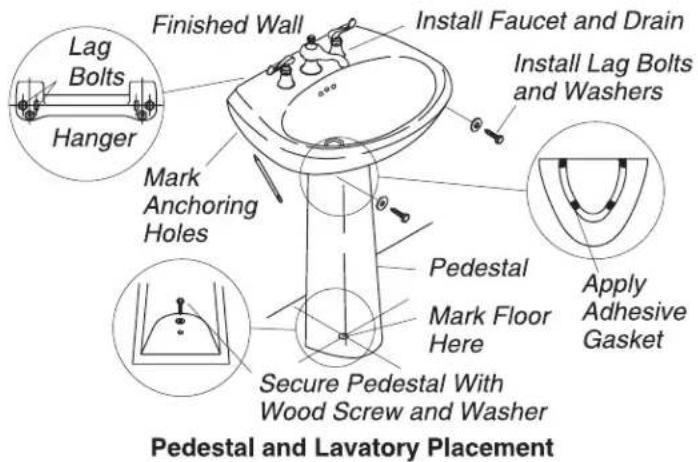
☐ Use lag bolts (not provided) to install the hanger to the wall according to the roughing-in information. Make sure the hanger is level, and is secured to the backing material behind the finished wall.
□ Apply four self-adhesive gaskets (provided) to the top edge of the pedestal as shown in "Install the Lavatory".
□ Mark the centerline on the floor.
☐ Refer to the roughing-in information, and position the pedestal on the floor centerline location at the required distance from the finished wall.
Preparation (cont.)
☐ Carefully lift the lavatory into place on the hanger and pedestal, and slowly move the pedestal as required to ensure proper fit in the desired location.
NOTE: The lavatory must be supported by the hanger and pedestal.
☐ Level the lavatory, and add additional self-adhesive gaskets as needed to level.
☐ Locate the two lavatory anchoring holes, and mark the hole locations on the finished wall. Now mark the floor through the hole in the pedestal bottom.
- Carefully remove the lavatory from the hanger and pedestal. Then move the pedestal from the area.
2. Install the Lavatory
☐ Drill 1/4" mounting holes at the marked locations on the finished wall and the floor.
□ Install the faucet and drain to the lavatory according to the manufacturer's instructions.

CAUTION: Risk of product damage. Do not overtighten the wood screw. Overtightening may damage the product.
☐ Move the pedestal over the drilled hole in the floor, and secure the pedestal to the floor by carefully tightening the wood screw and washer.

CAUTION: Risk of product damage. Do not overtighten the lag bolts. Overtightening may damage the product.
□ Carefully set the lavatory on the hanger and pedestal. Level the lavatory, and carefully secure the lavatory to the wall with lag bolts and washers. Tighten until snug.
□ Connect and tighten the trap to the drain, and complete the water supply connections to the faucet according to the instructions packed with the faucet.