TSH 600 B2 - Fan heater TRONIC - Free user manual and instructions
Find the device manual for free TSH 600 B2 TRONIC in PDF.

| Product type | Fan heater |
| Brand | Tronic |
| Model | TSH 600 B2 |
| Power supply | 220-240 V ~ / 50 Hz |
| Power | 600 W |
| Protection class | II (double insulation) |
| Heating technology | Ceramic |
| Adjustable temperature range | 6 °C to 32 °C |
| Timer | 1 to 24 hours |
| Tip-over protection | Yes |
| Overheat protection | Yes |
| Recommended use | Enclosed rooms, private use, not suitable for bathrooms |
| Cleaning | Slightly damp cloth, vacuum on the grilles |
| Warranty | 3 years |
| After-sales service France | 0800 919270, kompernass@lidl.fr |
| After-sales service Belgium | 0800 12089, kompernass@lidl.be |
| Recycling | Device and packaging recyclable, deposit in store or recycling center |
| Included accessories | Instruction manual |
Frequently Asked Questions - TSH 600 B2 TRONIC
User questions about TSH 600 B2 TRONIC
0 question about this device. Answer the ones you know or ask your own.
Ask a new question about this device
Download the instructions for your Fan heater in PDF format for free! Find your manual TSH 600 B2 - TRONIC and take your electronic device back in hand. On this page are published all the documents necessary for the use of your device. TSH 600 B2 by TRONIC.
USER MANUAL TSH 600 B2 TRONIC
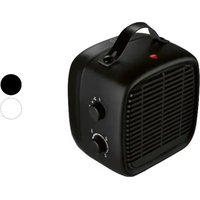
CERAMIC PLUG HEATER / KERAMIK-STECKDOSEN- HEIZLÜFTER / RADIATEUR SOUFFLANT CÉRAMIQUE SUR PRISE TSH 600 B2
GB IE
CERAMIC PLUG HEATER
Operating instructions
This product is only suitable for well insulated spaces or occasional use.
FR BE
RADIATEUR SOUFFLANT CÉRAMIQUE SUR PRISE
Mode d'emploi
GB/IE Operating instructions Page 1
Contents
Introduction 3
Information about these operating instructions .... 3
Proper use 3
Warnings and symbols used 4
Safety 5
Package contents and transport inspection ..... 9
Operating elements 9
Operation 10
Requirements for the operating location ..... 1 0
Handling and operation 11
Switching the appliance on and off 11
Setting the temperature 12
Set heating time 12
Protective devices....13
Overheating protection 13
Tilt cut-out 13
Cleaning 14
Storage ....14
Disposal 14
Disposal of the appliance 15
Disposal of the packaging 16
Troubleshooting 16
TRONIC
Appendix....17
Technical specifications 17
Information requirements for electric local space heaters ..... 1 8
Information about these operating instructions
Congratulations on the purchase of your new appliance. You have selected a high-quality product.
The operating instructions are part of this product. They contain important information about safety, usage and disposal. Before using the product, please familiarise yourself with all operating and safety instructions. Use the product only as described and for the range of applications specified. Please also pass these operating instructions on to any future owner.
Proper use
This ceramic plug-in fan heater – referred to below as appliance or heater – is intended only for heating closed interior rooms and is for private use only.
This appliance is not intended for use in areas where special conditions may apply, such as corrosive or potentially explosive atmospheres (dust, vapour or gas). It is not intended for heating up cars or tents, for example.
The appliance must not be used outside of closed rooms. Any other usage or modification of the appliance is deemed to be improper and carries a significant risk of accidents. It is not intended for use in commercial or industrial applications.
Warnings and symbols used
The following warnings and symbols are used in these operating instructions, on the packaging and on the appliance (where applicable):
 | DANGER! A warning with this symbol and the signal word "DANGER" indicates an imminently hazardous situation that will result in death or serious injury if not avoided. |
 | WARNING! A warning with this symbol and the signal word "WARNING" indicates a potentially hazardous situation that could result in death or serious injury if not avoided. |
 | CAUTION! A warning with this symbol and the signal word "CAUTION" indicates a potentially hazardous situation that could result in a minor or moderate injury if not avoided. |
 | ATTENTION! A warning with this symbol and the signal word "ATTENTION" indicates a potential situation that could result in property damage if not avoided. |
 | Note: A note identifies additional information that facilitates the use of the appliance. |
 | Do not cover the appliance! Covering the appliance can lead to overheating and result in a fire! |
 | Attention! Hot surface! This symbol warns of hot surfaces on the appliance. There is a risk of burns! |
| ~ | AC current/voltage |
 | Read the instructions. |
Safety
DANGER!
■ The appliance must not be used in the immediate vicinity of a bath, shower or swimming pool. Do not use the appliance in bathrooms, washrooms or similar areas.
■ The appliance is to be installed so that a person in the bath or shower is unable to touch the switch and other controls.
■ Never open the appliance housing. There are no parts inside the appliance which require user maintenance. In addition, this will invalidate the warranty.
■ Use only in dry environments.
WARNING!
■ Check the appliance for visible external damage before use. Do not use an appliance that has been damaged or dropped.
■ This appliance may be used by children aged 8 years and above and by persons with reduced physical, sensory or mental capabilities or lack of experience and/or knowledge if they are being supervised or have been instructed with regard to the safe use of the appliance and have understood the potential risks. Do not allow children to play with the appliance.
■ Cleaning and user maintenance tasks may not be carried out by children unless they are supervised.
■ Children younger than 3 years old should be kept away from the appliance unless they are constantly monitored.
■ Children older than 3 and younger than 8 years of age may only switch the appliance on and off if they are supervised or instructed in the safe use of the appliance and have understood the resulting dangers, and provided that the appliance is located or installed in its normal operating position.
■ Children older than 3 and younger than 8 years of age may not plug in, regulate or clean the appliance and may not carry out user maintenance tasks.
■ Children must be supervised to make sure that they do not play with the appliance.
■ The heater must not be used in small rooms occupied by persons who cannot leave the room independently, unless constant supervision is ensured.
■ Switch off the appliance after each use and before cleaning it.
■ Do not operate the appliance with an extension cable, adapter or on a multiple socket.
■ The appliance may only be used on a single socket.
■ Make sure that the mains socket being used is always easily accessible so that the appliance can be quickly disconnected from the power supply in an emergency.
■ Do not use the appliance together with a programmable switch, a timer, a separate remote control system or any other system which switches the heater on automatically, as this could lead to a fire risk if the heater is covered or set up incorrectly. Do not operate the appliance unattended.
■ The appliance is not suitable for use in caravans or motor homes.
■ Some parts of the product may be very hot and cause burns. Be particularly careful when children and vulnerable people are present.
■ Do not install the heater near curtains or other flammable materials as there is a risk of fire.
■ To reduce the risk of fire, keep textiles, curtains and all combustible materials at least 1 m away from the air outlet.
Package contents and transport inspection
The appliance is supplied with the following components as standard:
- Ceramic plug heater
• These operating instructions
(i) Note: Check the package for completeness and signs of visible damage.
If the delivery is incomplete or damage has occurred as a result of defective packaging or during transport, contact the service hotline (see section Service).
◆ Remove all packaging materials and any protective film from the appliance.
(i) Note: You may notice a slight smell when using the appliance for the first time. This is normal and is completely harmless.
Operating elements
① button
② button
③ Display
4 setting button
⑤ Operating LED
6 Protective grille
⑦ + button
8 Mains plug
9 Air inlet
10 Spacers
11 On/Off switch
12 Grip
Operation
Requirements for the operating location
For safe and trouble-free operation of the appliance, the operating location must fulfil the following requirements:
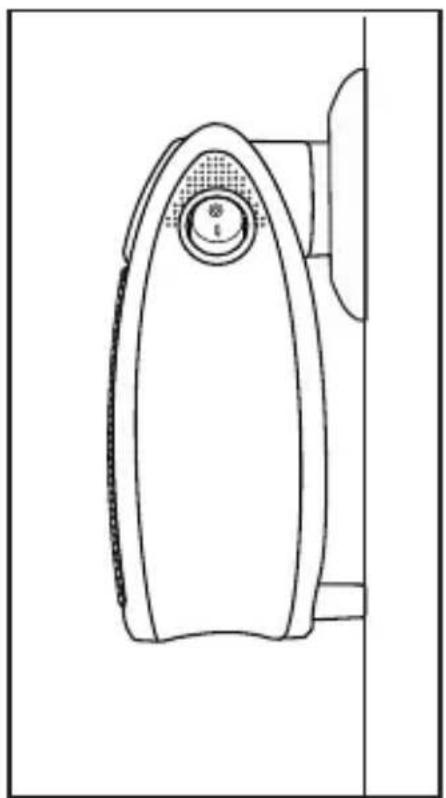
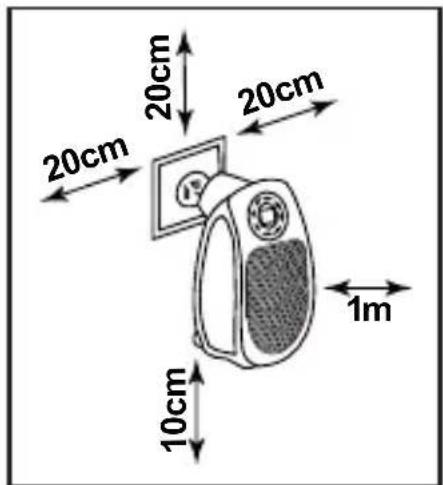
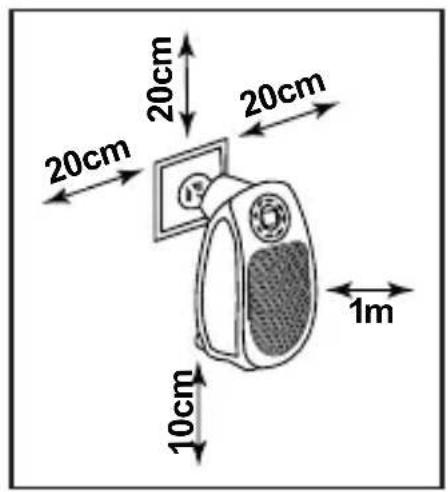
■ The appliance may only be operated in an upright position and fully assembled. The spacers 10 must touch the wall (see fig. 1).
■ The mains socket must be easily accessible so that the appliance can be quickly disconnected in an emergency.
■ The minimum distances between the appliance and other objects of 20 cm to the side, 20 cm to the top, 10 cm to the bottom and 1 m to the front must be observed (see fig. 2).
■ Ensure that the air can always enter and escape freely.
Otherwise, there could be a heat build-up in the appliance.
natural_image
Line drawing of a door with a circular vent and handle, no text or symbols presentFig. 1

DANGER!
Risk of fire due to contact with fabrics!
Do not allow flammable materials (e.g. textiles) to come into contact with the appliance.
Do not cover the appliance.
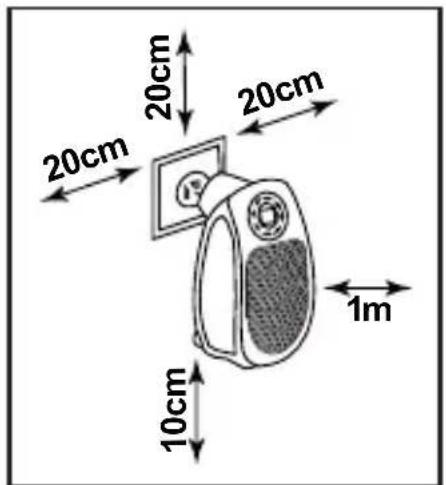
Fig. 2
Handling and operation
Switching the appliance on and off
◆ Plug the appliance into a suitable, easily accessible mains socket. The power plug must be fully inserted into the mains socket.
Switch on the appliance by pressing the On/Off switch ⑪. The operating LED ⑤ lights up red to show that the appliance is in standby mode.
- Press the ⏻ button ① to turn on the fan heater. The factory presettemperature 25 (25° Celsius) appears on the display ③.
Press the ⏻ button ① again to switch the fan heater back into standby mode. The display ③ goes out, while the operating LED ⑤ remains lit up red. The fan continues to run for approx. 30 seconds to cool down the appliance.
Switch off the appliance by pressing the On/Off switch ⑪. The operating LED ⑤ goes out, the appliance is disconnected from the power supply. Now unplug the appliance from the mains socket.
WARNING! THE FAN HEATER GETS VERY HOT DURING USE. Allow it to cool down before you disconnect it from the mains socket. Touch the heater only by the grips ⑫ provided.
Setting the temperature
You can set a temperature range from 6^ Celsius to 32^ Celsius on the fan heater.
- Press the ⏻ button ① to turn on the fan heater. The factory preset temperature (25) or the last-used temperature appears on the display ③.
- Press the + button ⑦, button repeatedly to increase the temperature in steps of 1° Celsius.
- Press the — button ②, button repeatedly to reduce the temperature in steps of 1^ Celsius.
(i) Note: The fan heater only starts heating when the room temperature falls below the set temperature value.
As soon as the room temperature has reached the set temperature value, the appliance stops heating until the room temperature drops below the set temperature value again.
Set heating time
The appliance has a timer that you can use to set the desired heating time between 1 to 24 hours. Once this heating period is over, the appliance automatically switches to standby mode.
With the appliance switched on, press the setting button once. The indication ③ flashes in the display ☐ (continuous operation).
◆ Press the button ⑦, button repeatedly to increase the heating duration in steps of 1 hour.
◆ Press the—button ②, button repeatedly to reduce the heating duration in steps of 1 hour.
(i) Note: After approx. 5 seconds without a button being pressed, the set heating duration is accepted and the timer is activated. When the timer is activated, the display ③ switches every few seconds between the set temperature and the heating duration display.
Protective devices
Overheating protection
The appliance is fitted with an overheating protector. If the appliance becomes too hot internally, the heating element and fan switch off automatically. In this case, pull the appliance out of the mains socket and let it cool down for 30 minutes. Then plug the appliance back into the mains socket and switch it on again.

WARNING! Overheating can lead to a risk of fire!
Check that the appliance can sufficiently dissipate the heat generated: Is the appliance covered, are the ventilation slots blocked or is the fan blocked?
If possible, eliminate the problem or contact the Service Hotline (see the section Service).
Tilt cut-out
The fan heater must always be plugged into a mains socket in an upright position, with the display ③ at the top. The tilt cut-out switches the appliance off as soon as it is tilted by a few degrees from the upright position. As soon as the appliance is back in an upright position, it can be switched back on again.
Cleaning
WARNING! Before cleaning the appliance, disconnect the appliance from the mains power socket!
Allow the appliance to cool down before cleaning to prevent any risk of burns.
Clean the appliance only when it is cool.
CAUTION! To avoid irreparable damage to the appliance, ensure that no moisture can get into it during cleaning.
Never immerse the appliance in water and protect it from splashing or sprayed water.
◆ Clean the housing only with a soft damp cloth and a mild detergent.
Remove accumulations of dust on the protective grille ⑥ and the air inlet ⑨ with a paintbrush or vacuum cleaner.
Storage
If you are not using the appliance, disconnect it from the mains power supply and store it in a clean, dry place away from direct sunlight.
Disposal
Applies only to France:

The product, its packaging and the operating instructions are recyclable. They are subject to an extended manufacturer responsibility and will be collected separately.
Applies only to Spain:
The packaging contains paper and/or cardboard components.
The packaging contains plastic and/or metal components.
Disposal of the appliance
natural_image
Simple line drawing of a trash bin with crossed lines indicating no waste or restriction (no text or symbols)The adjacent symbol of a crossed-out dustbin means that this appliance is subject to Directive 2012/19/EU. This directive states that this appliance may not be disposed of in the normal household waste at the end of its useful life, but must be taken to specially set-up collection locations, recycling depots or disposal companies.
The disposal is free of charge for the user. Protect the environment and dispose of this appliance properly.
If your old appliance has stored any personal data, you are responsible for deleting it yourself before returning it.
Your local community or municipal authorities can provide information on how to dispose of the worn-out product.
Disposal of the packaging

The packaging materials have been selected for their environmental friendliness and ease of disposal and are therefore recyclable. Dispose of packaging materials that are no longer needed in accordance with applicable local regulations.
Dispose of the packaging in an environmentally friendly manner. Note the labelling on the packaging and separate the packaging material components for disposal, if necessary. The packaging material is labelled with abbreviations (a) and numbers (b) with the following meanings: 1–7: plastics, 20–22: paper and cardboard, 80–98: composites.
Troubleshooting
This section contains important information on fault identification and rectification.

WARNING! Repairs to electrical appliances should only be carried out by specialists trained by the manufacturer. Improper repairs can cause considerable risks to users and damage to the appliance.
The following table will help you to identify and rectify minor malfunctions:
| Fault Possible | cause Remedy | |
| The appliance will not switch on. | The plug is not connected. | Insert the plug completely into the mains power socket. |
| The mains socket is not supplying any power. | Check the house mains fuse. | |
| The tilt cut-out has been activated. | Plug the appliance up-right into the mains so-cket with the display 3 at the top. | |
| The appliance switches itself to standby mode. | The set heating time has expired. | Increase the heating time if you wish. |
(i) Note: If the above-mentioned solutions do not resolve the problem, please contact Customer Service (see section Service).
Appendix
Technical specifications
| Input 220-240 V ~, | 50 Hz |
| Output 600 W | |
| Protection class | II/□ (double insulation) |
Information requirements for electric local space heaters
| Model identifier(s): SSH 600 B2 | |||
| Item Symbol Value Unit | |||
| Heat output | |||
| Nominal heat output P | nom | 0.6 kW | |
| Minimum heat output (standard value) | P_min | 0 | kW |
| Maximum continuous heat output P | max,c | 0.6 kW | |
| Auxiliary electricity consumption | |||
| At nominal heat output el | max | 0 | kW |
| At minimum heat output el | min | 0 | kW |
| In standby mode el | SB | 0.0006 kW | |
| Item | Unit | ||
| Type of heat input, for electric storage local space heaters only (select one) | |||
| manual heat charge control, with integrated thermostat no | |||
| manual heat charge control with room and/or outdoor temperature feedback | no | ||
| electronic heat charge control with room and/or outdoor temperature feedback | no | ||
| fan assisted heat output | no | ||
| Type of heat output/room temperature control (select one) | |
| single stage heat output and no room temperature control no | |
| Two or more manual stages, no room temperature control | no |
| with mechanic thermostat room temperature control no | |
| with electronic room temperature control | yes |
| electronic room temperature control plus day timer no | |
| electronic room temperature control plus week timer no | |
| Other control options (multiple answers possible) | |
| room temperature control, with presence detection no | |
| room temperature control, with open window detection no | |
| with distance control option no | |
| with adaptive start control no | |
| with working time limitation no | |
| with black bulb sensor | no |
| Contact details | KOMPERNASS HANDELS GMBH, BURGSTRASSE 21, 44867 BOCHUM, GERMANY |
This appliance has a 3-year warranty valid from the date of purchase. If this product has any faults, you, the buyer, have certain statutory rights. Your statutory rights are not restricted in any way by the warranty described below.
Warranty conditions
The warranty period starts on the date of purchase. Please keep your receipt in a safe place. This will be required as proof of purchase.
If any material or manufacturing fault occurs within three years of the date of purchase of the product, we will either repair or replace the product for you or refund the purchase price (at our discretion). This warranty service requires that you present the defective appliance and the proof of purchase (receipt) within the three-year warranty period, along with a brief written description of the fault and of when it occurred.
If the defect is covered by the warranty, your product will either be repaired or replaced by us. The repair or replacement of a product does not signify the beginning of a new warranty period.
Warranty period and statutory claims for defects
The warranty period is not prolonged by repairs effected under the warranty. This also applies to replaced and repaired components. Any damage and defects present at the time of purchase must be reported immediately after unpacking. Repairs carried out after expiry of the warranty period shall be subject to a fee.
Scope of the warranty
This appliance has been manufactured in accordance with strict quality guidelines and inspected meticulously prior to delivery.
The warranty covers material faults or production faults. The warranty does not extend to product parts subject to normal wear and tear or to fragile parts which could be considered as consumable parts such as switches, batteries or parts made of glass.
The warranty does not apply if the product has been damaged, improperly used or improperly maintained. The directions in the operating instructions for the product regarding proper use of the product are to be strictly followed. Uses and actions that are discouraged in the operating instructions or which are warned against must be avoided.
This product is intended solely for private use and not for commercial purposes. The warranty shall be deemed void in cases of misuse or improper handling, use of force and modifications / repairs which have not been carried out by one of our authorised Service centres.
Warranty claim procedure
To ensure quick processing of your case, please observe the following instructions:
■ Please have the till receipt and the item number (IAN) 487567_2501 available as proof of purchase.
■ You will find the item number on the type plate on the product, an engraving on the product, on the front page of the operating instructions (below left) or on the sticker on the rear or bottom of the product.
■ If functional or other defects occur, please contact the service department listed either by telephone or by e-mail.
■ You can return a defective product to us free of charge to the service address that will be provided to you. Ensure that you enclose the proof of purchase (till receipt) and information about what the defect is and when it occurred.
You can download these instructions along with many other manuals, product videos and installation software at www.lidl-service.com.
This QR code will take you directly to the Lidl service page (www.lidl-service.com) where you can open your operating instructions by entering the item number (IAN) 487567_2501.
Service
Service Great Britain
Tel.: 0800 404 7657
E-Mail: kompernass@lidl.co.uk

Servicelreland
Tel.: 1800 101010
E-Mail: kompernass@lidl.ie
IAN 487567_2501
Importer
Please note that the following address is not the service address. Please use the service address provided in the operating instructions.
KOMPERNASS HANDELS GMBH
BURGSTRASSE 21
44867 BOCHUM
GERMANY
www.kompernass.com
Inhaltsverzeichnis
Einführung 25
natural_image
Line drawing of a door handle with a circular vent and textured lid (no text or symbols)Abb. 1
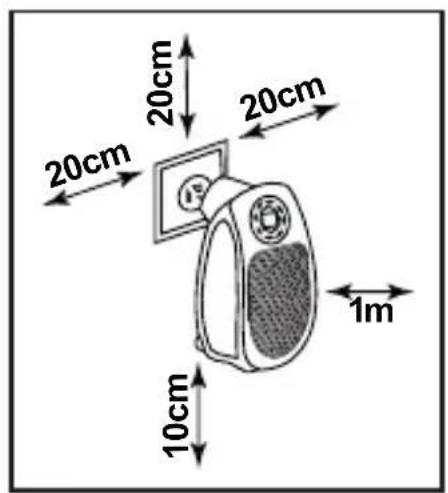
Abb. 2
natural_image
Simple line drawing of a trash bin with crossed lines indicating no waste or restriction (no text or symbols)KOMPERNASS HANDELS GMBH
BURGSTRASSE 21 • 44867 BOCHUM
DEUTSCHLAND • www.kompernass.com
Table des matières
Introduction 47
Protection anti-surchauffe 58
natural_image
Line drawing of a mechanical device with a circular top and side mounting bracket (no text or symbols)Fig. 1

Fig. 2
Protection anti-surchauffe
natural_image
Simple line drawing of a trash bin with crossed lines indicating no waste or restriction (no text or symbols)KOMPERNASS HANDELS GMBH
BURGSTRASSE 21
44867 BOCHUM
ALLEMAGNE
www.kompernass.com
Inhoud
Inleiding 75
natural_image
Line drawing of a door handle with a circular vent and textured grip (no text or symbols)Afb. 1
Afb. 2
natural_image
Simple line drawing of a trash bin with two crossed lines indicating no waste or prohibition (no text or symbols)KOMPERNASS HANDELS GMBH
BURGSTRASSE 21
44867 BOCHUM
DUITSLAND
www.kompernass.com
Obsah
Úvod....97
natural_image
Line drawing of a mechanical device with a circular top and side mounting bracket (no text or symbols)Obr. 1

Obr. 2
Obsluha a provoz
natural_image
Simple line drawing of a trash bin with crossed lines indicating no waste or restriction (no text or symbols)KOMPERNASS HANDELS GMBH
BURGSTRASSE 21
44867 BOCHUM
NĚMECKO
www.kompernass.com
Spis treści
W step 119
natural_image
Line drawing of a door with a circular vent and handle, mounted on a wall (no text or symbols)llustr. 1
Ilustr. 2
natural_image
Symbol of a trash bin crossed with a diagonal line, representing no waste or discharge (no text or labels)KOMPERNASS HANDELS GMBH
BURGSTRASSE 21
44867 BOCHUM
NIEMCY
www.kompernass.com
Obsah
Úvod....143
natural_image
Line drawing of a mechanical device with a circular top and side mounting bracket (no text or symbols)Obr. 1

Obr. 2
Obsluha a prevádzka
natural_image
Symbol of a trash bin crossed out by two diagonal lines (no text or numbers present)KOMPERNASS HANDELS GMBH
BURGSTRASSE 21
44867 BOCHUM
NEMECKO
www.kompernass.com
Índice
Introducción....165
natural_image
Line drawing of a door with a circular vent and handle, mounted on a wall (no text or symbols)Fig. 1
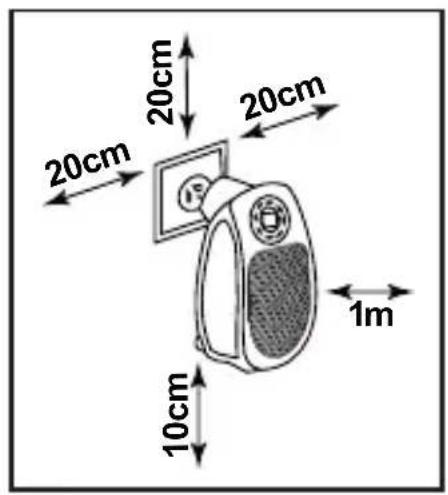
Fig. 2
natural_image
Simple line drawing of a trash bin with two crossed lines indicating no waste or restriction (no text or symbols)KOMPERNASS HANDELS GMBH
BURGSTRASSE 21 • 44867 BOCHUM
ALEMANIA
www.kompernass.com
Indholdsfortegnelse
Introduktion....187
natural_image
Line drawing of a mechanical device with a circular top and side mounting bracket (no text or symbols)Fig. 1
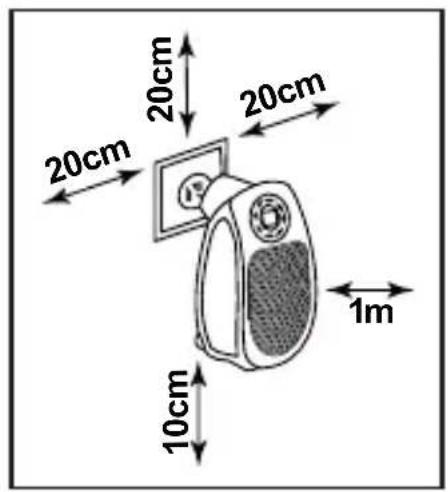
Fig. 2
natural_image
Simple line drawing of a trash bin with crossed lines indicating no waste or restriction (no text or symbols)KOMPERNASS HANDELS GMBH
BURGSTRASSE 21
44867 BOCHUM
TYSKLAND
www.kompernass.com
Indice
Introduzione 209
natural_image
Line drawing of a mechanical device with a circular top and side mounting bracket (no text or symbols)Fig. 1

Fig. 2
natural_image
Simple line drawing of a trash bin with two crossed lines indicating no waste or prohibition (no text or symbols)KOMPERNASS HANDELS GMBH
BURGSTRASSE 21
44867 BOCHUM
GERMANIA
www.kompernass.com
Tartalomjegyzék
Bevezető 233
natural_image
Line drawing of a door handle with a circular vent and textured grip (no text or symbols)- ábra

- ábra
natural_image
Simple line drawing of a trash bin with crossed lines indicating no waste or restriction (no text or symbols)KOMPERNASS HANDELS GMBH
BURGSTRASSE 21
44867 BOCHUM
NÉMETORSZÁG
www.kompernass.com
KOMPERNASS HANDELS GMBH
BURGSTRASSE 21
44867 BOCHUM
GERMANY
www.kompernass.com
Last Information Update · Stand der Informationen · Version des informations · Stand van de informatie
Stav informací · Stan informacji · Stav informácií · Estado de las informaciones