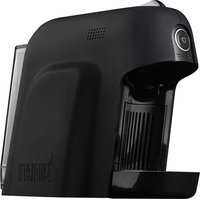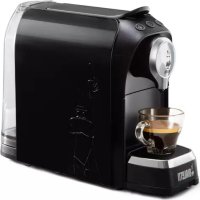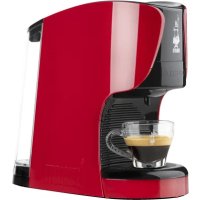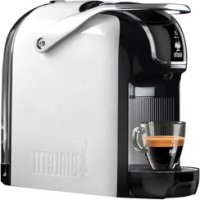
Gioia - Coffee machine BIALETTI - Free user manual and instructions
Find the device manual for free Gioia BIALETTI in PDF.


User questions about Gioia BIALETTI
0 question about this device. Answer the ones you know or ask your own.
Ask a new question about this device
Download the instructions for your Coffee machine in PDF format for free! Find your manual Gioia - BIALETTI and take your electronic device back in hand. On this page are published all the documents necessary for the use of your device. Gioia by BIALETTI.
USER MANUAL Gioia BIALETTI
natural_image
Line drawing of a portable coffee machine with a cartoon character inside, no text or symbols present
text_image
since 1919Instructions for use
EN Translation of original instructions 33
text_image
Image showing a cartoon character pointing at a prohibition symbol with a circle, likely indicating no prohibition or exclusion.I BAMBINI DEVONO ESSERE SORVEGLIATI PERCHÉ NON GIOCHINO CON L'APPAREC- CHIO.
2. Avvertenze

L'APPARECCHIO PUÒ ESSERE UTI- LIZZATO DA BAMBINI DI ETÀ NON INFERIORE A 8 ANNI PURCHÉ SOT- TO SORVEGLIANZA OPPURE DOPO CHE LE STESSE ABBIANO RICEVU- TO ISTRUZIONI RELATIVE ALL'USO SICURO DELL'APPARECCHIO E ALLA COMPRENSIONE DEI PERICOLI AD ESSO INERENTI. LE OPERAZIONI DI PULIZIA E MANUTENZIONE POSSO- NO ESSERE EFFETTUATE DA BAMBI- NI DI ETÀ NON INFERIORE AGLI 8 ANNI ADEGUATAMENTE SORVEGLIA- TI. TENERE IL PRODOTTO ED IL SUO CAVO DI ALIMENTAZIONE LONTA- NO DAI BAMBINI DI ETÀ INFERIORE AGLI 8 ANNI.

L'APPARECCHIO PUÒ ESSERE UTILIZZATO DA PERSONE CON CAPACITÀ FISICHE, SENSORIALI O MENTALI RIDOTTE O PRIVE DI ESPERIENZA E CONOSCENZA DELL'APPARECCHIO PURCHÉ SIANO SOTTO CONTROLLO O AD ESSE SIANO STATE IMPARTIRE ISTRUZIONI SU COME USARE L'APPARECCHIO IN SICUREZZA E SUI RISCHI CONNESSI ALL'USO DELLO STESSO.

NON IMMERGERE L'APPARECCHIO IN ACQUA O IN ALTRI LIQUIDI.

SE IL CAVO DI ALIMENTAZIONE DI QUESTO APPARECCHIO È DANNEGGIATO, DEVE ESSERE SOSTITUITO ESCLUSIVAMENTE DA UN CENTRO ASSISTENZA TECNICA AUTORIZZATO DAL COSTRUTTORE, POICHÉ SONO NECESSARI UTENSILI SPECIALI.

DURANTE L'EROGAZIONE DELLA BEVANDA, PRESTARE ATTENZIONE AD EVENTUALI SCHIZZI DI LIQUIDO CALDO. NON TOCCARE LE PARTI CALDE DELL'APPARECCHIO SUBITO DOPO L'USO PER EVITARE IL RISCHIO DI USTIONE. L'USO SCORRETTO PUÒ PROVOCA-RE LESIONI.

QUESTO APPARECCHIO È STATO CONCEPITO PER PRODURRE CAFFÈ ESPRESSO IN CAPSULA BIALETTI E DEVE ESSERE UTILIZZATO SOLO PER QUESTO SCOPO. OGNI ALTRO USO È DA CONSIDERARSI IMPROPRIO E QUINDI PERICOLOSO. IL COSTRUTTORE NON PUÒ ESSERE CONSIDERA-TO RESPONSABILE PER EVENTUALI DANNI DERIVANTI DA USI IMPROPRI, ERRONEI ED IRRAGIONEVOLI.
natural_image
Illustration of a hand inserting a plug into a wall socket, with no text or symbols present.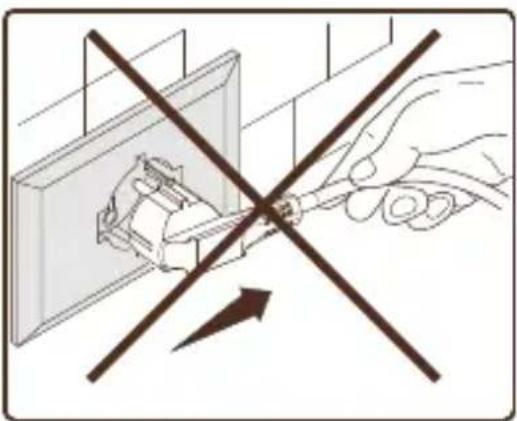
natural_image
Illustration of a hand using a tool to switch electrical plug, with no text or symbols present.
EVITARE DI SCOLLEGARE L'APPARECCHIO TIRANDO IL CAVO DI ALIMENTAZIONE.
2. Avvertenze

DURANTE IL FUNZIONAMENTO, LA PRESA DI CORRENTE DEVE ESSERE FACILMENTE ACCESSIBILE NEL CASO IN CUI FOSSE NECESSARIO SCOLLEGARE L'APPARECCHIO.
PRECAUZIONI
text_image
Technical diagram of a portable device with numbered parts for identification and assembly reference.natural_image
Diagram of a mechanical device with an upward arrow indicating motion, no text or symbols presentnatural_image
Line drawing of a device with an attached cable and cable connector, showing internal components (no text or symbols)natural_image
Technical line drawing of a mechanical component with a pointed tip and curved base (no text or symbols)natural_image
Diagram of a curved device with two circular components and a label '4' (no text or symbols on the diagram itself)natural_image
Diagram of a curved surface with two circular features and two arrows pointing to them, labeled '5' at bottom right (no text or symbols on the diagram itself)natural_image
Line drawing of a mechanical device with an arrow indicating rotation, no text or symbols presentnatural_image
Mechanical assembly diagram showing a tool interacting with a component, with arrows indicating motion direction (no text or symbols)natural_image
Line drawing of a coffee maker with a cup and side arm, no text or symbols presenttext_image
Diagram showing coffee cup cooking process with icons and a downward arrow, labeled '9'text_image
Diagram showing coffee cup and steaming cup with icons and a downward arrow, labeled '10' at bottom right.text_image
Diagram showing coffee cup and steaming cup with icons, indicating a cooking step or cooking process.text_image
Diagram showing coffee cup and steaming cup with a directional arrow, labeled '12' at bottom right.natural_image
Technical illustration of a mechanical assembly with a close-up view of a component being inserted into a housing (no text or symbols present)natural_image
Technical line drawing of a mechanical device with exploded view and assembled views (no text or symbols)natural_image
Six metallic coins with engraved patterns, arranged in a row (no visible text or symbols)natural_image
Symbol of a trash bin crossed out by two crossed lines (no text or numbers present)Nota/Remarks/Note/Notizen/Notes
1. Getting Started
Dear Customer,
Congratulations on choosing to purchase a Bialetti Espesso coff ee machine!
Thank you for choosing one of our products; we are sure that you will be completely satisfied with your choice.
The Bialetti Espresso System is the result of years of passion and careful research on coffee and the various methods of preparation. Since 1933, with the invention and launch of the Moka Express, the little man with moustache has been and continues to be a genuine icon of the authentic Italian espresso.
Thanks to its innovative sensor, your machine can only be used with the original Bialetti capsules in aluminium that contain the correct dose and are designed to offer an espresso, like that made at the bar, in the comfort of your own home.
Please read this manual with care before using this appliance and visit our website www.bialetti.com for any information and to access the advantages reserved to our customers.
Bialetti Industrie wishes you a pleasant tasting.
Declaration of conformity
C€
The manufacturer declares under his own responsibility that the appliance that this “Instruction manual” refers to complies with the EC Directive on appliances for domestic use, as LVD, EMC, EMF, ErP, RoHS, REACH, “Food contact”.
In order to improve the product and/or for manufacturing purposes, the manufacturer reserves the right make technological, aesthetic or dimensional variations without notice.
Regulatory information
The appliance object of this manual complies with the Directive 2014/30/EU; 2014/35/EU; Reg. (EC) n.1935/2004 and Reg. (EC) n.2023/2006.
2. Warnings
Description of symbols

ATTENTION
Always strictly comply with the information marked with ATTENTION or WARNING pictograms.
The WARNING sign warns against a serious injury hazard, while ATTENTION warns against minor injury hazard.

READING THE OPERATING MANUAL
It states to read this manual before using for a correct functioning and to prevent any electric shock and/or burn hazard.

ATTENTION - HOT SURFACE!
The surface temperature of the area where it is located may reach dangerous values and for this reason the direct contact with the skin and heat-sensitive fabrics/materials must be avoided.

RECOMMENDATIONS
This symbol warns to follow the recommendations of the manufacturer concerning safeguard and proper use of the product being used.
GENERAL WARNINGS

Please read this booklet carefully, as it provides important information on the safe installation, use and maintenance of the appliance.
Keep this booklet in a safe place for future reference.
THIS APPLIANCE IS INTENDED FOR HOUSELHOLD USE OR SIMILAR, AS:
- KITCHEN AREAS IN SHOPS, OFFICES AND OTHER WORKING PLACES;
- FARMHOUSES;
- BED AND BREAKFASTS AND SIMILAR STRUCTURES;
- HOTELS, MOTELS AND OTHER RESIDENTIAL ENVIRONMENTS (FOR CUSTOMER'S USE ONLY).
text_image
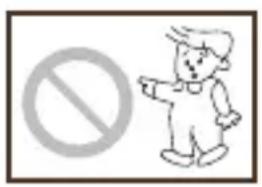
Illustration showing a person pointing at a prohibition symbol next to itCHILDREN SHOULD BE SUPER- VISED TO ENSURE THAT THEY DO NOT PLAY WITH THE APPLI- ANCE.
2. Warnings

THIS APPLIANCE CAN BE USED BY CHILDREN AGED FROM 8 YEARS AND ABOVE IF THEY HAVE BEEN GIVEN SUPERVISION OR INSTRUCTION CONCERNING USE OF THE APPLIANCE IN A SAFE WAY AND IF THEY UNDERSTAND THE HAZARDS INVOLVED. CLEANING AND USER MAINTENANCE SHALL NOT BE MADE BY CHILDREN UNLESS THEY ARE OLDER THAN 8 AND SUPERVISED. KEEP THE APPLIANCE AND THE POWER CORD OUT OF REACH OF CHILDREN UNDER 8 YEARS OF AGE.

APPLIANCES CAN BE USED BY PERSONS WITH REDUCED PHYSICAL, SENSORY OR MENTAL CAPABILITIES OR LACK OF EXPERIENCE AND KNOWLEDGE IF THEY HAVE BEEN GIVEN SUPERVISION OR INSTRUCTION CONCERNING USE OF THE APPLIANCE IN A SAFE WAY AND UNDERSTAND THE HAZARDS INVOLVED.
2. Warnings

NEVER IMMERSE THE APPLIANCE IN WATER OR OTHER LIQUIDS.

IF THE ELECTRICAL CORD OF THIS APPLIANCE IS DAMAGED, IT MUST BE REPLACED BY AN AUTHORIZED CUSTOMER SERVICE CENTRE SINCE SPECIALIZED TOOLS ARE NECESSARY.

DURING DISPENSING OF THE BEVERAGE, PAY ATTENTION TO ANY POSSIBLE SPLASHES OF HOT LIQUID.
DO NOT TOUCH THE APPLIANCE HOT PARTS IMMEDIATELY AFTER USE TO PREVENT THE RISK OF BURNS. IMPROPER USE MAY CAUSE INJURY.

THIS APPLIANCE WAS DESIGNED TO MAKE ESPRESSO COFFEE IN BIALETTI CAPSULES AND MUST BE USED FOR THIS PURPOSE ONLY. ANY OTHER USE IS CONSIDERED IMPROPER AND THEREFORE DANGEROUS. THE MANUFACTURER CANNOT BE HELD RESPONSIBLE FOR ANY DAMAGE ARISING FROM IMPROPER, INCORRECT, OR UNREASONABLE USES.
2. Warnings
- The appliance was designed only for indoor use and non-extreme temperature conditions; do not leave it exposed to the elements (rain, sun, etc.).
- The manufacturer accepts no responsibility and the warranty will not apply for any commercial use, inappropriate handling or use of the appliance, any damage resulting from use for other purposes, malfunctioning, non-professional repair or failure to comply with the instructions.
- After removing the packaging, and before use, make sure the appliance and all the attachments are working well. The electrical plug and sheath should not be cracked or broken. If the conditions described above are observed, immediately unplug the appliance from mains outlet and take it to an authorized After-Sales Service Centre for necessary checking.
- The packing materials (plastic bags, expanded polystyrene, nails, etc.) should be kept away from children since they are potential sources of danger.
- Place the appliance on a flat, smooth, and stable surface. Do not put it close to/on hot surfaces, as heaters, cooking hobs, ovens, gas ranges, open flames, etc.
- Before connecting the appliance, make sure the line voltage is correct. The label is located on the bottom of the appliance body.
- If the plug does not fit into the wall outlet, have the wall outlet replaced with another type by a qualified electrician. He/she must also check that the cord is suitable for the power absorbed by the appliance. In general, it is not advisable to use an adaptor, multiple socket or an extension cord. If they are necessary, use only simple or multiple adaptors and extension cords that conform to safety regulations, being careful not to exceed the load limits indicated on the adaptor and the extension cord, and the maximum power indicated on the multiple adaptor.
- Do not leave the appliance connected when not in use. Remove the plug from the mains outlet when the appliance is not used.
- If the appliance is not intended to be used for a quite long period, empty the water tank.
- Do not put the appliance into a cupboard during use.
2. Warnings

CONNECT THE APPLIANCE TO THE POWER MAINS ONLY WITH AN EARTHED PLUG.

FOR YOUR PERSONAL SAFETY, IT IS ADVISABLE TO POWER THE APPLIANCE BY MEANS OF A DIFFERENTIAL SWITCH (RCD), WHOSE OPERATING CURRENT DOES NOT EXCEED 30MA.
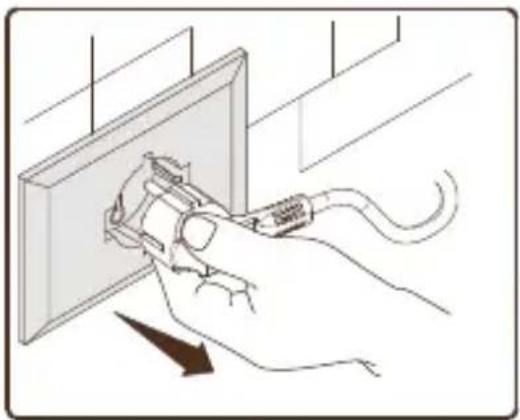
natural_image
Illustration of a hand inserting a plug into a wall socket, with no text or symbols present.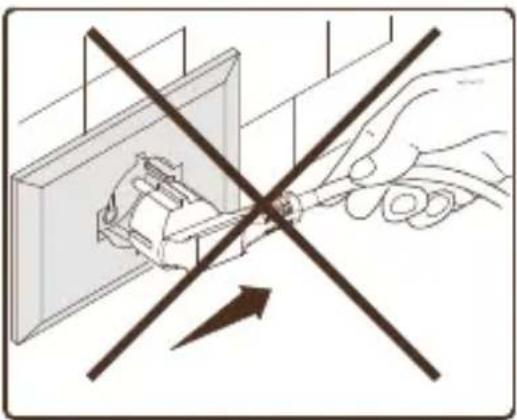
natural_image
Illustration of a hand using a tool to cut electrical socket socket, with no text or symbols present.
AVOID UNPLUGGING THE APPLIANCE BY PULLING THE POWER CORD.

WHILE IN USE, THE POWER SOCKET MUST BE EASILY REACHABLE IN CASE IT IS NECESSARY TO UNPLUG THE APPLIANCE.
2. Warnings
PRECAUTIONS
- Do not touch the appliance with wet or damp hands.
- Do not use the appliance with bare feet.
- Do not put the wire close to sharped edges, do not fix it and do not leave it hang.
- To avoid dangerous overheating, it is recommended that you unwind the electrical cord to its entire length and that you use the appliance as recommended in "Warnings" related to a correct use of the appliance.
- Do not block vent openings/intakes or heat outlets.
- If the appliance breaks down or functions improperly, shut it off and do not tamper with it. Repairs must only be carried out by an after-sales centre authorized by the manufacturer. Non-compliance with what has been stated above could compromise the safety of the appliance.
- If the appliance of this type is not be used anymore, it is recommended to make it inoperable by cutting off the power cord after removing the plug from the mains outlet. You should also render harmless those parts of the appliance that could be dangerous, especially for children who might use an abandoned appliance as a toy.

THE PRODUCTS MUST BE USED ACCORDING TO THE MANUFACTURER'S INSTRUCTIONS. IMPROPER USE COULD CAUSE DAMAGE TO PERSON, ANIMALS AND THINGS, FOR WHICH THE MANUFACTURER CANNOT BE HELD RESPONSIBLE.
2. Warnings
- Do not leave the appliance unattended while turned on.

DO NOT USE THE APPLIANCE WHEN THE WATER TANK IS EMPTY.
- Do not move the appliance whilst operating.

WHEN USING THE APPLIANCE FOR THE FIRST TIME, IT MAY EMIT SMELL OF BURNING OWING TO INSULATION MATERIALS AND HEATING ELEMENTS; ALL THIS IS NORMAL.
3. Package contents
1 Espresso coff ee machine
1 Instructions manual
1 Consumer leaflet "I Caffè d'Italia"
1 Tester kit of blends "I Caffè d'Italia" (only if indicated on the package)
4. Description of the appliance
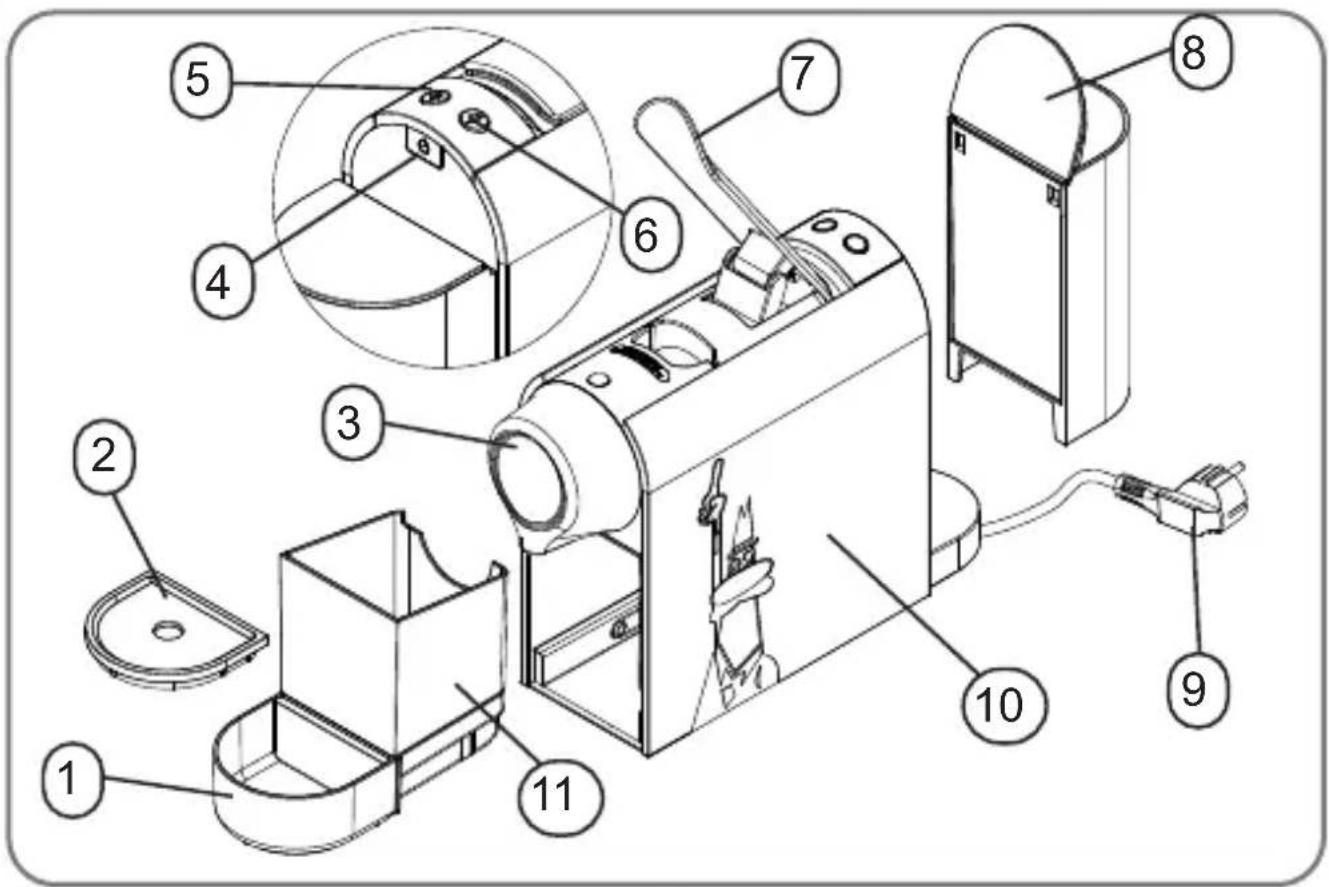
text_image
Technical diagram of a portable device with numbered parts for identification and assembly reference.| Key | |
| 1 | Drip tray |
| 2 Cup rack | |
| 3 | Nozzle |
| 4 On/off button | |
| 5 | espresso coff ee push button |
| 6 long coff ee push button | |
| 7 Lever | |
| 8 | Removable water tank with lid |
| 9 Power cord | |
| 10 | Appliance body |
| 11 | Compartment of used capsules (max 8) |
| Technical Data | |
| DimensionsLxPDxH(mm) | 93x340x221 |
| Voltage (V) | 220-240 V50-60 Hz |
| Power (W) 1200 | |
| Max. watertank capacity | 0.5 l |
| Automaticswitching offtime | about 9' |
5. First use of the appliance
EN
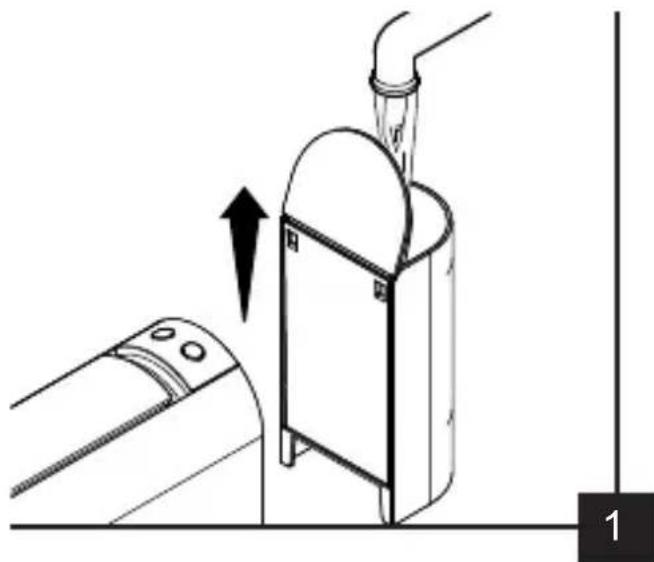
natural_image
Diagram of a mechanical device with an upward arrow indicating motion, no text or symbols presentWith the machine unplugged, take the tank (8) out and fi ll it with drinking water up to the MAX level.
natural_image
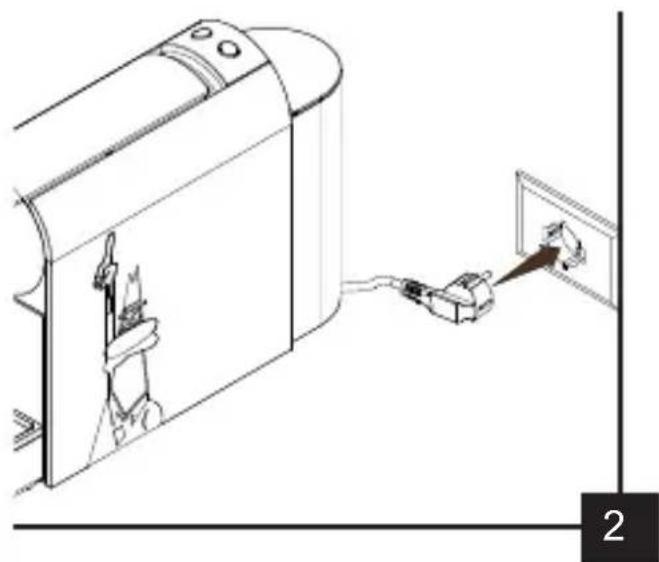
Line drawing of a door with a hand connecting a wall-mounted device to a wall-mounted panel (no text or symbols)Insert the plug (9) of the appliance in the socket as per instructions of "Warnings" section.
natural_image
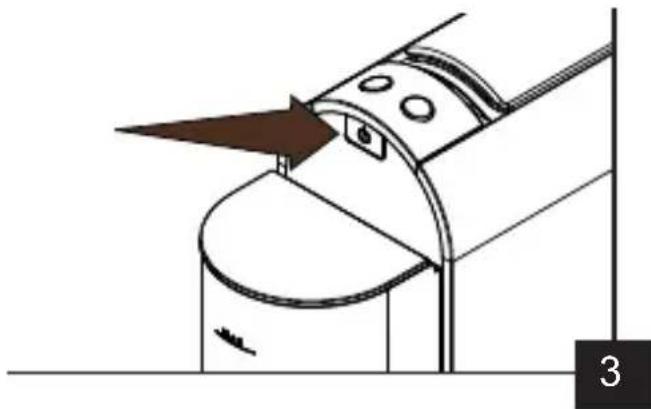
Technical line drawing of a mechanical component with a pointed tip and curved base (no text or symbols)Switch on the machine using the switch (4) on the top back.
natural_image
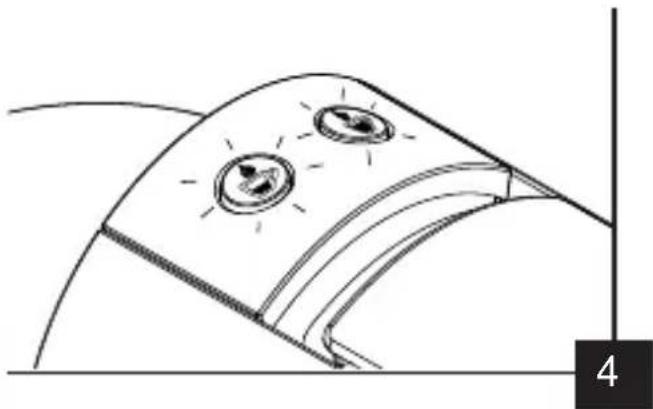
Diagram of a curved device with two circular components and a label '4' (no text or symbols on the diagram itself)During boiler heating, both lights of the pour push buttons (5-6) blink in red. Once the lights turn steady green, the machine is ready for dispensing.

NEVER USE THE APPLIANCE IF THE TANK IS EMPTY.
5. First use of the appliance
natural_image
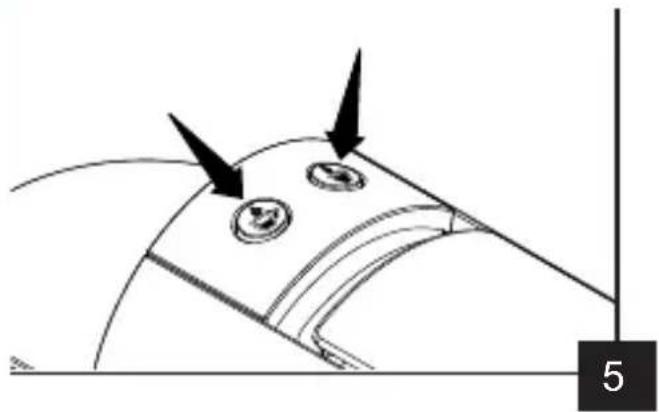
Diagram of a curved surface with two circular features and arrows pointing to them, labeled '5' at bottom right (no text or symbols on the diagram itself)Keeping the lever (1) lowered, position a suitable cup on the opposite rack and start the cleaning mode using the espresso coff ee push button (5) and the long coff ee one (6) at the same time for 5 secs. Stop the cleaning mode by pressing one the two pour push buttons when the tank is empty.

DURING CLEANING MODE, FOR ABOUT ONE MINUTE, THE MACHINE DISPENSES WATER INTERMITTENTLY IN ORDER TO CLEAN AND RINSE THE INNER CIRCUITS OF THE MACHINE DEEPLY. AFTER ONE MINUTE, DISPENSING IS CONTINUOUS AGAIN. DURING THIS CYCLE, THE LIGHTS OF THE TWO POUR PUSH BUTTONS WILL BLINK IN GREEN QUICKLY.
6. Coff ee making
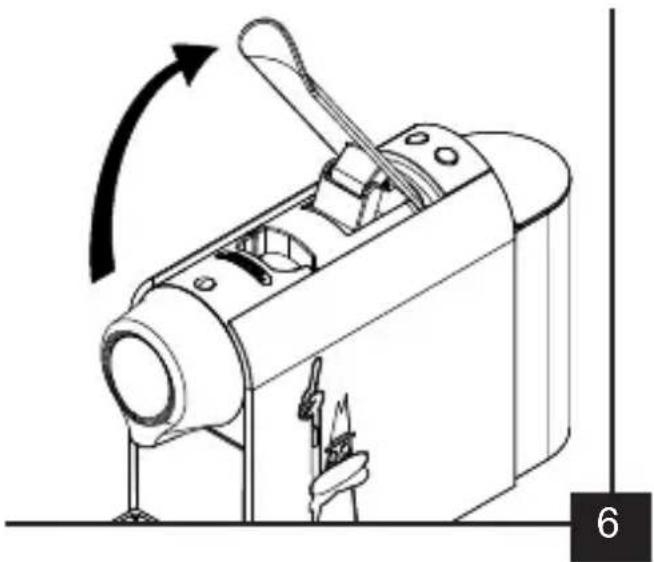
natural_image
Line drawing of a mechanical device with an arrow indicating rotation, no text or symbols presentBefore dispensing, check water level in the tank (8) and make sure the pour push buttons (5-6) are on in green, then lift the lever (7).
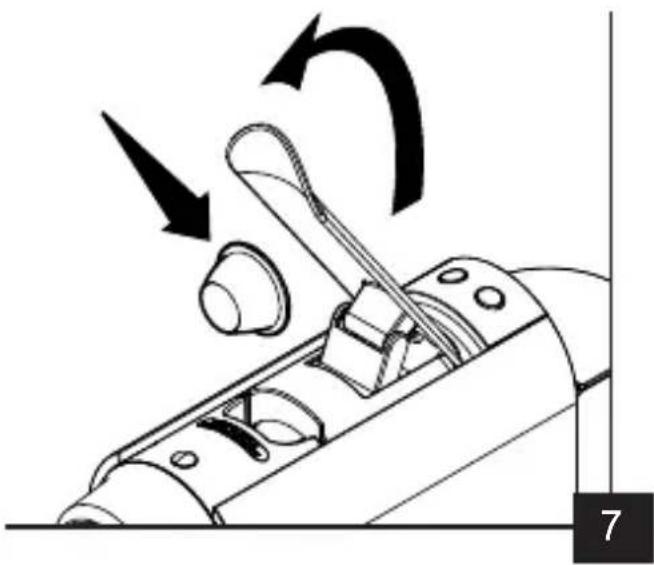
natural_image
Mechanical assembly diagram showing a tool interacting with a component, with arrows indicating motion direction (no text or symbols)Insert the capsule in the apposite compartment and close the lever (7), being careful to prevent hand crushing.

IF THE CAPSULE IS MISSHAPEN, BEND THE EDGES BACK INTO SHAPE.
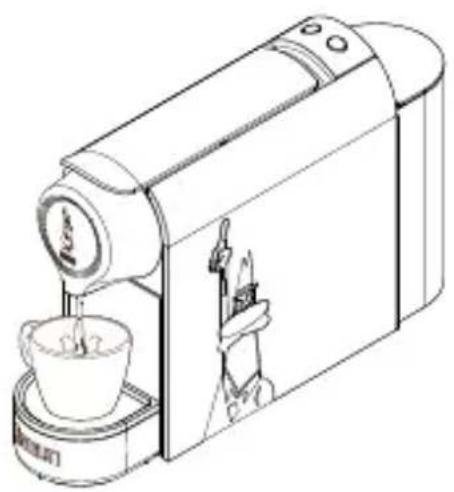
natural_image
Line drawing of a coffee maker with a cup and side arm, no text or symbols presentPlace a cup onto the rack (2). Start the required dispensing of coffee, according to the following procedures.
6. Coff ee making

NEVER PLACE FINGERS BETWEEN THE MECHANISMS OR INSIDE THE CAP-SULE COMPARTMENT.

text_image
Diagram showing coffee cup cooking process with icons and a downward arrow, labeled '9'Press the espresso coffee push button (5). The light of the long coffee push button (6) turns off.
NOTE: During dispensing, the light of the espresso coffee push button (5) starts blinking.
At the end of dispensing, the machine goes back to the ready mode. Both lights of the pour push buttons are on.
NOTE: The dispensing quantity of espresso coffee is 25 ml. To modify this value, refer to the chapter '7. Setting quantity of coffee dispensed.
LONG COFFEE MAKING PROCEDURE
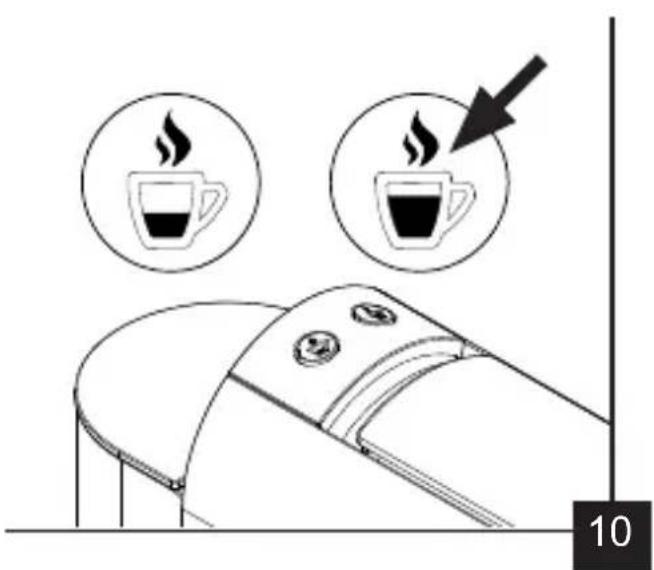
text_image
Diagram showing coffee cup and steaming cup with icons and a downward arrow, labeled '10' at bottom right.Press the long coffee push button (6). The light of the espresso coffee push button (5) turns off.
NOTE: During delivery, the light of the long coffee push button (6) starts blinking.
At the end of dispensing, the machine goes back to the ready mode. Both lights of the pour push buttons are on.
NOTE: The dispensing quantity of long coffee is 40 ml. To modify this quantity, refer to the chapter '7. Setting quantity of coffee delivered.
6. Coff ee making
For every following coffee, pull the lever (7) up to insert a new capsule.
NOTE: By pulling the lever (7) up, the capsule used is automatically ejected into the compartment of used capsules (11).
NOTE: Coffee dispensing can be stopped at any time by pressing one of the two pour push buttons.

THE MACHINE IS EQUIPPED WITH AN APPOSITE SENSOR, WHICH ALLOWS TO USE THE MACHINE WITH ALUMINIUM CAPSULES ONLY.

IN CASE OF PLASTIC CAPSULES, THE MACHINE DOES NOT DISPENSE COFFEE AND THE LIGHT ON THE BUTTON BLINKS RED FOR ABOUT 3 SECONDS.

WHEN TRYING TO DISPENSE WITHOUT CAPSULE, THE MACHINE WILL NOT DISPENSE COFFEE AND THE LIGHTS OF THE POUR BUTTONS WILL BLINK IN RED FOR ABOUT 3 SEC.

TO DISPENSE WATER, START THE CLEANING MODE USING THE ESPRESSO COFFEE PUSH BUTTON (5) AND THE LONG COFFE ONE (6) AT THE SAME TIME FOR 5 SECS. MAKE SURE THE CAPSULE IS NOT INSERTED DURING THIS FUNCTION.
7. Setting dispensing quantity
This type of espresso coffee machine allows to modify the quantity of coffee dispensed.
SETTING ESPRESSO COFFEE DISPENSING QUANTITY

DURING THIS STAGE, THERE MUST BE AN ALUMINIUM CAPSULE INSIDE THE MACHINE.
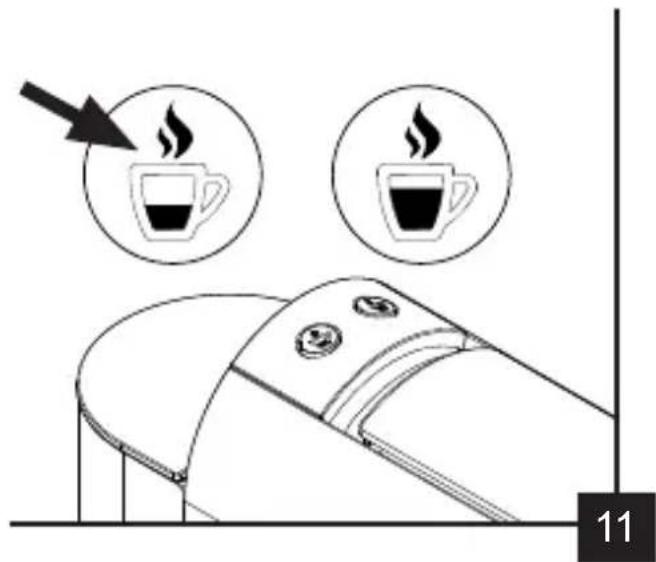
text_image
Diagram showing coffee cup cooking with a steaming cup, indicating heat and fire effectsWhen the machine is ready for use, press the espresso coff ee push button (5) for more than 3 seconds to start coff ee dispensing. Once having reached the required volume, press the espresso coff ee push button (5) again to stop dispensing. The dispensing time is saved for the espresso coff ee push button (5).

TO RESET THE DEFAULT SETTINGS, HOLD THE ON/OFF BUTTON FOR 5 SECS. BOTH LIGHTS WILL BLINK 3 TIMES TO CONFIRM THE RESET.

THE DISPENSING VOLUME THAT CAN BE SET FOR THE ESPRESSO COFFEE RANGES APPROX.LY FROM 20 ML TO 180 ML
7. Setting dispensing quantity
SETTING THE LONG COFFEE DISPENSING QUANTITY

DURING THIS STAGE, THERE MUST BE AN ALUMINIUM CAPSULE INSIDE THE MACHINE.
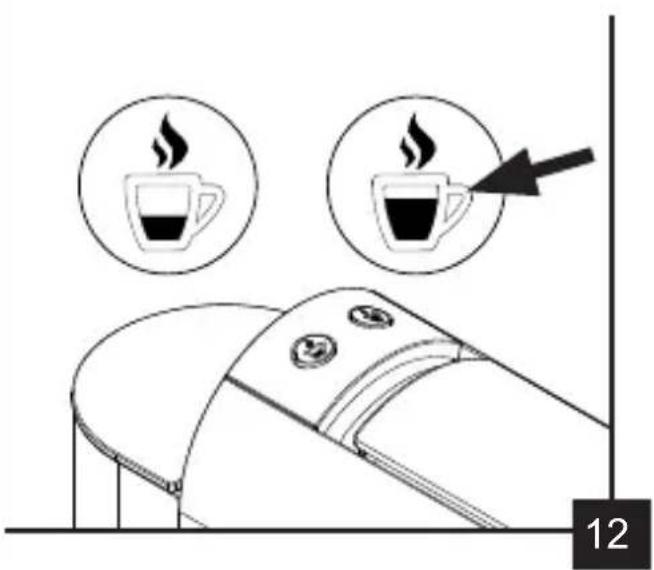
text_image
Diagram showing coffee cup and steaming cup with icons and a directional arrow, labeled '12' at bottom right.When the machine is ready for use, press the long coff ee push button (6) for more than 3 seconds to start coff ee dispensing. Once having reached the required volume, press the long coff ee push button (6) again to stop dispensing.
The dispensing time is saved for the long coffee push button (6).

TO RESET THE DEFAULT SETTINGS, HOLD THE ON/OFF BUTTON FOR 5 SECS. BOTH LIGHTS WILL BLINK 3 TIMES TO CONFIRM THE RESET.

THE DISPENSING VOLUME THAT CAN BE SET FOR THE ESPRESSO COFFEE RANGES APPROX.LY FROM 20 ML TO 180 ML.
APPLIANCE CLEANING

ALWAYS UNPLUG THE APPLIANCE BEFORE CLEANING IT. NEVER IMMERSE THE APPLIANCE BODY IN WATER OR OTHER LIQUIDS AND DO NOT PUT ANY APPLIANCE PART IN THE DISHWASHER.
- To clean the appliance body, use a wet cloth but avoid abrasive detergents.
- It is recommended to rinse the tank on a daily base. Never leave water in the tank for more than 5 days or, if it occurs, change water and dispense 50ml of water without capsule before making the coffee.
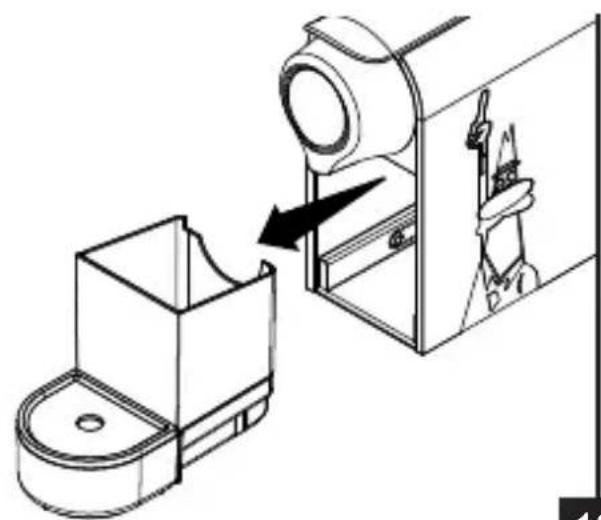
natural_image
Technical line drawing of a mechanical assembly with a bracket and housing, showing a close-up view of a component (no text or symbols present)13
The exhaust capsule compartment (11) is removable; take it out regularly and empty it when full.
The compartment can hold up to 6-8 used capsules before it needs emptying. It is advisable to check the capsule level.
Do not run the machine with full exhaust capsule compartment (11) to prevent damage.
Be careful when emptying the used capsule compartment as it could contain water and/or coffee remains.
8. Maintenance
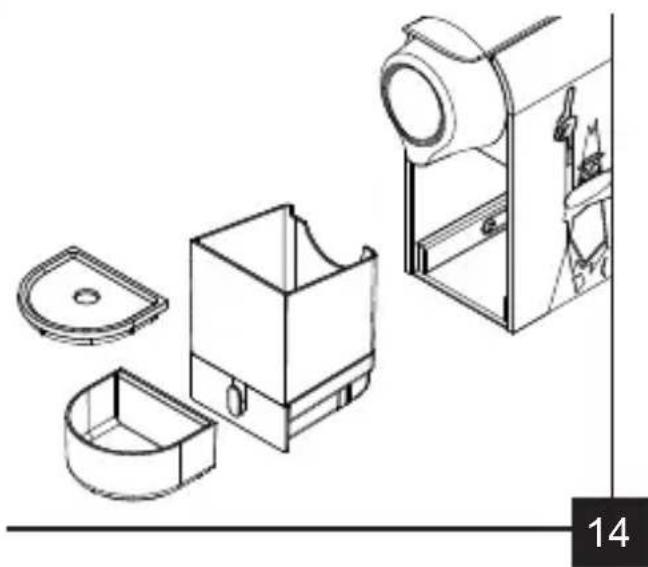
natural_image
Technical line drawing of a mechanical device with exploded view and assembled views (no text or symbols)Wash the drip tray (1), the cup rack (2), the exhaust capsule compartment (11) with water and dish detergent.
Do not put these parts in the dishwasher.
DESCALING PROCEDURE
The normal use of the machine with natural mineral water, both in bottle and from the tap, entails the formation of limescale.
It is recommended to carry out the descaling cycle every 300 cups of coffee (otherwise every 3-4 months) and/or when a constant decrease of the dispensed coffee flow is noticed.

THE FREQUENCY OF THIS OPERATION DEPENDS ON THE HARDNESS OF WATER USED.
A) Pour a dose of Bialetti descaling solution or equivalent (provided it is not toxic and is suitable for coffee machines) into the water tank (8).

DO NOT USE VINEGAR OR VINE- GAR-BASED SOLUTIONS AS DESCAL- ING AGENT.
B) Fill the tank with cold water up to the MAX level.
C) Press the on/off button (4) to switch the machine on.
D) Make sure the machines does not contain any capsule. If needed, open and close the lever (7).
E) Position a suitable cup on the apposite rack and start the cleaning mode pressing the espresso coffee push button (5) and the long coffee one (6) at the same time for 5 secs.

DURING CLEANING MODE, FOR ABOUT ONE MINUTE, THE MACHINE DISPENSES WATER INTERMITTENTLY IN ORDER TO CLEAN AND RINSE THE INNER CIRCUITS OF THE MACHINE DEEPLY. AFTER ONE MINUTE, DISPENSING IS CONTINUOUS AGAIN. DURING THIS CYCLE, THE LIGHTS OF THE TWO POUR PUSH BUTTONS WILL BLINK IN GREEN QUICKLY.
F) Stop the cleaning mode by pressing one of the two pour push buttons, when water reaches about half of the tank capacity.
G) Let the descaling agent act for aprox.ly 15-20 minutes with the machine off.
H) Switch the machine on and carry out again the operations described in point E) until the tank is completely empty.
I) Leave the machine off for approx.ly 5 minutes.
J) Remove the tank and rinse it thoroughly with clean cold water.
K) Fill the tank with clean water up to the "MAX" level and insert it in its seat.
L) Start the cleaning mode pressing the espresso coffee push button (5) and the long coffee one (6) at the same time for 5 secs until the tank is completely empty. If necessary, start the cleaning mode several times (the machine features a safety system, which interrupts the dispensing automatically after 100 operating seconds).
M) Carry out the operations described in point L).
9. Energy saving mode
This appliance was designed in compliance with the European Directives EC1275/2008 and 2009/125/EC, stating the need to adopt the energy saving mode.
This appliance is equipped with a stand-by function that activates after 9 minutes of downtime; the appliance goes off and the power consumption in this status is below 0.5 W.
To restart the machine it is necessary to press the power switch (2) located on the right panel of the product: the machine will start the pre-heating stage of the boiler (pour push button red LED) and once it reaches the operating temperature, it will indicate the ready state (pour push button green LED).
THE PRE-HEATING TIME IS BASED ON THE DOWNTIME OF THE MACHINE AND CAN LAST UP TO 50 SECONDS IF THE PRODUCT HAS NOT BEEN USED FOR A FEW HOURS.
THE MACHINE WILL ENTER STAND-BY MODE AUTOMATICALLY AFTER 9 MINUTES EVEN IF NO COFFEE IS DISPENSED.
10. Troubleshooting
| Problem Cause Solution | ||
| The machine does not heat up. | The machine is not connected to the mains power. | Connect the machine to the mains power. |
| The machine is not switched on. | Switch on the machine using the on/off button. | |
| The machine does not pour coff ee. | The capsule is stuck or badly positioned. | Unplug the machine from the power mains and wait for it to cool down; lift the lever and remove the capsule manually.Use a tool, never use fingers. |
| A capsule may have fall-en into the machine. | Take out the capsule compartment and check. | |
| There is no water in the tank. | Fill the tank with water. | |
| The pipes are clogged with scale. | Carry out a scale remov-al cycle. | |
| The coff ee is cold. The machine has not completely heated the water before pouring the coff ee. | Before dispensing coff ee, always await the green lights of the dispensing buttons are on. | |
| Carry out a scale remov-al cycle. | ||
10. Troubleshooting
| Problem Cause Solution | ||
| It is not possible to lower the lever. | The capsule is stuck or badly positioned. | Unplug the machine from the power mains and wait for it to cool down; lift the lever and remove the capsule manually. Use a tool, never use fingers. |
| The compartment of used capsules is full. | Empty the compartment. | |
| The machine is making too much noise. | There is no water in the tank. | Fill the tank with water. |
| The machine is not stable on the support surface. | Make sure it is positioned on a fl at and rigid surface. | |
| The capsule falls from its compartment | The lever is not completely raised. | Completely lower the lever and open it until it gets to its end point. |
| The machine does not dispense and both lights of the pour push buttons (5-6) blink quickly in red. | there is a plastic capsule or the capsule seat is empty. | Remove the plastic capsule and insert a Bialetti aluminium capsule. To clean the machine, start a cleaning cycle as previously described. Make sure no capsule has been inserted during this operation. |
11. Tips for a good coffee
- In order to obtain a thicker and more persistent cream, use cups with an inner ovoid-shape base.
12. Bialetti capsules

text_image
BIALETTII Caffè d'Italia
natural_image
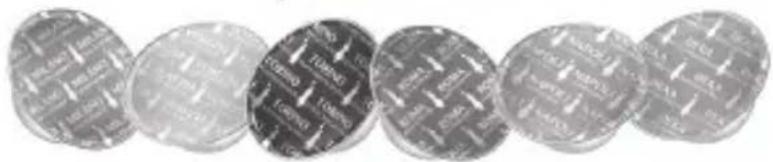
Six metallic coins with engraved patterns, arranged in a row (no visible text or symbols)The new patented capsules from Bialetti are unique on the market because they guarantee everything necessary for a perfect Bialetti Espresso in a single product:
- THE PERFECT AMOUNT: they contain 7 grams of coffee, as expressly envisaged by Espresso Italiano Certificato (Certified Italian Espresso).
- ALUMINIUM: the only material that, unlike the common plastic capsules, can preserve all of the organic substances of coffee, ensuring a product that is always fresh with the fl avour of freshly ground coffee.
- In the Bialetti stores, in more than 500 Bialetti partner points of sale, as well as in the best supermarkets.
The complete, updated list is on the web site www.bialetti.com
- Calls (for Italy only) from the comfort of our own homes:
text_image
SERVIZIO CONSUMATORI BIALETTI 030-7720104 www.bialetti.com- Access to the online shop on the web site:
www.bialetti.com
13. Guarantee
The appliance is guaranteed for two years from the date of delivery, as shown by the date on the receipt/invoice, unless the purchaser can prove that delivery took place on a later date. In case of defects on the product existing prior to delivery, Bialetti guarantees the repair or replacement of same, at no charge to the purchaser, unless one of the two remedies is disproportionate to the other. The purchaser is responsible for reporting any conformity defects no later than two months from discovery of same.
The warranty does not cover those parts found to be faulty as a result of negligence or careless use, for example:
- Damages caused by impacts, falls or scratches owing to the use of improper objects.
- Damages caused by limestone or failure to decalcify it on a regular basis.
- Failure to abide by the operating instructions for the appliance.
- Incorrect installation or maintenance carried out by unauthorized persons
• Normal wear and tear. - Damages caused by modifications made to the inside of the appliance.
- Damages caused through use of a voltage other than that stated in the use and maintenance manual.
- Damages from transport or circumstances that cannot be attributed to defects in the material or workmanship of the appliance.
- Damages arising from repairing carried out by unauthorized service centres.
The warranty also excludes all cases of improper use of the appliance or any instances of professional use. Bialetti refuses to accept any liability for damage that may directly or indirectly be caused to people, property or pets as a result of failure to abide by all of the guidelines and instructions in this booklet concerning the installation, use and maintenance of the appliance.
This warranty is without prejudice to contractual guarantees made to the retailer.
THE MANUFACTURER RESERVES THE RIGHT TO MAKE CHANGES FOR REGULATORY, INDUSTRIAL, COMMERCIAL OR AESTHETIC REASONS.
14. Disposal of the appliance
• This product complies with the Directive 2012/19/EC.
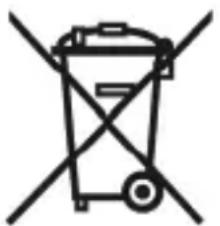
- The symbol representing the crossed out trash can on the appliance indicates that the product, at the end of its useful life, must be treated separately from domestic waste. It must be taken to a recycling centre for electrical and electronic appliances or turned in to the point of sale when purchasing a new, equivalent, appliance.
natural_image
Symbol of a trash bin crossed out by two crossed lines (no text or numbers present)- The user is responsible for taking the appliance to the recycling centre at the end of its life, under penalty of the sanctions foreseen by the current legislation on waste handling.
- Correct consignment of the no-longer used appliance to a recycling centre for treatment and environmentally compatible elimination contributes to avoiding a negative impact on the environment and public health, and permits recycling of the materials from which the product is made.
- For more detailed information regarding the available collection systems, contract the local refuse centre or the store where the product was purchased.
- The manufacturer and the importers comply with their responsibility for recycling, treating, and environmentally compatible disposal of waste both directly and in a collective system.
Nota/Remarks/Note/Notizen/Notes
1. Introduction
Cher client,
text_image
Illustration showing a person pointing at a prohibition symbol with a circle, likely indicating no prohibition or exclusion.LES ENFANTS DOIVENT ÊTRE SURVEILLÉS AFIN QU'ILS NE JOUENT PAS AVEC L'APPAREIL.
2. Remarques

L'APPAREIL PEUT ÊTRE UTILISÉ PAR LES ENFANTS DE MOINS DE 8 ANS À CONDITION QU'ILS SOIENT SURVEIL-LES OU QU'ILS AIENT REÇU UNE FOR- MATION ADEQUATE SUR L'USAGE DE L'APPAREIL ET SUR LA COMPREHEN- SION DES DANGERS QUIY SONT LIÉS. LES OPÉRATIONS DE NETTOYAGE ET D'ENTRETIEN PEUVENT ÊTRE EFFEC- TUEES PAR DES ENFANTS DE PLUS DE 8 ANS CORRECTEMENT SURVEILLES. GARDER L'APPAREIL, AINSI QUE SON CORDON, D'ALIMENTATION, HORS DE LA PORTÉE DES ENFANTS DE MOINS DE 8 ANS.

L'APPAREIL PEUT ÊTRE UTILISÉ PAR LES PERSONNES À CAPACITÉS PHYSIQUES, SENSORIELLES OU MEN-TALES RÉDUITES, OU DÉPOURVUES DE L'EXPÉRIENCE ET DE LA CONNAISSANCE NÉCESSAIRES, À CONDITION QU'ILS SOIENT SURVEILLÉS OU QU'ILS AIENT REÇU UNE FORMATION ADEQUATE SUR L'USAGE DE L'APPAREILETSURLA COMPRÉHENSION DES DANGERS QUI Y SONT LIÉS.

NE PAS PLONGER L'APPAREIL DANS DE L'EAU OU AUTRES LIQUIDES.

SI LE CORDON D'ALIMENTATION DE CET APPAREIL EST ENDOMMAGÉ, IL DOIT ÊTRE REMPLACÉ EXCLUSIVEMENT PAR UN CENTRE TECHNIQUE AGRÉÉ PAR LE CONSTRUCTEUR ET AVEC DES PIÈCES SPÉCIALES ET APPROPRIÉES AU BON FONCTIONNEMENT DE L'APPAREIL.

PENDANT LA DISTRIBUTION DE LA BOISSON, PRÊTER LA PLUS GRANDE ATTENTION AUX ÉVENTUELLES ÉCLA-BOUSSURES DE LIQUIDE CHAUD. NE TOUCHEZ PAS LES PARTIES CHAUDES DE L'APPAREIL TOUT DE SUITE APRÈS SON UTILISATION POUR ÉVITER LES RISQUES DE BRÛLURE. UN USAGE INCORRECT PEUT ENTRAÎNER DES LÉSIONS.

CET APPAREIL A ÉTÉ CONÇU POUR PRODUIRE DES CAFÉS EXPRESSO ET DES INFUSIONS EN CAPSULE BIALETTI ET IL DOIT ÊTRE DESTINÉ EXCLUSIVEMENT A CET USAGE. TOUT AUTRE UTILISATION EST CONSIDÉRÉE IMPROPRE ET DONC DANGEREUSE. LE CONSTRUCTEUR NE PEUT ÊTRE TENU RESPONSABLE POUR D'ÉVEN- TUELS DOMMAGES DÉRIVANT D'UNE MAUVAISE UTILISATION, IMPROPRE, ERRONÉE OU DÉRAISONNÉE.
natural_image
Illustration of a hand using a power adapter to install an electrical outlet (no text or symbols present)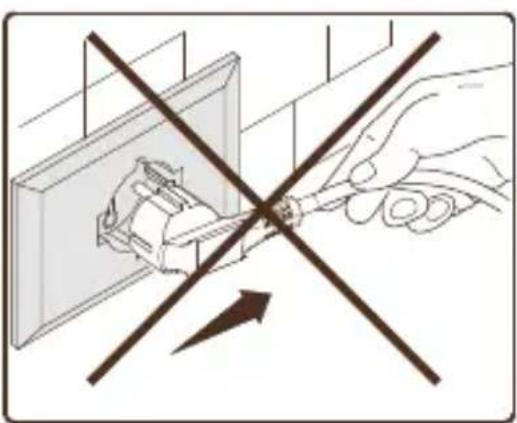
natural_image
Illustration of a hand using a tool to cut electrical socket into a wall, with no text or symbols present.
ÉVITER DE DÉBRANCHER L'APPAREIL EN TIRANT SUR LE CORDON D'ALIMENTATION.
2. Remarques

PENDANT LE FONCTIONNEMENT, LA PRISE DE COURANT DOIT ÊTRE FACILEMENT ACCESSIBLE DANS LE CAS OÙ IL SERAIT NÉCESSAIRE DE DÉBRANCHER L'APPAREIL.
PRÉCAUTIONS
text_image
Technical diagram of a portable device with numbered parts for identification and assembly reference.natural_image
Diagram of a mechanical device with an upward arrow indicating motion, no text or symbols presentnatural_image
Line drawing of a device with a connector and a wall-mounted panel, showing no text or symbolsnatural_image
Technical line drawing of a mechanical component with a pointed tip and curved base, no visible text or symbolsnatural_image
Diagram of a curved surface with two circular features and radiating lines, no text or symbols presentnatural_image
Diagram of a curved surface with two circular features and arrows pointing to them, labeled '5' at bottom right (no text or symbols on the diagram itself)natural_image
Line drawing of a mechanical device with an arrow indicating rotation, no text or symbols presentnatural_image
Mechanical assembly diagram showing a tool interacting with a component, with arrows indicating motion direction (no text or symbols)natural_image
Line drawing of a coffee maker with a cup and side arm, no text or symbols presenttext_image
Diagram showing coffee cup cooking process with two cups and a drop, labeled with number 9text_image
Diagram showing coffee cup cooking process with steaming cups and a directional arrow, labeled '10' at bottom right.text_image
Diagram showing coffee cup and steaming cup with icons and a downward arrow, likely illustrating a cooking or beverage concept.text_image
Diagram showing coffee cup and steaming cup with icons and a numbered label '12' at the bottom.natural_image
Technical line drawing of a mechanical assembly with a bracket and housing, showing a close-up view of a component (no text or symbols present)13
natural_image
Technical line drawing of a mechanical device with exploded view and assembled views (no text or symbols)natural_image
Six metallic coins with engraved patterns, arranged in a row (no visible text or symbols)natural_image
Symbol of a trash bin crossed out by two diagonal lines (no text or numbers present)Nota/Remarks/Note/Notizen/Notes
1. Einführung
Verehrter Kunde,
text_image
Illustration showing a person pointing at a prohibition symbol next to a circle, likely indicating no prohibition or exclusion.natural_image
Illustration of a hand inserting a plug into a wall socket, with no text or symbols present.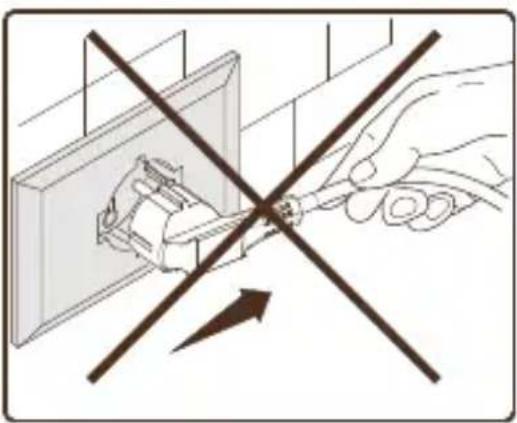
natural_image
Illustration of a hand using a screwdriver to cut electrical socket socket (no text or symbols present)2. Hinweise

NICHT AM STROMKABEL ZIEHEN, UM DEN STECKER AUS DER STECKDOSE ZU ZIEHEN.

text_image
Technical diagram of a portable device with numbered parts for identification and assembly reference.natural_image
Diagram of a mechanical device with an upward arrow indicating motion, no text or symbols presentnatural_image
Line drawing of a door with a hand connecting a wall-mounted device to a wall-mounted panel (no text or symbols)natural_image
Technical line drawing of a mechanical component with a pointed tip and curved base, no visible text or symbolsnatural_image
Diagram of a curved surface with two circular features and radiating lines, no text or symbols presentnatural_image
Diagram of a curved surface with two circular features and arrows pointing to them, labeled '5' at bottom right (no text or symbols on the diagram itself)natural_image
Line drawing of a mechanical device with an arrow indicating rotation, no text or symbols presentnatural_image
Mechanical assembly diagram showing a tool interacting with a component, with arrows indicating motion direction (no text or symbols)natural_image
Line drawing of a coffee maker with a cup and side arm, no text or symbols presenttext_image
Diagram showing coffee cup cooking process with two cups and a drop, labeled with number 9text_image
Diagram showing coffee cup cooking process with two cups and a drop, labeled with number 10text_image
Diagram showing coffee cup and steaming cup with icons and a downward arrow, likely illustrating a cooking or beverage concept.text_image
Diagram showing coffee cup and steaming cup with icons and a numbered label '12' at the bottom.natural_image
Technical line drawing of a mechanical assembly with a bracket and housing, showing a close-up view of a component (no text or symbols)natural_image
Technical line drawing of a mechanical device with exploded view and part views (no text or symbols)natural_image
Six metallic coins with engraved patterns, arranged in a row (no visible text or symbols)natural_image
Symbol of a trash bin crossed out by two crossed lines (no text or numbers present)Nota/Remarks/Note/Notizen/Notes
1. Introducción
Estimado cliente,
LEA EL MANUAL DE USO
text_image
Image showing a cartoon child pointing at a prohibition symbol next to it.natural_image
Illustration of a hand inserting a plug into a wall socket, with no text or symbols present.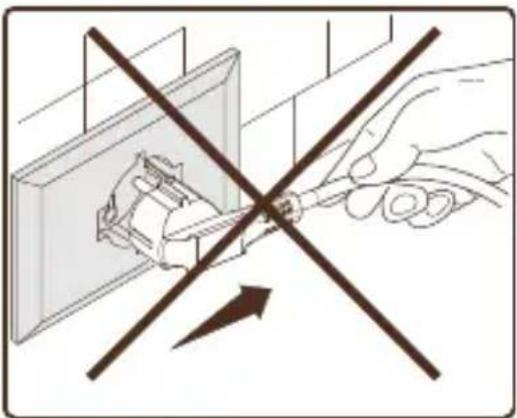
natural_image
Illustration of a hand using a tool to switch electrical wiring (no text or symbols present)
text_image
Technical diagram of a portable device with numbered parts for identification and assembly reference.natural_image
Diagram of a mechanical device with an upward arrow indicating motion, no text or symbols presentnatural_image
Line drawing of a device with a hand connecting to an electrical outlet (no text or symbols)natural_image
Technical line drawing of a mechanical component with a pointed tip and curved surfaces (no text or symbols)natural_image
Diagram of a curved surface with two circular features and radiating lines, no text or symbols presentnatural_image
Diagram of a curved surface with two circular features and arrows pointing to them, labeled '5' at bottom right (no text or symbols on the diagram itself)natural_image
Line drawing of a mechanical device with an arrow indicating rotation, no text or symbols presentnatural_image
Mechanical assembly diagram showing a tool interacting with a component, with arrows indicating motion direction (no text or symbols)natural_image
Line drawing of a coffee maker with a cup and side arm, no text or symbols presenttext_image
Diagram showing coffee cup cooking process with two cups and a drop, labeled with number 9text_image
Diagram showing coffee cup and steaming cup with icons, indicating a cooking step or cooking processtext_image
Diagram showing coffee cup and steaming cup with icons and a directional arrow, labeled '12' at bottom right.natural_image
Technical illustration of a mechanical assembly with a close-up view of a component being inserted into a housing (no text or symbols present)natural_image
Technical line drawing of a mechanical device with exploded view and assembled views (no text or symbols)natural_image
Six metallic coins with engraved patterns, arranged in a row (no visible text or symbols)natural_image
Symbol of a trash bin crossed out by two diagonal lines, no text or numbers presentNota/Remarks/Note/Notizen/Notes
Nota/Remarks/Note/Notizen/Notes
BIALETTI
Via Fogliano 1
25030 Coccaglio (BS)
Italy
www bialetti com