
TOR 1500 H1 - Electric heater TRONIC - Free user manual and instructions
Find the device manual for free TOR 1500 H1 TRONIC in PDF.

User questions about TOR 1500 H1 TRONIC
0 question about this device. Answer the ones you know or ask your own.
Ask a new question about this device
Download the instructions for your Electric heater in PDF format for free! Find your manual TOR 1500 H1 - TRONIC and take your electronic device back in hand. On this page are published all the documents necessary for the use of your device. TOR 1500 H1 by TRONIC.
USER MANUAL TOR 1500 H1 TRONIC
Natal on an individual of the political party
OLIERADIATOR
OLABRADIATOR
Kanakai, alve, atle, in buxuangal, adi
OIL-FILLED RADIATOR
Visiting invasion and loss invasion
OLIERADIATOR
③
Hood looks on a humped wine policy
RADIADOR DE ACEITE
Mars es. secloros a sactanas de sujrid ⑦
RADIATORE AD OLIO

(五) (六)
This product is only suitable for well insulated spaces or occasional use
图 1
- The following is a capital and investment, but the company has
[Unreadable]
In line with the following
for taking place to take out of
Davila sirolosojo
Adeases no adiell neopildich informen
A. In fact that an article refers to the information of the author's research and development.
in mind to be well understood.
natural_image
Technical line drawing of a radiator assembly with cooling unit and housing (no text or labels)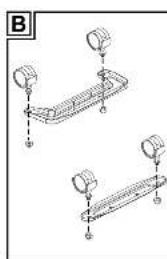
natural_image
Technical line drawing of a mechanical support system with two identical components and mounting holes (no text or symbols)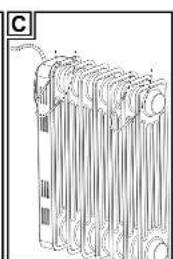
natural_image
Technical line drawing of a heat exchanger unit (no text or symbols visible)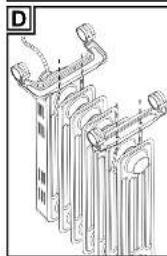
natural_image
Technical line drawing of a multi-tiered industrial or mechanical assembly with no visible text or symbols
natural_image
Diagram of a mechanical or electrical component with layered structure and no visible text or symbolsDeutsch......2
English 15
Français 28
Nederlands 43
Polski 56
Čeština....69
Slovensky....82
Español....94
Dansk 107
Italiano....119
Magyar 132
Inhaltsverzeichnis
https://www.targa.gmbh/downloads/conformity/487568_2501.pdf
- Intended use....15
- Package contents....16
- Overview ......16
- Technical specifications ....16
4.1 Information required on single room electric heaters.... 17 - Safety instructions ....18
- Before you start....21
6.1 Assembly 21 - Getting started....22
7.1 ECO function....22 - Troubleshooting....22
8.1 The oil radiator does not work....22
8.2 The oil radiator switches off 23 - Maintenance/cleaning 23
9.1 Maintenance 23
9.2 Cleaning 23 - Storage when not in use 23
- Environmental regulations and disposal information....24
- Conformity notes ......25
- Warranty and Service Information ....25
Congratulations!
By purchasing the TRONIC TOR 1500 H1 oil radiator, hereinafter referred to as the oil radiator, you have opted for a high-quality product.
Before first using it, familiarise yourself with the way the oil radiator works and read these operating instructions through carefully. Be careful to follow the safety instructions and only use the oil radiator as described in the operating instructions and for the applications given.
Keep these operating instructions in a safe place. Please also hand over all documents when passing on the oil radiator to third parties.
1. Intended use
The oil radiator is designed exclusively for additional heating of inside spaces. This oil radiator may not be used outdoors or in tropical climates. This oil radiator has not been designed for corporate or commercial applications. Use the oil radiator in domestic environments for private applications only. Any other use does not correspond to the intended use. This oil radiator fulfils all relevant norms and standards relating to CE conformity. In the event of any modification to the oil radiator that was not approved by the manufacturer,
compliance with these standards is no longer guaranteed. The manufacturer accepts no liability for any damage or malfunctions resulting from this. Only use accessories recommended by the manufacturer.
Observe the regulations and laws in the country of use.
2. Package contents
- Oil radiator
- 2 x transport caster holders
- 4 x transport castors (each with a cap nut)
- 2 x mounting brackets (each with two wing nuts)
• These operating instructions
3. Overview
These operating instructions have a fold-out cover. On the inside of the cover, the oil radiator is illustrated with all parts numbered. The meanings of the numbers are as follows:
1 Heating fins
2 Transport castor holder (rear)
3 Transport castor holder (front)
4 4 x transport castors
5 Power cable
6 4 x cap nuts
7 Cord wrap
8 Cable holder
9 Status indicator
10 ON/OFF switch (rotary switch with levels 0-1-2-3)
11 Thermostat
12 Handle
13 2 x mounting brackets [Fig. A]
14 4 x wing nuts [Fig. A]
- Technical specifications
| Power supply 220-240 V | ~, 50/60 Hz |
| Power consumption 1500W | |
| Power levelsLevel 1Level 2Level 3 | 600W900W1500W |
| Protection class I | |
| Operating temperature 5°C to 35°C | |
| Operating humidity 85% rel. humidity | |
| Acceptable storage conditions -10°C to +50°C, max. 85% RH. | |
The technical data and design may be changed without prior notice.
4.1 Information required on single room electric heaters
| Contact details Name and address of the manufacturer or its authorised representativeTARGA GmbHCoesterweg4559494 SoestGERMANY | |||||
| Model code(s): TOR 1500 H1 | |||||
| Designation | Symbol | Value | Unit | Designation Unit | |
| Heat output | Type of heat output/room temperature control | ||||
| Nominal heat output | P_nom 1.500 | kW Single stage heat | stage heat | output and no room temperature control | [No] |
| Minimum heat output (benchmark) | P_min 0.600 | kW Two or more manual stages, no room temperature control | more manual stages, no room temperature control | [No] | |
| Maximum continuous heat output | P_max,c 1.500 | kW Room temperature control with mechanical thermostat | room temperature control with mechanical thermostat | [Yes] | |
| Power consumption | With electronic room temperature control | [No] | |||
| When switched off P | o 0.00 W | Electronic room temperature control plus daily timer | room temperature control plus daily timer | [No] | |
| In standby mode P | sm - W | Electronic room temperature control plus weekly timer | room temperature control plus weekly timer | [No] | |
| At idle | P_idle | 0.00 | W | Other control options | |
| Connected to the mains and in standby mode | P_nsm | - W | Room temperature control, with presence detection | [No] | |
| Standby state with information or status display | [No] | Room temperature control, with open window detection | [No] | ||
| Annual room heating rate in active use | _b,on | 85.0 % | Remote control option | [No] | |
| With adaptive start control | [No] | ||||
| Operating time limit | [No] | ||||
| Black ball sensor | [No] | ||||
| Self-learning function | [No] | ||||
| Control accuracy | [No] | ||||
5. Safety instructions
Before you use this oil radiator for the first time, please read the following notes and heed all warnings, even if you are familiar with handling electric appliances. Keep these operating instructions in a safe place for future reference. If you sell the oil radiator or give it away, pass on the operating instructions at the same time. They are an integral part of the product.
Explanation of symbols used

WARNING! This symbol denotes important information for the safe operation of the product and user safety.
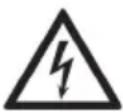
WARNING! This symbol denotes danger for human health and risk of death and/or risk of damage to property due to electric shock.

WARNING! This symbol denotes that the oil radiator must not be covered to prevent overheating.

DANGER! Warning, hot surfaces! This symbol denotes the risk of injuries or burns from hot surfaces on the oil radiator.

DANGER! Warning, hot surfaces! Do not touch the heating fins (1) when the unit is switched on.

Safety class I - Earthing

AC voltage
This symbol denotes further information on the topic.

Manufacturer's address
WARNING!

DANGER OF ELECTRIC SHOCK!
DO NOT OPEN THE DEVICE!
The oil radiator is not designed for use with an external timer or a separate remote control system. The appliance must also not be operated directly below a mains socket. Do not leave the oil radiator unattended when switched on with the thermostat (11) turned up. This constitutes a fire hazard!
In order to prevent overheating, do not cover the oil radiator or insert objects between the heating fins (1). This constitutes a fire hazard!
⚠️ Use this product in well-ventilated locations. Do not poke objects into the air inlets or outlets. To avoid any risk of fire, do not block or cover any air inlets or outlets.
Always place the oil radiator on a level, heat-resistant surface away from heat sources and flammable materials, liquids or gases. The components inside the oil radiator are very hot and can produce electric arcs or sparks. Leave a clearance of at least 1 m around the product on all sides to prevent fire hazards!
Make sure you connect the oil radiator to a mains socket that is easily accessible at all times. Only operate the oil radiator at the voltage indicated on the rating plate, otherwise there is a risk of electric shock!
⚠️ No action is required by the user to set the product to 50 or 60 Hz. The product automatically adjusts to 50 and 60 Hz.
Always hold the power cable (5) by the plug and do not pull on the cable itself. Do not place the oil radiator, furniture or other heavy objects on the power cable (5) and take care not to bend it, especially at the plug. Never tie knots in the power cable (5) and do not tie it to other cables. The power cable (5) should be positioned such that nobody can trip over it or k obstructed by it. Make sure that the power cable (5) does not touch any of the hot surfaces on the oil radiator. Stop using the product immediately if the power cable gets damaged, if the product does not work properly, if it has been dropped or if it has been damaged in any way. A damaged power cable (5) can cause a fire or electric shock. Inspect the power cable
(5) from time to time. If the power cable (5) is damaged, it must be replaced by the manufacturer, its customer service or a similarly qualified person, in order to avoid any possible danger. Never use adapter plugs or extension cables and do not tamper with the power cable (5)!
⚠️ Never touch the power cable (5) or the oil radiator with wet hands, as there is a risk of electric shock!
This oil radiator may be used by children of 8 years or over or by persons with physical, sensory or mental impairments or those with no knowledge or experience, providing they are supervised or they have been given instructions on the proper use of the oil radiator and they understand the associated risks. This oil radiator is not a toy. The product must not be cleaned or maintained by unsupervised children. Keep children under 3 away from the product unless they are under constant supervision. Children of between 3 and 8 may only switch the oil radiator on and off if they are supervised or have been instructed in the safe use of the oil radiator and understood the resulting risks, providing the oil radiator is placed or installed in its normal place of use. Children of between 3 and 8 may not insert the plug into the mains socket, adjust the oil radiator, clean the oil radiator or carry out user maintenance.
⚠️ DANGER! Some parts of the oil radiator can get very hot and cause burns.
Be particularly careful if children or other vulnerable people are present. Small parts can represent choking hazards. Keep the packaging out of the reach of these people. There is a risk of suffocation.
WARNING! This oil radiator is fitted with an adjustable thermostat (11). Turning the thermostat (11) clockwise as far as it will go sets it to maximum heating level. The oil radiator must not be used in small rooms with people that cannot leave the room by themselves, unless they are constantly supervised.
⚠️ If you notice smoke, unusual noises or odours, disconnect the mains plug from the socket immediately. If this occurs, the oil radiator should not be
used before it has been inspected by authorised service personnel. Never inhale smoke from a possible appliance fire. If you do inadvertently inhale smoke, seek medical attention. Smoke inhalation can be damaging to your health.
This oil radiator has been filled with a specific quantity of a specialist oil. Do not continue to use the oil radiator if it is damaged or oil has leaked out, as this could be hazardous. Get customer services or a qualified person to check the product and repair it if necessary.
The device must not be exposed to water drips or splashes or to abrasive liquids. Do not use the oil radiator near water (e.g. bath, shower, swimming pool or basin). It is important that you do not submerge the oil radiator (do not place objects filled with liquids, e.g. vases or drinks, on the oil radiator). Make sure that the oil radiator is not subject to excessive shocks or vibrations. Do not introduce any foreign bodies into the appliance. Otherwise, the oil radiator could be damaged and there is a risk of electric shock.
6. Before you start
Remove the oil radiator and the accessories from the packaging. Remove all the packaging material before getting started.
6.1 Assembly
- Attach two transport castors (4) to the outer holes of the transport castor holders (2 and 3). Use the pre-assembled cap nuts (6). Make sure that the transport castors (4) are on the recessed side of the transport castor holders (2 and 3) [see Fig. B]. Tighten the cap nuts (6) securely using pliers or an open-end spanner.
- Place the oil radiator on a flat surface with the underside facing upwards. If necessary, place a soft underlay under the oil radiator to prevent damage to the paintwork. Unscrew the wing nuts (14) from the mounting brackets (13). Insert one mounting bracket (13) between each of the two external heating fins (1) [see Fig. C].
- Fit the transport castor holders (2 and 3) and insert the mounting brackets (13) into the holes in the transport castor holders (2 and 3). Make sure that the transport castors (4) on the front transport castor holder (3) are pointing towards the front of the appliance [see Fig. D].
- Secure the transport castor holders (2 and 3) with the wing nuts (14) [see Fig. E]. Then carefully place the oil radiator on the mounted transport castors (4).

Wait a few minutes before using the oil radiator so that the oil in the appliance can settle at the bottom of the appliance.
7. Getting started

Risk of burns! When switched on, the exposed surfaces can get very hot.

When using the appliance for the first time or after an extended period of non-use, there can be some noise when it is first switch on, but this should disappear after a little while.
- Place the oil radiator on a level, heat-resistant surface.
- Turn the thermostat (11) anti-clockwise as far as it will go.
• Completely unwind the power cable (5) from the cord wrap (7). - Plug the mains plug into an easily accessible mains socket.
- Switch the oil radiator on by turning the ON/OFF switch (10) to the desired heating level 1, 2 or 3.
| Heat level Power | |
| 1 | 600 Watt |
| 2 | 900 Watt |
| 3 | 1500 Watt |
- Turn the thermostat (11) clockwise as far as it will go. The status indicator (9) lights up while the oil radiator is heating up.
- As soon as the desired room temperature is reached, you can slowly turn the thermostat (11) anticlockwise until the status indicator (9) goes out. The device will maintain the current room temperature. The oil radiator continues heating as soon as the room temperature falls below the set level. You can see this from the fact that the status indicator (9) lights up.
• To switch off the oil radiator, turn the ON/OFF switch (10) to the 0 position.
- Unplug the mains plug from the mains socket.
7.1 ECO function
The ECO function of the oil radiator is used for energy-saving mode. To do this, turn the ON/OFF switch (10) to position 1 (600 W). In this mode, the appliance works more energy efficiently and ensures constant, comfortable basic heat with reduced energy consumption.
Compared to the higher heating levels 2 (900 W) and 3 (1500 W), the ECO function is ideal for smaller rooms where only a moderate heat output is required. This optimises energy consumption without completely sacrificing comfort.
8. Troubleshooting
8.1 The oil radiator does not work
- Check that the mains plug is correctly inserted into the mains socket.
- Check that the mains socket used is live.
- Check that the oil radiator is switched on, the ON/OFF switch (10) must be set to level 1, 2 or 3.
- Check the position of the thermostat (11) and, if necessary, turn it clockwise as far as it will go.
8.2 The oil radiator switches off
This oil radiator is fitted with an overheating protection mechanism. The appliance automatically switches itself off if it gets too hot.

WARNING! There is normally a reason for overheating and it can constitute a fire hazard!
- Switch the oil radiator off by turning the ON/OFF switch (10) to the 0 position.
- Unplug the mains plug from the mains socket.
- Eliminate the cause of the overheating. Check whether the appliance can dissipate enough heat. Has it been covered or is it too close to a wall or other obstacle?
- Allow the appliance to cool down for at least 10 minutes before using it again.
The oil radiator is fitted with an anti-tip mechanism. If the appliance is knocked over when in use or put on a steep incline, it switches off automatically.
- Only operate the oil radiator in an upright position.
9. Maintenance/cleaning
9.1 Maintenance
Maintenance is required if the oil radiator has been damaged in any way, for example, if liquid has entered the product, if it has been exposed to rain or moisture, if it is not working properly or if it has been dropped. If you notice smoke, unusual noises or odours, switch off the oil radiator immediately and disconnect the mains plug from the socket. If this occurs, the oil radiator should not be used before it has been inspected by authorised service personnel. All servicing work must be carried out by qualified specialist personnel. Never open the housing on the oil radiator.
9.2 Cleaning

Disconnect the mains plug from the socket before cleaning - there is a risk of electric shock!

Wait until the oil radiator has cooled down completely to avoid the risk of burns.
Clean the oil radiator at regular intervals. Use a slightly damp cloth. Never use any solvents or aggressive detergents that could damage the plastic. Remove dust residues in the ventilation slots with a vacuum cleaner.
10. Storage when not in use

Wait until the oil radiator has cooled down completely. Otherwise there is risk of burns or fire!
If you do not intend to use the oil radiator for an extended period of time, disconnect the mains plug from the socket and wind the power cable (5) onto the cable wrap (7). Clamp the end of the power cable (5) into the cable holder (8).
Store the oil radiator in a clean, dry place out of direct sunlight.
- Environmental regulations and disposal information
 | Devices marked with this symbol are subject to the European Directive 2012/19/EU. All electrical and electronic appliances must be disposed of separately from household waste at official disposal centres. Avoid damage to the environment and risks to your personal health by disposing of the appliance properly. For further information about proper disposal, contact your local government, disposal bodies or the shop where you bought the appliance.Follow the current applicable guidelines for waste oil disposal.Unscrewing the heating element allows you to drain the oil (L-QB 300) and dispose of it separately. | ||
 | Dispose of all packaging in an environmentally friendly manner. Cardboard packaging can be taken to paper recycling centres or public collection points for recycling. Any film or plastic contained in the packaging should be taken to your public collection points for disposal. | ||
 ES/PT ES/PT | |||
| Only relevant for France: | |||
 |  |  |  |
 |  | ||
| "Sorting made easy"The product, the accessories, the printed material and the packaging are recyclable. They are subject to enhanced manufacturer responsibility and are sorted and collected separately. | |||
| Only relevant for Spain and Portugal:Please separate the packaging material and dispose of it in the relevant collection containers in accordance with the symbols on the packaging: | |||
 |  |  | |
 | Please note the markings on the packaging material when disposing of it, it is labelled with abbreviations (a) and numbers (b), the meanings of which are as follows:1-7: plastic / 20-22: paper and cardboard / 80-98: composite materials. | ||
 | |||
Only relevant for France:
Only relevant for Spain and Portugal:
| Symbol M | Material Contained in the following packaging elements for this product | ||
 | Low density polyethylene Plastic bag in the packaging | ||
 | Polystyrene | Inside the sales packaging to protect and store the accessories | |
 | Corrugated cardboard Sales packaging | ||
12. Conformity notes

The product complies with the requirements of the applicable European and national directives. Evidence of conformity has been provided. The manufacturer has the relevant declarations and documentation.

The product complies with the requirements of the applicable national directives of the Republic of Serbia.
The complete EU Declaration of Conformity and any other conformity declaration (where applicable) are available for download from this link:
https://www.targa.gmbh/downloads/conformity/487568_2501.pdf
Contact address in accordance with 2023/988 Product Safety Regulation: ce@targa.de
13. Warranty and Service Information
Warranty of TARGA GmbH
Dear Customer,
This device is sold with three years warranty from the date of purchase. In the event of product defects, you have legal rights towards the seller. These statutory rights are not restricted by our warranty as described below.
Warranty conditions
The warranty period commences upon the date of purchase. Please keep the original receipt in a safe place as it is required as proof of purchase. If any material or manufacturing faults occur within three years of purchase of this product, we will repair or replace the product free of charge as we deem appropriate.
Warranty period and legal warranty rights
The warranty period is not extended in the event of a warranty claim. This also applies to replaced and repaired parts. Any damage or defects discovered upon purchase must be reported immediately when the product has been unpacked. Any repairs required after the warranty period will be subject to charge.
Scope of warranty
The device was carefully manufactured in compliance with stringent quality guidelines and subjected to thorough testing before it left the works. The warranty applies to material and manufacturing faults. This warranty does not cover product components which are subject to normal wear and which can therefore be
regarded as wearing parts, or damage to fragile components such as switches, rechargeable batteries or components made of glass. This warranty is void if the product is damaged, incorrectly used or serviced. To ensure correct use of the product, always comply fully with all instructions contained in the user manual. The warnings and recommendations in the user manual regarding correct and incorrect use and handling of the product must always be observed and complied with. The product is solely designed for private use and is not suitable for commercial applications. The warranty is rendered void in the event of incorrect handling and misuse, if it is subjected to force, and also if any person other than our authorised service technicians interfere with the device. No new warranty period commences if the product is repaired or replaced.
Submitting warranty claims
To ensure speedy handling of your complaint, please note the following:
- Before using your product for the first time, please read the enclosed documentation carefully. Should any problems arise which cannot be solved in this way, please call our hotline.
- Always have your receipt, the product article number as well as the serial number (if available) to hand as proof of purchase.
- If it is not possible to solve the problem on the phone, our hotline support staff will initiate further servicing procedures depending on the fault.
- You can find this and many more manuals, product videos and installation software available for download at www.lidl-service.com. This QR code takes you directly to the LIDL service page (www.lidl-service.com). There, you can enter the item number (IAN) to access your operating manual.

Spare parts availability
The availability of spare parts for the repair of this appliance is at least 10 years from the date of purchase. Spare parts can be delivered to you within 10 working days of receipt of your order.

Service / Spare parts request / Repair request

Phone: 0800 404 7657
E-Mail: targa@lidl.co.uk

Phone: 1800 101010
E-Mail: targa@lidl.ie

Phone: 800 62230
E-Mail: targa@lidl.com.mt

Phone: 8009 4241
E-Mail: targa@lidl.com.cy
IAN: 487568_2501

Manufacturer
Please note that the following address is not a service address. First contact the service point stated above.
TARGA GmbH
Coesterweg 45
59494 Soest
GERMANY
Table des matières
https://www.targa.gmbh/downloads/conformity/487568_2501.pdf
Cher client, chère cliente,
Cher client, chère cliente,
OPEN HET APPARAAT NIET!
https://www.targa.gmbh/downloads/conformity/487568_2501.pdf
Contactadres overeenkomstig Verordening 2023/988 inzake productveiligheid: ce@targa.de
https://www.targa.gmbh/downloads/conformity/487568_2501.pdf
https://www.targa.gmbh/downloads/conformity/487568_2501.pdf
https://www.targa.gmbh/downloads/conformity/487568_2501.pdf
https://www.targa.gmbh/downloads/conformity/487568_2501.pdf
https://www.targa.gmbh/downloads/conformity/487568_2501.pdf
https://www.targa.gmbh/downloads/conformity/487568_2501.pdf
https://www.targa.gmbh/downloads/conformity/487568_2501.pdf