
PWH 2800 C3 - Mechanical chipper PARKSIDE - Free user manual and instructions
Find the device manual for free PWH 2800 C3 PARKSIDE in PDF.

| Product type | Mechanical chipper (roller grinder) |
| Brand | Parkside |
| Model | PWH 2800 C3 |
| Dimensions (L x W x H) | 630 x 450 x 910 mm |
| Weight | 20.5 kg |
| Power supply | 220-240 V~, 50 Hz |
| Power consumption (P1) | 2800 W |
| Blade shaft speed | 60 min⁻¹ |
| Number of blades | 8 |
| Max. branch diameter | 42 mm |
| Collection container capacity | 56 L |
| Protection class | II (double insulation) |
| Protection rating | IPX4 (splash-proof) |
| Operating mode | P40 (4 min on load, 6 min idle) |
| Sound pressure level (LpA) | 76.3 dB (uncertainty 2.38 dB) |
| Guaranteed sound power level (LWA) | 98 dB |
| Maintenance and cleaning | Disconnect before any maintenance; clean with a brush or cloth; do not spray with water |
| Safety | Safety switch on the container, overload protection, restart block, emergency stop |
| Spare parts and repairability | Wear parts: carbon brushes (ref. 3904409008), blade shaft (3904409009), pressure plate (3904409010); repairs by a qualified electrician |
| General information | 3-year warranty; outdoor use only; storage temperature 5-30 °C |
Frequently Asked Questions - PWH 2800 C3 PARKSIDE
User questions about PWH 2800 C3 PARKSIDE
0 question about this device. Answer the ones you know or ask your own.
Ask a new question about this device
Download the instructions for your Mechanical chipper in PDF format for free! Find your manual PWH 2800 C3 - PARKSIDE and take your electronic device back in hand. On this page are published all the documents necessary for the use of your device. PWH 2800 C3 by PARKSIDE.
USER MANUAL PWH 2800 C3 PARKSIDE
natural_image
Exterior view of a mechanical device with a cylindrical base and attached lever (no visible text or symbols)
PDF ONLINE
parkside-diy.com
GARDEN SHREDDER PWH 2800 C3
WALZENHÄCKSLER PWH 2800 C3
BROYEUR DE VÉGÉTAUX À ROTOR PWH 2800 C3
GB IE NI CY MT DE
GARDEN SHREDDER
Operating and Safety Instructions.
Translation of Original Operating Manual.
FR BE CH
BROYEAR DE VÉGÉTAUX À ROTOR
Before reading, unfold the page with the illustrations and then familiarise yourself with all the functions of the product.
DE AT CH
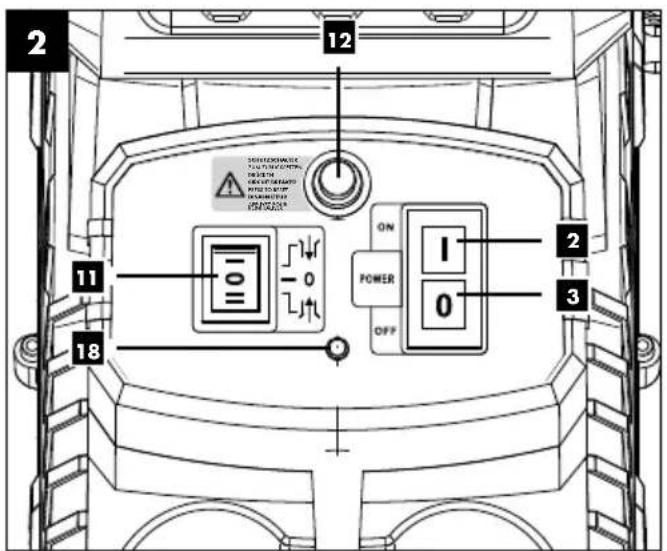
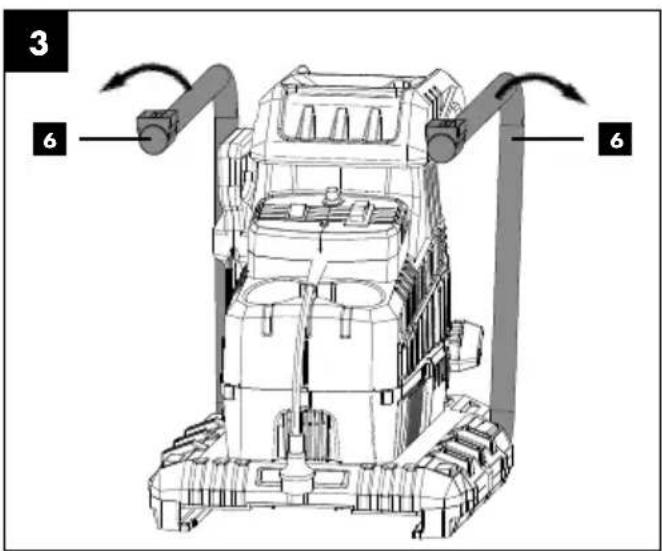


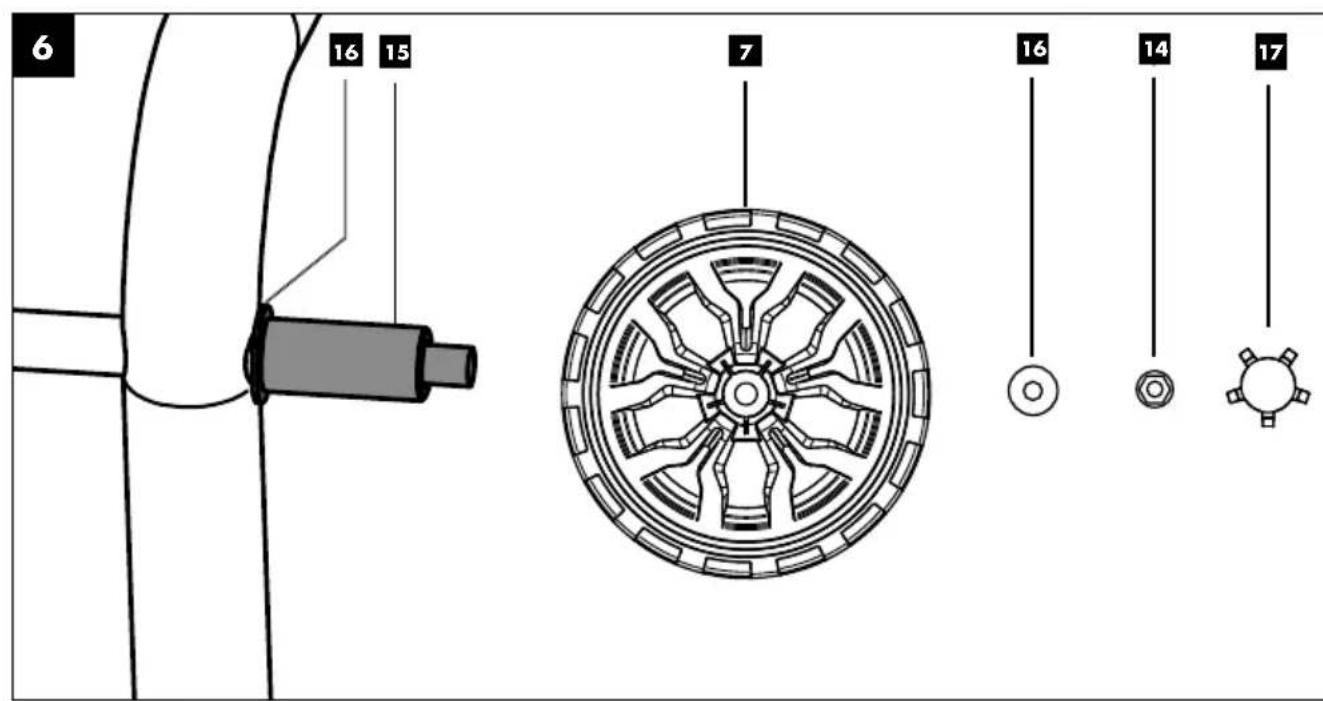
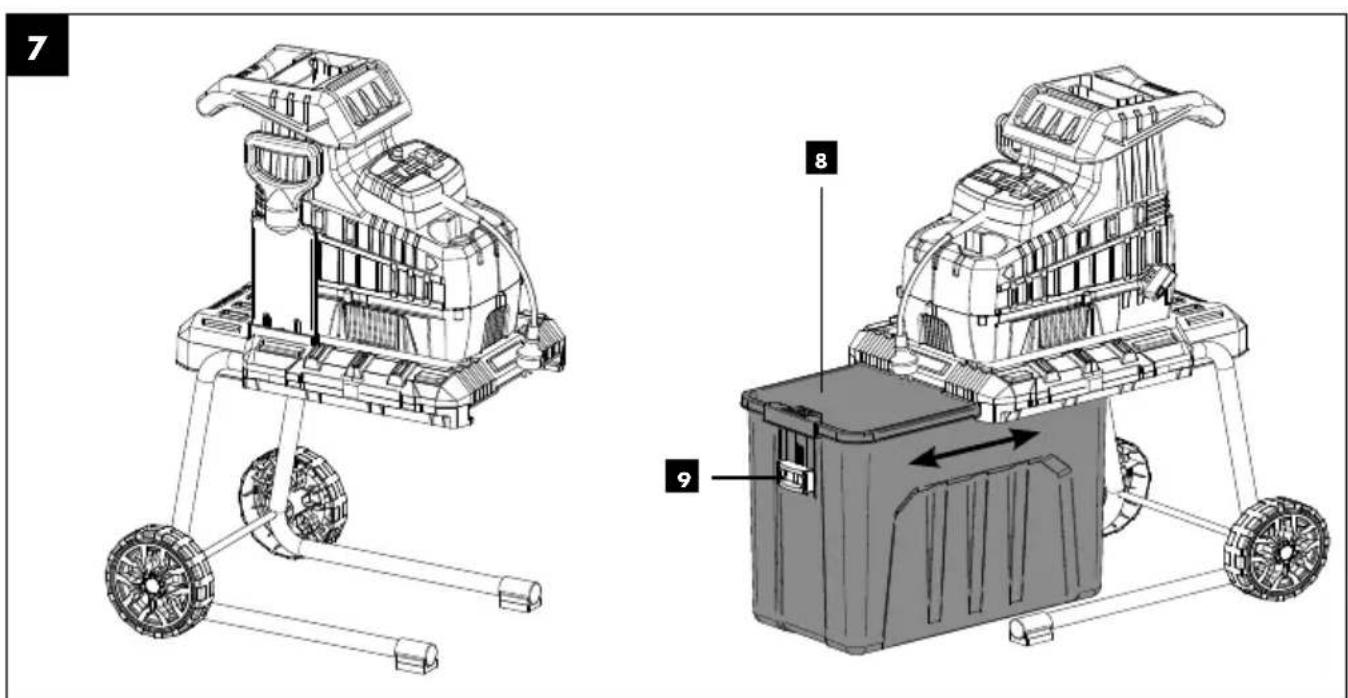
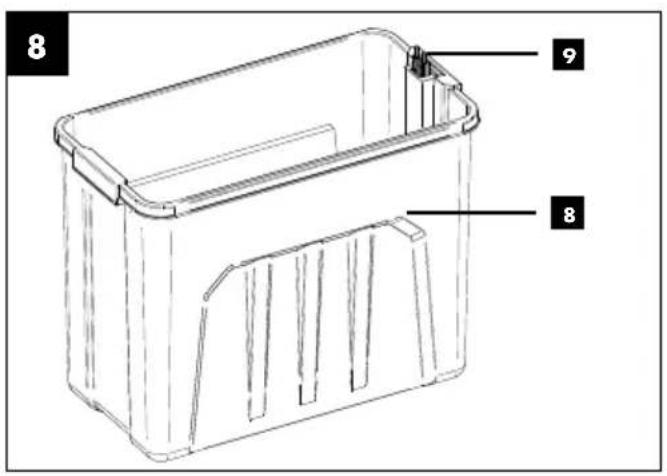
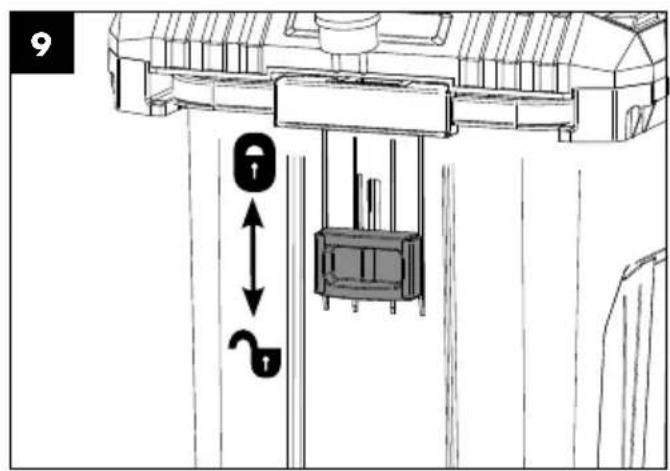
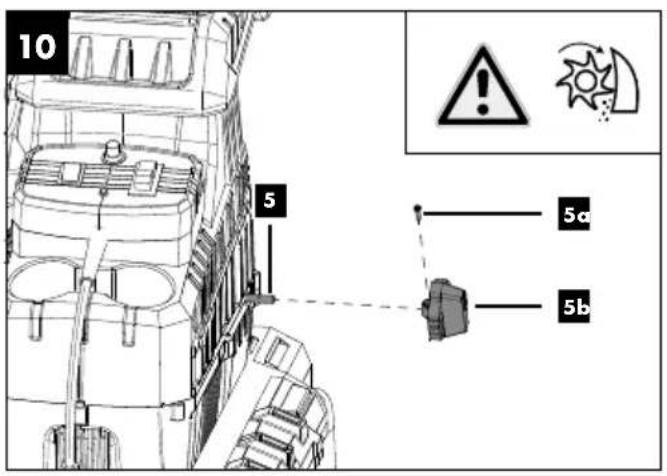
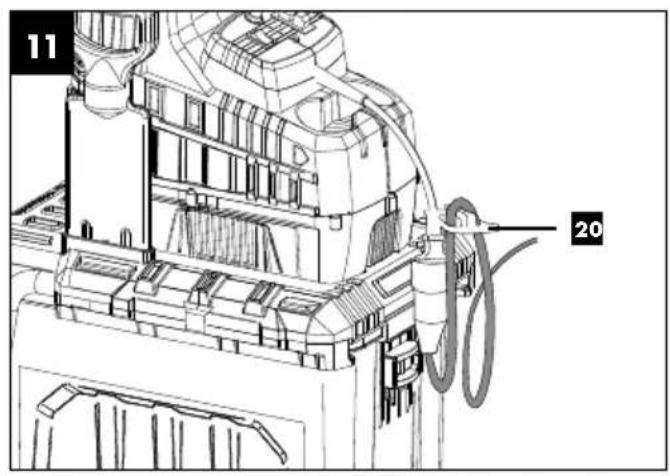
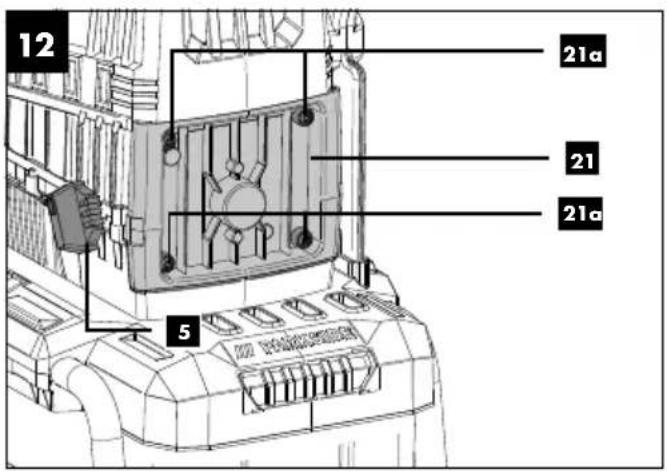
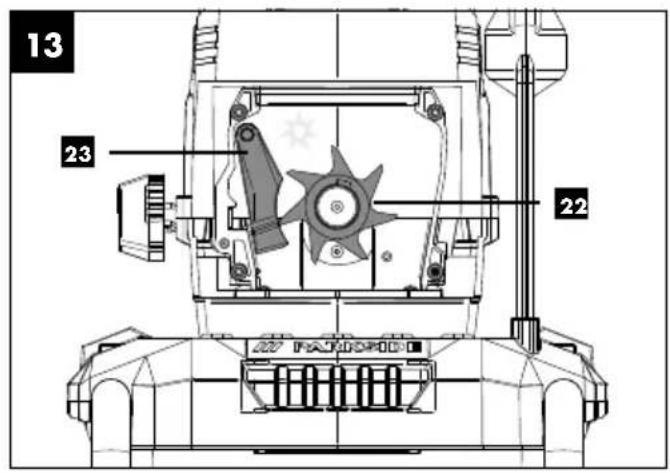
Table of contents: Page:
- Explanation of the symbols on the device 2
- Introduction 4
- Device description....4
- Scope of delivery.... 4
- Proper use....5
- Safety information .... 5
- Technical data 9
- Before commissioning....9
- Assembly....9
- Operation.... 10
- Electrical connection.... 12
- Cleaning and maintenance.... 13
- Storage.... 13
- Disposal and recycling 14
- Troubleshooting.... 15
- Warranty certificate .... 16
- Exploded view.... 191
- Declaration of conformity.... 192
1. Explanation of the symbols on the device
 | Observe all safety instructions before use. |
 | Read the whole text of the operating instructions thoroughly before start up. |
 | Wear safety goggles and hearing protection. |
 | Wear work gloves. |
 | Do not use as a step. |
 | Keep other people away. |
 | Protect the device from rain and do not leave outdoors in the rain! |
 | Danger! Switch off the machine and unplug the mains plug before making any adjustments, cleaning the machine or if the cable is tangled or damaged. |
 | Danger! Rotating blades. Keep hands and feet outside of the openings when the machine is running. |
 | Guaranteed sound power level. |
 | Locking mechanism opened. |
 | Locking mechanism closed. |
 | The product complies with the applicable European directives. |
 | Protection class II - double insulation |
 | The product is intended exclusively for use at connection points that have a continuous current carrying capacity of the mains of at least 100 A per phase. |
 | Setting of the pressure plate |
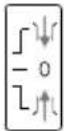 | Direction of roller rotation- Entry- Stop- Reverse |
 | Weight |
 | Branch diameter |
 | Roller rpm |
 | Wait until all machine parts have come to a complete stop before touching them. |
| ⚠ Attention! | We have marked points in these operating instructions that impact your safety with this symbol. |
2. Introduction
MANUFACTURER:
Scheppach GmbH
Günzburger Straße 69
D-89335 Ichenhausen
DEAR CUSTOMER,
We hope your new tool brings you much enjoyment and success.
NOTE:
In accordance with the applicable product liability laws, the manufacturer of this device assumes no liability for damage to the device or caused by the device arising from:
- Improper handling,
- Failure to comply with the operating instructions.
- Repairs carried out by third parties, unauthorised specialists.
• Installing and replacing non-original spare parts,
• Application other than specified, - Failure of the electrical system in the event of the electrical regulations and VDE provisions 0100, DIN 57113 / VDE0113 not being observed.
Please consider:
Read through the complete text in the operating manual before installing and commissioning the device.
This operating manual should help you to familiarise yourself with your device and to use it for its intended purpose.
The operating manual includes important instructions for safe, proper and economic operation of the device, for avoiding danger, for minimising repair costs and downtimes, and for increasing the reliability and extending the service life of the device.
In addition to the safety instructions in this operating manual, you must also observe the regulations applicable to the operation of the device in your country. Keep the operating manual package with the machine at all times and store it in a plastic cover to protect it from dirt and moisture. They must be read and carefully observed by all operating personnel before starting the work.
The device may only be used by personnel who have been trained to use it and who have been instructed with respect to the associated hazards. The required minimum age must be observed.
In addition to the safety instructions in this operating manual and the separate regulations of your country, the generally recognised technical rules relating to the operation of such machines must also be observed.
We accept no liability for accidents or damage that occur due to a failure to observe this manual and the safety instructions.
3. Device description
- Filling funnel
- On switch
- Off switch
- Upper section of machine
- Adjusting screw
5a. Fixing screw (pre-mounted)
5b. Handle for the adjusting screw - Support foot
- Wheel
- Drip tray
- Safety switch
- Mains cable
- Switch for direction of roll rotation
- Overload switch
- Wheel axle
- Locknut
- Wheel sleeve
- Washer
- Wheel cap
- Status LED
- Stopper holder
- Strain relief
- Gearing cover
21a. Screws - Cutting roller
- Pressure plate
a.) Spanner
b.) Allen key
c.) Plunger
4. Scope of delivery
• Upper section of machine
- Plunger
- Wheel axle
• Collecting container with safety switch
- Wheel (2x)
- Wheel cap (2x)
- Locknut (2x)
- Wheel sleeve (2x)
- Washer (4x)
- Spanner
- Allen key (5 mm)
- Handle for the adjusting screw
- Operating manual
5. Proper use
The device is designed for shredding fibrous woody garden waste, such as hedge and tree cuttings, branches, bark or fir cones.
Proper use includes the shredding of:
- All types of branches up to a maximum diameter of 42 mm (depending on the type of wood and freshness)
- Wilting, moist, garden waste that has already been stored for several days, alternating with branches.
Any other use not expressly permitted in these instructions may result in damage to the device and pose a serious danger to the user.
The roller shredder must not be filled with stones, glass, metal, bones, plastics, or fabric waste.
The device is not suitable for the shredding of household, bedding and flower waste.
The machine may only be used in the intended manner. Any use beyond this is improper. The user/operator, not the manufacturer, is responsible for damages or injuries of any type resulting from this.
An element of the intended use is also the observance of the safety instructions, as well as the assembly instructions and operating information in the operating manual.
Persons who operate and maintain the machine must be familiar with it and must be informed about potential dangers.
The liability of the manufacturer and resulting damages are excluded in the event of modifications of the machine.
The machine may only be operated with original parts and original accessories from the manufacturer.
The safety, operating and maintenance specifications of the manufacturer, as well as the dimensions specified in the technical data, must be observed.
Please observe that our equipment was not designed with the intention of use for commercial or industrial purposes. We assume no guarantee if the equipment is used in commercial or industrial applications, or for equivalent work.
or
6. Safety information
IMPORTANT:
READ CAREFULLY BEFORE USE. KEEP FOR YOUR RECORDS.
This device can cause serious injuries in the event of misuse. Before working with the device, read the operating manual carefully and familiarise yourself with all control parts. If you are uncertain, ask a specialist for advice. Store the operating manual in a safe place and pass them on to any subsequent user so that the information is available at any time.
This device is not intended to be used by children, persons with reduced physical, sensory or mental capabilities or lack of experience and knowledge, or persons who are not familiar with the instructions.
Children may not play with the device. Cleaning and user maintenance must not be carried out by children.
The device must not be used at altitudes higher than 2000 m.
Training:
- Read through the instructions carefully. Familiarise yourself with the control devices and the proper use of the machine.
- Never allow persons who are not familiar with these instructions or children to use the machine. Local regulations may restrict the age of the user.
- It should be noted that it is the user who is responsible for accidents or hazards to other persons or their property.
-
Children must not be left unattended, to ensure they do not play with the device.
-
Never allow children or other persons who do not know the operating manual to use the device. Local provisions can determine the minimum age of the operator.
- Avoid abnormal posture.
- Switch the device off and pull out the mains plug. Wait until all machine parts have come to a complete stop before touching them.
- Do not work with the device when you are tired or are unfocused or after taking alcohol or tablets. Always take breaks from work in good time.
Observe the noise protection and local regulations.
Attention!
The following basic safety measures must be observed when using power tools for protection against electric shock, and the risk of injury and fire:
Preparation:
- Hearing protection and safety goggles must always be worn while the machine is in operation.
- Always wear sturdy footwear and long trousers when operating the machine. Do not operate the machine barefoot or in light sandals. Avoid wearing loose clothing or clothing with hanging strings or ties.
- Only use the device outdoors (i.e. not against a wall or another rigid object) and on a solid, level surface.
- Do not use the machine on a surface paved with gravel where ejected material could cause injuries.
- Before switching on the machine, always check that the shredding unit, shredding unit screws and other attachments are well secured and that the protective devices and shields are in place. Replace worn and damaged parts in sets to avoid imbalance. Worn or damaged labels must be replaced.
- Before use, always inspect the connection and extension lead for signs of damage or ageing. If the lead is damaged during use, it must be disconnected from the mains supply immediately. DO NOT TOUCH THE LEAD BEFORE IT IS DISCONNECTED FROM THE MAINS. Do not use the machine if the lead is damaged or worn.
- Never use the device when persons and especially if children or animals are nearby.
-
Only use spare or accessory parts which are supplied or recommended by the manufacturer. Using third-party parts leads to a loss of guarantee claims.
-
Do not leave the device running unattended and store the device in a dry place, out of the reach of children.
- Only connect the device to a properly earthed mains. Sockets and extension cables must have a functional protective conductor.
- When using outdoors, the device must be connected to a socket with a residual current device (RCD) with a rated leakage current of no more than 30 mA.
- Always stay outside of the ejection zone when commissioning the machine.
Operation:
- Before starting the device, make sure that the filling funnel is empty.
- Keep your face, head, hair and body a safe distance from the filling funnel.
- Do not place hands, other parts of the body and clothing in the filling chamber, the ejector chute or in the vicinity of other moving parts.
- Always pay attention to your balance and fir footing. Do not overreach. When feeding material, never stand on a higher level than the level of the base of the machine.
- Do not stay in the ejection area when operating the machine.
- Ensure that hard objects such as metal, stones, glass, bottles, cans or other foreign objects are not contained in the material being thrown in.
- If foreign objects get into the cutting tool or the machine makes unusual noises or vibrates abnormally, switch the motor off immediately and allow the machine to run down. Disconnect the machine from the mains and take the following steps before restarting and operating the machine:
- Check the machine for damage
- Check the parts for firm seating, retighten them if necessary.
- Repair or replace any parts with parts that are of equivalent quality.
- Do not let processed material pile up within the ejection area; this could prevent proper ejection and cause a kick-back of the material through the filling funnel.
- In the event of blockages in the loading or discharge area of the machine, switch off the motor and pull the mains plug before removing material remaining in the filling funnel or ejector chute
Make sure that the motor is free of waste and other accumulations to safeguard the motor from damage or possible fire. Remember that when the starter mechanism with motorised machines is commissioned, the cutting tool also starts operating.
- Do not reach into the filling funnel during operation. The device continues to run for a short time after switching off.
- Warning! Never operate the machine with faulty protective devices or covers or without protective devices or with a damaged or worn cable.
- Keep the motor clean of debris and other accumulations to prevent damage to it or possible fire.
- Do not transport or tilt the device with the motor running.
- Stop the machine and remove the plug from the power socket. Ensure that all moving parts have come to a complete stop:
- when the device is not in use, is being transported or is unattended;
- before freeing a jammed blade.
- before clearing a blockage or cleaning blocked ducts;
- when checking the device, it is raining or when removing blockages;
- when cleaning or performing maintenance or changing accessories;
- when the power or extension cable is damaged or tangled;
- when you want to move or lift the device;
- when foreign bodies get into the device, in the event of unusual noises or vibrations (check the device for damage before restarting).
Maintenance and storage:
- When the machine is stopped for servicing, inspection, storage or for replacing accessories, switch off the power source, disconnect the machine from the mains and ensure that all moving parts have run out. Allow the machine to cool down before inspections, adjustments, etc. Maintain the machine with care and keep it clean.
- Store the machine in a dry place and out of reach of children.
-
Always allow the machine to cool down before storing it.
-
When servicing the shredder, be aware that even though the motor is switched off due to the inter-locking function of the guard, the shredder can still be moved.
- Replace worn or damaged parts for safety reasons. Only use original spare parts and accessories.
- Never attempt to bypass the interlocking function of the safety guard.
Additional safety instructions for machines with collecting containers:
- Switch off the machine before attaching or removing the collecting container.
Recommendation
- The machine should be supplied via a residual current device (RCD) with a trigger current of no more than 30 mA.
- Do not use the device when it is raining or in bad weather conditions. Only work in daylight or with good lighting.
- Make sure all covers and deflectors are in place and in good working condition.
- Warning! Danger of injury from moving dangerous parts!
- Have a secure footing at all times on slopes and to walk, not run.
- Do not touch moving dangerous parts until the machine has been disconnected from the mains power connection and the moving dangerous parts have come to a complete stop.
- Be careful not to connect a damaged cable to the power supply or touch a damaged cable before it has been disconnected from the power supply, as damaged cables can cause active parts to be touched.
- Avoid operating the machine in bad weather conditions, especially when there is a risk of lightning.
Caution!
In this way you avoid damage to the device and any personal injury resulting from it:
- Clean the ventilation openings regularly and follow the maintenance instructions.
-
Do not overload your device. Only work in the specified power range. Do not use low-output machines for heavy work. Do not use your device for purposes for which it is not intended.
-
Do not switch off the device until the filling funnel is completely empty, otherwise the device could become blocked and may not start up again.
- Do not try to repair the device yourself unless you have been trained to do so. All work that is not specified in this operating manual may carried out by our service centre.
Electrical safety
Caution:
To avoid accidents and injuries due to electric shock:
- Use the intended strain relief for attaching the extension cable.
- Check the condition of the machine, power supply and extension leads regularly before starting work. If the device is damaged, it must not be put into operation.
- Keep extension cables away from dangerous moving parts to avoid damage to the extension cable, which can lead to contact with active parts.
- Do not use damaged cables, couplings and connectors or connection cables that do not comply with the regulations. If the mains cable is damaged, pull the plug out of the socket immediately. Never touch the mains cable as long as the mains plug is plugged in.
- If the connection cable is damaged then it must be replaced by the manufacturer or their customer services personnel or by a similarly person, in order to avoid hazards.
- Do not use the device if the switch cannot be switched on and off. Damaged switches must be replaced by our service centre.
- Only use splash-proof extension cables that are approved for outdoor use. The conductor core cross-section of the extension cable must be at least 2.5 mm^2 . Always unroll a cable drum completely before use. Check the cable for damage.
- Do not use the cable to pull the plug out of the outlet. Protect the cable from heat, oil and sharp edges.
- Only have damage to extension cables repaired by a qualified electrician.
only
Warning!
This power tool generates an electromagnetic field during operation. This field can impair active or passive medical implants under certain conditions. In order to prevent the risk of serious or deadly injuries,
be recommend that persons with medical implants consult with their physician and the manufacturer of the medical implant prior to operating the power tool.
Residual risks
The machine has been built according to the state-of-the-art and the recognised technical safety requirements. However, individual residual risks can arise during operation.
- Health hazard due to electrical power, with the use of improper electrical connection cables.
- Before performing setting or maintenance work, release the start button and pull out the power plug.
• Furthermore, despite all precautions having been met, some non-obvious residual risks may still remain. - Residual risks can be minimised if the “Safety instructions” and “Proper use” are observed along with the whole of the operating instructions.
- Avoid accidental start-ups of the machine: The operating button may not be pressed when inserting the plug in a socket.
qualified Use the tool that is recommended in this operating manual. This is how to ensure that your machine provides optimum performance.
- Keep your hands away from the work area, when the machine is in operation.
Behaviour in an emergency
Initiate the necessary first aid measures for the injury and seek medical assistance as quickly as possible.
Protect the injured person from further harm and keep them calm. A first-aid kit according to DIN 13164 should always be available at the workplace in the event of an accident. Any material taken from the first aid kit must be refilled immediately.
When you request assistance, provide the following information
- Place of the accident
-
Nature of the accident
-
Number of injured
- Nature of the injuries
- Wait for further questions
7. Technical data
Dimensions L x W x H ......630 x 450 x 910 mm
Cutting roller ∅ ....87 mm
Number of blades 8
Capacity of the collection container....56 l
Weight 20.5 kg
max. branch diameter 42 mm
Motor....220-240V\~50Hz
Nominal consumption P1....2800 W
Cutting roller speed....60 rpm
Operating mode* P40
Protection category....IPX4
Protection class....II
Technical changes reserved!
* Continuous operation with intermittent load (4 min. load - 6 min. idle)
Wear hearing protection.
Excessive noise can result in a loss of hearing.
Noise data
Sound pressure level L_pA 76.3 dB
Uncertainty K_pA 2.38 dB
Measured sound power level L WA ......95.8 dB
Guaranteed sound power level L WA ......98 dB
Uncertainty K_WA 2.38 dB
Note:
The specified sound levels have been determined in accordance with a standardised test procedure and can be used to compare different power tools with one another. In addition, these values are suitable for estimating the stresses for the user resulting from the noise in advance.
8. Before commissioning
ATTENTION!
Always make sure the device is fully assembled before commissioning!
ATTENTION!
Before using for the first time, empty the collection bucket (8) into the household waste and wipe it out with a household cloth.
- Open the packaging and carefully remove the device.
- Remove the packaging material, as well as the packaging and transport safety devices (if present).
- Please do not remove the film from the status LED (18).
- Check whether the scope of delivery is complete.
- Check the device and accessory parts for transport damage.
- In the event of complaints the carrier must be informed immediately. Later claims will not be recognised.
- If possible, keep the packaging until the expiry of the warranty period.
- Familiarise yourself with the product by means of the operating instructions before using for the first time.
- With accessories as well as wearing parts and replacement parts use only original parts. Replacement parts can be obtained from your dealer.
- When ordering please provide our article number as well as type and year of manufacture for your equipment.
- Before connecting the machine, make certain that the data on the type plate matches with the mains power data.
⚠️ DANGER
The device and the packaging are not children's toys! Do not let children play with plastic bags, films or small parts! There is a danger of choking or suffocating!
9. Assembly
⚠ WARNING!
Always pull out the mains plug before carrying out adjustments on the device.
9.1 Fitting the support feet (Fig. 3/4)
-
Position the roller shredder so that the support feet (6) can be folded out by 180^ .
-
Guide the wheel axle (13) into the intended position on the support feet (6). (Fig. 4)
9.2 Fitting the wheels (7) (fig. 5/6)
-
Assemble both wheels (7), as shown in fig. 6, using the lock nuts (14), the wheel sleeves (15) and the washers (16). Use the tool supplied to tighten the wheels (7). NOTE: If the axle rotates when tightening, use the Allen key (b) to hold in place.
-
After tightening the locknut (14), fit the wheel cap (17) on the wheel (7).
9.3 Installing the collecting container (Fig. 7, 8, 9)
- Set the safety switch (9) on the collecting container (8) to its lowest position (Fig. 7).
- Slide the collecting container (8) along the guide rail into the machine stand. The collecting container (8) can only be pushed in one direction.
- To lock the collecting container (8), push the safety switch (9) on the collecting container (8) back up as far as it will go (Fig. 8; 9).
9.4 Fitting the handle for the adjusting screw (5b) (Fig. 10)
The adjusting screw (5) can be used to adjust the pressure plate (23) inside the device. The exact setting of the pressure plate (23) is explained under point 10.9.
- Remove the pre-fitted fixing screw (5a).
- Put the handle for the adjusting screw (5b) on the free end of the adjusting screw (5).
- Tighten the pre-fitted fixing screw (5a).
10. Operation
The roller shredder has a powerful electric motor, overload protection and a restart lock for additional safety. A roller system is used as the cutting system, which works very quietly and automatically pulls in the chopped material. The robust chassis provides stability and good mobility of the device.
Please refer to the following descriptions for the function of the controls.
Attention!
The roller shredder can only be started when the collecting container (8) is pushed into the machine stand and the safety switch (9) is in the top position.
10.1 Connecting the extension cable (Fig. 11)
- Form a loop from the end of the extension cable and hook it into the strain relief (20) on the mains cable (10).
- Connect the extension cable.
10.1.1 Status LED (18) (Fig . 2)
The status LED (18) shows you whether your device is connected to the power supply.
If the status LED (18) lights up, your device is supplied with power and can start up.
Note: Please do not remove the film from the status LED (18).
10.2 Switching on and off (Fig. 2)
- On switch (2): The roller shredder is started when this button is pressed.
- Off switch (3): The roller shredder is stopped when this button is pressed.
10.3 Switch for direction of roller rotation (11) (Fig. 2)
- Switch position "I" Entry:
- By pressing this button, the device runs in continuous operation. Material is drawn in.
- Switch position "0" Stop:
- Device stops.
- Switch position "II" Reverse:
- You can change the direction of rotation of the cutting roller (Reverse) to remove jammed chopped material. Set the switch for the roller rotation direction to "II". As soon as you press and hold the on switch (2) (jog mode), the device runs in reverse. Trapped chopped material is released.
10.4 Overload switch (12)
The motor is equipped with an overload switch (12). If the roller shredder is overloaded, the overload switch switches off automatically to protect the roller shredder from overheating.
- If the overload switch has triggered, switch the roller shredder off at the off switch (3) and until the roller shredder has cooled down.
- Now press the overload switch (12) and switch the roller shredder on again.
10.5 Overload protection
If the motor is overloaded, e.g. if the roller is blocked by branches that are too thick, the device switches off automatically.
10.6 Working notes
⚠ Attention!
Keep a sufficient distance from the device when shredding, as long branches can kick out when being pulled in. There is a danger of injury.
- Ensure that the collecting container (8) is pushed properly into the machine stand and that the safety switch (9) is in the top position.
- Connect the roller shredder to the power supply (see 10.1).
- Put the roller shredder into operation using the on switch (2) (see 10.2).
- Hold branches when feeding them into the device until they are automatically drawn in.
- Alternate the chopping of wilting garden waste and branches that have been stored for several days with branches in order to prevent clogging.
- Before shredding, remove roots from attached soil debris and stones.
- Do not shred soft, moist material such as kitchen waste, but compost it directly.
- Allow the roller shredder to fully shred the chopped material introduced before you introduce any new materials.
- Do not use your hands to push down the chopped material, only use a specialist plug (c) for this or other chopped material.
- Switch off the roller shredder after the work has been completed and disconnect it from the power supply.
- Save a few dry branches until the end to use them to help clean the device.
- Do not switch off the device until all the chopped material has passed through the cutting roller area. Otherwise, the cutting roller may jam when restarting.
10.7 Unblocking
ATTENTION:
If the material becomes jammed, first press the off switch (3) to stop the device.
- Press the roller rotation direction switch (11) to position "II".
- Start the device by pressing the on switch (2).
- The device runs in jog mode. As long as the switch for the roller rotation direction is held in position "II", the cutting roller runs in reverse.
- Trapped chopped material is released.
- Replace the direction of rotation again to continue shredding (see 10.3).
10.8 Emptying the collecting container
Empty the collecting container in good time. Note that the collecting container under the ejector chute fills unevenly!
- Switch off the device and remove the plug from the socket.
- Place the safety switch (9) on the collecting container (8) in its lowest position.
- Pull out the collecting container (8) and empty it.
- Make sure that the area of the safety switch (9) is free of wood splinters before you push the collecting container (8) back in.
- Replace the collecting container (8) and push the safety switch (9) back up to the stop.
10.9 Adjusting the pressure plate
The pressure plate has been preset at the factory. The running-in process of a new machine may make it necessary to readjust the pressure plate at shorter intervals at the beginning.
You can recognise the right time to readjust the pressure plate by the fact that the chopped material is only slightly crushed and still hangs together in a chain.
- Empty the collection container (8) and put the roller shredder into operation.
- Slowly rotate the adjusting screw (5) clockwise until slight grinding noises can be heard. The cutting roller is brought approx. 0.50 mm closer to pressure plate with a clockwise half-turn of the adjusting screw (5).
-
The pressure plate is correctly set, as soon as no grinding noise is audible.
-
Note: Metal chips may be produced by adjusting the pressure plate. Chopped material with metal chips is hazardous waste and must NOT be composted. To avoid this hazardous waste, empty and clean the collection container (8) immediately after setting the pressure plate.
- Check the setting of the pressure plate by shredding a few branches on a trial basis. Properly dispose this chopped material, which could possibly contain metal chips.
Note:
If the shredder blade touches the pressure plate, the pressure plate is recut and small metal chips can fall out of the ejection opening. This is not a defect, but readjustment may only be made to the extent necessary, otherwise the pressure plate will wear out prematurely.
11. Electrical connection
The electrical motor installed is connected and ready for operation. The connection complies with the applicable VDE and DIN provisions. The customer's mains connection as well as the extension cable used must also comply with these regulations.
11.1 Damaged electrical connection cable
The insulation on electrical connection cables is often damaged.
This may have the following causes:
- Pressure points, where connection cables are passed through windows or doors.
- Kinks where the connection cable has been improperly fastened or routed.
- Places where the connection cables have been cut due to being driven over.
- Insulation damage due to being ripped out of the wall outlet.
- Cracks due to the insulation ageing.
Such damaged electrical connection cables must not be used and are life-threatening due to the insulation damage.
Check the electrical connection cables for damage regularly. Ensure that the connection cables are disconnected from electrical power when checking for damage.
Electrical connection cables must comply with the applicable VDE and DIN provisions. Only use connection cables with the designation H07RN-F.
The printing of the type designation on the connection cable is mandatory.
Connection type Y
If the mains connection cable of this device is damaged, it must be replaced by the manufacturer, their service department or a similarly qualified person to avoid dangers.
11.2 AC motor
- The mains voltage must be 220-240 V\~
- An extension cable with too small a conductor cross-section causes a significant reduction in the performance of the gardening tool. Cables up to 25 m long must have a cross section of at least 3 x 1.5 mm ^2 , cables over 25 m long must have a cross section of at least 2.5 mm ^2 .
Connections and repair work on the electrical equipment may only be carried out by electricians.
- The product fulfils the requirements of EN 61000-3-11 and may only be used at the following connection points: This means that use of the product at any freely selectable connection points is not allowed.
- Given unfavourable conditions in the power supply the product can cause the voltage to fluctuate temporarily.
- The product is intended exclusively for use at connection points that have a continuous current carrying capacity of the mains of at least 100 A per phase.
- As the user, you are required to ensure, in consultation with your electric power company if necessary, that the connection point at which you wish to operate the product meets the requirement named above.
For single-phase AC motors, we recommend a fuse rating of C 16A or K 16A for machines with a high starting current (from 3000 watts)!
12. Cleaning and maintenance
Attention!
Pull out the mains plug before all maintenance and cleaning work.
Have work which is not described in these operating instructions carried out by one of our authorised customer service centres. Use only original parts.
Wear gloves when handling the cutting roller.
Before all maintenance and cleaning work, switch the device off, pull out the mains plug and wait for the cutting roller to come to a standstill.
12.1 Replacing the cutting roller and pressure plate (Fig. 12 + 13)
WARNING! Risk of cuts!
Always wear work gloves before working on the blade.
- Switch off the device and remove the plug from the socket.
- Turn the adjusting screw (5) approx. 2 turns anticlockwise.
- Loosen the four screws (21a) with the Allen key provided and remove the gear cover (21) from the device.
- Carefully pull the cutting roller (22) off the motor shaft.
- Remove the pressure plate (23).
- Remove dirt from the motor shaft and lightly lubricate it.
- Place the new cutting roller (22) in the same position on the shaft. When doing so, ensure that the cutting roller (22) is correctly aligned (note the curvature of the blade teeth).
- Re-insert the pressure plate (23).
- Insert the gearbox cover (21) and retighten the screws (21a).
- Adjust the pressure plate as described in point 10.9.
General cleaning and maintenance work
Do not splash the roller shredder with water. Danger due to electric shock!
- Always keep the device, the wheels and the ventilation openings clean. Use a brush or cloth to clean, but do not use cleaning agents or solvents.
- Check the device, in particular the protective devices, for damage such as loose, worn or damaged parts before each use. Check all nuts, pins and screws for firm seating.
- Check the covers and protective devices for damage and correct seating. Replace them if necessary.
- Keep the device dry and out of the reach of children. Do not cover the device with nylon bags as moisture could form.
Connections and repairs
Connections and repair work on the electrical equipment may only be carried out by electricians.
Please provide the following information in the event of any enquiries:
- Type of current for the motor
• Data of machine type plate
• Data of motor type plate
Service information
With this product, it is necessary to note that the following parts are subject to natural or usage-related wear, or that the following parts are required as consumables.
Wearing parts*: Carbon brushes, cutting roller, pressure plate
* may not be included in the scope of supply!
With accessories as well as wearing parts and replacement parts use only original parts:
Carbon brushes: 3904409008
Cutting roller: 3904409009
Pressure plate: 3904409010
13. Storage
Store the device and its accessories in a dark, dry and frost-free place that is inaccessible to children. The optimum storage temperature lies between 5 and 30 °C.
Store the power tool in its original packaging.
Cover the power tool to protect it from dust or moisture. Store the operating manual with the power tool.
14. Disposal and recycling
You can find out how to dispose of the disused device from your local authority or city administration.
Notes for packaging


The packaging materials are recyclable. Please dispose of packaging in
Notes on the electrical and electronic equipment act [ElektroG]
Waste electrical and electronic equipment does not belong in household waste, but must be collected and disposed of separately!
- Used batteries or rechargeable batteries that are not installed permanently in the old appliance must be removed non-destructively before disposal. Their disposal is regulated by the battery law.
- Owners or users of electrical and electronic devices are legally obliged to return them after use.
- The end user is responsible for deleting their personal data from the old device being disposed of!
- The symbol of the crossed-out dustbin means that waste electrical and electronic equipment must not be disposed of with household waste.
- Waste electrical and electronic equipment can be handed in free of charge at the following places:
- Public disposal or collection points (e.g. municipal works yards)
- LIDL offers you return options directly in the branches and stores. Return and disposal are free of charge for you.
- Up to three waste electrical devices per type of device, with an edge length of no more than 25 centimetres, can be returned free of charge to the manufacturer without prior purchase of a new device from the manufacturer or taken to another authorised collection point in your vicinity.
- Further supplementary take-back conditions of the manufacturers and distributors can be obtained from the respective customer service.
- If the manufacturer delivers a new electrical appliance to a private household, the manufacturer can arrange for the free collection of the old electrical appliance upon request from the end user. Please contact the manufacturer's customer service for this.
- These statements only apply to devices installed and sold in the countries of the European Union and which are subject to the European Directive 2012/19/EU. In countries outside the European Union, different regulations may apply to the disposal of waste electrical and electronic equipment.
15. Troubleshooting
| Fault Possible cause Remedy | ||
| Motor does not start Collecti | ng container not in correct position | Insert collecting container correctly and check safety switch |
| Motor is overloaded Switch the roller shredder on again | ||
| No mains voltage Have the socket, cable, lead and plug checked by a qualified electrician (see Electrical connection) | ||
| Garden waste is not being drawn in | Cutting roller moves counterclockwise Switch direction of rotation | |
| Chopped material is too soft Push in the chopped material with a special plug for the roller shredder | ||
| Cutting roller is blocked Unblock | ||
| Chopped material hanging together like a chain | Pressure plate not adjusted correctly Re adjusting the pressure plate | |
16. Warranty certificate
Dear Customer,
All of our products undergo strict quality checks to ensure that they reach you in perfect condition. In the unlikely event that your device develops a fault, please contact our service department at the address shown on this guarantee card. Of course, if you would prefer to call us then we are also happy to offer our assistance under the service number printed below. Please note the following terms under which guarantee claims can be made:
- These guarantee terms cover additional guarantee rights and do not affect your statutory warranty rights. We do not charge you for this guarantee.
- Our guarantee only covers problems caused by material or manufacturing defects, and it is restricted to the rectification of these defects or replacement of the device. Please note that our devices have not been designed for use in commercial, trade or industrial applications. Consequently, the guarantee is invalidated if the equipment is used in commercial, trade or industrial applications or for other equivalent activities. The following are also excluded from our guarantee: compensation for transport damage, damage caused by failure to comply with the installation/assembly instructions or damage caused by unprofessional installation, failure to comply with the operating instructions (e.g. connection to the wrong mains voltage or current type), misuse or inappropriate use (such as overloading of the device or use of non-approved tools or accessories), failure to comply with the maintenance and safety regulations, ingress of foreign bodies into the device (e.g. sand, stones or dust), effects of force or external influences (e.g. damage caused by the device being dropped) and normal wear resulting from proper operation of the device.
- The guarantee is rendered null and void if any attempt is made to tamper with the device.
- The guarantee is valid for a period of 3 years starting from the purchase date of the device. Guarantee claims should be submitted before the end of the guarantee period within two weeks of the defect being noticed. No guarantee claims will be accepted after the end of the guarantee period. The original guarantee period remains applicable to the device even if repairs are carried out or parts are replaced. In such cases, the work performed or parts fitted will not result in an extension of the guarantee period, and no new guarantee will become active for the work performed or parts fitted. This also applies when an on-site service is used.
- In order to assert your guarantee claim, please contact the service partner shown below. If the complaint is within the guarantee period, we will provide you with a return slip, with which you can return your defective device free of charge to us. It would help us if you could describe the nature of the problem in as much detail as possible. If the defect is covered by our guarantee then your device will either be repaired immediately and returned to you, or we will send you a new device.
Of course, we are also happy offer a chargeable repair service for any defects which are not covered by the scope of this guarantee or for units which are no longer covered. To take advantage of this service, please send the device to our service address.
16.1 Processing of warranty claims
To ensure that your request is processed quickly, please follow the instructions below:
- Please have the receipt and article number (e.g. IAN 466536_2404) ready as proof of purchase for all enquiries.
- Please refer to the type plate on the product, an engraving on the product, the title page of your instructions (bottom left) or the sticker on the back or underside of the product for the article number.
- If functional faults or other defects occur, first contact the service department named below by telephone or e-mail.
- You can then send a product recorded as defective to the service address provided to you free of charge, enclosing the proof of purchase (receipt) and stating what the defect is and when it occurred.
- You can view and download these and many other manuals at parkside-diy.com. This QR code will take you directly to parkside-diy.com. Select your country and use the search mask to search for the operating instructions. Enter the article number (IAN) 466536_2404 to access the operating instructions for your article.
Service contact (GB):
Name: Forest Park & Garden Coed Court, Taffsmead Road Treforest, Ind. Estate, Pontypridd CF375SW
Tel: 00800 4003 4003
E-Mail: service.GB@scheppach.com
Location: Great Britain
Service contact (NI):
Name: Forest Park & Garden Coed Court, Taffsmead Road Treforest, Ind. Estate, Pontypridd CF375SW
Tel: 00800 4003 4003
E-Mail: service.NI@scheppach.com
Location: Great Britain
Service contact (IT):
Service contact (IE):
Name: Forest Park & Garden Coed Court, Taffsmead Road Treforest, Ind. Estate, Pontypridd CF375SW
Tel: 00800 4003 4003
E-Mail: service.IE@scheppach.com
Location: Great Britain
Service contact (CY):
Name: GEORGE C SOLOMONIDES & SON LTD PO.BOX 56236 / 169, LEONTIOS A' GR - 3022 LIMASSOL/CYPRUS
Tel: 00800 4003 4003
E-Mail: service.CY@scheppach.com
Location: Cyprus

Günzburger Straße 69
D-89335 Ichenhausen
VEREHRTER KUNDE,
Günzburger Straße 69
D-89335 Ichenhausen
CHER CLIENT,
PDF ONLINE
parkside-diy.com
CERTIFICAT DE GARANTIE
Günzburger Straße 69
D-89335 Ichenhausen
GEACHTE KLANT,
Servicecontact (NL):
Naam:TeleMarComEuropean
Services GmbH
Am Ziegelweiher 24
DE - 61130 Nidderau
Telefoon: 00800 4003 4003
E-mail: service.NL@scheppach.com
Günzburger Straße 69
D-89335 Ichenhausen
ESTIMADO CLIENTE:
Günzburger Straße 69
D-89335 Ichenhausen
GENTILE CLIENTE,
Günzburger Straße 69
D-89335 Ichenhausen
VÁŽENÝ ZÁKAZNÍKU,
Günzburger Straße 69
D-89335 Ichenhausen
VÁŽENÝ ZÁKAZNÍK,
Günzburger Straße 69
D-89335 Ichenhausen
KEDVES ÜGYFELÜNK!
Günzburger Straße 69
D-89335 Ichenhausen
SZANOWNY KLIENCIE,
Günzburger Straße 69
D-89335 Ichenhausen
KÆRE KUNDE
Standard references:
EN 60335-1:2012/A15:2021; EN 50434:2014; EN IEC 55014-1:2021; EN IEC 55014-2:2021;
EN IEC 61000-3-2:2019/A1:2021; EN IEC 61000-3-11:2019; EN IEC 63000:2018
This declaration of conformity is issued under the sole responsibility of the manufacturer.
Subject to change without notice
Documents registrar: Tobias Ihle
Günzburger Str. 69, D-89335 Ichenhausen

CE
SCHEPPACH GMBH
Günzburger Str. 69
D-89335 Ichenhausen


Last Information Update · Stand der Informationen · Version des informations · Stand van de informatie ·
Estado de las informaciones · Versione delle informazioni · Stav informaci · Stav informacií · Informaciók állása ·

- GARDEN SHREDDER PWH 2800 C3
- WALZENHÄCKSLER PWH 2800 C3
- BROYEUR DE VÉGÉTAUX À ROTOR PWH 2800 C3
- GARDEN SHREDDER
- BROYEAR DE VÉGÉTAUX À ROTOR
- Table of contents: Page:
- Explanation of the symbols on the device
- Introduction
- MANUFACTURER:
- DEAR CUSTOMER,
- NOTE:
- Please consider:
- Device description
- Scope of delivery
- Proper use
- The roller shredder must not be filled with stones, glass, metal, bones, plastics, or fabric waste.
- Safety information
- IMPORTANT:
- READ CAREFULLY BEFORE USE. KEEP FOR YOUR RECORDS.
- Training:
- Attention!
- Preparation:
- Operation:
- Maintenance and storage:
- Additional safety instructions for machines with collecting containers:
- Recommendation
- Caution!
- Electrical safety
- Caution:
- Warning!
- Residual risks
- Behaviour in an emergency
- Technical data
- Wear hearing protection.
- Noise data
- Before commissioning
- ⚠️ DANGER
- Assembly
- ⚠ WARNING!
- Fitting the support feet (Fig. 3/4)
- Fitting the wheels (7) (fig. 5/6)
- Installing the collecting container (Fig. 7, 8, 9)
- Fitting the handle for the adjusting screw (5b) (Fig. 10)
- Operation
- Connecting the extension cable (Fig. 11)
- Status LED (18) (Fig . 2)
- Switching on and off (Fig. 2)
- Switch for direction of roller rotation (11) (Fig. 2)
- Overload switch (12)
- Overload protection
- Working notes
- ⚠ Attention!
- Unblocking
- ATTENTION:
- Emptying the collecting container
- Adjusting the pressure plate
- Electrical connection
- Damaged electrical connection cable
- Connection type Y
- AC motor
- Cleaning and maintenance
- Replacing the cutting roller and pressure plate (Fig. 12 + 13)
- WARNING! Risk of cuts!
- General cleaning and maintenance work
- Do not splash the roller shredder with water. Danger due to electric shock!
- Connections and repairs
- Please provide the following information in the event of any enquiries:
- Service information
- Storage
- Disposal and recycling
- Troubleshooting
- Warranty certificate
- Processing of warranty claims
- Service contact (GB):
- Service contact (NI):
- Service contact (IT):
- Service contact (IE):
- Service contact (CY):
- VEREHRTER KUNDE,
- CHER CLIENT,
- CERTIFICAT DE GARANTIE
- GEACHTE KLANT,
- ESTIMADO CLIENTE:
- GENTILE CLIENTE,
- VÁŽENÝ ZÁKAZNÍKU,
- VÁŽENÝ ZÁKAZNÍK,
- KEDVES ÜGYFELÜNK!
- SZANOWNY KLIENCIE,
- KÆRE KUNDE
- Standard references:
Brand : PARKSIDE
Model : PWH 2800 C3
Category : Mechanical chipper