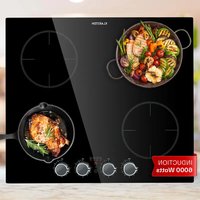
Kochheld - Cooker Klarstein - Free user manual and instructions
Find the device manual for free Kochheld Klarstein in PDF.


User questions about Kochheld Klarstein
0 question about this device. Answer the ones you know or ask your own.
Ask a new question about this device
Download the instructions for your Cooker in PDF format for free! Find your manual Kochheld - Klarstein and take your electronic device back in hand. On this page are published all the documents necessary for the use of your device. Kochheld by Klarstein.
USER MANUAL Kochheld Klarstein
text_image
COOKINGCO COOKINGCO KINGCOOKING KINGCOOKING COOKINGCO KINGCOOKING KINGCOOKING KINGCOOKINGKLARSTEIN
www.klarstein.com

area
| Category | Value | | -------- | ----- | | 1 | 100 | | 2 | 100 | | 3 | 100 | | 4 | 100 | | 5 | 100 | | 6 | 100 | | 7 | 100 | | 8 | 100 | | 9 | 100 | | 10 | 100 | | 11 | 100 | | 12 | 100 | | 13 | 100 | | 14 | 100 | | 15 | 100 | | 16 | 100 | | 17 | 100 | | 18 | 100 | | 19 | 100 | | 20 | 100 | | 21 | 100 | | 22 | 100 | | 23 | 100 | | 24 | 100 | | 25 | 100 | | 26 | 100 | | 27 | 100 | | 28 | 100 | | 29 | 100 | | 30 | 100 | | 31 | 100 | | 32 | 100 | | 33 | 100 | | 34 | 100 | | 35 | 100 | | 36 | 100 | | 37 | 100 | | 38 | 100 | | 39 | 100 | | 40 | 100 | | 41 | 100 | | 42 | 100 | | 43 | 100 | | 44 | 100 | | 45 | 100 | | 46 | 100 | | 47 | 100 | | 48 | 100 | | 49 | 100 | | 50 | 100 | | 51 | 100 | | 52 | 100 | | 53 | 100 | | 54 | 100 | | 55 | 100 | | 56 | 100 | | 57 | 100 | | 58 | 100 | | 59 | 100 | | 60 | 100 | | 61 | 100 | | 62 | 100 | | 63 | 100 | | 64 | 100 | | 65 | 100 | | 66 | 100 | | 67 | 100 | | 68 | 100 | | 69 | 100 | | 70 | 100 | | 71 | 100 | | 72 | 100 | | 73 | 100 | | 74 | 100 | | 75 | 100 | | 76 | 100 | | 77 | 100 | | 78 | 100 | | 79 | 100 | | 80 | 100 | | Note: The actual values are not provided in the code. I have used the label 'Value' as a placeholder for the value detection. You would need to run the code to get the actual values from the code list. Please note that the actual values would be the result of this example. You would need to run the code to get the actual values from the code list. You would need to run the code to get the actual values from the code list. You would need to run the code to get the actual values from the code list. You would need to run the code to get the actual values from the code list. You would need to run the code to get the actual values from the code list. You would need to run the code to get the actual values from the code list. You would need to run the code to get the actual values from you would need to run the code.Lieber Kunde, liebe Kundin,
text_image
QR code image containing encoded data, no visible human-readable textINHALT
text_image
Diagram showing six labeled circular components with directional arrows, likely illustrating a physical or engineering concept.text_image
P 0 0 P 0 0 P 0 ②③④ ①①text_image
Diagram showing six labeled circular components arranged in a 2x3 grid, with arrows indicating direction and a scale bar at the bottom.text_image
P 0 0 P 0 0 P 0 0 ① ② ③ ④ ⑤text_image
Diagram showing six labeled circular components with directional arrows, likely illustrating a physical or engineering concept.text_image
P 0 P 0 P 0 P 0 P 0 ② ③ ④ ⑤ ⑥ ①text_image
Diagram showing two hand positions with check and cross symbols, likely indicating correct and incorrect states.natural_image
Simple line drawing of a cooking pot with crossed-out X marks (no text or symbols)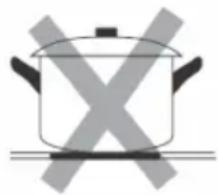
natural_image
Simple line drawing of a cooking pot with crossed X marks (no text or symbols)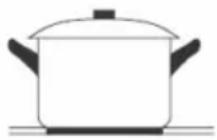
natural_image
Simple line drawing of a cooking pot with crossed X marks (no text or symbols)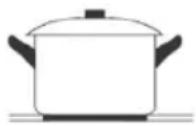
flowchart
graph TD
    A["Circle"] --> B["Square"]
    C["Square"] --> D["Box"]
    E["Circle"] --> F["Square"]
    G["Circle"] --> H["Square"]
    I["Circle"] --> J["Square"]
    K["Circle"] --> L["Square"]
    M["Circle"] --> N["Square"]
    O["Circle"] --> P["Square"]
    Q["Circle"] --> R["Square"]
    S["Circle"] --> T["Square"]
    U["Circle"] --> V["Square"]
    W["Circle"] --> X["Square"]
    Y["Circle"] --> Z["Square"]
    AA["Circle"] --> AB["Square"]
    AC["Circle"] --> AD["Square"]
    AE["Circle"] --> AF["Square"]
    AG["Circle"] --> AH["Square"]
    AI["Circle"] --> AJ["Square"]
    AK["Circle"] --> AL["Square"]
    AM["Circle"] --> AN["Square"]
    AO["Circle"] --> AP["Square"]
    AQ["Circle"] --> AR["Square"]
    AS["Circle"] --> AT["Square"]
    AU["Circle"] --> AV["Square"]
    AW["Circle"] --> AX["Square"]
    AY["Circle"] --> AZ["Square"]
    BA["Circle"] --> BB["Square"]
    BC["Circle"] --> BD["Square"]
    BE["Circle"] --> BF["Square"]
    BG["Circle"] --> BH["Square"]
    BI["Circle"] --> BJ["Square"]
    BK["Circle"] --> BL["Square"]
    BM["Circle"] --> BN["Square"]
    BO["Circle"] --> BP["Square"]
    BQ["Circle"] --> BR["Square"]
    BS["Circle"] --> BT["Square"]
    BU["Circle"] --> BV["Square"]
    BW["Circle"] --> BX["Square"]
    BY["Circle"] --> BZ["Square"]
    CA["Circle"] --> CB["Square"]
    CC["Circle"] --> CD["Square"]
    CE["Circle"] --> CF["Square"]
    DG["Circle"] --> DH["Square"]
    DI["Circle"] --> DJ["Square"]
    DK["Circle"] --> DL["Square"]
11. PRODUKTDATENBLATT
INDUKTIONSKOCHFELD
natural_image
Symbol of a trash bin with crossed lines indicating no waste or discharge, and a solid black rectangle below (no text or labels)Congratulations on your purchase. Please read the following instructions carefully and follow them to prevent potential damage. We accept no liability for damage caused by disregarding the instructions and improper use. Please scan the QR code to access the latest operating instructions and further information about the product.

text_image
QR code image containing encoded data, no visible human-readable textCONTENTS
- Technical Data 41
- Safety Instructions 42
- Product Overview 46
- A Word on Induction Cooking 54
- Choosing the right cookware 55
- Installation 56
- Operation 61
- Device Protection 63
- Cleaning and maintenance 64
- Troubleshooting 66
- Product Data Sheet induction hob 69
Disposal Considerations 73
Manufacturer & Importer (UK) 73
1. TECHNICAL DATA
| Article number 10047622 | 10047623,10047865 | 10047866,10047867 | 10047868 |
| Model Kochheld 30 cm Kochheld 45 cm Kochheld 60 cm Kochheld 90 cm | |||
| Supply Voltage | 220-240 V ~50 Hz | ||
2. SAFETY INSTRUCTIONS
Your safety and the safety of others are very important. Please read all safety instructions and warnings below before installation or use.
2.1 Electrical Safety and Installation
• Installation by Qualified Professional: This appliance must be installed and connected by a qualified electrician. Incorrect installation or wiring can lead to electric shock, injury, or product damage and will void the warranty.
- Disconnect from Mains: Always switch off the circuit breaker and unplug or isolate the hob from the mains before installing, cleaning, or servicing the unit.
- Proper Grounding: The hob must be properly earthed. Connect it to a dedicated, grounded circuit according to local electrical codes. An isolating switch (all-pole disconnection with at least 3 mm contact gap) must be incorporated into the fixed wiring for safety.
- Electrical Supply: Ensure the voltage and frequency of your power supply correspond to the ratings on the appliance nameplate. Use an appropriate circuit breaker/fuse as specified. Do not use extension cords, multi-plug adapters or portable power plugs to connect the hob – this is a fire and safety hazard.
- Cable Safety: Use the specified power supply cable type and diameter. The cable should not be bent, pinched, or come into contact with any hot surfaces. If the supply cord is damaged, it must be replaced by the manufacturer, an authorized service agent, or similarly qualified persons to avoid danger.
- No DIY Alterations: Do not modify the plug, power cord or internal wiring yourself. Do not attempt to repair or replace any electrical components of the appliance. All repairs must be performed by qualified service technicians using original spare parts.
2.2 Operational Safety
- Intended Use: This induction hob with integrated extractor is intended for indoor domestic use only. It is not designed for commercial or outdoor use. Using the appliance in a commercial setting or for any purpose not outlined in this manual may result in injury, damage, and will void the warranty.
- Supervision Required: CAUTION: Never leave the appliance unattended during operation. Boil-overs, spills, or overheated oil/fat can ignite and cause fire.
- Suitable Cookware Only: Only use cookware that is compatible with induction hobs (ferrous-metal bottoms). The hob will automatically shut off or not activate if incompatible or undersized cookware is used (see Section 5 Choosing the Right Cookware).
- No External Timer: WARNING: The appliance is not intended to be operated by means of an external timer or separate remote-control system. Always switch it off manually as described in this manual.
- No Worksurface: Do not use the hob surface as a cutting board, worktop, or for storage. Placing heavy objects can scratch or crack the glass, and objects left on the hob (even when off) may heat up or melt if the hob is accidentally turned on.
- Hot Surfaces: WARNING – Burn Hazard: During use, the cooking zones and certain accessible parts of the hob will become very hot. Do not touch the ceramic glass surface or nearby metal parts until they have fully cooled. Even after switching off, the surface remains hot for some time and is indicated by an “H” (hot) on the display.
- Keep clothing, paper, curtains and other flammable materials away from the hob. They may catch fire from residual heat or if accidentally placed on an active cooking zone.
- Handles of pots and pans should be turned inward so they do not extend over the edge of the hob or over other active zones. This helps prevent knocks, spills, and burns.
- Child Safety
- WARNING: Keep children under 8 years old away from the hob unless constantly supervised. The appliance and its accessible parts become hot during use, which can cause serious burns.
- This appliance can be used by children aged 8+ and by persons with reduced physical, sensory or mental capabilities only if they are given supervision or instruction concerning safe use and understand the hazards.
-
Do not let children play with the appliance, sit or climb on it, or operate any controls.
• Children must not perform cleaning or maintenance unsupervised. -
Cooking with Oil /Grease: WARNING – Fire Hazard: Oil and fat can overheat rapidly and catch fire.
-
When heating oil for frying:
-
Do not leave the hob unattended.
- Do not attempt to extinguish an oil fire with water! In case of fire, switch off the hob and use a pan lid, metal tray or fire blanket to smother flames.
- Flammable Items: WARNING: Do not store items on the hob's cooking surface. Objects such as plastic utensils, dishcloths, packaging or other flammable materials can melt or ignite if placed on a hot cooking zone or near the extractor inlet.
- After Use: Always turn off all cooking zones using the controls after cooking. Do not rely only on the automatic pan detection or safety shut-off alone. When finished, also switch off the hob using the main power (ON/OFF) button to fully deactivate the appliance.
- No Room/Ambient Heating: Do not use the appliance for space heating or to dry clothes. It is designed for cooking food only.
2.3 Appliance and component safety
- Glass ceramic surface: Do not cook on a broken or cracked hob surface. If you notice a crack in the glass, even a small one, unplug the hob immediately and do not use it until it has been repaired or replaced by a qualified technician. A cracked surface may allow water to penetrate, or sharp edges may present a risk of electric shock or injury.
- Pan detection & auto shut-off: This induction hob is equipped with safety features such as pan detection and auto shut-off. If no pan is detected on an active zone, or if you forget to switch off a zone, the hob will automatically switch off that zone after a preset time (see section 8 Auto shut-off times). However, do not rely on this – always switch off the hob manually after use.
- Cooling fan and ventilation: An internal cooling fan runs during cooking and may continue to run for a short time after the hob is switched off to cool the electronics. This is normal. Do not disconnect the power supply while the fan is running. Ensure that the ventilation openings (air intake and outlet) are not blocked. Good airflow is essential for safe operation.
- Use hob guards: WARNING: Only use a hob guard that has been designed or approved by Klarstein for this model. Use of an incompatible guard may result in an accident.
- Sharp edges: Be careful when handling the appliance during installation - the metal edges of the cooktop or cut-out may be sharp. Wear suitable gloves to avoid cuts. Similarly, if you use a scraper to clean the glass (for burnt-on spills), be extremely careful - the scraper blade is very sharp (cut hazard).
2.4 Health Advice
- This appliance complies with electromagnetic safety standards.
• However, persons with pacemakers or other electrical implants (such as insulin pumps) should consult their physician or implant manufacturer before using this appliance to ensure that their implants are not affected by the electromagnetic field. - Failure to follow this advice may result in death.
2.5 Cleaning and Maintenance Safety
- Disconnect the power supply: Always switch off the hob and disconnect it from the power supply before cleaning or carrying out any maintenance (e.g. removing filters, wiping the control panel).
- Allow to cool: Clean the hob only after all surfaces have cooled down. Cleaning a hot glass surface can cause burns or damage to your cleaning tools.
- No steam cleaners: Do not use steam or high pressure cleaners to clean the hob. Steam can reach electrical components and cause a short circuit or electric shock.
- Gentle cleaning: Do not use abrasive sponges, steel wool or harsh scouring powders on the glass or stainless steel parts. They can scratch or damage the finish. Use only non-scratching cleaners and follow the guidelines in Section 6 for proper cleaning techniques.
- Filter handling: Handle with care when cleaning or replacing the extractor hood filters. Some edges may be sharp. Ensure that the filters are replaced correctly before using the extractor hood again. Do not operate the extractor hood without filters.
• Service: There are no user serviceable parts inside the appliance (except for routine cleaning of accessible components as described). Do not attempt to disassemble or modify internal components. If the unit requires service or repair, contact Klarstein Customer Service or an authorised technician.
IMPORTANT: Failure to follow the safety instructions and warnings may result in electric shock, fire, serious injury, or damage to the appliance. Incorrect installation or misuse will void your warranty. Keep these safety instructions for future reference and share them with any person who will be operating the appliance.
3. PRODUCT OVERVIEW
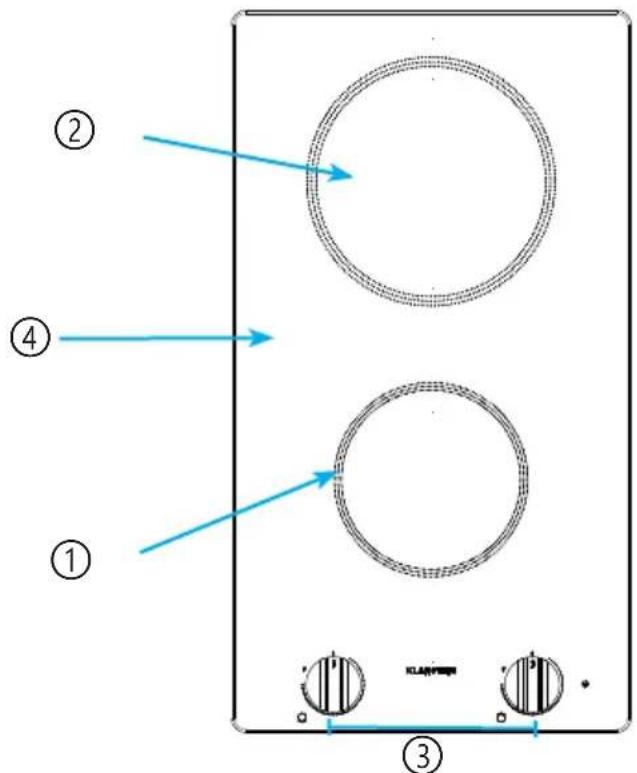
3.1 Appliance 10047622
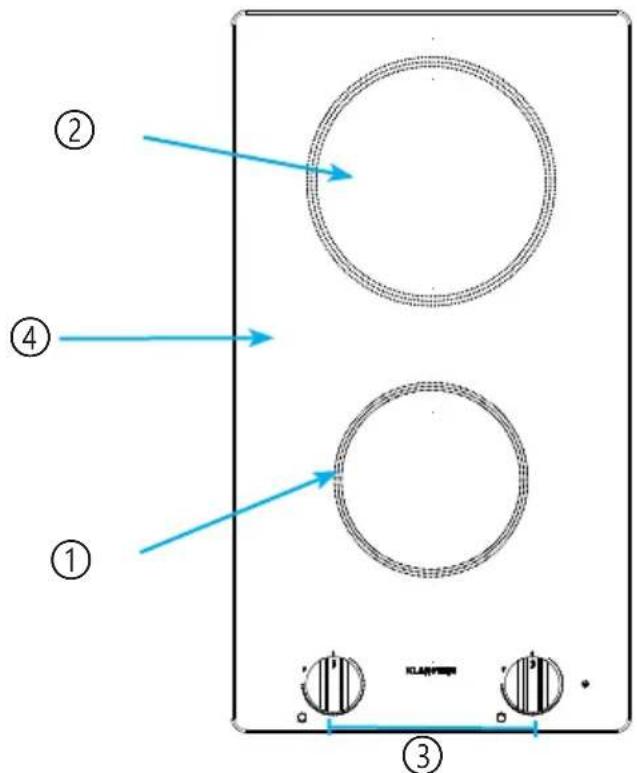
text_image
① ② ③ ④| Number Function Description | |
| 1 Front Cooking zone Induction hob zone | ( 140 mm, 1200 W normal / 1500 W boost) |
| 2 Rear cooking zone Induction hob zone | ( 180 mm, 1500 W / 2000 W boost) |
| 3 Control knobs Control knobs for the hob functions. | |
| 4 Glass ceramic surface Durable vitro-ceramic cooking surfacethat is easy to clean. The cooking zones are marked on the surface. | |
3.2 Control panel Layout 10047622
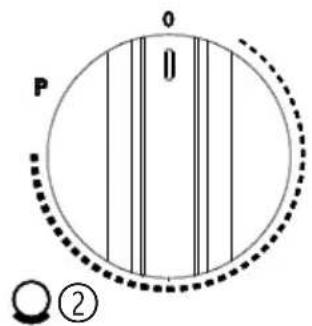
text_image
P O ②KLARSTEIN
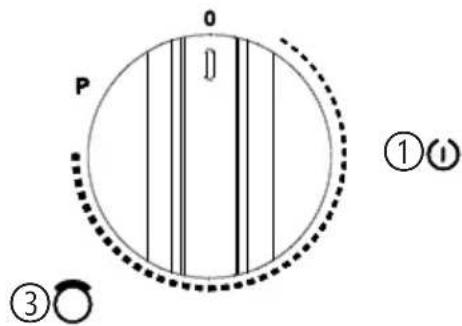
text_image
P O ①② ③| Nr. | Reference Function | Description | |
| 1 | ON/OFF  | Main power touch button for the hob. Turns the appliance on or off (standby). | |
| 2 | Front he  density density | Adjust the heat intensity of the front cooking zone | |
| 3 | Rear he  density density | Adjust the heat intensity of the rear cooking zone |
Note: The control panel will beep to acknowledge touches. The power indicator for each active cooking zone shows its level or an error code if applicable.
3.3 Appliance 10047623, 10047865
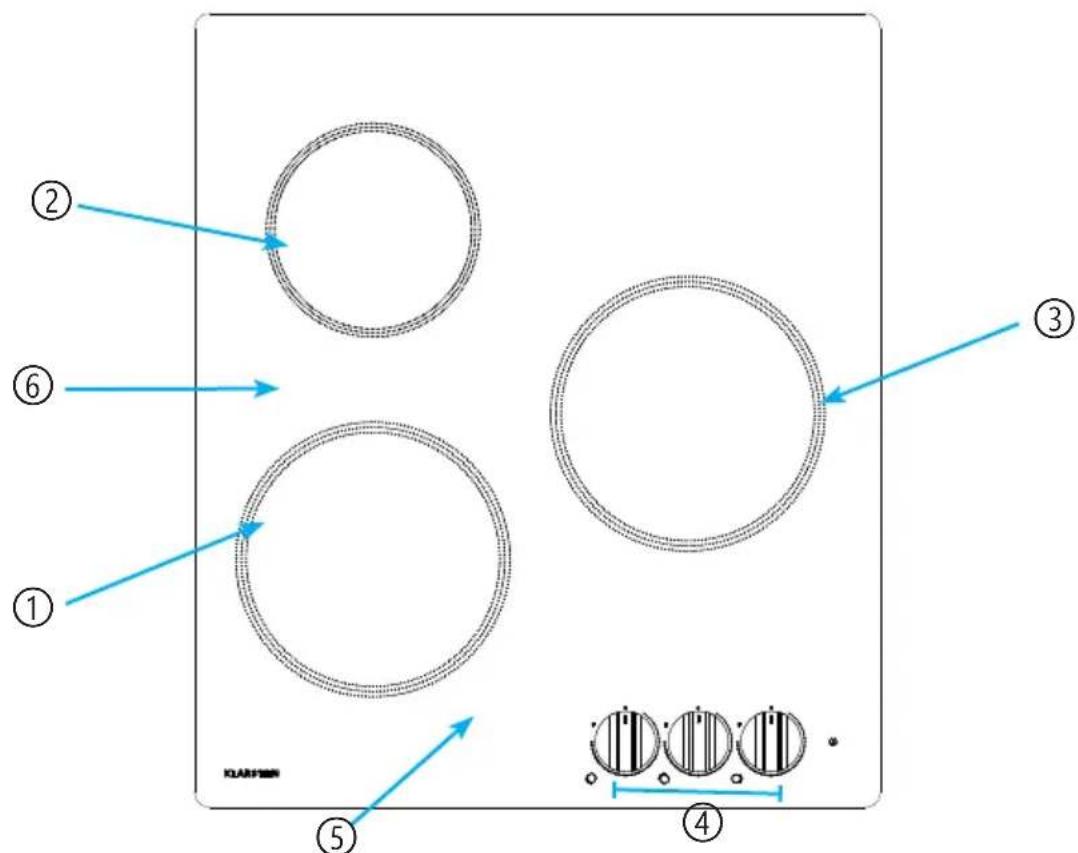
text_image
Diagram showing six labeled circular components with directional arrows, likely illustrating a physical or engineering concept.| Number Function Description | |
| 1 Left front cooking zone Induction hob zone ( ~180 mm, 1800 W normal / 2100 W boost) | |
| 2 Left rear cooking zone Induction hob zone ( ~140 mm, 1200 W / 1500 W boost) | |
| 3 Centre right cooking zone Induction hob zone ( ~180 mm, 1800 W / 2100 W boost). | |
| 4 Control knobs Control knobs for the hob functions. | |
| 5 Glass ceramic surface Durable vitro-ceramic cooking surfacethat is easy to clean. The cooking zones are marked on the surface. | |
3.4 Control panel Layout 10047623, 10047865
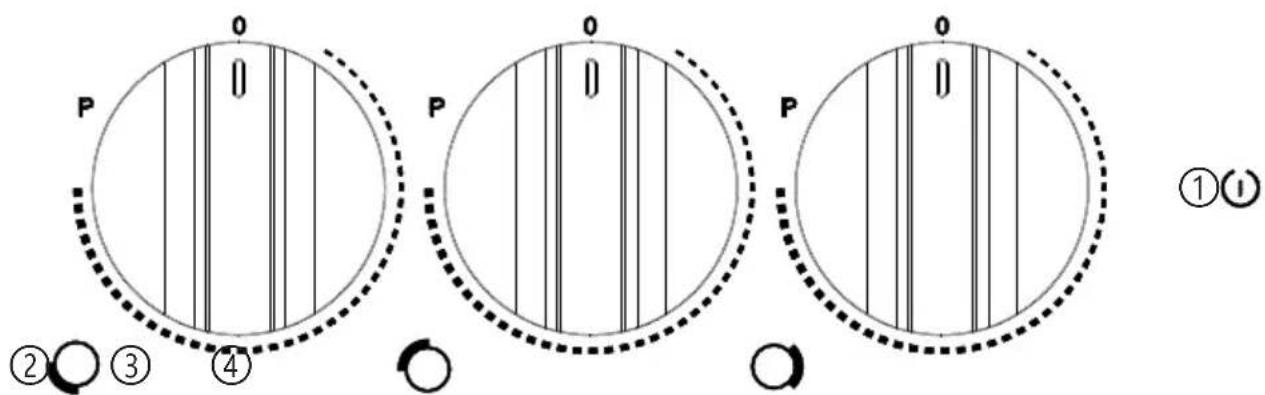
text_image
0 P 0 P 0 P ②③④ ①①| Nr. | Reference Function | Description | |
| 1 ON | /OFF  | Main power touch button for the hob. Turns the appliance on or off (standby).- | |
| 2 |  | Front left heat intensity | Adjust the heat intensity of the front left cooking zone |
| 3 |  | Rear left heat intensity | Adjust the heat intensity of the rear left cooking zone |
| 4 |  | Centre right heatzone | Adjust the heat intensity of the centre right cooking zone |
Note: The control panel will beep to acknowledge touches. The power indicator for each active cooking zone shows its level or an error code if applicable.
3.5 Appliance 10047866, 10047867
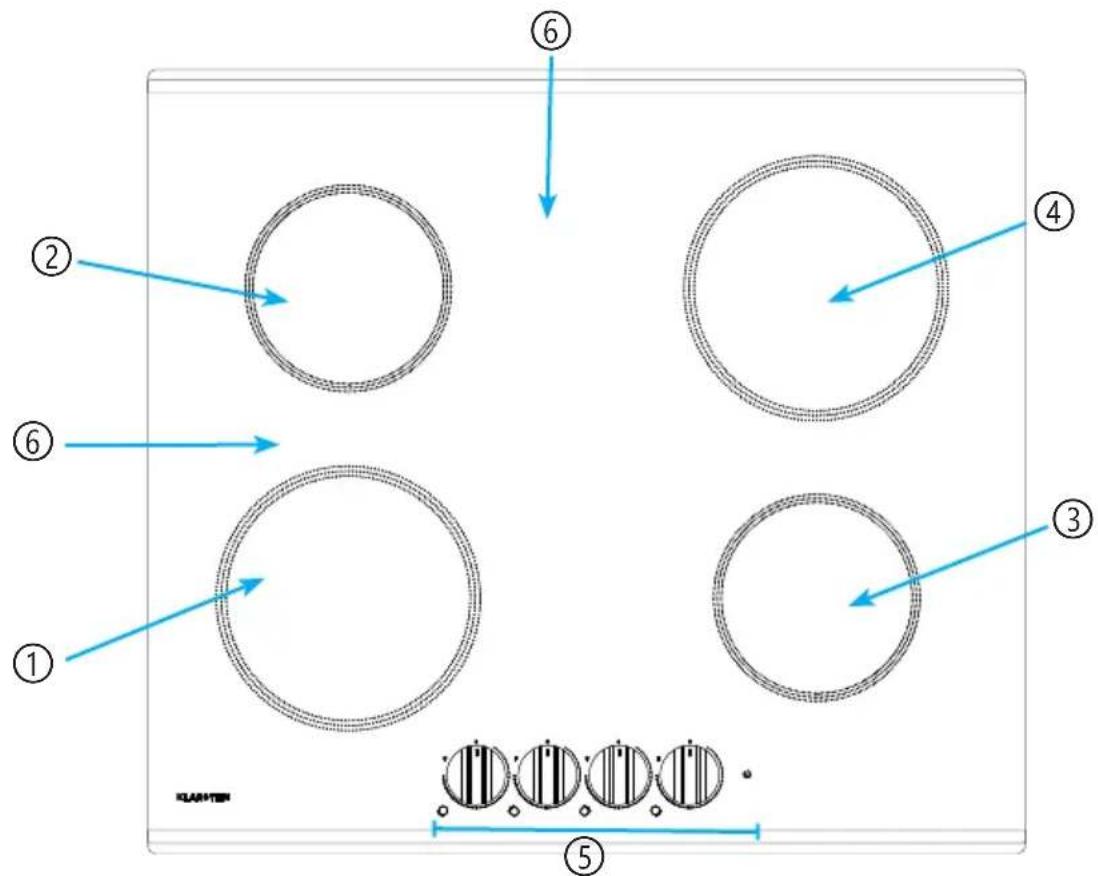
text_image
Diagram showing six labeled circular components arranged in a square, with arrows indicating direction and a scale bar below.| Number | Function Description 10 | 047866 Description 10047867 | |
| 1 Left front cooking zone Induction | hob zone (∅ ~180 mm, 1800 W normal / 2100 W boost) | Induction hob zone (∅ ~180 mm, 1500 W normal / 2000 W boost) | |
| 2 Left rear cooking zone Induction | hob zone (∅ ~140 mm, 1200 W / 1500 W boost) | Induction hob zone (∅ ~140 mm, 1200 W / 1500 W boost) | |
| 3 Right front cooking zone | Induction hob zone (∅ ~140 mm, 1200 W / 1500 W boost). | Induction hob zone (∅ ~140 mm, 1200 W / 1500 W boost). | |
| 4 Right rear cooking zone Induction | hob zone (∅ ~180 mm, 1800 W / 2100 W boost). | Induction hob zone (∅ ~180 mm, 1500 W / 2000 W boost). | |
| 5 Control knobs Control knobs for the hob functions. | Control knobs for the hob functions. | ||
| 6 Glass ceramic surface Durable | vitro-ceramic cooking surface that is easy to clean. The cooking zones are marked on the surface. | Durable vitro-ceramic cooking surface that is easy to clean. The cooking zones are marked on the surface. | |
3.6 Control panel Layout 10047866, 10047867
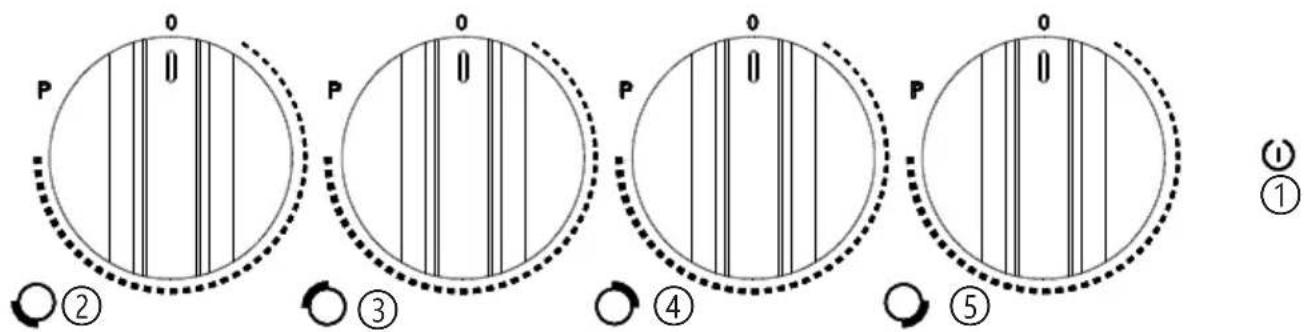
text_image
P 0 0 P 0 0 P 0 0 ② ③ ④ ⑤ ①| Nr. | Reference Function | Description | |
| 1 ON | /OFF  | Main power touch button for the hob. Turns the appliance on or off (standby).- | |
| 2 |  | Front left heat intensity | Adjust the heat intensity of the front left cooking zone |
| 3 |  | Rear left heat intensity | Adjust the heat intensity of the front left cooking zone |
| 4 |  | Rear right heat intensity | Adjust the heat intensity of the rear right cooking zone |
| 5 |  | Front right heat intensity | Adjust the heat intensity of the front right cooking zone |
Note: The control panel will beep to acknowledge touches. The power indicator for each active cooking zone shows its level or an error code if applicable.
3.7 Appliance 10047868
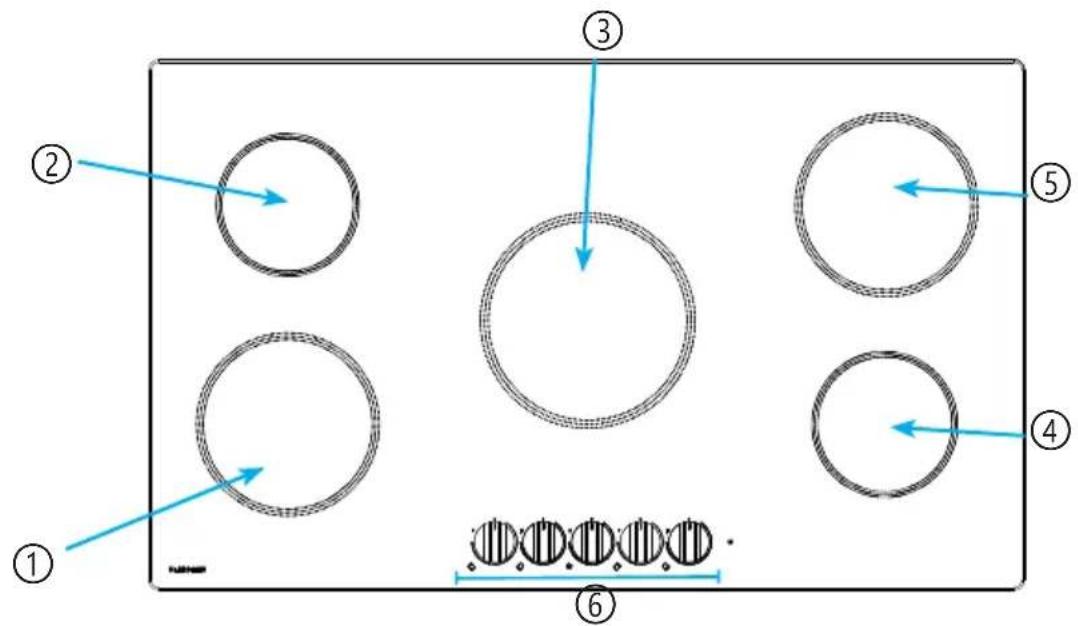
text_image
Diagram showing six labeled circular components with directional arrows, likely illustrating a physical or engineering concept.| Number Function Description | |
| 1 Left front cooking zone Induction hob zone ( ~180 mm, 1500 W normal / 1800 W boost) | |
| 2 Left rear cooking zone Induction hob zone ( ~140 mm, 1200 W / 1500 W boost) | |
| 3 Centre cooking zone Induction hob zone ( ~210 mm, 1800 W / 2100 W boost). | |
| 4 Right front cooking zone Induction hob zone ( ~140 mm, 1200 W / 1500 W boost). | |
| 5 Right rear cooking zone Induction hob zone ( ~180 mm, 1500 W / 1800 W boost). | |
| 6 Control knobs Control knobs for the hob functions. | |
| 7 Glass ceramic surface Durable vitro-ceramic cooking surfacethat is easy to clean. The cooking zones are marked on the surface. | |
3.8 Control panel Layout 10047868
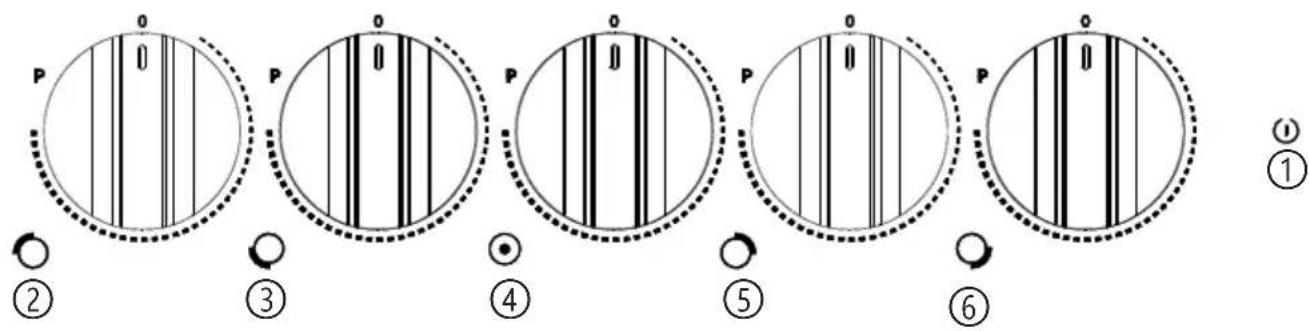
text_image
P 0 P 0 P 0 P 0 P 0 ② ③ ④ ⑤ ⑥ ①| Nr. | Reference Function | Description | |
| 1 | ON/OFF  | Main power touch button for the hob. Turns the appliance on or off (standby).- | |
| 2 |  | Rear left heat intensity | Adjust the heat intensity of the rear left cooking zone |
| 3 |  | Front left heat intensity | Adjust the heat intensity of the front left cooking zone |
| 4 |  | Centre heat intensity | Adjust the heat intensity of the centre cooking zone |
| 5 |  | Rear right heat intensity | Adjust the heat intensity of the rear right cooking zone |
| 6 |  | Front right heat intensity | Adjust the heat intensity of the front right cooking zone |
Note: The control panel will beep to acknowledge touches. The power indicator for each active cooking zone shows its level or an error code if applicable.
4. A WORD ON INDUCTION COOKING
Induction cooking is an advanced, efficient and affordable cooking technology. It works with the help of electromagnetic vibrations and transfers the heat directly to the pot instead of heating it indirectly via the glass surface. The glass only gets hot because the pot heats it up.
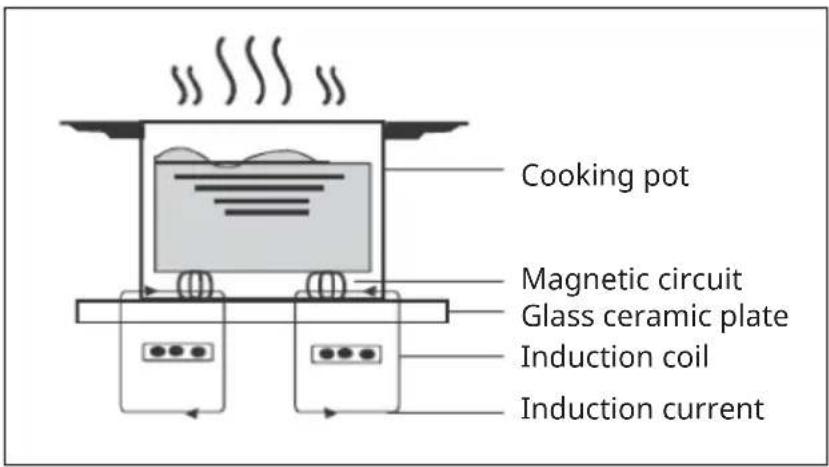
text_image
Cooking pot Magnetic circuit Glass ceramic plate Induction coil Induction currentTouch Controls
- The controls respond to touch, so you don't need to apply any pressure.
- Use the ball of your finger, not its tip.
- You will hear a beep each time a touch is registered.
- Make sure the controls are always clean, dry, and that there is no object (e.g. a utensil or a cloth) covering them. Even a thin film of water may make the controls difficult to operate.
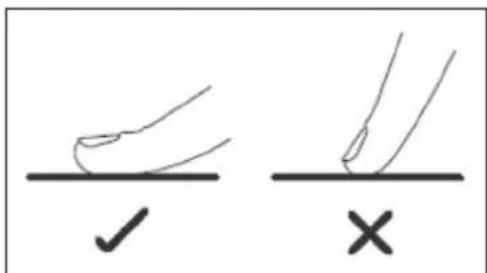
text_image
Diagram showing two hand-drawn checkmark and cross symbols on a line, likely indicating correct and incorrect conditions.5. CHOOSING THE RIGHT COOKWARE
Note: Only use cookware suitable for induction. Look for the induction symbol on the packaging or on the bottom of the pot. Always lift the pot off the induction hob. Do not pull the pot as this could scratch the glass.
natural_image
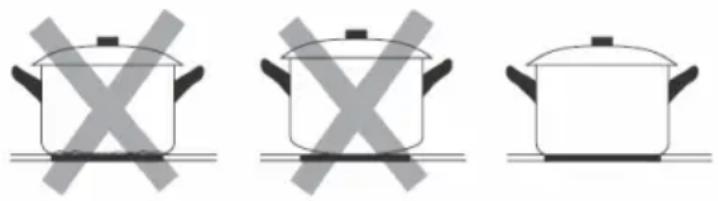
Three identical cooking pots with crossed-out X marks, placed on a flat surface (no text or symbols)Cookware made of the following materials is not suitable: pure stainless steel, aluminium or copper without magnetic underside, glass, wood, porcelain, ceramics and pottery. Do not use cookware that has sharp edges or a rounded bottom.
natural_image
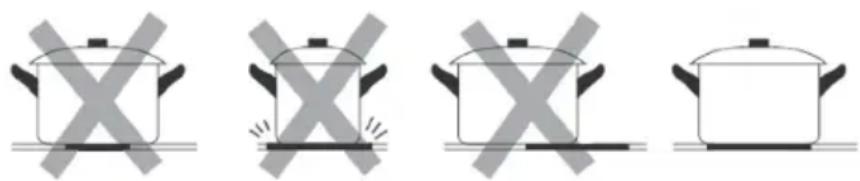
Four identical cooking pots with crossed-out X marks, arranged horizontally (no text or symbols)Make sure the bottom of your pot is level, sits flat on the glass surface and is the same size as the hob. Only use pots whose diameter is as large as the marking on the hob. If you use a slightly larger pot, the energy is consumed at the highest efficiency level. If you use a smaller pot, the efficiency might be lower than expected. Pots with a diameter of less than 140 mm might not be detected by the induction hob. Always place the pot in the middle of the hob.
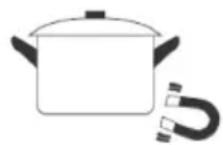
You can perform a magnet test to check the usability. Move a magnet in the direction of the bottom of the pot. If the magnet is attracted to it, the pot is suitable for induction.
6. INSTALLATION
IMPORTANT: Installation of this equipment must comply with local building and electrical codes. Improper installation, adjustment or maintenance can cause personal injury or property damage. Have the hob and extractor installed by a qualified engineer. Klarstein is not responsible for damage or injury caused by improper installation.
Before starting the installation, read this entire section carefully and make sure you have the necessary tools and materials.
6.1 Installation requirements
6.1.1 Installation Location & Cut-out
- Suitable cabinetry: This hob is designed for installation into a counter-top or worktop. Ensure that the mounting surface is flat, level and structurally sound enough to support the weight of the hob.
- Clearances: Maintain the required clearances around the hob for safety and ventilation. There must be at least 50 mm clearance on all sides of the cut-out (under the worktop) to allow for heat dissipation and airflow. No structural supports, beams or appliances should obstruct the space directly beneath the hob.
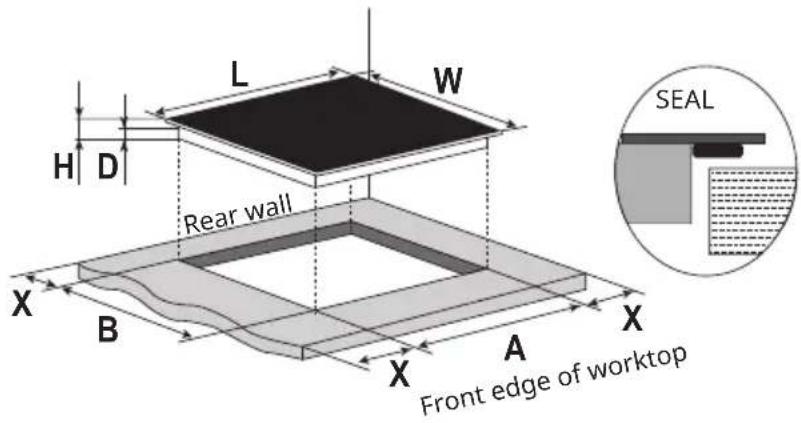
- Cut-out dimensions: Cut an opening in the worktop to the following dimensions in the table below. Use a suitable jigsaw or router with a straight edge to ensure a clean cut. It is recommended that the edges of the cut-out are lightly sanded or filed. (See Figure 3 for cut-out diagram.) The thickness of the worktop should be 30–50 mm for secure installation.
- Heat resistant surface: The worktop material around the cut-out must be heat resistant ( ≥ 90^ ) to avoid warping. WARNING: Do not install on a combustible surface that hasn't been properly insulated. The use of heat reflective tape or a heat resistant barrier around the edges of the cut-out is recommended for wood or laminate worktops.
text_image
L W H D Rear wall X B X A X SEAL Front edge of worktopNote: The dimensions given in the table are "mm".
Dimensions table 10047622
| LWH | DABX | |||
| 288 520 62 56 268 500 min. 50 |
Dimensions table 10047623, 10047865
| LWH | DABX | |||
| 450 520 65 59 | 432 490 min. 50 |
Dimensions table 10047866
| LWH | DABX | |||||
| 590 5 | 26 67 6 | 1 560 | 490 min. 50 | |||
Dimensions table 10047867
| LWH | DABX | |||||
| 590 5 | 20 66 6 | 0 560 | 490 min. 50 | |||
Dimensions table 10047868
| LWH | DABX | |||||
| 860 5 | 20 61 5 | 5 835 | 490 min. 50 | |||
6.1.2 Before Installation Checks
Before installing the hob in the cut-out, verify that
- The mains wiring and the isolation switch (or socket) are in place and accessible. You should be able to easily connect and disconnect the hob after installation.
- The ambient temperature of the installation area does not exceed 50°C (e.g. don't install above a dishwasher or refrigerator without proper insulation, as these appliances can transfer heat or moisture). Do not install the hob directly above a washing machine, tumble dryer or refrigerator.
- If installing above a built-in oven, ensure that the oven has its own cooling fan and that the oven and hob combination is approved by the manufacturer. (Typically, this hob can be installed above an oven if there is an air gap or insulating partition between them - check the oven manual for compatibility with the above induction hob).
- Check that the supplied mounting brackets and screws are available to secure the hob.
6.2 Securing the hob in the counter-top
6.2.1 Mounting Brackets Installation
1 Assemble Seal Gasket – Assemble the supplied seal gasket in the full perimeter of the product. Do not use additional sealant (such as silicone). Check if worktop is level and cut-out is correct to assure prefect levelling.
2 Insert the Hob - With help of another person, carefully lower the hob into the prepared cut-out. Caution: The hob is heavy, take care and wear gloves to avoid injury or scratching the appliance. Do not push on the control panel or glass surface. Be careful not to get your fingers caught between the appliance and the worktop.
3 Positioning - Rotate the hob into place and align final position. Be careful to not damage the seal gasket. If that happens, please replace the gasket with a new one.
4 Tighten the screws - Manually tighten the screws and supplied brackets. Do not over-tighten as this could deform the hob frame or worktop.
| A B C | D E F G | |||||
| 600 min. | 50 min. | 20 Air inlet | opening Air outlet ≥5 | mm >25 mm < 50mm |
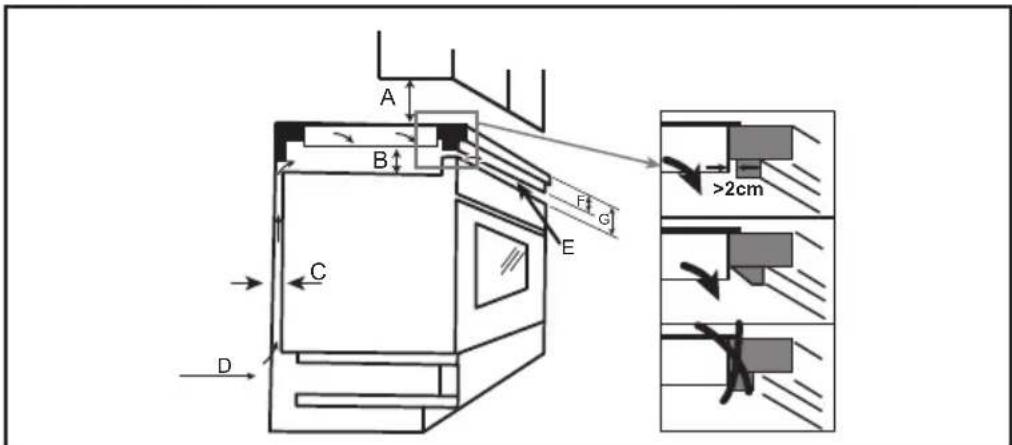
text_image
A B C D F G E >2cmNote: The distance between the hotplate and the cupboard above should be at least 600 mm and there must be a 560x5mm opening in the front (position E) to dissipate the air.
6.3 Disassembly of the bottom base (10047868)
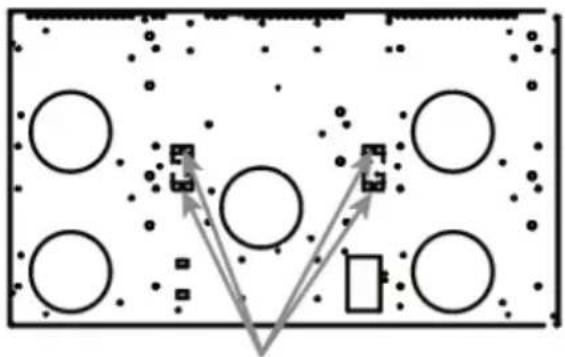
4 screws need to be removed first (see image below) before the base can be disassembled. The disassembly of the bottom base must be carried out by a qualified person.
flowchart
graph TD
    A["Circle"] --> B["Square"]
    C["Circle"] --> D["Square"]
    E["Square"] --> F["Box"]
    G["Circle"] --> H["Square"]
    I["Circle"] --> J["Square"]
    K["Circle"] --> L["Square"]
    M["Circle"] --> N["Square"]
    O["Circle"] --> P["Square"]
    Q["Circle"] --> R["Square"]
    S["Circle"] --> T["Square"]
    U["Circle"] --> V["Square"]
    W["Circle"] --> X["Square"]
    Y["Circle"] --> Z["Square"]
    AA["Circle"] --> AB["Square"]
    AC["Circle"] --> AD["Square"]
    AE["Circle"] --> AF["Square"]
    AG["Circle"] --> AH["Square"]
    AI["Circle"] --> AJ["Square"]
    AK["Circle"] --> AL["Square"]
    AM["Circle"] --> AN["Square"]
    AO["Circle"] --> AP["Square"]
    AQ["Circle"] --> AR["Square"]
    AS["Circle"] --> AT["Square"]
    AU["Circle"] --> AV["Square"]
    AW["Circle"] --> AX["Square"]
    AY["Circle"] --> AZ["Square"]
    BA["Circle"] --> BB["Square"]
    BC["Circle"] --> BD["Square"]
    BE["Circle"] --> BF["Square"]
    BG["Circle"] --> BH["Square"]
    BI["Circle"] --> BJ["Square"]
    BK["Circle"] --> BL["Square"]
    BM["Circle"] --> BN["Square"]
    BO["Circle"] --> BP["Square"]
    BQ["Circle"] --> BR["Square"]
    BS["Circle"] --> BT["Square"]
    BU["Circle"] --> BV["Square"]
    BW["Circle"] --> BX["Square"]
    BY["Circle"] --> BZ["Square"]
    CA["Circle"] --> CB["Square"]
    CC["Circle"] --> CD["Square"]
    CE["Circle"] --> CF["Square"]
    DG["Circle"] --> DH["Square"]
    DI["Circle"] --> DJ["Square"]
    DK["Circle"] --> DL["Square"]
the screws need to be removed
6.4 Electrical connection
WARNING
Risk of electric shock! Check with an electrician whether the domestic wiring system is suitable without alterations. Any alterations must only be made by a qualified electrician.
- This hob must be connected to the mains power supply only by a suitably qualified person. Before connecting the hob to the mains power supply, check that:
- The domestic wiring system is suitable for the power drawn by the hob.
- The voltage corresponds to the value given in the rating plate.
- The power supply cable sections can withstand the load specified on the rating plate. To connect the hob to the mains power supply, do not use adapters, reducers, or branching devices, as they can cause over heating and fire.
WARNING: Electrical Shock Hazard!
Voltage of heating elements 220-240V!
In the event of any connection the safety Wire must be connected to the E-Terminal.
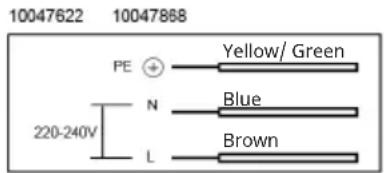
text_image
10047622 10047868 PE + 220-240V N L Yellow/ Green Blue Brown10047623, 10047865
10047866, 10047867
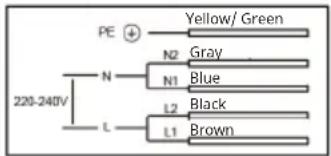
text_image
PE + 220-240V N L N2 Gray N1 Blue L2 Black L1 BrownNote: If the power cable is too short or needs replacing, it must be replaced with an equivalent type by a qualified technician. The new cable should be routed and clamped exactly as the original to maintain safety. Do not replace the cable without proper validation by a qualified technician.
7. OPERATION
7.1 Using the Induction Hob
7.1.1 Basic operation – switching on and cooking
| 1. Power on the Hob: Ensure the appliance is connected to the mains and the isolation switch is on. Touch the ON/OFF button.You will hear a beep and all zone displays will light up briefly and then show “-”. This indicates the hob is in standby mode, ready for zone selection. | 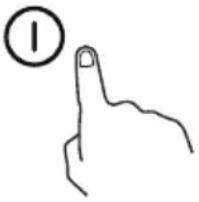 |
| 2. Place Cookware: Put a suitable induction-compatible pan in the center of the desired cooking zone. The bottom of the pan should cover the zone completely. Make sure the pan base and the hob surface are clean and dry. | 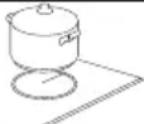 |
| 3. Set the heat level: Turn the knob clockwise to the required power level (1-P). The corresponding heating zone display will flash the selected level for five seconds, then start working.Note: Do not turn the knob anticlockwise directly from 0 to P. If you don’t choose a heat setting within 1 minute, the induction hob will automatically switch off. You will need to start again at step 1.You can modify the heat setting at any time during cooking. | 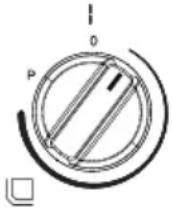 |
| Boost ControlTurn the knob clockwise to the "P"position, the corresponding heating zone will enter the BOOST function, the display will show "P", the BOOST function can run for up to 5 minutes, after 5 minutes, the power will automatically drop to level 9, the display will show "9". | 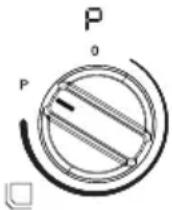 |
Note: If you do not select a heat setting within 1 minute of switching on the hob (step 1), the hob will automatically switch to standby (off) as a safety measure. In this case, simply switch on again if you still wish to cook.
7.1.2 Finish cooking and switching off
Turning off a cooking zone
- Turn the knob anticlockwise to the "0" position. The corresponding heating zone display will flash "☐ for 5 seconds, then stop heating. Note: Do not turn the knob clockwise directly from P to 0.
- The "H" indicator shows which cooking zone is hot to touch. This indicator will disappear when the surface has cooled down to a safe temperature. This indicator can also be used for energy saving: if you want to heat more pans, use the hotplate that is still hot.
7.2 Power limit working mode for 10047868
All 5 zones cannot be operated simultaneously on full power as it would exceed the power limit. The left two heating zones can operate with the full power setting. The right two and the middle heating zones, if operated simultaneously, exceed 3600 W. This means, when selecting the higher settings for these zones, they will adjust the setting automatically to ensure that the total power is less than 3600 W.
7.2 Heat settings
The settings below are guidelines only. The exact setting will depend on several factors, including your cookware and the amount you are cooking. Experiment with the induction hob to find the settings that best suit you.
| Power level Suitable for | |
| 1-2 | Warming up small amounts of foodMelting chocolate, butter, and foods that burn quicklySimmeringSlow heating |
| 3-4 | Warming upRapid simmeringCooking rice |
| 5-6 • Pancakes | |
| 7-8 | Brief fryingCooking pasta |
| 9 | Deep frying and searingBringing soup to a boilBringing water to a boil |
8. DEVICE PROTECTION
Over-temperature protection
A built-in temperature sensor can monitor the temperature inside the induction and infrared hob. When an excessive temperature is monitored, the induction hob will stop operation automatically.
Detection of small articles
When an unsuitable size or non-magnetic pan (e.g. aluminium), or some other small item (e.g. knife, fork, key) has been left on the hob, flashes on the display and the hob automatically go on to standby in 1 minute. The fan will keep cooling down the induction hob for a further 2 minutes.
Auto Shutdown protection
Auto shut down is a safety protection function for your induction hob. The hob will shut down automatically if you forget to finish your cooking. The default working time for various power levels are shown in the below table:
| Power level | 1-3 4-6 7-9 | ||
| Default working time (hours) | 8 4 2 |
When the pot is removed, the induction hob can stop heating immediately and the hob automatically switch off after 1 minute.

Caution! Danger of personal injury
People with a pacemaker should consult with their doctor before using this unit.
9. CLEANING AND MAINTENANCE
Regular maintenance will ensure that your machine operates efficiently and safely for many years. Always follow safety precautions when cleaning (see Safety Information). Ensure that the appliance is switched off and has cooled down sufficiently before cleaning.
9.1 Cleaning the cooking surface
The cooking surface is made of high quality ceramic glass. It should be cleaned after each use to prevent food from sticking or burning. Prompt cleaning makes it easier to remove spills.
Recommended cleaning materials: soft cloth or sponge, cooktop cream cleaner or mild soapy water, paper towels and a scraper for stubborn residues. Avoid abrasive cleaners or metal scouring pads as they can scratch the glass.
The table below outlines cleaning methods for different types of spillage:
| Type of soiling How to clean Important Tips | |
| Light daily soiling (fingerprints, water marks, minor stains) | After switching off the hob, wait until the glass is only warm (not hot).Apply a few drops of ceramic hob cleaner or a mild detergent to the glass.Wipe with a soft cloth or paper towel to remove any residue.Rinse the cloth and wipe again to remove any cleaner residue.Dry the surface with a clean, lint-free cloth or paper towel. |
| Stubborn spills or slightly burnt residue | Follow steps 1–3 above (use warm soapy water or detergent).Leave the cleaner on the stain for a minute to soften it.Scrub gently with a nylon scrubber (non-scratch) if necessary.Wipe and dry as in steps 4-5. |
| Boil-overs, melted sugar or syrup, heavily burnt spills (e.g. milk or starchy foods) | 1. Immediate action (while the hob is still hot but switched off):2. Wearing oven gloves for protection, use a hob scraper at a low angle of 30° to the glass. Gently scrape most of the spill away from the hot area to a cooler part of the hob.3. Still carefully, use paper towels to gently wipe up the spill from the cooler area.4. When the hob has cooled down, apply cooktop cleaner and clean as normal (steps above) to remove any film. |
| Spillage on touch controls (liquid or food on buttons / display area) | 1. Switch off the hob immediately (if it hasn't already switched off - liquid may cause the controls to beep).2. Use a soft cloth or sponge to absorb the spill from the control panel.3. Wipe the controls with a damp cloth to remove any residue.4. Dry the area thoroughly with a paper towel.5. Do not switch on the hob until the control panel is completely dry. |
Additional cleaning reminders:
- Never use steel wool, scouring powder or harsh oven cleaners on the ceramic glass. They can scratch or dull the surface.
- For limescale or mineral deposits (white, cloudy stains), you can use a little vinegar or a special glass-ceramic cleaner. Apply, leave to soak and then wipe off.
- Make sure the base of your cookware is clean. Deposits on pan bottoms can be transferred to the hob and burn on.
• After cleaning, make sure the hob surface is completely dry before next use. Even a small amount of water on the surface can cause the controls to beep or the pan detection to malfunction when the hob is switched on.
10. TROUBLESHOOTING
| Problem Possible cause Solution | ||
| The cook-top cannot be turned on (no lights on display). | No power to the appliance Verify the hob is connected to the power supply and that the circuit breaker or fuse hasn't tripped. Make sure the wall switch (isolation switch) is on. Check for a general power outage in your home. If power is definitely present and the hob still shows no sign of life, do not attempt to fix internally - call a technician. | |
| The glass surface is being scratched. | Using rough or uneven-bottomed cookware (e.g., ceramic or cast iron with burrs); or cleaning with abrasive scourers/chemicals | Use cookware with flat, smooth bases - check that your pots/pans have no rough edges. Lift cookware slightly when moving it on the hob, don't drag it. For cleaning, use recommended non-scratch methods (see Section 9.1). Minor scratches cannot be removed, but they usually don't affect function. For future prevention, be mindful of cookware and cleaning tools. |
| You hear a crackling or clicking noise from the cookware during cooking. | This is often due to the construction of the cookware - layers of different metals expanding at different rates can create sounds. It can also occur with certain types of cookware on induction. | This is generally normal and not a fault. You can continue cooking. If the noise is very loud or bothersome, consider trying a different pan. Using heavy, high-quality pans tends to produce less noise. |
| A low humming noise is heard, especially on high heat settings. | The induction system can hum when drawing a lot of power, and the cooling fan also makes a steady hum. | This is normal for induction hobs. The hum should reduce when you decrease the heat setting. Ensure the appliance is installed correctly with proper ventilation, as restricted airflow can make the fan louder. |
| The internal cooling fan keeps running for several minutes after the hob has been turned off. | The hob's electronics are cooling down. The fan is designed to run until a safe temperature is reached. | This is normal. Do not switch off power at the wall until the fan stops on its own. Just let it finish (usually no more than 5-10 minutes). If the fan runs excessively long (beyond 15 minutes after use) every time, check that the air intakes and outlets aren't blocked by dust or an object. |
| Pans do not become hot and appears in the display | The induction hob cannot detect the pan because it is not suitable for induction cooking. | The induction hob cannot detect the pan because it is too small for the cooking zone or not properly centred on it: Use cookware suitable for induction cooking. See section "Choosing the right cookware". Centre the pan and make sure that its base matches the size of the cooking zone. |
| A cooking zone suddenly turned itself off during use. (Also maybe a beep sounded.) | Several possibilities:- The zone may have automatically shut off because no pan was detected (e.g., if the pan was lifted or is non-inductive).- The built-in timer turned it off (check if you had a timer set and forgot).- The hob overheated or detected an electrical fault, triggering a safety shutdown. In that case, an error code might be displayed. | If it's the pan detection, the display would show a flashing pan symbol or similar. Ensure your pan is induction-compatible and properly centered. The zone will resume heating once a proper pan is detected and you turn it back on. If it was the timer, the zone display will possibly show an "H". Simply restart the zone if more cooking is needed, or realize that the programmed time elapsed. If it was a technical fault (with an error code or all zones off), see Error Codes below. In such a case, turn the hob off, wait a few minutes for cooling, then turn it on and try again. If it repeats, call a technician. |
10.1 Errorcodes
| Errorcode Possible cause Solution | ||
| ≥slant U ≤slant | The hob cannot detect the pan or the pan material is not induction friendly. | Use a magnetic (ferrous) pan of the correct size. Ensure the pan is centered on the zone. Once a proper pan is recognized, the indicator will stop flashing and heating will commence. If you remove a pan intentionally, the zone will show the pan-missing indicator and then shut off after a minute. |
| E1 Input power too high. | The voltage of the main power supply exceeds 250 V. Please check that the voltage is normal. Once the voltage returns to normal, restart the unit. If there is a PCB fault, please send the unit to the service centre for repair. | |
| E2 Input power too low. | The voltage of the main power supply is less than 180 V. Please check that the voltage is normal. Once the voltage returns to normal, restart the unit. If there is a PCB fault, please send the unit to the service centre for repair. | |
| E3 | Temperature of coil thermistor is too high. | The temperature on the induction glass surface is too high. Please check that there is no water in the pan. After treatment, reconnect to power. If the problem persists, it is possible that the cooktop sensor has failed. Send it to the service centre for repair. |
| E5 IGBT thermistor temperature is to high | The temperature of the IGBT thermistor is too high and the air outlet is blocked. Open the air outlet and restart the unit. It is possible that there is an error in the cooling fan connection, the cooling fan is damaged or the fan drive circuit has faile or the IGBT temperature sensor is open/short-circuited. If the problem persists, send it to a service centre for repair. | |
| F3 | Coil thermistor short curcuit | Coil thermistor sensor connection error. If the coil thermistor fails, send it to the service centre for repair. |
| F4 | Coil thermistor open curcuit | |
| F9 | IGBT thermistor short circuit | The IGBT thermistor sensor detects connection errors. If the IGBT PCB sensor fails, send it to the service centre for repair. |
| FA | IGBT thermistor open circuit | |
11. PRODUCT DATA SHEET INDUCTION HOB
| Symbol Value Unit | ||||
| Model identification 10047622 | ||||
| Type of hob Built-In Hob | ||||
| Number of cooking zones and/or areas | 2 | |||
| Heating technology (induction cooking zones and cooking areas, radiant cooking zones, solid plates) | Induction cooking zone | |||
| For circular cooking zones or area: diameter of useful surface area per electric heated cooking zone, rounded to the nearest 5 mm | ∅ | Front Rear | 14 18 | cm |
| For non-circular cooking zones or areas: length and width of useful surface area per electric heated cooking zone or area, rounded to the nearest 5 mm | L W | cm | ||
| Energy consumption per cooking zone or area calculated per kg | EC Electric Cooking Hob | Front Rear | 194.5 194 | Wh/kg |
| Energy consumption for the hob calculated per kg | EC Electric Cooking Hob | 194.3 Wh/kg | ||
| Model identification 10047623, 10047865 | ||||
| Type of hob Built-In Hob | ||||
| Number of cooking zones and/or areas | 3 | |||
| Heating technology (induction cooking zones and cooking areas, radiant cooking zones, solid plates) | Induction cooking zone | |||
| For circular cooking zones or area: diameter of useful surface area per electric heated cooking zone, rounded to the nearest 5 mm | ∅ | Left Front Left Rear Right | 18 14 18 | cm |
| For non-circular cooking zones or areas: length and width of useful surface area per electric heated cooking zone or area, rounded to the nearest 5 mm | L W | cm | ||
| Energy consumption per cooking zone or area calculated per kg | EC Electric Cooking Hob | Left Front Left Rear Right | 194 194.5 194 | Wh/kg |
| Energy consumption for the hob calculated per kg | EC Electric Cooking Hob | 194.2 Wh/kg | ||
| Model identification 10047866, 10047867 | ||||
| Type of hob Built-In Hob | ||||
| Number of cooking zones and/or areas | 4 | |||
| Heating technology (induction cooking zones and cooking areas, radiant cooking zones, solid plates) | Induction cooking zone | |||
| For circular cooking zones or area: diameter of useful surface area per electric heated cooking zone, rounded to the nearest 5 mm | ∅ | Left Front Left Rear Right Front Right Rear | 18 14 14 18 | cm |
| For non-circular cooking zones or areas: length and width of useful surface area per electric heated cooking zone or area, rounded to the nearest 5 mm | L W | cm | ||
| Energy consumption per cooking zone or area calculated per kg | EC Electric Cooking Hob | Left Front Left Rear Right Front Right Rear | 194 194.5 194.5 194 | Wh/kg |
| Energy consumption for the hob calculated per kg | EC Electric Cooking Hob | 194.3 Wh/kg | ||
| Model identification 10047868 | ||||
| Type of hob Built-In Hob | ||||
| Number of cooking zones and/or areas | 5 | |||
| Heating technology (induction cooking zones and cooking areas, radiant cooking zones, solid plates) | Induction cooking zone | |||
| For circular cooking zones or area: diameter of useful surface area per electric heated cooking zone, rounded to the nearest 5 mm | ∅ | Left Front Left Rear Center Right Front Right Rear | 18 14 21 14 18 | cm |
| For non-circular cooking zones or areas: length and width of useful surface area per electric heated cooking zone or area, rounded to the nearest 5 mm | L W | cm | ||
| Energy consumption per cooking zone or area calculated per kg | EC Electric Cooking Hob | Left Front Left Rear Center Right Front Right Rear | 194 194.5 194.5 194.5 194 | Wh/kg |
| Energy consumption for the hob calculated per kg | EC Electric Cooking Hob | 194.3 Wh/kg | ||
DISPOSAL CONSIDERATIONS
natural_image
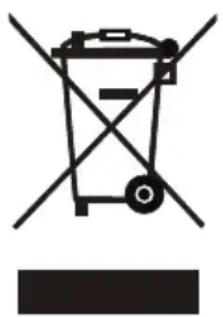
Symbol of a trash bin with crossed lines indicating no waste or discharge, and a solid black rectangle below (no text or labels)If there is a legal regulation for the disposal of electrical and electronic devices in your country, this symbol on the product or on the packaging indicates that this product must not be disposed of with household waste. Instead, it must be taken to a collection point for the recycling of electrical and electronic equipment. By disposing of it in accordance with the rules, you are protecting the environment and the health of your fellow human beings from negative consequences. For information about the recycling and disposal of this product, please contact your local authority or your household waste disposal service.
MANUFACTURER & IMPORTER (UK)
Chal-Tec GmbH, Mühlenstrasse 25, 10243 Berlin, Germany.
Contact: info@electronic-star.de
Estimado cliente:
text_image
QR code image containing encoded data, no visible human-readable textÍNDICE
- DATOS TÉCNICOS
text_image
Diagram showing six labeled circular components with directional arrows, likely illustrating a physical or engineering concept.text_image
0 P 0 P 0 P ②③④ ①①text_image
Diagram showing six labeled circular components arranged in a 2x3 grid, with arrows indicating direction and a scale bar at the bottom.text_image
P 0 0 P 0 0 P 0 0 ② ③ ④ ⑤ ①text_image
Diagram showing six labeled circular components with directional arrows, likely illustrating a physical or engineering concept.text_image
P 0 P 0 P 0 P 0 P 0 ② ③ ④ ⑤ ⑥ ①text_image
Diagram showing two hand positions with check and cross symbols, likely indicating correct and incorrect states.5. ELIJA LA BATERÍA DE COCINA ADECUADA.
natural_image
Three identical cooking pots with crossed X marks, no text or symbols presentnatural_image
Four identical cooking pots with crossed-out X marks, arranged horizontally (no text or symbols)flowchart
graph TD
    A["Circle"] --> B["Square"]
    C["Circle"] --> D["Square"]
    E["Square"] --> F["Box"]
    G["Circle"] --> H["Square"]
    I["Circle"] --> J["Square"]
    K["Circle"] --> L["Square"]
    M["Circle"] --> N["Square"]
    O["Circle"] --> P["Square"]
    Q["Circle"] --> R["Square"]
    S["Circle"] --> T["Square"]
    U["Circle"] --> V["Square"]
    W["Circle"] --> X["Square"]
    Y["Circle"] --> Z["Square"]
    AA["Circle"] --> AB["Square"]
    AC["Circle"] --> AD["Square"]
    AE["Circle"] --> AF["Square"]
    AG["Circle"] --> AH["Square"]
    AI["Circle"] --> AJ["Square"]
    AK["Circle"] --> AL["Square"]
    AM["Circle"] --> AN["Square"]
    AO["Circle"] --> AP["Square"]
    AQ["Circle"] --> AR["Square"]
    AS["Circle"] --> AT["Square"]
    AU["Circle"] --> AV["Square"]
    AW["Circle"] --> AX["Square"]
    AY["Circle"] --> AZ["Square"]
    BA["Circle"] --> BB["Square"]
    BC["Circle"] --> BD["Square"]
    BE["Circle"] --> BF["Square"]
    BG["Circle"] --> BH["Square"]
    BI["Circle"] --> BJ["Square"]
    BK["Circle"] --> BL["Square"]
    BM["Circle"] --> BN["Square"]
    BO["Circle"] --> BP["Square"]
    BQ["Circle"] --> BR["Square"]
    BS["Circle"] --> BT["Square"]
    BU["Circle"] --> BV["Square"]
    BW["Circle"] --> BX["Square"]
    BY["Circle"] --> BZ["Square"]
    CA["Circle"] --> CB["Square"]
    CC["Circle"] --> CD["Square"]
    CE["Circle"] --> CF["Square"]
    DG["Circle"] --> DH["Square"]
    DI["Circle"] --> DJ["Square"]
    DK["Circle"] --> DL["Square"]
natural_image
Symbol of a trash bin with crossed lines indicating no waste or discharge, and a solid black rectangle below (no text or labels)text_image
QR code image containing encoded data, no visible human-readable textSOMMAIRE
3. APERÇU DU PRODUIT
3.1 appareil 10047622
text_image
① ② ③ ④text_image
Diagram showing six labeled circular components with directional arrows, likely illustrating a physical or engineering concept.text_image
P 0 0 P 0 0 P 0 ②③④ ①①text_image
Diagram showing six labeled circular components arranged in a square, with arrows indicating direction and a scale bar below.text_image
P 0 0 P 0 0 P 0 0 ② ③ ④ ⑤ ①text_image
Diagram showing six labeled circular components with directional arrows, likely illustrating a physical or engineering concept.text_image
P 0 P 0 P 0 P 0 P 0 ② ③ ④ ⑤ ⑥ ①text_image
Diagram showing two hand positions with check and cross symbols, likely indicating correct and incorrect states.5. CHOIX DU BON USTENSILE DE CUISSON
natural_image
Simple line drawing of a cooking pot with crossed-out X marks (no text or symbols)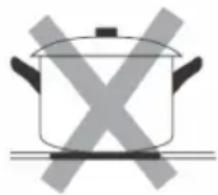
natural_image
Simple line drawing of a cooking pot with crossed X marks (no text or symbols)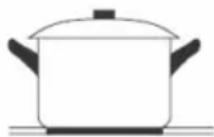
flowchart
graph TD
    A["Circle"] --> B["Square"]
    C["Square"] --> D["Box"]
    E["Circle"] --> F["Square"]
    G["Circle"] --> H["Square"]
    I["Circle"] --> J["Square"]
    K["Circle"] --> L["Square"]
    M["Circle"] --> N["Square"]
    O["Circle"] --> P["Square"]
    Q["Circle"] --> R["Square"]
    S["Circle"] --> T["Square"]
    U["Circle"] --> V["Square"]
    W["Circle"] --> X["Square"]
    Y["Circle"] --> Z["Square"]
    AA["Circle"] --> AB["Square"]
    AC["Circle"] --> AD["Square"]
    AE["Circle"] --> AF["Square"]
    AG["Circle"] --> AH["Square"]
    AI["Circle"] --> AJ["Square"]
    AK["Circle"] --> AL["Square"]
    AM["Circle"] --> AN["Square"]
    AO["Circle"] --> AP["Square"]
    AQ["Circle"] --> AR["Square"]
    AS["Circle"] --> AT["Square"]
    AU["Circle"] --> AV["Square"]
    AW["Circle"] --> AX["Square"]
    AY["Circle"] --> AZ["Square"]
    BA["Circle"] --> BB["Square"]
    BC["Circle"] --> BD["Square"]
    BE["Circle"] --> BF["Square"]
    BG["Circle"] --> BH["Square"]
    BI["Circle"] --> BJ["Square"]
    BK["Circle"] --> BL["Square"]
    BM["Circle"] --> BN["Square"]
    BO["Circle"] --> BP["Square"]
    BQ["Circle"] --> BR["Square"]
    BS["Circle"] --> BT["Square"]
    BU["Circle"] --> BV["Square"]
    BW["Circle"] --> BX["Square"]
    BY["Circle"] --> BZ["Square"]
    CA["Circle"] --> CB["Square"]
    CC["Circle"] --> CD["Square"]
    CE["Circle"] --> CF["Square"]
    DG["Circle"] --> DH["Square"]
    DI["Circle"] --> DJ["Square"]
    DK["Circle"] --> DL["Square"]
natural_image
Symbol of a trash bin with crossed lines and a horizontal bar below (no text or labels)text_image
QR code image containing encoded data, no visible human-readable textINDICE
text_image
Diagram showing six labeled circular components with directional arrows, likely illustrating a physical or engineering concept.text_image
P 0 0 P 0 0 P 0 ②③④ ①①text_image
Diagram showing six labeled circular components arranged in a square, with arrows indicating direction and a scale bar below.text_image
P 0 Ⅱ P 0 Ⅱ P 0 Ⅱ ① ② ③ ④ ⑤text_image
Diagram showing six labeled circular components with directional arrows, likely illustrating a physical or engineering concept.text_image
P 0 P 0 P 0 P 0 P 0 ② ③ ④ ⑤ ⑥ ①text_image
Diagram showing two hand positions with check and cross symbols, likely indicating correct and incorrect states.5. SCEGLIERE LE STOVIGLIE GIUSTE
natural_image
Three identical cooking pots with crossed X marks, no text or symbols presentnatural_image
Four identical cooking pots with crossed-out X marks, shown in different orientations (no text or symbols)text_image
A B C D E F G >2cmflowchart
graph TD
    A["Circle"] --> B["Square"]
    C["Square"] --> D["Box"]
    E["Circle"] --> F["Square"]
    G["Circle"] --> H["Square"]
    I["Circle"] --> J["Square"]
    K["Circle"] --> L["Square"]
    M["Circle"] --> N["Square"]
    O["Circle"] --> P["Square"]
    Q["Circle"] --> R["Square"]
    S["Circle"] --> T["Square"]
    U["Circle"] --> V["Square"]
    W["Circle"] --> X["Square"]
    Y["Circle"] --> Z["Square"]
    AA["Circle"] --> AB["Square"]
    AC["Circle"] --> AD["Square"]
    AE["Circle"] --> AF["Square"]
    AG["Circle"] --> AH["Square"]
    AI["Circle"] --> AJ["Square"]
    AK["Circle"] --> AL["Square"]
    AM["Circle"] --> AN["Square"]
    AO["Circle"] --> AP["Square"]
    AQ["Circle"] --> AR["Square"]
    AS["Circle"] --> AT["Square"]
    AU["Circle"] --> AV["Square"]
    AW["Circle"] --> AX["Square"]
    AY["Circle"] --> AZ["Square"]
    BA["Circle"] --> BB["Square"]
    BC["Circle"] --> BD["Square"]
    BE["Circle"] --> BF["Square"]
    BG["Circle"] --> BH["Square"]
    BI["Circle"] --> BJ["Square"]
    BK["Circle"] --> BL["Square"]
    BM["Circle"] --> BN["Square"]
    BO["Circle"] --> BP["Square"]
    BQ["Circle"] --> BR["Square"]
    BS["Circle"] --> BT["Square"]
    BU["Circle"] --> BV["Square"]
    BW["Circle"] --> BX["Square"]
    BY["Circle"] --> BZ["Square"]
    CA["Circle"] --> CB["Square"]
    CC["Circle"] --> CD["Square"]
    CE["Circle"] --> CF["Square"]
    DG["Circle"] --> DH["Square"]
    DI["Circle"] --> DJ["Square"]
    DK["Circle"] --> DL["Square"]
natural_image
Symbol of a trash bin with crossed lines indicating no waste or discharge, and a solid black rectangle below (no text or labels)area
| Category | Value | | -------- | ----- | | 1 | 100 | | 2 | 100 | | 3 | 100 | | 4 | 100 | | 5 | 100 | | 6 | 100 | | 7 | 100 | | 8 | 100 | | 9 | 100 | | 10 | 100 | | 11 | 100 | | 12 | 100 | | 13 | 100 | | 14 | 100 | | 15 | 100 | | 16 | 100 | | 17 | 100 | | 18 | 100 | | 19 | 100 | | 20 | 100 | | 21 | 100 | | 22 | 100 | | 23 | 100 | | 24 | 100 | | 25 | 100 | | 26 | 100 | | 27 | 100 | | 28 | 100 | | 29 | 100 | | 30 | 100 | | 31 | 100 | | 32 | 100 | | 33 | 100 | | 34 | 100 | | 35 | 100 | | 36 | 100 | | 37 | 100 | | 38 | 100 | | 39 | 100 | | 40 | 100 | | 41 | 100 | | 42 | 100 | | 43 | 100 | | 44 | 100 | | 45 | 100 | | 46 | 100 | | 47 | 100 | | 48 | 100 | | 49 | 100 | | 50 | 100 | | 51 | 100 | | 52 | 100 | | 53 | 100 | | 54 | 100 | | 55 | 100 | | 56 | 100 | | 57 | 100 | | 58 | 100 | | 59 | 100 | | 60 | 100 | | 61 | 100 | | 62 | 100 | | 63 | 100 | | 64 | 100 | | 65 | 100 | | 66 | 100 | | 67 | 100 | | 68 | 100 | | 69 | 100 | | 70 | 100 | | 71 | 100 | | 72 | 100 | | 73 | 100 | | 74 | 100 | | 75 | 100 | | 76 | 100 | | 77 | 100 | | 78 | 100 | | 79 | 100 | | 80 | 100 | | Note: The actual values are not provided in the code. I have used the label 'Value' as a placeholder for the value detection. You would need to run the code to get the actual values from the code list. Please note that the actual values would be the result of this example. You would need to run the code to get the actual values from the code list. You would need to run the code to get the actual values from the code list. You would need to run the code to get the actual values from the code list. You would need to run the code to get the actual values from the code list. You would need to run the code to get the actual values from the code list. You would need to run the code to get the actual values from the code list. You would need to run the code to get the actual values from you would need to run the code. You would need to run the code to get the actual values from you would need to run the code.