
Cook n Roll - Cooker Klarstein - Free user manual and instructions
Find the device manual for free Cook n Roll Klarstein in PDF.


| Product type | Cooker |
| Brand | Klarstein |
| Model | Cook n Roll |
| Dimensions (W x D x H) | 50 x 60 x 85 cm |
| Weight | 32 kg |
| Power supply | 230 V ~ 50 Hz |
| Total power | 5600 W |
| Number of burners | 4 |
| Burner type | Radiant |
| Oven | Yes, 65 L capacity |
| Oven functions | Convection, grill, bottom heat |
| Control type | Rotary |
| Timer | Yes |
| Oven light | Yes |
| Cleaning | Easy-clean enamel |
| Safety | Auto shut-off, child lock |
| Energy class | A |
| Spare parts | Available on request |
| Repairability | Repairability index 8/10 |
| Warranty | 2 years |
Frequently Asked Questions - Cook n Roll Klarstein
User questions about Cook n Roll Klarstein
0 question about this device. Answer the ones you know or ask your own.
Ask a new question about this device
Download the instructions for your Cooker in PDF format for free! Find your manual Cook n Roll - Klarstein and take your electronic device back in hand. On this page are published all the documents necessary for the use of your device. Cook n Roll by Klarstein.
USER MANUAL Cook n Roll Klarstein
Induction Cooking Plate
KLARSTEIN
www.klarstein.com

area
| Category | Value | | -------- | ----- | | A | 100 | | B | 100 | | C | 100 | | D | 100 | | E | 100 | | F | 100 | | G | 100 | | H | 100 | | I | 100 | | J | 100 | | K | 100 | | L | 100 | | M | 100 | | N | 100 | | O | 100 | | P | 100 | | Q | 100 | | R | 100 | | S | 100 | | T | 100 | | U | 100 | | V | 100 | | W | 100 | | X | 100 | | Y | 100 | | Z | 100 |INHALT
Technische Daten 4
natural_image
Symbol of a trash bin crossed with a diagonal line, no text or labels presentBerlin Brands Group UK Limited
PO Box 42
272 Kensington High Street
London, W8 6ND
United Kingdom
Dear Customer,
Congratulations on purchasing this device. Please read the following instructions carefully and follow them to prevent possible damages. We assume no liability for damage caused by disregard of the instructions and improper use. Scan the QR code to get access to the latest user manual and more product information.

CONTENTS
Technical Data 20
Safety Instructions 21
Instructions on Use and Maintenance 22
Device Overview 25
Operation 26
Cooking Methods 27
Sous-vide Function 28
Child Lock Function 28
Choice of Cookware 29
Maintenance and Daily Care 29
Troubleshooting 30
Disposal Considerations 32
Manufacturer & Importer (UK) 32
TECHNICAL DATA
| Item number 10034708 | |
| Power supply 220-240 V~ 50 Hz | |
| Power 2000 W | |
| Measurements 28x35x6.5 cm | |
| Weight 2.3 kg | |
SAFETY INSTRUCTIONS
Risk of electrical shock
- Unplug the appliance from the mains before servicing or repairing the appliance.
- The connection to a grounded power connection is required and essential.
• Changes to the electrical connection may only be made by a qualified electrician. - Failure to follow the instructions may result in electric shock or death.

CAUTION
Risk of injury! Panel edges are sharp. Failure to use caution could result in injury or cuts.
General safety instructions
- Read these instructions carefully before installing or using this appliance.
- No combustible material or products should be placed on this appliance at any time.
- Please provide this information to the person installing the device as this may save you installation costs.
- This device must be installed in accordance with this manual to avoid damage to property or personal injury.
- This device must be installed and grounded by a qualified person.
- This equipment should be connected to an electrical circuit that has a circuit breaker that allows complete isolation from the power supply.
- Incorrect installation of the device may void all guarantees and warranty claims.
- Children over the age of 8 and persons with reduced physical, sensory or mental capabilities may only use the device if they have been thoroughly familiarised with the functions and safety precautions in advance by a responsible supervisor and understand the risks involved.
- The device is not a toy. The cleaning and maintenance of the hob should never be carried out by unsupervised children.
- If the power cord is damaged, it must be replaced by the manufacturer, after-sales service or a similarly qualified person to prevent property damage and / or personal injury.
- If the surface has any cracks, immediately switch off the device to reduce the risk of electric shock (the cooking surface made of glass ceramic or similar material protects the live parts).
- Do not place metal objects, such as knives, forks, spoons, and saucepans on the hob, as they could get very hot there.
- Do not use a steam cleaner to clean the hob.
-
The device must not be used in conjunction with an external timer or separate remote control system.
-
The cooking process must be supervised. A short cooking process must be supervised constantly.
- Never leave the appliance unattended during cooking, as cooking with oil or fat in particular can be dangerous and can lead to the outbreak of a fire. Never try to extinguish a grease fire with water. Instead, switch off the unit and cover the flame with a fire blanket or pot lid.

WARNING
Risk of fire! do not store other items on the cooking surfaces, except pans and pots.
INSTRUCTIONS ON USE AND MAINTENANCE
Risk of electric shock
- Never cook on a broken or cracked cooking surface. Should the cooking surface break or crack, switch off the appliance immediately using the main switch (mains socket) and contact a qualified technician.
- Turn off the cooking surface before cleaning or servicing.
- Failure to follow the instructions may result in electric shock or death.
Health risks
• This device complies with electromagnetic safety standards.
- Persons with pacemakers or other electrical implants (such as insulin pumps) must contact their physician or implant manufacturer before using this device to ensure that their implants are not affected by the electromagnetic field of the hotplate.
- Failure to follow the instructions may result in death.

CAUTION
Risk of burns! During use, accessible parts of this appliance will become hot enough to cause burns. Do not let your body, clothing or any item other than suitable cookware contact the Induction glass until the surface is cool.
- Keep children away.
- Handles of saucepans may be hot to touch. Check saucepan handles do not overhang other cooking zones that are on.
- Keep handles out of reach of children.
- Failure to follow this advice could result in burns and scalds.

WARNING
Risk of injury! The razor-sharp blade of a cooktop scraper is exposed when the safety cover is retracted. Use with extreme care and always store safely and out of reach of children. Failure to use caution could result in injury or cuts.
General Instructions
- Never leave the appliance unattended when in use. Boilover causes smoking and greasy spillovers that may ignite.
- Never use your appliance as a work or storage surface.
- Never leave any objects or utensils on the appliance.
- Do not place or leave any magnetisable objects (e.g. credit cards, memory cards) or electronic devices (e.g. computers, MP3 players) near the appliance, as they may be affected by its electromagnetic field.
- Never use your appliance for warming or heating the room.
- After use, always turn off the cooking zones and the cooktop as described in this manual (i.e. by using the touch controls).
- Do not rely on the pan detection feature to turn off the cooking zones when you remove the pans.
- Do not allow children to play with the appliance or sit, stand, or climb on it.
- Do not store items of interest to children in cabinets above the appliance. Children climbing on the cooktop could be seriously injured.
- Do not leave children alone or unattended in the area where the appliance is in use.
- Children or persons with a disability which limits their ability to use the appliance should have a responsible and competent person to instruct them in its use. The instructor should be satisfied that they can use the appliance without danger to themselves or their surroundings.
-
Do not repair or replace any part of the appliance unless specifically recommended in the manual. All other servicing should be done by a qualified technician.
-
Do not place or drop heavy objects on your cooktop.
- Do not stand on your cooktop.
- Do not use pans with jagged edges or drag pans across the Induction glass surface as this can scratch the glass.
- Do not use scourers or any other harsh abrasive cleaning agents to clean your cooktop, as these can scratch the Induction glass.
- This appliance is intended to be used in household and similar applications such as: staff kitchen areas in shops, offices and other working environments; farm houses; by clients in hotels, motels and other residential type environments; bed and breakfast type environments.
- The appliance and its accessible parts become hot during use.
- Care should be taken to avoid touching heating elements.
- Children less than 8 years of age shall be kept away unless continuously supervised.
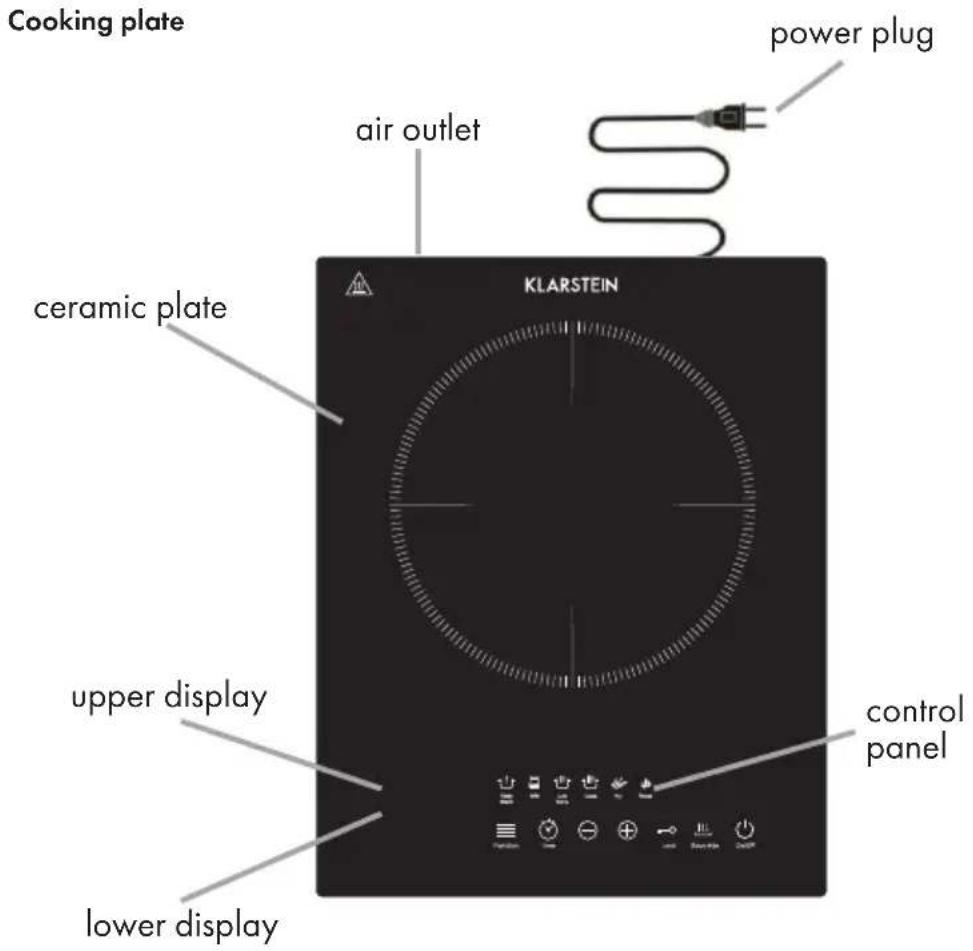
DEVICE OVERVIEW
OPERATION
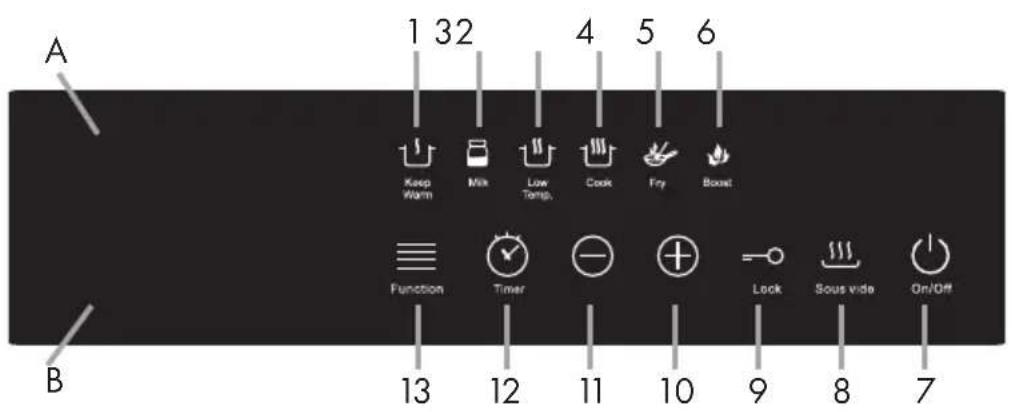
A Upper display
B Lower display
1 Keep warm
2 Warm milk
3 Low temperature
4 Cook
5 Fry
6 Boost button
7 On/off button
8 Sous-vide button
9 Child lock
10 Adjustment (increase)
11 Adjustment (decrease)
12 Timer
13 Function / cooking level
Plug the power plug into the mains. A beep will sound. The light above the on / off button will flash, indicating that the device is plugged in and is in standby mode. Place the cookware in the middle of the hob.
When you press the power button once, the display will remain on. The unit will enter selection mode and the lamp above the on / off button will still be lit. Press the function key to put the hotplate into operation. Stop operation by pressing the on / off button.
COOKING METHODS
Keep Warm
Press the [Function] key until the indicator of [Keep Warm] lights up. The keep-warm function lamp [Keep Warm] will light up. The lower display shows the preset level 1. It cannot be set by pressing the [+] and [-] buttons. To exit, press the [Function] soft key to switch to other modes. To exit, press the power button.
Warm up milk
Press the [Function] key until the indicator of [Milk] lights up, the 2nd display will show [3] representing that the default power level is 3. It can not be adjusted by pressing the [+] or [-] key to set the desired power level. To cancel this mode, press [Function] key to switch to other cooking modes or [On/Off] key to stop the operation.
Low temperature level
Press the function key until the low temperature lamp lights up. The lower display will show '3'. It cannot be adjusted by pressing the [+] and [-] buttons. To cancel the mode, press the function key [Function] and switch to another mode. To exit, press the power button.
High temperature level / boiling
Press the function key until the high temperature lamp [COOK] will light up. The lower display will show '7'. It can be adjusted by pressing the [+] and [-] buttons. There are a total of 10 levels. To cancel the mode, press the [Function] soft key to switch to other modes. To exit, press the power button.
Fry
Press the function key until the fry lamp [FRY] will light up. The lower display will show '220', which stands for 220 °C. The level can be adjusted by pressing the [+] and [-] buttons. There are a total of 10 temperature levels (60 °C, 80 °C, 100 °C, 120 °C, 140 °C, 160 °C, 180 °C, 200 °C, 220 °C, 240 °C). To cancel 'fry', press the function key again. This will change to another operating mode. To exit, press the power button.
Boost
Boost: Press the [Function] key until the indicator of [Boost] lights up, the 2nd display will show [2000] representing that the max. heating power is 2000 W. It can not be adjusted by pressing the [+] or [-] key to set the desired power. To cancel this mode, press [Function] key to switch to other cooking modes or [On/Off] key to stop the operation.
SOUS-VIDE FUNCTION
If the external thermometer is not connected, the sous vide button will not be active.
When the external thermometer is connected, press the sous vide button and the corresponding indicator will light up.
Place the sensor in the pot or food that has been detected by the induction hotplate, and the temperature will be measured and will appear on the first display. When the detected temperature is higher than or equal to the set temperature, the sous vide display will flash.
Press the [+] or [-] button to set the desired temperature, which will be displayed on the lower display. The adjustable temperature range is from 40 ^ to 160 ^ (in increments of 1 ^ ). Press the function key to switch to other cooking methods. If the external thermometer is not connected, the sous vide function will be canceled. Timer Once you have selected an operating mode, you may set the cooking time if a certain cooking level has been set. Press the timer button once to call up the timer function. The lamp above the timer button will light up.
The standard time (30 minutes) will appear on the upper display. You can press the [+] or [-] key to set the desired time. Press the [+] key to increase the number of minutes and the [-] key to decrease the number of minutes. Press and hold for 3 seconds to enter the quick setting. The time may be set from 1 to 180 minutes.
After setting, press the timer button once to confirm. Alternatively, wait until the indicator stops flashing. After the beep, the hotplate will stop operation and will automatically switch to standby mode after the set time has elapsed.
If you want to stop the function, press the on / off button to switch to standby mode. Press and hold the timer button to return to the previously selected power level or temperature setting. Press the function key to switch to another cooking level.
CHILD LOCK FUNCTION
On the function mode or standby mode, user can lock the control panel to prevent children from turning the cooktop on accidentally or changing the cooking settings. When you press the [Lock] key, you will switch on the control panel lockout. The indicator light will come on and the lock is set.
When the lock is set, none of the buttons on the control panel work, except for the [On/Off] key. The lower display will show [LOC].
To cancel the children lockout, press the [Lock] key for at least 3 seconds or press the [On/Off] key to return to standby mod.
CHOICE OF COOKWARE
- Suitable material: steel, cast iron, enamelled iron, stainless steel, flat bottom pans / pots with a bottom diameter of 12 cm to 26 cm.
- Use an appropriate pot. Do not attempt to use any other pot (especially not pressure cookers).
 | stainless steel kettle |
 | cast iron skillet |
 | pot (stainless steel) |
 | ferromagnetic stainless iron pot |
 | iron frying pan |
- Use cookware suitable for induction hotplates.
- Try newly purchased pots and pans first to see if there are any unusual phenomena.
- Pots and pans must be flat. The lid must have a steam outlet.
MAINTENANCE AND DAILY CARE
- Pull out the mains plug before cleaning. Do not start cleaning until the surface has cooled completely.
- Use a soft cloth for the glass plate, the control panel, and the case to clean light soiling. For greasy or coarse dirt, use a clean damp cloth with a neutral cleaner.
- When the fan is running, dust and dirt will remain on the air outlet. Clean the air outlet with a brush or cotton swabs.
• To avoid damage, do not splash the device directly with water.
TROUBLESHOOTING
| Problem Points to check Remedy | ||
| After connecting to the power supply and pressing the on / off button, the unit does not respond. | Has the mains power in the house been switched off? | Use the device after the power has been restored. |
| Has a circuit breaker been tripped? | Check the possible causes. If the problem cannot be resolved, contact customer service to check further. | |
| Is the mains plug fully inserted? | ||
| During operation, the heat goes out. | Is the cookware unsuitable for induction or is no cookware being used? | Rule out improper use of the device. |
| Is the cookware not properly positioned in the middle of the hotplate? | Place the cookware in the middle of the hotplate. | |
| Is the pot warm, but is it always being taken off the hotplate? | Put the pot on the heating zone. | |
| No heat during the cooking operation | Is the cookware empty or the temperature too high? | Check if the device is being used improperly. |
| Is the air outlet clogged or has dirt accumulated there? | Remove the blockages from the air outlet. Put the hotplate back into operation once it has cooled down. | |
| Has the hotplate already been running for more than 2 hours without operator input? | Reset the cooking mode or use the timer function. | |
| Error codes | ||
| E0 Internal circuit errorE1 Without cookware or Incompatible cookware usedE2 Internal overheatE3 Over-voltageE4 Under-VoltageE5 Top plate sensor open/short circuitE6 IGBT sensor open circuit/short circuitE7 Top plate overheat | When showing error signal E1, E2 and E7, please check whether the cookware is not suitable, or switch on the appliance again after it is cooled down naturally.When showing E0, E3-E6, please contact Service Centre for checking and repairing. | |
DISPOSAL CONSIDERATIONS
natural_image
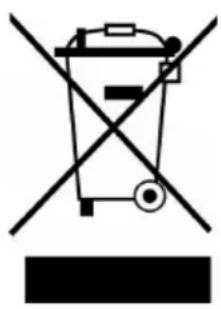
Symbol of a trash bin crossed with a diagonal line, no text or numbers presentIf there is a legal regulation for the disposal of electrical and electronic devices in your country, this symbol on the product or on the packaging indicates that this product must not be disposed of with household waste. Instead, it must be taken to a collection point for the recycling of electrical and electronic equipment. By disposing of it in accordance with the rules, you are protecting the environment and the health of your fellow human beings from negative consequences. For information about the recycling and disposal of this product, please contact your local authority or your household waste disposal service.
MANUFACTURER & IMPORTER (UK)
Manufacturer:
Chal-Tec GmbH, Wallstrasse 16, 10179 Berlin, Germany.
Importer for Great Britain:
Berlin Brands Group UK Limited
PO Box 42
272 Kensington High Street
London, W8 6ND
United Kingdom
Chère cliente, cher client,
SOMMAIRE
Fiche technique 34
natural_image
Symbol of a trash bin crossed with a diagonal line, no text or numbers presentBerlin Brands Group UK Limited
PO Box 42
272 Kensington High Street
London, W8 6ND
United Kingdom
Gentile Cliente,
INDICE
Dati tecnici 48
natural_image
Symbol of a trash bin crossed with a diagonal line, no text or numbers presentPRODUTTORE E IMPORTATORE (UK)
Produttore:
Chal-Tec GmbH, Wallstraße 16, 10179 Berlino, Germania.
Berlin Brands Group UK Limited
PO Box 42
272 Kensington High Street
London, W8 6ND
United Kingdom
Estimado cliente,
ÍNDICE
Datos técnicos 62
natural_image
Symbol of a trash bin crossed with a diagonal line, no text or numbers presentBerlin Brands Group UK Limited
PO Box 42
272 Kensington High Street
London, W8 6ND
United Kingdom

area
| Category | Value | | -------- | ----- | | 1 | 100 | | 2 | 100 | | 3 | 100 | | 4 | 100 | | 5 | 100 | | 6 | 100 | | 7 | 100 | | 8 | 100 | | 9 | 100 | | 10 | 100 | | 11 | 100 | | 12 | 100 | | 13 | 100 | | 14 | 100 | | 15 | 100 | | 16 | 100 | | 17 | 100 | | 18 | 100 | | 19 | 100 | | 20 | 100 | | 21 | 100 | | 22 | 100 | | 23 | 100 | | 24 | 100 | | 25 | 100 | | 26 | 100 | | 27 | 100 | | 28 | 100 | | 29 | 100 | | 30 | 100 | | 31 | 100 | | 32 | 100 | | 33 | 100 | | 34 | 100 | | 35 | 100 | | 36 | 100 | | 37 | 100 | | 38 | 100 | | 39 | 100 | | 40 | 100 | | 41 | 100 | | 42 | 100 | | 43 | 100 | | 44 | 100 | | 45 | 100 | | 46 | 100 | | 47 | 100 | | 48 | 100 | | 49 | 100 | | 50 | 100 | | 51 | 100 | | 52 | 100 | | 53 | 100 | | 54 | 100 | | 55 | 100 | | 56 | 100 | | 57 | 100 | | 58 | 100 | | 59 | 100 | | 60 | 100 | | 61 | 100 | | 62 | 100 | | 63 | 100 | | 64 | 100 | | 65 | 100 | | 66 | 100 | | 67 | 100 | | 68 | 100 | | 69 | 100 | | 70 | 100 | | 71 | 100 | | 72 | 100 | | 73 | 100 | | 74 | 100 | | 75 | 100 | | 76 | 100 | | 77 | 100 | | 78 | 100 | | 79 | 100 | | 80 | 100 | | Note: The actual values are not provided in the code. I have used the label 'Value' as a placeholder for the value detection. You would need to run the code to get the actual values from the code list. Please note that the actual values would be the result of this example. You would need to run the code to get the actual values from the code list. You would need to run the code to get the actual values from the code list. You would need to run the code to get the actual values from the code list. You would need to run the code to get the actual values from the code list. You would need to run the code to get the actual values from the code list. You would need to run the code to get the actual values from the code list. You would need to run the code to get the actual values from you would need to run the code. You would need to run the code to get the actual values from you would need to run the code.
KLARSTEIN
- INHALT
- Dear Customer,
- CONTENTS
- SAFETY INSTRUCTIONS
- Risk of electrical shock
- CAUTION
- General safety instructions
- WARNING
- INSTRUCTIONS ON USE AND MAINTENANCE
- Risk of electric shock
- Health risks
- General Instructions
- DEVICE OVERVIEW
- OPERATION
- COOKING METHODS
- Keep Warm
- Warm up milk
- Low temperature level
- High temperature level / boiling
- Fry
- Boost
- SOUS-VIDE FUNCTION
- CHILD LOCK FUNCTION
- CHOICE OF COOKWARE
- MAINTENANCE AND DAILY CARE
- TROUBLESHOOTING
- DISPOSAL CONSIDERATIONS
- MANUFACTURER & IMPORTER (UK)
- Manufacturer:
- Importer for Great Britain:
- Chère cliente, cher client,
- SOMMAIRE
- Gentile Cliente,
- INDICE
- PRODUTTORE E IMPORTATORE (UK)
- Produttore:
- Estimado cliente,
- ÍNDICE
- KLARSTEIN
Brand : Klarstein
Model : Cook n Roll
Category : Cooker