
PC-TDC 3128 - Steam cleaner ProfiCare - Free user manual and instructions
Find the device manual for free PC-TDC 3128 ProfiCare in PDF.

| Product Type | Steam Cleaner / Garment Steamer |
| Brand | ProfiCare |
| Model | PC-TDC 3128 |
| Power Supply | 220 – 240 V ~, 50 – 60 Hz |
| Power Consumption | 1580 W |
| Power Consumption in Off Mode | 0.5 W |
| Protection Class | I |
| Net Weight | Approx. 4 kg |
| Heat-up Time | Approx. 40 seconds |
| Number of Steam Levels | 5 (01 to 05) |
| Recommended Water Type | Distilled water only |
| Tiltable Ironing Board | Yes, 3 positions: vertical, 45°, horizontal |
| Telescopic Rod | Yes, extendable |
| Included Accessories | Brush, protective glove, hanger, nozzle holder, steam hose |
| Appliance Cleaning | Dry cloth for the housing, slightly damp cloth for the nozzle |
| Descaling | Not necessary (use of distilled water) |
| Recommended Storage | In a dry, well-ventilated place, out of reach of children |
| Draining the Tank | Possible via drain plug (wait 30 min after use) |
Frequently Asked Questions - PC-TDC 3128 ProfiCare
User questions about PC-TDC 3128 ProfiCare
0 question about this device. Answer the ones you know or ask your own.
Ask a new question about this device
Download the instructions for your Steam cleaner in PDF format for free! Find your manual PC-TDC 3128 - ProfiCare and take your electronic device back in hand. On this page are published all the documents necessary for the use of your device. PC-TDC 3128 by ProfiCare.
USER MANUAL PC-TDC 3128 ProfiCare
natural_image
Modern office lamp with gray headrest and white base, connected by metal frame (no visible text or symbols)Textil-Dampfglätter PC-TDC 3128
Textile Steam Straightener • Textiel stoom stijltang • Défroisseur textile à vapeur Plancha de vapor textil • Raddrizzatore a vapore per tessuti • Prostownica parowa do tekstyliów Textil göz kiegyenesítő • Паровой выпрямитель для текстиля • جهاز قилиس يخار المنسوجات
CE
Bedienungsanleitung......Seite 5
Instruction Manual...... Page 11
Gebruiksaanwijzing......Pagina 16
Mode d'emploi.... Page 22
Manual de instrucciones ...... Página 28
Istruzioni per l'uso....Pagina 34
Instrukcja obsługi......Strona 40
Használati utasítás .... Oldal 47
Руководство по эксплуатации ...... стр. 53
63 صفحة ____ دليل التعليمات
natural_image
Line drawing of a portable electric kettle with a bulb and cord (no text or symbols)2.
natural_image
Simple line drawing of a mechanical lever or fulcrum with an arrow indicating motion (no text or symbols)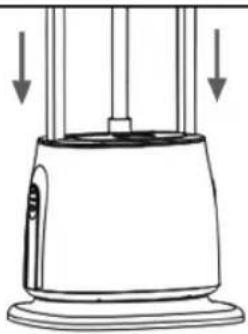
natural_image
Simple line drawing of a portable refrigerator with vertical supports and a side-mounted top (no text or symbols)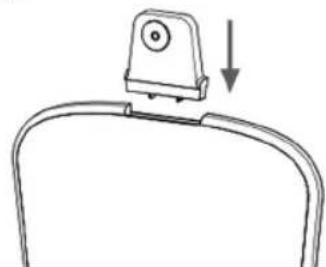
natural_image
Simple line drawing of a mechanical component with an arrow indicating downward motion (no text or symbols)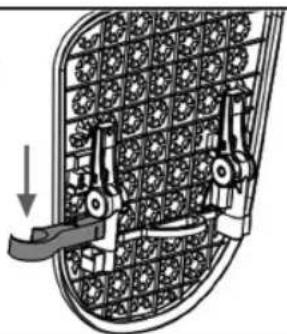
natural_image
Diagram of a car interior with gear and lever mechanism, no text or symbols present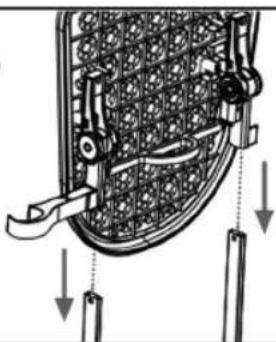
natural_image
Technical diagram of a mechanical assembly with arrows indicating force or movement (no text or symbols present)
natural_image
Technical diagram of a mechanical assembly with gears and linkages (no text or labels)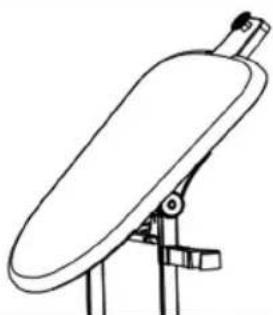
natural_image
Line drawing of a satellite dish antenna mounted on a tripod stand (no text or symbols)
natural_image
Technical line drawing of a mechanical support structure (no text or symbols)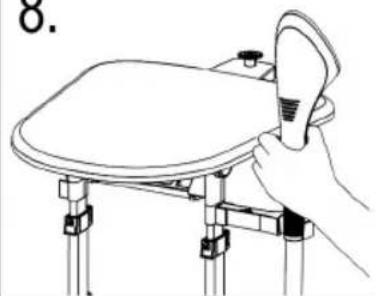
natural_image
Line drawing of a hand holding a light bulb over a table with legs and feet (no text or symbols)WICHTIG:
Be sure to read the separately enclosed safety instructions first.
Instruction Manual
Thank you for choosing our product. We hope you will enjoy using the appliance.
Read the instruction manual and the separately enclosed safety instructions very carefully before using this appliance. Keep these documents, including the warranty certificate, receipt and, if possible, the box with the inner packaging in a safe place. If you pass the appliance on to a third party, always include all the relevant documents.
Symbols in this Instruction Manual
Important information for your safety is specially marked. It is essential to comply with these instructions in order to avoid accidents and prevent damage to the appliance:

WARNING:
This warns you of dangers to your health and indicates possible injury risks.

CAUTION:
This refers to possible hazards to the appliance or other objects.
Content
Overview of the Components ....3
Unpacking the Appliance 11
Overview of the Components/Scope of Delivery ..... 11
Warnings for the Use of the Appliance 11
Notes for Use 12
Mounting the Appliance 12
Operation 12
Cleaning 13
Descaling 15
Storage....15
Troubleshooting 15
Technical Data....15
Disposal....15
Unpacking the Appliance
- Remove the appliance from its packaging.
- Remove all packaging material, such as foils, filling material, cable ties and cardboard packaging.
- Check the scope of delivery for completeness.
- If the contents of the packaging are incomplete or if damage can be detected, do not operate the appliance. Return it to the dealer immediately.
Overview of the Components / Scope of Delivery
1 Hanger holder
2 Ironing board
3 Lever for adjusting the inclination of the ironing board
4 Nozzle
5 Holder for the nozzle
6 Steam hose
7 Kink protection
8 Water tank
9 Release for the telescopic rod
10 Water drain plug
11 Base
12 Mains cable
13 Control panel
a Steam level button (⊕)
b Steam level indicator
c On / off button (
14 Extendable telescopic rod
15 Clamps for releasing / fixing the extendable telescopic rods
Accessories
A Brush attachment for the nozzle
B Glove
Warnings for the Use of the Appliance

WARNING: Risk of Burns!
- There is a risk of burns from the continuously escaping steam!
- Always hang the steam nozzle in the holder when it is not in use. This will prevent injuries or damage to surfaces caused by escaping steam.
- Do not touch hot surfaces! Wait until the appliance has cooled down before replacing accessories.
- The appliance emits a large amount of hot steam. Never aim the steam jet at people or animals.
- Do not use on items of clothing if they are worn on the body.
- To ensure an unobstructed flow of steam, always extend the telescopic rods fully. If the steam hose is kinked, an audible bubbling sound is produced. The hot water is forced back into the water tank and overflows.

CAUTION:
- The appliance must be set up and operated on a level and stable surface.
- Only use distilled water!
- Only operate the appliance with a full water tank.
- The appliance shall not be used for cleaning electrical appliances or systems.
- Do not carry or lift the appliance by the mounted telescopic rods.
Connected Load
The appliance has a total power consumption of 1580 W. Do not use a multiple socket as this appliance is too powerful.
Notes for Use
Unpacking
- Remove any protective film and stickers from the steam nozzle.
- Unwind the power cable completely.
Location of the Base
Make sure that the handpiece (nozzle) is always higher than the base. Otherwise, water can build up in the steam hose, which can lead to water droplets on the fabric.
- The steam output will be noticeably reduced. In this case, hold the steam nozzle higher for 2 – 3 seconds to solve the problem.
Water
Only use distilled water!
Battery water, water from the tumble dryer and water with additives (such as starch, perfume, fabric softener or other chemicals) should not be poured into the water tank.
This could damage the appliance as residues could form in the steam chamber. These residues can contaminate the ironed items when they fall out through the steam outlet openings.
Electrical Connection
• Make sure that the appliance voltage (see rating plate) and the mains voltage match.
- Only connect the mains plug with a correctly installed earthed socket.
Ending Operation
- Hang the nozzle in the holder.
- Switch the appliance off with the ⏻ button. The display goes out.
- Then disconnect the mains plug from the socket.
Mounting the Appliance
Please refer to the illustrations on page 4.
- Place the appliance on a level and stable surface. Preferably on the floor.
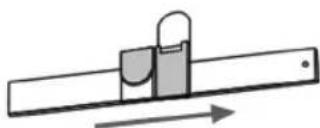
- Release the clamps and pull the telescopic rods completely apart. Secure the telescopic rods by closing the clamps again.
- Important! To ensure an unobstructed flow of steam, always extend the telescopic rods fully.
- Insert the telescopic rods into the base with slight pressure as far as they will go.
- Check that the telescopic rods are locked into place.
- Insert the hanger holder into the recess on the ironing board.
- The holder for the nozzle can be attached to the back of the ironing board. Optionally on the right or left.
- Attach the ironing board to the telescopic rods.
- If necessary, the angle of the ironing board can be adjusted. To do this, press the lever on the back of the ironing board. There are three tilt settings: vertical, 45° and horizontal. The ironing board locks into the selected position.
- Always hang the steam nozzle in the holder when it is not in use. This prevents injury or damage to surfaces caused by escaping steam.
Brush Attachment
- Place the brush attachment on the metal hook located at the lower end of the brush nozzle.
- To remove the brush attachment, pull it off the metal hook.
Operation
Filling the Water Tank
Always disconnect the appliance from the power supply before filling the water tank.
-
Pull the water tank out of the base at the back.
-
Unscrew the closure at the bottom of the water tank by turning it anti-clockwise.
- Fill the water tank with water up to the mark.
- Close the water tank with the closure and screw it on hand-tight. Dry all sides of the water tank before inserting it.
- Push the water tank back into the base.
Steam Level Button (€)
Press this button several times to select the amount of steam. You can choose between levels 01 to 05
- Each time the appliance is switched on, it always starts with the highest level.
Smoothing Textiles

WARNING: Risk of Burns!
The appliance emits a large amount of hot steam. Never aim the steam jet at people or animals.

CAUTION:
-
Do not pull too hard on the clothes, the appliance could tip over.
• Make sure that the steam hose is not kinked. -
To smooth an item of clothing with steam, hang it on a hanger that you hang in the hanger holder.
- If necessary, you can place the garment on the ironing board. If necessary, change the angle of the ironing board with the lever on the back.
- Once you have filled the water tank, insert the mains plug into a correctly installed earthed socket.
- Set the desired steam level. The appliance is ready for use after approx. 40 seconds.
- Hold the steam nozzle by the handle and point it at the lower part of the garment. The steam rises from the inside and outside and smoothes out the creases.
- Slowly move the nozzle from the bottom to the top of the fabric.
- Remove the nozzle from the fabric and smooth it with your gloved hand.
- Use the glove supplied for this!
- Repeat steps 4 to 6 until all creases have been removed.
- To remove larger creases, it is recommended to treat the inside and outside of the fabric with steam.
- The brush attachment can also be used to remove larger creases.
- Heavy fabrics require repeated steaming.
-
When using horizontally, hold the steam nozzle at a distance of approx. 10 cm above the fabric.
-
Switch the appliance off after each use with the ⏻ button. Then disconnect the mains plug from the socket.
Cleaning

WARNING:
• Always disconnect the mains plug from the socket before cleaning.
- Wait until the appliance has cooled down completely!
- Never immerse the appliance in water for cleaning. This could lead to an electric shock or fire.

CAUTION:
- Do not use a wire brush or other abrasive objects.
-
Do not use harsh or abrasive cleaning agents.
-
Clean the housing with a dry cloth.
- Clean the steam nozzle with a slightly damp cloth.
Empty the Water Tank and Base
For long-term storage or prolonged periods of non-use, we recommend emptying the water tank and base. Proceed as follows:
- Remove the telescopic rods. To do this, pull the telescopic rod releases on the sides of the base downwards. At the same time, pull the telescopic rod upwards.
- Place the appliance over a drain. When unscrewing the water drain plug, water will run out immediately!
-
Remove the water tank. Also remove the filter underneath. Rinse the water tank with fresh water and empty it completely. Clean the filter under running water.
-
⚠️ WARNING:
If the appliance has not cooled down long enough, hot water will leak out! Therefore, wait 30 minutes before removing the water drain plug.
To empty the water in the base, unscrew the water drain plug (10) anti-clockwise with a screwdriver.
- To rinse out the appliance, fill fresh water into the water inlet and empty the appliance completely.
- Replace the water drain plug. Screw it hand-tight in a clockwise direction.
- Reinsert the filter above the water inlet. Then reinsert the water tank into the base.
- Reassemble the appliance. Hook the steam nozzle into the holder.
Descaling
Decalcification is not intended for this appliance since it should only be used with distilled water.
Storage
- Clean the appliance as described.
• We recommend storing the appliance in its original packaging if you do not intend to use it for a longer period of time.
• Always store the appliance out of the reach of children in a well-ventilated and dry place.
Troubleshooting
| Problem Possible Cause Remedy | ||
| The appliance has no function. | The appliance has no power supply. | Check the power socket with another appli-ance. |
| Insert the mains plug correctly. | ||
| Check the house fuse. | ||
| The appliance is defective. Contact our service or a specialist. | ||
| The appliance is switched on, but no steam is being emitted. | The water tank is empty. Fill the water tank with water. | |
| The water tank is not inserted correctly. Check the position of the water tank. | ||
| Reduced amount of steam. Blockage on the filter. | Clean the filter insert underneath the water tank. | |
| Blockage on the water tank. Clean the water tank and the closure of the water tank. | ||
| Water is dripping from the steam nozzle. | Condensation in the steam hose. Pull the steam hose vertically upwards so that the water can flow back into the appliance. | |
| Strong audible bubbling in the hose and in the nozzle. | Condensation in the steam hose. A slight bubbling is a normal effect of the steam process. If there is a lot of bubbling, pull the steam hose vertically upwards so that the water can flow back into the appliance. | |
| The steam output is uneven. | This is normal as the heating is switched on and off via the thermostat. | |
Technical Data
Model: PC-TDC 3128
Power supply: 220–240V\~, 50–60Hz
Power consumption: 1580 W
Power consumption in off-mode: 0.5 W
Protection class:....I
Net weight: .... approx. 4 kg
The right to make technical and design modifications in the course of continuous product development remains reserved.
This appliance has been tested according to all applicable, current CE directives and built according to the latest safety regulations.
Disposal
Meaning of the "Dustbin" Symbol
Protect our environment: do not dispose of electrical equipment in the domestic waste.
Please return any electrical equipment that you will no longer use to the collection points provided for their disposal.
This helps avoid the potential effects of incorrect disposal on the environment and human health.
This will contribute to the recycling and other forms of re-utilisation of electrical and electronic equipment.
Information concerning where the equipment can be disposed of can be obtained from your local authority. Your dealer and contractual partner is also obliged to take back the old appliance free of charge.
BELANGRIJK:
WAARSCHUWING: Verbrandingsgevaar!
WAARSCHUWING: Verbrandingsgevaar!
CTC Clatronic Sp. z o.o
Ul. Brzeska 1
45-960 Opole
Usuwanie


- Textil-Dampfglätter PC-TDC 3128
- WICHTIG:
- Be sure to read the separately enclosed safety instructions first.
- Instruction Manual
- Symbols in this Instruction Manual
- WARNING:
- CAUTION:
- Content
- Unpacking the Appliance
- Overview of the Components / Scope of Delivery
- Accessories
- Warnings for the Use of the Appliance
- WARNING: Risk of Burns!
- Connected Load
- Notes for Use
- Unpacking
- Location of the Base
- Water
- Electrical Connection
- Ending Operation
- Mounting the Appliance
- Brush Attachment
- Operation
- Filling the Water Tank
- Steam Level Button (€)
- Smoothing Textiles
- Cleaning
- Empty the Water Tank and Base
- Descaling
- Storage
- Technical Data
- Disposal
- Meaning of the "Dustbin" Symbol
- BELANGRIJK:
- WAARSCHUWING: Verbrandingsgevaar!
- Usuwanie
Brand : ProfiCare
Model : PC-TDC 3128
Category : Steam cleaner