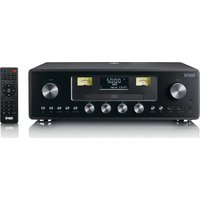
Dabman 280CD - Radio Imperial - Free user manual and instructions
Find the device manual for free Dabman 280CD Imperial in PDF.


| Product type | Stereo alarm clock with CD player, DAB+, FM, Bluetooth, USB, auxiliary input |
| Brand | Imperial |
| Model | Dabman 280CD |
| Dimensions (W x H x D) | 425 x 280 x 135 mm |
| Weight | 4.8 kg |
| Power supply | Mains adapter 100-240 V AC, 50/60 Hz; output 15 V DC, 4 A |
| Power consumption | 50 W max; standby < 1 W |
| Audio power (RMS) | 2 x 15 W |
| Speakers | 4 x 3 Ω, 8 W |
| Radio frequency ranges | DAB: 174.928 – 239.200 MHz; FM: 87.5 – 108 MHz |
| Bluetooth | Version 5.4; frequency 2,402 – 2,480 MHz; power < 3.56 dBm EIRP |
| Main functions | DAB+/FM radio, CD/CD MP3 player, Bluetooth, USB (MP3 playback), AUX/LINE input, dual alarm, snooze, sleep, ASA (Automatic Safety Alert) |
| Number of presets | 50 for DAB, 50 for FM |
| Equalizer | Presets: Flat, Rock, Pop, Jazz, Classic; bass and treble adjustment |
| USB charging port | 5 V / 1 A |
| Remote control | Included; batteries 2 x AAA (not supplied) |
| Operating temperature | 0 to 35 °C |
| Maintenance and cleaning | Soft dry cloth; do not use solvents |
| Safety | Class 1 laser; do not open; avoid humidity and heat sources; keep batteries out of reach of children |
| Spare parts and repairability | Contact retailer or support@commaxxgroup.com; unauthorized opening voids warranty |
Frequently Asked Questions - Dabman 280CD Imperial
User questions about Dabman 280CD Imperial
0 question about this device. Answer the ones you know or ask your own.
Ask a new question about this device
Download the instructions for your Radio in PDF format for free! Find your manual Dabman 280CD - Imperial and take your electronic device back in hand. On this page are published all the documents necessary for the use of your device. Dabman 280CD by Imperial.
USER MANUAL Dabman 280CD Imperial
User manual - DAB+/ FM radio with CD player, USB and Bluetooth Gebruikershandleiding - DAB+/FM-radio met cd-speler, USB en Bluetooth Bedienungsanleitung – DAB+/FM-Radio mit CD-Player, USB und Bluetooth Guide d’utilisation – Radio DAB+/FM avec lecteur CD, USB et Bluetooth Manual del usuario - radio DAB+/FM con reproductor de CD, USB y Bluetooth
Brugervejledning – DAB+/FM-radio med CD-afspiller, USB og Bluetooth Användarhandbok – DAB+/FM-radio med CD-spelare, USB och Bluetooth Käyttöopas – DAB+ / FM -radio CD-soittimella; USB- ja Bluetooth-liitäntä
Index
ENGLISH 3
NEDERLANDS 23
DEUTSCH....45
FRANÇAIS....68
ESPAÑOL 90
DANSK/NORSK....112
SVENSKA 133
SUOMI 155
ENGLISH
CAUTION:
Usage of controls or adjustments or performance of procedures other than those specified herein may result in hazardous radiation exposure.
KEEP THESE INSTRUCTIONS IN MIND:
- Do not cover or block any ventilation openings. When placing the device on a shelf, leave 5 cm (2") free space around the whole device.
- Install in accordance with the supplied user manual.
- Keep the device away from heat sources such as radiators, heaters, stoves, candles and other heat-generating products or naked flame. The device can only be used in moderate climates. Extremely cold or warm environments should be avoided. Working temperature between 0irc and 35irc C.
- Avoid using the device near strong magnetic fields.
- Electrostatic discharge can disturb normal usage of this device. If so, simply reset and restart the device following the instruction manual. During file transmission, please handle with care and operate in a static-free environment.
- Warning! Never insert an object into the product through the vents or openings. High voltage flows through the product and inserting an object can cause electric shock and/or short circuit internal parts. For the same reason, do not spill water or liquid on the product.
- Do not use in wet or moist areas such as bathrooms, steamy kitchens or near swimming pools.
- The device shall not be exposed to dripping or splashing and make sure that no objects filled with liquids, such as vases, are placed on or near the apparatus.
- Do not use this device when condensation may occur. When the unit is used in a warm wet room with damp, water droplets or condensation may occur inside the unit and the unit may not function properly; let the unit stand in power OFF for 1 or 2 hours before turning on the power: the unit should be dry before getting any power.
- Although this device is manufactured with the utmost care and checked several times before leaving the factory, it is still possible that problems may occur, as with all electrical appliances. If you notice smoke, an excessive build-up of heat or any other unexpected phenomena, you should disconnect the plug from the main power socket immediately.
- This device must operate on a power source as specified on the specification label. If you are not sure of the type of power supply used in your home, consult your dealer or local power company.
- Keep away from animals. Some animals enjoy biting on power cords.
- To clean the device, use a soft dry cloth. Do not use solvents or petrol based fluids. To remove severe stains, you may use a damp cloth with dilute detergent.
- The supplier is not responsible for damage or lost data caused by malfunction, misuse, modification of the device or battery replacement.
-
Do not interrupt the connection when the device is formatting or transferring files. Otherwise, data may be corrupted or lost.
-
If the unit has USB playback function, the USB memory stick should be plugged into the unit directly. Don't use an USB extension cable because it can cause interference resulting in failing of data.
- The rating label has been marked on the bottom or back panel of the device.
- This device is not intended for use by people (including children) with physical, sensory or mental disabilities, or a lack of experience and knowledge, unless they're under supervision or have received instructions about the correct use of the device by the person who is responsible for their safety.
- This product is intended for non-professional use only and not for commercial or industrial use.
- Make sure the unit is adjusted to a stable position. Damage caused by using this product in an unstable position vibrations or shocks or by failure to follow any other warning or precaution contained within this user manual will not be covered by warranty.
- Never remove the casing of this device.
- Never place this device on other electrical equipment.
- Do not allow children access to plastic bags.
- Only use attachments/accessories specified by the manufacturer.
- Refer all servicing to qualified service personnel. Servicing is required when the device has been damaged in any way, such as the power supply cord or the plug, when liquid has been spilled or objects have fallen into the device, when the device has been exposed to rain or moisture, does not operate normally, or has been dropped.
- Long exposure to loud sounds from personal music players may lead to temporary or permanent hearing loss.
-
If the product is delivered with power cable or AC power adaptor:
-
If any trouble occurs, disconnect the AC power cord and refer servicing to qualified personnel.
- Don't step on or pinch the power adaptor. Be very careful, particularly near the plugs and the cable's exit point. Do not place heavy items on the power adaptor, which may damage it. Keep the entire device out of children's reach! When playing with the power cable, they can seriously injure themselves.
● Unplug this device during lightning storms or when unused for a long period.
● The socket outlet must be installed near the equipment and must be easily accessible. - Do not overload ac outlets or extension cords. Overloading can cause fire or electric shock.
● Devices with class 1 construction should be connected to a main socket outlet with a protective earthed connection.
● Devices with class 2 construction do not require an earthed connection.
● Always hold the plug when pulling it out of the main supply socket. Do not pull the power cord. This can cause a short circuit. -
Do not use a damaged power cord or plug or a loose outlet. Doing so may result in fire or electric shock.
-
If the product contains or is delivered with a remote control containing coin/cell batteries:
Warning:
- “Do not ingest battery, Chemical Burn Hazard” or equivalent working.
● [The remote control supplied with] This product contains a coin/button cell battery. If the battery is swallowed, it can cause severe internal burns in just 2 hours and can lead to death.
- Keep new and used batteries away from children.
- If the battery compartment does not close securely, stop using the product and keep it away from children.
- If you think batteries might have been swallowed or placed inside any part of the body, seek immediate medical attention.
29. Caution about the use of Batteries:
● Danger of explosion if battery is incorrectly replaced. Replace only with the same or equivalent type.
● Battery cannot be subjected to high or low extreme temperatures, low air pressure at high altitude during use, storage or transportation.
● Replacement of a battery with an incorrect type that can result in an explosion or the leakage of flammable liquid or gas.
- Disposal of a battery into fire or a hot oven, or mechanically crushing or cutting of a battery, that can result in an explosion.
● Leaving a battery in an extremely high temperature surrounding environment that can result in an explosion or that leakage of flammable liquid or gas.
● A battery subjected to extremely low air pressure that may result in an explosion or the leakage of flammable liquid or gas.
● Attention should be drawn to the environmental aspects of battery disposal.
INSTALLATION
- Unpack all parts and remove protective material.
- Do not connect the unit to the mains before checking the mains voltage and before all other connections have been made.
WARNING
1. Class 1 Laser Product
CLASS 1 LASER PRODUCT APPAREIL Á LASER DE CLASSE 1 PRODUCTO LASER DE CLASE 1
This product contains a low power laser device.
CAUTION INVISIBLE LASER RADIATION WHEN OPEN AND INTERLOCKS DEFEATED. AVOID EXPOSURE TO BEAM

natural_image
Warning symbol with a sunburst pattern inside a triangle (no text or numbers)Warning: Do not touch the lens.
2. General ASA Function Warning
WARNING:
This device is equipped with a DAB+ Automatic Safety Alert (ASA) system, which may automatically interrupt playback or switch stations to broadcast emergency alerts (e.g., severe weather, public safety warnings). To ensure you receive critical alerts, do not disable this feature unless absolutely necessary.
3. Warning About Disabling ASA
IMPORTANT NOTICE:
Disabling the ASA function will prevent the reception of emergency alerts. This device is designed to prioritize public safety warnings, and turning off this feature may result in missing vital information during emergencies.
4. Signal & Interference Warning
CAUTION:
The ASA system relies on a stable DAB+ signal. Weak reception, obstructions, or electronic interference may affect alert delivery. Ensure the antenna is properly extended and avoid placing the device near sources of interference (e.g., Wi-Fi routers, microwaves).
5. Legal/Regulatory Compliance Notice
i NOTE:
This product complies with [relevant standards, e.g., ETSI TS 103 461 for DAB+ ASA]. Tampering with or disabling safety alert functions may violate local regulations in some regions.
6. Standby Mode Alert
i REMINDER:
Even in standby mode, this device may activate for emergency broadcasts via the ASA system. To ensure functionality, keep the radio connected to power when possible.

Automatic Safety Alert
digitalradio DAB+ DAB FM

Accessories
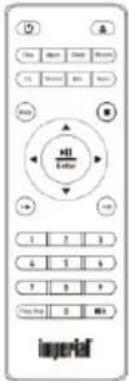
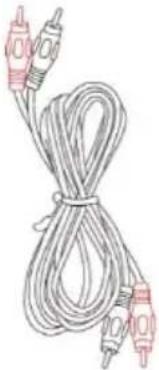
| Remote control | User manual | AUX cable |
 |  |  |
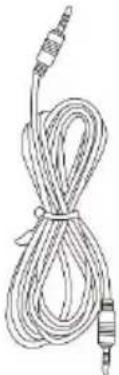
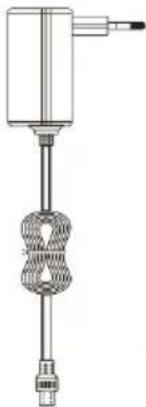
| 3.5mm Line in cable | Indoor antenna | AC adapter |
 |  |  |
Description of Parts
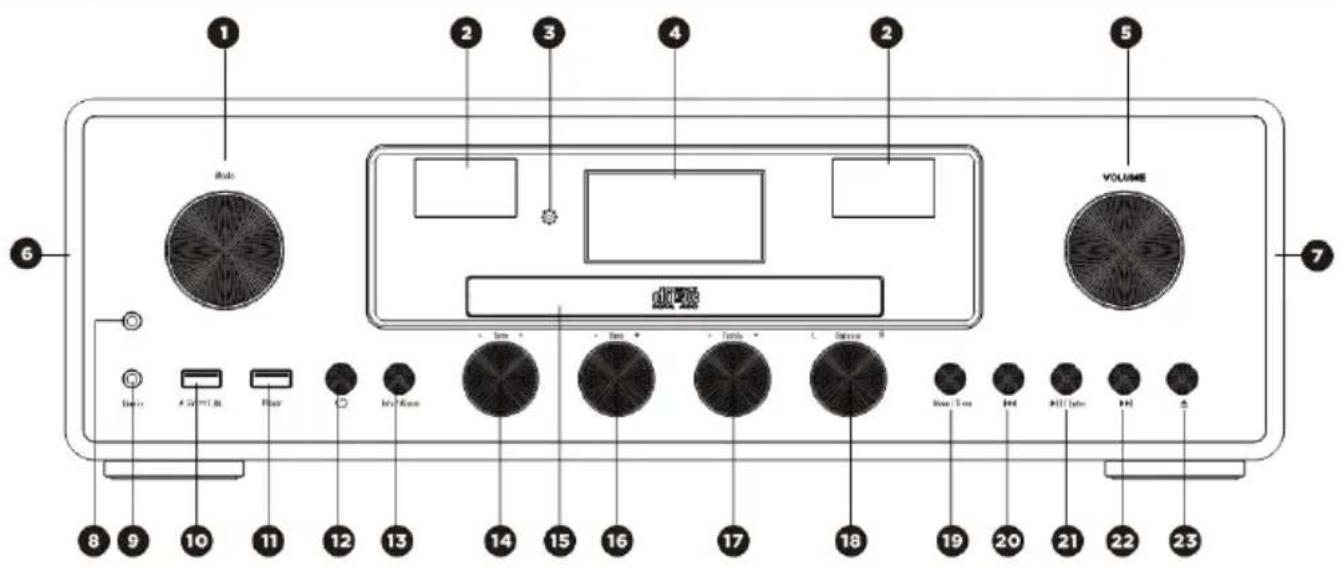
- Mode
Rotate the knob to Select the audio mode:
DAB-FM-BT-CD-USB-AUX-LINE
-
VU meter
-
Remote control receiver
-
Display
-
Volume knob
-
Speaker L
-
Speaker R
-
Earphone jack
-
Line in jack
-
USB charge 5V /1A port
-
USB MP3 play jack
-
Power on/off
-
Info/Alarm
-
Tone adjust knob
-
CD door
-
Bass adjust knob
-
Treble adjust knob
-
L/R Balance adjust
-
Menu / Time
-
Previous button
-
Play/Pause/Enter button
-
NEXT button
-
CD open/close button
-
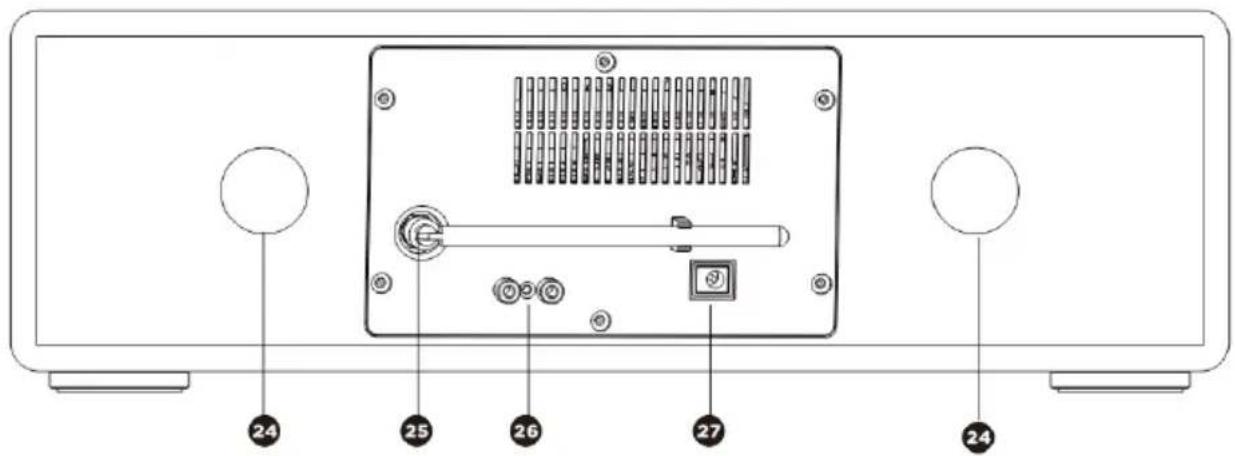
Bass reflex hole
-
DAB/FM indoor antenna
-
AUX in jack
-
USB-C Adapter in
Remote control
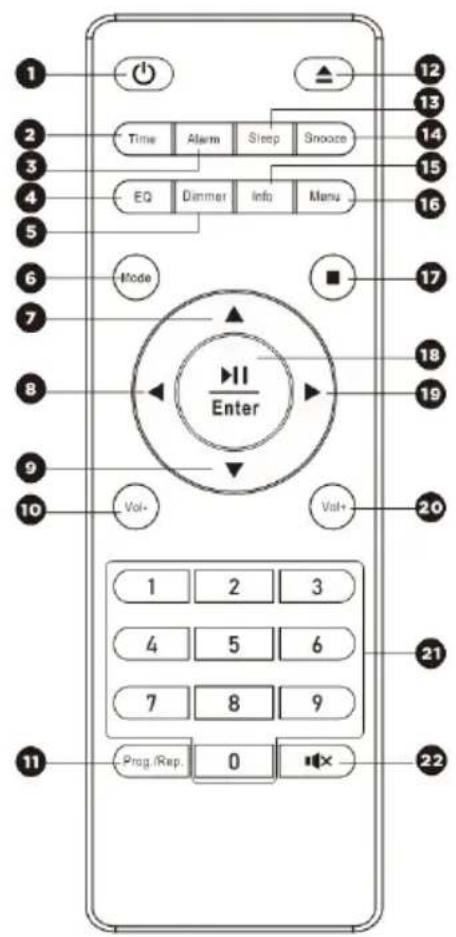
- Power on/off
- Time setting
- Alarm setting
- EQ setting
- Dimmer
- Mode
- Up cursor button
- Go back one track / Left cursor button
- Down cursor button
- Volume -
- Program for CD/USB Repeat for CD/USB
- CD open /close
- Sleep setting
- Snooze
- Info
- Menu
- Stop
- Enter/Play /pause
- Go forward one track / Right cursor button
- Vol +
- 0...9 for selection of the CD/USB song number
- Mute
BATTERY INSTALLATION
Battery must be inserted correctly to avoid damaging to the remote control. Always remove the battery when the remote control will not be used for a long period of time, as this may cause leakage of the battery and subsequently damage the remote.
Inserting the remote control batteries
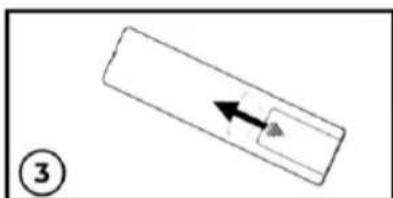
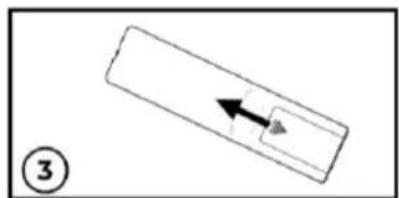
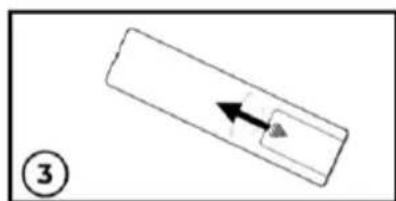
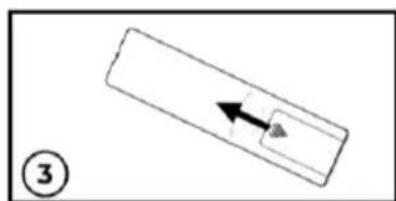
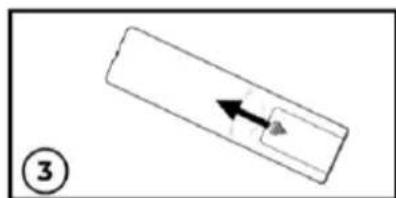
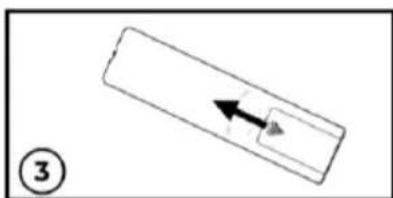
- Push the release clip on the battery compartment downwards and lift to remove the cover.
- Insert 2 x 1.5 V AAA batteries (not supplied) the correct way around, by observing the polarity (+ and -) indicated on the battery compartment.
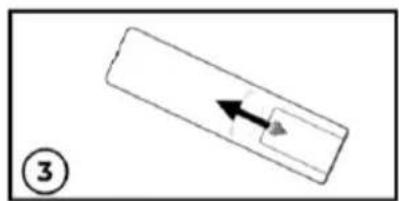
- Place the furthest end of the cover in position on top of the battery compartment. Then press the nearest end of the cover until you hear it click firmly into place.
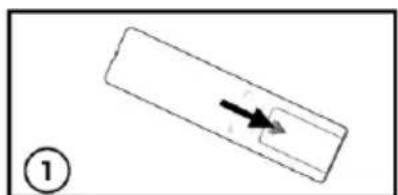
natural_image
Simple line drawing of a rectangular object with an arrow pointing downward (no text or symbols)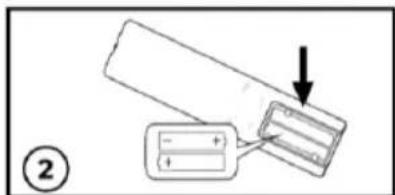
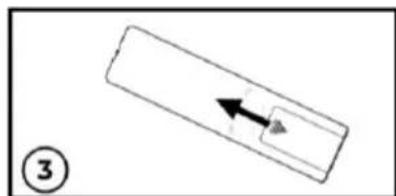
natural_image
Simple diagram showing a rectangular object with an arrow pointing to a small circular feature, labeled with number 3 (no text or symbols on the object itself)If the distance required between the remote control and the appliance decreases, the batteries are exhausted. In this case replace the batteries with new ones.
Auto standby
When playing media from a connected device, the device automatically switches to standby if:
• No button is pressed for 10 minutes,
• No audio from a connected device for 10 minutes
Power setting
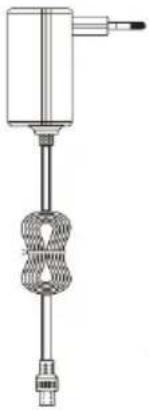
Plug in the supplied AC/DC power adaptor to an AC household outlet in order to get power source, and plug the DC connector of power adaptor to the power jack on the rear panel of main unit. Then the unit is ready work for you.
Open the battery compartment cover of remote control, insert 2 x AAA batteries to the compartment according to the correct polarity showed in the compartment. (Batteries are not included) We recommend use high quality alkaline or lithium batteries for the best product performance. Heavy duty or rechargeable batteries are not recommended.
Press the POWER button to turn ON or turn OFF the unit.
ASA emergency announcements
ASA (Automatic Safety Alert) is the new standard for official emergency announcements via the DAB network.
The Dabman 280CD automatically receives all emergency announcements and plays them back if the current station is participating in the ASA system.
Even in standby mode, the Dabman 280CD searches for emergency announcements in the background and switches the radio on automatically if necessary. This means you are always optimally supplied with warning messages. We therefore recommend to always operate the device in standby mode and never disconnecting it completely from the mains.
ASA warning messages can be labelled with a specific warning area so that only listeners in certain local, relevant areas received a warning message. To do this, your location must be stored in the device.
You can set up your ASA area code during the initial setup or at any time in the DAB settings. The area code consists of three blocks, each with four numbers from 1 to 8. This code contains your position to an accuracy of approximately one kilometer.
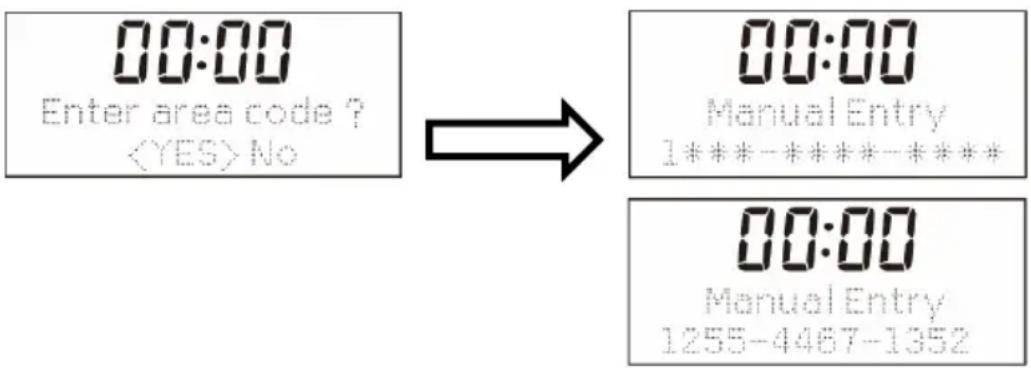
flowchart
graph LR
    A["00:00 Enter area code ? <YES> No"] --> B["00:00 Manual Entry 1****-****-****"]
    C["00:00 Manual Entry 1255-4467-1352"] --> B
You can calculate your ASA Area Code at https://asa.radio/. You can search for your address there or use the GPS function on your smartphone.
ATTENTION: If you do not store an area code in the device, the device will ignore all local messages and only play back nationwide messages. You may therefore miss important messages that only affect your area. We strongly recommend that you program in your area code in order to receive all important messages.
https://asa.radio/
Web portal for the generation of ASA Area Codes
Operation
Adjusting the volume
Rotate the Volume knob clockwise or press the Volume + on remote control to increase the volume. Rotate the Volume knob counter-clockwise or press the Volume - on remote control to decrease the volume. The display will show the volume setting.
Adjust the Tone
Rotate slowly the Tone knob to adjust the tone quality.
Adjust the Treble
Rotate the treble knob clockwise to increase the TREBLE Rotate the treble knob counter-clockwise to decrease the TREBLE
Adjust the Bass
Rotate the Bass knob clockwise to increase the BASS Rotate the Bass knob counter-clockwise to decrease the BASS
Adjust the Balance
Rotate the Balance knob clockwise to increase the right channel Rotate the Balance knob counter-clockwise to increase the left channel
Mute function
Pressing the MUTE button on remote control will mute the volume. "MUTE" will appear on the display. Press this button again to cancel the mute function.
Clock and timers
Setting the clock and date
After the unit is plugged into a mains supply or after a power failure, the time and date on the LCD display will blink. The unit should be in standby mode to set the clock.
- Press Time button, "Time setup" is displayed, press ENTER to confirm.
- Press ▲ /▼ to select "24H" or "12H", Press ENTER confirm. The hour digits on the display will blink.
- Press ▲ /▼ to set the hour, press ENTER confirm, the minutes digits on the display will blink.
- Press ▲ /▼ to set the minutes, press ENTER confirm, the Day digits on the display will blink.
- Press ▲ /▼ to set the Day, press ENTER confirm, the Month digits on the display will blink.
- Press ▲ /▼ to set the Month, press ENTER confirm, the Year digits on the display will blink.
- Press ▲ /▼ to set the Year, press ENTER confirm, time setting is completed.
Setting Alarm
Note: Check that the radio has the correct time and date before you set an alarm.
This unit may be used as an alarm clock. The CD/USB device or DAB/FM/Buzzer is activated to play at a preset time.
- Press POWER to switch the unit to standby mode.
- Make sure that you have set the clock correctly.
- Press the ALARM button to set alarm 1; press ALARM button twice to set alarm 2
- "Alarm 1 (or 2) Setup" is displayed. Press ▲ /▼ ENTER button to select.
- "Alarm 1 (or 2) Setup On time" is displayed and the hour digits for the alarm will flash.
- Press ▲ /▼ repeatedly to set hour. Press ENTER to confirm.
-
Press ▲ /▼ to set minute, Press ENTER to confirm.
-
Press ▲ /▼ to choose the duration for the alarm. You can choose from 15 to 90 minutes. Press the ENTER button to confirm.
- Press ▲ /▼ to scroll to choose DAB/FM /USB/CD /Buzzer. Press ENTER to confirm. Then select alarm repeat from "Daily" "Once" "Weekends" "Weekdays".
- Press ▲ /▼ select the Alarm volume from 0 to 32, Press ENTER to confirm.
- Press ▲ /▼ to select alarm "ON" "OFF", press ENTER to save the alarm setting.
- The display will show the current time and Alarm 1 (or Alarm 2 or both at the same time)
Warning: When alarm source CD/USB is selected and there is no CD / USB inserted, there will sound "buzzer" Note: Choose Alarm source OFF if the alarm shouldn't activate the next day
Snooze
- Whenever the alarm (alarm 1, alarm 2) comes on, it can be temporarily suspended for a short period of approximately 9 minutes, by pressing the "SNOOZE" key once.
- The alarm (alarm 1, alarm 2) will then automatically sound again after approximately 9 minutes have passed.
- The "Zz" symbol will show on the display to remind that the snooze function is active.
- To deactivate the snooze, press and release the "POWER" key.
Sleep Timer
- Repeatedly press the SLEEP button, you can choose between 90//60/50/45/30/15 minutes. After this time, the unit will go to standby mode. This is useful for falling asleep to music at night.
- If you want to cancel the sleep mode, repeatedly press SLEEP until OFF appears on the display
Display Backlight
You can press the DIMMER button adjust the display backlight brightness, there are 3 options available, High, Medium and Low.
Radio mode
DAB Radio mode
Carefully extend the telescopic antenna.
Press the POWER button to turn on the unit, press the MODE button to select to DAB mode, it will start up into DAB mode.
Auto Scan
- If this is the first time the unit has entered DAB Mode, it will automatically start an 'Auto Scan' to search for available stations. (Once DAB Mode has been used before, the unit will automatically select the previously played station)
- Hold the ENTER button to automatically start auto scan to search for available stations. During the scanning process, the lower line of the display shows a bar graph indicating the progress of the scan.

Preset
1. Preset Recall
In DAB menu, press [◀◀] or [▶▶] station select "Preset Recall", then press [ENTER] to tune to the stored in preset memory. Or press PROG. Button (11) of the remote control.

Note: If you have not previously stored a preset station and the preset button is pressed, "Empty preset" will be displayed.
2. Preset Store
You may store your preferred DAB stations to the preset station memories. There are 50 memory presets in your radio. Presets are remembered by your radio in the event of a power failure.
In DAB menu, select [Preset store] with ◀◀ and ▶▶, then press [ENTER]. Press the “previous or next” buttons to select a storage space, then press [ENTER] to confirm the desired preset number under which you will store the station you are currently playing. Press [ENTER] to confirm.

Manual Scan
- Press the MENU key on main unit to enter the menu.
- Press the [◀◀] or [▶▶] button to select "Manual tune", press the [ENTER] button to the service menu.
- Press [◀◀] or [▶▶] enter to tune in the desired channel. A graph will indicate the signal strength if you press [ENTER]
- Press [MENU] or [▲ /▼] to exit scan.
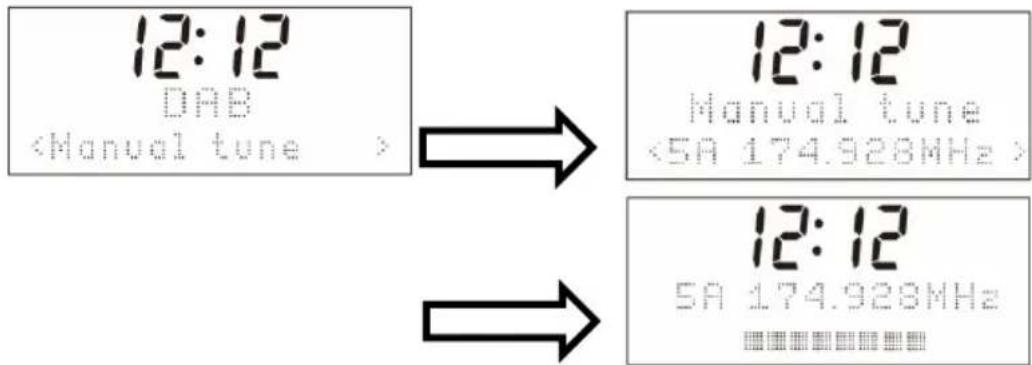
- If no stations are found, please ensure the aerial is extended and test the reception by doing another auto scan in a different location.
DRC (Dynamic Range Control)
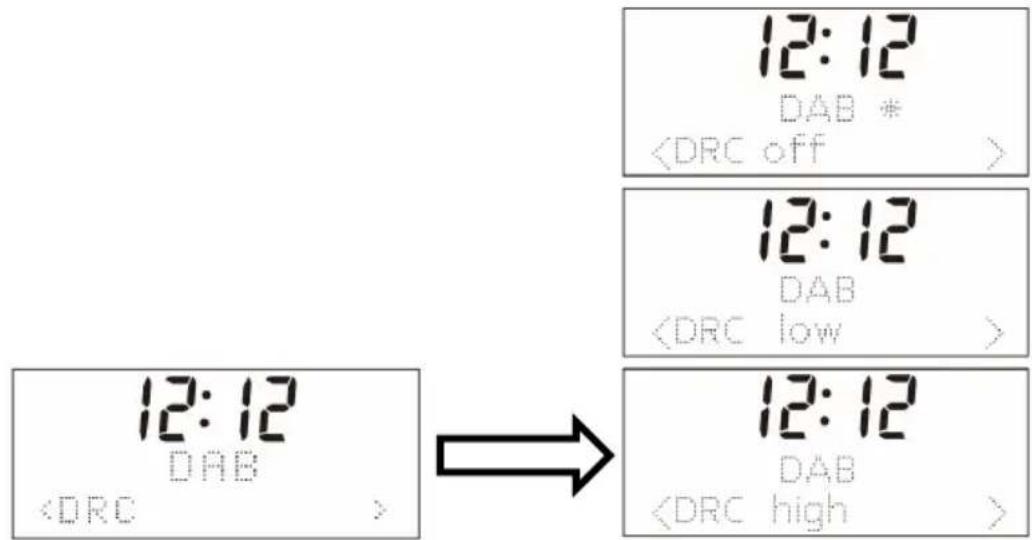
Dynamic Range Control (also known as DRC) is a technology used to help make quieter sounds easier to hear in a noisy environment.
- In DAB menu, press the [◀◀] / [▶◀] button or ◀/▶ button on remote control to select "DRC", press the [ENTER] button to display "*" to the top right.
- DRC OFF - DRC is switched off, broadcast DRC will be ignored. DRC LOW - DRC level is set to 1/2 that sent by broadcaster.
DRC HIGH - DRC level is used as sent by broadcaster.
Press MENU to confirm the setting. The display will return to normal.
Prune (To Remove Stations That are Listed But Unavailable)
In DAB menu, press [◀◀] or [▶▶] to display the "Prune" submenu, press [ENTER] to select the Prune option.

ASA (Automatic safety albert)
In DAB menu, press [◀◀] or [▶▶] to show the "ASA" SUBMENU, PRESS [ENTER] button to go to the ASA setting.
- Press [◀◀] or [▶▶] button to select the ASA function "on"/ "off";
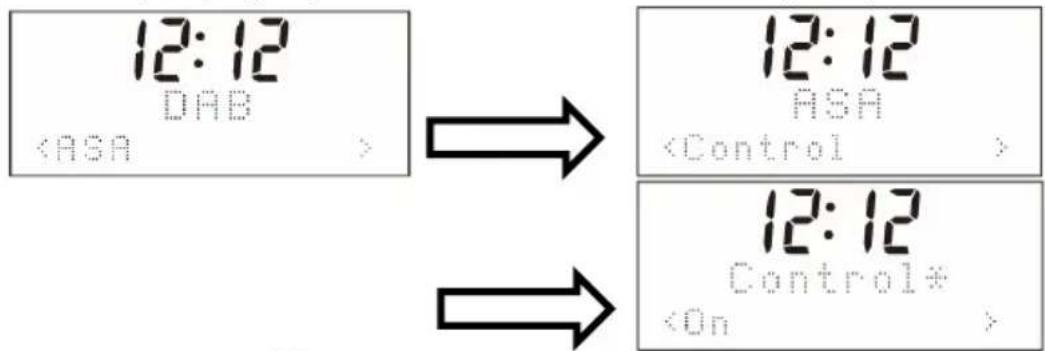
- Press [◀] or [▶] button to setting the Location code.
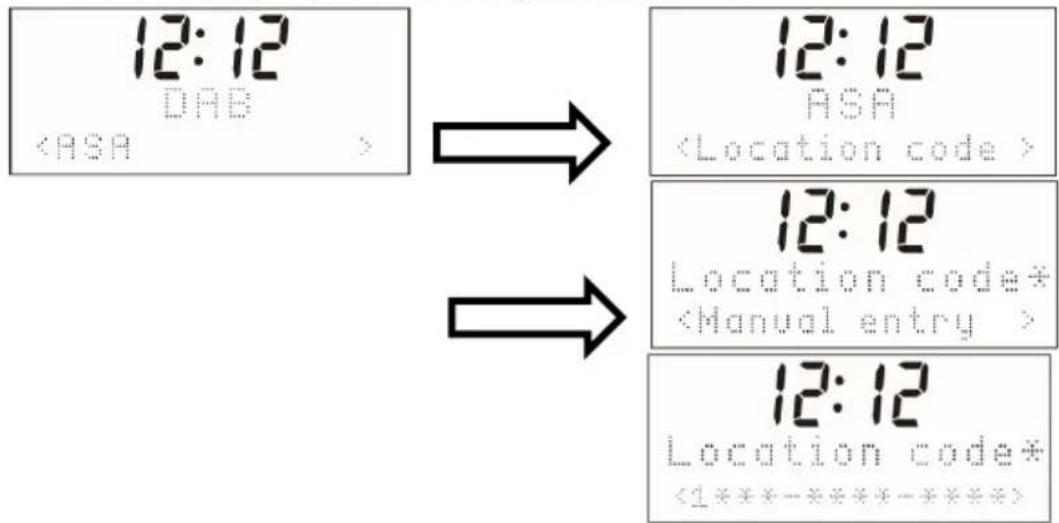
flowchart
graph TD
    A["12:12 DAB <ASA>"] --> B["12:12 ASA <Location code>"]
    A --> C["12:12 Location code* <Manual entry >"]
    C --> D["12:12 Location code* <1****-*****-*****>"]
You can calculate your ASA Area Code at https://asa.radio/. You can search for your address there or use the GPS function on your smartphone.
System (DAB)
In DAB menu, press [◀◀] or [▶▶] to show the "SYSTEM" submenu, press the [ENTER] button to go to the system settings.
1. Language
Press [ENTER] to go to language selection; the default source language is English, the selected language will have "*" displayed at the top right. Users may choose between English, French, Italian, Deutsch, Polish, Nederlands, Espanol

2. Factory Reset
Press [ENTER] to perform a factory reset. If you wish to perform the reset operation, push [◀◀] or [▶▶] until "YES" is highlighted on the display and press [ENTER]. A full reset of your radio will be performed. All presets and station lists will be erased.

3. SW Version
Press [ENTER] to view DAB software version. Press Menu to stop displaying the software version.

(It will be updated along with the product upgrade..)
*If there are no operations after 10 minutes, the display will return to normal.
FM Radio
Carefully extend the telescopic aerial to its full length.
Auto Scan
- Rotate the MODE knob to select "FM Mode".
- Long Press button, and your radio will scan and stop automatically when it finds a station of sufficient signal strength.
- After a few seconds, the display will update. The display will show the station frequency. If the signal is strong enough and the station signal contains RDS data, then the radio will display the station name.
- To find other stations, press and hold the button as before.
- To scan the FM band in the opposite direction (high frequencies to low frequencies), press the button and hold for 2 seconds.
- When the waveband end is reached, your radio will recommence tuning from the opposite waveband end.

Manual Scan
- Press the MODE key on the main unit to select "FM Mode".
- Select FM mode as previously described, if required.
- Press for shortly adjust tuning. Each press of the tuning button will change the frequency up or down by 50 kHz.
- When the waveband end is reached, the radio will recommence tuning from the opposite waveband end. If no stations are found, please ensure the aerial is extended and test the reception by doing another auto scan in a different location.
Menu
1. PRESET:
In FM menu, press [◀] or [▶] station select "Preset Recall", then press [ENTER] to tune to the stored in preset memory. Or press PROG. Button (15) of the remote control.
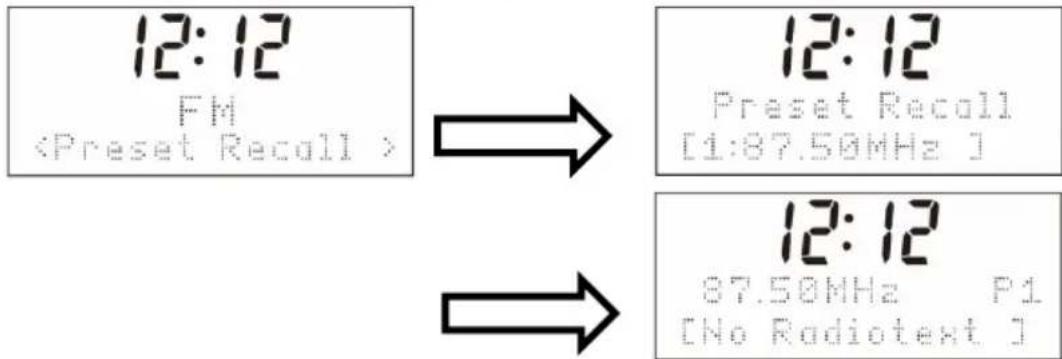
flowchart
graph LR
    A["12:12 FM <Preset Recall>"] --> B["12:12 Preset Recall [1:87.50MHz"]]
    A --> C["12:12 87.50MHz P1 [No Radiotext"]]
1.1. Preset Store (Save a Station):
You may store your preferred FM stations to the preset station memories. There are 50 memory presets in your radio. Presets are remembered by your radio in the event of a power failure.
In FM menu, select [Preset store] with ◀ and ▶, then press [ENTER]. Press the “previous or next” buttons to select a storage space, then press [ENTER] to confirm the desired preset number under which you will store the station you are currently playing. Press [ENTER] to confirm.
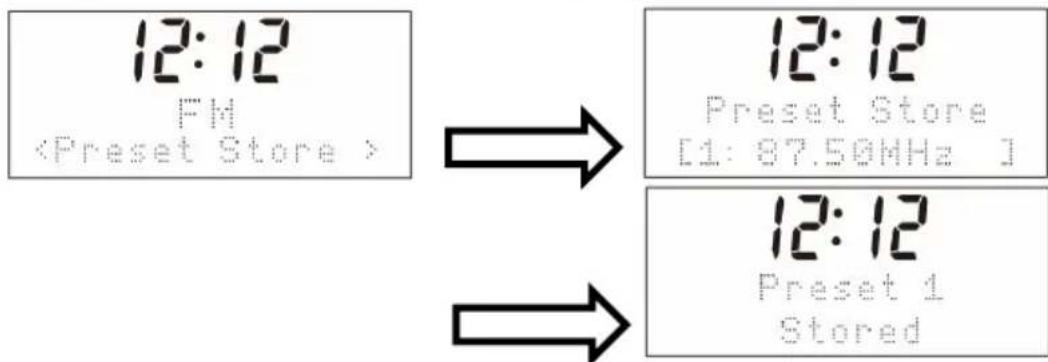
flowchart
graph TD
    A["12:12 FM <Preset Store>"] --> B["12:12 Preset Store [1: 87.50MHz"]]
    B --> C["12:12 Preset 1 Stored"]
2. Scan Setting
In FM mode, press MENU to enter the FM menu, then press ◀◀ or ▶▶ to select [Scan setting], then press ENTER to select the sensitivity setting:
2.1. All stations: \~15dB

2.2. Strong stations only: \~19dB,

3. Audio Setting
3.1. Stereo allowed:

3.2. Forced mono

3.3. System (FM system), same as DAB system setting.
Bluetooth Mode
You must follow several steps to connect your mobile phone:
- Activate Bluetooth from your mobile phone (please refer to your phone's user manual)
- Press POWER button to turn on the unit, then press the MODE button repeatedly until the "Bluetooth searching..." indicator appears on the LCD display. It will be ready to pair automatically.
- Use your mobile phone to search for the Bluetooth device named "Imperial Dabman 280CD".
- Select "Imperial Dabman 280CD" on your phone and it present the option to connect or not. Please connect to it using the password "0000" (if any). When you are successfully connected, the Bluetooth indicator "Bluetooth connected" appears on the LCD display.
Automatically Connecting with Your Phone
Pairing is only needed the first time the unit and phone are used together. When the unit and phone have been paired once, they will automatically connect when the unit is on and Bluetooth is activated on the phone. The next time you power on, the unit will automatically connect to the most recently connected mobile phone.
Play from Bluetooth Device
After successful Bluetooth connection, press the ▶II button to play. Press the ◀◀ or ▶▶ button to skip the tracks backwards or forwards. To pause or resume play, press ▶the button again. Press and hold the button to ▶II disconnect all paired Bluetooth devices.
Marks: The maximum connection distance is around 10 meters. Please place your Bluetooth device as close as possible to this device to avoid connection getting disturbed.
Playing a compact disc (CD)
Playing a compact disc (CD)
NOTE: Never touch the laser lens inside the CD compartment. Clean the laser lens using a CD cleaner disc if it becomes dirty.
- Press the POWER button to turn on the unit.
- Press the MODE button repeatedly to select the CD function.
- Press the ▲ button to open the CD door and insert a CD into the tray (with printed label side facing up).
- Press the ▲ button again to close the CD DOOR and the disc will rotate for a few seconds, then play the 1st track automatically.
- To temporarily stop playback, press the ▶ button, and to resume playback, press it again.
- Press the ■ button to STOP play.
REVERSE/FORWARD
- The and Buttons used to jump to a different track number or hold to scan disc tracks at high speed.
- Press the button to start playing the previous tracks on the disc.
- Press the button to start playing the next tracks on the disc.
- Press and hold the button; The current track will be rewarded towards the start of the track track(s); When the desired track section is found, release the button and normal play will resume.
- Press and hold the ▶ button, the current track will be sped up towards the next track(s). When the desired track section is found, release the selected button and normal playback will resume.
REPEAT FUNCTION
The CD REPEAT button may be used to repeat a single track or repeat all tracks on a compact disc.
- Press the REPEAT button once during playback, the "REPEAT ONE" sign will appear on the LCD display. The same track will be repeated over and over.
- Press the REPEAT button a second time to repeat all tracks. The "REPEAT ALL" sign will appear on the LCD display.
- Press the button three times to start Random playback. The screen will display "RAN".
- To cancel REPEAT PLAY, press the REPEAT button repeatedly until "Disc" appears on the LCD display..
PROGRAM FUNCTION
The Program feature may be used to program up to 20 tracks to play in a selected order.
- While in the stop mode only (CD is not playing), press the PROG button and the LCD display will show the wording "P 01" and "T 01" starts to flash.
- Press the I and buttons to allocate the desired track.
- Press the PROG button to select and store the track into memory.
- Repeat step 2 to 3 to select up to 20 tracks.
- To play the selected tracks (in the program mode), press the button.
- Press the button to hear the previous program track or press the button to hear the next program track.
Note: After all programmed tracks have been played, the CD player will return to the stop mode.
- To clear the programmed tracks from memory, press button twice.
MP3 DISC SECTION
- Press the POWER button to turn on the unit.
- Press the MODE button repeatedly to select CD Mode.
- Close the CD Door and the disc will rotate for a few seconds and then play the 1st track automatically.
- Press the I and buttons to choose a track.
- To temporarily stop playback, press the ▶ button; to resume, press the button again.
- Press the button to stop play.
Note: Because MP3 discs have a large capacity, disc access times are a little longer.
Repeat Playing Function
Single Track Repeat
Press the REPEAT button once to repeat a single track. The display appears as "Repeat one".
Whole Disc Repeat
In Play mode, press the REPEAT button 2 times to repeatedly play all tracks on the disc. The display will show "Repeat All".
To cancel repeat play, press the REPEAT button repeatedly until the "DISC" sign appears.
PROGRAM PLAY
The tracks on the disc can be programmed to play in any order (99 tracks can be programmed). Note: this can only be done while in Stop mode
- Press the PROG button while in Stop mode. "P01" "F01" will appear on the display and "T001" will flash.
- Press the ◀◀ or ▶▶ button to select the desired tracks in the album, then press the PROG button to store in the memory.
- The first track number is now stored in memory, and the program number changes to "P02", waiting for your next selection.
- Repeat Steps 1 – 3 to program additional tracks.
After programming is finished, press the button, and programmed play begins from the first programmed track. The player stops automatically after all programmed tracks have been played. (Press the button twice to cancel the programmed tracks memory).
Playing music via USB
This device has been developed using the latest technical advances in the USB field. However, given the wide range of USB storage device types that are currently on the market, we unfortunately cannot guarantee full compatibility with all USB storage devices. For this reason, in rare cases, there may be problems in playing back files from USB storage devices. This is not due to device malfunction.
- Press the POWER button to turn on the unit.
- Press the MODE button repeatedly until 'USB' appears on the display.
- Connect a USB storage device directly into the PLAYER USB port. The display briefly shows the number of folders and then the total number of tracks. Playback will automatically start.
- Operation of the control buttons is the same as for MP3 CD playback. Please refer to MP3 DISC SECTION operations as described previously.
NOTES:
• Always directly connect a USB storage medium to the USB port to prevent any malfunctions.
- The PLAYER USB port is not designed for charging external devices.
- Important: Switch the device to a different operating mode before you remove the USB storage device.
AUX input jack
AUX Input Jack
- Press the POWER button to turn on the unit.
- Rotate the MODE button repeatedly to select the Aux-In mode. 'Aux-input' will appear on the LCD display.
- Connect the AUX connect wire from the line out jack of your personal player (e.g. portable MP3player) to the AUX input jack.
- Start playback from your personal player.
Line Input Jack
- Press the POWER button to turn on the unit.
- Press the MODE button repeatedly to select the Line-In mode. 'Line input' will appear on the LCD display.
- Connect the Line connect wire from the line out jack of your personal player (e.g. portable MP3player) to the Line input jack.
- Start playback from your personal player.
Equalizer
With your unit switched on (not in Standby mode):
- Press EQ button once, use the ◀◀ or ▶◀ button to change the EQ setting like: FLAT, ROCK, POP, JAZZ, CLASSIC according to your individual preferences.
- Press EQ button twice, use the ◀◀ or ▶◀ button to scroll the Bass setting.
- Press EQ button three times, use the ◀◀ or ▶◀ button to scroll the Treble setting.
USB charge
The USB port is designed for charging external devices, such as smart phones. Output power is 5V—1A
Technical specifications:
| Input | AC 100-240V ~ 50/60Hz |
| Music power | 2 x 15W RMS |
| Speaker Driver | 3Ω, 8W,4pcs |
| Batteries in remote control | 2x1.5V AAA / UM4 /LR03(not included) |
| DAB Frequency | 174.928 - 239.200 MHz |
| FM Frequency | 87.5 - 108 MHz |
| Bluetooth Frequency: | 2402 - 2480MHz |
| Bluetooth Version: | V5.4 |
| EIRP / RF output power: | <3.56dBm |
| Power consumption | Max 50W |
| Power consumption (standby) | < 1W |
| Operating Temperature | 0°C-35°C |
| Operating position | Horizontal |
| Dim. unit | 425 x 280 x 135mm |
| Weight | 4.8 kgs |
Adapter specifications
- Adaptor manufacturer name or trademark: Shenzhen Boshenggao Techn. Co., Ltd, 106 Fuyuan Rd. St Baoan District Shenzhen Guangdong 518103, China
• Adaptor model number: BSG065A-1504000EU
• Input voltage and frequency: 100-240V, 50/60Hz
• Output voltage, current, power: 15.0V, 4.0A, 60W
• Average active efficiency: 89.10 %
• Efficiency at low load (10%): 80.2%
• No-load power consumption: 0.10W
Remark
Poor DAB reception in some locations.
As the DAB network is not yet fully developed, this can lead to poor reception, especially in rural areas that are not yetfully developed. You should therefore test the DR 455 radio ata different location before sending it in for repair due to poor reception.
WARNING! Risk of hearing impairment
- Set a low volume on the playback device before connecting headphones.
- Avoid excessive volume, particularly over extended periods or frequent use. Excessive volume can result in permanent hearing impairment.
About the disks
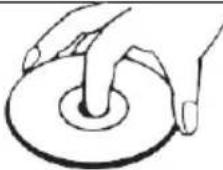 | HandlingDo not touch the underside of disks.Hold disks by the edges to avoid leaving fingerprints on the surface. Any dust, fingerprints or scratches may cause a malfunction.Never affix a label or sticky tape to the disk. |
 | StoragePut disks back in their case after use.Never expose disks to direct sunlight or heat sources. Never leave disks inside a car parked in full sunlight. |
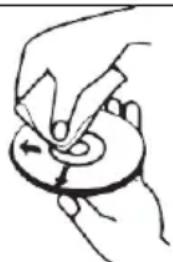
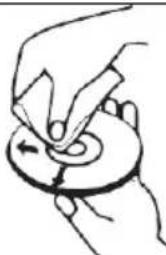 | CleaningUse a clean, soft, lint-free cloth to clean the disk, working from the center outwards in a straight line. Do not use solvents such as petrol, thinners, commercially available cleaners or antistatic sprays for vinyl disks. |
1. Guarantee
Commaxx B.V. (Lenco) offers service and warranty in accordance to European law, which means that in case of repairs (both during and after the warranty period) you should contact your local dealer.
Important note: It is not possible to send products that need repairs to Commaxx B.V. directly. Important note: If this unit is opened or accessed by a non-official service center in any way, the warranty expires.
This device is not suitable for professional use. In case of professional use, all warranty obligations of the manufacturer will be voided.
2. Disclaimer
Updates to Firmware and/or hardware components are made regularly. Therefore some of the instruction, specifications and pictures in this documentation may differ slightly from your particular situation. All items described in this guide for illustration purposes only and may not apply to particular situation. No legal right or entitlements may be obtained from the description made in this manual.
3. Disposal of the Old Device
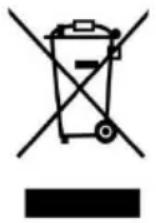
This symbol indicates that the relevant electrical product or battery should not be disposed of as general household waste in Europe. To ensure the correct waste treatment of the product and battery, please dispose them in accordance to any applicable local laws of requirement for disposal of electrical equipment or batteries. In so doing, you will help to conserve natural resources and improve standards of environmental protection in treatment and disposal of electrical waste (Waste Electrical and Electronic Equipment Directive).
4. DECLARATION OF CONFORMITY
Hereby, Commaxx B.V. (Lenco) declares that the radio equipment type [Imperial Dabman280] is in compliance with directive 2014/53/EU. The full text of the EU declaration of conformity is available at the following internet address:
https://doc.nedis.com/en-us/DABMAN280CDBK
https://doc.nedis.com/en-us/280CDWDSI
| Type RF | Frequency range (MHz) | Power (dBm) |
| DAB | 174-240 | - |
| FM | 87.5-108 | - |
| Bluetooth | 2402-2480 | <6 |
5. Service
For more information and helpdesk support, please contact : support@commaxxgroup.com
NEDERLANDS
VOORZICHTIG:
This product contains a low power laser device.
CAUTION INVISIBLE LASER RADIATION WHEN OPEN AND INTERLOCKS DEFEATED. AVOID EXPOSURE TO BEAM

natural_image
Warning symbol with a sunburst pattern inside a triangle (no text or numbers)| EN | NL |
| CLASS 1 LASER PRODUCT | KLASSE 1 LASERPRODUCT |
| CAUTION | VOORZICHTIG |
| INVISIBLE LASER RADIATION WHEN OPEN AND INTERLOCKS DEFEATED | ONZICHTBARE LASERSTRALING INDIEN OPEN EN VERGRENDELINGEN UITGESCHAKELD |
| AVOID EXPOSURE TO BEAM | VERMIJD BLOOTSTELLING AAN DE STRAAL |
| This product contains a low power laser device. | Dit product bevat een laserapparaat met laag vermogen. |
Automatic Safety Alert
digitalradio DAB+ DAB FM certified
Accessoires
| Afstandsbediening | Gebruikershandleiding | Aux-ingangskabel |
| | |
| 3,5 mm Line-in kabel | Binnenantenne | AC-adapter |
| | |
natural_image
Simple line drawing of a rectangular object with an arrow pointing downward (no text or symbols)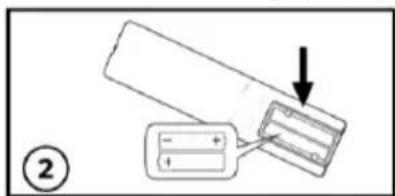
natural_image
Simple diagram showing a rectangular object with an arrow pointing to a small triangular symbol inside, labeled with number 3 (no text or symbols on the object itself)2.2. Alleen sterke zenders: \~19 dB,

3. Audio-instelling
3.2. Gedwongen mono

This product contains a low power laser device.
CAUTION INVISIBLE LASER RADIATION WHEN OPEN AND INTERLOCKS DEFEATED. AVOID EXPOSURE TO BEAM

natural_image
Warning symbol with a black triangular triangle containing a central sunburst pattern (no text or numbers)Automatic Safety Alert
digitalradio DAB+ DAB FM certified
Zubehör
natural_image
Simple diagram showing a rectangular object with an arrow pointing downward, labeled with number 1 (no text or symbols on the object itself)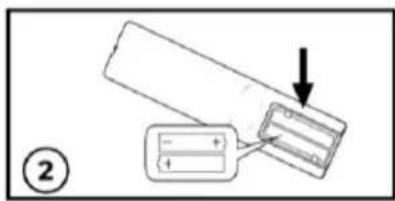
natural_image
Simple diagram showing a rectangular object with an arrow pointing to a smaller internal component, labeled with number 3 (no text or symbols on the object itself)3. Audioeinstellung
3.1. Stereo zulassen:

3.2. Mono erzwingen

This product contains a low power laser device.
CAUTION INVISIBLE LASER RADIATION WHEN OPEN AND INTERLOCKS DEFEATED. AVOID EXPOSURE TO BEAM

natural_image
Warning symbol with a sunburst pattern inside a triangle (no text or numbers)| EN | FR |
| CLASS 1 LASER PRODUCT | PRODUIT LASER DE CLASSE 1 |
| CAUTION | ATTENTION |
| INVISIBLE LASER RADIATION WHEN OPEN AND INTERLOCKS DEFEATED | RAYONNEMENT LASER INVISIBLE EN CAS D'OUVERTURE ET DE DÉVERROUILLAGE |
| AVOID EXPOSURE TO BEAM | ÉVITER D'ÊTRE EXPOSÉ AU FAISCEAU |
| This product contains a low power laser device. | Ce produit contient un dispositif laser à faible puissance. |
Automatic Safety Alert
digitalradio DAB+ DAB FM certified
Accessoires
natural_image
Simple line drawing of a rectangular object with an arrow pointing downward, labeled with number 1 (no text or symbols on the object itself)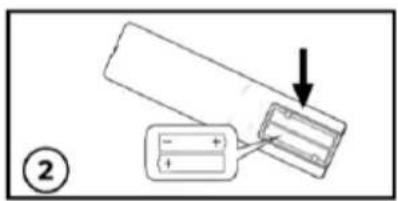
natural_image
Simple diagram showing a rectangular object with an arrow pointing to a smaller internal component, labeled with number 3 (no text or symbols on the object itself)2.2. Strong station only (Stations fortes uniquement) : \~19 dB,

3. Paramètres audio
3.2. Mono forcé

natural_image
Simple line drawing of a hand pressing down on a circular object (no text or symbols)
natural_image
Illustration of hands performing a circular motion or maneuvering operation on a circular object (no text or symbols)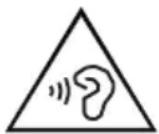
Manipulation
4. DÉCLARATION DE CONFORMITÉ
This product contains a low power laser device.
CAUTION INVISIBLE LASER RADIATION WHEN OPEN AND INTERLOCKS DEFEATED. AVOID EXPOSURE TO BEAM

natural_image
Warning symbol with a sunburst pattern inside a triangle (no text or numbers)Automatic Safety Alert
digitalradio DAB+ DAB FM certified
Accesorios
natural_image
Simple line drawing of a rectangular object with an arrow pointing downward, labeled with number 1 (no text or symbols on the object itself)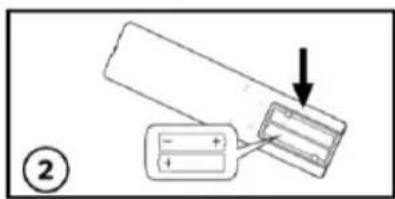
natural_image
Simple diagram showing a rectangular object with an arrow pointing to a small triangular symbol inside, labeled with number 3 (no text or symbols on the object itself)3. Ajustes de audio
3.2. Solo mono

This product contains a low power laser device.

natural_image
Warning symbol with a sunburst pattern inside a triangle (no text or numbers)| EN | DA |
| CLASS 1 LASER PRODUCT | LASERPRODUKT I KLASSE 1 |
| CAUTION | FORSIGTIG |
| INVISIBLE LASER RADIATION WHEN OPEN AND INTERLOCKS DEFEATED | USYNLIG LASERSTRÅLING HVIS ENHEDEN ÅBNES, OG SIKKERHEDSLÅSE BRYDES OP |
| AVOID EXPOSURE TO BEAM | UNDGÅ EKSPONERING FOR STRÅLE |
| This product contains a low power laser device. | Produktet indeholder en laserenhed med lav effekt. |
Automatic Safety Alert
digitalradio DAB+ DAB FM

Tilbehør
DAB-FM-BT-CD-USB-AUX-LINE
(DAB-FM-BT-CD-USB-AUX-LINJE)
natural_image
Simple line drawing of a rectangular object with an arrow pointing downward, labeled with number 1 (no text or symbols on the object itself)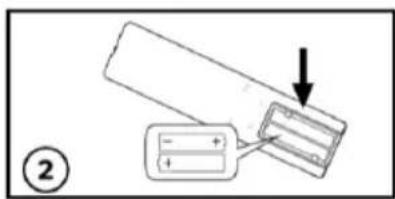
natural_image
Simple diagram showing a rectangular object with an arrow pointing to a small triangular symbol inside, labeled with number 3 (no text or symbols on the object itself)2.2. Strong stations only (Kun radiostationer med stærkt signal): - 19 dB,

3. Lydindstilling
3.1. Stereo tilladt:

3.2. Forced mono (Tvungen mono)

3.3. System (FM-system), identisk med indstillingen for DAB-system.
Bluetooth-tilstand
Følg disse trin for at tilslutte din mobiltelefon:
This product contains a low power laser device.
CAUTION INVISIBLE LASER RADIATION WHEN OPEN AND INTERLOCKS DEFEATED. AVOID EXPOSURE TO BEAM

natural_image
Warning symbol with a black triangular triangle containing a central sunburst pattern (no text or numbers)| EN | SE |
| CLASS 1 LASER PRODUCT | KLASS 1 LASERPRODUKT |
| CAUTION | FÖRSIKTIGHET |
| INVISIBLE LASER RADIATION WHEN OPEN AND INTERLOCKS DEFEATED | OSYNLIG LASERSTRÅLNING I ÖPPET LÄGE OCH MED ÅSIDOSATTA FÖRREGLINGAR |
| AVOID EXPOSURE TO BEAM | UNDVIK EXPONERING FÖR STRÅLE |
| This product contains a low power laser device. | Den här produkten innehåller en laserenhet med låg effekt. |
Automatic Safety Alert
digitalradio DAB+ DAB FM

Tillbehör
| Fjärrkontroll | Bruksanvisning | AUX-kabel |
| | |
| 3,5 mm ledning i kabel | Inomhusantenn | Nätadapter |
| |  |
natural_image
Simple line drawing of a rectangular object with an arrow pointing downward, labeled with number 1 (no text or symbols on the object itself)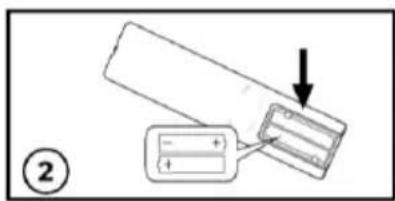
natural_image
Simple diagram showing a rectangular object with an arrow pointing to a small triangular symbol inside, labeled with number 3 (no text or symbols on the object itself)2.2. Endast stationer med starka signaler: \~ 19 dB,

3. Ljudinställning
3.2. Tvingad mono

natural_image
Warning symbol with black triangular triangle and central sunburst pattern (no text)This product contains a low power laser device.
| EN | FI |
| CLASS 1 LASER PRODUCT | LUOKAN 1 LASERTUOTE |
| CAUTION | HUOMIO |
| INVISIBLE LASER RADIATION WHEN OPEN AND INTERLOCKS DEFEATED | NÄKYMÄTÖNTÄ LASERSÄTEILYÄ KUN AUKI JA LUKITUKSET ON OHITETTU |
| AVOID EXPOSURE TO BEAM | VÄLTÄ ALTISTUMISTA SÄTEELLE |
| This product contains a low power laser device. | Tämä tuote sisältää matalatehoisen laserlaitteen. |
Automatic Safety Alert
digitalradio DAB+ DAB FM

Tarvikkeet
DAB-FM-BT-CD-USB-AUX-LINJA
natural_image
Simple line drawing of a rectangular object with an arrow pointing downward (no text or symbols)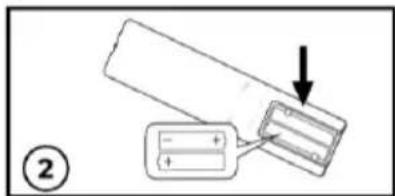
natural_image
Simple line drawing of a rectangular object with an arrow pointing to it, labeled with number 3 (no text or symbols on the object itself)3. Ääniasetus
3.2. Pakotettu mono

- Index
- ENGLISH
- CAUTION:
- KEEP THESE INSTRUCTIONS IN MIND:
- Caution about the use of Batteries:
- INSTALLATION
- WARNING
- Class 1 Laser Product
- General ASA Function Warning
- WARNING:
- Warning About Disabling ASA
- IMPORTANT NOTICE:
- Signal & Interference Warning
- Legal/Regulatory Compliance Notice
- i NOTE:
- Standby Mode Alert
- i REMINDER:
- Accessories
- Remote control
- BATTERY INSTALLATION
- Auto standby
- Power setting
- ASA emergency announcements
- Operation
- Adjusting the volume
- Adjust the Tone
- Adjust the Treble
- Adjust the Bass
- Adjust the Balance
- Mute function
- Clock and timers
- Setting the clock and date
- Setting Alarm
- Snooze
- Sleep Timer
- Display Backlight
- Radio mode
- DAB Radio mode
- Auto Scan
- Preset
- Preset Recall
- Preset Store
- Manual Scan
- DRC (Dynamic Range Control)
- System (DAB)
- Language
- Factory Reset
- SW Version
- FM Radio
- Menu
- PRESET:
- Preset Store (Save a Station):
- Scan Setting
- All stations: \~15dB
- Strong stations only: \~19dB,
- Audio Setting
- Stereo allowed:
- Forced mono
- System (FM system), same as DAB system setting.
- Bluetooth Mode
- Automatically Connecting with Your Phone
- Play from Bluetooth Device
- Playing a compact disc (CD)
- REVERSE/FORWARD
- REPEAT FUNCTION
- PROGRAM FUNCTION
- MP3 DISC SECTION
- Repeat Playing Function
- Whole Disc Repeat
- PROGRAM PLAY
- Playing music via USB
- NOTES:
- AUX input jack
- Line Input Jack
- Equalizer
- USB charge
- Adapter specifications
- Remark
- Poor DAB reception in some locations.
- WARNING! Risk of hearing impairment
- About the disks
- Guarantee
- Disclaimer
- Disposal of the Old Device
- DECLARATION OF CONFORMITY
- Service
- NEDERLANDS
- VOORZICHTIG:
- Accessoires
- Alleen sterke zenders: \~19 dB,
- Audio-instelling
- Gedwongen mono
- Zubehör
- Audioeinstellung
- Stereo zulassen:
- Mono erzwingen
- Strong station only (Stations fortes uniquement) : \~19 dB,
- Paramètres audio
- Mono forcé
- Manipulation
- DÉCLARATION DE CONFORMITÉ
- Accesorios
- Ajustes de audio
- Solo mono
- Tilbehør
- Strong stations only (Kun radiostationer med stærkt signal): - 19 dB,
- Lydindstilling
- Stereo tilladt:
- Forced mono (Tvungen mono)
- Bluetooth-tilstand
- Tillbehör
- Endast stationer med starka signaler: \~ 19 dB,
- Ljudinställning
- Tvingad mono
- Ääniasetus
- Pakotettu mono
Brand : Imperial
Model : Dabman 280CD
Category : Radio