Structo 7.0 - Saw SCHEPPACH - Free user manual and instructions
Find the device manual for free Structo 7.0 SCHEPPACH in PDF.


User questions about Structo 7.0 SCHEPPACH
0 question about this device. Answer the ones you know or ask your own.
Ask a new question about this device
Download the instructions for your Saw in PDF format for free! Find your manual Structo 7.0 - SCHEPPACH and take your electronic device back in hand. On this page are published all the documents necessary for the use of your device. Structo 7.0 by SCHEPPACH.
USER MANUAL Structo 7.0 SCHEPPACH
text_image
scheppachnatural_image
Exterior view of a modern office building (no signage)Inhalt
D
AllgemeineHinweise
Sicherheitshinweise
natural_image
Technical line drawing of a mechanical assembly with gears and bolts (no text or symbols)Fig. 04
Fig. 05
text_image
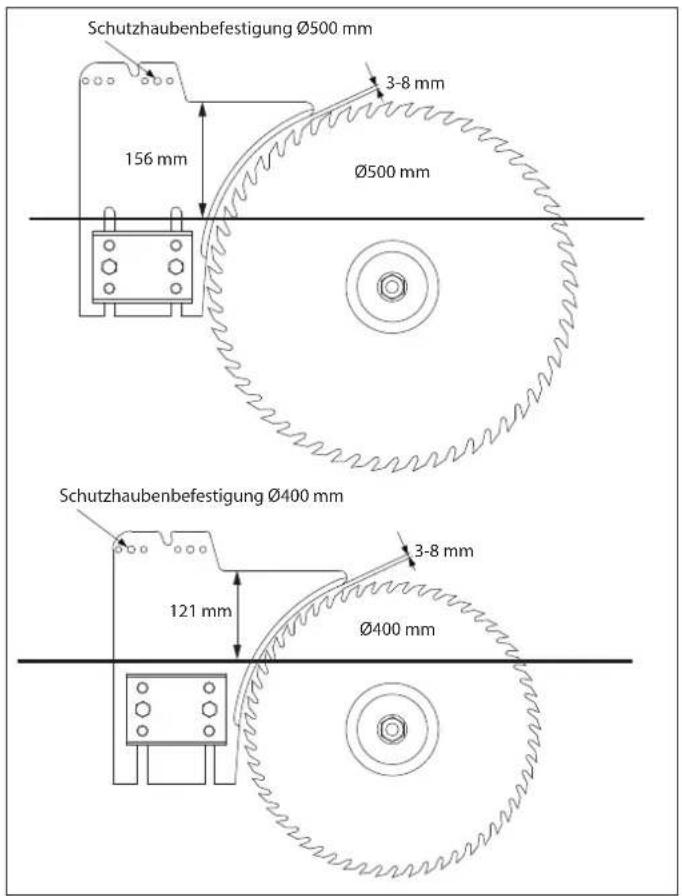
Schutzhaubenbefestigung Ø500 mm 156 mm 3-8 mm Ø500 mm Schutzhaubenbefestigung Ø400 mm 121 mm 3-8 mm Ø400 mmFig. 06
natural_image
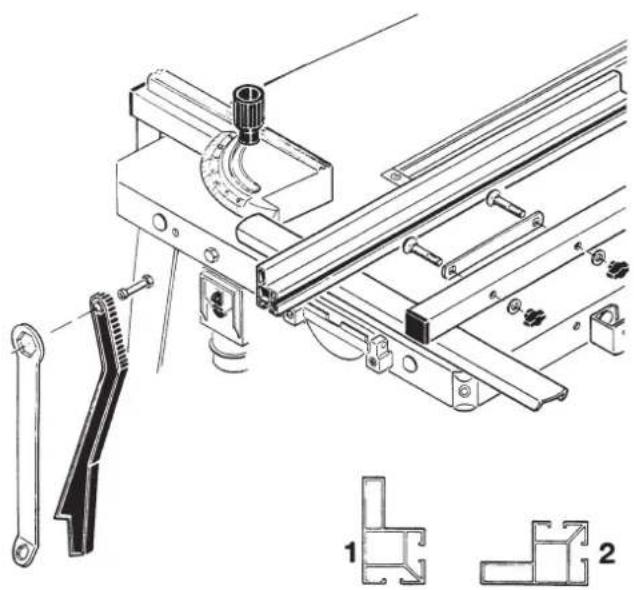
Technical line drawing of a mechanical assembly with labeled components (no text or symbols present)Fig. 07
Fig. 09
natural_image
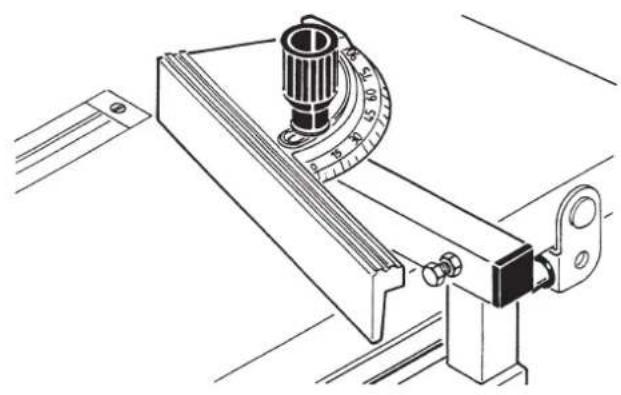
Technical line drawing of a mechanical clamp or measuring device with a central knob and scale (no text or symbols)Fig. 10
natural_image
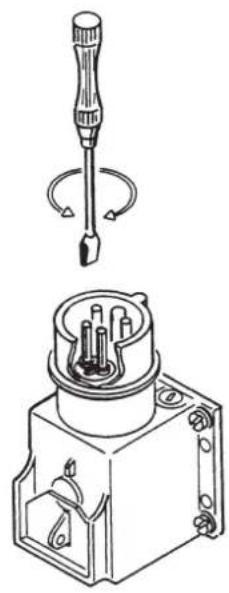
Technical line drawing of a screwdriver and its internal components (no text or symbols)Fig. 08
natural_image
Technical line drawing of a mechanical lifting device with crane hook and mounting base (no text or symbols)
natural_image
Technical line drawings of a mechanical assembly with two views (top and side), showing components like a saw, workpiece, and frame (no text or symbols)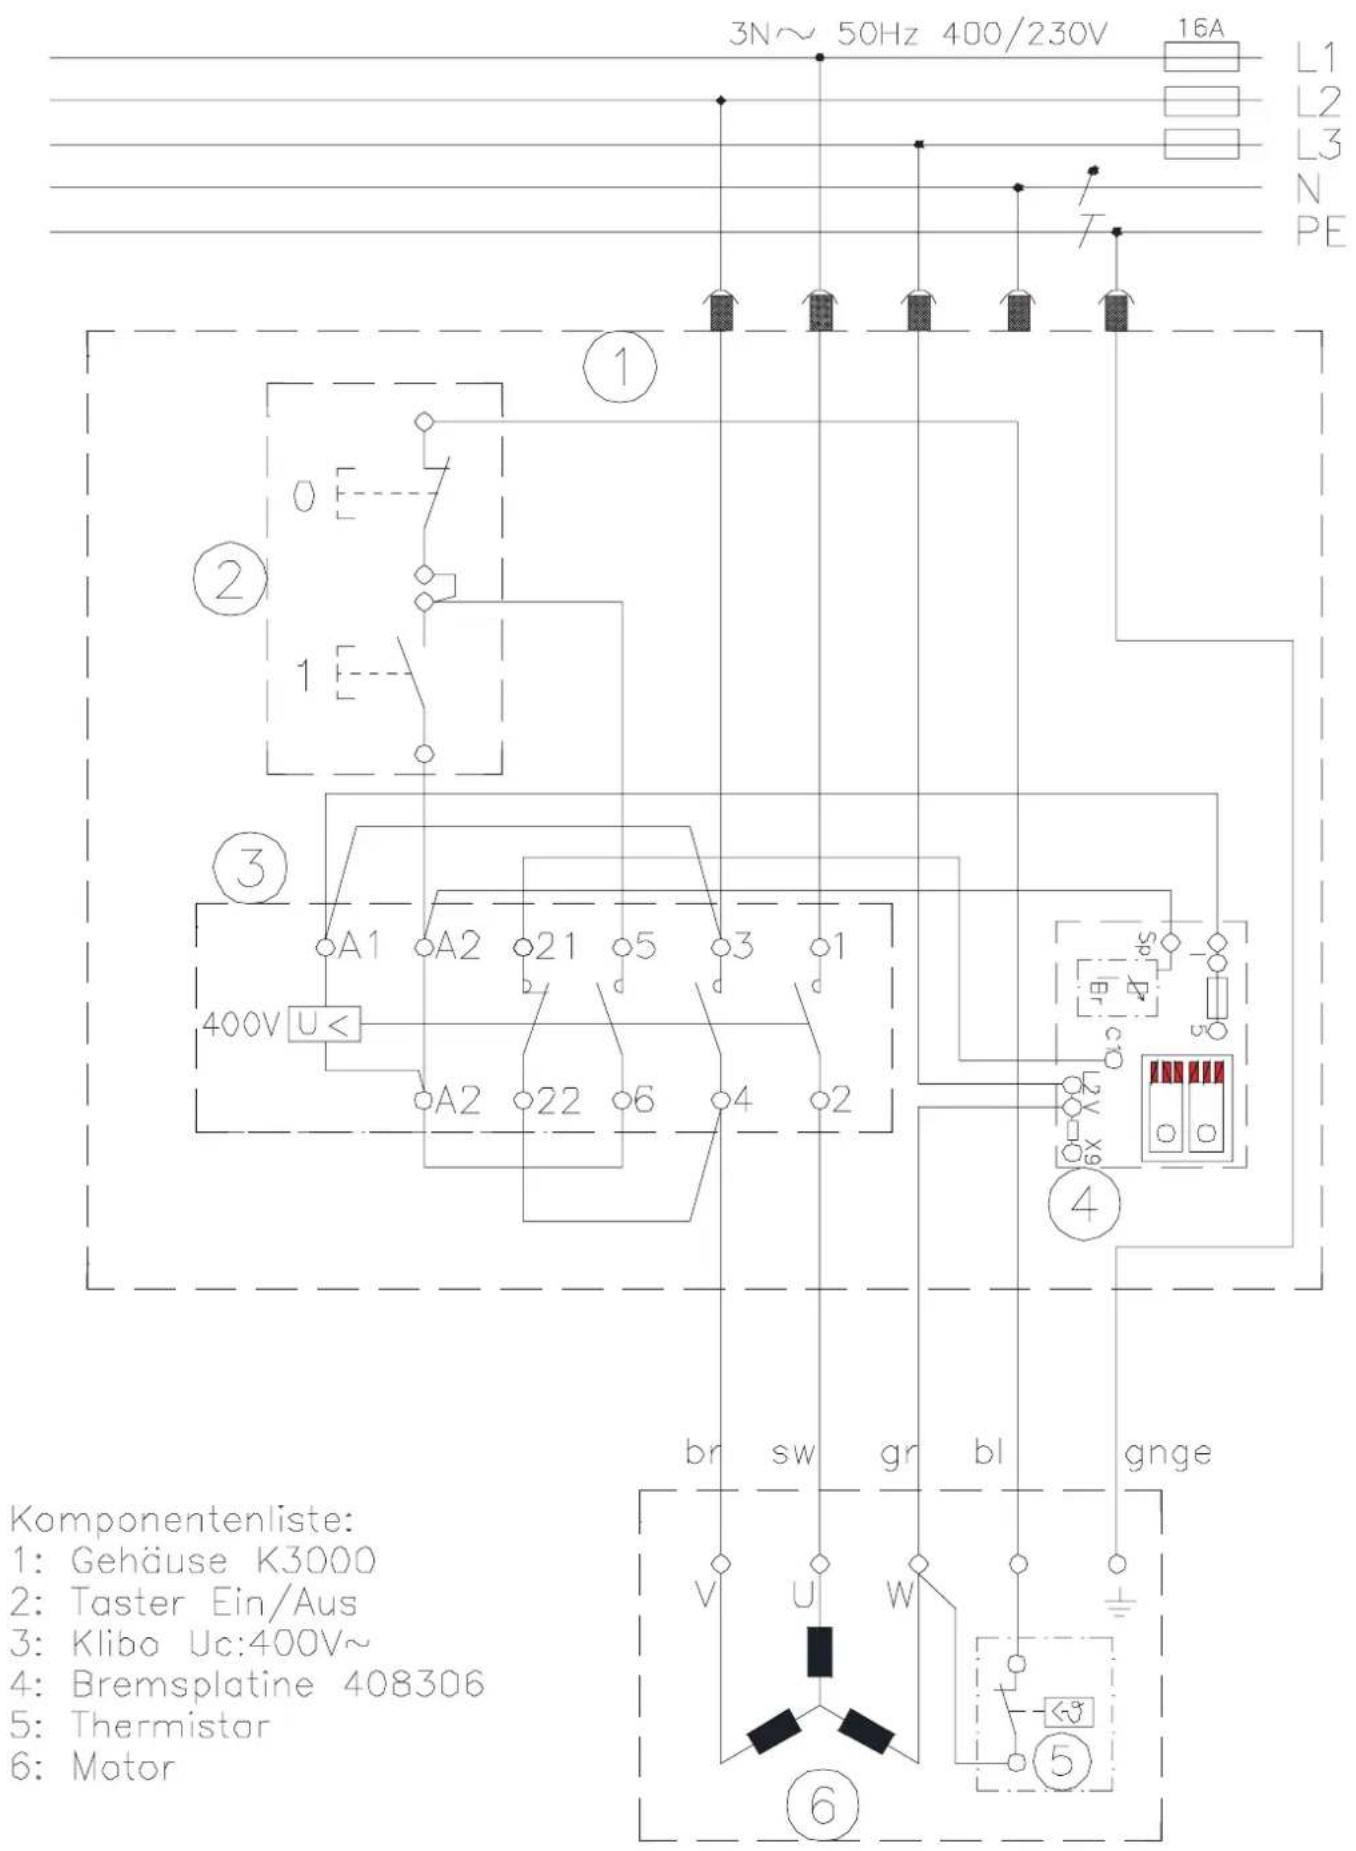
text_image
3N~50Hz 400/230V 16A L1 L2 L3 N PE ① ② ③ A1 A2 21 5 3 1 400V U< A2 22 6 4 2 ④ br sw gr bl gnge V U W ⑤ Komponentenliste: 1: Gehäuse K3000 2: Taster Ein/Aus 3: Klibo Uc:400V~ 4: Bremsplatine 408306 5: Thermistor 6: MotorKomponentenliste:
1: Gehäuse K3000
2: Taster Ein/Aus
3: Klibo Uc:400V\~
4: Bremsplatine 408306
5: Thermistor
6: Motor
Hersteller:
Scheppach
Günzburger Straße 69
D-89335 Ichenhausen
Verehrter Kunde,
Gabelschlüssel SW 7, 8, 10, 13, 17
Günzburger Straße 69
D-89335 Ichenhausen
Dear client,
We hope you will enjoy your new Scheppach construction circular saw and wish you success with it.
The manufacturer of this tool is, according to the current product liability law, not liable for damages caused to or by this tool because of:
- incorrect usage,
- failure to observe the manual,
• repairs by third parties, not authorized specialists, - fitting and exchange of non-original exchange parts,
• non-intended use, - failure of the electrical installations because of inobservance of the electrical Rules and VDE-Regulations 0100, DIN 57113/VDE0113.
We recommend that you:
Read the entire operating instructions before assembling and implementing.
This instruction manual should make it easier for you to get to know your machine and to use its range of applications as intended. The manual contains important information on how to work with the machine in a secure, correct and efficient way, and how you can avoid risks, save repair costs, reduce down time and increase the reliability and life span of the machine. Apart from the security rules mentioned in these operating instructions, you should implicitly pay attention to the valid regulations of your country for the use of the machine. Keep the manual, in a plastic cover protected against dirt and humidity, with the machine. They should be read and observed carefully by every member of staff before starting to work. Only people instructed on how to use the machine and informed about the possible risks, should be allowed to use it. The required minimum age is to be adhered to. Besides the safety instructions in this manual and the special regulations of your country the recognized technical rules for the operation of wood processing machines need to be observed.
General Instructions
• After unpacking please check all parts for possible damage during transport. In case of complaints the driver needs to be contacted as soon as possible.
- Complaints coming in later will not be recognized as such.
- Check if the consignment is complete.
- Familiarize yourself with the machine by means of the operating instructions before implementing it.
- In case of replacing worn or exchange parts, as for accessories, only use original Scheppach parts. You can obtain exchange parts at the specialized dealer.
- Upon ordering, please specify our article n°s as well as type and year of construction of the tool.
Safety instructions
In these operating instructions we have indicated positions that concern your safety with this mark.
- Forward the safety instructions to all people working on or with this machine.
- The machine is only to be used in technically faultless condition as well as according to its intended use, and in a safety and risk conscious manner, and with observance of the operation instructions! Especially malfunctions that can threaten safety have to be repaired immediately.
- Pay attention to all safety and risk instructions of the machine.
- Keep all safety and risk instructions of the machine completely readable.
- The circular saw should not be used to saw firewood.
- Be careful at work: Danger of damaging finger(s) and hand(s) by the rotating cutting tool.
- Check power supply lines.
- Do not use defective lines. See "Electrical connection".
- Please be vigilant the machine is steadfast.
- Please pay attention that the construction circular saw is steadfast while being assembled.
- Keep children away from the to power supply connected machine.
- The minimum age for the operating person is 18 years.
- People running the machine should not be distracted.
- Keep the operating site free from wood chips and waste.
- Pay attention to the rolling direction of the motor and saw blade. See instructions "Electrical connection" page U5 (wall mounted connector).
- Build in only well sharpened, slit free and non-deformed saw blades.
- Circular saw blades made out of high-performance steel should not be built in.
- The security facilities of the machine should not be dismantled nor be made unusable.
- The slit wedge is an important security facility, which leads the workpiece and avoids the closing of the joints behind the saw blade and the reversing of the workpiece. Please note the thickness of the slit wedge – see the staved in n°s on the slit wedge. The slit wedge should not be thinner than the saw blade and not thicker than its intersection width.
- Put the cover on the workpiece at every operation.
- The cover should be put horizontal above the saw blade at every operation.
- When cutting lengthwise small workpieces – less than 120 mm – implicitly use the spline end.
- To repair disorders or to pull out jammed pieces of wood, switch the machine off. Pull out power plug!
- In case of a knocked-out sawing split, renew the inset. Pull out power plug!
- Modifying as well as adjusting, measuring and cleaning to be carried out only when motor is switched off. Pull out power plug!
- Upon leaving the working place, switch off the motor. Pull out power plug!
• Installations, repairs and maintenance with regards to the electrical installation should only be carried out by specialists.
• The machine is only intended for industrial use. - Wear protection gloves when exchanging the saw blade.
- All protection - and safety instructions must be assembled immediately after finished repair and maintenance works.
- Also upon the slightest position movement separate the machine from the external power supply! Upon return to service, connect the machine to the power supply according to the rules!
Intended use
- The machine complies with the valid EG Machines guideline.
- The Scheppach construction circular saw should not be used in closed rooms.
- Only work with ear protection.
- The machine is built according to the electronic level and the safety-related rules. Nevertheless, danger for life and limb of the user or a third party, respectively damage to the machine and other intrinsic values can arise during its use.
- Use the machine only in technical impeccable condition as well as according to its intended use, and in a safety and danger conscious manner with observance of the operational constructions! Immediately eliminate, or have eliminated, in particular those disorders that can harm the safety!
- The Scheppach construction circular saw has been constructed exclusively with tools supplied by Scheppach, according to EN 847-1 and accessories constructed for the sawing of wood. Please note that while sawing all workpieces should be held and led safely.
- The maximum workpiece thickness is 156 mm
- Every use surpassing this counts as non-intended use. In this case the manufacturer is not liable for damages caused; therefore the user only bears the consequences.
- The safety, work and maintenance regulations of the producer as well as the measurements mentioned in the "Technical information" must be adhered to.
- Attention must be paid to the applicable prevention of accidents rules and to the other, generally accepted safety-related rules.
- The Scheppach construction circular saw should only be used, maintained or repaired by people who are familiar with it and informed about the risks. Arbitrary changes to the machine exclude liability of the manufacturar.
- The Scheppach construction circular saw should only be used with original accessories, original extension tools and original saw blades of the manufacturer.
- According to the currently valid regulations the use of this machine is not allowed in closed rooms. The machine should only be used outside or in sufficiently ventilated rooms.
Other risks
The machine is built according to the up to date technical level and the accepted safety-related rules. However, some remaining risks might appear during work.
- Risk of injury to fingers and hands by the rotating saw blade in case of incorrect usage of the workpiece.
- Injuries because of the workpiece being slung away due to incorrect holding or usage, such as working without end stop.
- Risk to health because of wood dust or wood splinters. Wear personal protection gear such as eye protection and dusk mask without fail.
-
Injuries caused by a defect saw blade. Check the saw blade regularly for its integrity.
-
Electricity danger, in case electrical connections that are not according to the rules are used.
• Furthermore, despite of all precautions unapparent remaining risk can exist. - Remaining risks can be minimized, when the "Safety information" and the "Intended use" as well as the operational instructions are both respected.
- Deactivate the machine and pull out the power plugs when you want to clean the machine.
- Keep the electrical connections always oil and grease free.
- The machine has a working area that is in front of the machine.
Scope of delivery
Construction circular saw Longitudinal end stop
| Crosscut | gauge |
| Saw | blade |
| Spline | end |
| Blade | wrench |
| Adherence | arbor |
| Assembly | accesoires |
| Manual |
Technical information
Measurements
LxWxH mm 1725x706x1082
Table size mm 675x1000
Saw blade ∅ mm 500
Cut height mm 156
Rotation 1/min 2840
Weight kg 98
Power unit
| Motor | 400V / 50Hz | |
| P1 | kW | 5,0 |
| P2 | kW | 4,0 |
Subject to technical changes!
Noise specific values
The according to the EN 23746 for the sound pressure level resp. EN 31202 (correction factor k3 after supplement A.2 from EN 31204 calculated) for the sound pressure level on the working site ascertained noise emission value amounts under the foundations of ISO 7960 supplement
A performed working conditions to:
Sound pressure level in dB
Idle state LWA = 105,8 dB(A),
Processing LWA = 111,5 dB(A)
Sound pressure level on working site in dB
Idle state LpAeq = 91,3 dB(A),
Processing LpAeq = 96,1 dB(A)
There is a measurement insecurity allowance K=4dB for the mentioned emission values.
Assembly
Your Scheppach construction circular saw is completely assembled.
Blade wrench
Adherence arbor
Allen wrench SW 5/SW 6 are included in the delivery scope
Open-end wrenches SW 7, 8, 10, 13, 17
Screw driver is not included in the delivery scope
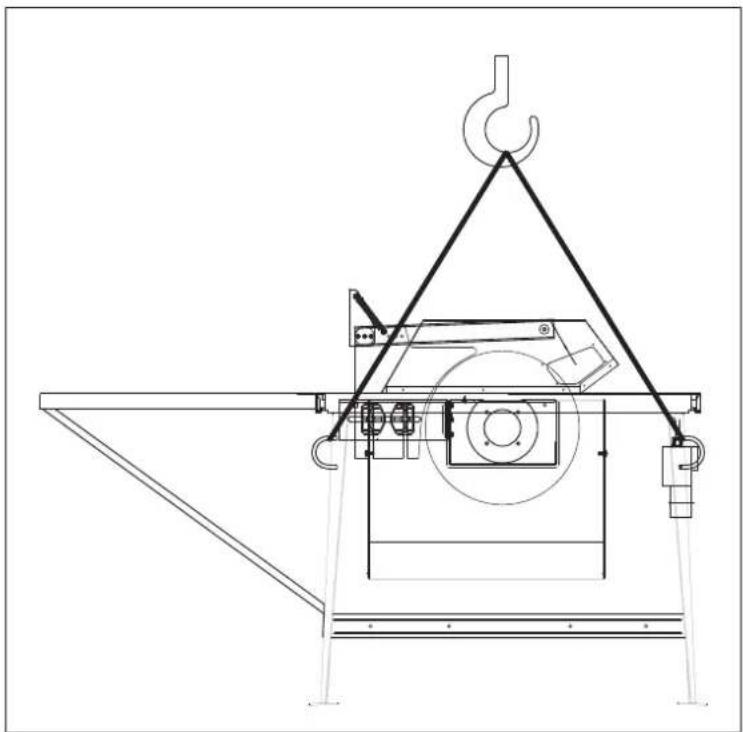
U-bolts
- Both crane U-bolts (6) are diagonally assembled together.
With both crane U-bolts the machine can be hung onto a crane using slings.
Clamping appliance for the longitudinal end stop, (5)
- With the clamping appliance the correctly adjusted longitudinal end stop can be fixated.
Cross-cut gauge, Fig. 08
- Put a round-head screw M8 x 70 from below through the square tub into the crosscut gauge. Clamp the crosscut gauge with disc 8 and handle.
Adjust the slewing unit right-angled to the saw blade with the sixfold screw in the square tub. Use the 90° angle and subsequently carry out a trial cut.
- Assemble the retaining screw on the frame head valve at the front left for the saw blade wrench and spline end.
1 cylindrical screw M5 x 40
2 discs 5
2 sixfold nuts M5
Cover, Fig. 01
- The cover is assembled ready to operate.
- The cover is a protection facility and should always be installed.
- Be vigilant that the cover is always laid out on the table blade by its own weight but with both screws loosely tightened.
Fitting slit wedge, Fig. 04
- The slit wedge socket is assembled.
- Loosen the sixfold screws M12 x 40 in the slit wedge socket. Do not unscrew completely!
- Insert the slit wedge (4) from above between the clamping plate and the inbetween plate and tighten the sixfold screws M12 x 40.
- On fitting the saw blade the slit wedge has to be set up accordingly. (see Fig 09)
Fitting of the saw blade, Fig. 03
- sixfold nut M20 take off left-hand thread and flange.
- set up saw blade from below and den Flange
- on tightening the sixfold nut hold back the motor shaft with the retaining arbor.
Adjustment slit wedge, Fig. 04
- The distance between the saw blade and the slit wedge should maximum be 8 mm.
Check this after every saw blade exchange and adjust if necessary. The peak of the slit wedge should never be set deeper than the height of the highest sprocket. It is recommended to adjust max. 5mm below the peak of the upper saw sprocket peak.
The slit wedge is an important protection facility that
leads the workpiece and avoids the closing of slit joints behind the saw blade, and the returning of the workpiece.
Please note the thickness of the slit wedge – see staved in n°s in the slit wedge. The slit wedge should not be thinner than the saw blade and not thicker than the width of its slit joints.
The slit wedge has to align with the saw blade.
Fig. 02
In case of deviations adjust as follows.
- Loosen sixfold screws (1)
- Align slit wedge vertically
- Slightly tighten sixfold screws (1)
- Align the slit wedge to the saw blade and tighten the sixfold screws (1) again.
Longitudinal end stop, Fig. 05
Screw the middle plate onto the end stop pipe. Do not tighten!
2 flat edge screws M6 x 50
2 discs ∅ 6
2 wing nuts M6
Slide in end stop rail and wedge.
Position 1 = high installation surface
Position 2 = low installation surface
Put the longitudinal end stop in the clamping appliance.
Clamp = pull clamping flap up
Unfasten = push clamping flap down
Electrical connection
The installed electrical motor is connected ready to operate
The connection complies with the relevant VDE- and DIN-regulations
The power supply as well as the used extension cable should comply with these regulations.
Motor-brake facility
Your construction circular saw is equipped with an automatically functioning deadlock brake. The brake starts functioning after switching off the motor.
Important information
The electrical motor is made for operating mode S6 / 40% When the motor gets overcharged, it automatically switches off. After a short cool-down period (time varies) the motor can be switched on again.
Defective electrical power supply cords
Electrical power supply cords often suffer insolation damages. Causes are:
- Pressure spots, when power supply cords are being led through windows or doors.
- Buckling spots by incorrect attachment or guidance of the power supply cords.
•Cuttings by driving over a power supply cord.
• Insulation damages through pulling out of the socket.
•Cracks in worn-out insulation.
Such defective electrical power supply cords should not be used and are extremely dangerous because of the insulation damage.
Check electrical power supply cords for damages on a regular basis. Please observe that upon checking the power supply cord is not plugged in. Electrical power supply
cords have to comply with the relevant VDE - and DIN r regulations. Only use power cables with the qualification H 07 RN. An imprint of the type denomination is rule.
Rotary current motor
• The power supply should be 400 Volt/50 Hz.
- The power supply and the extension cables must be 5-fold leads = 3 P + N + SL.
- Extension cables must have a minimum cable cross section of 1.5 square millimeter.
- The power supply should be maximum 16 A.
- In case of connection to the power supply or moving site the rotary direction should be checked, otherwise the polarity has to be changed (wall mounted connector). Therefore screw the phase switcher into the plug surrounding with a screw driver.
Connections and repairs of the electrical equipment should only be carried out by an electrical specialist.
In case you have further questions, please specify the following:
- Motor manufacturer
- Current type of the motor
• Information of the machine type label
• Information of the switch type label
When sending back the motor, always return the complete power unit with switch
Implementation
Please read the safety information before implementation. The implementation of the machine is only admissible when protection and safety facilities have been installed completely.
Put the machine on a stable, even floor. If necessary attach through the bottom through the holes to the frame valves. (screws/nails)
After connection to the power supply your scheppach construction circular saw is ready to operate.
Longitudinal cuts, Fig. 07
For parallel cuts use the longitudinal end stop. To process smaller workpieces (less than 120 mm) use the stick rail.
Use end stop rail with lower end stop height. In case of disuse take down the longitudinal end stop to the right table side.
For cutting jobs over 120 mm use the end stop ruler with the high end stop side (1) and for cutting jobs under 120 mm use the lower end stop side (2).
Cross cuttings, Fig. 08
For cross - and angle cuttings use the crosscut gauge. The performance of the crosscut gauge also allows the making of wedges. The adjust scale reaches from 0^ to 90^ . Introduce the slewing unit right-angled with the sixfold screw to the saw blade.
In case of disuse deviate the crosscut gauge sideways. A sliding table is optional.
Exchange of saw blade, Fig. 09
Be careful: pull out power plug!
- Untighten both upper screws (M8) at the lower saw blad cover.
- Deviate saw blade cover.
- Loosen clamping nut (M20 links) and hold back with retaining arbor.
- Wear gloves to protect your hands.
• Take out saw blade, introduce new one. - Only put in well sharpened, crack-free and not disformed saw blades.
- Tighten clamping nut and hold back with retaining arbor (left-hand thread).
- Lift up the lower saw blade cover and tighten both screws (M8) again.
- After every saw blade exchange the slit wedge has to be re-adjusted. See slit wedge adjustment.
Maintenance
With all maintenance and cleaning works switch off the motor and pull out the power plug.
All protection and safety facilities should be fitted again after completed repair and maintenance works.
- The circular saw is to the greatest possible extent maintenance-free, including the electrical motor. Excluded are the saw blades, the table insert and the brake linings, which are subject to wear (approx. 15,000 shifts) of the electrical motor. The saw blade has to stop within 10 sec. If necessary exchange the petered-out table insert.
- Brake pads should only be exchanged by specialized staff.
- Keep the table surface always resin-free.
- Keep the saw blade protection box free from wood particles and sawdust. When the power supply is pulled out, open the protection box lid, remove possible sawdust remains
Accesores
On removing the machine one should unconditionally comply with the local legal regulations.
(For further information contact the responsible local waste department.)
Troubleshooting plan
| Malfunction | Possible cause | Solution |
| 1. Brake motor has no brake function | Brake pads are worn | Have brake pads renewed.Electrical connection works only by a specialized electronics technician! |
| 2.Saw blade detaches after switching off the motor. | a) Attachment nuts are not tightened enoughb) Brake effect of motor is too strong | a) Tighten attachment nuts M20 left-hand threadb) Adjust electric current brakesTake out little plug sideways from switch housingUse small screw driver to adjust carefully the electric current of the brakes on the potentiometerAfter switching off the motor the saw blade stagnation should take place after 8 - 19 secondsPut the little plug into the switch housing again |
| 3. Motor does not initiate | a) Breakdown mains fuseb) Extension cable defectc)Connections to the motor or to the switch are not in orderd)Motor or switch is defect | a) Check mains fuseb) See instructions “Electrical connections”c) Have it checked by an electronics techniciand) See instructions “Electrical connections” |
| 4. Motor runs backwards or forwards | Condensator defect | Have it exchanged by an electronics technician |
| 5.Motor does not perform, switches off automatically | Overcharged because ofa) Blunt saw bladeb) 2 Phase run – Motor becomes hot | a) Put in a sharpened saw bladeb) Have the extension cable and the main power supply checked by a specialized electronics technician |
| 6.Burn marks on the intersection by longitudinal cutsby cross cuts | a) Blunt saw bladeb) Wrong saw bladec) Longitudinal end stop not parallel to saw bladed) Slide table not parallel to saw blade | a) Put in a sharpened saw bladeb) Put in a saw blade for longitudinal cutsc) Re-adjust motor on rocker or exchange longitudinal end stopd) Align slide table to saw blade |
| 7. Wrong rolling direction by rotary current motor | Socket wrongly tapped | Change polarity of socket |
Costruttore:
Scheppach
Günzburger Straße 69
D-89335 Ichenhausen
Egregio cliente,
Günzburger Straße 69
D-89335 Ichenhausen
Cher client,
Günzburger Straße 69
D-89335 Ichenhausen
Estimado cliente,
Llaves de boca SW 7, 8, 10, 13, 17
text_image
R.Bauer 6.36i.V.
EC Declaration of Conformity
We herewith declare, scheppach Fabrikation von Holzbearbeitungsmaschinen GmbH, Günzburger Str. 69, D-89335 Ichenhausen that the machine described below due to its con struc tion and design and in the version delivered by us complies with the relevant provisions of the following EC Directives. In case of a modification of the machine this declara tion ceases to be valid.
Machine description: Circular construction saw
Machine type: structo 7.0
Applicable EC EC machine guideline 89/37/EG (bis 28.12.2009)
Directives: EC machine guideline 2006/42/EG (ab 29.12,2009); EC low-voltage guideline 2006/95/EWG; EC EMV guideline 2004/108/EWG, Outdoor-Richtlinie 2000/14/EG
Applied harmonized European Standards
EN ISO 12100-1, EN ISO 12100-2, EN ISO 13857, EN
349, EN 418, EN 847-1, EN 13849-1, EN 1088, EN 1870-1, EN
60204-1, EN 55014, EN 60555-2, EN 60555-3,
Notified Body ISO 7960
The machine corresponds to the checked template
Called in for: EC type-examination
(EC type-examination certificate no. 051 030)
text_image
R.Bauer i. v. 6.3htext_image
R.Bauer 6.34Signature: i.V. Reinhold
Apparent defects must be notified within 8 days from the receipt of the goods. Otherwise, the buyer's rights of claim due to such defects are invalidated. We guarantee for our machines in case of proper treatment for the time of the statutory warranty period from delivery in such a way that we replace any machine part free of charge which provably becomes unusable due to faulty material or defects of fabrication within such period of time. With respect to parts not manufactured by us we only warrant insofar as we are entitled to warranty claims against the upstream suppliers. The costs for the installation of the new parts shall be borne by the buyer. The cancellation of sale or the reduction of purchase price as well as any other claims for damages shall be excluded.