FS8500 - Saw SCHEPPACH - Free user manual and instructions
Find the device manual for free FS8500 SCHEPPACH in PDF.


User questions about FS8500 SCHEPPACH
0 question about this device. Answer the ones you know or ask your own.
Ask a new question about this device
Download the instructions for your Saw in PDF format for free! Find your manual FS8500 - SCHEPPACH and take your electronic device back in hand. On this page are published all the documents necessary for the use of your device. FS8500 by SCHEPPACH.
USER MANUAL FS8500 SCHEPPACH
natural_image
Mechanical device with labeled components including a 1250 W power input and 'Scheppach' branding (no readable text beyond labels)FS8500
| DE | FliesenschneidmaschineOriginalbetriebsanleitung | 6 |
| GB | Tile-cutting machineTranslation from the original instruction manual | 18 |
| FR | Coupe carrelageTraduction des instructions d'origine | 28 |
| SI | Stroj za rezanje ploščicPrevod originalnih navodil za uporabo | 39 |
| NL | TegelsnijmachineVertaling van originele gebruiksaanwijzing | 49 |
natural_image
Close-up of a mechanical device with wires and a numbered component (13), no visible text or symbols beyond the number.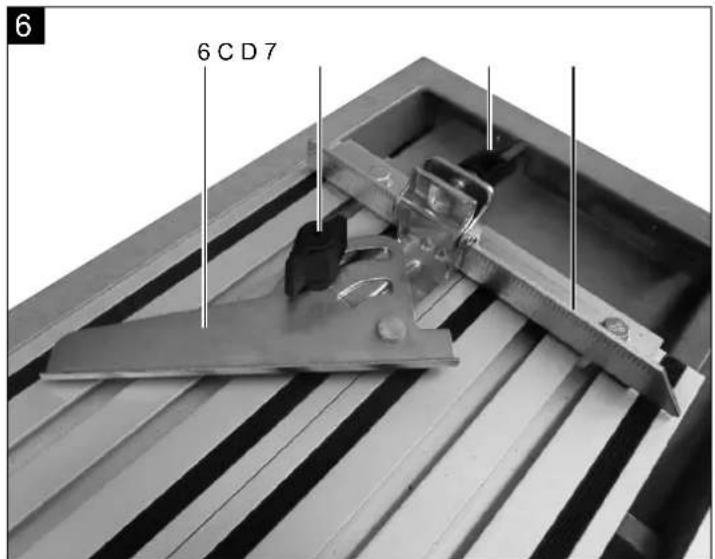
text_image
6 CD7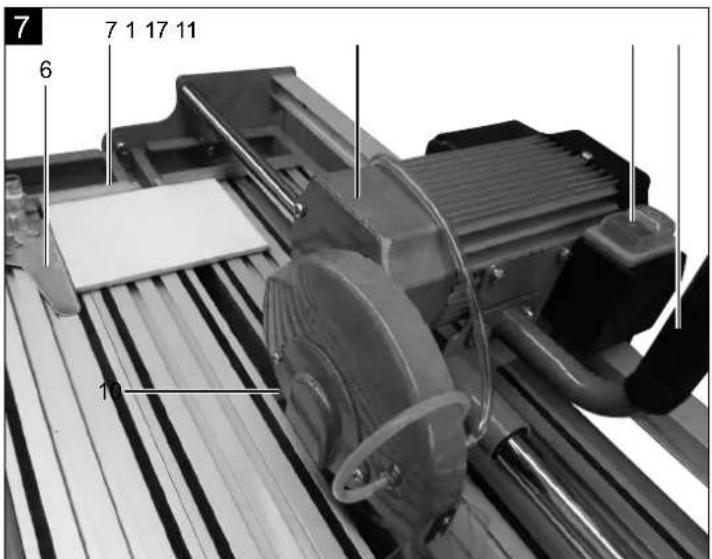
text_image
7 6 7 1 17 11 1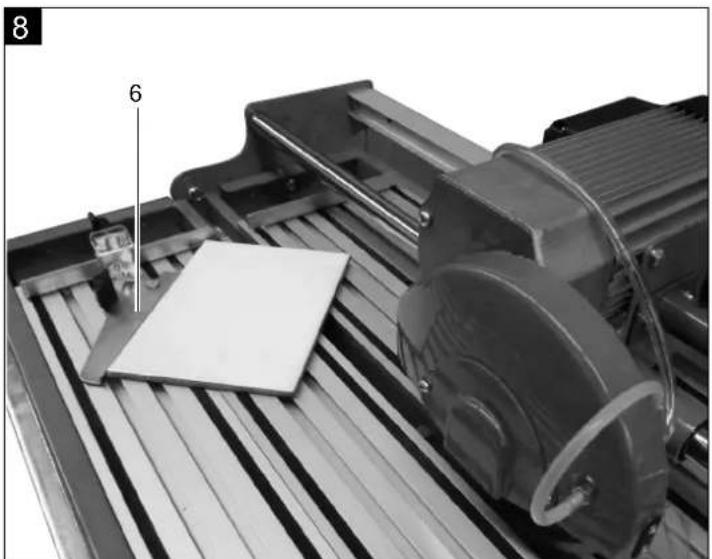
natural_image
Close-up of a mechanical device with a labeled component (6) and panel, no readable text or symbols present.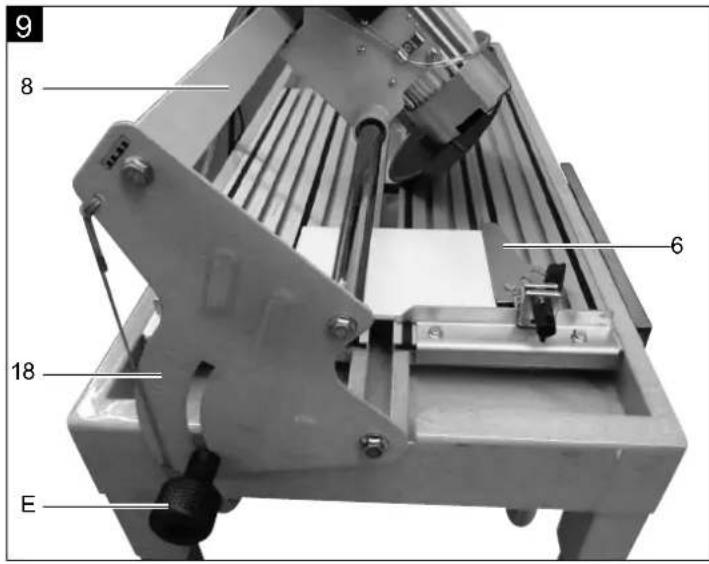
text_image
9 8 6 18 E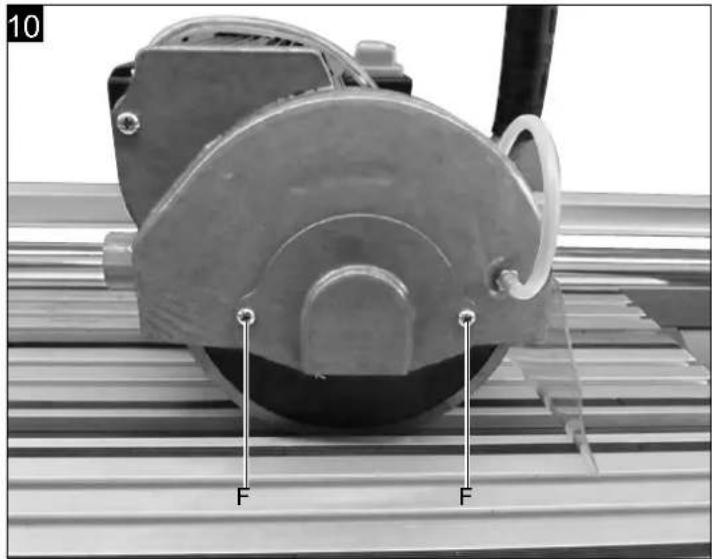
natural_image
Close-up of a mechanical device on a metal surface, labeled 'F' with measurement indicators (no readable text or symbols beyond labels)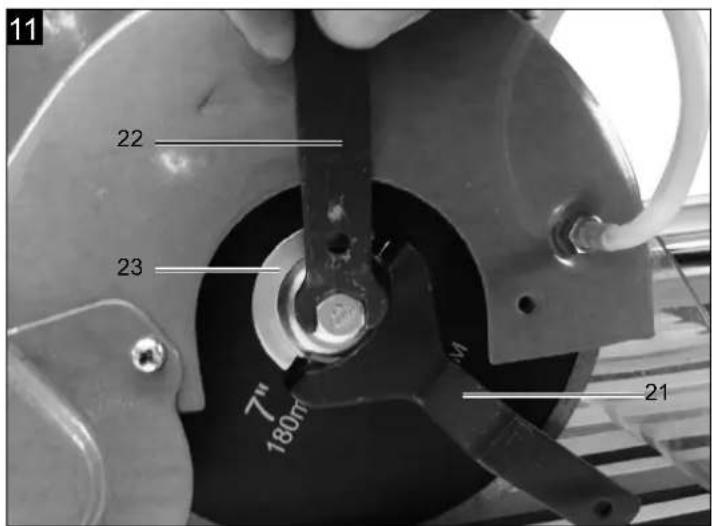
text_image
11 22 23 7" 180mm 21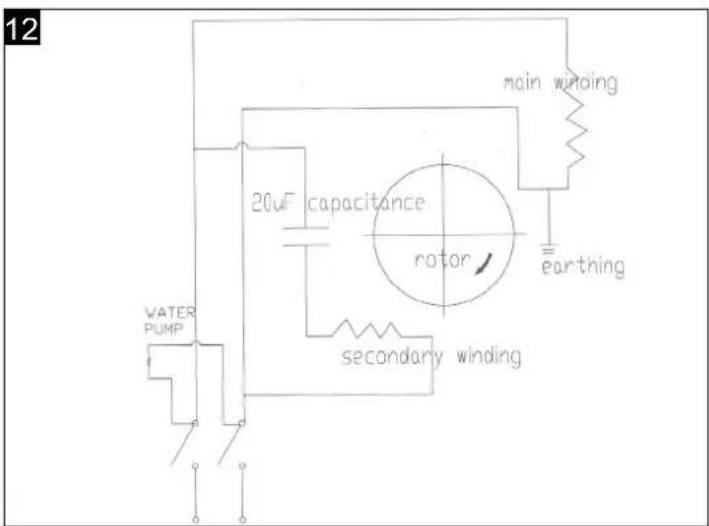
text_image
12 main winding 20µF capacitance rotor earthing water PUMP secondary winding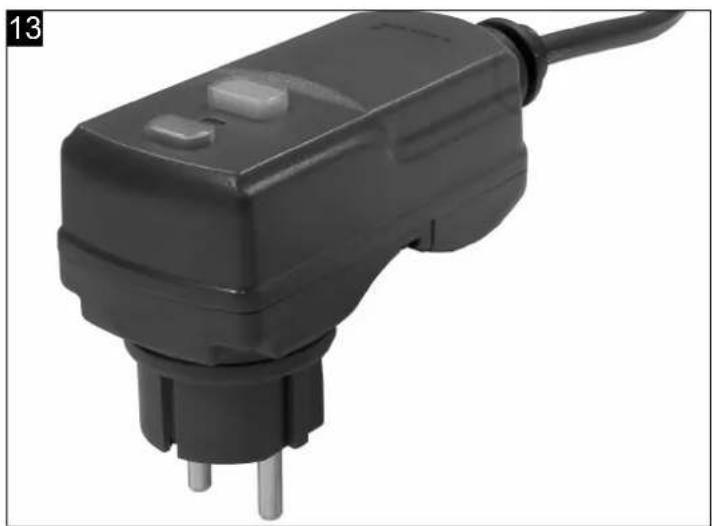
natural_image
Close-up of a black electrical plug with two terminal pins and a cable (no visible text or symbols)Inhaltsverzeichnis:
Günzburger Straße 69
D-89335 Ichenhausen
Verehrter Kunde
Table of contents: Page:
- Introduction......20
- Device description....20
- Technical data 20
- Delivery scope....21
- Attachment 21
- Construction 21
- Safety information 21
- Additional safety instructions 22
- Proper use....23
- Installation 24
- Cleaning 25
- Transport 26
- Storage....26
- Maintenance....26
- Trouble shooting....27
- Disposal and recycling 27
Explanation of the symbols on the equipment
The use of symbols in this manual is intended to draw your attention to possible risks. The safety symbols and the explanations that accompany them must be perfectly understood. The warnings in themselves do not remove the risks and cannot replace correct actions for preventing accidents.
 | Caution - Read the operating instructions to reduce the risk of inquiry. |
 | Wear ear-muffs! The impact of noise can cause damage to hearing. |
 | Wear a breathing mask! Dust which is injurious to health can be generated when working on wood and other materials. Never use the device to work on any materials containing asbestos! |
 | Wear safety goggles! Sparks generated during working or splinters, chips and dust emitted by the device can cause loss of sight. |
 | Wear protective gloves |
1. Introduction
MANUFACTURER:
scheppach
Günzburger Straße 69
D-89335 Ichenhausen
Dear Customer,
We wish you lots of fun and success in working with your new scheppach machine.
Note:
As per the applicable Product Liability Law, the manufacturer of this device will not be liable for damages that occur in this device or that are caused by this device in the following cases:
- Improper handling,
• Non-observation of the operating instructions,
• Repair by third parties, unauthorized technicians, - Installation and replacement with non-original spare parts,
- Use not in conformity with the manufacturer's specifications,
- Failures of the electrical system attributable to non-observation of the electrical specifications and VDE clauses 0100, DIN 57113 / VDE0113.
We recommend:
Read through the complete text in the operating instructions before installing and commissioning the device. The operating instructions are intended to help the user to become familiar with the machine and take advantage of its application possibilities in accordance with the recommendations. The operating instructions contain important information on how to operate the machine safely, professionally and economically, how to avoid danger, costly repairs, reduce downtimes and how to increase reliability and service life of the machine.
In addition to the safety regulations in the operating instructions, you have to meet the applicable regulations that apply for the operation of the machine in your country. Keep the operating instructions package with the machine at all times and store it in a plastic cover to protect it from dirt and moisture. Read the instruction manual each time before operating the machine and carefully follow its information. The machine can only be operated by persons who were instructed concerning the operation of the machine and who are informed about the associated dangers. The minimum age requirement must be complied with. In addition to the safety instructions in this operating manual and the separate regulations of your country, the generally recognised technical rules for operating woodworking machines must also be observed.
We accept no liability for accidents or damage that occur due to a failure to observe this manual and the safety instructions.
2. Device description
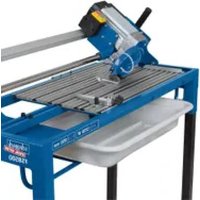
1 Machine head
2 Base frame
3 Legs
4 Tub
5 Alu. table
6 Angled stop
7 Stop rails
8 Guide rails
9 Cutting disc protection
10 Diamond cutting-disc
11 Handle
12 Star knob screw for angle adjustment
13 Pin for transport lock
14 Cooling water pump
15 Hose
16 Motor
17 ON/OFF switch
18 Angle scale
19 Table extension
20 Saw blade protection
3. Technical data
Dimensions L x W x H 1250 x 530 x 1090 mm
| Cutting table 680 x 465 mm | |
| Diamond cutting disc D 180 mm | |
| Hole D 22,2 mm | |
| Water filling quantity | 30,0 l / 40,0 l |
| Speed | 5800 1/min |
| Weight | 40 kg |
| Max. cutting length | 850 mm |
| Max. diagonal cutting length | 640 x 640 mm |
| Max 90° cutting height | 40 mm |
| Max. 45° cutting height | 14 mm |
| Motor | 230 V/50 Hz |
| Power intake | 1250 W (S3 20%) |
| Motor speed | 2950 1/min |
| Insulating material class | B |
| Protection type | IP54 |
Technical changes reserved!
Noise characteristic values
Noise at the workplace can exceed 85 dB (A). In this case, noise protection measures are necessary for the user (wear hearing protection!).
Noise output in dB
Sound power level of L_WA = 108/111 dB (A) uncertainty 3 dB (A)
Noise pressure level L_PA = 95/98 dB (A) uncertainly 3 dB (A) according to DIN EN ISO 3744; EN ISO 11201
4. Delivery scope
• Translation from the original instruction manual
- Tile-cutter
- Cooling water pump
- Angle stop
- Table extension
- 4 legs
- Handle
- Tub
- 14 mm wrench
- Counter torque wrench
5. Attachment
- Open the packaging and remove the device carefully.
- Remove the packaging material as well as the packaging and transport bracing (if available).
- Check that the delivery is complete.
- Check the device and accessory parts for transport damage.
- If possible, store the packaging until the warranty period has expired.
- Familiarize yourself with the machine with the help of the operating instructions manual before using it.
- Use only original parts for accessories as well as consumables and spare parts. Spare parts can be obtained from your scheppach retailer.
- Please quote our article numbers as well as type and production year in all your orders.
ATTENTION
The device and packaging materials are not toys! Children must not be allowed to play with plastic bags, film and small parts! There is a risk of swallowing and suffocation!
6. Construction
Fig.3-5
For packaging purposes, your machine is not fully assembled.
1 Remove the machine from the packaging and place carefully to one side on the ground.
2 Introduce the legs (3) into the base frame and lock them with butterfly nuts (A). (Fig. 3)
3 Set the machine on its legs.
4 Install the handle with 2 cross-recess screws (B) on the motor casing. (Fig. 4)
Note: The handle with 2 cross-recess screws (B) on the motor casing. (Fig. 4)
5 Place the tub (4) in the base frame (2).
6 Place the cooling water pump (14) in the tub (4).
7 Fill water till the pump (14) is filled completely with water. (Fig. 4)
8 Pull out the pin of the transport lock (13). (Fig.5)
7. Safety information
Working with the tile-cutting machine can be risky, if safe and correct work procedures are not followed. Not observing the customary safety measures can lead to physical injuries to the operators. Safety equipment such as protective goggles, dust masks and ear protection can reduce the risks of possible injury. Even the best possible protection however, cannot match incorrect assessment, carelessness or negligence. Always use your healthy common sense and caution in the workshop. If you feel an operation is risky, do not try it out. Think about an alternative method which feels safer. Think of the following: Your physical integrity is your personal responsibility. This machine was designed to perform certain jobs.
We recommend urgently that the machine should not be altered and it should not be used for application areas for which it was not designed. If you are not sure, please ask your dealer before working with the product.
Warning: Non-observation of these specifications can lead to serious injuries.
- Keep work area clean Cluttered areas and benches invite injuries.
- Consider work area environment Don't expose power tools to rain. Don't use power tools in damp or wet locations. Keep work area well lit. Don't use power tools in presence of flammable liquids or gases.
- Guard against electric shock Prevent body contact with grounded surfaces (e.g. pipes, radiators, ranges refrigerators).
- Keep children away Do not let visitors contact tool or extension cord. All visitors should be kept away from work area.
- Store idle tools When not is use, tools should be stored in dry, high, or locked-up place, out of the reach of children.
- Don't force tool It will do the job better and safer at the rate for which it was intended.
- Use right tool Don't force small tools or attachments to do the job of heavy duty tool. Don't use tools for purposes not intended: for example, don't use circular saw for cutting tree limbs or logs.
-
Dress properly Do not wear loose clothing or jewellery. They can be caught in moving parts. Rubber gloves and nonskid footwear are recommended when working outdoors. Wear protective hair covering to contain long hair.
-
Use safety glasses Also use face or dust mask if cutting operation is dusty.
- Don't abuse cord Never carry tool by cord or yank it to disconnect it from receptacle. Keep cord from heat, oil and sharp edges.
- Secure work Use clamps or a vise to hold work. It's safer than using your hand and it frees both hands to operate tool.
- Don't overreach Keep proper footing and balance at all times.
- Maintain tools with care Keep tools sharp and clean for better and safer performance. Follow instructions for lubricating and changing accessories. Inspect tool cords periodically and, if damaged, have repaired by authorized service facility. Inspect extension cords periodically and replace if damaged. Keep handles dry, clean and free from oil and grease.
- Disconnect tools When not in use, before servicing, and when changing accessories such as blades, bits and cutters.
- Remove adjusting keys and wrenches Form the habit of checking to see that keys and adjusting wrenches are removed from tool before turning it on.
- Avoid unintentional starting Don't carry plugged-in tool with finger on switch. Be sure switch is off when plugging in.
- Outdoor use extension cords When tool is used outdoors, use only extension cords intended for use outdoors and so marked.
- Stay alert Watch what you are doing. Use common sense. Do not operate tool when you are tired.
- Check damaged parts Before further use of the tool, a guard or other part that is damaged should be carefully checked to determine that it will operate properly and perform its intended function. Check for alignment of moving parts, binding of moving parts, breakage of parts, mounting, and any other conditions that may affect its operation. A guard or other part that is damaged should be properly repaired or replaced by an authorized service center unless otherwise indicated elsewhere in this instructions manual. Have defective switches replaced by an authorized service center. Do not use tool if switch does not turn it on and off.
- Warning The use of any other accessory or attachment other than recommended it this operating instruction or the catalog may present a risk of personal injury.
-
Have your tool repaired by an expert This electric appliance is in accordance with the relevant safety rules repairing of electric appliances may be carried out only by experts otherwise it may cause considerable danger for the user.
-
Connect the dust extraction device Wherever there are facilities for fitting a dust extraction system, make sure it is connected and used.
Warning! This electric tool generates an electromagnetic field during operation. This field can impair active or passive medical implants under certain conditions. In order to prevent the risk of serious or deadly injuries, we recommend that persons with medical implants consult with their physician and the manufacturer of the medical implant prior to operating the electric tool.
Protect yourself and you environment from accidents using suitable precautionary measures!
- Do not look directly into the laser beam with unprotected eyes.
- Never look into the path of the beam.
- Never point the laser beam towards reflecting surfaces and persons or animals. Even a laser beam with a low output can cause damage to the eyes.
- Caution - methods other than those specified here can result in dangerous radiation exposure.
- Never open the laser module. Unexpected exposure to the beam can occur.
- If the machine is not used for an extended period of time, the batteries should be removed.
- The laser may not be replaced with a different type of laser.
- Repairs of the laser may only be carried out by the laser manufacturer or an authorised representative.
8. Additional safety instructions
Please read all the instructions before using this product!
Workplace
To rule out the risk of physical injury, machine damage, fire and electric shock, please ensure that your workplace is protected
- against humidity, wetness and rain,
- It is free of Inflammable gases and liquids,
- It is clean and empty,
- It is well-ventilated and illuminated.
The operators
Healthy commonsense and caution are factors that cannot be integrated in a machine. These factors are the responsibility of the operator. Please consider the following:
Prevent body contact with grounded surfaces such as pipes and radiators. Please be watchful. Do not work at the machine if you are tired. Always wear:
• ANSI- approved dust masks.
- Safety glasses
- Hearing protection.
Do not stretch yourself over running machines.
ADDITIONAL INSTRUCTIONS
FOR LEAKAGE CURRENT CIRCUIT-BREAKER.
Please observe the following important instructions on start-up and handling.
Pay attention to the instructions even if you hand over the product to a third party. Preserve this operating Instructions manual for subsequent reference.
SAFETY INSTRUCTIONS!
- Arbitrary alteration and/or modification of the product is not allowed for safety- and approval reasons (CE). Never dismantle the product.
- The product is not suitable for handling by children. Children cannot assess the risks involved in handling electrical devices. Therefore, pay special attention to the presence of children.
- The structure of the product corresponds to Protection Class 1. Only a proper mains socket with an earth wire (230V\~/50Hz) of the public power supply should be used.
- In industrial equipment, the Accident Prevention Specifications of the Federation of Trade Associations for Electrical Systems and Resources must be observed.
- In schools, training centres, hobby- and self-help workshops, the operation of the product must be monitored responsibly by trained staff.
- Handle the product carefully. Impacts, hits and drops from even low heights can damage the machine.
- Never use the product if it is brought from a cold to a hot room. Under certain circumstances, the resulting condensed water can destroy the product.
- Let the product come to the room temperature, before connecting it to the mains power supply. Under certain circumstances, this can take several hours.
- Do not hold the product with moist or wet hands.
- Ensure that the Insulation of the entire product is neither damaged nor destroyed.
- If the product is not operated over long periods, disconnect it from the mains power supply, pull the plug out of the socket.
- Avoid the following environmental conditions at the installation site or during transport.
- Wetness or very high humidity. Extreme cold. Dust or combustible gases, vapours or solvents. Strong vibrations.
- Strong magnetic fields as in the vicinity of machines or loudspeakers.
9. Proper use
The machine corresponds to the valid EU Machine Directive
- Before starting work, all the protection- and safety devices must be installed on the machine.
- The machine is designed for operation by one person. The operator will be responsible for the presence of third persons in the work area.
- Observe all safety- and danger instructions on the machine.
- Keep all safety and danger instructions near the machine in complete and readable form.
- The machine is designed exclusively for cutting small and medium-sized tiles (glazed, ceramic or similar tiles) with the offered tool and accessories. Cutting of metal and wood is not allowed.
- The dimensions of the workpieces to be machined should not exceed or fall below the specified maximum and minimum dimensions.
- Please use the machine only if it is in a technically fault-free condition. Use It properly, conscious of the involved safety and risk factors and giving due consideration to the operating instructions manual! Faults, especially those that can affect safety must be rectified immediately!
- The safety-, workplace- and maintenance specifications of the manufacturer as well as the dimensions specified in the technical data must be observed.
- The applicable accident prevention measures and the other generally recognized technical safety rules must be observed.
- The machine must be used, serviced or repaired only by persons who are familiar with it and who have been briefed about its risks.
Arbitrary alterations to the machine will make the liability of the manufacturer for damages resulting there from null and void.
- The machine may be used only with original accessories and original tools of the manufacturer.
Residual risks
Despite proper use, certain residual risk factors cannot be eliminated fully. The following things can occur, depending on the design and structure of the machine:
- Intervention in the running diamond cutting disc.
- Contact with the diamond cutting disc in exposed area.
- Ejection of work pieces and work piece components.
- Ejection of a faulty diamond attachment in the cutting disc.
- Hearing damage due to non-use of the required hearing protection.
- Injuries to the eyes due to non-use of eye protection
Residual risks can be minimized if the „safety instructions“ and the „proper use“, as well as operating instructions manual are observed jointly.
Please note that our equipment has not been designed for use in commercial, trade or industrial applications. Our warranty will be voided if the equipment is used in commercial, trade or industrial businesses or for equivalent purposes.
Any use beyond the one specified will be treated as improper. The manufacturer will not be liable for damages resulting from such improper use; the risk will be borne by the user alone.
10. Installation
▲ IMPORTANT!
You must fully assemble the appliance before using it for the first time!
Replace cracked diamond cutting discs.
- Get to know your machine. Familiarize yourself with its use and its restrictions, but also with the specific potential risks.
- Check the machine carefully for damages to ensure that it is able to achieve the intended output. In case of doubt, please replace the concerned component.
- Ensure that the switch is on Off, before inserting the power plug into the mains socket.
- Ensure that the machine is cleaned and lubricated properly.
- Before start-up, check the machine for damaged parts and find out whether these parts are working properly and performing their defined function.
- Check the alignment of all moving parts, all broken or fastening parts, and all other conditions that can affect smooth operation. Each damaged part should be repaired or replaced by a technician immediately.
- Do not use the machine if a switch cannot be activated/deactivated correctly.
On/Off switch (Fig. 4)
To switch on, press "I" on the On/Off switch (16) Before starting the cutting process, wait until the cutting wheel reaches its maximum speed and the cooling water pump (14) has fed the water to the cutting wheel. To switch off, press the "0" on the switch (16). (Fig. 4).
Operation
• Install the machine on an even, slide-proof floor.
- Check that the voltage on the nameplate matches the existing voltage; connect the power plug to the mains power supply only thereafter
- The cutting disc should be free to run before the machine is switched on.
Caution: Cutting disc must always be cooled with water.
Caution: Cutting disc runs with a time lag.
Do not break the cutting disc by applying pressure at the sides.
- Under normal use conditions, the motor casing can become hot.
- Do not use force on the machine or on an accessory to achieve the performance of a bigger Industrial machine. It does a better job at the output for which it is designed.
- Define all machine settings only when it is switched off.
- Do not leave the machine unattended as long as it is running.
- During shut down, leave the machine only after it comes to a complete standstill.
- Always switch the machine off before pulling out the power plug from the mains socket.
- Always pull out the power plug. Never disconnect the power plug from the mains socket by pulling at the cable.
- Do not use cutting discs that do not meet the size specifications.
- Do not carry the machine by the cable.
Do not work with the machine if you are not sure whether a working condition is safe of unsafe.
90° cuts Fig.6-7
- Loosen the wing bolt (C)
- Set angled stop (6) to 90° and tighten the wing bolt (C) again.
- Tighten the wing bolt (D) to fix the angled stop (6). (Fig.6)
- Push the machine head (1) towards the rear by the handle (11).
- Place the tile on the stop rail (7) at the angled stop (6).
- Switch the tile-cutting machine on. (Fig.7) Caution: Wait for the cooling water to reach the cutting disc (10).
- Pull the machine head (1) slowly and uniformly by the handle (11) in the forward direction through the tile.
- Switch the tile-cutter off again after reaching the end.
45° diagonal cut (Fig. 8)
- Set the angled stop (6) to 45^
- Perform cutting as described above.
45° longitudinal cut (Fig. 9)
- Loosen the star knob screw (E) on both sides
- Angle the guide rails (8) 45^ to the left on the angle scale (17).
- Re-tighten the star knob screw (E) on both sides.
- Perform cutting as described.
Replacing the diamond cutting wheel (Fig. 10-12) Attention! Pull out the mains plug
- Loosen the 2 bolts (F) and take out the saw blade protection (20). (Fig.10)
- Place the wrench (21) on the motor shaft and keep it there.
- Loosen the flange nut in the running direction of the cutting disc (10) with the wrench (22).
- Remove the outer flange (23) and cutting disc (10). (Fig.11)
- Clean the supporting flange carefully before installing the new cutting disc.
- Insert the cutting disc in the reverse sequence and tighten it. Caution: Pay attention to the running direction of the cutting disc!
- Reinstall the saw blade protection (20).
Electric connection
Check electric cables regularly for damage. Ensure that during the check, the connecting cable is not connected to the mains.
Electric connecting cables must conform to the common VDE- and DIN provisions. Only use connecting cables with the H 07 RN designation.
Keeping a copy of the type designation on the connecting cable is a specification
Damaged electric connecting cables
Insulation damages frequently occur on electric connecting cables. The reasons are:
- Pressure points, if connecting cables are routed through window or door gaps.
- Kinks due to improper mounting or routing of connecting cables.
- Intersections due to overruns of connecting cables.
- Insulation damage due to pulling out from wall sockets.
- Cracks due to ageing of insulation.
Such damaged electric connecting cables should not be used and can be fatal because of the insulation damage
AC motor 230 V/ 50 Hz (Fig. 12)
Mains voltage 230 Volt / 50 Hz.
Mains connection and extension cable must have 3-wires = P + N + SL. - (1/N/PE).
Extension cables must have a minimum cross-section of 1.5 mm^2 .
The mains connection is secured with a max. 16A fuse.
Start-up of the leakage current circuit-breaker (Fig. 13):
- The function should be checked before each start-up and at regular Intervals (min. once every week).
-
If the leakage current circuit-breaker does not switch off properly during this test, there is no personal protection! The device must therefore be switched off immediately!
-
In case of damages caused by the non-observation of this operating instructions manual, all warranty claims will become null and void. We do not accept any liability for consequential damages.
- Check the product for damage before each use! If you detect a damage, do not connect the product to the mains power supply!
- After actuating the orange Reset button, the device is ready for operation. Before operation, please test the triggering with the help of the Test button (as described in "Operation").
- Insert the leakage current circuit-breaker into the socket.
- Press the orange Reset button.
- A red symbol is displayed in the window indicating operational readiness.
- Press the red Test button. This action simulates a leakage current.
- If the machine is working properly, the circuit-breaker will disconnect the load from the mains. This is displayed in the window through the disappearance of the red symbol.
- Protection of man and animal is effective only if the machine works properly.
- The Reset button must be pressed a second time for operation.
- The load can now be inserted.
Technical data:
Triggering leakage current: < 30 mA
Power supply: 230V\~/50Hz
Load capacity: 16A (3680W)
Number of pins: 2-pin wired
Preliminary fuse: 16 A
Protection type: IP54
Dimensions: 126x50x88mm
USE ACCORDING TO MANUFACTURER'S INSTRUCTIONS!
The portable leakage current circuit-breaker is designed for wet grinding machines and similar electrical loads in the household.
It is simply connected between the mains power supply and the load, and therefore offers optimum protection against physical contact with live components and sudden restart of the machine after restoration of power.
Always operate the machine with the provided leakage current circuit-breaker installed.
11. Cleaning
Caution! Pull out power plug.
Clean the machine after each work cycle.
12. Transport
Attention! Pull out the power plug
To transport the machine, set the machine head in front and engage the locking pin (13). (Fig.5).
13. Storage
Store the device and its accessories in a dark, dry and frost-proof place that is inaccessible to children. The optimum storage temperature is between 5 and 30°C.
Store the electrical tool in its original packaging.
Cover the electrical tool in order to protect it from dust and moisture. Store the operating manual with the electrical tool.
14. Maintenance
Caution! Pull out power plug.
- Replace worn out cutting discs.
- Replace damaged protection device
- Dust and pollution must be removed regularly from the machine. The best way to clean the machine is with a piece of cloth or brush.
- All moveable parts must be re-lubricated at periodic intervals.
- Do not use any corrosive substances to clean the plastic. A damp cloth is sufficient in most cases.
- The tub (4) and coolant pump (14) must be cleaned regularly to remove dirt, as otherwise the pump or the pipe or the cooling of the diamond cutting disc (10) is not guaranteed.
Service information
Please note that the following parts of this product are subject to normal or natural wear and that the following parts are therefore also required for use as consumables.
Wear parts*: cutting wheel, carbon brush, table & cutting head guides
* Not necessarily included in the scope of delivery!
Spare parts
Please quote the following in your order for spare parts:
- Type of device
• Article No. of device - Ident. No. of device
- Spare Part No. of the required spare part
15. Trouble shooting
The table below contains a list of fault symptoms and explains what you can do to remedy the problem if your equipment fails to work properly. If the problem still persists after working through the list, please contact your nearest service workshop.
| Fault Possible cause Remedy | ||
| Diamond cutting disc comes off when motor is deactivated. | Fastening nut not tightened properly Tighten fastening nu | |
| When motor is deactivated. | Failure of mains circuit-breaker Check mains | circuit-breaker |
| Extension cable defective Replace extension | cable | |
| Connection with motor or switch is not OK Have it checked by an electrician | ||
| Motor or switch Is defective Have it checked by an electrician | ||
| Motor has no output | Cross-section of the extension cable Is not sufficient | See electrical connection, the fuse has blown |
| Overloading Check tool | ||
16. Disposal and recycling
The equipment is supplied in packaging to prevent it from being damaged in transit. The raw materials in this packaging can be reused or recycled. The equipment and its accessories are made of various types of material, such as metal and plastic. Defective components must be disposed of as special waste. Ask your dealer or your local council.
Old devices must not be disposed of with household waste!
This symbol indicates that this product must not be disposed of together with domestic waste in compliance with the Directive (2012/19/EU) pertaining to waste electrical and electronic equipment (WEEE). This product must be disposed of at a designated collection point. This can occur, for example, by handing it in at an authorised collecting point for the recycling of waste electrical and electronic equipment. Improper handling of waste equipment may have negative consequences for the environment and human health due to potentially hazardous substances that are often contained in electrical and electronic equipment. By properly disposing of this product, you are also contributing to the effective use of natural resources.
You can obtain information on collection points for waste equipment from your municipal administration, public waste disposal authority, an authorised body for the disposal of waste electrical and electronic equipment or your waste disposal company.
Table des matières: Page:
Günzburger Straße 69
D-89335 Ichenhausen
Cher client,
Günzburger Straße 69
D-89335 Ichenhausen
Spoštovanai kupec,
ob delu z vašim novim strojem Scheppach vam želimo mnogo veselja in uspeha.
Namig:
Skladno z zakonom o jamstvu za proizvode proizvajalec te naprave ne odgovarja za škodo, ki se pojavi na izdelku ali z njegovo uporabo v primeru:
Günzburger Straße 69
D-89335 Ichenhausen
Vgeachte klant,
L_PA = 95 / 98 dB (A); K = 3 dB (A)
Conform DIN EN ISO 3744; EN ISO 11201
Günzburger Straße 69
D-89335 Ichenhausen
Szanowny Kliencie,
Günzburger Straße 69
D-89335 Ichenhausen
Austatud klient!
Günzburger Straße 69
D-89335 Ichenhausen
Gerbiamas kliente,
Günzburger Straße 69
D-89335 Ichenhausen
Godātais klient!
CE - Declaration of Conformity
| 2014/29/EU | 2004/22/EC | 89/686/EC_96/58/EC | 2000/14/EC_2005/88/EC | ||||
| X | 2014/35/EU | 2014/68/EU | 90/396/EC | Annex V | |||
| X | 2014/30/EU | X | 2011/65/EU* | Annex VINoise: measured LWA= xx dB(A); guaranteed LWA= xx dB(A)P = xx KW; L/∅ = cmNotified Body: Notified Body No.: | |||
 | |||||||
| Annex IVNotified Body:Notified Body No.:Certificate No.: | 2010/26/EC | ||||||
| Emission. No: | |||||||
Standard references:
EN 61029-1; EN 12418; EN 55014-1; EN 55014-2; EN 61000-3-2; EN 61000-3-3
This declaration of conformity is issued under the sole responsibility of the manufacturer.
Subject to change without notice
Apparent defects must be notified within 8 days from the receipt of the goods. Otherwise, the buyeris rights of claim due to such defects are invalidated. We guarantee for our machines in case of proper treatment for the time of the statutory warranty period from delivery in such a way that we replace any machine part free of charge which provably becomes unusable due to faulty material
or defects of fabrication within such period of time. With respect to parts not manufactured by us we only warrant insofar as we are entitled to warranty claims against the upstream suppliers. The costs for the installation of the new parts shall be borne by the buyer. The cancellation of sale or the reduction of purchase price as well as any other claims for damages shall be excluded.