YMXT-XC39-5 - Sliding door accessory Vevor - Free user manual and instructions
Find the device manual for free YMXT-XC39-5 Vevor in PDF.

| Product Type | Sliding Door Kit |
| Brand | Vevor |
| Model | YMXT-XC39-5 |
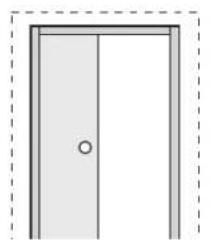
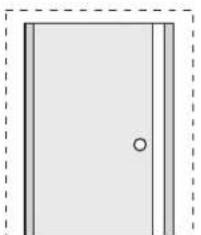
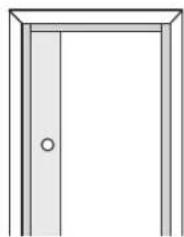
| Use | Sliding interior door for closet or partition |
| Rail Material | Robust steel |
| Recommended Door Width | 2 times door width + 25 mm |
| Compatible Door Thickness | 25 mm to 45 mm (1" to 1-3/4") |
| Door Height | To be determined: finished floor + 19 mm or subfloor + 38 mm |
| Required Tools | Level, pencil, wrench, drill, screws, screwdriver |
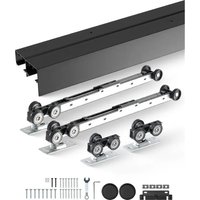
| Kit Contents | Rail, brackets, door plates, bumpers, guides, mounting screws |
| Maximum Supported Weight | Up to 50 kg (estimate) |
| Maintenance | Avoid prolonged sun exposure to prevent aging |
| Safety | Wear impact-resistant glasses and protective gloves during installation |
| Warranty | Technical support via www.vevor.com/support |
| Manufacturer | Shanghaiuxinmuyeyouxiangongsi, Shanghai, China |
| US Importer | Sanven Technology Ltd., Rancho Cucamonga, CA 91730 |
| Australia Importer | SIHAO PTY LTD, NSW 2122 |
| EU Importer | E-CrossStu GmbH, 60329 Frankfurt am Main |
| Repairability | Spare parts available via Vevor technical support |
| Cleaning | Clean with a soft dry cloth. Avoid abrasive products. |
Frequently Asked Questions - YMXT-XC39-5 Vevor
User questions about YMXT-XC39-5 Vevor
0 question about this device. Answer the ones you know or ask your own.
Ask a new question about this device
Download the instructions for your Sliding door accessory in PDF format for free! Find your manual YMXT-XC39-5 - Vevor and take your electronic device back in hand. On this page are published all the documents necessary for the use of your device. YMXT-XC39-5 by Vevor.
USER MANUAL YMXT-XC39-5 Vevor
Technical Support and E-Warranty Certificate www.vevor.com/support
Sliding Door Set
Model:YMXT-XC39-5
We continue to be committed to provide you tools with competitive price. "Save Half", "Half Price" or any other similar expressions used by us only represents an estimate of savings you might benefit from buying certain tools with us compared to the major top brands and does not necessarily mean to cover all categories of tools offered by us. You are kindly reminded to verify carefully when you are placing an order with us if you are actually Saving Half in comparison with the top major brands.
VEVOR®
TOUGH TOOLS, HALF PRICE
Sliding Door Set
Model:YMXT-XC39-5

NEED HELP? CONTACT US!
Have product questions? Need technical support? Please feel free to contact us: Technical Support and E-Warranty Certificate www.vevor.com/support
This is the original instruction, please read all manual instructions carefully before operating. VEVOR reserves a clear interpretation of our user manual. The appearance of the product shall be subject to the product you received. Please forgive us that we won't inform you again if there are any technology or software updates on our product.
INSTRUCTIONS
Thank you very much for choosing this Sliding Door Set.
- Please read all of the instructions before using it. The information will help you achieve the best possible results.
The products carried in this catalog may be different in color than the actual item.
SAVE THESE INSTRUCTIONS
WARNING:
Ensure Health and Safety, local authority and general workshop practice
regulations are adhered to when using tools.
- DO NOT use tools if damaged.
- Maintain tools in good and clean condition for best and safest performance.
- Wear suitable clothing to avoid snagging. Do not wear loose jewellery and tie back long hair.
- Account for all tools and parts being used.
- If working off the vehicle, ensure that the workplace is secure and stable.
- Do Not use these tools if you are tired or under the influence of alcohol, drugs or intoxicating medication.
- PERSONAL SAFE TY WARNING!
Always Wear personal protective equipment.
*PERSONAL PROTECTIVE EQUIPMENT
- Always wear impact safety goggles that provide front and side protection for the eyes. Eye protection equipment should comply with CSA Z94.3-07 or ANSI Z87.1 standards based on the type of work performed.
- Wear gloves that provide protection based on the work materials or to reduce the effects of tool vibration.
Assembly and Use
PRE INSTALLATION
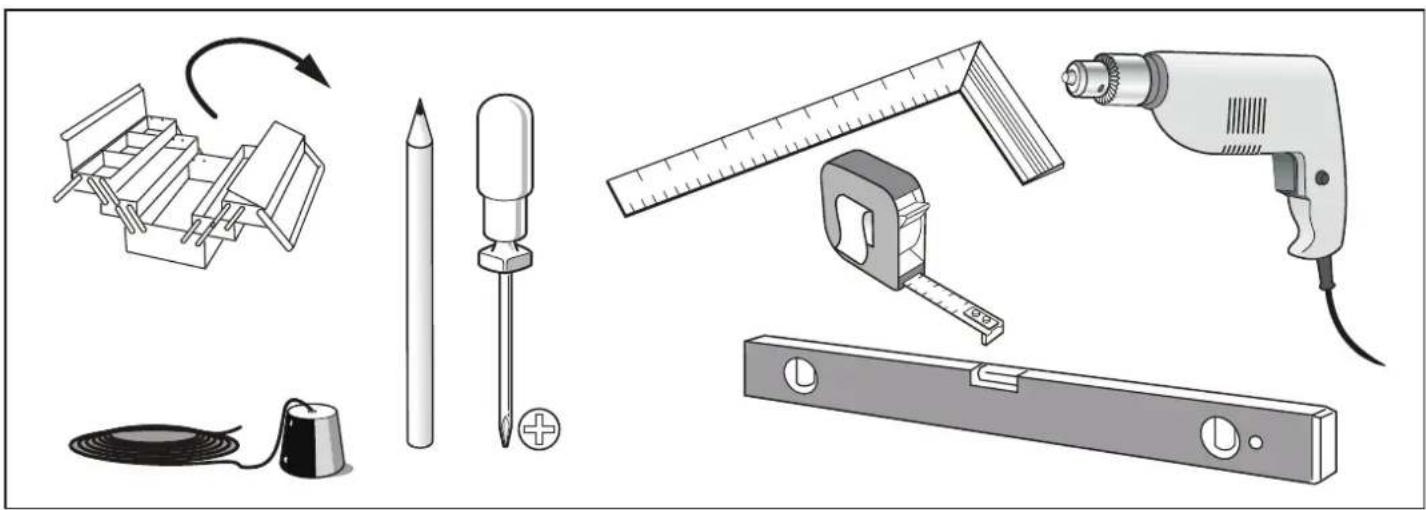
TOOLS REQUIRED
HARDWARE INCLUDED
| (x1)(x1) | ST5.5x32(x4)ST4.2x32 (x8P)x3T4.2x13 (x2) | |
| ST4.2x31.7 (x1) (x1) | (x1) | |
Installation
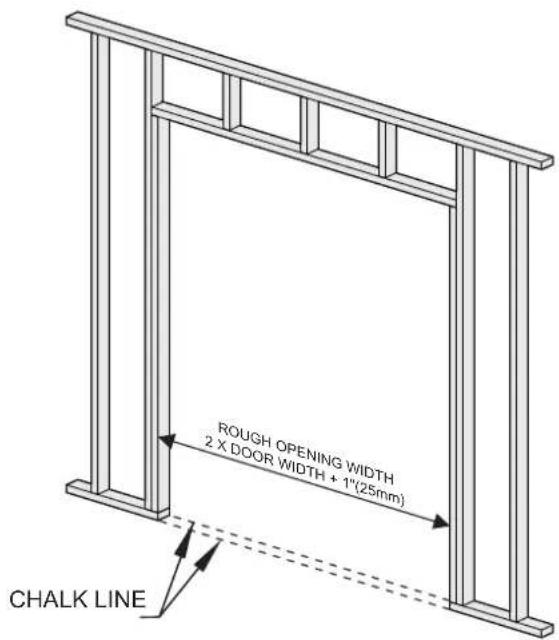
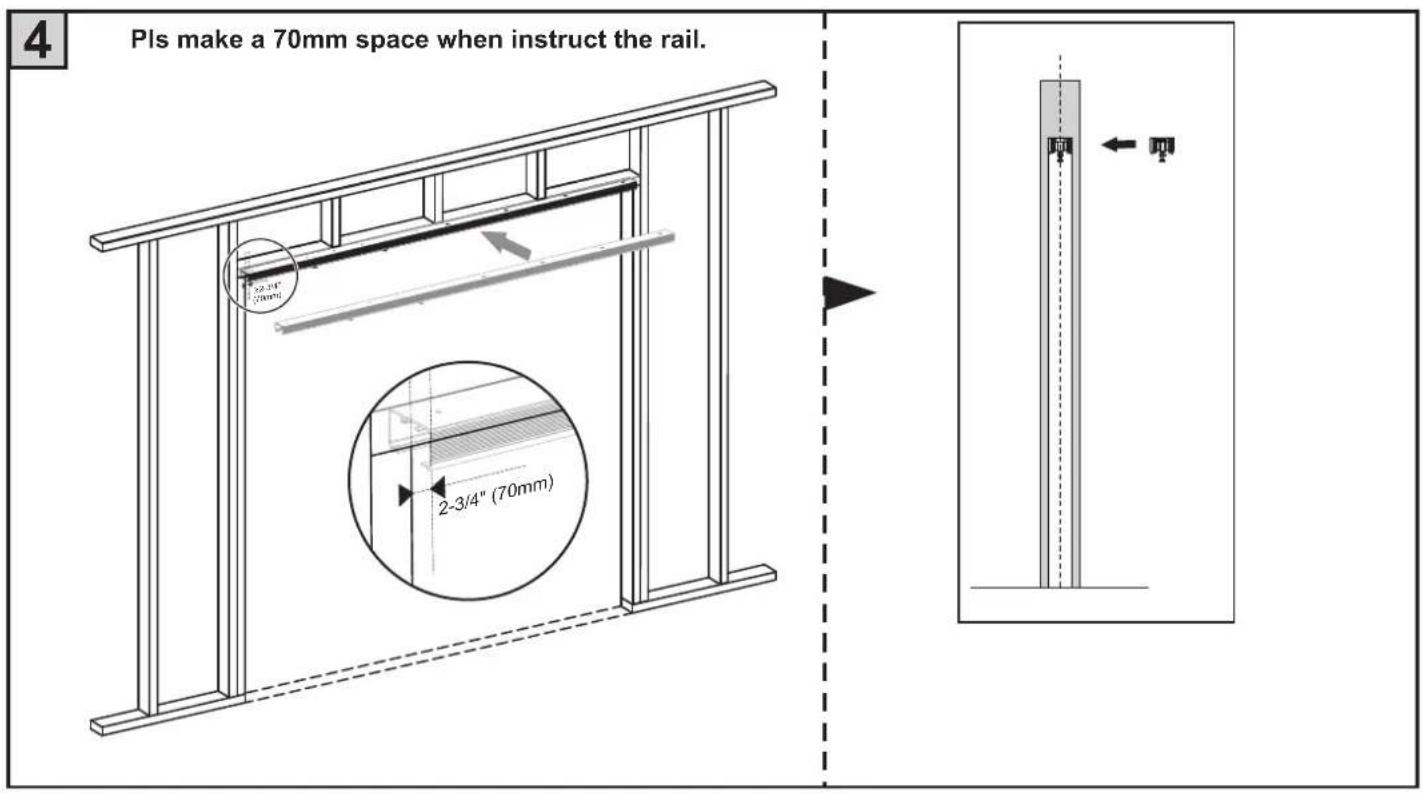
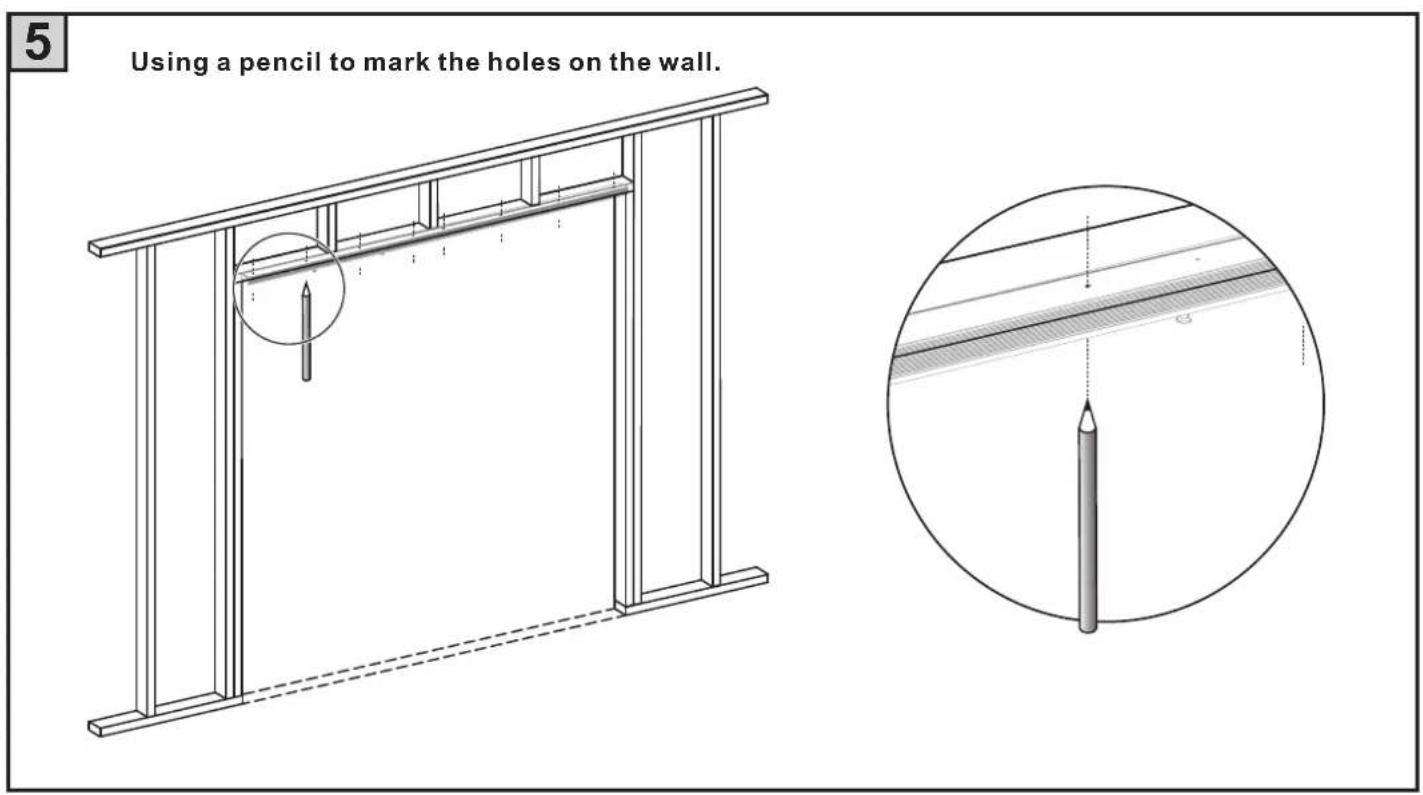
1 CONSTRUCT ROUGH OPENING
- Header must be SQUARE and PLUMB with tube and LEVEL.
- Width is 2X Door width plus 1" (25mm).
- Fit Door depth: For 1^ (25mm) to 1-3/4"(45mm) Panels.
Snap a chalk line on floor even with side jambs. Measure up from finished floor Door Height +3 / 4 or from sub-floor to Door Height +1 - 1 / 2
3

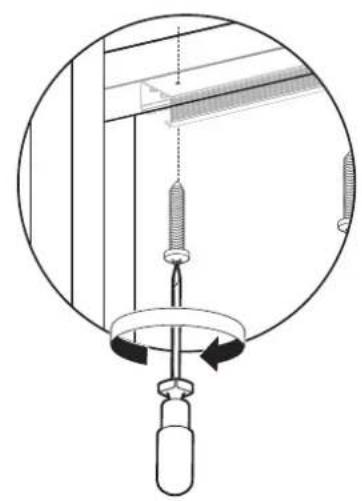
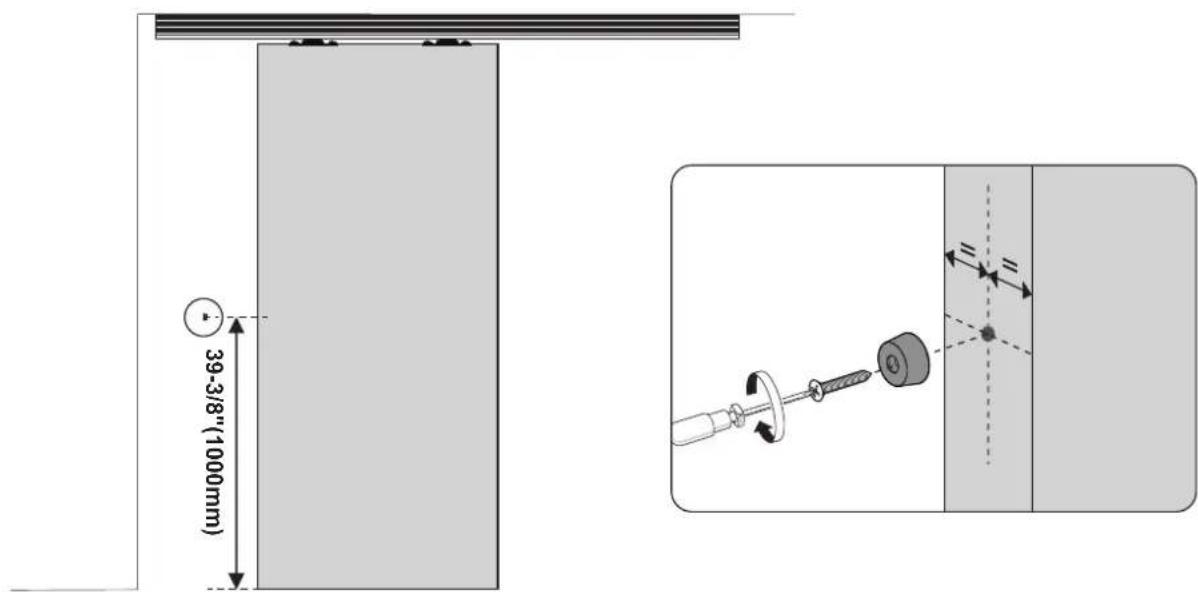
Insert the screw into the hole.

6
7
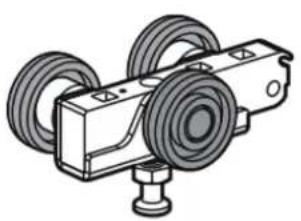
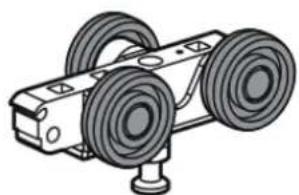
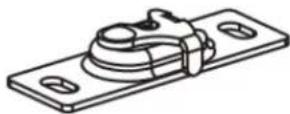
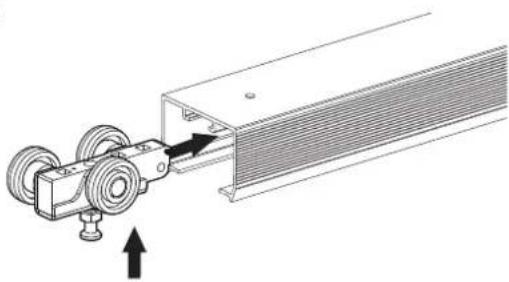
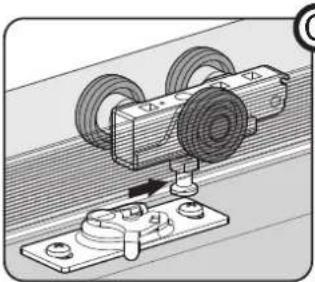
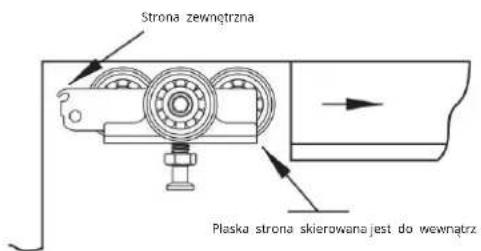
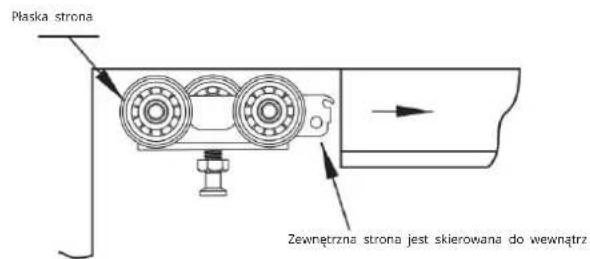
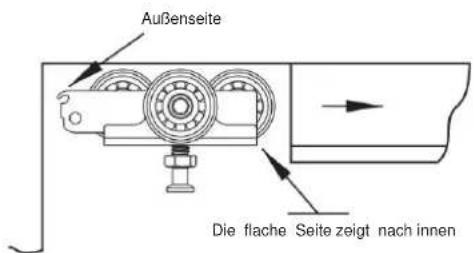
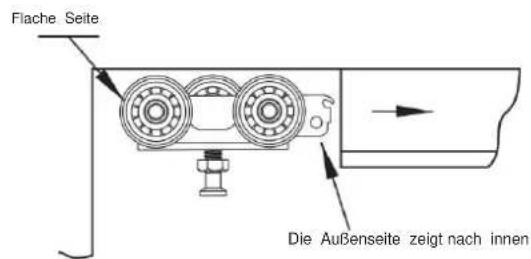
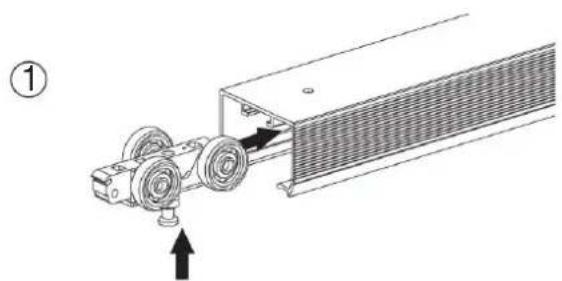
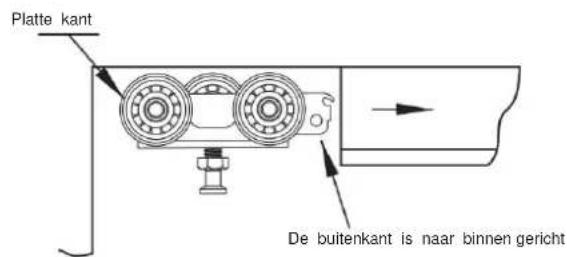
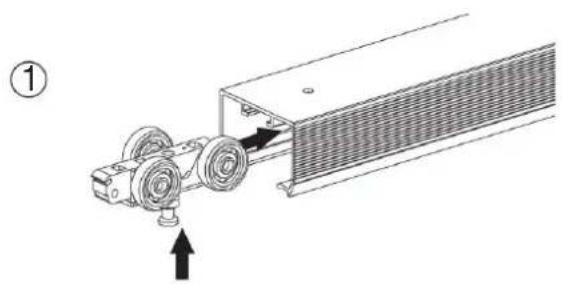
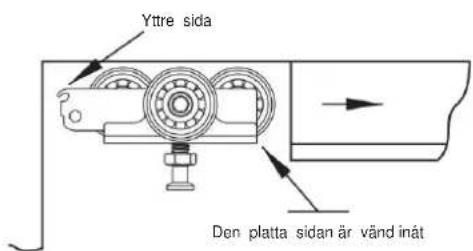
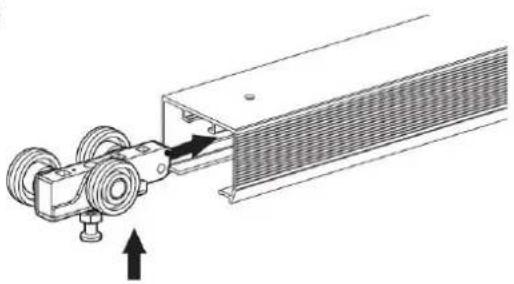
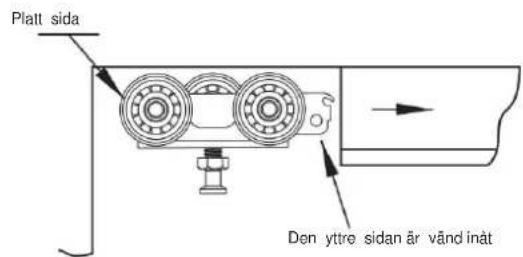
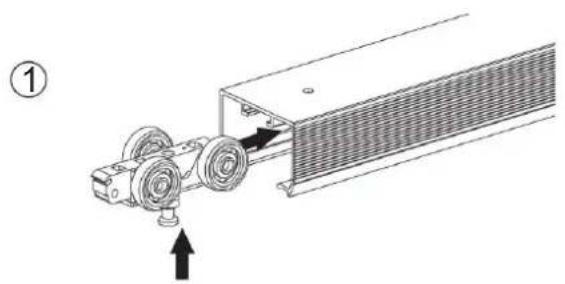
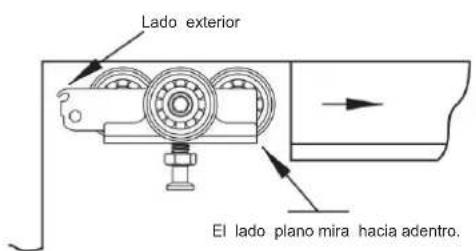
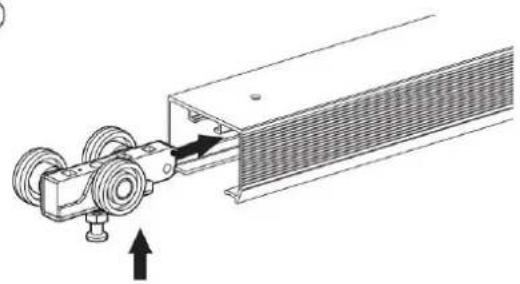
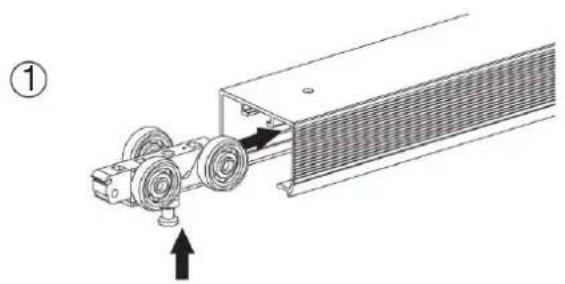
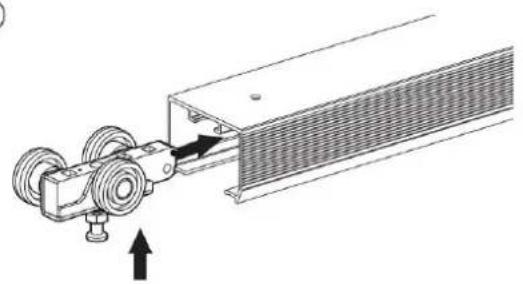
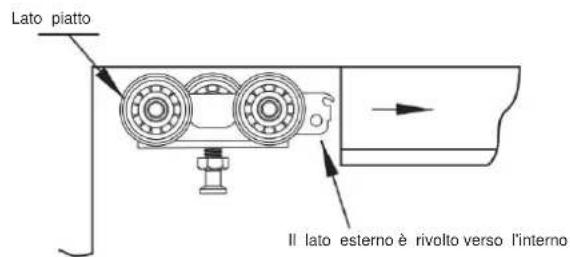
Insert Ball Bearing Hanger Wheel assembly into Track, leave untightened as this will be done latter.

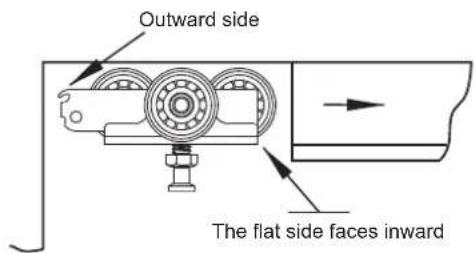
②
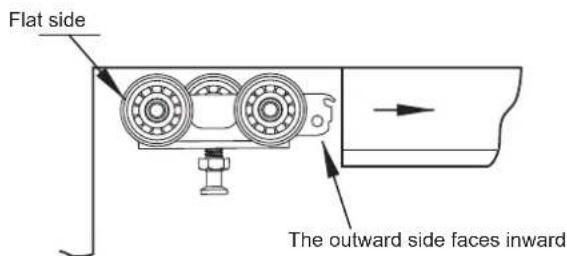
8
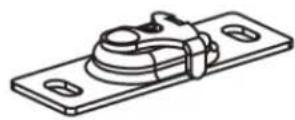
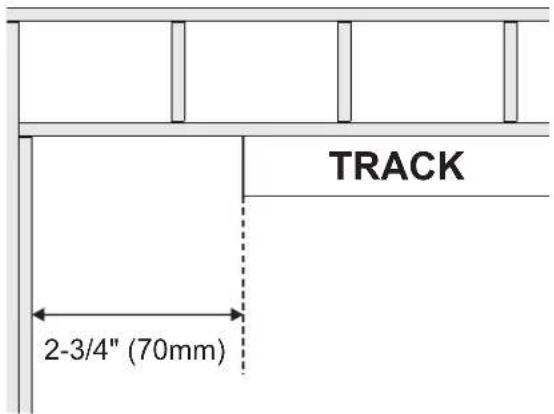
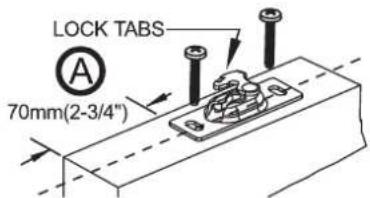
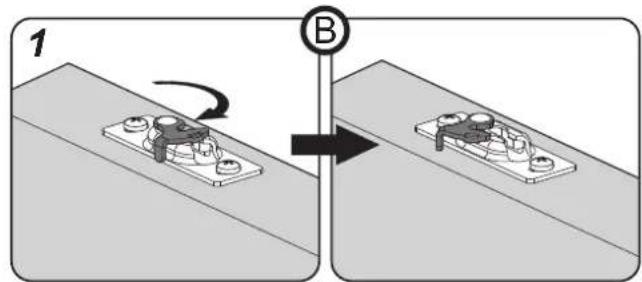
AB/Attach door plates on top of door 2-3/4" (70mm) from each edge with lock tabs on the same side.
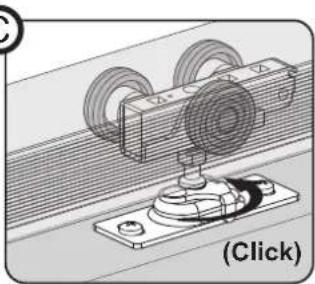
CD/Mount door by locating door plate under adjusting bolt of hanger. Lift door and push bolt into door plate, then click the tab in place. Repeat with other hanger/door plate.
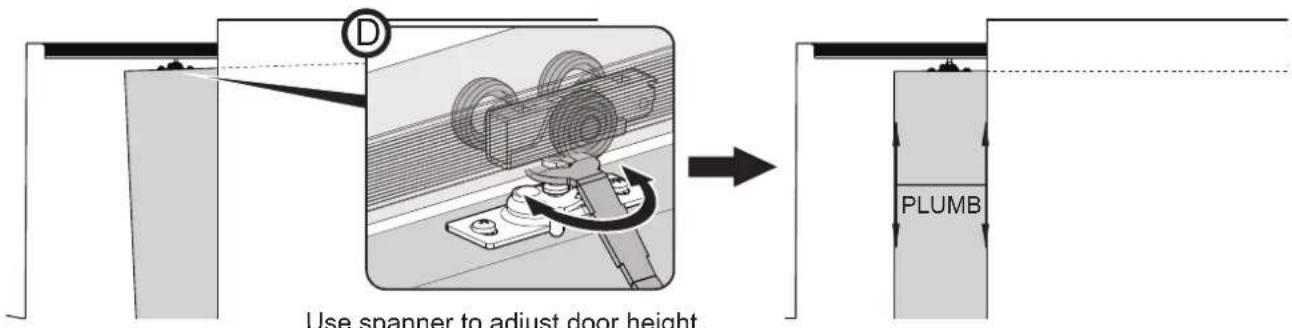
Use spanner to adjust door height.
9
Fasten the bumper on back edge of door 39-3/8"(1000mm) from bottom edge.
10
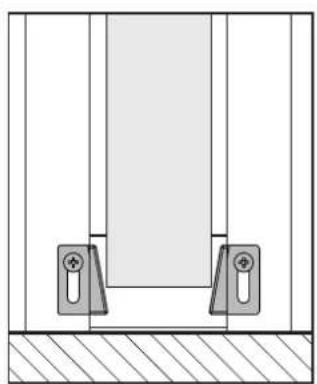
Fasten Guides on finished split jambs at door bottom so door is held in center of opening.
11
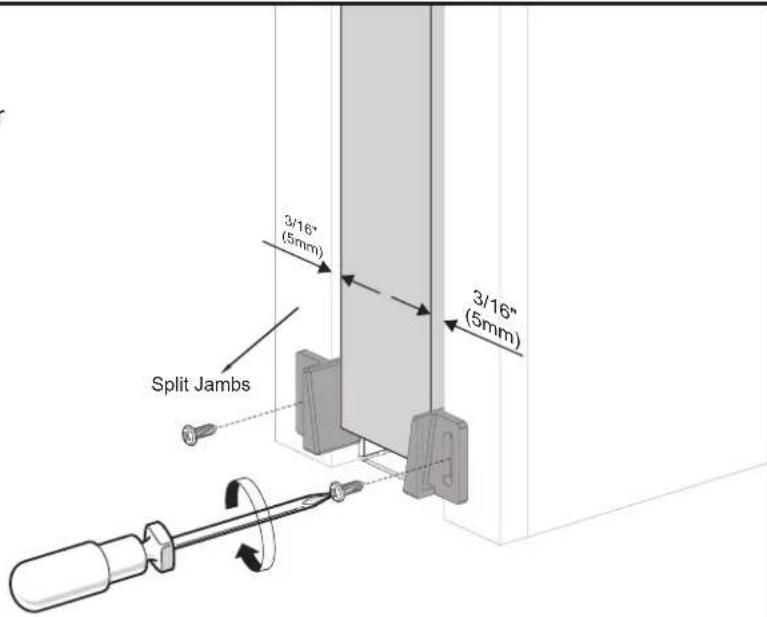
Install finished jambs, split header and casing as shown.
Fasten split header on lock lever side with screws for future
door removal or adjustment. DO NOT USE JAMBS WITH DADO'S.
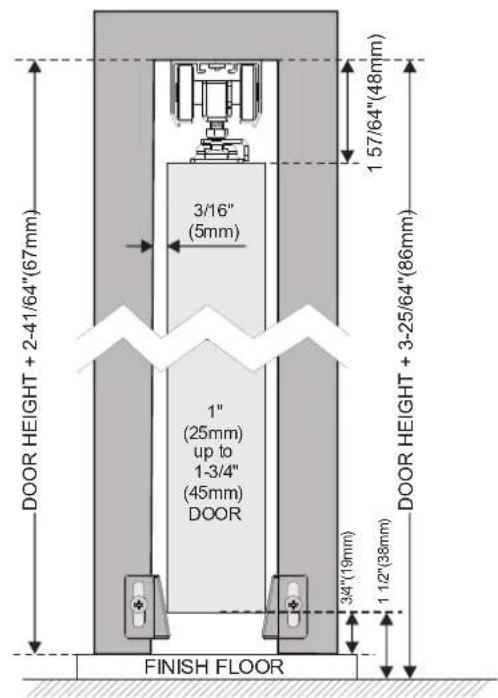
Note: minimum 3/16"(5mm) clearance between jamb and door.


YES

NO
a
ATTACH FINISH SPLIT JAMB TO STEEL TUBE/ PLUMB DOOR WITH JAMB
C
FINISH SPLIT HEADER
b
SHIM AND PLUMB FINISH JAMB WITH DOOR
d
FINISH TRIM
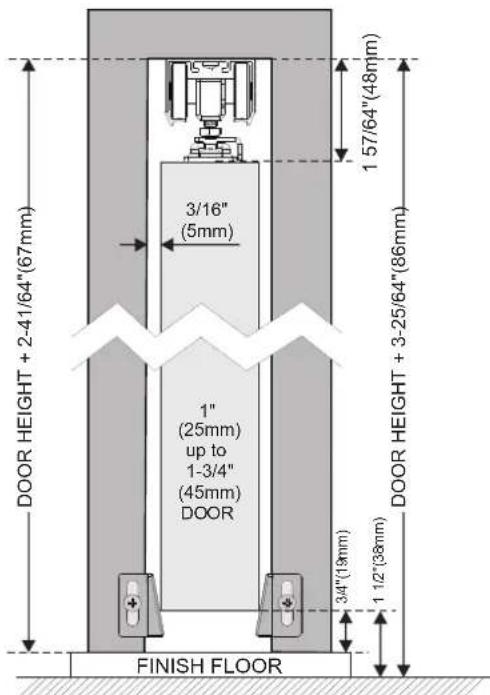
Measure up from finished floor Door Height +3 / 4 or from sub-floor to Door Height +1 - 1 / 2
Maintenance
1.Avoid prolonged exposure to the sun to avoid aging.
Manufacturer: Shanghaiuxinmuyeyouxianggsi
Address: Shuangchenglu 803nong11hao1602A-1609shi, baoshanqu, shanghai 200000 CN.
Imported to AUS: SIHAO PTY LTD. 1 ROKEVA STREETEASTWOOD NSW 2122 Australia
Imported to USA: Sanven Technology Ltd. Suite 250, 9166 Anaheim Place, Rancho
Cucamonga, CA 91730
E-CrossStu GmbH
Mainzer Landstr.69, 60329 Frankfurt am Main.

YH CONSULTING LIMITED.
C/O YH Consulting Limited Office 147, Centurion House,
London Road, Staines-upon-Thames, Surrey, TW18 4AX
VEVOR®
TOUGH TOOLS, HALF PRICE
Technical Support and E-Warranty Certificate
www.vevor.com/support
VEVOR®
TOUGH TOOLS, HALF PRICE
www.vevor.com/support
| (x1) | (x1) | ST5.5x32(x4)(x1) | ST4.2x32 (x8) | ST4.2x13 (x2)(x2) | |
| ST4.2x31.7 (x1)(x1) | (x1) | ||||
1
WYKONANIE WSTEPNEGOTWORU 1. Kolektor
musi byc KWADRATOWY i PIONOWY z rurai POZIOMICA
- Szerokoscwynosi 2X szerokosc drzwi plus 1" (25mm).
- Dopasuj glebokos drzwi: dia paneli o grubosci od 1" (25 mm) do 1-3/4" (45 mm).
2

7
Insert Ball Bearing Hanger Wheel assembly into Track, leave untightened as this will be done latter.

(2)
8
C/O YH Consulting Limited Biuro 147, Centurion House,
London Road, Staines-upon-Thames, Surrey, TW18 4AX
VEVOR
TOUGH TOOLS, HALF PRICE
www.vevor.com/support
Insert Ball Bearing Hanger Wheel assembly into Track, leave untightened as this will be done latter.


(2)
8
C/O YH Consulting Limited Office 147, Centurion House,
London Road, Staines-upon-Thames, Surrey, TW18 4AX
VEVOR
TOUGH TOOLS, HALF PRICE
www.vevor.com/support
VEVOR®
TOUGH TOOLS, HALF PRICE
Assistance technique et certificate de garantie electronique www.vevor.com/support
| ST4.2x32 (x8) (x1) | (x1)(x1) | ST5.5x32(x4) | ST4.2x13 (x2)(x2) |
| ST4.2x31.7 (x1)(x1) | (x1) | ||
Installation
1
CONSTRUIRE UNE OUVERTURE BRUTE 1. L'en-tete
Insert Ball Bearing Hanger Wheel assembly into Track, leave untightened as this will be done latter.

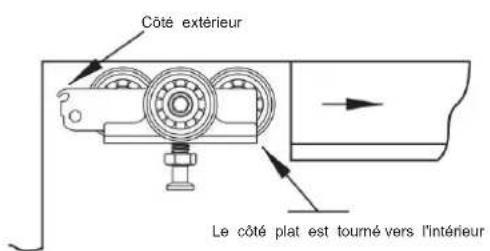

(2)

8
A/S YH Consulting Limited Bureau 147, Centurion House, London
Road, Staines-upon-Thames, Surrey, TW18 4AX
VEVOR
TOUGH TOOLS, HALF PRICE
HULP NODIG? NEEM CONTACT METONS OPI
Insert Ball Bearing Hanger Wheel assembly into Track, leave untightened as this will be done latter.

(2)
8
Rancho Cucamonga, CA 91730
E-CrossStu GmbH
Mainzer Landstr.69, 60329 Frankfurt am Main.

YH CONSULTING LIMITED.
C/O YH Consulting Limited Kantoor 147, Centurion House,
London Road, Staines-upon-Thames, Surrey, TW18 4AX
VEVOR®
TOUGH TOOLS, HALF PRICE
www.vevor.com/support
VEVOR®
TOUGH TOOLS, HALF PRICE
Insert Ball Bearing Hanger Wheel assembly into Track, leave untightened as this will be done latter.
(2)
8
AB/Fäst dörplattor ovanpà dorren 2-3/4" (70 mm) frán varje Kant med lásflikar pá sama sida.
C/O YH Consulting Limited Office 147, Centurion House,
London Road, Staines-upon-Thames, Surrey, TW18 4AX
VEVOR®
TOUGH TOOLS, HALF PRICE
www.vevor.com/support
VEVOR®
TOUGH TOOLS, HALF PRICE
Soporte专业技术o y certificate de garantia electrònica www.vevor.com/support
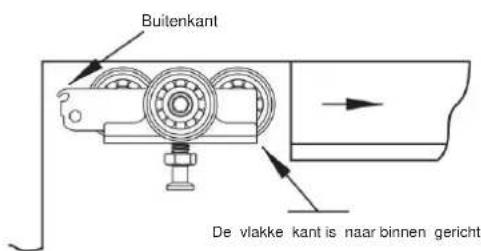
Insert Ball Bearing Hanger Wheel assembly into Track, leave untightened as this will be done latter.
(2)

8
C/O YH Consulting Limited Oficina 147, Centurion House,
London Road, Staines-upon-Thames, Surrey, TW18 4AX
VEVOR®
TOUGH TOOLS, HALF PRICE
Soporte专业技术 y certificate de garantia electrònica www.vevor.com/support
VEVOR®
TOUGH TOOLS, HALF PRICE
Insert Ball Bearing Hanger Wheel assembly into Track, leave untightened as this will be done latter.

(2)
8
C/O YH Consulting Limited Ufficio 147, Centurion House,
London Road, Staines-upon-Thames, Surrey, TW18 4AX
VEVOR
TOUGH TOOLS, HALF PRICE
elettronica www.vevor.com/support