
HL600E - Log splitter SCHEPPACH - Free user manual and instructions
Find the device manual for free HL600E SCHEPPACH in PDF.

| Product Type | Vertical hydraulic log splitter |
| Brand | Scheppach |
| Model | HL600E |
| Dimensions (L/W/H) | 700 x 450 x 1500 mm |
| Weight | 81 kg |
| Power supply | 230 V ~ 50 Hz |
| Rated input power (P1) | 2200 W |
| Rated output power (P2) | 1600 W |
| Motor speed | 2800 rpm |
| Maximum splitting force | 6 tons |
| Cylinder stroke | 49 cm |
| Permissible log length | 57, 78 or 106 cm |
| Log diameter min./max. | 12 cm / 32 cm |
| Advance speed | 4.0 cm/s |
| Return speed | 12 cm/s |
| Oil tank capacity | 3.0 L |
| Operating mode | S6 40% (intermittent duty) |
| Motor protection | Yes (thermal circuit breaker) |
| Safety | Two-hand control, emergency stop, vent cap |
| Adjustable table height | 280 / 560 / 770 mm |
| Working height | 900 mm |
| Maintenance | Oil change every 500 h (first at 50 h), column lubrication |
| Repairability | Spare parts available via Scheppach after-sales service |
| Delivery contents | Log splitter, control arms (2), table, axle, wheels (2), manual |
Frequently Asked Questions - HL600E SCHEPPACH
User questions about HL600E SCHEPPACH
0 question about this device. Answer the ones you know or ask your own.
Ask a new question about this device
Download the instructions for your Log splitter in PDF format for free! Find your manual HL600E - SCHEPPACH and take your electronic device back in hand. On this page are published all the documents necessary for the use of your device. HL600E by SCHEPPACH.
USER MANUAL HL600E SCHEPPACH
natural_image
Industrial machine with labeled parts, no visible text or symbols on the device itselfHL600E
Only for EU countries.
Do not dispose of electric tools together with household waste material! In observance of European directive 2012/19/EU on wasted electrical and electronic equipment and its implementation in accordance with national law, electric tools that have reached the end of their life must be collected separately and returned to an environmentally compatible recycling facility
FR

natural_image
Industrial machine with motor and wheels, no visible text or symbols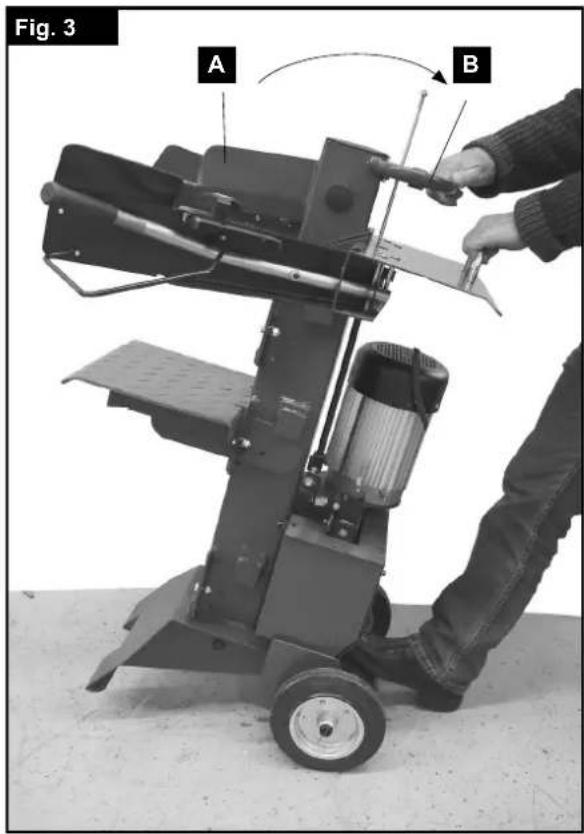
natural_image
Person operating a mechanical device labeled A and B, with no visible text or symbols on the device itself.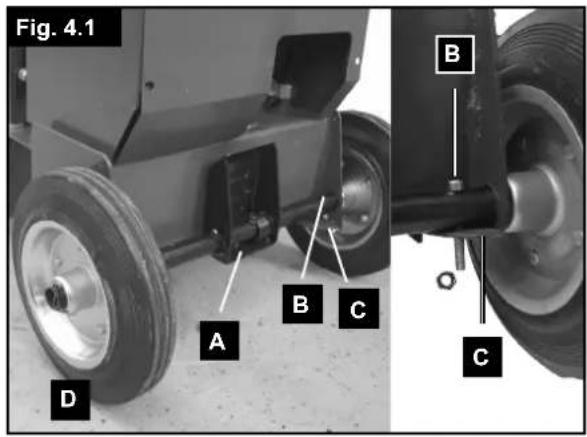

natural_image
Close-up of a mechanical component with a labeled part (11) and figure marker (Fig. 7), no readable text or symbols beyond labels.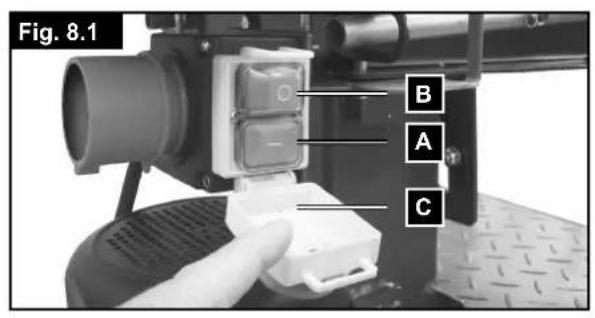
natural_image
Close-up of a mechanical device component with labeled parts D and an arrow pointing to a specific part (no text or symbols beyond labels)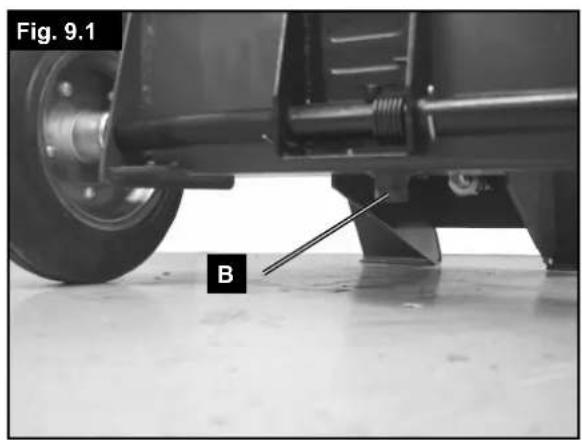
natural_image
Close-up of a vehicle's lower leg and wheel assembly with labeled component B (no text or symbols beyond labels)
Günzburger Straße 69
D-89335 Ichenhausen
VEREHRTER KUNDE,
Explanation of the symbols on the equipment
 | Please read the manual before start-up |
 | Wear safety footwear |
 | Wear work gloves |
 | Use hearing protection and safety goggles |
 | Wear a head protection |
 | Authorised personnel only |
 | No smoking in the working area |
 | Do not spill hydraulic oil on the floor |
 | Keep your workspace clean! Untidiness can cause accidents! |
 | If a crane is used, put the lifting belt round the housing. Never lift the firewood splitter by the hand grip, |
 | Dispose of waste oil correctly (waste oil collection point on site). Do not dump waste oil in the ground or mix it with waste. |
 | Do not remove or modify protection and safety devices. |
 | Only the operator is allowed in the work area of the machine. Keep other people and animals (minimum distance 5 m) at a distance. |
 | |
| [ZZW6] | Do not remove jammed trunks with your hands. |
 | Caution! Switch off the engine before repair, maintenance and cleaning. Unplug the mains plug. |
 | Danger of bruising and injury from sharp edges; never touch danger areas when the cleaver is moving. |
 | The machine must only be operated by one person! |
 | Loosen the vent bolt two revolutions, before starting work. Close before transport. |
 | |
 | Caution! Moving machine parts! |
 | Do not transport the device in the horizontal position! |
 | Before operating the two-hand control, carefully read the operating instructions! |
Table of contents: Page:
- Introduction 21
- Layout 21
- Scope of delivery 21
- Intended use 21
- Safety information 22
- Technical data 24
- Assembly 25
- Starting the equipment 25
- Working instructions 25
- Maintenance and repair 26
-
Storage 27
-
Transport 27
-
Electrical connection 27
-
Disposal and recycling 28
-
Troubleshooting 28
-
Declaration of conformity 67
1. Introduction
MANUFACTURER:
scheppach
Günzburger Straße 69
D-89335 Ichenhausen
DEAR CUSTOMER,
We hope your new tool brings you much enjoyment and success.
NOTE:
According to the applicable product liability laws, the manufacturer of the device does not assume liability for damages to the product or damages caused by the product that occurs due to:
- Improper handling,
• Non-compliance of the operating instructions,
• Repairs by third parties, not by authorized service technicians.
• Installation and replacement of non-original spare parts,
• Application other than specified, - A breakdown of the electrical system that occurs due to the non-compliance of the electric regulations and VDE regulations 0100, DIN 57113 / VDE0113.
⚠ Important!
When using electric tools safety precautions should always be followed to reduce the risk of fire, electric shock and personal injury including the following. Read all these instructions before attempting to operate this product and save these instructions. Keep this manual in a safe place, so that the information is available at all times. If you give the equipment to any other person, hand over these operating instructions and safety regulations as well. We cannot accept any liability for damage or accidents which arise due to a failure
In addition to the safety regulations in the operating instructions, you have to meet the applicable regulations that apply for the operation of the machine in your country. Keep the operating instructions package with the machine at all times and store it in a plastic cover to protect it from dirt and moisture. Read the instruction manual each time before operating the machine and carefully follow its information. The machine can only be operated by persons who were instructed concerning the operation of the machine and who are informed about the associated dangers. The minimum age requirement must be complied with.
We assume no liability for accidents or damages resulting by disregarding these instructions and the safety instructions.
2. Layout (Fig. 1-2)
1 Handle
2 Cleaver blade
3 Cleaver column
4 Clamping claw
5 Control arm
6 Handle protection
7 Table bracket (front)
8 Table bracket (side)
9 Table locking levers
10 Cleaver table
11 Vent cap/Oil filler plug
12 Base frame
13 Wheels
14 Switches and plugs
15 Stroke adjustment rod
16 Motor
17 Hoop guards
3. Scope of delivery
- Open the packaging and remove the device carefully.
- Remove the packaging material as well as the packaging and transport bracing (if available).
- Check that the delivery is complete.
- Check the device and accessory parts for transport damage.
- If possible, store the packaging until the warranty period has expired.
ATTENTION
The device and packaging materials are not toys! Children must not be allowed to play with plastic bags, film and small parts! There is a risk of swallowing and suffocation!
• Hydraulic log splitter (1x)
- Accessory pack (1x)
- Operating arms (2x)
- Fixed platform (1x)
- Wheel axle (1x)
- Running wheels (2x)
- Operating instructions (1x)
4. Intended use
The wood splitter has only been designed to split wood in the fibre direction. Respecting technical data and safety precautions. When splitting, it is essential to make sure the split wood only contacts the checkered sheet of the splitting desk.
The hydraulic log splitter can only be used in a vertical position. Logs may only be split along the direction of the fiber. Log dimensions are:
max. Log lengths 57 cm/78 cm/106 cm
∅ min. 12 cm, max. 32 cm
Never split logs in horizontal position or against the direction of the fiber.
- The equipment is to be used only for its prescribed purpose. Any other use is deemed to be a case of misuse.
-
The user / operator and not the manufacturer will be liable for any damage or injuries of any kind caused as a result of this.
-
To use the equipment properly you must also observe the safety information, the assembly instructions and the operating instructions to be found in this manual.
- All persons who use and service the equipment have to be acquainted with this manual and must be informed about the equipment's potential hazards.
- It is also imperative to observe the accident prevention regulations in force in your area.
- The same applies for the general rules of health and safety at work.
- The manufacturer will not be liable for any changes made to the equipment nor for any damage resulting from such changes.
Even when the equipment is used as prescribed it is still impossible to eliminate certain residual risk factors. The following hazards may arise in connection with the machine's construction and design:
- Dry and dried-up wood may jump up when being split and injure the face of the operator. Adequate protective clothes to be worn!
- Wooden pieces produced during splitting may fall down and injure legs of the operator.
- When splitting wood, parts of body may be crushed or separated due to hydraulic knife lowering.
- There is a risk of branchy wood getting stuck when being split. Please be advised that wood being separated is under heavy pressure and your fingers may get squeezed in the gap.
- Caution! Pieces of wood cut at the right angle to be split only! Diagonally cut pieces of wood may slip when cutting! This may cause personal injury or damage to the splitter knife especially when using the gap extension by wedge!
Please note that our equipment has not been designed for use in commercial, trade or industrial applications. Our warranty will be voided if the equipment is used in commercial, trade or industrial businesses or for equivalent purposes.
5. Safety information
These operating instructions provide places concerning your safety which are marked with this indication:
△ GENERAL SAFETY NOTES
You must read the complete instruction and maintenance manual before you use the machine.
- You must wear safety shoes at all times to protect yourself against the risk of falling trunks.
- You must wear work gloves at all times to protect your hands from chips and splinters generated while you work.
- You must wear safety goggles or a visor to protect yourself from chips and splinters generated while you work.
- It is prohibited to remove or modify any protective equipment or safety equipment.
- No one apart from the operator is permitted to stand within the working radius of the machine. No other person or animal is permitted to be within a radius of 5 meters of the machine.
- It is prohibited to allow used oil to be discharged to the environment. The oil must be disposed of in accordance with the regulations of the country in which the machine is used.
⚠️ Risk of hands being cut or crushed:
- Never touch any dangerous areas while the wedge is moving.
⚠ WARNING!
Keep an eye on the movement of the trunk pusher at all times.
⚠ WARNING!
Never attempt to remove a trunk which has got stuck on the wedge by hand.
⚠ WARNING!
Always unplug the power plug prior to starting any of the maintenance work described in this manual.
⚠ WARNING!
The voltage must be the same as the voltage specified on the rating plate.
Keep these regulations in a safe place!
1. WORK AREA
- Keep your work area clean and tidy. Disorder and insufficiently illuminated work areas can lead to accidents.
- Do not use this tool in a potentially explosive environment containing combustible liquids, gases or dust. Electric tools generate sparks, which can in turn ignite dust or vapors.
- Keep children and other persons away from the electric tool while it is being used. Allowing yourself to get distracted can cause you to lose control of the tool..
2. ELECTRICAL SAFETY
Attention! The following basic safety measures must be observed when using electric tools for protection against electric shock, and the risk of injury and fire. Read all these notices before using the electric tool and keep the safety instructions for later reference.
- The tools connector plug must be able to fit into the socket outlet. Do not modify the plug in any way! Do not use adapter plugs in conjunction with electrically grounded tools. Unmodified plugs and matching socket outlets reduce the risk of an electric shock.
- Avoid touching grounded surfaces, such as those of pipes/tubes, heaters, cookers and refrigerators. There is an increased risk of getting an electric shock if you are electrically grounded.
- Keep the tool away from rain and moisture/wet conditions. Penetration of water into an electric tool increases the risk of an electric shock.
- Do not use the cable to carry the tool, hang it up or pull the plug out of the socket. Keep the cable away from sources of heat, oil, sharp edges and moving tool parts. Damaged or tangled cable increases the risk of an electric shock.
- If you intend to use an electric tool outdoors, ensure that you only use extension cable that is approved for outdoor applications. Using extension cable that is approved for outdoor applications reduces the risk of an electric shock.
- Connect the electric tool to the mains power supply (230V\~, 50Hz) via a socket-outlet with earthing contact with maximum 16A protection. We recommend that you fit a residual-current protection de-
vice with a maximum nominal tripping current of 30 mA. Seek the advice of your electrician.
3. PERSONAL SAFETY
- Be alert, work conscientiously and exercise appropriate caution when using the electric tool. Do not use the tool if you are tired or are under the influence of drugs/medication or alcohol. One moment of carelessness or lack of attention when using the electric tool can cause serious bodily injury!
- Always wear personal protective equipment (PPE), including safety goggles. Wearing personal protective equipment such as a dust mask, non-slip footwear, protective headgear and ear muffs (depending upon the type of electric tool and the particular application) reduces the risk of sustaining injury.
» Wear ear-muffs. The impact of noise can cause damage to hearing.
» Wear a breathing mask. Dust which is injurious to health can be generated when working on wood and other materials. Never use the device to work on any materials containing asbestos!
» Wear safety goggles. Sparks generated during working or splinters, chips and dust emitted by the device can cause loss of sight.
- Physically touching the switch with your finger when carrying the tool or connecting the tool to the power supply switched on can lead to accidents.
- Remove adjusting tools/wrench(es) prior to switching on the power tool. A tool or wrench that is positioned inside a rotating power tool part can cause injury.
- Do not overestimate your abilities. Make sure you stand squarely and keep your balance at all times. This way, you will be able to have better control over the tool in unexpected situations.
- Wear suitable clothes. Never wear loose fitting clothes or jewelry. Keep hair, clothes and gloves away from moving parts. Loose clothing, dangling jewelry and long hair can be caught by moving parts.
4. CAREFUL HANDLING AND USE OF ELECTRIC TOOLS
- Do not overload your tool. Only use suitable electric tools to perform your work. Using the right electric tool allows you to work better and safer within the tool's quoted capacity range.
- Do not use an electric tool whose switch is defective. An electric tool that no longer can be switched on or off is dangerous and must be repaired.
- Always pull the plug out of the socket outlet before making any adjustments. Exchange accessory parts or put away the tool. This precaution eliminates the possibility of inadvertently starting the tool.
- When not in use, store electric tools out of the reach of children. Do not allow those persons to use this tool who are unfamiliar with it or who have not read these instructions. Electric tools are dangerous when they are used by inexperienced persons.
- Take good care of your tool. Check that moving parts properly function and do not jam, that parts are not broken off or damaged in any way and that the tool can be used to its full capacity. Have damaged parts repaired prior to using the tool. The
cause of many accidents can be traced back to poorly maintained electric tools.
- Use electric tools and plug-in tools, etc. in compliance with these instructions and in the manner that is prescribed for the model at hand. In so doing, pay due attention to working conditions and the job to be performed. Using electric tools for applications other than those intended can lead to dangerous situations.
- If the power cable of the electric tool is damaged, it must be replaced by a specially prepared connection lead which can be obtained from the customer service center.
5. SERVICE
Have your tool repaired only by authorized specialists using original replacement parts. This will ensure that your tool remains safe to use.
SPECIAL SAFETY INSTRUCTIONS FOR THE WOOD SPLITTER
⚠️ CAUTION! Moving machine parts. Never reach into the splitting zone.
⚠ WARNING!
The use of this powerful machine can give rise to special types of danger. Take particular care to protect both yourself and all other persons in the vicinity. You should comply with basic precautionary measures at all times in order to minimise the risk of injuries and danger.
The machine must never be operated by more than one operator.
- Never attempt to split any trunks which are larger than the recommended trunk capacity.
- The trunks must be free of any nails or wire which may be flung out or might damage the machine during operation.
- The trunks must be cut flat at the ends and have had all branches removed from them.
- The wood must always be split along the direction of the grain. Never insert the piece of wood cross-wise to the splitter and then attempt to split it as this could damage the splitter
- The operator must operate the machine controls with both hands and must not use any other kind of device as a substitute for the controls.
- The machine may be operated only by adults who have read the operating instructions prior to starting operation. No one is permitted to use the machine without reading the manual first.
- Never attempt to split two trunks in a single operation as this may cause pieces of wood to be flung out, which is dangerous.
- Never add more wood or replace a piece of wood while the machine is in the middle of an operation as this would be extremely dangerous.
- All persons and animals must be kept at least 5 meters from the machine while it is working.
-
Never modify the protective equipment on the wood splitter or carry out any work without such equipment attached.
-
Never attempt to force the wood splitter to split excessively hard pieces of wood under cylinder pressure for more than 5 seconds. Overheated oil under pressure may cause damage to the machine. Stop the machine, turn the trunk through 90^ and then try to split it again. If the wood still fails to split this means that it is too hard for the capacity of the machine and must be removed to avoid damaging the wood splitter.
- Never leave the machine unattended while running. Stop the machine and unplug the power plug whenever you are not using it.
- Never use the machine near natural gas, petrol channels or other inflammable materials.
- Never open the control box or the motor cover. If necessary, contact a qualified electrician.
- Make sure that the machine and the cable never come into contact with water. Handle the power cable with care and never pull or tug it with a jolt to unplug it. Keep all cables away from excessive heat, oil and sharp-edged objects.
- Please take note of the temperature conditions whilst you work. Extremely low and extremely high ambient temperatures may cause malfunctions.
- Before using the wood splitter for the first time, users should be given practical training by an experienced operator and should initially work with it under supervision.
Before starting work check the following
- Do all the functions of the tool function correctly?
- Does all the safety equipment function correctly (two-handed safety switch)?
- Can the tool be switched off correctly?
- Is the tool adjusted correctly (truck support, trunk holding plates, splitter height)?
Keep the working area free of obstructions (for example pieces of wood) whilst working.
SPECIAL WARNINGS RELATING TO THE USE OF THE WOOD SPLITTER
Special types of danger can arise during the use of this powerful machine. Take particular care to protect both yourself and all other persons in the vicinity.
Hydraulic system
Never use the machine if there is ever any danger from hydraulic fluid. Check for leaks in the hydraulic system every time before you start using the machine. Check that the machine and your work area are clean and free of any patches of oil: Hydraulic fluid may be the cause of danger because it can cause you to slip and fall, may make your hands slip while operating the machine or may cause a fire.
Electrical safety
- Never use the machine if there is any risk of an electrical hazard.
- Never use an electrical device in moist conditions.
- Never use this machine with an unsuitable cable or extension cable. Never use this machine if you are not connected to a properly earthed connection which provides the power required as specified on the label and is protected by a 16 amp fuse.
Mechanical hazards
Wood splitting is associated with particular mechanical hazards.
- Never use this machine if you are not wearing proper safety gloves, shoes with steel caps and certified eye protection.
- Be cautious of splinters generated while working; avoid stab-like injuries and the possibility of the machine seizing up.
- Never attempt to split any trunks which are either too long or too small and do not fit in the machine properly.
- Never attempt to split any trunks which contain nails, wire or any other objects.
- Clear up while you work; collections of split wood and wood chips can make your work area dangerous. Never continue working if your work area is full to the extent that you could slip, trip or fall over.
- Keep onlookers well away from the machine and never permit unauthorized persons to operate the machine.
⚠ REMAINING HAZARDS
The machine has been built using modern technology in accordance with recognized safety rules. Some remaining hazards, however, may still exist.
- The splitting tool can cause injuries to fingers and hands if the wood is incorrectly guided or supported.
- Thrown pieces can lead to injury if the work piece is not correctly placed or held.
- Injury through electric current if incorrect electric connection leads are used.
- Danger due to particular properties of the log (branches, irregular shape etc)
Even when all safety measures are taken, some remaining hazards which are not yet evident may still be present.
Remaining hazards can be minimized by following the safety instructions as well as the instructions in the chapter Authorized use and in the entire operating manual.
6. Technical data
| Dimensions D/W/H mm 700/450/1500 | |
| Table height mm 280/560/770 | |
| Working height mm 900 | |
| Log length cm 57/78/106 | |
| Power max. t* | 6.0 |
| Piston stroke cm | 49 |
| Forward speed cm/s | 4.0 |
| Return speed cm/s | 12 |
| Oil quantity litres | 3.0 |
| Weight kg | 81 |
| Drive | |
| Motor V/Hz | 230/50 |
| Input P1 W | 2200 |
| Output P2 W | 1600 |
| Operating mode S6 40% | |
| Motor speed 1/min | 2800 |
| Motor protection | yes |
Technical datas subject to change!
* The maximum achievable splitting power depends on the resistance of the material to be split and can, due to influencing variable, deflect to the hydraulic system.
7. Assembly
For reasons of packing, your log splitter is not completely assembled.
Mounting the wheels, Fig 4.1
- Insert the wheel axle with pedal (A) through the two holes on the oil tank.
- Insert the hexagon socket screw M6 (B) through the wheel axle and tighten it onto the lug (C) with a safety nut.
- Then, mount a wheel on each side and secure both with a cotter pin (D). Slightly bend the cotter pin to prevent it from falling out.
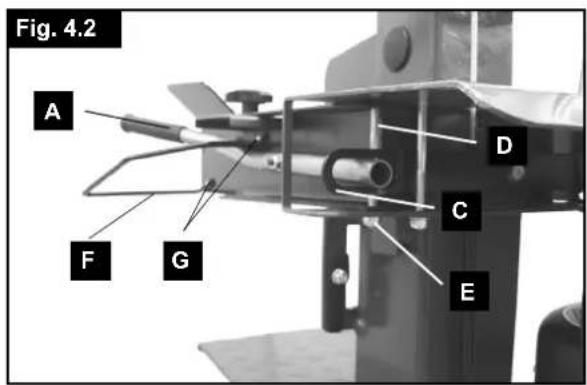
Mounting the control arms, Fig. 4.2/4.3
- Insert the control arm (A) in the rocker switch (C), and screw it in place with the hexagon bolt (D), the washer (E) and the safety nut. Tighten the lock nut so the control arm can still be moved.
- Now, mount the control arm on the right, following the method described above.
- Mount the hoop guards (F) to both control arms, using 2 crosshead screws (G) in each case.
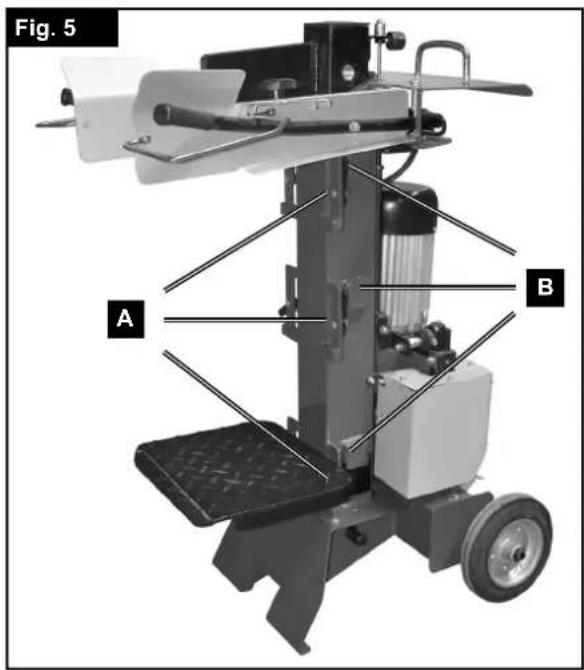
Mounting the table, Fig. 5
Depending on the length of the timber to be cleaved, the table can be mounted at 3 different heights: 57 cm, 78 cm and 106 cm. 2 Locking levers (A) are available at every installation position.
Insert the tabletop into the desired mounting brackets (B). Now, secure the tabletop with the locking lever on both sides. Then secure the locking lever by using the spring pin on one side.
8.Starting the equipment
Make sure the machine is completely and expertly assembled. Check before every use:
- The connection cables for any defective spots (cracks, cuts etc.).
- The machine for any possible damage.
- The firm seat of all bolts.
• The hydraulic system for leakage. - The oil level.
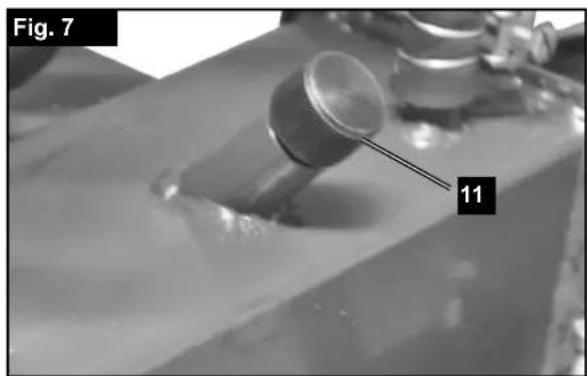
Venting, Fig. 7
Bleed the hydraulic system, before you put the log splitter into operation.
- Loosen the vent cap (11) by a few turns, so that air can escape from the oil tank.
- Leave the cap open during operation.
- Close the cap again, before moving the splitter, otherwise oil may leak.
If the hydraulic system is not vented, the trapped air will damage the seals and thus the splitter!
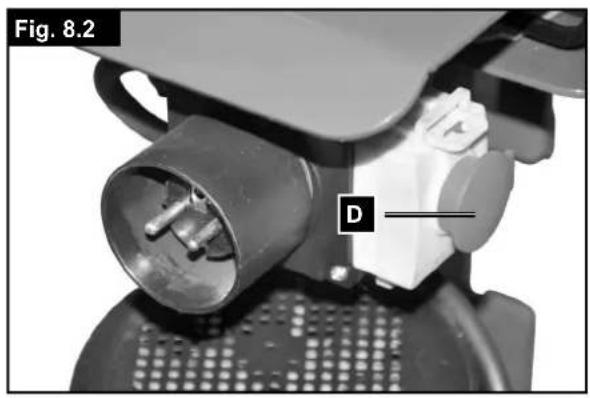
Switching ON / OFF, Fig. 8.1 / 8.2
Open the protective cap (C).
Press the green button (A) to switch the appliance on.
Press the red button (B) to switch the appliance off.
Press the emergency stop (D) in the event of emergencies.
Note: Prior to each use, check the functioning of the on-off switch by switching the device on and off.
Restarting safety in case of current interruption (no-volt release).
In case of current failure, inadvertent pulling of the plug, or a defective fuse, the machine is switched off automatically. For switching on again, press anew the green button of the switch unit.
End of work
- Move the splitting knife to the lower position.
- Release one operating arm.
- Switch the machine off and pull the power plug.
- Close the venting cap.
- Observe the general maintenance instructions.
9. Working instructions
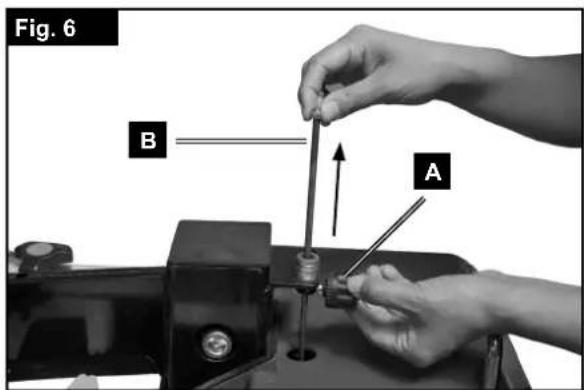
Stroke limit for short logs, Fig. 6
Lower splitting knife position about 10 cm above table.
- Move splitting knife to the desired position
- Release one operating arm
- Switch motor off
- Release the second operating arm
- Release the locking screw (A)
- Push the stroke set rod (B) to the top until it is stopped
- Retighten the locking screw (A)
- Switch motor on
- Check upper position
Setting the table height, Fig. 5
Upper table position for logs up to 57 cm, centre table position for logs up to 78 cm, lower table position for logs up to 106 cm.
Functional test
Test the function before every use.
Action:
Result:
| Push both handles towards below. | Splitting knife goes down to approx. 10 cm above the table. |
| Let one handle loose, then the other. | Splitting knife stops in the desired position. |
| Let both handles loose. | Splitting knife returns to upper position. |
Check the oil level before every use – see chapter "Maintenance".
- Place the log on the table, hold it with both handles, press the handles down. As soon as the splitting knife enters the wood, push the handles down and to the outside at the same time. This prevents the wood from putting pressure on the holder plates.
- Only split straight cut logs.
- Split the logs in vertical position.
- Never split in horizontal position or across.
- Wear protective gloves when splitting.
Rational working method
- Upper position approx. 5 cm above log.
- Lower position approx. 10 cm above table.
ACCIDENT PREVENTION STANDARDS
1) The machine may only be operated by people who are well familiar with the contents of this manual.
2) Before use, check the intactness and perfect function of the safety devices.
3) Before use, make yourself also familiar with the control mechanisms of the machine, following the operating instructions.
4) The capacity of the machine indicated may not be surpassed. In no way may the machine be used for any other purposes than splitting firewood.
5) In agreement with your country's laws, the personnel must wear adequate, close-fitting working clothes. Jewelry like watches, rings and necklaces must be taken off. Long hair must be protected by a hair net.
6) The work place should always be tidy and clean. Tools, accessories and wrenches should lie within reach.
7) During cleaning or maintenance work, the machine may never be connected to the mains.
8) It is strictly prohibited to use the machine with the safety devices removed or switched off.
9) It is strictly prohibited to remove or modify the safety devices.
10) Before undertaking any maintenance or adjusting work, carefully read and understand the present operating instructions.
11) For a good performance of the machine as well as for safety reasons, the plan given herein must be adhered to.
12) In order to prevent accidents, the safety labels must always be kept clean and legible, and they must be strictly observed. Any missing labels must be reordered from the manufacturer and be attached to the correct place.
13) In case of fire, only fire-fighting powder may be used. Water is not allowed to extinct the fire because of the risk of short circuit.
14) If the fire cannot be extinct immediately, pay attention to leaking liquids.
15) In case of a longer fire, the oil tank or the pressure lines can explode. Be careful not to get
10. Maintenance and repair
Switch off the motor and pull the power supply plug before undertaking any converting, maintenance, or cleaning work.
⚠ Always pull power plug!!
Skilled craftsmen can execute smaller repairs on the machine themselves.
Repair and maintenance work on the electrical system may only be carried out by an electrician.
All protection and safety devices must be replaced immediately after completing repair and maintenance procedures.
We recommend:
• Thoroughly clean the machine after every use.
- Splitting knife
The splitting knife is a wearing part that should be reground or replaced by a new one, if necessary.
- Two-hand control
The combined supporting and control unit must be kept easy-going. Occasionally grease with a few drops of oil.
- Moving parts
Keep splitting knife guides clean from dirt, wood chips, bark etc.
Grease sliding rails with oil spray or grease.
- Checking the hydraulic oil level
Check hydraulic connections and bolts for tightness and wear. Retighten the bolts if necessary.
Checking the oil level
The hydraulic unit is a closed system with oil tank, oil pump and control valve. Check the oil level regularly before every use. Too low an oil level can damage the oil pump. The correct oil level is approx. 10 to 20 mm below the oil tank surface.
Note: The level of oil must be checked when the riving knife is pulled back. The measuring stick for the oil is located on the base in the ventil cap (11) (Fig. 7) and has two notches. If the oil level is at the lower notch, then the oil level is at a minimum. Should this be the case, oil must be immediately added. The upper notch indicates the maximum oil level.
When must the oil be changed?
First oil change after 50 operating hours, then every 500 operating hours.
Changing the hydraulic oil (Fig. 7/9.1)
• Completely retract the splitting column.
- Put a bin of at least 6 litres capacity underneath the log splitter
- Release the venting cap (11).
- Open the drain plug (B), allow the oil to run out.
- Close the drain plug (B) again and tighten it properly.
- Fill 3 litres of new oil in with the help of a clean funnel.
- Refit the venting cap.
Dispose of the used oil in a correct manner at a public collection facility. It is prohibited to drop old oil on the ground or to mix it with waste.
We recommend the following hydraulic oils:
Aral Vitam gf 22
BP Energol HLP-HM 22
Mobil DTE 11
Shell Tellus 22
or oils of same quality.
Do not use any other types of oil as they would influence the function of the hydraulic cylinder.
Splitting spar
Before use, the spar of the splitter must be slightly greased. Repeat this procedure every five operating hours. Slightly apply grease of oil spray. The spar may never run dry.
Hydraulic system
The hydraulic unit is a closed system with oil tank, oil pump and control valve.
The system is complete when the machine is delivered, and may not be changed or manipulated.
Regularly check the oil level.
Too low an oil level damages the oil pump.
Regularly check the hydraulic connections and bolts for tightness. Retighten if necessary.
Before undertaking any maintenance or checking work, the working area must be cleaned. Keep the necessary tools within the reach of your hand.
The intervals mentioned herein are based on normal conditions of use. An excessive use of the machine shortens the intervals accordingly.
Clean the panels, screens and control levers with a soft cloth. The cloth should be dry or slightly humid with a neutral cleaning agent. Do not use any solvents like alcohol or benzene as they could damage the surfaces.
Store oil and grease outside the reach of unauthorized personnel. Strictly follow the instructions on the bins. Avoid direct contact with the skin. Rinse well after use.
11. Storage
Store the device and its accessories in a dark, dry and frost-proof place that is inaccessible to children. The optimum storage temperature is between 5 and 30°C.
Store the electrical tool in its original packaging. Cover the electrical tool in order to protect it from dust and moisture.
Store the operating manual with the electrical tool.
12. Transport
Transport by hand, Fig. 3
For transport, the splitting knife (A) must be completely moved down. Slightly tilt the log splitter with handle (B) on the splitting column until the machine is inclined on the wheels and can be moved.
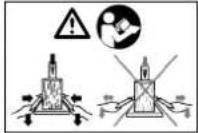
Transport by crane:
Never lift the machine on the splitting knife!
The machine should operate under the following environmental conditions:
| minimum | maxi-mum | recom-mended | |
| Temperature | 5 ^ 40 ^ C | 16 ^ C | |
| Humidity | 95 % | 70 % |
Setting up
Prepare the work place where the machine is to stand. Create sufficient space in order to allow safe working without disturbance.
The machine has been designed for working on a level surface. It must therefore be set up in a stable position on firm ground.
13. Electrical connection
The electrical motor installed is connected and
ready for operation. The connection complies with the applicable VDE and DIN provisions.
The customer's mains connection as well as the extension cable used must also comply with these regulations.
- The product meets the requirements of EN 61000-3-11 and is subject to special connection conditions. This means that use of the product at any freely selectable connection point is not allowed.
- Given unfavorable conditions in the power supply the product can cause the voltage to fluctuate temporarily.
- The product is exclusively intended for use at connection points that have a continuous current-carrying capacity of at least 100 A per phase.
- As the user, you are required to ensure, in consultation with your electric power company if necessary, that the connection point at which you wish to operate the product meets the specified requirements.
Important information
In the event of an overloading the motor will switch itself off. After a cool-down period (time varies) the motor can be switched back on again.
Damaged electrical connection cable
The insulation on electrical connection cables is often damaged.
This may have the following causes:
- Passage points, where connection cables are passed through windows or doors.
- Kinks where the connection cable has been improperly fastened or routed.
- Places where the connection cables have been cut due to being driven over.
- Insulation damage due to being ripped out of the wall outlet.
- Cracks due to the insulation ageing.
Such damaged electrical connection cables must not be used and are life-threatening due to the insulation damage.
Check the electrical connection cables for damage regularly. Make sure that the connection cable does not hang on the power network during the inspection. Electrical connection cables must comply with the applicable VDE and DIN provisions. Only use connection cables with the marking „H05VV-F“.
The printing of the type designation on the connection cable is mandatory.
Mains fuse protection is 16 A maximum.
AC motor 230 V/ 50 Hz
Supply voltage 230 V/ 50 Hz.
The mains connection and the extension cable must be 3-wire = P + N + SL. - (1/N/PE).
Extension cables must have a minimum cross-section of 1.5 mm^2 .
Connections and repairs of electrical equipment may only be carried out by an electrician.
Please provide the following information in the event of any enquiries:
- Type of current for the motor
• Machine data - type plate
• Machine data - type plate
14. Disposal and recycling
The equipment is supplied in packaging to prevent it from being damaged in transit. The raw materials in this packaging can be reused or recycled. The equipment and its accessories are made of various types of material, such as metal and plastic. Defective components must be disposed of as special waste. Ask your dealer or your local council.
Dismounting and disposal
The machine does not include any components harmful to health or environment. All the materials can be recycled or decomposed the normal way.
Charge specialized personnel with the disposal that is familiar with the possible risks and with the present manual.
When the machine is not used any more and is to be disposed of, proceed as follows:
- Cut off the electric power supply.
- Remove all electric cables and bring them to a specialized public collection facility following your country's regulations.
- Empty the oil tank, fill the oil in a tight bin and bring it to a specialized public collection facility following your country's regulations.
- Take all other machine parts to a scrap collection facility following your country's regulations.
Be sure every machine part is disposed of following your country's regulations.
15. Troubleshooting
In case of any malfunctions not mentioned here, contact your dealer's after-sales service.
| Malfunction | Possible cause | Remedy | Danger class |
| The hydraulic pump does not start | No electric power Check | cable for electric power | Risk of electric shock.This job must be done by a service electrician. |
| Thermal switch of motor cut off | After cool-down time you press the button "I". | ||
| The column does not move down | Low oil level Check oil level and refill Risk of getting dirty | This job can be done by the machine operator. | |
| One of the levers not connected | Check fixing of lever | Risk of getting cut.This job can be done by the machine operator. | |
| Dirt in the rails | Clean the column | ||
Maintenance and repairs
All servicing jobs must be executed by specialized personnel under strict observation of the present operating instructions. Before every work, every possible caution must be taken: Switch off the motor, disconnect the power supply (pull the plug, if necessary). Attach a board to the machine explaining the reason for being out of order: "Machine out of order due to servicing work: Unauthorized people must not come close to the machine or switch it on."
Günzburger Straße 69
D-89335 Ichenhausen
VÁŽENÝ ZÁKAZNÍKU,
Günzburger Straße 69
D-89335 Ichenhausen
VÁŽENÝ ZÁKAZNÍK,
| 2009/105/EC | 89/686/EC_96/58/EC | |
| X 2006/95/EC | X 2006/42/EC | |
| 2006/28/EC | Annex IVNotified Body:Notified Body No.:Reg. No.: | |
| 2005/32/EC | ||
| X 2004/108/EC | 2000/14/EC_2005/88/EC | |
| 2004/22/EC | Annex V | |
| 1999/5/EC | Annex VINoise: measured L_WA = dB(A); guaranteed L_WA = dB(A)P = kW;Notified Body:Notified Body No.: | |
| 97/23/EC | ||
| 90/396/EC | 2004/26/EC | |
| X 2011/65/EU | Emission. No: | |
Standard references: EN 13857; EN 60204-1; EN 847-1; EN 609-1; EN 55014-1; EN 55014-2; EN 61000-3-2; EN 61000-3-11
Ichenhausen, den 15/09/2015
M. B.-L. Unterschrift / Markus Bindhammer / Technical Director
Art.-No. 5905307901 Subject to change without notice
Documents registar: Christian Drößler Günzburger Str. 69, D-89335 Ichenhausen
Garantie DE
Apparent defects must be notified within 8 days from the receipt of the goods. Otherwise, the buyer's rights of claim due to such defects are invalidated. We guarantee for our machines in case of proper treatment for the time of the statutory warranty period from delivery in such a way that we replace any machine part free of charge which provably becomes unusable due to faulty material or defects of fabrication within such period of time. With respect to parts not
manufactured by us we only warrant insofar as we are entitled to warranty claims against the upstream suppliers. The costs for the installation of the new parts shall be borne by the buyer. The cancellation of sale or the reduction of purchase price as well as any other claims for damages shall be excluded.