MD-350 - Detector Duramaxx - Free user manual and instructions
Find the device manual for free MD-350 Duramaxx in PDF.

User questions about MD-350 Duramaxx
0 question about this device. Answer the ones you know or ask your own.
Ask a new question about this device
Download the instructions for your Detector in PDF format for free! Find your manual MD-350 - Duramaxx and take your electronic device back in hand. On this page are published all the documents necessary for the use of your device. MD-350 by Duramaxx.
USER MANUAL MD-350 Duramaxx
natural_image
Black and white diagonal striped pattern with no text or symbols↑
natural_image
Black background with a pattern of white chevron shapes arranged in rows (no text or symbols)DURAMAXX
MD-350
Metalldetektor
Metal Detector
Detector de metales
Détecteur de métaux
Metal detector
10000503
10019080
text_image
QR code image containing encoded data, no visible human-readable textINHALTSVERZEICHNIS
Berlin Brands Group UK Limited
PO Box 42
272 Kensington High Street
London, W8 6ND
United Kingdom
SICHERHEITSHINWEISE
natural_image
Black analog multimeter with digital display and control knob (no visible text or symbols)natural_image
Diagram showing two mechanical arms interacting with a circular symbol, no text or labels present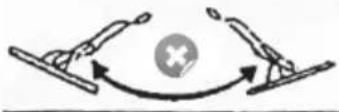
natural_image
Diagram of a robotic arm connecting a sensor to a coil with an upward arrow (no text or symbols)natural_image
Diagram of a mechanical or optical device with directional arrows indicating flow or movement (no text or symbols present)FEHLERBEHEBUNG
natural_image
Symbol of a trash bin crossed with a diagonal line, no text or numbers presentCongratulations on purchasing this equipment. Please read this manual carefully and take care of the following hints to avoid damages. Any failure caused by ignoring the items and cautions mentioned in the instruction manual is not covered by our warranty and any liability. Scan the QR code to get access to the latest user manual and other information about the product:

text_image
QR code image containing encoded data, no visible human-readable textCONTENT
Safety Instructions 14
Connections and Features 14
Getting Started 14
Use and Functions 16
Troubleshooting 19
Hints on Disposal 20
TECHNICAL DATA
| Item number 10002888 | |
| Power supply | 6x 1.5 V AA batteries (not included) |
| Searchcoil diameter 16.6 cm | |
| Search depth | ≤ 1.5 m |
MANUFACTURER & IMPORTER (UK)
Manufacturer:
Chal-Tec GmbH, Wallstrasse 16, 10179 Berlin, Germany.
Importer for Great Britain:
Berlin Brands Group UK Limited
PO Box 42
272 Kensington High Street
London, W8 6ND
United Kingdom
SAFETY INSTRUCTIONS
- Please do not let the metal detector fall. This may cause the unit to have inaccurate results.
- Keep the metal detector away from dust and dirt, as this may cause damage to certain parts.
- Please only use the metal detector in normal temperatures, otherwise the electronics will be damaged.
- Clean with a damp cloth. Do not use chemical cleaners.
CONNECTIONS AND FEATURES
With your Metal Detector, you can hunt for coins, relics, jewellery, gold, and silver just about anywhere. This metal detector is versatile and easy to use and contains the following connections and features:
- Earphone Jack: lets you connect earphones (not supplied) to the detector in private.
- Viewmeter and Pointer: shows the probable type of metal and shows when the batteries are empty.
- Waterproof Search Coil: lets you use the detector's search coil even if you must put it under water.
- Adjustable stem: lets you adjust the detector's length for comfortable use.
GETTING STARTED
Adjusting the Stem
- Turn the stem's lock nut clockwise until it loosens.
- Lengthen or shorten the stem so when you stand upright with the detector in your hand, the search coil is level with and about 1/2 to 2 inches above the ground with your arm relaxed at your side.
- Turn the stem's lock nut counter clockwise to lock it in place.
Adjusting the Search Coil
Loosen the knobs at the search coil's end, then adjust the search coil to the desired angle. (The search coil should be parallel with the ground.) Tighten the knobs just enough to keep the search coil from rotating or wobbling.
Installing Batteries
You need six AA batteries to power your detector. Use only fresh batteries of the required size and recommended type. Do not mix old and new batteries, different types of batteries (standard, alkaline, of rechargeable), or rechargeable batteries of different capacities.
- If the detector is on, turn VOLUME (on the control housing) to OFF (The control clicks).
- Press on the battery compartment cover and slide the cover off.
- Insert the batteries into the compartment as indicated by the polarity symbols (+ and -).
- Replace the cover.
Important: Always remove old or weak batteries and dispose properly. Batteries can leak chemicals that can destroy electronic parts. If you do not plan to use the detector for a week or more, remove the batteries.
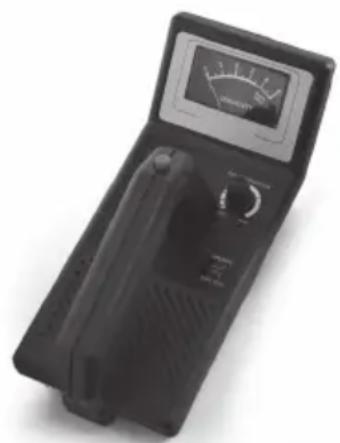
Testing the Batteries
If the detector does not turn on, has weak volume, will not tune properly, or has erratic operation, or drifts, test the battery power. Rotate VOLUME away from OFF and set OPERATE to BATT TEST. If the pointer on the viewmeter is between 3 and 6 (green area), the batteries have enough power to operate the detector. If the pointer is not in the green area, replace the batteries.
Using Earphones
You can connect a pair of stereo earphones to the detector. Using earphones also saves battery power and makes it easier to identify subtle changes in the sounds you hear, for better detection results. To connect earphones to the detector, insert the earphones' 1/8-inch plug into the EAR jack on the side of the control housing. The detector's internal speaker disconnects when you connect earphones.
Attention: Set the volume to the lowest setting before you begin listening and adjust the volume to a comfortable level. Do not listen at extremely high volume levels. Extended high volume listening can lead to permanent hearing loss. Once you set the volume, do not increase it. Over time, your ears adapt to the volume level, so a volume level that does not cause discomfort might still damage your hearing. Do not wear earphones while operating your detector near high-traffic areas.
USE AND FUNCTIONS
Your Metal Detector distinguishes between ferrous and nonferrous metals. Ferrous metals contain iron, while nonferrous metals such as gold, silver, copper, platinum, aluminium, lead, and zinc do not. When the detector senses a metallic object, the meter reading changes and the detector might sound a tone. The actual reaction depends on what metal is detected.
Preparing the Detector
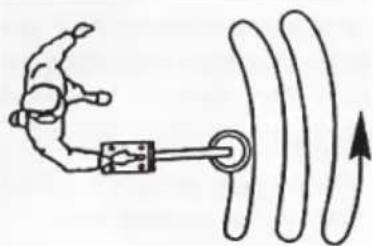
Hold the detector in a comfortable position, then rotate VOLUME away from OFF to the desired sound level. Set BATT TEST to OPERATE to detect. TUNE fi ne-tunes the balance between the detector's receiver and transmitter circuitry to provide consistent pointer and tone indications.
- Rotate VOLUME to the 11 o'clock position and set DISCRIMINATION to its midpoint.
- Hold the search coil about 1 foot away from the ground and any metal object, hold down the red button on the handle, and slowly rotate TUNE left and right until the pointer on the viewmeter rests at or near 0, then release the red button.
natural_image
Black analog multimeter with digital display and control knob (no visible text or symbols)As you search, you can fi ne-tune the detector using DISCRIMINATION (see „Fine-Tuning the Detector“ on the next Page). Press the red button on the handle at any time during operation to automatically return the pointer to 0.
Testing the Detector
- Remove all rings and your wristwatch and place the search plate on a wooden table.
- Set the volume control to 11 and turn the DISCRIMINATION control to the middle.
- Move a metal object about 5 cm above the seeker disc and observe the needle deflection.
When set correctly, you will hear a warning tone and the needle will deflect. For ferrous objects, the needle will strike to the left and for non-ferrous metals such as precious metals, brass, copper, etc., the needle will strike to the right. If the needle does not deflect, check that the seeker disc is properly connected and repeat the detector adjustment (as described in the previous paragraph).
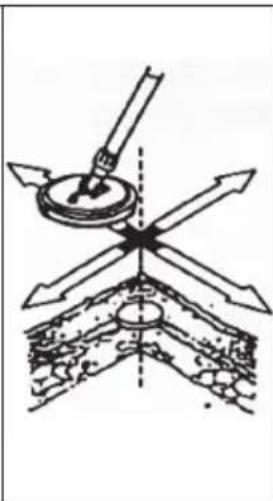
Use in practice
Important: First obtain permission from the landowner before you begin your search. Make sure that there is no regulation that prohibits searching the area. Do not damage other people's property. Do not leave any traces and refi ll holes you have dug. Take any waste you have found with you and dispose of it in accordance with the regulations. Do not leave it lying around.
- Select a suitable spot, e.g. a lawn, where there are no metal objects in the ground.
- Place a metal object, such as a coin, on the ground to track it down for practice.
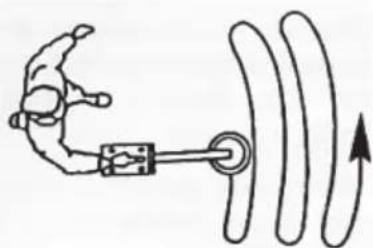
- Press the red knob and slowly turn the TUNE knob until the needle of the coil knife is in the middle position.
- Now move the seeker plate evenly back and forth at a height of 50 cm above the ground.
natural_image
Diagram showing two figures in a physical or mechanical setting with directional arrows, no text or symbols present.
natural_image
Diagram showing two figures interacting with a central cross symbol (no text or labels)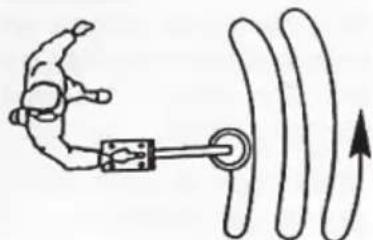
natural_image
Simple line drawing of a robotic arm interacting with a mechanical device and curved wires (no text or symbols)Move the plate parallel to the surface of the earth, do not swivel it back and forth. Slowly move the disc to avoid missing any objects. Check that you hear a sound and that the needle deflects when you guide the seeker plate over the metal object. Note that the metal detector only responds when the seeker plate is moved.
Fine adjustment of the detector
Careful fi ne-tuning during the search allows you to distinguish between the different metals even better. This sensitivity adjustment is made with the DISCRIMINATION slider.
This control also adjusts the sensitivity for the size of the metal objects. Turning the control to the left will make the device less sensitive and will only detect large metal objects. The most sensitive setting is all the way to the right. Here the detector even detects small pieces of silver paper. Adjust this control according to the local conditions.
Determining the exact location of the find
It takes some practice to find the precise location of the metal object. For the exercise you can bury (leave) coins and nails in your garden. Sometimes it is also useful to change the search movement by 90°.
- If trash in an area is so heavy that you get false signals, slow your sweep speed and use shorter sweeps. Recently buried coins might not respond the same as coins buried for a long period of time because of oxidation.
- Some nails, nuts, bolts, and other iron objects (such as old bottle caps) oxidize and create a „halo“ effect. A halo effect is caused by a mixture of natural elements in the ground and the oxidation created by different metals. Because of the metal mixtures, target signals might not be in a „fixed“ position. This effect makes these objects very hard to detect accurately.
natural_image
Diagram of a mechanical device with directional arrows indicating motion or force (no text or symbols)TROUBLESHOOTING
If your detector is not working as it should, follow the suggestions below to see if you can eliminate the problem. If you cannot, take the detector to your local store for assistance.
| Problem Suggested solution | |
| The detector emits false signals or tones. | You are moving the search plate too fast or at the wrong angle. Try to move the seeker slower and parallel to the ground. |
| If objects are heavily rusted, sometimes a wrong signal is sent. Try aiming at the target from a different angle. If the device emits different signals and sounds each time, it may be heavily rusted metal. | |
| The display shows the wrong metal type when the detector finds a target. | There is more than one metal object underground. |
| The object is made of a metal that the detector will not detect. | |
| If the object is heavily rusted, the type of metal may not be detected correctly. However, this is not a malfunction. |
HINTS ON DISPOSAL
natural_image
Symbol of a trash bin crossed with a diagonal line, no text or numbers presentIf there is a legal regulation for the disposal of electrical and electronic devices in your country, this symbol on the product or on the packaging indicates that this product must not be disposed of with household waste. Instead, it must be taken to a collection point for the recycling of electrical and electronic equipment. By disposing of it in accordance with the rules, you are protecting the environment and the health of your fellow human beings from negative consequences. For information about the recycling and disposal of this product, please contact your local authority or your household waste disposal service.
This product contains batteries. If there is a legal regulation for the disposal of batteries in your country, the batteries must not be disposed of with household waste. Find out about local regulations for disposing of batteries. By disposing of them in accordance with the rules, you are protecting the environment and the health of your fellow human beings from negative consequences.
Estimado cliente:
Berlin Brands Group UK Limited
PO Box 42
272 Kensington High Street
London, W8 6ND
United Kingdom
natural_image
Black analog multimeter with digital display and control knob (no visible text or symbols)natural_image
Diagram showing two hands holding a ball with an arrow indicating movement, no text or symbols present
natural_image
Diagram showing two hands interacting with a central cross symbol (no text or labels)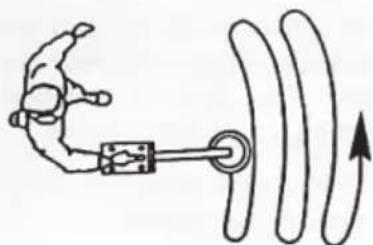
natural_image
Simple line drawing of a robotic arm connected to a coil with directional arrows (no text or symbols)natural_image
Diagram of a mechanical or optical device with directional arrows indicating flow or movement (no text or symbols present)natural_image
Symbol of a trash bin crossed with a diagonal line, no text or numbers presentBerlin Brands Group UK Limited
PO Box 42
272 Kensington High Street
London, W8 6ND
United Kingdom
CONSIGNES DE SÉCURITÉ
natural_image
Black analog multimeter with digital display and control knob (no visible text or symbols)natural_image
Diagram showing two human figures interacting with a circular symbol, no text or labels present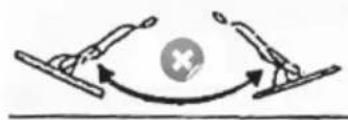
natural_image
Diagram showing two skis interacting with a central cross symbol (no text or labels)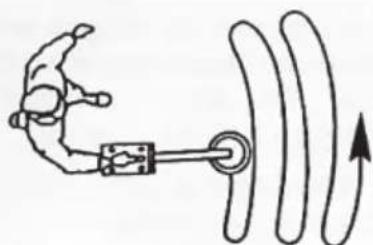
natural_image
Simple line drawing of a robotic arm connecting a mechanical component to a curved surface with an upward arrow (no text or symbols)natural_image
Diagram of a mechanical device with directional arrows indicating force or movement (no text or symbols)RÉSOLUTION DES PROBLÈMES
natural_image
Symbol of a trash bin crossed with a diagonal line, no text or numbers presenttext_image
QR code image containing encoded data, no visible human-readable textINDICE
PRODUTTORE E IMPORTATORE (UK)
Produttore:
Chal-Tec GmbH, Wallstraße 16, 10179 Berlino, Germania.
Berlin Brands Group UK Limited
PO Box 42
272 Kensington High Street
London, W8 6ND
United Kingdom
AVVERTENZE DI SICUREZZA
natural_image
Black analog multimeter with digital display and control knob (no visible text or symbols)natural_image
Diagram showing two robotic arms interacting with a circular checkmark (no text or symbols)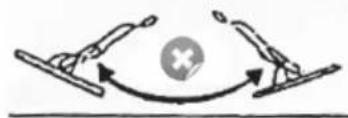
natural_image
Diagram showing two skis interacting with a central cross symbol (no text or labels)