TS156A - Detector Vevor - Free user manual and instructions
Find the device manual for free TS156A Vevor in PDF.

User questions about TS156A Vevor
0 question about this device. Answer the ones you know or ask your own.
Ask a new question about this device
Download the instructions for your Detector in PDF format for free! Find your manual TS156A - Vevor and take your electronic device back in hand. On this page are published all the documents necessary for the use of your device. TS156A by Vevor.
USER MANUAL TS156A Vevor
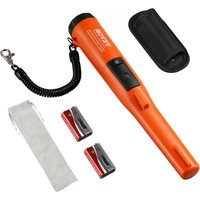
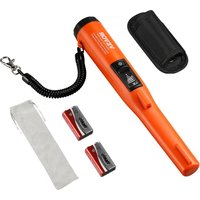
Technical Support and E-Warranty Certificate www.vevor.com/support
METAL DETECTOR
MODEL:TS156A
We continue to be committed to provide you tools with competitive price. "Save Half", "Half Price" or any other similar expressions used by us only represent estimate of savings you might benefit from buying certain tools with us compared top brands and doses not necessarily mean to cover all categories of tools offered are kindly reminded to verify carefully when you are placing an order with us actually saving half in comparison with the top major brands.
MODEL:TS156A
natural_image
Illustration of a metal detector with a circular base and chain, no text or symbols present.NEED HELP? CONTACT US!
Have product questions? Need technical support? Please feel fr contact us:

CustomerService@vevor.com
This is the original instruction, please read all manual instructions carefully before operating. VEVOR reserves a clear interpretation of user manual. The appearance of the product shall be subject to product you received. Please forgive us that we won't inform your use, there are any technology or software updates on our product.
| FC | This device complies with Part 15 of the FCC Rules. Operat subject to the following two conditions:(1)This device may not harmful interference, and (2)this device must accept any inter received, including interference that may cause undesired oper |
 | This product is subject to the provision of European Directive 2012/19/EC. The symbol showing a wheelie bin crossed through indicates that the product requires separate refuse collection in European Union. This applies to the product and all accesso marked with this symbol. Products marked as such may not discarded with normal domestic waste, but must be taken to collection point for recycling electrical and electronic devices |
INTRODUCTION
This metal detector is designed using the latest technology. It features lightwe and is easy to operate. It has two detection modes, which are ALL METALS and DISCRIMINATION mode, and you can select a desired mode between th
Features:
- Two detection modes - ALL METALS mode and DISCRIMINATION mode
- Adjustable sensitivity
- Two kinds of alarm tones
- Adjustable volume
• Auto ground balance - Audio alarm
- Current meter used to indicate metal detection intensity
- Low battery indication
•3.5mm earphone jack
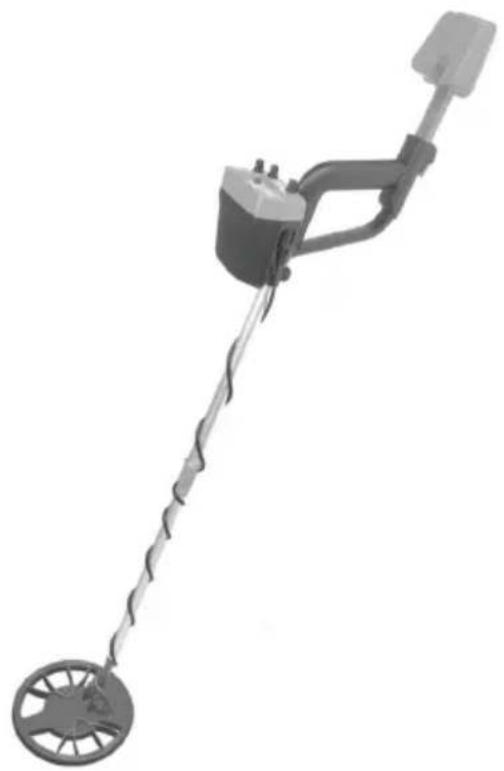
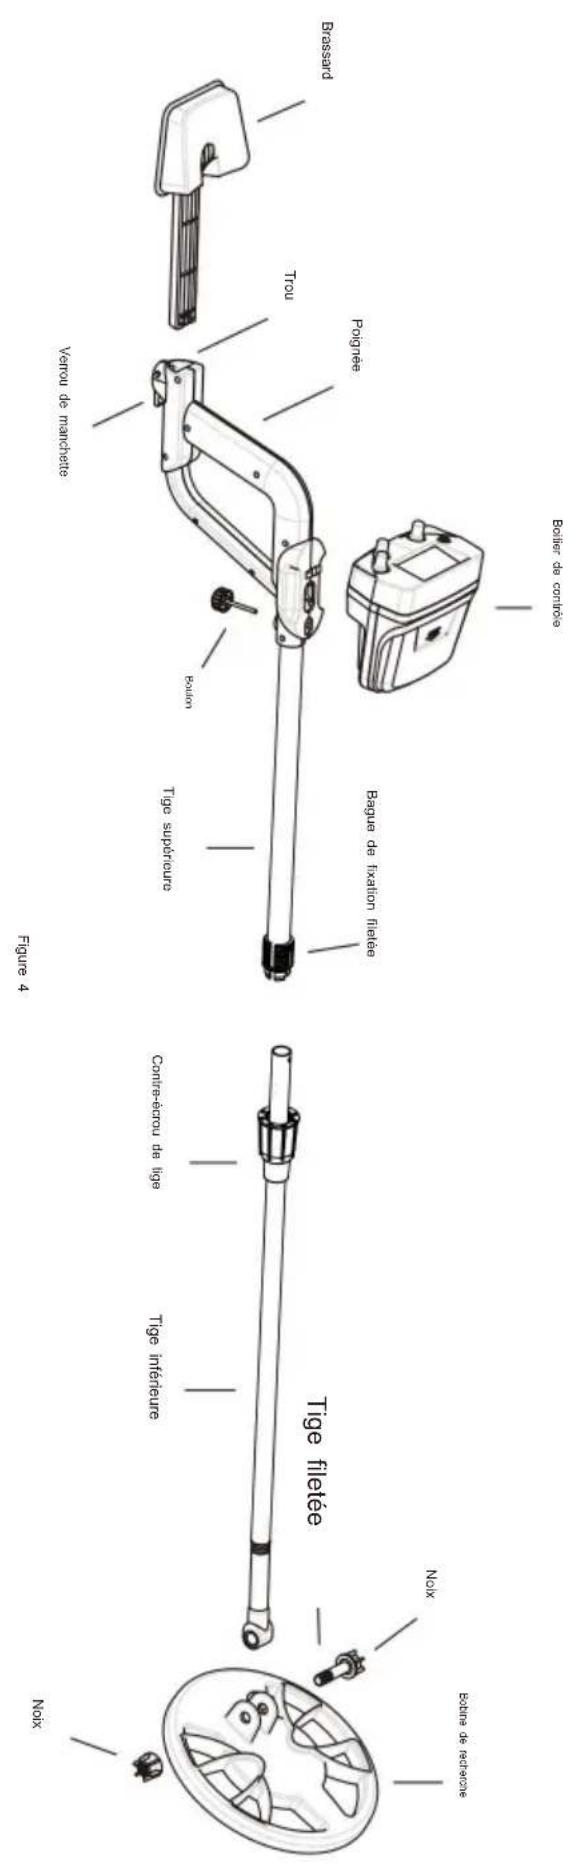
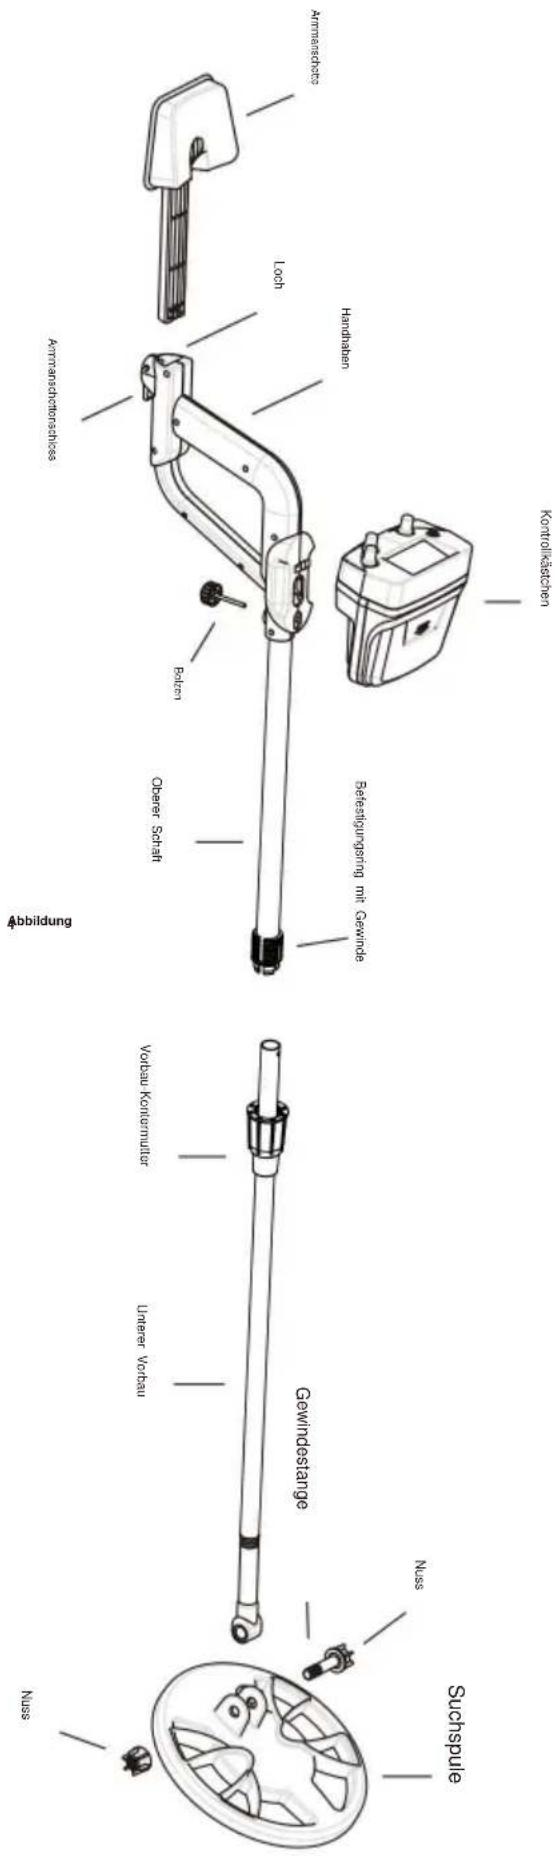
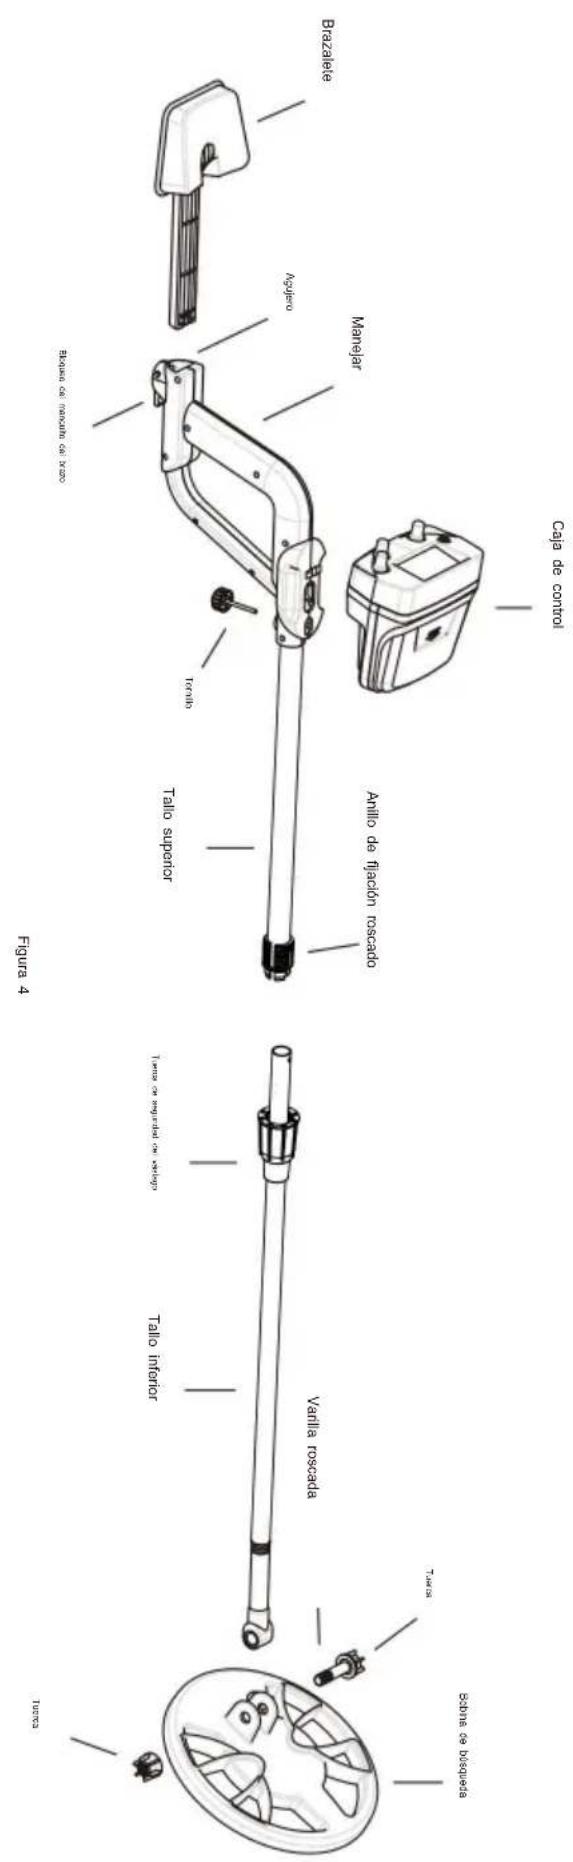
Overall Structure:
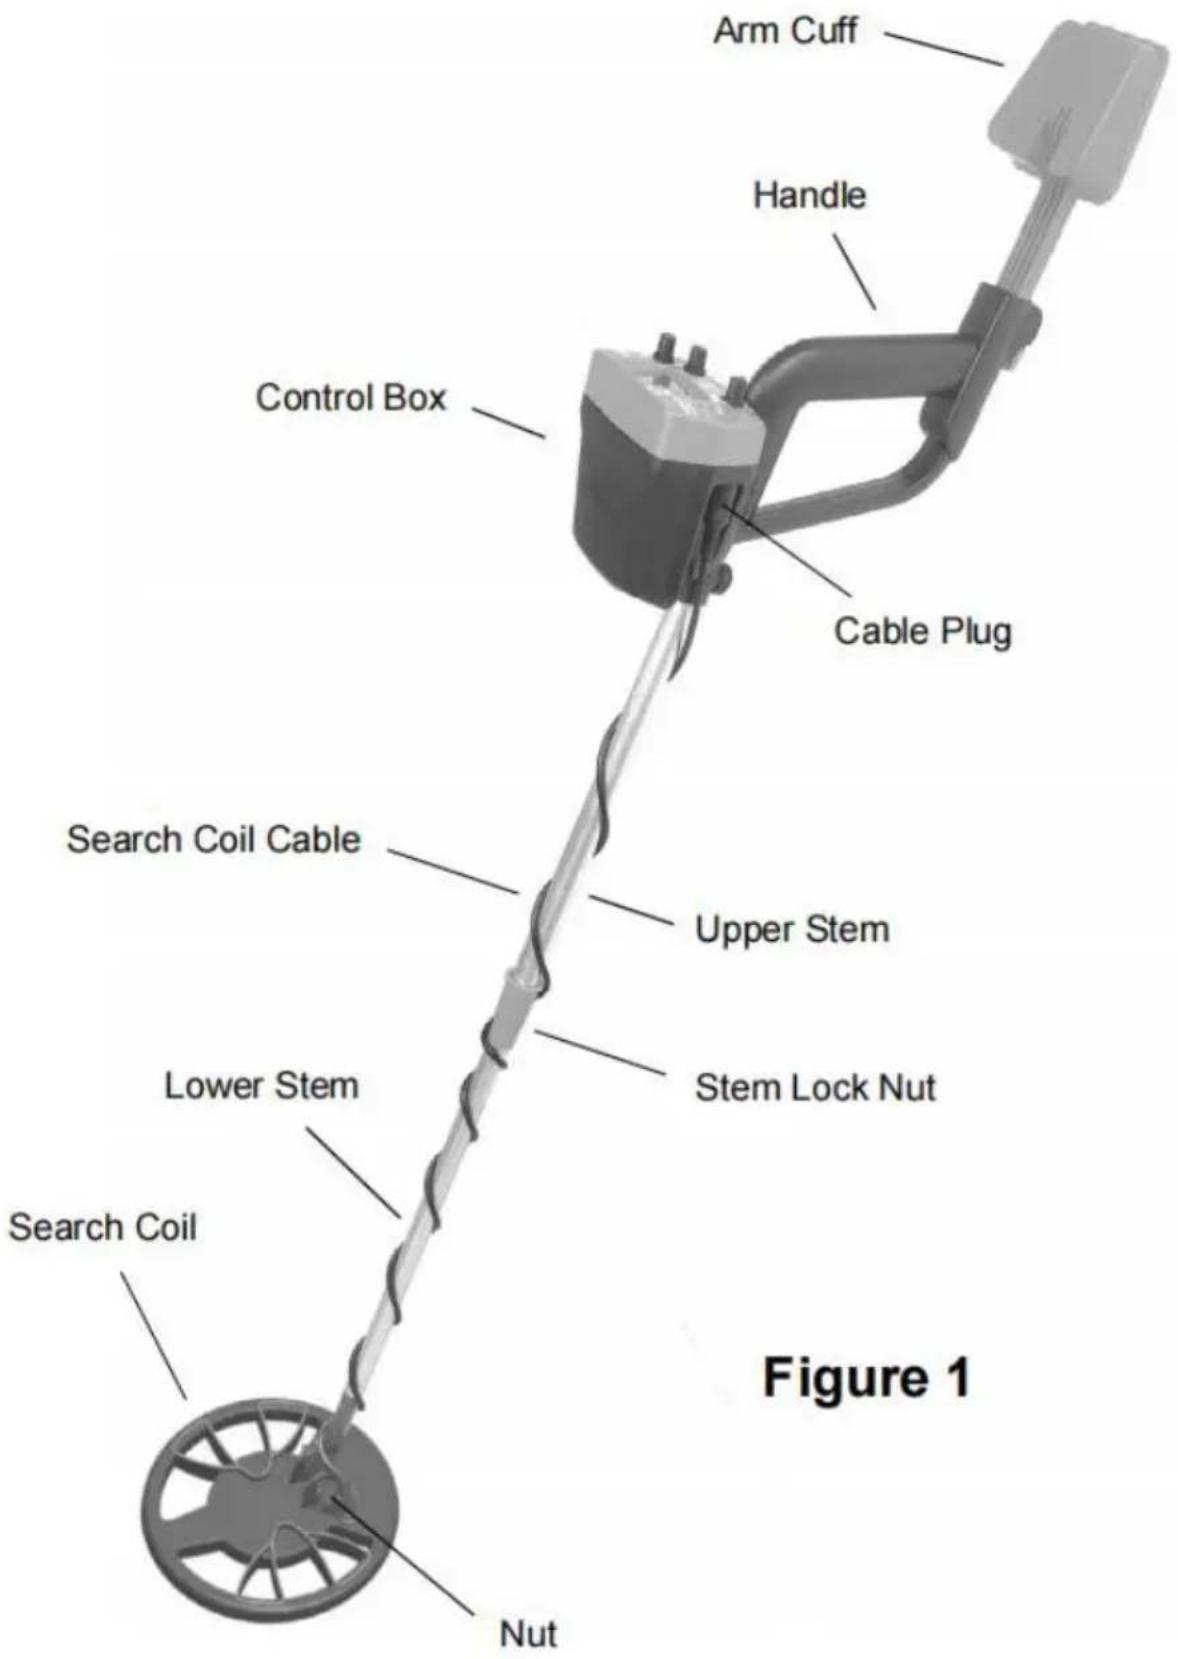
Upper Part Structure:
Tip:
You can slide the battery cover downwards to remove it.
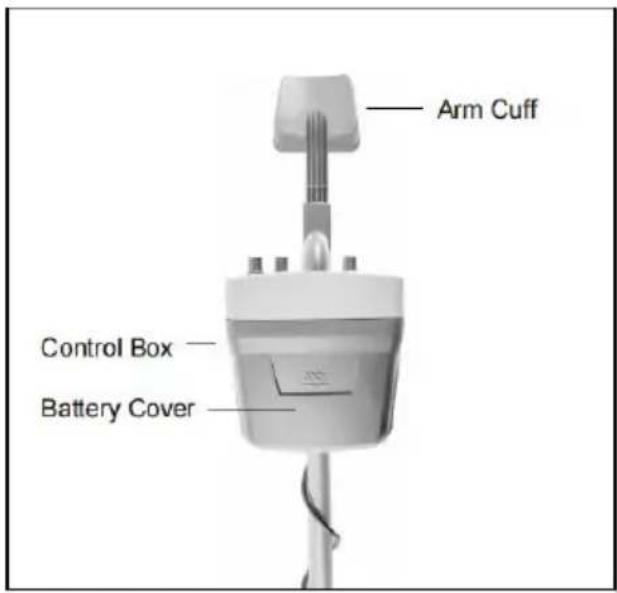
Figure 2. Front View of the Upper Part of the Detector
Tip:
After you gently pull up the end of the arm cuff lock by 90°, you can adjust the height of the arm cuff. After you finish the adjustment, pull down the end of the arm cuff lock to lock the arm cuff.
To remove the control box from the upper stem, counterclockwise turn the bolt that holds the cor box to remove the bolt. Then move the control box upwards remove it from the upper stem.
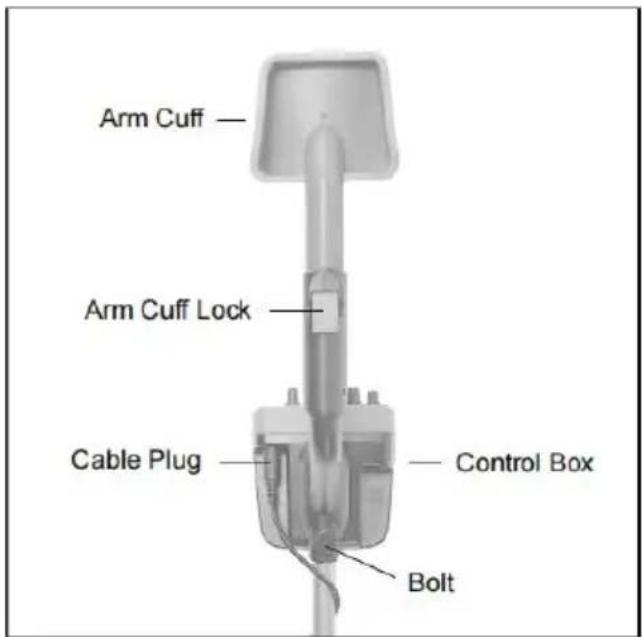
Figure 3. Back View of the Upper Part of the Detector
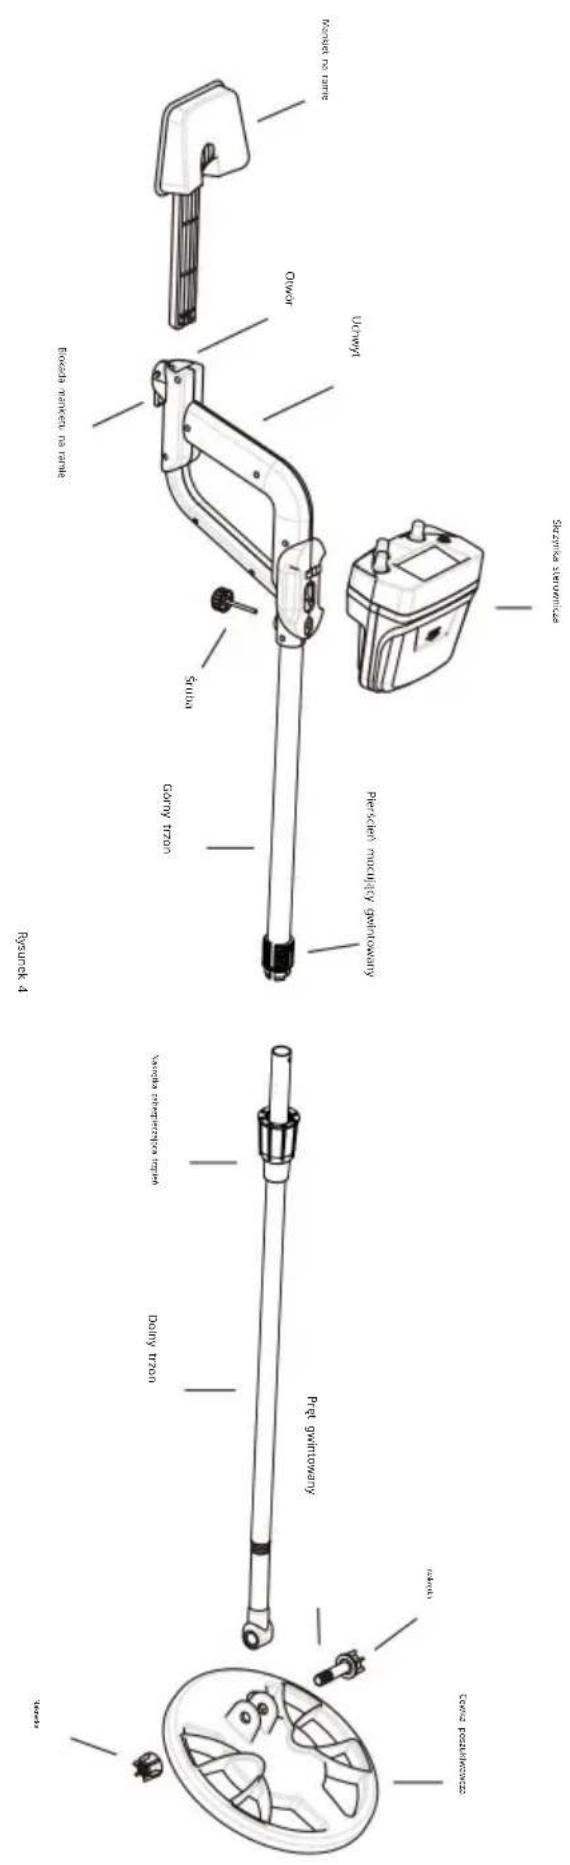
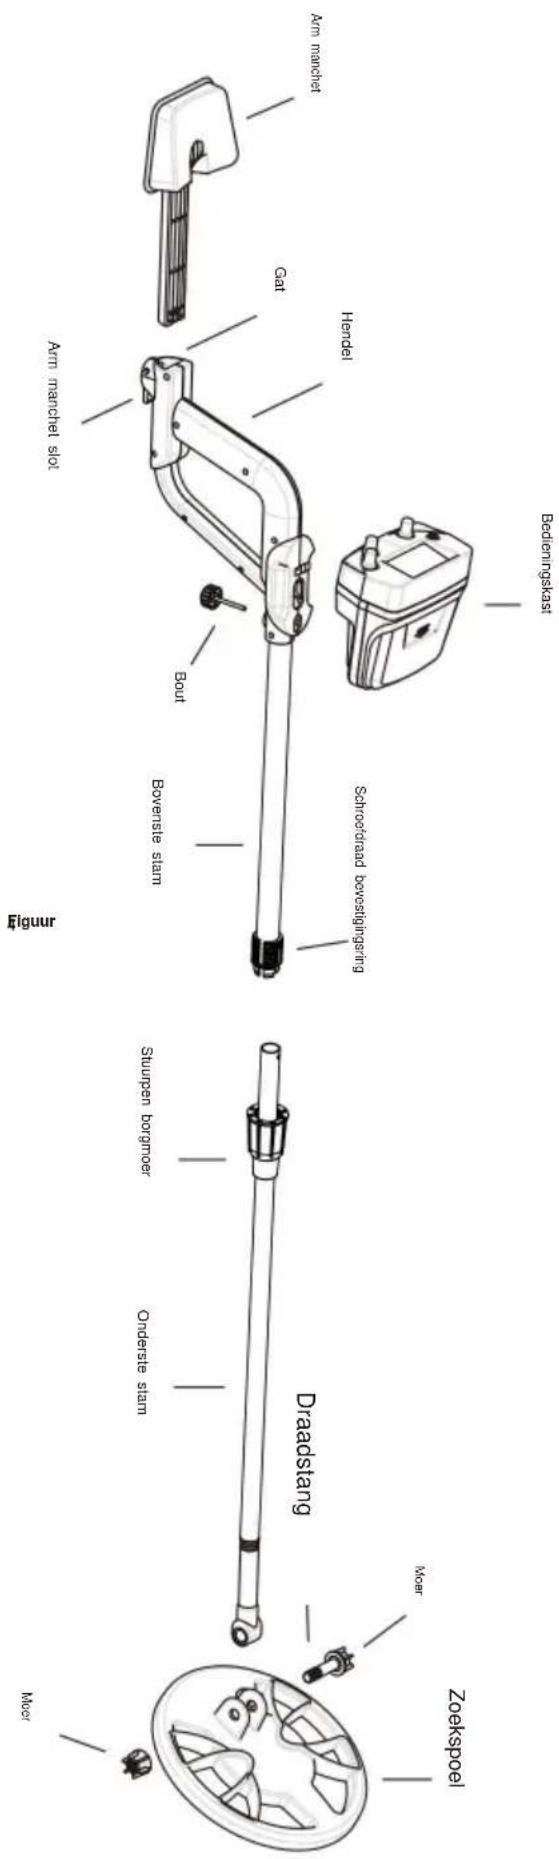
Assembly Drawing
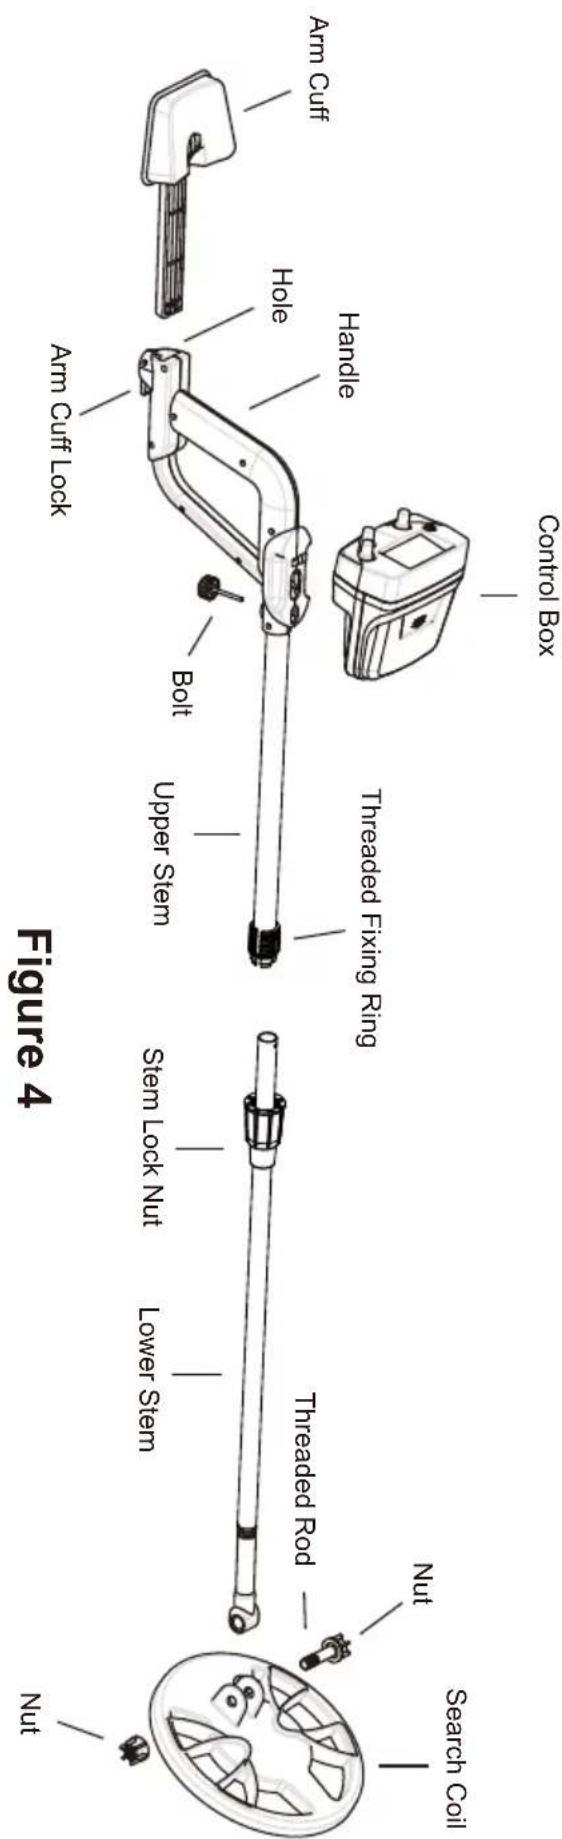
Note:
- See the above figure, the fixing ring is placed around the lower s and its flat side faces the upper stem.
- The two protrusions on the inner surface of the threaded ring must be the two holes near the lower end of the upper stem.
- If you want to use the arm cuff, insert it into the corresponding I beside the handle to a desired depth and then pull down the end of cuff lock to lock the arm cuff. Once inserted, the arm cuff can not disconnected from the upper stem.
- To avoid damage, do not pull the search coil cable with force. We connecting the cable to the socket on the rear of the control box or disconnecting the cable from the socket, hold the cable plug instead cable.
PANEL OF THE CONTROL BOX
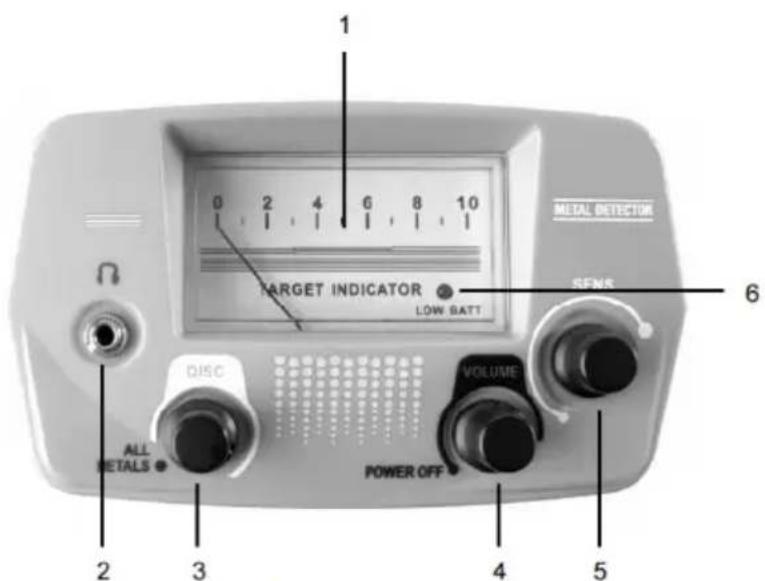
Figure 5
1. Meter
Used to indicate the operating status of the detector.
2. Earphone Jack
3. ALL METALS/DISC Knob
Counterclockwise turn this ALL METALS/DISC knob to the "ALL METALS" pos The knob clicks and the detector stays in the ALL METALS detection mode.
When this knob is in the "ALL METALS" position, clockwise turn it and, after clicks, the detector is in the DISCRIMINATION (DISC) mode.
4. POWER/VOLUME Knob
Used to turn on or off the detector or select a desired alarm volume.
To turn on the detector, clockwise turn this POWER/VOLUME knob until it cl Continue to clockwise turn this knob to increase the alarm volume.
To decrease the alarm volume, counterclockwise turn this knob. To turn off the detector, counterclockwise turn this knob until it clicks.
5. SENS Knob
Used to adjust the sensitivity of the detector.
You can clockwise turn this SENS knob to increase the sensitivity, or counterclockwise turn this knob to decrease the sensitivity.
6. Low Battery Indicator
When the batteries are not high enough, this low battery indicator will light to an indication and you must replace the batteries immediately; otherwise the detector's detecting ability will decrease or the detector will not be able to w normally.
Preparation prior to metal detection
Before beginning an outside search, test the detector with the following metal samples:
• An iron nail
• A five-cent coin ( nickel )
• A one-cent penny ( zinc coin, after 1982 )
• A 25-cent silver quarter

natural_image
Black-and-white illustration of a hand holding a metal detector with a coiled cable extending from it (no text or symbols)Figure 6
Place the metal detector on a wooden or plastic table with the search coil I perpendicular to the table surface (see Figure 6). Make sure the table is from TVs, computers, or any device that can cause electromagnetic interference.
Note: To avoid interference, remove any watches, rings, or other metal objects your fingers and hands.
Testing the detector in the All METALS mode
Counterclockwise turn the ALL METALS/DISC knob until it clicks. Now the detector is in the ALL METALS mode. Gently turn the SENS knob completely clockwise until it reaches the end.
Now the detection sensitivity is at the highest level. Refer to Figure 6, respe pass the metal samples (the iron nail and 3 coins) across the search coil distance of 5 ~cm to 8 ~cm . When any of the metal samples passes across the coil, the detector should beep and the meter pointer should deflect rightwards When the detector stops sounding, the meter pointer should return to its origin position quickly.
The ALL METALS mode allows the detector to achieve the maximum detectic depth possible.
Note: During test, the metal sample which you are using must be in motion; otherwise the detector will not respond to this metal sample.
Testing the detector in the DISCRIMINATION mode
Note:
The Figure 7 on the right shows the knob positions for some often encountered metals. If the ALL METALS/DIS knob is in one of these positions, the corresponding metal will be ignored during scanning. The specifications or descriptions on the figure are not accurate and are for non-critical reference only.
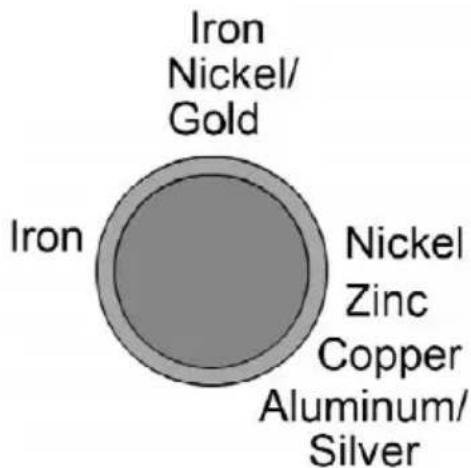
Figure 7. The ALL METALS/DISC Knob
Make sure that the ALL METALS/DISC knob is in the "ALL METALS" position, then turn the knob clockwise until it clicks. Now the detector is already in the DISCRIMINATION mode. In this mode, you can use the ALL METALS/DISC knob to search for specific metals by having it ignore other kinds of metals. At the present knob position, where the knob just clicked, the detector will respond ANY metal object and the meter pointer will swing to the right when the de beeps.
-
To adjust the settings to prevent the metal detector from detecting iron m set both the VOLUME knob and SENS knob at midpoint (or a higher setting).
-
Then set the ALL METALS/DISC knob to about "12 o'clock". See Figure 8.
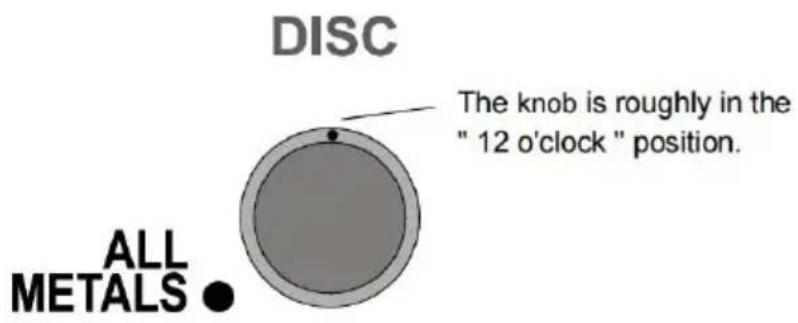
Figure 8. The ALL METALS/DISC Knob
-
As a test, sweep the iron nail sample across the search coil at a distance about 5 ~cm to 7.5 ~cm , the detector will not beep and the metal pointer will not be but the other metal samples (the three coins) will cause the detector to be the meter pointer to deflect rightwards when they are respectively swept across the search coil.
-
To have the metal detector ignore nickel metals, set the ALL METALS/DISC knob to about "3 o'clock" (see Figure 9). Sweep the nickel across the at a distance of about 5 ~cm to 7.5 ~cm ; the metal detector will not respond to nickel or the iron nail. But it will respond to the other samples.
DISC

Figure 9. The ALL METALS/DISC Knob
- To prevent the zinc penny from being detected, set the ALL METALS/DIS knob to about " 5 o'clock " ( see Figure 10 ). By now, only the 25-cent s should be detected.
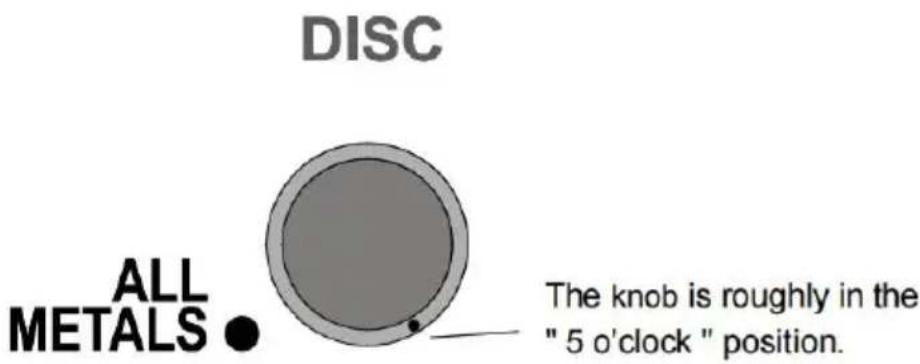
Figure 10. The ALL METALS/DISC Knob
Note: The discrimination position of aluminum is similar to that of silver. So metals will be detected at the same time. The discrimination position of gold similar to the nickel setting.
Through the above tests, you can quickly know the performance of the detect and know how to use the detector.
Tip: During test, the metal sample which you are using must be in motion.
Detecting metallic object with the detector
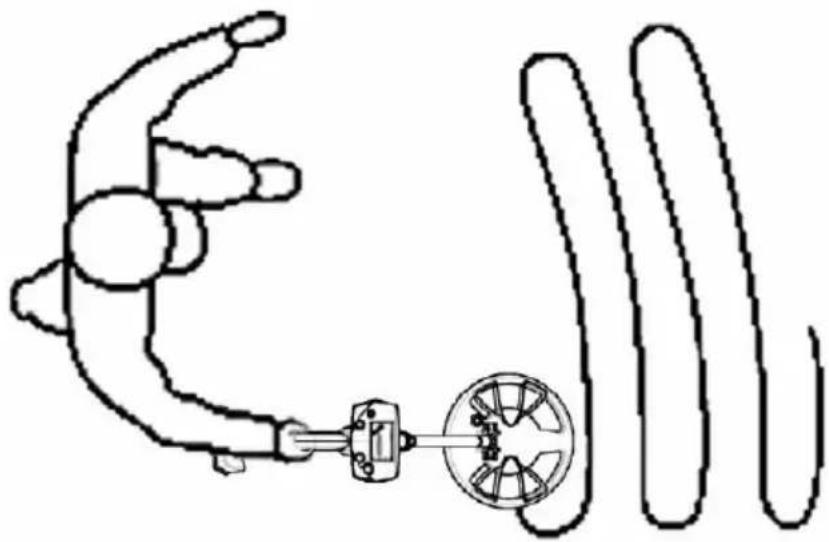
natural_image
Simple line drawing of a robotic arm with a wheel and gear, no text or symbols presentFigure 11. Detecting Metallic Object
After you finish all the tests mentioned above and have set the detector to your need, you can start to detect metallic objects.
Turn on the detector, and set it in the ALL METALS mode. Adjust the SEN a desired sensitivity setting, and be far away from any external interference source.
During detection, keep the search coil height approximately 3cm to 5cm above ground and parallel to the ground at all times for best detection results, walk as you scan slowly the search coil in a straight line from side to side.
When you detect a metallic object, you can use the DISCRIMINATION mode further identification or discrimination, if necessary.
Metal detection is a careful, difficult job. Because there may be iron nails, m oxides, and metal scraps in soil, it may be necessary to perform detection n times in a same location to get an accurate result, especially in an area wh soil contains complex mineral substance constituents.
Note:
- Because many factors ( degree of oxidation of metallic object, metal impuri
in soil, soil moisture content, etc) can affect metal detection/identification in DISCRIMINATION mode, the results of metal identification/discrimination are not guaranteed to be correct.
- During detection, the search coil must be in motion. If the search coil is detector can not detect metal normally.
- The detector can work with the earphone (optional). To use the earphone insert the plug of the earphone into the earphone jack on the control box, t loudspeaker in the control box will be disabled automatically.
Note:
For safety, do not use earphone near traffic.
To avoid hearing loss, do not use earphone if using it makes you feel uncomfortable.
DUAL-FREQUENCY AUDIO ALARM FUNCTION
The detector has a dual-frequency audio alarm function. When it detects a ferrous meta object, it emits a tone of 660Hz audio signal, and when it detects a non-ferrous metal object, it emits a tone of 2000Hz audio signal.
BATTERY REPLACEMENT
When the low battery indicator lights, the batteries are not high enough and be replaced immediately.
To replace the batteries, turn off the detector first. Then slide the battery count (see Figure2) downwards to remove it. Replace the old batteries with new the same type, make sure that the polarity connections are correct (see the polarity indications at the bottom of the battery compartment). Reinstall the I cover.
NOTE
- To preserve battery life, turn off the detector when not in use.
- If the detector can not operate normally, a possible cause is that the bat are exhausted.
- Protect the plug of the search coil cable from damp; otherwise the detect lose its detecting ability. Dry the plug as needed.
- The control box is not waterproof. Protect the control box from water, and use the detector in the rain.
- Do not place the detector in any high-temperature environment.
- Do not tamper with the circuit of the detector.
- Do not pull the search coil cable with force.
- Handle the detector gently. Do not bump, drop or abuse the detector.
- When you turn a knob, do not apply excessive force.
WARNING
Any metal detector may discover underground power lines, explosives or other items which when struck could cause personal injury. When searching for me observe these precautions:
- Do not search in an area where you believe there may be shallowly buri underground electric lines or pipes.
- Avoid striking any line known to be or suspected to be carrying electrical
- Do not disturb any pipeline, particularly if it could be carrying flammable liquid.
- Use reasonable caution when digging toward any target, particularly in area where you are uncertain of underground conditions.
- Observe all national, state and local laws while detecting.
TECHNICALSPECIFICATION
OperatingCurrent:80mA
Battery:1.5Vbattery,AAorequivalent,6pieces
DECLARATION
- This manualissubjecttochangewithoutnotice.
- Our company will not take the other responsibilities for any loss.
- The content of this manual cannot be used as thereasontousethedetector for any special application.
ACCESSORIES
Manual:1piece
Earphone:1 piece
Handbag:1piece
Diggingshovel:1 piece
Earphoneplug:1 piece
Battery:6pieces
Address:Shuangchenglu 803nong11hao1602A-1609shi, baoshanqu, shanghai 200000 CN.
Imported to AUS: SIHAO PTY LTD, 1 ROKEVA STREETEASTWOOD NSW 2122 Australia
Imported to USA: Sanven Technology Ltd, Suite 250, 9166 Anaheim Place, Rancho Cucamonga, CA 91730
| REPE |
E-CrossStu GmbH.
Mainzer Landstr.69, 60329 Frankfurt am Main.
| REPU |
YH CONSULTING LIMITED.
K/O YH Consulting Limited Office 147, Centurion House, London Road, Staines-upon-Thames, Surrey, TW18 4AX
MadelnChina
VEVOR®
TOUGH TOOLS, HALF PRICE
Technical Support and E-Warranty Certificate
www.vevor.com/support
VEVOR®
TOUGH TOOLS, HALF PRICE
natural_image
3D rendering of a metal detector with a circular base and chain, no text or symbols visibleBESOIN D'AIDE? CONTACTEZ-NOUS!
Figure 2. Front View of the Upper Part of the Detector
Conseil:
Figure 3. Back View of the Upper Part of the Detector
Dessin d'assemblage
Note:
natural_image
Illustration of a hand holding a metal detector with a coil extending outward (no text or symbols)Figure 6
Figure 7. The ALL METALS/DISC Knob
Figure 8. The ALL METALS/DISC Knob
Figure 9. The ALL METALS/DISC Knob
Figure 10. The ALL METALS/DISC Knob
natural_image
Simple line drawing of a robotic arm with a gear and wheel, no text or symbols presentFigure 11. Detecting Metallic Object
A/S YH Consulting Limited Bureau 147, Centurion House, London Road, Staines-upon-Thames, Surrey, TW18 4AX
Fabriqué en Chine
VEVOR®
TOUGH TOOLS, HALF PRICE
natural_image
3D rendering of a metal detector with a circular base and chain, no text or symbols visibleKundenservice@vevor.com
Aufbau Oberteil:
Tipp:
Figure 2. Front View of the Upper Part of the Detector
Tipp:
Figure 3. Back View of the Upper Part of the Detector
Montagezeichnung
natural_image
Illustration of a hand holding a metal detector with a coil extending outward (no text or symbols)Figure 6
Figure 7. The ALL METALS/DISC Knob
Figure 8. The ALL METALS/DISC Knob
Figure 9. The ALL METALS/DISC Knob
Figure 10. The ALL METALS/DISC Knob
natural_image
Simple line drawing of a robotic arm with a gear and wheel, no text or symbols presentFigure 11. Detecting Metallic Object
C/O YH Consulting Limited Office 147, Centurion House, London Road, Staines-upon-Thames, Surrey, TW18 4AX
www.vevor.com/support
VEVOR®
TOUGH TOOLS, HALF PRICE
natural_image
3D rendering of a metal detector with a circular base and chain, no text or symbols visibleFigure 2. Front View of the Upper Part of the Detector
Mancia:
Figure 3. Back View of the Upper Part of the Detector
4. Manopola ACCENSIONE/VOLUME
natural_image
Illustration of a hand holding a metal detector with a coil extending outward (no text or symbols)Figure 6
Figure 7. The ALL METALS/DISC Knob
Figure 8. The ALL METALS/DISC Knob
Figure 9. The ALL METALS/DISC Knob
Figure 10. The ALL METALS/DISC Knob
natural_image
Simple line drawing of a robotic arm with a gear and wheel, no text or symbols presentFigure 11. Detecting Metallic Object
Importato in AUS: SIHAO PTY LTD, 1 ROKEVA STREETEASTWOOD
Nuovo Galles del Sud 2122 Australia
C/O YH Consulting Limited Ufficio 147, Centurion House, London Road, Staines-upon-Thames, Surrey, TW18 4AX
Made in China
VEVOR®
TOUGH TOOLS, HALF PRICE
elettronica www.vevor.com/support
VEVOR®
TOUGH TOOLS, HALF PRICE
natural_image
3D rendering of a metal detector with a circular base and chain, no text or symbols visible•Volumen ajustable •Balance
Figure 2. Front View of the Upper Part of the Detector
Consejo:
Figure 3. Back View of the Upper Part of the Detector
Dibujo de montaje
Nota:
natural_image
Illustration of a hand holding a metal detector with a coil extending outward (no text or symbols)Figure 6
Figure 7. The ALL METALS/DISC Knob
Figure 8. The ALL METALS/DISC Knob
Figure 9. The ALL METALS/DISC Knob
Figure 10. The ALL METALS/DISC Knob
natural_image
Simple line drawing of a robotic arm with a gear and wheel, no text or symbols presentFigure 11. Detecting Metallic Object
C/O YH Consulting Limited Oficina 147, Centurion House,
London Road, Staines-upon-Thames, Surrey, TW18 4AX
Hecho en china
VEVOR®
TOUGH TOOLS, HALF PRICE
natural_image
3D rendering of a metal detector with a circular base and chain, no text or symbols visiblePOTRZEBUJESZ POMOCY? SKONTAKTUJ SIĘ Z NAMI!
Figure 2. Front View of the Upper Part of the Detector
Wskaźówka:
Figure 3. Back View of the Upper Part of the Detector
Rysunek montażowy
Notatka:
natural_image
Black-and-white illustration of a hand holding a metal detector with a coil extending into it (no text or symbols)Figure 6
Figure 7. The ALL METALS/DISC Knob
Figure 8. The ALL METALS/DISC Knob
Figure 9. The ALL METALS/DISC Knob
Figure 10. The ALL METALS/DISC Knob
natural_image
Simple line drawing of a robotic arm with a gear and wheel, no text or symbols presentFigure 11. Detecting Metallic Object
Importowane do AUS: SIHAO PTY LTD, 1 ROKEVA STREETEASTWOOD NSW 2122 Australia
C/O YH Consulting Limited Biuro 147, Centurion House, London Road, Staines-upon-Thames, Surrey, TW18 4AX
natural_image
3D rendering of a metal detector with a circular base and chain, no text or symbols visibleHULP NODIG? NEEM CONTACT MET ONS OP!
Klantenservice@vevor.com
Figure 2. Front View of the Upper Part of the Detector
Tip:
Figure 3. Back View of the Upper Part of the Detector
Montagetekening
Opmerking:
natural_image
Black-and-white illustration of a hand holding a metal detector with a coil extending into it (no text or symbols)Figure 6
Figure 7. The ALL METALS/DISC Knob
Figure 8. The ALL METALS/DISC Knob
Figure 9. The ALL METALS/DISC Knob
Figure 10. The ALL METALS/DISC Knob
natural_image
Simple line drawing of a robotic arm with a gear and wheel, no text or symbols presentFigure 11. Detecting Metallic Object
C/O YH Consulting Limited Kantoor 147, Centurion House, London Road, Staines-upon-Thames, Surrey, TW18 4AX
Gemaakt in China
VEVOR®
TOUGH TOOLS, HALF PRICE
garantiecertificaat www.vevor.com/support
VEVOR®
TOUGH TOOLS, HALF PRICE
natural_image
3D rendering of a metal detector with a circular base and chain, no text or symbols visibleBEHÖVER HJÄLP? KONTAKTA OSS!
Övre delens struktur:
Tips:
Figure 2. Front View of the Upper Part of the Detector
Dricks:
Figure 3. Back View of the Upper Part of the Detector
3. ALL METALS/DISC-ratt
Vrid denna ALL METALS/DISC-ratt moturs till läget "ALL METALS".
natural_image
Black-and-white illustration of a hand holding a metal detector with a coil extending into it (no text or symbols)Figure 6
Figure 7. The ALL METALS/DISC Knob
Figure 8. The ALL METALS/DISC Knob
Figure 9. The ALL METALS/DISC Knob
Figure 10. The ALL METALS/DISC Knob
natural_image
Simple line drawing of a robotic arm with a gear and wheel, no text or symbols presentFigure 11. Detecting Metallic Object
C/O YH Consulting Limited Office 147, Centurion House, London Road, Staines-upon-Thames, Surrey, TW18 4AX
Tillverkad i Kina
VEVOR®
TOUGH TOOLS, HALF PRICE
www.vevor.com/support